VCGX30W - Smart Speaker ONKYO - Free user manual and instructions
Find the device manual for free VCGX30W ONKYO in PDF.
| Product Type | Smart speaker with built-in Google Assistant |
| Brand | Onkyo |
| Model | VCGX30W |
| Dimensions (W × H × D) | 120 mm × 168 mm × 128 mm |
| Weight | 1.8 kg |
| Power Supply | AC 100-240 V, 50/60 Hz (detachable power cord included) |
| Power Consumption | 26 W operation, 2.7 W network standby |
| RMS Output Power | 40 W (4 Ω, 1 kHz, THD 10%) / 10 W (8 Ω, 10 kHz, THD 10%) |
| Frequency Response | 20 Hz - 20 kHz (sampling 44.1/48 kHz) |
| Wireless Connectivity | Bluetooth 4.2 (range ~10 m), Wi-Fi IEEE 802.11 a/b/g/n/ac (2.4 GHz and 5 GHz) |
| Voice Assistant | Built-in Google Assistant (wake words "Ok Google" / "Hey Google") |
| Requirements | Google Home app (Android 4.2+ or iOS 8.0+), same Wi-Fi network |
| Speakers | 20 mm dome tweeter × 1, 80 mm cone woofer × 1 (sealed enclosure) |
| Control Buttons | Play/pause, Bluetooth, microphone mute, volume +/-, reset (microphone 10 s) |
| LED Indicators | 6 white LEDs + 4 central Google Assistant LEDs (colors and flashes depending on state) |
| Microphone | Built-in microphone for voice commands (mute possible) |
| Ports | Micro USB port (service only), AC IN input |
| Care and Cleaning | Wipe with a soft, dry cloth. Do not use abrasive products or solvents. |
| Safety | Use only the supplied power cord. Unplug before any cleaning. |
| Spare Parts and Reparability | Contact Onkyo after-sales service for any repairs. The micro USB port is for troubleshooting only. |
| Included Accessories | Power cord, Quick Start Guide, Google Assistant documents |
| Operating Temperature | 0 °C to 35 °C (estimated, not specified in the manual) |
Frequently Asked Questions - VCGX30W ONKYO
User questions about VCGX30W ONKYO
0 question about this device. Answer the ones you know or ask your own.
Ask a new question about this device
Download the instructions for your Smart Speaker in PDF format for free! Find your manual VCGX30W - ONKYO and take your electronic device back in hand. On this page are published all the documents necessary for the use of your device. VCGX30W by ONKYO.
USER MANUAL VCGX30W ONKYO
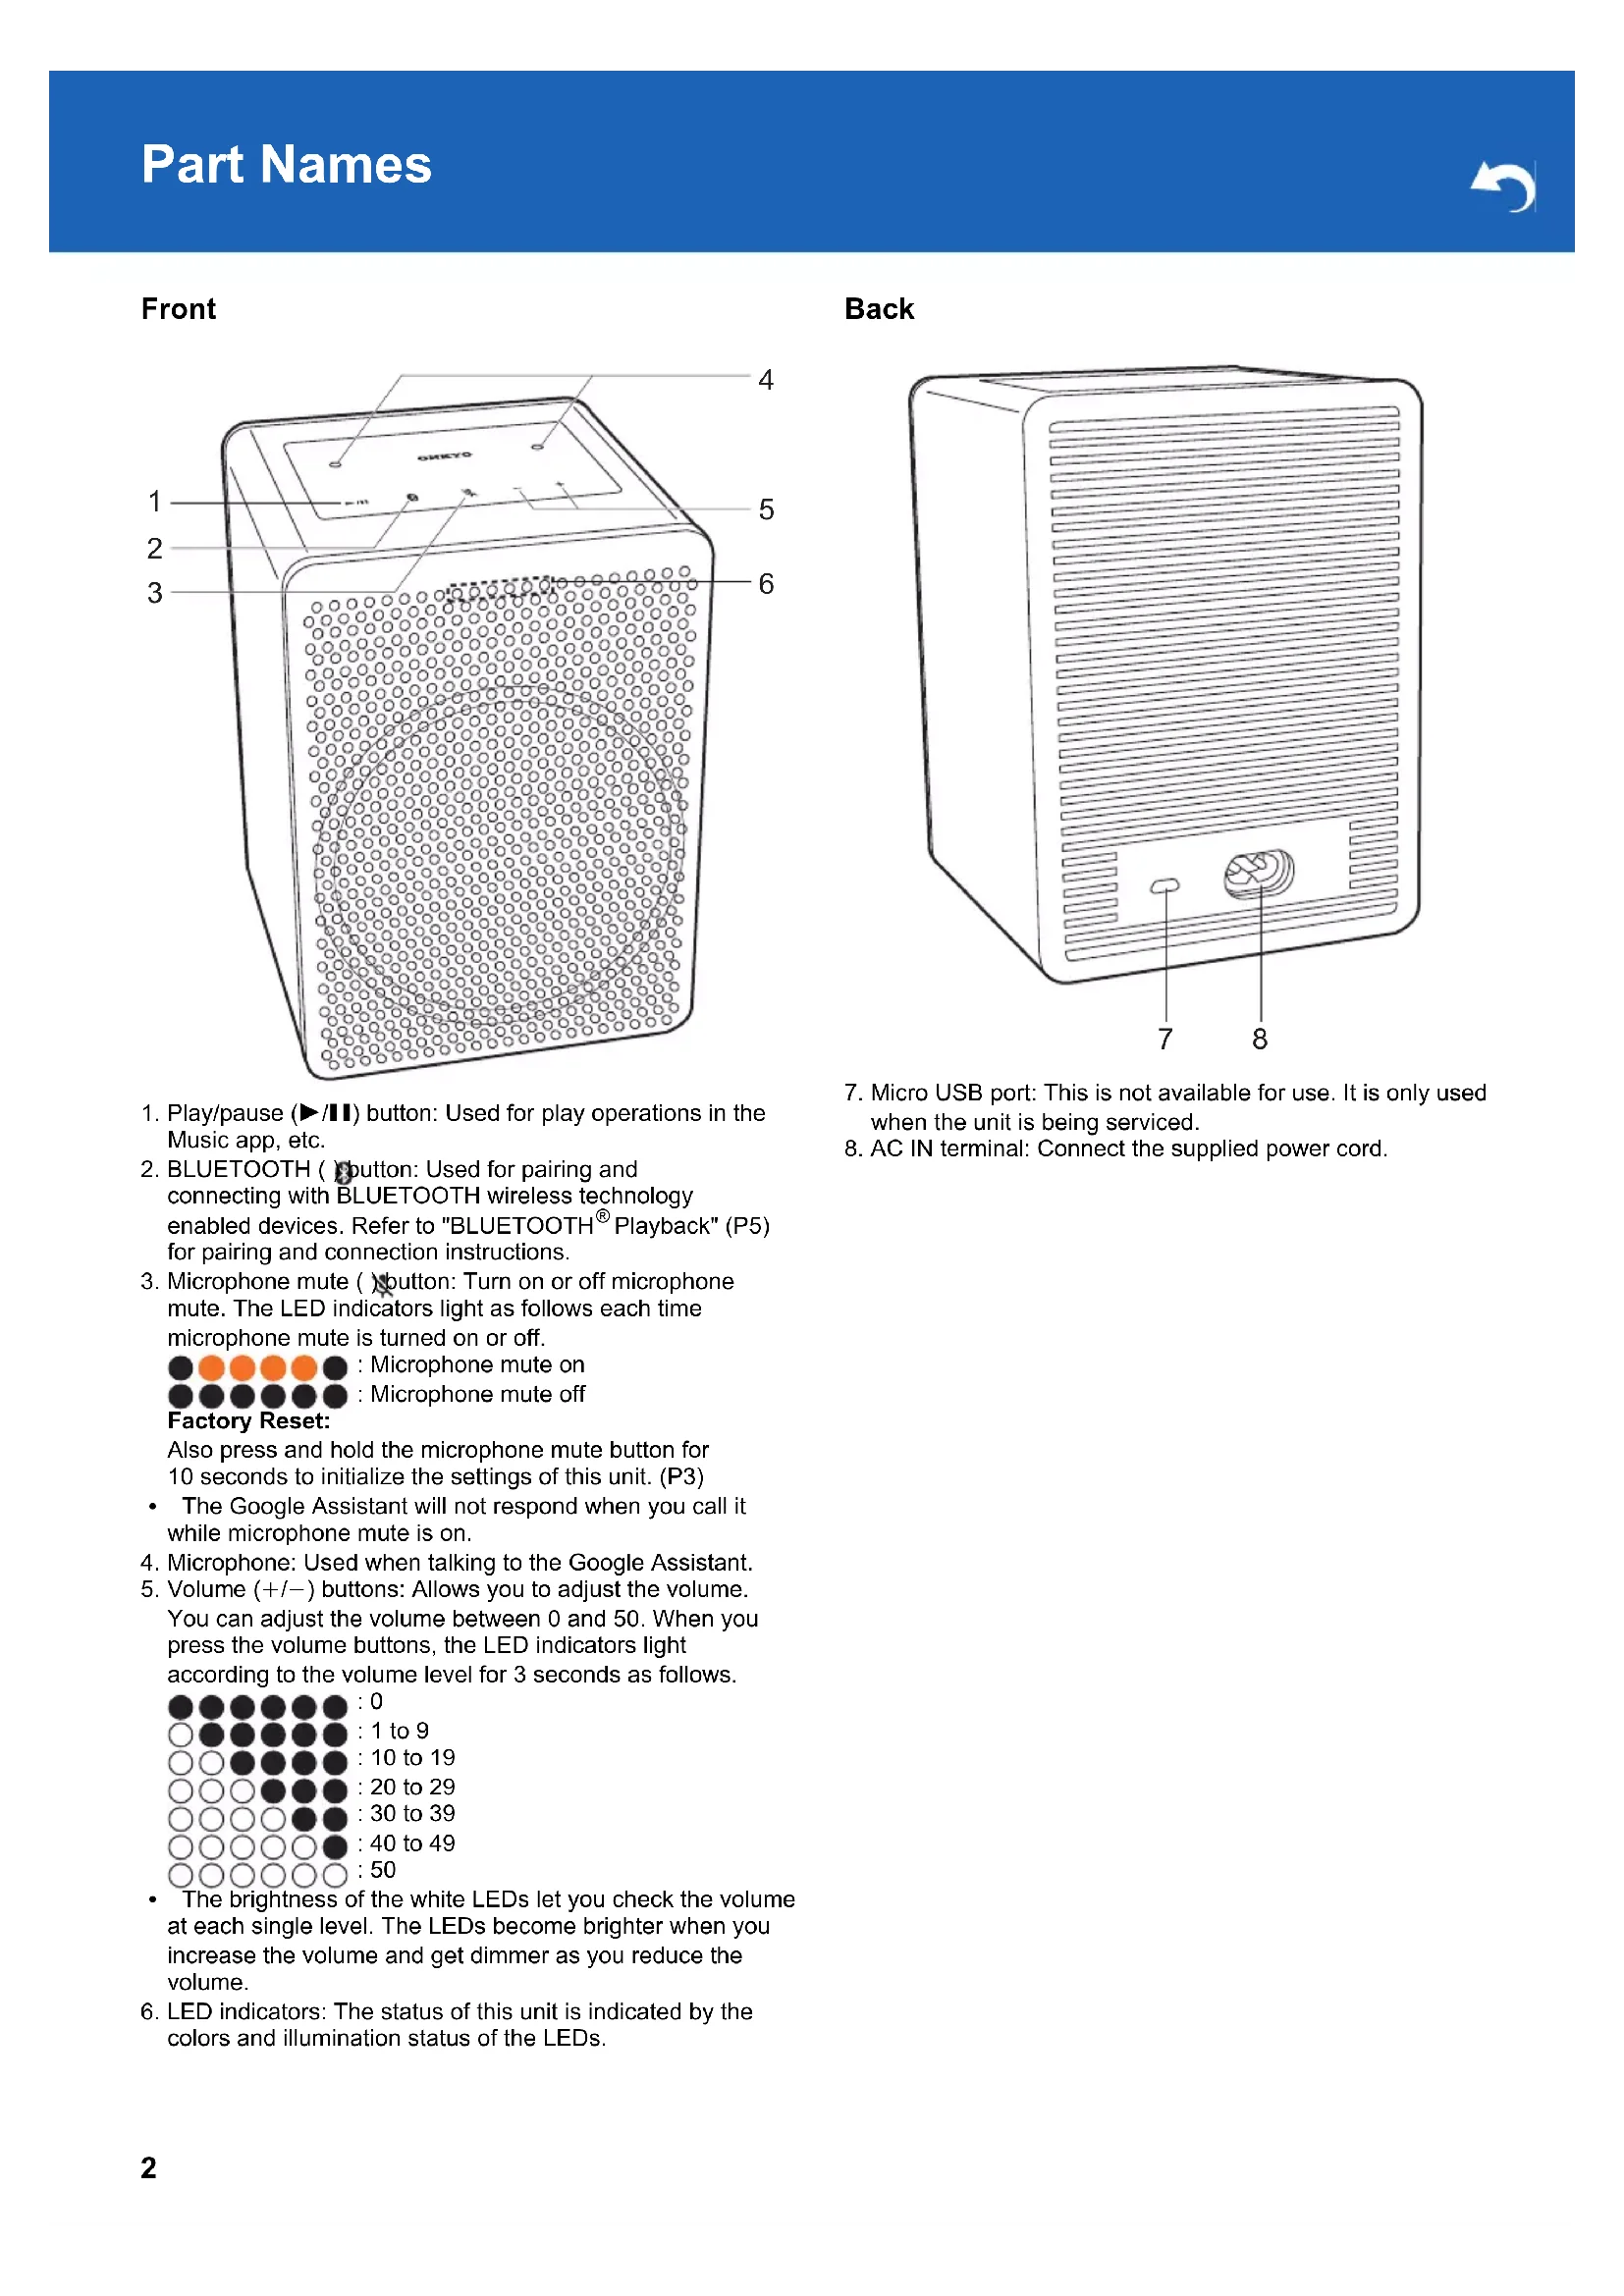
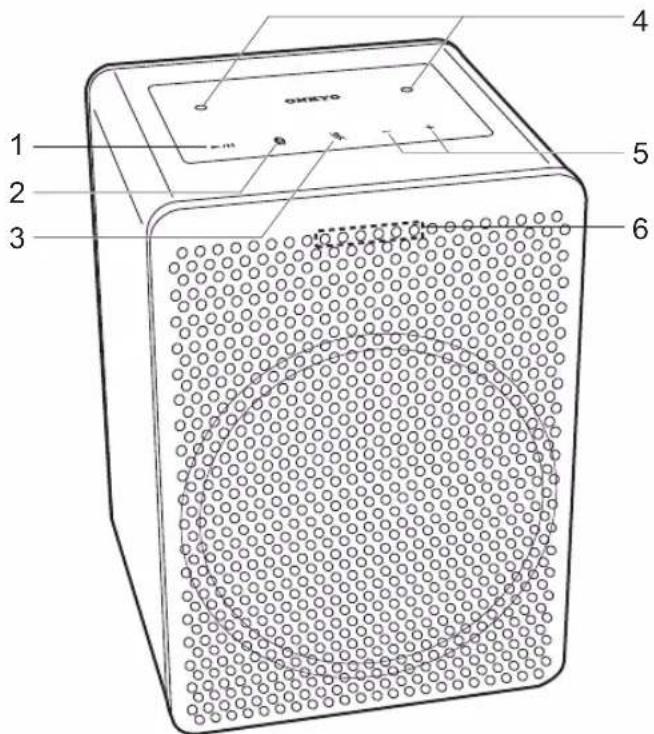
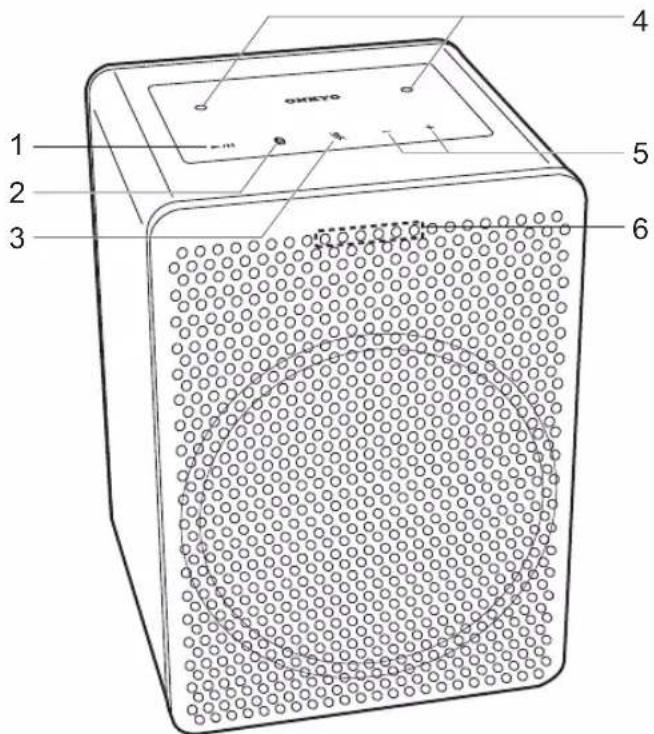
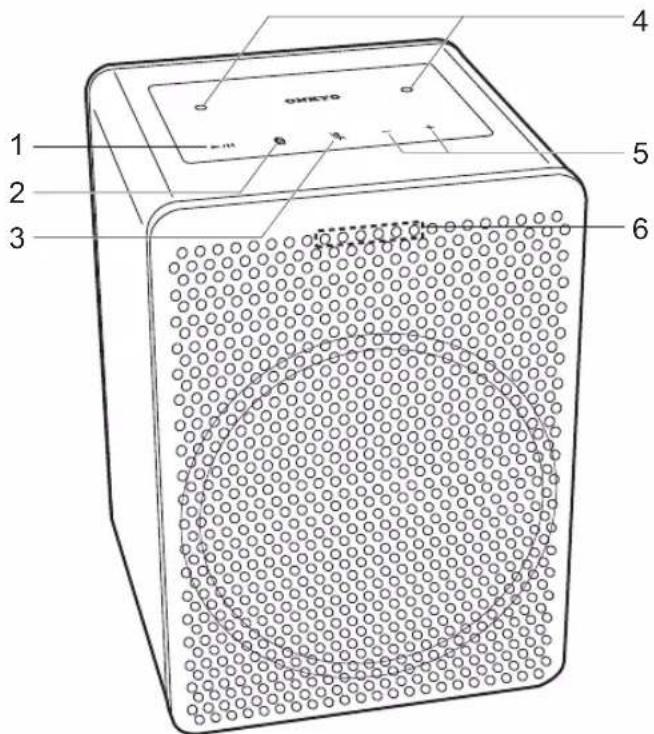
- Play/pause (▶/■) button: Used for play operations in the Music app, etc.
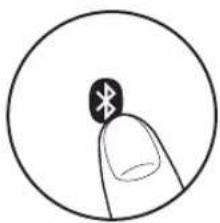
- BLUETOOTH ( button: Used for pairing and connecting with BLUETOOTH wireless technology enabled devices. Refer to "BLUETOOTH® Playback" (P5) for pairing and connection instructions.
- Microphone mute ( button: Turn on or off microphone. mute. The LED indicators light as follows each time microphone mute is turned on or off.
: Microphone mute on : Microphone mute off
Factory Reset:
Also press and hold the microphone mute button for 10 seconds to initialize the settings of this unit. (P3)
The Google Assistant will not respond when you call it while microphone mute is on.
4. Microphone: Used when talking to the Google Assistant.
5. Volume (+ / - ) buttons: Allows you to adjust the volume. You can adjust the volume between 0 and 50. When you press the volume buttons, the LED indicators light according to the volume level for 3 seconds as follows.
0
1 to 9
10 to 19
20 to 29
30 to 39
40 to 49
50
- The brightness of the white LEDs let you check the volume at each single level. The LEDs become brighter when you increase the volume and get dimmer as you reduce the volume.
- LED indicators: The status of this unit is indicated by the colors and illumination status of the LEDs.
Back
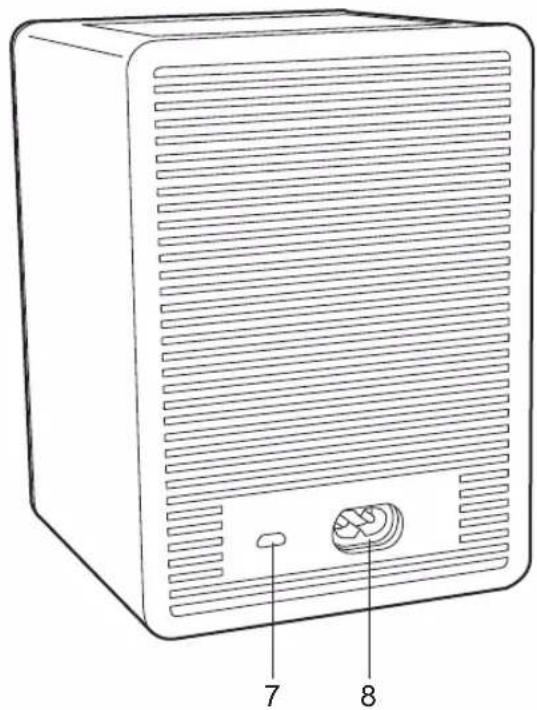
- Micro USB port: This is not available for use. It is only used when the unit is being serviced.
- AC IN terminal: Connect the supplied power cord.
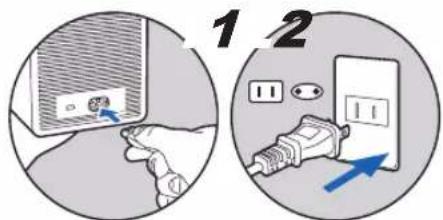
Power Cord Hookup
This unit includes a removable power cord. Connect the power cord to AC IN of the unit and then connect to the outlet. Always disconnect the outlet side first when disconnecting the power cord.
Download the Google Home app
Use the Google Home app to setup the unit and operate it. Download the Google Home app from Google Play or the App Store to your smartphone or tablet.
- Google Home app can be used on the following operating systems. (As of September 2017)
AndroidTM: Android 4.2 or later
iOS: iOS 8.0 or later (supported on iPhone®, iPad®, and iPod touch®)
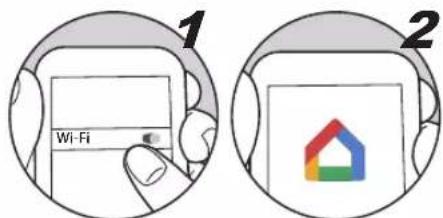
The smartphone or tablet needs to be connected to the same network as this unit to setup and operate the unit. Check network connection beforehand.
Initial Setup
Perform the following procedure when the unit is on.
- Start the Google Home app.
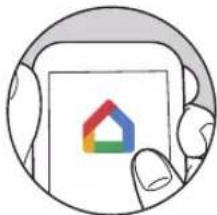
When you tap "ACCEPT" for the terms of service and privacy policy, the network connection between this unit and the smartphone is initiated. Follow the on-screen instructions to complete the initial settings.
- You can select a tutorial which lets you practice using your Google Assistant once initial settings are complete. Refer to "Meet your Google Assistant" (P4) for information on your Google Assistant.
Note: Your device may download and apply an Over-the-Air software update during installation. This is normal. Please be patient while your device is updated to enjoy the latest Google Chromecast built-in and Google Assistant features.
Initialize
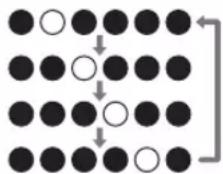
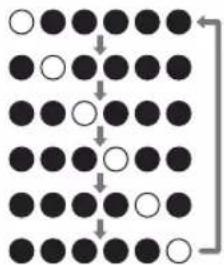
Initialize the settings of the unit to return the settings to the status at the time of purchase. Press and hold the microphone mute button for 10 seconds to initialize the unit. The LED indicators flash as follows when initializing is started.
It takes about 20 seconds to initialize. The LED indicators turn off when initializing is finished, and the settings return to the default settings.
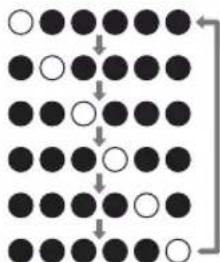
You can call up the Google Assistant by saying "Ok Google" at the unit. The LED indicators flash white when the Google Assistant has started and ready to receive questions.
Hotword Detected: When the device mics are not muted and it recognizes the hotword "Ok Google" or "Hey Google," the four (middle) Google Assistant LEDs light up in left-to-right order to confirm hotword detection and await your voice command.
Listening: After the hotword has been detected and the Assistant is awaiting the user query, all four (middle) Google Assistant LEDs slowly pulse.

Thinking: While a voice command is processing, the four (middle) Google Assistant LEDs slowly blink from left-to-right, one at a time.
Responding: As the Google Assistant responds to the user's voice command, all four (middle) Google Assistant LEDs blink on and off.

- The LED indicators light orange when microphone mute is on, and there will be no response from your Google Assistant even if you call it.

Questions For The Google Assistant

Hi, how can I help?
How are you?
Stop
Turn it up
Volume level 6
What can you do?
Play some Music
Play dance music on Youtube
Pause
Next Song
Set a timer 15 minutes
How many teaspoons in a cup?
When's my first event tomorrow?
Wake me up at 6 am tomorrow
Tell me about my day
What's the weather today?
What's the latest news?
How do you I say hello in Spanish?
How many calories in an apple?
What sound does a cow make?
What is the nearest pharmacy?
When do they close?
What is their phone number?
Play some music on AV Receiver
Pause the Living Room Speaker
Play sneezing panda video on TV
Set the thermostat 72 degrees
Turn on the living room light
Dim the light in the kitchen
Turn off the bed room light
Pairing
Pairing is necessary when connecting the BLUETOOTH enabled devices for the first time. Perform the following procedure when the unit is on.
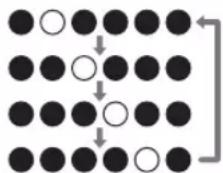
- Press and hold the BLUETOOTH button on this unit for 3 seconds.
The LED indicators flash as follows when pairing is started.
- Enable (turn on) the BLUETOOTH function of the BLUETOOTH wireless technology enabled device, then select this unit from amongst the devices displayed. This unit is displayed as "VC-GX30****".

- All six LEDs blink on and off when pairing is finished.

Pairing has failed if all six LEDs does not blink on and off.
Retry from step 1.

- Do steps 1 to 3 to connect another BLUETOOTH wireless technology enabled device.
- The coverage area is within about 10m . Note that connection is not always guaranteed with all BLUETOOTH wireless technology enabled devices.
Playing Back
Perform the following procedure when the unit is on.
-
Perform the connection procedure on the BLUETOOTH wireless technology enabled device.
-
You can also press the BLUETOOTH button on this unit
to connect the BLUETOOTH wireless technology enabled device that was last connected. Note that this may not work with some BLUETOOTH wireless technology enabled devices.
-
Play the music files. Increase the volume of the BLUETOOTH wireless technology enabled device to an appropriate level.
-
Due to the characteristics of BLUETOOTH wireless technology, the sound produced on this unit may slightly be behind the sound played on the BLUETOOTH wireless technology enabled device.
■ Analog Audio Output
RMS Output Power
40 W (4 ohm at 1 kHz THD 10% )
10 W (8 ohm at 10 kHz THD10%)
Network Section
Wireless LAN
IEEE802.11 a/b/g/n/ac standard
5 GHz/2.4 GHz band
EU: 1-13ch, 36-48ch, 52-64ch, 100-140ch
JP: 1-14ch, 36-48ch, 52-64ch, 100-140ch
US: 1-11ch, 36-48ch, 52-64ch, 100-140ch, 149-165ch
Bluetooth Section
Communication system
BLUETOOTH Specification version 4.2
Frequency band
2.4 GHz (2.402 GHz - 2.480 GHz)
Modulation method
FHSS (Freq Hopping Spread Spectrum)
Compatible Bluetooth profiles
A2DP:1.31
AVRCP:1.6
Supported Codes
SBC
AAC
Transmission range (A2DP)
20 Hz - 20 kHz (Sampling frequency 44.1/48 kHz)
Maximum communication range
Line of sight approx. 10m^*
- The actual range will vary depending on factors such as obstacles between devices, magnetic fields around a microwave oven, static electricity, cordless phone, reception sensitivity, antenna's performance, operating system, software application, etc.
Descriptions required by the RE Directive of the European Union (EU)
Maximum radio-frequency power transmitted in the
frequency band(s) (For European models)
2400 - 2483.5 MHz: 20 dBm (Equivalent Isotropic
Radiated Power)
5150 - 5350 MHz: 20 dBm (Equivalent Isotropic Radiated
Power)
5470 - 5725 MHz: 20 dBm (Equivalent Isotropic Radiated
Power)
General
Power Supply
AC 100 - 240 V, 50 / 60 Hz
Power Consumption
26W
VC-GX30 complies with European Commission Regulation
(EC) No 1275/2008 as a networked equipment with high network availability (HiNA equipment and equipment with HiNA functionality).
Power consumption
In Standby : N/A
In Network Standby: N/A
Operation Standby*: 2.7 W
- Operation Standby : VC-GX30 is connected to a wireless network but does not provide active audio functions.
Speaker Type
Closed box type
Speaker Configuration
Tweeter: 20mm× 1 Soft Dome
Woofer: 80mm× 1 Cone
Dimensions (W× H× D)
120mm× 168mm× 128mm
4-5/7" × 6-3/5" × 5"
Weight
1.8 kg (4.0 lbs.)
Accessory
AC Power cord (1)
Quick Start Guide (1)
Meet your Google Assistant (European models) (3)
Meet your Google Assistant (North American models) (2)
- This document is an online instruction manual. It is not included as an accessory.
Specifications and appearance are subject to change without notice.
We will not accept responsibility for damage arising from the connection of equipment manufactured by other companies.
License and Trademark
Google, Google Home, Google Play, Chromecast built-in and other related marks and logos are trademarks of Google Inc.
The Google Assistant requires an internet connection and is not available in all countries or languages. Availability and performance of certain features, services and applications are device and network dependent and may not be available in all areas; subscription(s) may be required and additional terms, conditions and/or changes may apply.
Apple and the Apple logo are trademarks of Apple Inc., registered in the U.S. and other countries. App Store is a service mark of Apple Inc., registered in the U.S. and other countries.
Bluetooth
The BLUETOOTH word mark and logos are registered trademarks owned by Bluetooth SIG, Inc.
All other trademarks are the property of their respective owners. / Toutes les autres marques commerciales sont la propriété de leurs détenteurs respectifs. / El resto de MARCAS commerciales son propietad de sus responsivos propriétarios. / Tutti gliali marchi di fabbrica sono di proprietà dei rispetti propriétari. / Alle anderen Warenzeichen sind das Eigentum ihrer jeweiligen Eigentümer. / Alle andere handelsmerken zijn eigendom van de desbetreffende rechtebbenden. / Alla andar varumärken tillhör deras respective āgare. / Kaiki muut tuotemerkit ovat omistajensa omaisuutta. /所有其他商標為各自所有者所有。
1-10-5 Yokoami, Sumida-ku, Tokyo 130-0015 Japan
http://www.onkyo.com/
18 Park Way, Upper Saddle River, N.J. 07458, U.S.A.
For Dealer, Service, Order and all other Business Inquiries:
Tel: 201-785-2600 Fax: 201-785-2650
http://www.us.onkyo.com/
For Product Support Team Only: 1-800-229-1687 http://www.us.onkyo.com/
Gutenbergstrasse 3, 82178 Puchheim, Germany
Tel: +49-8142-4401-0 Fax: +49-8142-4208-213
http://www.eu.onkyo.com/
6, Avenue de Marais F - 95816 Argenteuil Cedex FRANCE
For Product Support only: +33 969 368 138
http://www.fr.onkyo.com/fr/
Unit 1033, 10/F, Star House, No 3, Salisbury Road, Tsim Sha Tsui Kowloon, Hong Kong.
Tel: +852-2429-3118 Fax: +852-2428-9039
http://www.hk.onkyo.com/
302, Building 1, 20 North Chaling Rd., Xuhui District, Shanghai, China 200032, Tel: +86-21-52131366 Fax: +86-21-52130396
http://www.cn.onkyo.com/
Please contact an Onkyo distributor referring to Onkyo SUPPORT site.
http://www.intl.onkyo.com/support/
The above-mentioned information is subject to change without prior notice. Visit the Onkyo web site for the latest update.
Enceinte intelligente
VC-GX30
Instruction Manual
Mode d'emploi
Bedienungsanleitung
取拔説明書

Avant
FHSS (Freq Hopping Spread Spectrum)
Profils Bluetooth compatibles
A2DP:1.31
AVRCP:1.6
Codes pris en charge
SBC
AAC
Portee de transmission (A2DP)
Google, Google Home, Google Play, Chromecast built-in and other related marks and logos are trademarks of Google Inc.
The Google Assistant requires an internet connection and is not available in all countries or languages. Availability and performance of certain features, services and applications are device and network dependent and may not be available in all areas; subscription(s) may be required and additional terms, conditions and/or changes may apply.
Apple and the Apple logo are trademarks of Apple Inc., registered in the U.S. and other countries. App Store is a service mark of Apple Inc., registered in the U.S. and other countries.
Bluetooth
The BLUETOOTH word mark and logos are registered trademarks owned by Bluetooth SIG, Inc.
All other trademarks are the property of their respective owners. / Toutes les autres marques commerciales sont la propriété de leurs détenteurs respectifs. / Elosto de MARCAS commerciales son propiedad de sus respectivos propriétarios. / Tutti gli altri marchi di fabbrica sono di proprietà dei rispetti propriétari. / Alle anderen Warenzeichen sind das Eigentum ihrer jeweiligen Eigentümer. / Alle andere handelsmerken zijn eigendom van de desbetreffende rechtebbenden. / Alla andra varumärken tillhör deras respectinge Āgare. / Kaiki muut tototemerkit ovat omistajensa omaisuutta. /所有其他商標為各自所有者所有。
1-10-5 Yokoami, Sumida-ku, Tokyo 130-0015 Japan
http://www.onkyo.com/
18 Park Way, Upper Saddle River, N.J. 07458, U.S.A.
For Dealer, Service, Order and all other Business Inquiries:
Tel: 201-785-2600 Fax: 201-785-2650
http://www.us.onkyo.com/
For Product Support Team Only: 1-800-229-1687 http://www.us.onkyo.com/
Gutenbergstrasse 3, 82178 Puchheim, Germany
Tel: +49-8142-4401-0 Fax: +49-8142-4208-213
http://www.eu.onkyo.com/
6, Avenue de Marais F - 95816 Argenteuil Cedex FRANCE
For Product Support only: +33 969 368 138
http://www.fr.onkyo.com/fr/
Unit 1033, 10/F, Star House, No 3, Salisbury Road, Tsim Sha Tsui Kowloon, Hong Kong.
Tel: +852-2429-3118 Fax: +852-2428-9039
http://www.hk.onkyo.com/
302, Building 1, 20 North Chaling Rd., Xuhui District, Shanghai, China 200032, Tel: +86-21-52131366 Fax: +86-21-52130396
http://www.cn.onkyo.com/
The above-mentioned information is subject to change without prior notice. Visit the Onkyo web site for the latest update.
SMART SPEAKER G3
VC-GX30
Instruction Manual
Mode d'emploi
Bedienungsanleitung
取拔說明書
Front
FHSS (Freq Hopping Spread Spectrum)
Ko mpatible Bluetooth Profile
A2DP: 1.31
AVRCP:1.6
Unterstützte Codes
SBC
AAC
Google, Google Home, Google Play, Chromecast built-in and other related marks and logos are trademarks of Google Inc.
The Google Assistant requires an internet connection and is not available in all countries or languages. Availability and performance of certain features, services and applications are device and network dependent and may not be available in all areas; subscription(s) may be required and additional terms, conditions and/or changes may apply.
Apple and the Apple logo are trademarks of Apple Inc., registered in the U.S. and other countries. App Store is a service mark of Apple Inc., registered in the U.S. and other countries.
Bluetooth
The BLUETOOTH word mark and logos are registered trademarks owned by Bluetooth SIG, Inc.
All other trademarks are the property of their respective owners. / Toutes les autres marques commerciales sont la propriété de leurs détenteurs respectifs. / El resto de MARCAS commerciales son propietad de sus responsivos propriétarios. / Tutti gliali marchi di fabbrica sono di proprietà dei rispetti propriétari. / Alle anderen Warenzeichen sind das Eigentum ihrer jeweiligen Eigentümer. / Alle andere handelsmerken zijn eigendom van de desbetreffende rechtebbenden. / Alla andra varumärken tillhör deras respective Āgare. / Kaiki muut tuotemerkit ovat omistajensa omaisuutta. /所有其他商標為各自所有者所有。
1-10-5 Yokoami, Sumida-ku, Tokyo 130-0015 Japan
http://www.onkyo.com/
18 Park Way, Upper Saddle River, N.J. 07458, U.S.A.
For Dealer, Service, Order and all other Business Inquiries:
Tel: 201-785-2600 Fax: 201-785-2650
http://www.us.onkyo.com/
For Product Support Team Only: 1-800-229-1687 http://www.us.onkyo.com/
Gutenbergstrasse 3, 82178 Puchheim, Germany
Tel: +49-8142-4401-0 Fax: +49-8142-4208-213
http://www.eu.onkyo.com/
6, Avenue de Marais F - 95816 Argenteuil Cedex FRANCE
For Product Support only: +33 969 368 138
http://www.fr.onkyo.com/fr/
Unit 1033, 10/F, Star House, No 3, Salisbury Road, Tsim Sha Tsui Kowloon, Hong Kong.
Tel: +852-2429-3118 Fax: +852-2428-9039
http://www.hk.onkyo.com/
302, Building 1, 20 North Chaling Rd., Xuhui District, Shanghai, China 200032, Tel: +86-21-52131366 Fax: +86-21-52130396
http://www.cn.onkyo.com/
Please contact an Onkyo distributor referring to Onkyo SUPPORT site.
http://www.intl.onkyo.com/support/
The above-mentioned information is subject to change without prior notice. Visit the Onkyo web site for the latest update.
SMART SPEAKER G3
VC-GX30
Instruction Manual
Mode d'emploi
Bedienungsanleitung
取拔説明書

前面
Google, Google Home and Google Play and other related marks and logos are trademarks of Google Inc.