
GVC D813BS - Tumble drier CANDY - Free user manual and instructions
Find the device manual for free GVC D813BS CANDY in PDF.
| Product type | Condenser tumble dryer |
| Brand | Candy |
| Model | GVC D813BS |
| Drying capacity | 8 kg (cotton) 4 kg (synthetics) 1 kg (wool) |
| Dimensions (H x W x D) | 85 x 60 x 60 cm |
| Power supply | 220-240 V, 50 Hz, 10 A |
| Automatic programs | Cotton (Ready to store, Ready to iron), Synthetics, Wool, Mix&Dry, Shirts, Quick 40', Timed drying (30-180 min), Memo |
| Options | Delay start (1-24 h), Wrinkle prevent, Delicate dry (Acrylics/Synthetics) |
| Drum type | Stainless steel |
| Drum volume | 115 L |
| Water tank capacity | Approx. 6 L (full weight: 6 kg) |
| Lint filter | Removable, clean after each cycle |
| Condenser | Cleanable with water, check regularly |
| Maintenance | Clean filter and empty tank after each cycle; periodic condenser cleaning; wipe drum interior |
| Safety | Automatic stop if door opened; cooling phase at cycle end |
| Included accessories | User manual, warranty card, energy label |
| Mounting options | Stacking kit (for washing machine); permanent drainage kit (drain hose) |
| Operating ambient temperature | +2°C to +35°C |
| Grounding | Required |
| Spare parts | Available from GIAS service |
| Repairability | Repairs only by authorized GIAS technician |
| Indicator lights | Filter maintenance light, tank empty light, ventilation light |
Frequently Asked Questions - GVC D813BS CANDY
User questions about GVC D813BS CANDY
0 question about this device. Answer the ones you know or ask your own.
Ask a new question about this device
Download the instructions for your Tumble drier in PDF format for free! Find your manual GVC D813BS - CANDY and take your electronic device back in hand. On this page are published all the documents necessary for the use of your device. GVC D813BS by CANDY.
USER MANUAL GVC D813BS CANDY
| Safety Reminders | 3 |
| Drain Hose Kit: Fitting Instructions | 8 |
| Preparing the Load | 9 |
| Controls and Indicators | 10 |
| Selecting the Programme | 11 |
| Door and Filter | 12 |
| Condenser | 13 |
| Operation | 14 |
| Cleaning and Routine Maintenance | 14 |
| Troubleshooting | 15 |
| Customer Service | 15 |
Please read and follow these instructions carefully and operate the machine accordingly. This booklet provides important guidelines for safe use, installation, maintenance and some useful advice for best results when using your machine.
Keep all documentation in a safe place for future reference or for any future owners.
SAFETY REMINDS
Use
-
This appliance can be used by children aged from 8 years and above and persons with reduced physical, sensory or mental capabilities or lack of experience and knowledge if they have been given supervision or instruction concerning use of the appliance in a safe way and understand the hazards involved. Children shall not play with the appliance. Cleaning and user maintenance shall not be made by children without supervision. Children of less than 3 years should be kept away unless continuously supervised.
-
WARNING Misuse of a tumble dryer may create a fire hazard.
-
This appliances is intended to be used in household and similar applications such as:
-
Staff kitchen areas in shops , offices and other working environments;
- Farm houses
- By clients in hotels, motels and other residential type environments;
- Bed and breakfast type environments"
A different use of this appliance from household environment or from typical housekeeping functions, as commercial use by expert or trained users, is excluded even in the above applications.
If the appliance is used in a manner inconsistent with this it may reduce the life of the appliance and may void the manufacturer's warranty. Any damage to the appliance or other damage or loss arising through use that is not consistent with domestic or household use ( even if located in a domestic or household environment) shall not be accepted by the manufacturer to the fullest extent permitted by law.'
- This machine should only be used for its intended purpose as described in this manual. Ensure that the instructions for installation and use are fully understood before operating the appliance.
- Do not touch the appliance when hands or feet are damp or wet.
- Do not lean on the door when loading the machine or use the door to lift or move the machine.
-
Do not allow children to play with the machine or its controls.
-
WARNING Do not use the product if the fluff filter is not in position or is damaged; fluff could be ignited.
- WARNING Where the hot surface symbol is located the temperature rise during operation of the tumble dryer may be in excess of 60 degrees C.
- Remove the plug from the electricity supply. Always remove the plug before cleaning the appliance.
- Do not continue to use this machine if it appears to be faulty.
- Lint and fluff must not be allowed to collect on the floor around the outside of the machine.
- The final part of a tumble dryer cycle occurs without heat (cool down cycle) to ensure that the items are left at a temperature that ensures that the items will not be damaged.
The tumble dryer is not to be used if industrial chemicals have been used for cleaning. - WARNING: Never stop a tumble dryer before the end of the drying cycle unless all items are quickly removed and spread out so that the heat is dissipated.
Maximum load drying weight: see energy label.
The Laundry
- Do not dry unwashed items in the tumble dryer.
- WARNING Do not tumble dry fabrics treated with dry cleaning fluids.
- WARNING Foam rubber materials can, under certain circumstances, when heated become ignited by spontaneous combustion. Items such as foam rubber (latex foam), shower caps, waterproof textiles, rubber backed articles and clothes or pillows fitted with foam rubber pads MUST NOT be dried in the tumble dryer.
- Always refer to the laundry care labels for directions on suitability for drying.
- Clothes should be spin dried or thoroughly wrung before they are put into the tumble dryer. Clothes that are dripping wet should not be put into the dryer.
- Lighters and matches must not be left in pockets and NEVER use flammable liquids near the machine.
- Glass fibre curtains should NEVER be put in this machine. Skin irritation may occur if other garments are contaminated with the glass fibres.
- Items that have been soiled with substances such as cooking oil, acetone, alcohol, petrol, kerosene, spot removers, turpentine, waxes and wax removers should be washed in hot water with an extra amount of detergent before being dried in the tumble dryer.
- Fabric softeners, or similar products, should be used as specified by the fabric softener instructions.
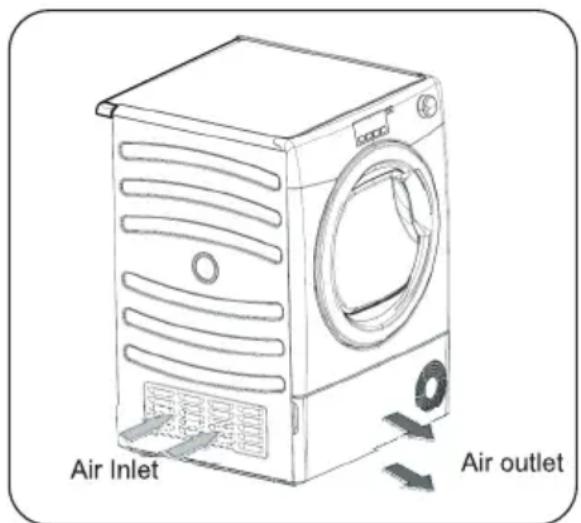
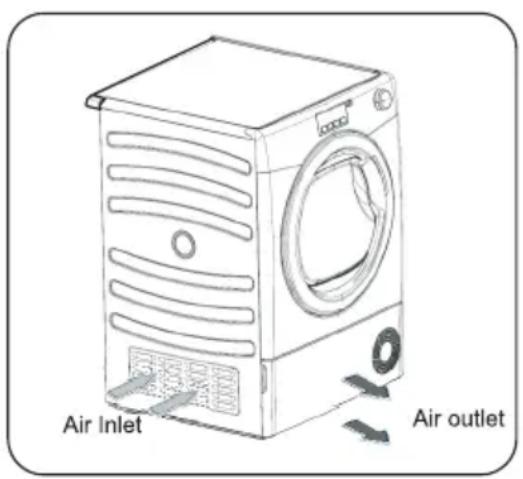
Ventilation
- Adequate ventilation must be provided in the room where the tumble dryer is located to prevent gases from appliances burning other fuels, including open fires, being drawn into the room during operation of the tumble dryer.
- Installing the rear of the appliance close to a wall or vertical surface.
- There should be a gap of at least 12mm between the machine and any obstructions. The inlet and outlet should be kept clear of obstruction. To ensure adequate ventilation the space between the bottom of the machine and the floor must not be obstructed.
- Check regularly that the air flowing through the dryer is not restricted.
- Check frequently the fluff filter after use, and clean, if necessary.
- Prevent items from falling or collecting behind the dryer as these may obstruct the air inlet and outlet
- NEVER install the dryer up against curtains.
- In cases where the dryer is installed on top of a washing machine, a suitable stacking kit must be used according to the follow configuration.
-Stacking kit Mod 35100019: for minimum washing machine depth 49 cm -Stacking kit Mod 35900120: for minimum washing machine depth 51 cm
The stacking kit shall be one of that above, obtainable from our spa service.
The stacking kit shall be one of that above, obtainable from our spare service.
The instructions for installation and any fixing attachments, are provided with the staking kit.
Do not install the product in a low temperature room or in a room where there is a risk of frost occurring. At temperature around freezing point the product may not be able to operate properly: there is a risk of damage if the water is allowed to freeze in the hydraulic circuit (valves, hoses, pumps). For a better product performance the ambient room temperature must be between +2^ and +35^ . Please note that operating in cold condition (between +2 and +15^ ) might simply some water condensation and water drops on floor.
Environmental Issues
- All packaging materials used are environmentally-friendly and recyclable. Please help dispose of the packaging via environmentally-friendly means. Your local council will be able to give you details of current means of disposal.
To ensure safety when disposing of an old tumble dryer disconnect the mains plug from the socket, cut the mains power cable and destroy this together with the plug. To prevent children shutting themselves in the machine break the door hinges or the doorlock.
European Directive 2012/19/EU
This appliance is marked according to the European directive 2012/19/EU on Waste Electrical and Electronic Equipment (WEEE).

WEEE contains both polluting substances (which can cause negative consequences for the environment) and basic components (which can be re-used). It is important to have WEEE subjected to specific treatments, in order to remove and dispose property all pollutants, and recover and recycle all materials. Individuals can play an important role in ensuring that WEEE does not become an environmental issue; it is essential to follow some basic rules:
- WEEE should not be treated as household assets.
Electrical Requirements
Tumble dryers are supplied to operate at a voltage of 220-240V, 50 Hz single phase. Check that the supply circuit is rated to at least 10A.
Electricity can be extremely dangerous.
This appliance must be earthed.
The socket outlet and the plug on the appliance must be of the same type.
Do not use multiple adapters and/or extension leads.
The plug should be accessible for disconnection after the appliance has been installed.
CE Appliance complies with European Directive 2004/108/EC, 2006/95/EC and subsequent amendments.
You may be charged for a service call if a problem with your machine is caused by incorrect installation.
If the mains cord on this appliance is damaged, it must be replaced by a special cord which is ONLY obtainable from the spares service. It must be installed by a competent person.
A Do not plug the machine in and switch it
DRAIN HOSE : FITTING INSTRUCTIONS
To avoid emptying the water container after each drying cycle, the water can be discharged directly to a waste water drain pipe (the same drainage system as household sinks). Water Bye-Laws prohibit connection to a surface water drain. The waste water drain pipe should be located adjacent to the tumble dryer.
The kit consists of:1 hose and 1 tap.

WARNING! Switch off and remove the ble dryer plug from the electricity supply pre carrying out any work.
Fit the Hose as Follows:
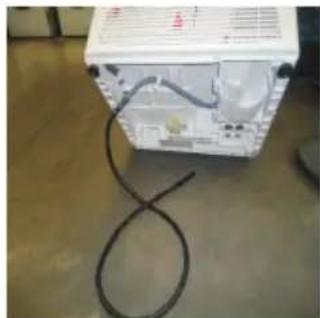
1.Tilt the machine backwards.
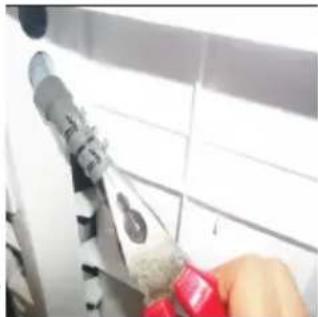
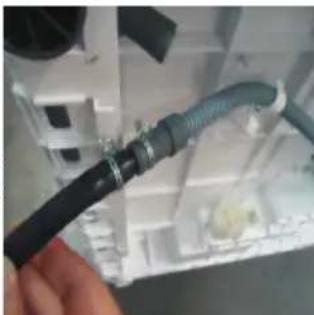
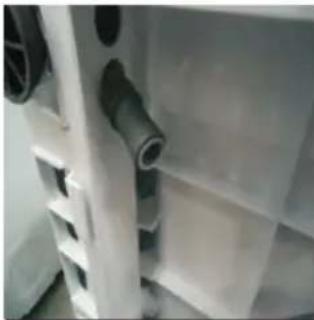
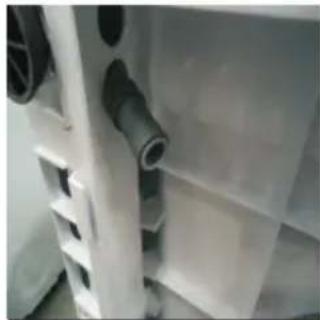
- The waste water pipe is situated at the left -hand side of the machine (see the picture). A grey hose connects to the bridge at the left hand side of the machine. Using pliers, remove the pipe retaining clip from the bridge.
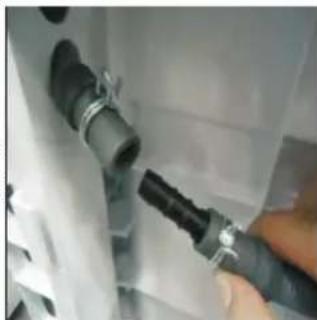
3.Pull the hose off the bridge connection.
- Attach the black hose from the kit, (using the connector and pipe clips supplied), to the hose removed from the bridge connection.
-
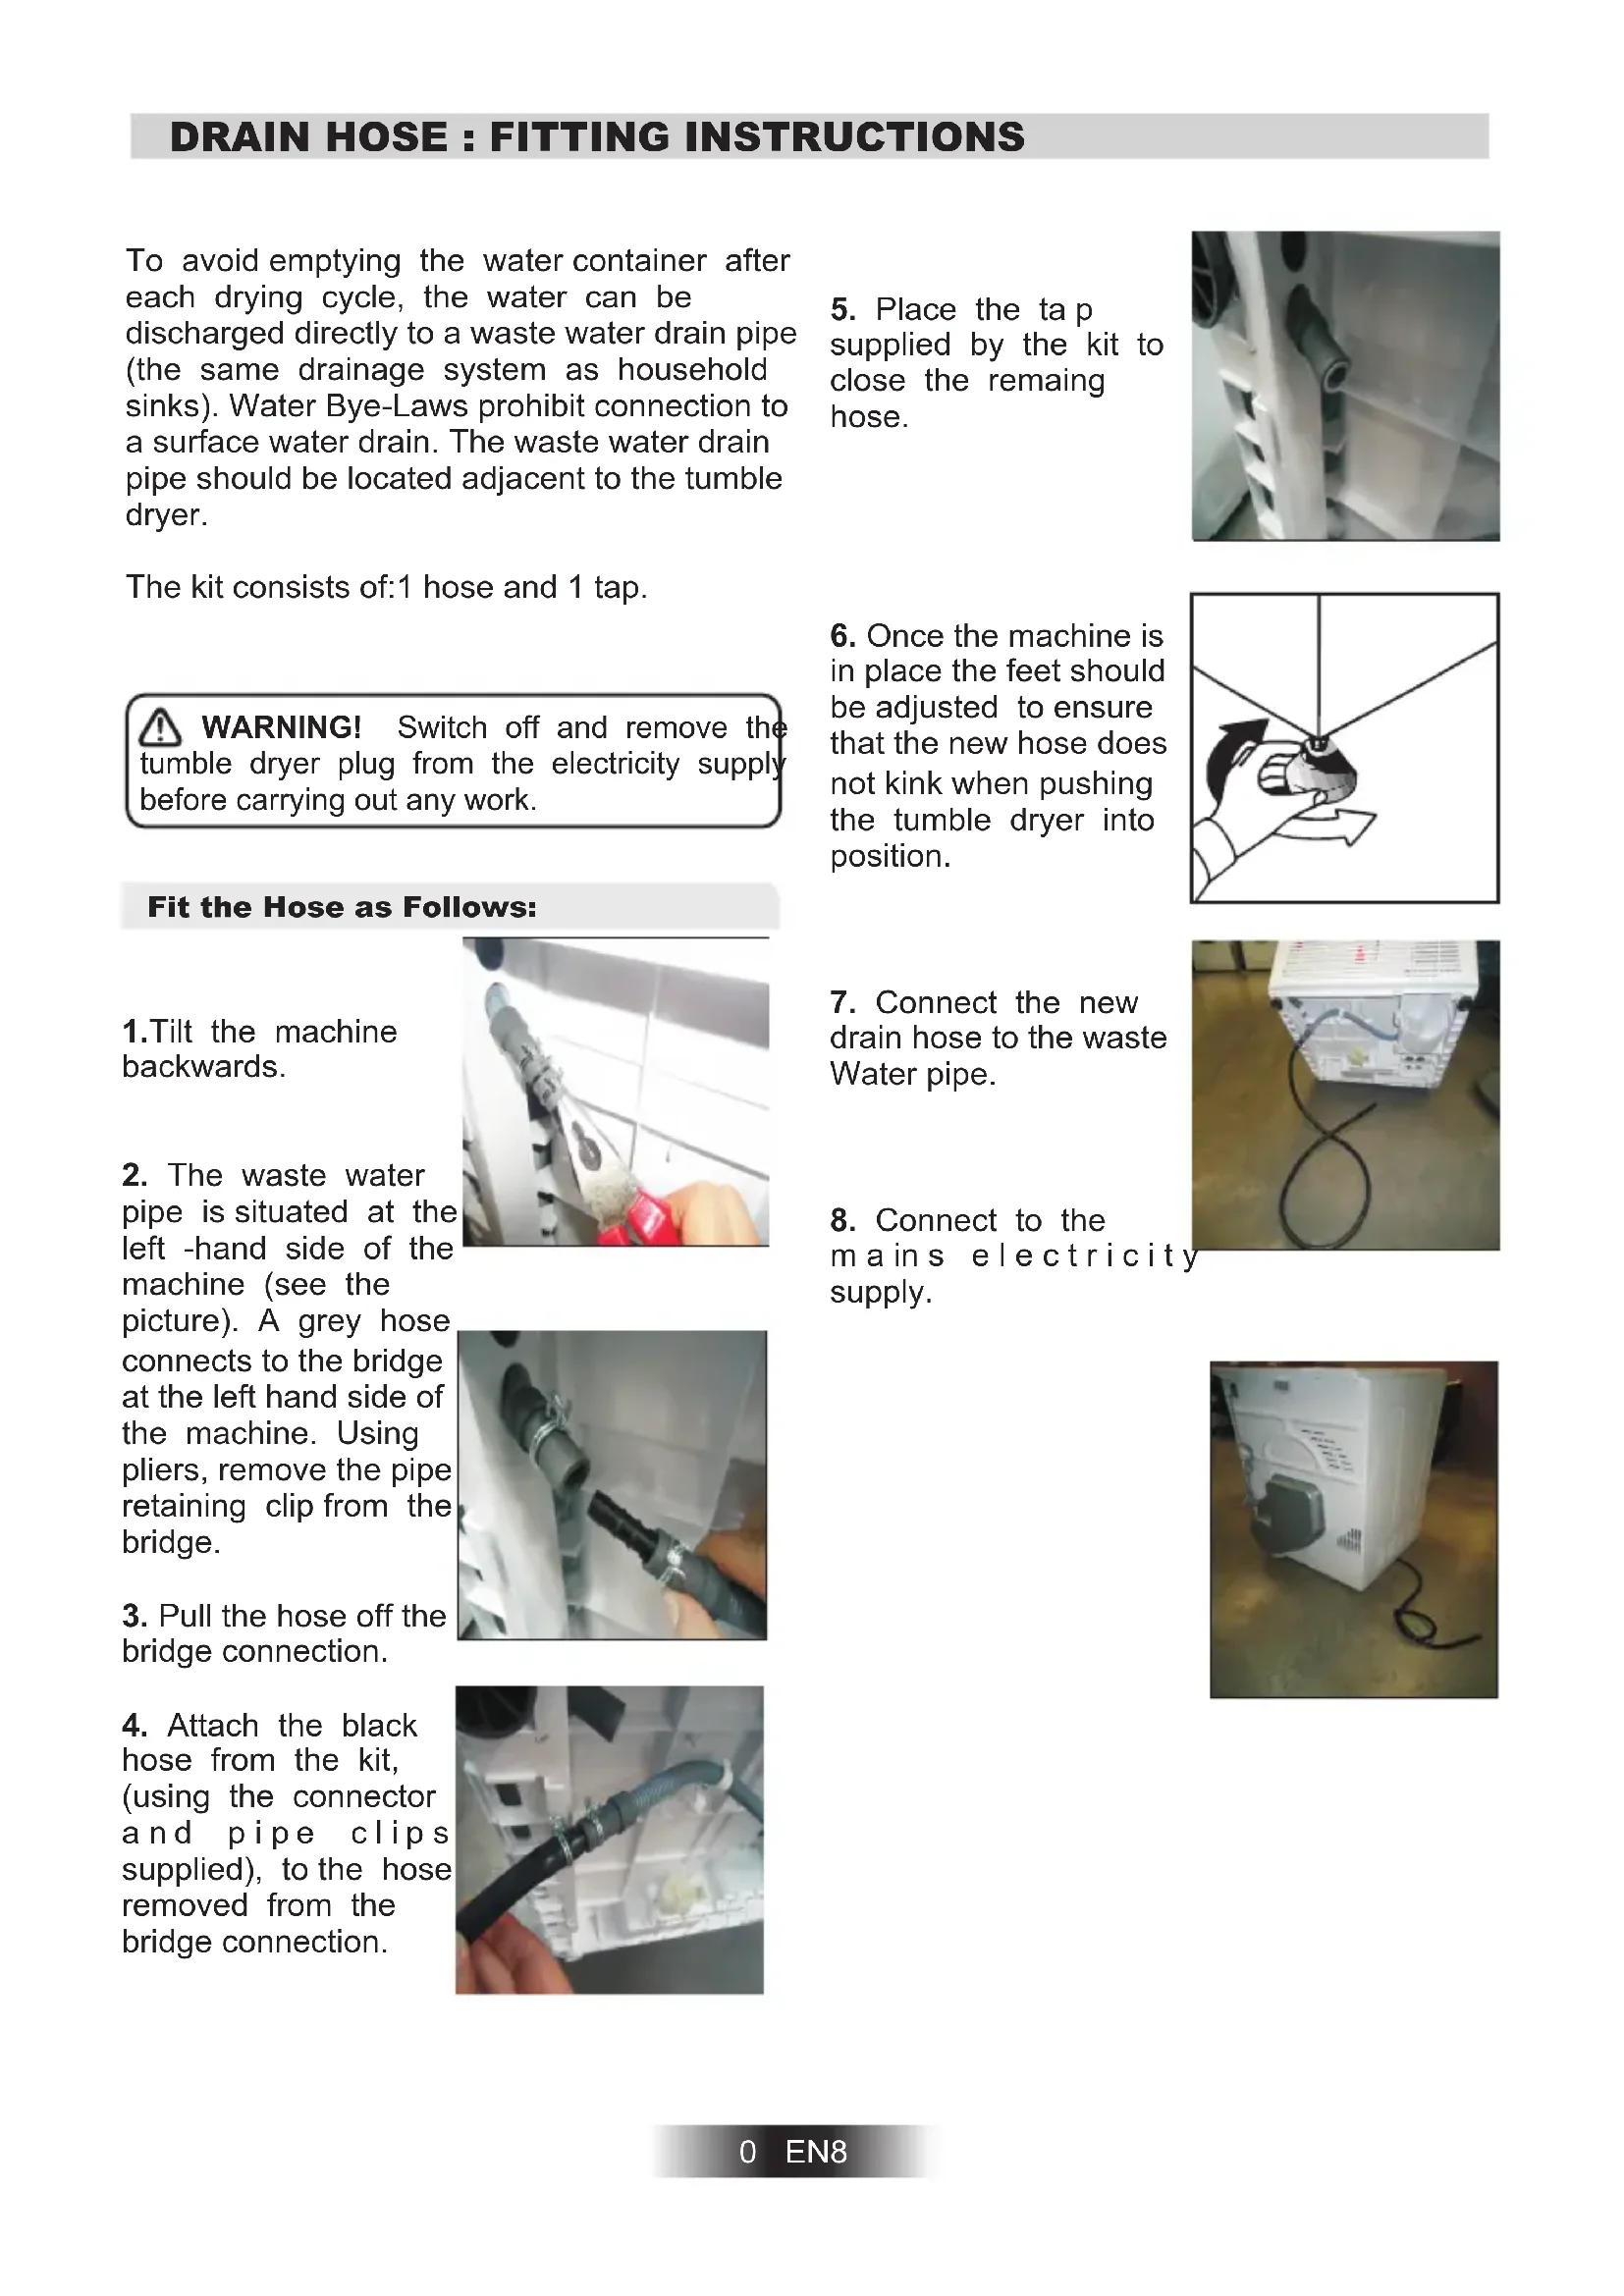
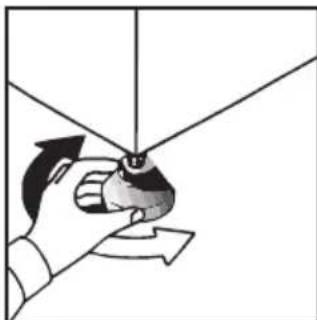
Place the tap supplied by the kit to close the remaing hose.
-
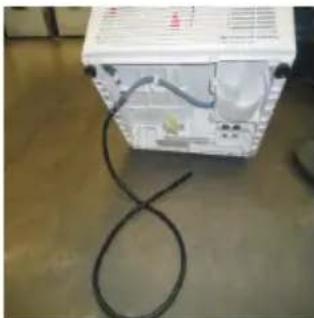
Once the machine is in place the feet should be adjusted to ensure that the new hose does not kink when pushing the tumble dryer into position.
-
Connect the new drain hose to the waste Water pipe.
-
Connect to the mains electricity supply.
PREPARING THE LOAD
Before using the tumble dryer for the first time:
- Please read this instruction book thoroughly.
- Remove all items packed inside drum.
- Wipe the inside of the drum and door with a damp cloth to remove any dust which may have settled in transit.
Clothes Preparation
Make sure that the laundry you are going to dry is suitable for drying in a tumble dryer, as shown by the care symbols on each item.
Check that all fastenings are closed and that pockets are empty. Turn the articles inside out. Place clothes loosely in the drum to make sure that they don't get tangled.
Do Not Tumble Dry:
Woollens, silk, delicate fabrics, nylon stockings, delicate embroidery, fabrics with metallic decorations, garments with PVC or leather trimmings, training shoes, bulky items such as sleeping bags, etc.

IMPORTANT: Do not dry articles which have been treated with a dry cleaning fluid or rubber brushes (danger of fire or explosion).
During the last 15 minutes the load is always tumbled in cool air.
Energy Saving
Only put into the tumble dryer laundry which has been thoroughly wrung or spin-dried. The drier the laundry the shorter the drying time thus saving electricity.
ALWAYS
- Try to dry the maximum weight of laundry, this will save time and electricity.
- Check that the filter is clean before every drying cycle.
NEVER
- Exceed the maximum weight, this will waste time and electricity.
- Put dripping wet items into the tumble dryer, this may damage the appliance.

Do not overload the drum, large items when can exceed the maximum admissible clothes (for example: sleeping bags, duvets).
| Maximum Drying Weight | ||||||
| Cottons | Max. | 10 Kg | 9 Kg | 8 Kg | 7 Kg | 6 Kg |
| Synthetics | Max. | 4 Kg | 4 Kg | 4 Kg | 3,5 Kg | 3 Kg |
Sort the Load as Follows
- By care symbols
These can be found on the collar or inside seam:

Suitable for tumble drying.

Tumble drying at high temperature.

Tumble drying at low temperature only.

Do not tumble dry.
If the item does not have a care label it must be assumed that it is not suitable for tumble drying.
- By amount and thickness
Whenever the load is bigger than the dryer capacity, separate clothes according to thickness (e.g. towels from thin underwear).
-By type of fabric
Cottons/linen: Towels, cotton jersey, bed and table linen.
Synthetics: Blouses, shirts, overalls, etc. made of polyester or polyamid, as well as for cotton/synthetic mixes.
- By drying level
Sort into: iron dry, cupboard dry, etc. For delicate articles press the Delicates button to select low drying temperature.

Do not overload the drum, large items
when wet can exceed the maximum admissible clothes load (for example: sleeping bags, duvets).
CONTROLS AND INDICATORS
Programme Display
Filter Care Indicator
Start/Pause Button
Programme Selector
Time Selection Button
Delay Start Button
Acrylic Synthetic Button
Anti-Crease Button
Control Panel and Indicator Lights
Memo Button - Allows user to record the programme by pressing simultaneously the Anti-Create and the Acrylic Synthetic buttons for 3 seconds, after 2 minutes duration of the chosen programme/option.
SELECTING THE PROGRAMME
The Candy Sensor Dry machine gives many options for drying the laundry to suit all circumstances. The table on the next page lists the programmes and the function of each programme.
Note:
The sensor may not detect a small load of small articles. For small loads and separate items or predried fabrics with low moisture content, use the timed programmes. If the sensor does not detect the item the dryer will only operate for 10 minutes before going into cooldown. If the load is too large or too wet to tumble dry the dryer will automatically go into cooldown after approximately 3 hours. In these cases we advise to use a time cycles between 30 and 75minutes depending on the load size and dryness required, and select high or low heat depending upon the fabric type.
The wool drying cycle of this machine has been approved by The Woolmark Company for the drying of machine washable wool products provided that the products are washed and dried according to the instructions on the garment label and those issues by the manufacturer of this machine. M1524.
In UK, Eire, Hong Kong and India the Woolmark trade mark is a Certification trade mark.
SELECTING THE PROGRAMME
PROGRAMME DESCRIPTION
Perfect Home
Store Dry
Hang Dry
Iron Dry
Anti Crease
Wool
Woolen clothes: the program can be used to dry up to 1kg of laundry (around 3 jumpers). It is recommended to reverse all clothes before drying. Timing can change due to dimensions and thickness of load and to spinning chosen during washing. At the end of the cycle, clothes are ready to be worn, but if they are more heavy, edges can be a bit wet: it is suggested to dry them naturally. It is recommended to unload clothes at the very end of the cycle.
Attention: felting process of wool is irreversible; please dry exclusively clothes with symbol (symbol "ok tumble"); this program is not indicated for acrylic clothes.
Mix & Dry
Shirts
Rapid 40 Min.
The Rapid 40^ programme allows a drying cycle to be completed quickly. This is an ideal programme for having dry, refreshed and ready-to-wear clothes in less than 40^ . This special programme constantly monitors the temperature in the drum. The maximum load is 2kg and the programme is suitable for all types of fabrics where tumble drying is appropriate.
Time
Memo
Memo Program allows to re-perform a program that the user has saved before, without selecting the correct sequence of program selector positions and option buttons for that particular program.
DOOR and FILTER
Pull on handle to open the door.
To restart the dryer, close the door and press Start / Pause button

WARNING! When the tumble dryer is in use, a drum and door may be VERY HOT. Never go to a tumble dryer before the end of the drying time unless all items are quickly removed and read out so that the heat is dissipated.
Filter
IMPORTANT: To maintain the efficiency of the dryer check that the fluff filter is clean before each drying cycle.
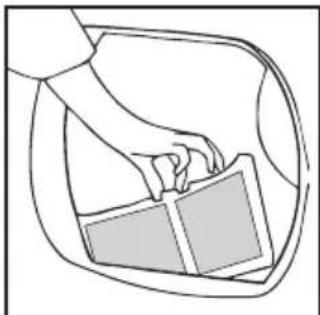
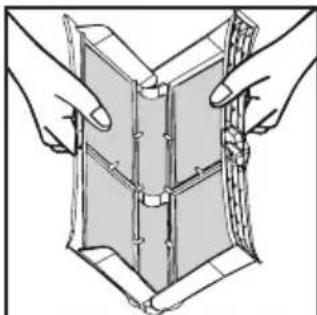
1.Pull the filter upwards.
2. Open filter as shown.
3. Gently remove lint using a soft brush or your fingertips.
4. Snap the filter together and push back into place.
Filter Care Indicator

Lights when the needs cleaning.
If the laundry is not drying check that the filter is not clogged.

DO NOT USE WATER TO CLEAN THE FILTER

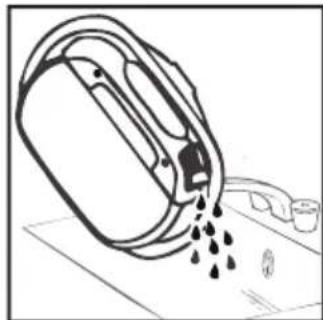
WARNING! If you open the door mid cycle, are the cool-down cycle has completed, then it may be hot. Please use extreme caution in attempting to empty the water reservoir along the cycle.
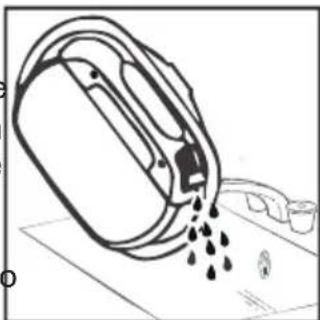
WATER CONTAINER
The water removed from the laundry during the drying cycle is collected in a container inside the door of the dryer. When the container is full the indicator on the control panel will light, and the container MUST be emptied. However, we recommend that the container is emptied after each drying cycle.
NOTE: Very little water will collect during the first few cycles of a new machine as an internal reservoir is filled first.
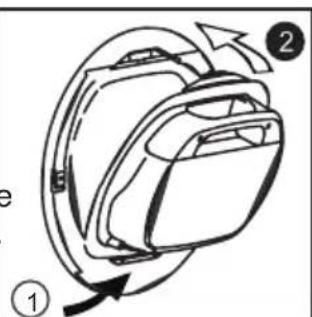
To Remove the Container
- Gently pull out the water container holding the handle.
When it is full the water container will weigh about 6kg - Tilt the water container to empty the water out through the spout.
When empty, replace the water container back as shown; first insert the base of the container into position as shown then gentle push the top into position.
3. Press Button to restart the cycle.
NOTE: If you have the option of drainage near to the dryer you can use the discharge kit to provide a permanent drainage for the water collected in the container of the dryer
This means that you don't have to empty the water container.
WARNING! If you open the door mid cycle, before the cool-down cycle has completed, the handle may be hot. Please use extreme caution when attempting to empty the water reservoir during the cycle.
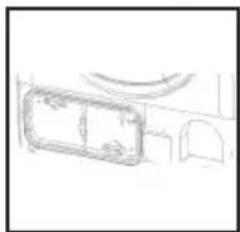
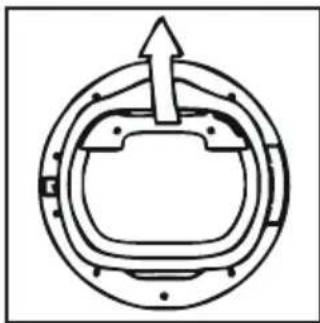
CONDenser
Important: Always switch off and remove the plug from the electricity supply before cleaning the condenser.
To maintain the efficiency of the dryer regularly check that the condenser is clean.
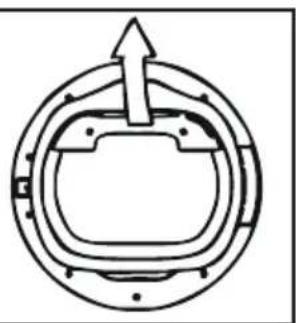
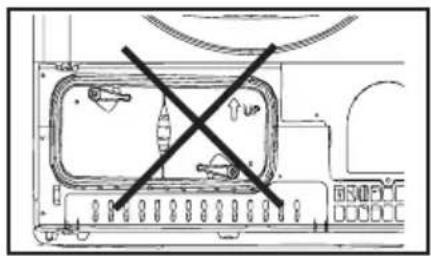
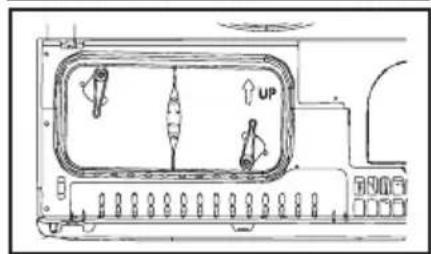
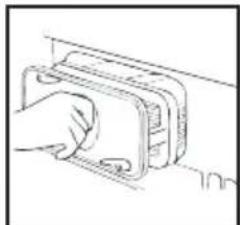
To Remove the Condenser
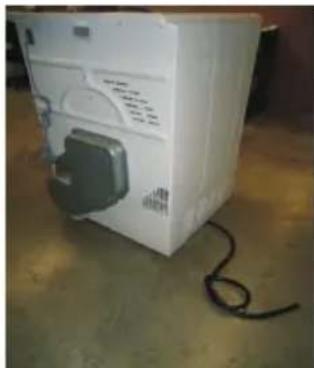
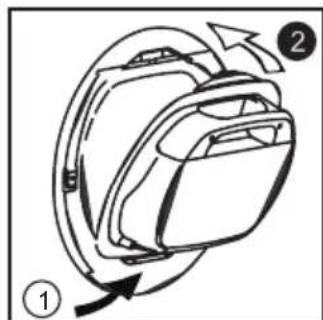
1.Remove the kickplate.
2. Turn the two locking levers anti-clockwise and pull out the condenser.
3.Pull out the condenser unit.
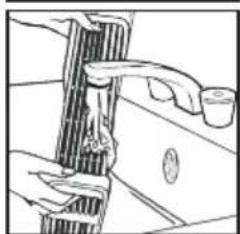
4. Gently remove any dust or fluff with a cloth, then wash the unit by holding it under a running tap turning it so that water flows between the plates, to remove any dust or fluff.
5. Check the gasket position after cleaning. Fit the gasket in to the groove if it is misaligned.
6. Refit the condenser ensuring it is in the correct way (as indicated by the arrow) and pushed firmly into place. Lock the two levers by turning them clockwise. Be sure that condenser unit fixed to the basement tightly.
7. Refit the kickplate.

OPERATION
- Open the door and load the drum with laundry. Ensure that garments do not hinder closure of the door.
- Gently close the door pushing it slowly until you hear the door 'click' shut.
- Turn the Programme Selector dial to select the required drying programme (see Programme Guide).
- If drying synthetics, acrylics or delicate items, press the button to reduce the heat level.
The indicator will light up when the machine is in low heat setting. To deselect in the first few minutes of the programme, press the button, after this time reset the machine to change the setting.
- Press the button. The dryer will start automatically and the indicator above the button will be continuously lit.
- If the door is opened during the programme to check the laundry, it is necessary to press III to recommence drying after the door has been closed.
- When the cycle is nearing completion the machine will enter the cool down phase, the clothes will be tumbled in cool air allowing the load to cool down.
- Following the completion of the cycle the drum will rotate intermittently to minimize creasing. This will continue until the machine is switched OFF or the door is opened.
Do not open the door during the automatic programs in order to obtain a proper drying.
OPERATION
Delay Start Function
The Delay Start Function allows the user to delay the start of the drying cycle by 1 to 24 hours.
When the function is first selected the display will show a delay of 1 hour, subsequent presses of the button will increase the delay with 1 hour steps.
To commence the programme press and the appliance will complete the drying cycle at the end of this time. The indicator light will flash to indicate that the start delay is in progress.
Cancelling and Resetting the Programme
To cancel a programme press the button for 3 seconds. In the TIME CONTROL display 0:00 Light will flash to indicate that it has been reset.
CLEANING AND ROUTINE MAINTENANCE
Cleaning the Dryer
- Clean the filter and empty the water container after every drying cycle.
Regularly clean the condenser.
After each period of use, wipe the inside of the drum and leave the door open for a while to allow circulation of air to dry it. - Wipe the outside of the machine and the door with a soft cloth.
DO NOT use abrasive pads or cleaning agents. - To prevent the door sticking or the build up of fluff clean the inner door and gasket with a damp cloth after every drying cycle.

be very hot.
WARNING! The Drum, door and load may

IMPORTANT Always switch off and remove
the plug from the electricity supply before cleaning this appliance.

For electrical data refer to the rating label on
the front of the dryer cabinet (with the door open).

WARNING! The Drum, door and load may
be very hot.
Drying Guide
The standard cycle HANG DRY ( ) is the most energy efficient and best suited for drying normal wet cotton laundry.
The table in last page shows the approximate times and energy consumption of the main drying programmes.
| Capacity (as energy label) | 6 kg | 7 kg | 8 kg | 9 kg / 10 kg |
| Power consumption of off-mode | 0,20 W | 0,25 W | 0,20 W | 0,15 W |
| Power consumption of on-mode | 0,75 W | 0,80 W | 0,80 W | 0,75 W |
Information for Test Laboratory
EN 61121 Programme Programme To Use
-DRY COTTON
-HANG DRY
-IRON DRY COTTON
-IRON DRY
-EASY-CARE TEXTILE
-HANG DRY + SYNTHETIC
Technical Specifications
| Drum capacity 115 | |
| Maximum load See energy label | |
| Height 85 cm | |
| Width 60 cm | |
| Depth 60 cm | |
| Energy class See energy label | |
TROUBLESHOOTING
What Might be the Cause of...
Defects you can remedy yourself
Before calling GIAS Service for technical advice please run through the following checklist. A charge will be made if the machine is found to be working or has been installed incorrectly or used incorrectly.
If the problem persists after completing the recommended checks, please call GIAS Service, they may be able to assist you over the telephone.
Time display to end could change during drying cycle. The time to end is continuously checked during the drying cycle and the time is adjusted to give the best estimation time. The displayed time may increase or decrease during the cycle and this is normal.
Drying time is too long/clothes are not dry enough...
Have you selected the correct drying time/programme?
- Were the clothes too wet? Were the clothes thoroughly wrung or spindried?
Does the filter need cleaning?
*Is the dryer overloaded?
hao that 10 antlion has an aplated from a pravino
The dryer is noisy...
- Switch off the dryer and contact GIAS Service for advice.
The Indicator is on...
- Does the filter need cleaning?
The indicator is on... - Does the water container need emptying?
CUSTOMER SERVICE
Should there still be a problem with your dryer after completing all the recommended checks, please call GIAS Service for advice.
They may be able to assist you over the telephone or arrange for a suitable appointment for an engineer to call under the terms of your guarantee. However, a charge may be made if any of the following applies to your machine:
Is found to be in working order.
- Has not been installed in accordance with the installation instructions.
Has been used incorrectly.
Spares
Always use genuine spares, available direct from GIAS Service.
GIAS Service
For service and repairs call your local GIAS
INDICE
Caa aalalalalalalalalalalalalalalalalalalalalalalal
[Durante gli ultimi 15 minuti (approximativamente)] I can also sometimes refer to this book.
Solzionare La Blancheria Nal Modo Segunt:
| Passo Massimo di Azugatori | ||||||
| Capi in ottofo | Max. | 10 Kg | 9 Kg | 8 Kg | 7 Kg | 6 Kg |
| Capi astraticl | Max. | 4 Kg | 4 Kg | 4 Kg | 3.5 Kg | 3 Kg |
O6cnyroByBaHHaKOpncTyBaayB 85
Будлackа,ознайомтеся 3Вka3aHIMN iHCTpyKcIaMn Ta cTporO cnIyTe im npn BnKOpNCtAHHI npnady.LЯбpoшура mICTNbBaxKnBi peKOMeHdaJIДЯ 6e3neuHORo BnKOpNCtAHN, yCTaHOBKN, 6cnyroByBaHHa, a TAKOK DeaKi npaKTnHi nopadi dЯ 6iNbW epeKTNBHOrO KOpNCtBuHHa npnadom.
36epiraTe ycIO DOKyMeHToIIO B HAdiHOMy Micci IaN NOaIbWoO BVKOpNCtAHn, a6o Ira NoaJIbWux BlaChNKIB daHOrO npInaMy.
Будь lacka, nepeBipTe HaЯВиICTb HacTyHnX позцi, 3a3HaueHnx HxKYe, як HаДaIOTbcR pa30M 3 npINAqOM:
- IHCtpyKci3 ekcnnyataaii
-「rapaHTiHnTaIoh
MapkyBaHH eHeproepeKTHBHOCTi
Ipekehntecb y TOMy, zo npna He 6yno nookxeho nid yac TpaHcnopTybaHH. Y Bnnapky nookxehnra,3BepHiTbcrdo cepbichoro ceHTpy (rpyna komnaii 3 06cnyroBaHHKopncTyBaivCandy). HeBnkoHaHH Bnue3raDaHx yMOB MoKe cnpuHHInrHeCnpa BHOCTi Bpo6oti npnala. Y Bnnapky HnnpabNbHorO BnKOpNCtAHn npnala, Bam Heo6xIDHO 6yde 3anNatn 3a BnKnK cepBicHOcnyk6n.
3AXOДи BE3ПЕКИ
BukopncTaHH
- Пплад доЗвягьсь викоростовыати дітам bід 8 рokіВ та пюд'm 3 0бмжehимn φi3ичимn, ceHCOPHIMn a6o po3ymOBHmN MOЖЛВОCTЯМn, a TAKOJ HeDOCBIDUchEhM KOpNTyBaYam 3a yMOBn 3di'chHeHnHaTny 3a HImn a6o NaDAHnI m NOrCHEh b IcOdo 6e3neuHOrO vNkOpNCTaHHЯ пиJaDy Ta po3ymiHnHЯ HIMn IOB'raHnx i3 цIM He6e3neK. He dоЗвягийTe dітAm rpatncs 3 пиJaDom.ДiTЯМ 3a6bOpOHЯETbCry BnKOHyBaTn ChISeHnR Ta obcIpyROvBaHnR npalbHOi MaunHn.
- YBAGA HenpaBnIbHe BnKOpNCTaHHaCyapKn dIy 6iIN3Hm MoKe npn3BeCTn Do BnHnKHeHHaNoXeKi.
- Bci πριπañn ToproBoi Mapkn Candy πριπ三等奖и Дя ВИКОПСТАнну TЛьку ДOMaшьOMy ГСпОДapCTВi.
BnKOpncTaHnY cIbOrO npJaDy 3 iHsoIO MeToO, HIX y DOMaShhOBMy roCnoapCTBi a6o no6yTi, HanpNKJa, KomepuiHe BnKOpncTaHHa ekCneptAmn a6o CneuaIbHo HaBueHmN KopNCtUBaayamn, 3abopOHaETbcra.
BnKOpNCTaHnI npUaHy He 3a BnIeONIcaHm npu3HaueHnM MoKe 3MeHsHTn CToPc Knyx6b npUaHy Ta CToTn npuynHOo anyIIOBaHHraPaHTII BnpO6HnKa.
Будь-які пошкоДжениnpиладу abo inші пошкоДженинHaHeceHnny shkoДи npиладу chepe3 ВИКОрпстаннг He y ДOMOROCПОДapCTBi a60 no6yTi (habTb,Якso npилад BCTaHOBJIeHo y DOMOROCПОДapCTBi) He npиMaIOTbCSВИРбИКOM y BCIX BCTaHOBJIeHnx 3aKOHOM BInpaIakx.
-Дани ппад ппзачен Tыкдя DOMaHb OTo BnKOpncTaHHa,TO6TO ДЯ cyшинь DOMaHbOTo TEkCTnIIO Ta Odary.
- Дану понен ВИКОПСТОВВATиСЯ Лш经 «цiley, 3a3haueHx B iHCTpyKuzi》.перд ВИКОПСТАнгМ пиладу, pepekoHaIteCb, lo Bci Bka3iBkn lodo yctahOBKn Ta BИKOPCSTAHNЯ пиладу NOBHCtIO 3po3ymili.
He TopkaTeC8do npnady, kso BaWi dOnoHi a6o cTynHi BOnori a60 Mokpi.
He cnnpaTecnHaDbepi, npn 3aBaHTaxeHHi npuady, ta He BnKOpncToByTe Dbepi Dnra TORo, 06 nIDHrAn a6o nepemictn npua.
He do3BOJnTe dITaTnC 3 npuaDom a6o 3 noro cncTeMoO ynpabnHH.
- YBAGA He BnKOpNCTOByIe npnaI, y BnPaIky, KOnn φiNbTp nIpy 3HaXoIITbcra B HeHaJIexHOMy nOIOJKeHHi a60 noIkoI
- YBAGAЯкшоHa pObochii nobepxHi 3O6paXeHcNMBoJ ,ce O3Naue, Ⅲ,Te mnepepatypa nId yac po60n cywapkn iDnUyETbcra Ta moKe nepeBnUyBaTn 60 rpaYcIB Lelbcia. BntrHITb Bnky 3 DxepeJa cTpyM. 3aBXdn BnTayIte BnKy nepei ouHsEHNm npnaNy. Jkso npnilad HeCnpabHni, He BnKOpncTOByte NOro Haani.
Bopc, nyx Ta nn He noBHHi 36npaTncs HABKOIO 3OBHIshHbOi cSTOPHN npnady.
Bapa6aH BCEpeHi MoKe CNbHO HarpiBaTncr. Npeed Tm k BntraTn 6iIn3Hy, 3aBXdN nepeKohyTeCb, 0o BiH NobHicTHO OxOnoJKeHn.
3aKIIouHa yactnHa cIKny cyiHnI npoxoNTb 6e3 BnKOpNCTaHHa Tepna (zIKI OXOJODKeHH), IJIr TORO 06 He NOWKOHTN BOJOKHa TKAHH.
3aboponeho BnKOpncTOByBaTu cyuInbHy MaunHy, kUO dJyHnueHHaBn3Hb yIoo BnKOpncTaHO npomncNoBi ximikatn.
Y YBAGA: Hikon He 3ynnHnTe cyuInbHy MaunHy Do 3aKinHeHHa cnKny cyuHn, xi6a 0 Bu Wn BnDko DicTaHnTe Ta po3BicnTe 6iinn3Hy, o6 TeNllo po3ciIIOsc.
MaKcImaJIbHe 3aBaHTaXeHHaДИВ.eHepreTnUHy etNKeTKy..
yctahobka
He BnKOpncToBvIte aIaITePn, 6araTopa3OBi 3'eDHyBaui, Ta/a6o IIOOBxuBaui.
-
Hikon He BCTaHOBIOHTe cyuapky 6n3bKO Do 3aHaBicOK, Ta nepekoHaIteCb, 1o peyi He naiaOTb 3a cyuapky Ta He HaKoJIyOTbcr TaM.
-
Прилад He NOВинен 6уTN BCTaHOBJIeHIM 3a DBepnMa, 70 3amNKaOTbCS, 3a PO3CyBnIMn DBepnMa a6o DBepnMa, 3 peTЯМn Ha npOTnJIeXHi CTOpOHi Do cyuapKn.
He cywiB C syapci HeBnnpaH peyi.
- YBAGA He cywiTb TkaHHn, o6po6JIeHi MInOuHm 3aC06om Ha 6e3BOJHi OCHOBI.
- YBAGA Nopincti rymobi matepiann, 3a DejKx o6ctabHn, npn Harpibahhi MOxytb 3aropitncs yJXOM cmo3aImaHH. Peyi, Bnpo6IeHi 3 nopncToi rym (naTeKcHa niHa), wanouchn dnyu, BOHOHePOnHKHI TKAHNH, Bnpo6n Ha pe3INHOBI oCHOBI ta OJr a6o NODyUKN 3 nopncTO-rymoBOIO npoklaadkoH, HE MOXHA cyuHTN B cyuapzi.
-3aBxДn 3BepTaIe yBaIy Ha eTnKeTKn Ha 6iIn3Hi ДЯ Bka3iBOK IcOdo cyuHn.
-Перед 3аВаHTажehнямdo cyшаркn,Одяг NOВиен 6уТи BИСушeнmВ npaJIbHiMaшиNi y BiДnobiДнOMy peЖиMi a6o BИчавлeну pyKaMuN. He peKOMeHdUcTbcSra 3aВaHTaЖуВaTn do cyшapkn MOKpni OdЯr.
- KapmaHn NOBHHi 6yTu NpeBipeni Ha HaeBHicTb B Hnx 3aNaJbHnUOK Ta cipHnKiB, Ta HIKOJIH He BnKOpncToByte JERko3aMnCTi PiDnHn 6iJa npNJadv.
·HIKOJIH He 3aBaHTaJyIte Do npuJaDy 3aHaBicKn i3 cKNoBOJOKHa. B3aEmoJia IHsOro OJary 3 CKNoBOJOKHom MoKe CnpuHHTn IOdpa3HeHHa ShKipN.
BnBeHnBocKy,pei nepeCyuHnM B cyuapci NOBHHI 6yTIN Bnpani B rapuii Boi3 BeNkoIO KjIbKICTU MIOUOro 3aco6v.
- KoHdNzioHepn (nom'kUyBaui) IJRA 6IIN3HN, a6o cxOxj 3ac06n, cIiD BVKOpNCTOBvBaTn 3rIDHO 3 Bka3IBKamN IODO IXHbOrO BVKOpNCtAHHJ.
- KimhaT, B kii BCTaHOBNeHcUapKy, NOBnHa MaTn HadiHy BeHTnIaIHy CnCTeMy, Ka 3a6e3neuNTb 3anO6irAHNr NoBn Ra3iB, IIO BTaIgYcB B KIMHaTy, BiD npInaID, IIO BnKOpNCTOByOTb IHsi BnIN NaINBa, BKIIouaIOUc N BiDKpITN BOHOh
- BntjxHe nobitpy He noBHHo BiIDBOINTnC8 Do dIMOXOy, kN BnKOpNCTOByeTbC8 DnB BiDBeDeHn8 DNMy BiD npuIaIb, 0o BnKOpNCTOByOTb ra3 a6o iHsi BnI naiBa.
- Perugia npo nepebiprte, 06 cnpkyjnzio nobitprB cyupci He maanepeokod.
-Пись ВИКОРИСТАНHAприладу,перевягte Фільър пилу Та чистсь. нору у разi Heo6xIDHOCtI.
BxiD Ta Bxid NOBITpI NOBHHI 3diHcHOBaTnC8 6e3 nepeWkoJ. DJIa3a6e3neueHnraPHOI BeHTnlaqii, npocTip MIX HxKHBOu qAcTHNOHpUpaNy Ta NiIIOrOHe NOBHeH 6yTu 3akpntm. Mix npuaDom Ta 6yd-b-koIO nepeWKoDOIO NOBHHO 6yTu 50HaMeHwe 12 MM.
3anobiraTe naHnTo haKoNueHHo peey 3a cyuapko, ockIbKn Ce MoKe cnpuHNHTn nepeWKOJxAHNraC npKyJyIi NOBITpR.
HIKOJIH He BCTaHOBNIoTe cyuapky 6iJa 3aHaBicok.
He BcTaHOBJIOnTe npnlaB B npmiiUeHHI 3 Hn3bKOIO TemnepaTyPO, a6o B npmiiUeHHI de e pN3NK 3aMeP3aHH. Pn TEmnpaTyPi 6bn3bKi Ido ToCKN 3aMeP3aHH, npnlaD He MoKe npauBOBatn npabINbHO, Ta E pN3NK NOxKOJKeHH, kso BOda 3aMeP3He B rIdpABNIiHi cInCTem BiPo6y. INa BnCOKoi npOdyKTHBHOCTI npnAHy, HABKOJIuHr TemnepaTypa, NobHHa 6ytN B MeXax Bi+2°C Do +35°C. Bydb NaCKa, 3BepHtYbary, So npu pOboTiB XONODHomy npmiiUeHI, 3 TemnepaTyPO BI+2 Do +15° C, MoKe yTBOpOBaTncb KOHNecAT Ta KpanPi BoND Ha NiIDNo3i
3AXODN BE3NEKNI
- Yci BnKOpncTahi nakyBaIbHi MaTepiAne ekOnorIyHo 6e3neuHmTa NiIaIraToB NOBTOPHOMy BnKOpncTahHIO. Byb IacKa, DOnOMoxItb No36yTuNcY yNaKOBKn WJnxom BnKOpncTAHHRe KOnorIyHO 6e3neuHnx MeToDIB. BiNobiHm OprAh y BaWOMy Micti 3MoXe Haatn Bam iHOpMaUIO npo DoCTynHi MeToDnyTnJIi3aui.
-Дя 6e3neuhoi yTuNi3aui cywapKn, BiD'edHaIte Bnky BiD po3eKn, BiDpiXTe Ka6enb XNBneHnTa yTuNi3yIne NOro pa3om 3 BuNkoHO.ДЯ 3anobirAHn CnTyaui, KOnN DiTn MoKyTB 3akpTN Ce6e B npnadi, 3HIMtB DBePHi Netni a60 3amKn.
Cbponecbla DnpekTnBa 2012/19/EC
Ue npnna n03haueho 3riHNO 3
DnpeKTHBOHO CBponeiCbKoro CoO3y
2012/19/EU 0do BixoDiB
eNeKtpnHOro Ta eNeKtpoHHoro
0bnHaHHa (BEEO).
BEEOMictaTb k 3abpydHIOUoyi peoOBHH (Aki MOxytb cnpuHNrN HeratNBH i HacnIDKn DnA DOBkllna), TAK i OCHOBHI elemehn (Aki MoXHa BnKOpNCTOByBaTH NOBtOHO).IJa HaleXHoro BnDaJIeHH Bcix 3abpydHIOUoxpeoOBHH i 3bnpaHH Ta yTNI3auii Bcix MATEpiaJIB BaxnBO, a6n NOBdoJHenn 3 BEEO BiD6yBaJoc3 DoTpMaHHm CneuaJIbHnx npouedyp.
Pomajn MoKyb BiirpaBAtn BaxnBy poIy 3anobiraHHi BNHKHeHHIO 3arpo3n DOBkiJIIO BiD BEEO; nra yx BaxnBO DoTPmYBaTnCn OCHOBHX npaBnI:
He MoXHa NOBOdntuc3 BEEO, 3i 3BnuaHUMN DOMaUHMN BiDxOdaMn;
-BEEO cnid 3daBAtn Do BiIDNOiDnHnx NyKtIB 3bnpaHH,oprAHI3OBaHHx MicceBmMoprAHaMn BnaI a6o Bnpo6nKaMn Y npOaBcMn Takoro 0bnadHaHH. Y 6araTbox KpaIHax BEEO BeNkNx po3MpipB MoKe 3bnpaTncr y Micqx npoxnBaHHc CnoXuBaiv.
Y 6araTbox KpaiaHax npn NOKyni HOBOr npnlaDy npoDaBIO MoXHa NOBepHyTN CTapn NpnilaD, kKm ToM Mae 3a6patn 6e3 DoaTKOBoI PNaT, kKIO CTape 0bnaHaHH e EKBiBaIeHTHO TIny Ta Mae Taki cami fynkui, kI HOBe 0bnadHaHH.
Cepbichn zentp
-Дязабe3neueHЯндиHoI Ta epeKTHBHOi p6oTn npnnaMy peKOMeHdyEmo 3BepTaTncn no Donomory abo lodo peMOHTy npnady nIwe do ynoBHobaxeHoro MaNCTpa BiIDNOBIDHoro cepBicHoro ueHTpy.
! 阿KIO npnlaH He npaHc HaleXHM YHOM, a6o nonamABcB, BmKHITb NOro Ta BiD'EDHaTe BnKy Bd po3eKn. 3BepHiTbcr Do cepBicHorO ceHTpy zoDo MOxNIBORo peMOHTy
BmOrn do eJeKToxKnBneHn
Cywapka npaue npn Hanpy3i 220-240B 50r odnofoa3HOI Mepeki. IpekoHaTeCb, 0o 6Jok XNBHeHHcTahOBHTb OOnaHMeHwe 10A.
EneKtpoeHepri MoKe cTaHOBHTn Ha3BnuaHy 3arpo3y.
DAnH npnlaI IOBHeH 6yTH 3a3EmneHM.
Po3eTka Ta BnIka Ha npIaDi NOBHHi 6yTN OndHoroTnny.
He BnKOpncToByte TpiHnKn Ta/a6o noDobKyBaui.
PpHnad NOBHeH 6yTH BCTaHOBHeH N TaKHM HOM, 6yna MoXnHBicTB BHTAHT Bnky 3 po3eKn NiCnBA NKOpNCtAHN npHaNy.
DpoTn B uHpyi XNBHeHH MaHOt b p3Hi KOJIbOpN BiINOBIDHO Do HAcTyNHx HanaWtYBaHb:
BlaaknTHm
BctaHOBiBt bIJIaHR HAcTynHm YHOM
- P03BepHITb cyuINbHy MaunHy 3aHbOIO nAHeNeIO Do ce6e.
- Tpy6a dna ctoky BODn 3haxoDntbcra Ha npabin ctopoHimaiHHN (INB. fOTO). Cipn nn Hn iiknouaetbca Do nepexidnka Ha nibin ctopoHimaHHn. BnkopncTobyu npnackory6ci, 3himt b 3 aTncka 3 nepexidnka.
- BiTyrHITb 7nHaR BID nepexiDnka.
- PpNkpiniTb YOpHn ⅢaHr 3 KOMnneKtY, (3 BnKOpNCtaHHa M po3'Emy i Tpy6hNx XOMyTiB, 10 BxOJaTb B KOMnNEKT NOCTaBKn).


- Nomicitb kpaH (Noctabnaetbcra B KOMnneKTi).
- Npeed BCTaHOBHeHnM cyuNbHOI MaunHn Ha Micue ekcnnyata u i, BiDperyIOHTe HIXKN TAK 06 He nepenHaBCN HOBNI JnAHR niCJRA BCTaHOBHeHHcUAPKnB Notpi6He Micue.
7.Пдкючы HOBN 3ивншангdo Tpy6o npOBOy.
8.Пдключы cywnbHy MaunHy do eNeKtpomepexi.
ПИДГOTOBКА ДО 3ABAHTAXKEHHЯ
INPNUHNEHHIΦINbTPAHE BNIKOPNCTOByTE BODY.
EMHICTbДЯ BODN
Boda, 60 BndaTbC3 6IIN3Hn nIac npoccy cyiHH, 3bnpaTbC8 B emHicTB BCEpHi DBepuT cyuapKn. Pn 3anOBHeHHi EMHocTi Ha naHeli ynpabInHH 3acBtntbc8 iHdkatop , i Body 3 KOHTeHepa HEOxIDHO BNNTu. Tm He MeHs, MPeKoMeHdyEmo BnHBaTu Body 3 KOHTeHepa nicra KOKHO rukny cyiHH.
PIMITKA: npotarom nepux Dekeibkox uknib BnKOpNCTaHHa HOBoI MaunHn B EMHOcti 6yde Ha6npatncb dyke mano Bodn, ocknbKn B nepuy Yepry 3anOBHIOCTbcra BHyTpiuHi pe3epByap.
Uo6 dictatn emhictb
- Akypatno BntarHitb NOTOK, NOKN BIn He 3Himetbcn NOBHCIO. TpmaTe NotoK oboma pykam. KOnn BIHNOBHN,EMHICTb DnBn6yde BaxNTn 6n3bKO 4Kr.
- Haxunitb emhictb DnBODN, 0o6 3nTn Body yepe3 3aHin OTBip.
PnabHO 3acyHbTe npOxHIO eMHicTb DnB OAnHa3aHaMicue.
3AΦIKCYI TE I OJIOXEHHY E MHOCTI, HATNUCHYBUN HA HEI.
1PIMITKA:KuOyBacEMOXNBIcTB niknueHHKaHani3auiI Do cywapKn, Bm MOKeTe BnKOpNCTOByBatn 3nHBn KOMnKeT, knn 3a6e3neye NoCTiHn 3nB BoDn, 0o 3bnpaetbcrywapkoTo. TOni BiDnaDe Heo6xHicTh OUnsATN NotOK 3 BDOIO BpyHy. Bc iHΦopMaia, 0o CTocyETbcr cKnadHn KOMnNEkTy, MICTHTbcr y BiINOBiDHomY KOHBeptTi.
KOHДЕHCATOP
Baxnbo:pepeuueHHKoHcHcTopa 3aBXn BmkaTe cyapky 3 MepeKi eNkTPOXNBHeHH Ta BmMaTe wTenCeIbHy BNKy 3 pO3eTK.
Дя пдтуmaнг eфektubhoi po6otn cywapkn perynarpho nepebiprayte, n He 3a6pydneHn komnpecop.
UCYHEHHH HECPABHOCTEN
PpnuHn HeCnpaBHOtei
Hecnpabhocti, kIMoKHa ycyHytn camOCTiHo
Ipeed TmJ K 3BepHyTncJdo CnyXbO 6cnyroByBaHHcnoXnBaiv 3a TexHIO KOHCyNbTaicu, 6yd Jnacka, CKopNCtaIteC HabeHnM HxKHe nepenikom HecnpabHocTei, kI MoXHa YcyHyTn CamoCTiHNo. KaOp npN 3BepHeHHI Do CnyXbO 6cnyroByBaHHcnoXnBaiv 6yde BnABneHo, 0o MaunHa npaue HopMaJIbHo, a6o npaucOBana HnpabInbHo Yepe3 II HenpabInbHe BCTAHOBHeHHY BnKOpNCtAHH, KopNCTyBaUy DOBeTeBCa CnNaTNT3a HaDaHI NocLytn.
KIO nicn npoBeHnpeKomeHdoBaHnx nepeBipok HecnpabHicb ycHyTN He Bdaetbcra, Telefohynte do cny6n 06cnyrobyBaHH nOxNBaiv3a KOHCyIbTauiio.
Yac, 3aHnwaTbc8 Do 3aBepweHH np60t, MoXe 3MinHOBATnc npotraom uKny cyuHH. Cen Yac noctiHo nepeBiprc7bc npotraom uKny cyuHH dNr OTPMaHH naKpaOoi ouHKn yacy. Yac, kNBIdo6paxactbc8 Ha dinCnnei, MoXe 3MeHswBaTnc a6o 36IbWyBatnc npotraom uKny, ce c HopMaJIbHNM.
Yac cyuHHaHTo DOBrn / 6iH3Ha He c DOCTaTHbO CyXoH...
- Yu npabunbHo Bn6paHo Yac/nporpamy dny cyuHH?
-Чи 6уна 6ииз ha 3aHaДTO BONOrO? Ch 6уно II HanexKHO BiJxato B npalbHi MaunHia a6o BpyHy? - Yu notpe6ye φínbtp ouhiéHHa?
-Чи не посяваразке на сушарka?
-Чусын Вибрано onцio 20 i3 nonepeHboro uNKny?
Cyuapka He npaioe...
- Yn noaetbcra eNeKtpnuHa Hanpyra Ha cywapky? IpepeipTe ue 3a DonomoroHInworo npnay, HapnknaD, HactinbHOJnAMn.
- Yn npabnIbHo NiKlNoeHo wTeNceIb do po3eKn eNeKtpuHoiMepexi?
- Yu Henpyra BeneKtpomepexi?
- Yu He 3ropiB 3an06ixHnK?
- YN NOBHCIO 3aunHeNO DBepTa?
-ЧИ BBIMKHeHO cyuapky -як 3a ДОПOMOrOВ ВIMnKaчжИБлЕнгЯ,Тak i ВIMnKaчHa npalbHi MaunHi? - 6yIbBv6paHoc a6o nporpamc yuHH?
- 6yno MaunHy 3HOBy BBIMKHeHo nicna BiKpTTA DBePrt?
MaHbBnBnIacBaPo6Omy CtaHi;
MaunHy BCTaHOBneHo He npabnIbHo 6e3 ypaxyBaHH BIDNOBIDHX yka3iBOK;
MaunHa BnKOpncTOByBaJnac HnnpaBnIbHo.
3anachi yactnHH
3aBxDn BnKOpNCTOByTe NlWe opnIHbHi 3anachi YactHHi, OTPMaHI 6e3nocepEnhBo Bi d Cnyk6n 06cnyroByBaHHcNoKBaivB.
Cny6a 06cnyroByBaHHcnoXnBauiB
3 nntaHb 06cnyroByBaHHra Ta peMOHTy 3BeptaIteCra Do CBOeMicueBoi Cnyx6n 06cnyroByBaHHra CnoXnBaivB.
Bnpo6HnK He Hece BiDnOBiDaIbHocTi y 3B'ra3ky 3 MoXJIHBmN DpykapcbKmN NOMIKAMN B cIbOMy 6yKnTei. Bnpo6HnK 3aIIHa CBOcI npOyKciI 6e3 3MiHN II OCHOBHX XapaKTepncTnK.
INDEKSI
This appliance is marked according to the European directive 2012/19/EU on Waste Electrical and Electronic Equipment (WEEE).
WEEE contains both polluting substances (which can cause negative consequences for the environment) and basic components (which can be re-used). It is important to have WEEE subjected to specific treatments, in order to remove and dispose properly all pollutants, and recover and recycle all materials.
Individuals can play an important role in ensuring that WEEE does not become an environmental issue; it is essential to follow some basic rules:
-
WEEE should not be treated as household waste.
-
WEEE should be handed over to the relevant collection points managed by the municipality or by registered companies. In many countries, for large WEEE, home collection could be present.
In many countries, when you buy a new appliance, the old one may be returned to the retailer who has to collect it free of charge on a one-to-one basis, as long as the equipment is of equivalent type and has the same functions as the supplied equipment.
GIAS Service
To ensure the continued safe and efficient operation of this appliance we recommend that any servicing or repairs are only carried out by an authorised GIAS service engineer.
Elektriske Krav
WARNING! When the tumble dryer is in use, a drum and door may be VERY HOT. Never go to a tumble dryer before the end of the drying time unless all items are quickly removed and read out so that the heat is dissipated.
Filter
VIGTIGT: For at bevare tørretumblerens effektivitet skal det kontrolleres, at fnugfiltret er rent for hver tørrecyklus.
-
Traek filret opad.
-
Abn filtrret som vist.
-
Fjern forsigt
bomuldsfibrene meden blod borste eller
fingerspidserne.
| Capacitance (mA) (volts) | 8 kg | 7 kg | 8 kg | 8 kg (10A) |
| Power consumption of the case | 1225W | 1.25W | 0.20W | 0.15W |
| Power consumption of the case | 1275W | 1.80W | 0.80W | 0.75W |
Oplysninger til Testlaboratorium
EN 61121 Program Program till at home
FEJLFINDING
Sikkerhetspaminnelser 115
Avlpsslange:Monteringsveiledning 120
Gjoreklarttoyet 121
Kontrollpanel og indicatorlamper 122
Velge program 123
Dor og filter 124
Kondensatoren 125
Drift 126
SIKKERHETSPAMINNELSER
Bruk
EN 61121 Program Program For a bike
FEILSØKING
EN 61121 Program Program at anvanda
FELSÖKNING
EepapooTe Tov oWlnva ouupwva tis odnyies:
Now try to obtain the answer by using the following method.
- △aβαατινροακτίασιντο τοραν γεγαρβαδοδηγαλν.
Apapant oka ta ebn mou dov avonuaa t jao aorumava.
KoMTTOE TO EWTPOI TO TUMAVU KAI TYMOTPA
mu pO ToA VAMOTAVKUTTE TUGVAKOVTHOU
TUMAPU VA KAFAT OTN TAPOPA.
Ppoetoiqaia twpouxw
BepaWBeTe on ta pouxa Tou npoknai va atywaeTt cvi katoA yia atnyuwa a Tpei paoikotayywnipio. atwo auto umoekvxtar oto aoujba apovriagac Kbe6 5oc. EExTe on dka ra kauimia vai kauumwueva Kaoi rotme cwi adies. Tupiar ta pouya to jda eW. Tomoeirare ta pouya atro tufnaovxupicva Ta mtdc, ya va unmupeurou.
Mn OTEYWUVETE OTO OTEYWHTIPO:
palaiva, peraefura, euaiaotra upaayata, valav kaiarz, euaiaotra gavirek, upaayata ueta aekic biakaoyntc, evuayata uie biakaoyminka ato PVC nepua, nanoura yuvvattn, oynan agnamusunovakouk.
Egoikovopon evpycias
TanoBencir a t mpiatpapko atyuvmppo maovuayou mou yauv atupre kala me to xepn atn auynnpo. Oao mo atnyd evai ra pouya, rado upepatpc ovai a xpvos atnyvuaorcs kai trr ecaokovjutnAnkprkivvzycia.
NANTA
| Baujouane | Méty | 10 Kg | 9 Kg | 8 Kg | 7 Kg | 6 Kg |
| Zuoritmo | Méty | 4 Kg | 4 Kg | 4 Kg | 3.5 Kg | 3 Kg |
TaivopnoTe to poptio wS ehs
Kardaojulalapovr8a
Auro ytopeire va to Bpite oto kaloapoi e cawtepkip pap):

KarAnko yia otynu aotn ppoqk otnyvam po.

Etynwua at reepopokk atynwnpio at npnkepckpaia.

Tnyuoyo or ppoqko atynwto yor o yunhepxopda.

Mny to orcyvovte ae nepiotpogko orryvuaio.
Av eva doc \& cv tya mtta apovntboc, mptna va 8awpnd on dcv chai katalno yia mcrtoppeko otynua.
Kardmoaormaaiaayos
OTo a qopio ovai yucuIepo amo mduvauikmra tou ateywntpo. uapic ta poqa anya ma to mao (mX, mTeic cmo Actnacawpaa).
Kata turoupoog
BaoBaxpo/ Aucu: nntotoc, aaiokpaa 1
Zuvetika: Mmokc, mokauo, apuuc knt. at o mukatopn n mukupio, kooa ka pktcs hlaqba/avtnetk.
·
IIaepopoeic yia EpyaoTnpiakec MTePnoeic
Ipoypαμα EN61121