AVENT SCD223 - Breast pump PHILIPS - Free user manual and instructions
Find the device manual for free AVENT SCD223 PHILIPS in PDF.
Frequently Asked Questions - AVENT SCD223 PHILIPS
User questions about AVENT SCD223 PHILIPS
0 question about this device. Answer the ones you know or ask your own.
Ask a new question about this device
Download the instructions for your Breast pump in PDF format for free! Find your manual AVENT SCD223 - PHILIPS and take your electronic device back in hand. On this page are published all the documents necessary for the use of your device. AVENT SCD223 by PHILIPS.
USER MANUAL AVENT SCD223 PHILIPS
natural_image
Product photo of a Philips AVENT air pump with two models and a digital display unit (no visible text or symbols on the devices themselves)

natural_image
Illustration of an open book with a grid layout and a curved arrow pointing to the right page (no text or symbols)Fig. A

text_image
Exploded diagram of a hair dryer with numbered parts and brand label 'PHILIPS'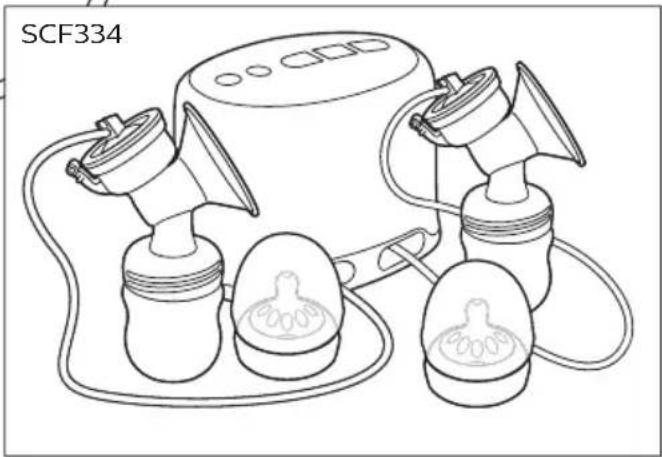
natural_image
Line drawing of a SCF334 medical device with two pump units and three internal components (no text or symbols)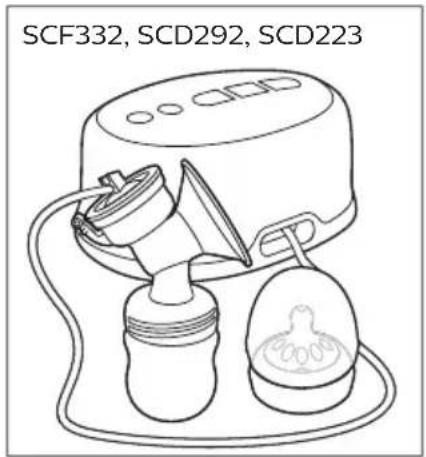
text_image
SCF332, SCD292, SCD223

English 6
Español 43
Français (Canada) 82
6 English
Contents
Introduction 7
Instructional symbols 7
General description (Fig. A) 8
Intended use 9
Important safety information 9
Contraindications 9
Warning! 9
Caution 10
Preparing for use 11
Cleaning 11
Disinfection (optional) 12
Find the best cushion for you 12
Assembling the breast pump 14
Using the breast pump 16
When to express milk 16
Tips 17
Operating the breast pump 17
Storing breast milk 20
Compatibility 20
Feeding 20
For your child's safety and health 21
WARNING! 21
Caution 21
Additional information 23
Accessories 24
Manual breast pump converter 24
Storage cups 27
Additional items 30
Breast milk bag 30
Replacement 33
Batteries 33
Ordering accessories 33
Disposal 34
Removing the batteries 34
Full two year warranty 34
Troubleshooting 35
Supplemental information 36
Technical information 37
EMC information 37
Usage and storage conditions 40
Technical specifications 41
Explanation of symbols 42
Introduction
Congratulations on your purchase and welcome to Philips Avent! To fully benefit from the support that Philips Avent offers, register your product at www.philips.com/welcome.
The Philips Avent breast pump has a special design that enables you to sit in a more comfortable position while expressing. The soft massage cushion* is designed to feel soft and warm and to mimic your baby's suckling action to provide milk flow – comfortably and gently. The power cushion is designed for stronger suction**. The breast pump starts in a gentle mode that helps to stimulate your milk flow. You can then choose from three suction modes, according to your own personal comfort.
The pump is easy to assemble and operate and all parts that come into contact with breast milk are dishwasher-safe.
Healthcare professionals say that breast milk is the best nutrition for babies during the first year, combined with solid food after the first 6 months. Your breast milk is specially adapted to your baby's needs and help protect your baby against infection and allergies. A breast pump can help you to breastfeed longer. You can express and store your milk so that your baby can still enjoy the benefits of it, even if you cannot be there to provide it yourself. As the pump is compact, quiet and discreet to use, you can take it with you anywhere, allowing you to express milk at your own convenience and maintain your milk supply.
This breast pump is for household use only.
*The cushions included with this pump were designed to comfortably fit the majority of mothers. However, if you need it, you can buy a smaller size cushion separately.
**The power cushion is not included in SCF334/25 and SCD223/10.
Instructional symbols
The following instructional symbols are used in this user manual:

Contraindication A condition that could cause injury to yourself.

Warning A situation that could cause injury to yourself or others.

Caution A situation that could cause damage to your appliance or other equipment.

Note Usage tips, additional information or a note.
8 English
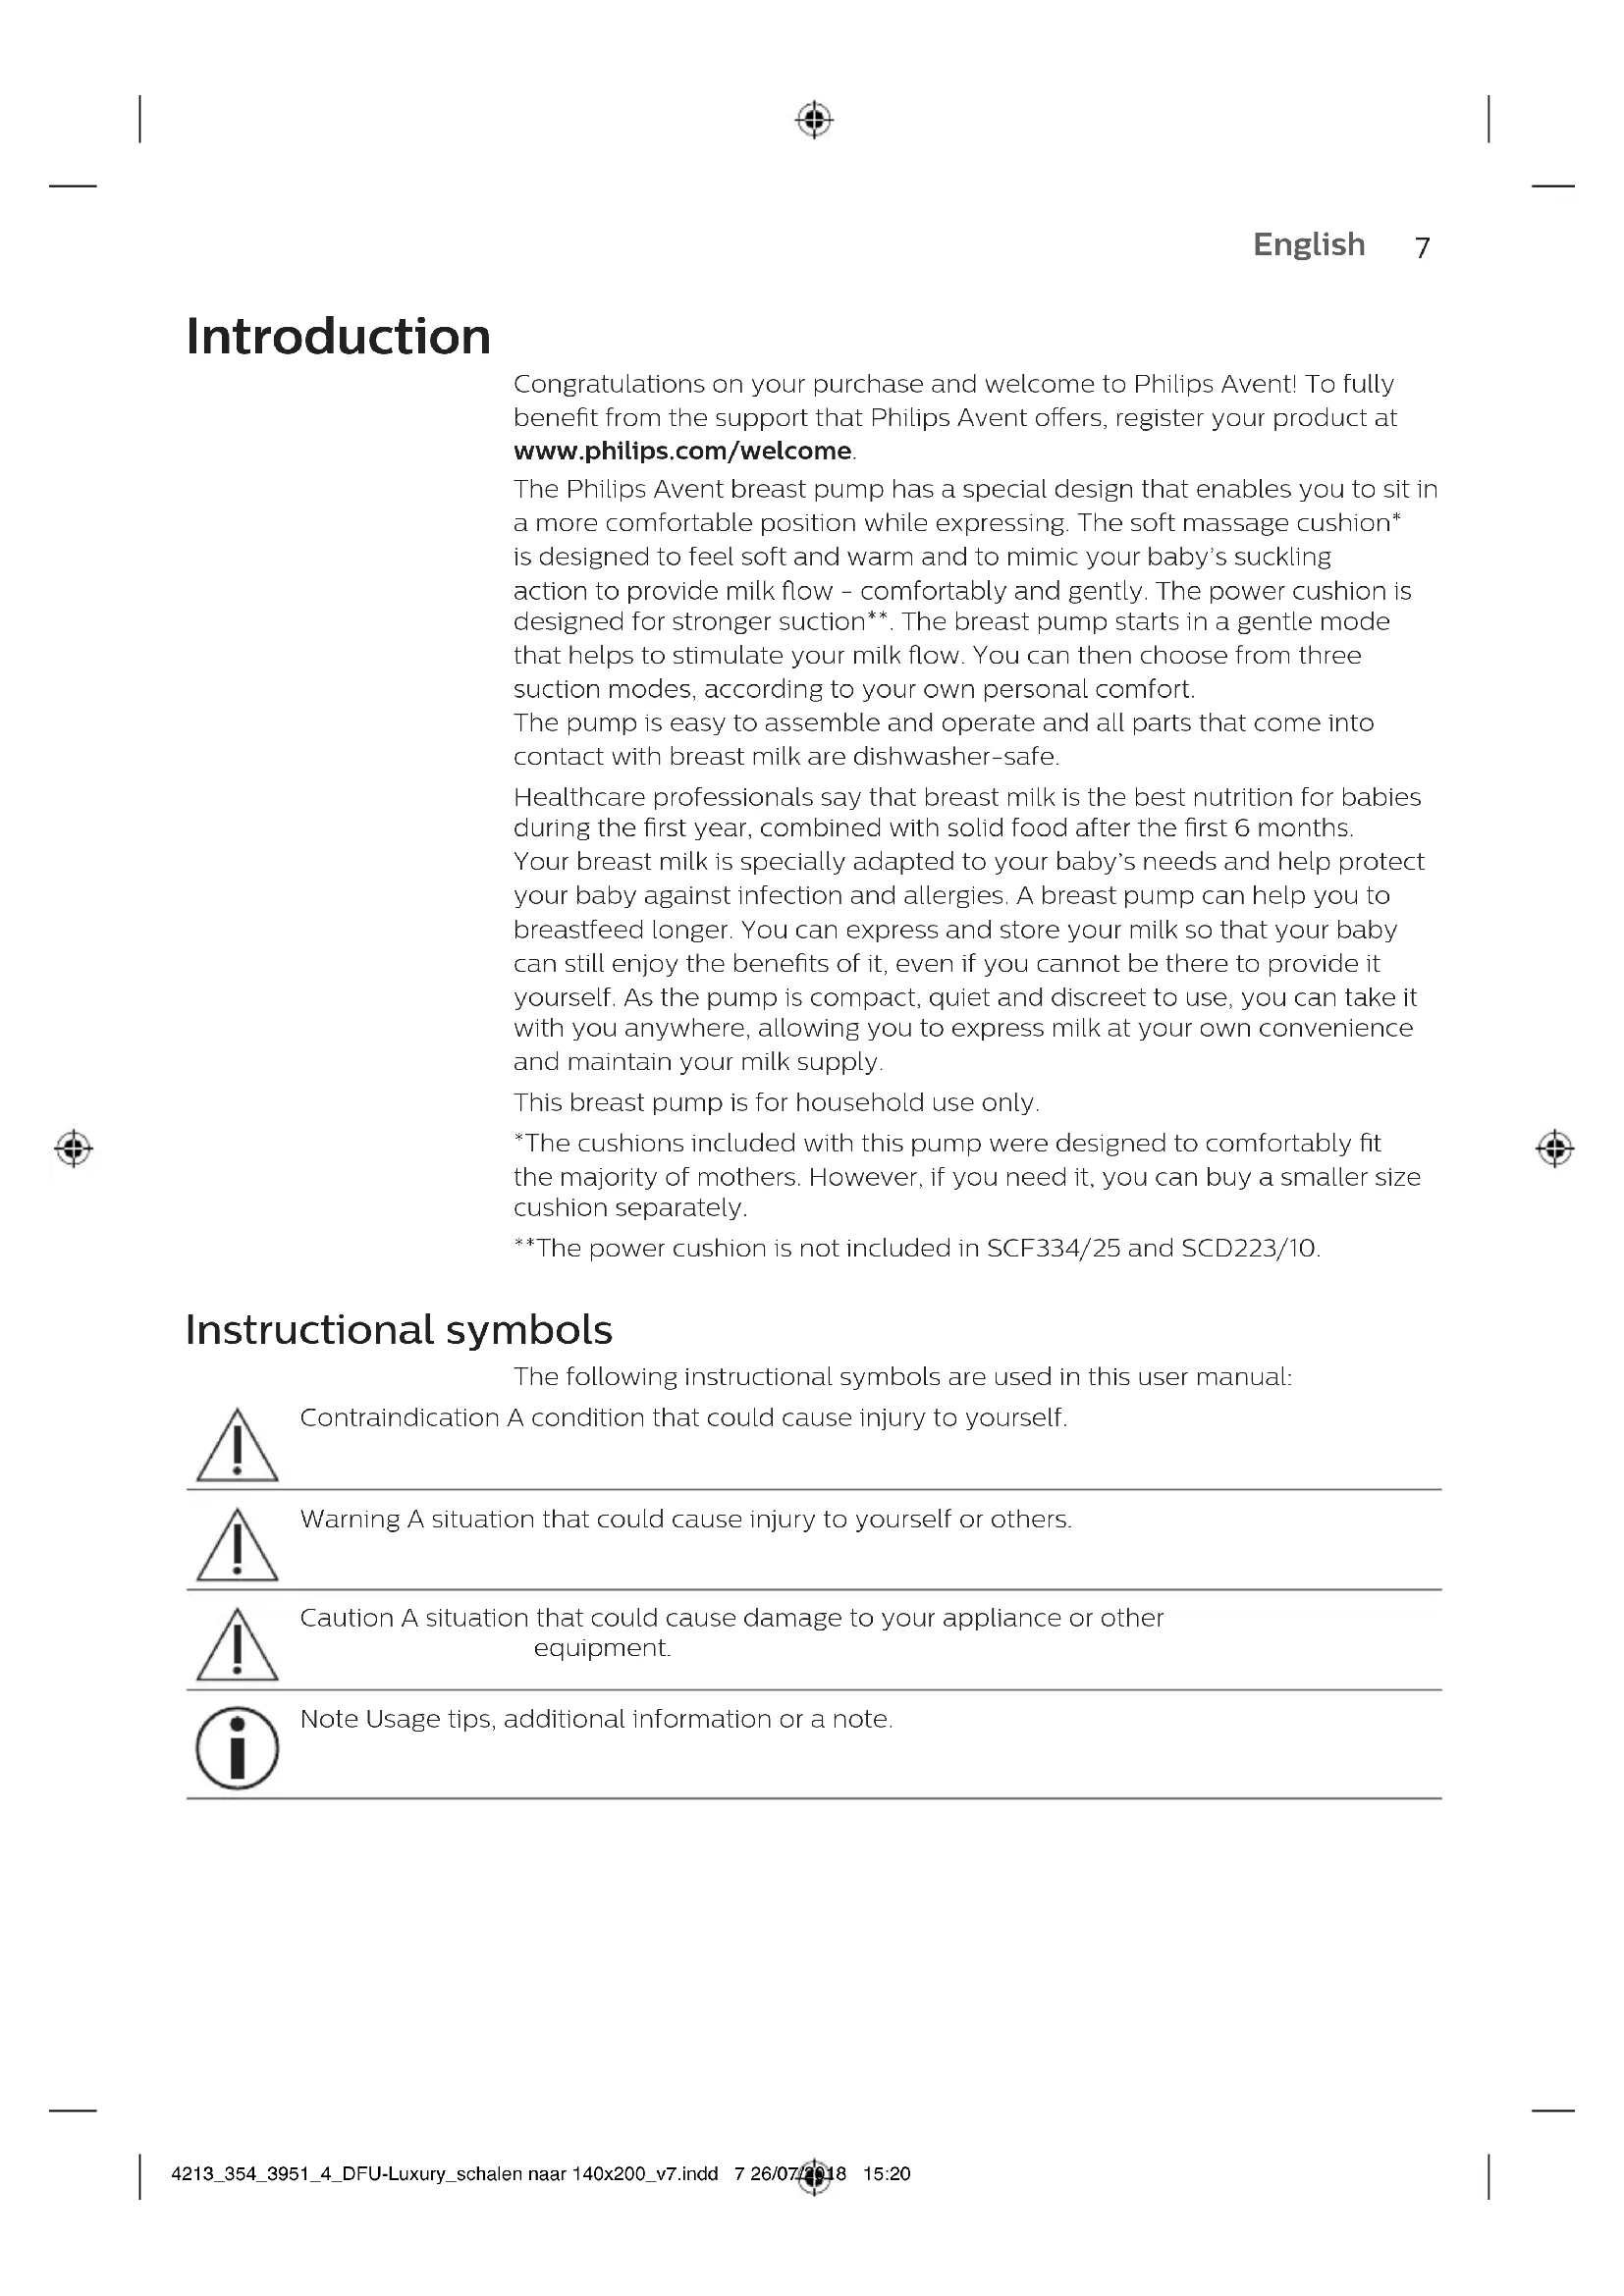
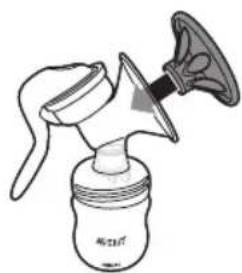
General description (Fig. A)
Figure A. The numbers mentioned below refer to the numbers of the figure on the back foldout page of this user manual.
1 Motor unit with silicone tube and cap *
2 Silicone diaphragm
3 Pump body *
4 Massage cushion *
5 Cover *
6 Battery housing (SCF332, SCD223 and SCD292 only)
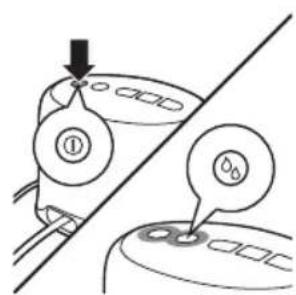
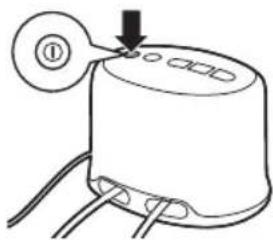
7 On/off button
8 Stimulation button
9 Low suction button
10 Medium suction button
11 Deep suction button
12 Adapter
13 White valve *
14 Philips Avent Natural bottle *
15 Dome cap
16 Screw ring *
17 Nipple *
18 Sealing disc *
*Note: Model SCF334 comes with two pieces of the marked parts, except for the motor unit.
SCF332/21 contains: Single electrical breast pump (including 1 bottle) + Breast pad (4x), Power cushion (1x).
SCF334/25 contains: Twin electrical breast pump (including 2 bottles) + Breast pad (4x).
SCF334/22 contains: Twin electrical breast pump (including 2 bottles) + Breast pad (4x), Power cushion (2x), Travel bag.
SCF334/23 contains: Twin electrical breast pump (including 2 bottles) + Bottle (2x), Breast pad (40x), Power cushion (2x), Travel bag, Brush.
SCF334/26 contains: Twin electrical breast pump (including 2 bottles)
+ Manual breast pump converter, Bottle (2x), Breast pad (8x), Power cushion (2x), Storage cup (10x), Storage cup adapter (2x), Breast milk bag (25x), Travel bag.
SCD223/10 contains: Single electric pump (including 1 bottle), Bottle (1x), Breast pad (4x), Storage cup (10x), Storage cup adapter (2x)
SCD292/22 contains: Single electric breast pump (including 1 bottle), Bottle (1x), Breast pad (28x), Power cushion (1x), Storage cup (10x), Storage cup adapter (2x), Thermopads (2x)
Intended use
The Philips Avent Comfort Single/Twin electric breast pump is intended to express and collect milk from the breast of a lactating woman.
The device is intended for a single user.
Important safety information

Read this user manual carefully before you use the breast pump and save it for future reference. This user manual can also be found online via the Philips Avent website: www.philips.com/avent
Contraindications

-Never use the breast pump while you are pregnant, as pumping can induce labor.
Warning!

Warnings to avoid choking, strangulation and injury:
- Do not allow children or pets to play with the motor unit, the adapter or accessories.
-Always unplug the breast pump immediately after use.
-Do not leave the breast pump unattended when it is plugged in.
- This breast pump is not intended for use by persons (including children) with reduced physical, sensory or mental capabilities, or lack of experience and knowledge. Such persons can only use this breast pump if they are supervised by or have received proper instruction concerning use of the appliance by a person responsible for their safety.
Warnings to avoid electric shock:
- Inspect the breast pump, including the adapter, for signs of damage before each use. Do not use the breast pump if the adapter or plug is damaged, if it does not work properly or if it has been dropped or submerged in water.
Warnings to prevent burns:
- Only use the adapter indicated on the appliance to prevent overheating of the adapter.
-Non-rechargeable batteries are not to be recharged to prevent overheating and leaking of batteries.
Warning infectious diseases:
- If you are a mother who is infected with Hepatitis B, Hepatitis C or Human Immunodeficiency Virus (HIV), pumping breast milk will not reduce or remove the risk of transmitting the virus to your baby through your breast milk.
Warnings to avoid poisoning and contamination and to ensure hygiene:
- For hygienic reasons, the breast pump is only intended for repeated use by a single user.
- Clean and rinse all parts listed in section, Cleanable parts', before each use.
-Only store breast milk collected with a cleaned and (optionally) disinfected pump.

- Do not use the breast pump if the silicone diaphragm appears to be damaged or broken. See chapter 'Ordering accessories' for information on how to obtain replacement parts.
- Do not use antibacterial or abrasive cleaning agents when you clean breast pump parts.
- If you are not going to use the appliance for a long period of time, remove the batteries to prevent leaking of batteries.
Warnings to avoid breast and nipple problems and pain:
- Do not attempt to remove the pump body from your breast while under vacuum. Turn off the appliance and break the seal between your breast and the pump funnel with your finger. Remove the pump from your breast.
- Never use the breast pump while you are sleepy or drowsy to avoid lack of attention during use.
- Always turn off the breast pump before you remove the pump body from your breast to release the vacuum.
- Never use any accessories or parts from other manufacturers or that Philips Avent does not specifically recommend. This could lead to improper working of the appliance and could influence Electromagnetic Compatibility (EMC). If you use such accessories or parts, your warranty becomes invalid.
- Do not continue pumping for more than five minutes at a time if you do not succeed in expressing any milk. Try to express at another time during the day.
- If the process becomes very uncomfortable or painful, stop using the pump and consult your breastfeeding advisor.
- If the pressure generated is uncomfortable or causes pain, turn off the appliance, break the seal between the breast and the pump body with your finger and remove the pump from your breast.
- Never drop or insert any foreign object into any opening.
Caution

Caution to prevent damage to and malfunctioning of the product:
- Prevent the adapter and motor unit from coming into contact with water.
- Keep the adapter and the silicone tubes away from heated surfaces to avoid overheating and deformation of these parts.
- Never put the motor unit or the adapter in water or in a dishwasher.
- Although the breast pump is compliant with applicable EMC directives, it may still be susceptible to excessive emissions and/or may interfere with other equipment. A consequence can be that the breast pump turns off or goes into error mode. To prevent interference, keep other electric equipment away from the breast pump during expressing (see 'Technical information').
- There are no user serviceable parts inside the motor unit of the breast pump. No modification of equipment is allowed. If you do, your warranty becomes invalid.
-Do not short-cut the supply terminals of the batteries.
Preparing for use
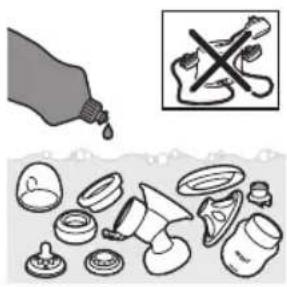
Cleaning

The motor unit, the silicone tube, cap and the adapter do not require cleaning, as they do not come into contact with breast milk. Clean all parts listed in section 'Cleanable parts' before (first) use. Also clean these parts after each subsequent use.
Caution: Never put the motor unit or the adapter in water or in a dishwasher, as this causes permanent damage to these parts.
Cleanable parts
Clean the following parts before (first) use and after each subsequent use:
Breast pump parts:
-Silicone diaphragm
-Pump body
-Massage cushion
-White valve
-Cover
-Power cushion (not included in SCF334/25 and SCD223/10)
Bottle parts:
-Philips Avent Natural bottle
-Dome cap
-Screw ring
-Nipple
-Sealing disc
Accessories (please refer to general description on page 8):
-Philips Avent storage cup
-Philips Avent storage cup adapter
-Manual breast pump converter
-Handle
-Silicone diaphragm with stem
Supplies needed for cleaning:
Washing in sink Washing in dishwasher
| - Mild dishwashing liquid | - Mild dishwasher liquid/tablet |
| - High quality drinking water | - High quality drinking water |
| -Soft brush or clean dish towel | |
| -Clean sink or bowl |

Warning: Do not use antibacterial or abrasive cleaning agents when you are cleaning.
1 Disassemble the breast pump, bottle and storage cup completely. Also remove the white valve from the breast pump.

Caution: Be careful when you remove the white valve and when you clean it. If it gets damaged, your breast pump does not function properly. To remove the white valve, gently pull at the ribbed tab on the side of the valve.
2 Wash the parts in the sink or dishwasher.
12 English
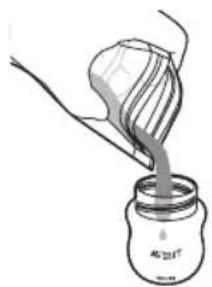
natural_image
Illustration showing a hand pouring liquid into a bottle, with an inset showing a crossed-out plastic bag (no text or symbols)Washing in sink: Soak all separated parts for 5 minutes in hot water with some mild dishwashing liquid. Clean all parts with a soft brush or clean dish towel and then rinse them thoroughly.
Washing in dishwasher: Clean the parts, except the motor unit, the silicone tube and cap and the adapter, in the dishwasher (on the top rack only).

Note: To clean the valve, rub it gently between your fingers in warm water with some washing-up liquid. Do not insert objects into the valve, as this may cause damage.
Disinfection (optional)
After cleaning, if you also want to disinfect, you can boil the parts in water in a household pot.
Supplies needed for disinfection:
-A household pot
-High quality drinking water
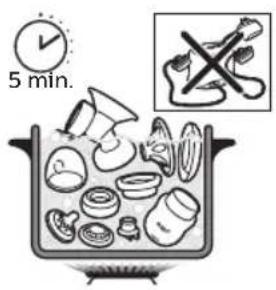
text_image
5 min.Disinfect the parts in the following way:
Fill a household pot with enough water to cover all parts. Bring the water to boil. Place the parts in the household pot and boil them for 5 minutes. During disinfection with boiling water, prevent the bottle or other parts from touching the side of the pan. This can cause irreversible product deformation or damage that Philips cannot be held liable for.
Allow water to cool and gently remove the parts from the water. Place the parts neatly on a clean paper towel or in a clean drying rack and allow them to air dry. Avoid using cloth towels to dry the parts because they can carry germs and bacteria that are harmful to your baby.
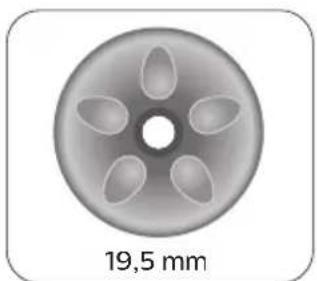
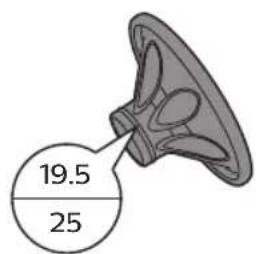
Find the best cushion for you
Expressing breast milk should be comfortable. Therefore we offer 3 soft flexible cushions: a 19.5 mm massage cushion, a 25 mm massage cushion (supplied with your breast pump) and a 27 mm power cushion (supplied with your breast pump ^* ).
For optimal comfort and performance, you should choose the optimal cushion for your nipples.
*Not included in SCF334/25 and SCD223/10.
natural_image
Circular object with five petal-like cutouts, labeled 19.5 mm below (no other text or symbols)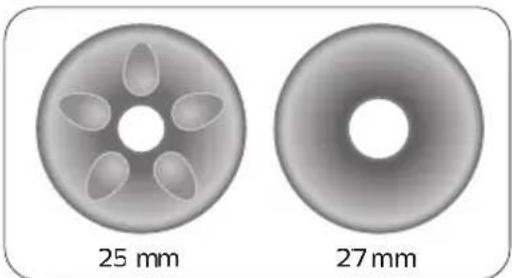
natural_image
Two grayscale circular objects with internal oval patterns, labeled 25 mm and 27 mm respectively (no additional text or symbols)19,5 mm: Massage cushion (not included).
25 mm: Massage cushion,
27 mm: Power cushion (not included in SCF334/25 and SCD223/10).
1 Start with the standard 25 mm massage cushion supplied with your breast pump. You can find the size of the cushion on the cushion itself.
pie
| Category | Value | |---|---| | Segment 1 | 19.5 | | Segment 2 | 25 |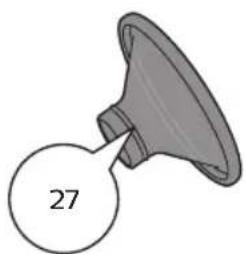
natural_image
Simple illustration of a speaker with a speech bubble containing the number 27 (no text or symbols on the speaker itself)2 If the cushion is too large, purchase the smaller 19.5 mm cushion (see 'Ordering accessories'). A too large cushion can cause pain or less effective expression.
natural_image
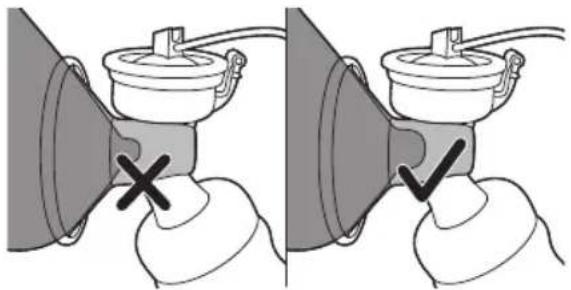
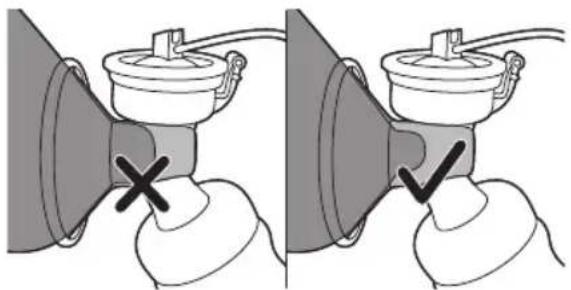
Diagram showing two identical mechanical setups with a valve and bulb, one marked with a cross and the other with a checkmark (no text or symbols present)3 If you prefer stronger suction or if you need a larger cushion size, you can try the 27 mm power cushion. This cushion is not included in SCF334/25 and SCD223/10 and is not available as a separate accessory.
natural_image
Diagram showing two identical mechanical components with a cross mark and checkmark, no text or symbols present.14 English
Assembling the breast pump

Note: Make sure you have cleaned and optionally disinfected the appropriate parts of the breast pump.

1 Wash your hands thoroughly before you handle the cleaned parts.
Warning: Be careful, the cleaned parts may still be hot. Only start assembling the breast pump when cleaned parts have cooled down.

Note: You may find it easier to assemble the breast pump while it is wet.
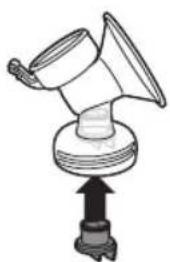
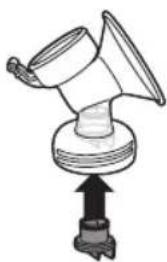
natural_image
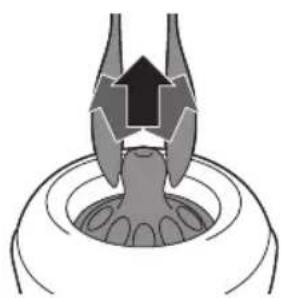
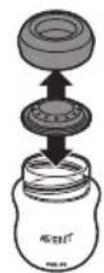
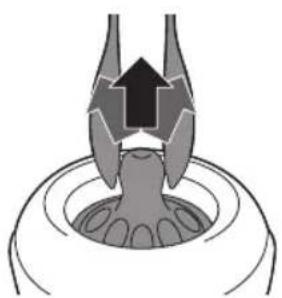
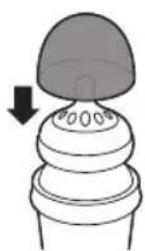
Diagram of a mechanical device with a central component and an upward arrow, no text or symbols present.2 Insert the white valve into the pump body from underneath. Push the valve in as far as possible.
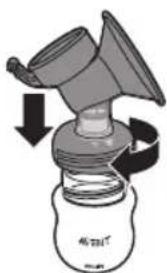
natural_image
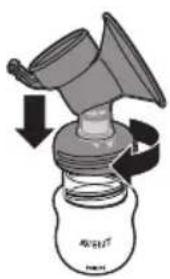
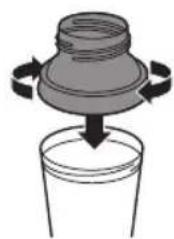
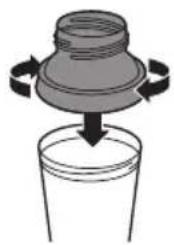
Diagram of a mechanical device with a funnel and rotating base (no text or symbols)3 Screw the pump body clockwise onto the bottle until it is securely fixed.
natural_image
Technical line drawing of a spray gun with a close-up inset showing internal components (no text or symbols)4 Insert the silicone diaphragm into the pump body from above. Make sure it fits securely around the rim by pressing down with your fingers to ensure a perfect seal.

natural_image
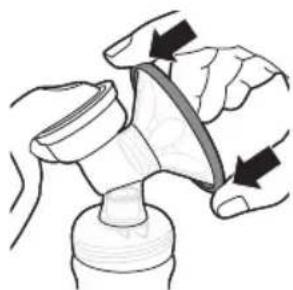
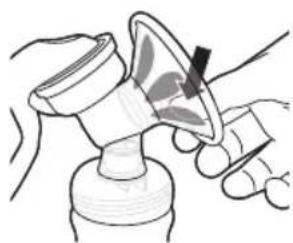
Line drawing of a hand pump bottle with a handle and label (no text or symbols on the diagram itself)5 Insert the cushion into the funnel-shaped section of the pump body.

natural_image
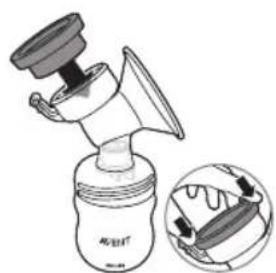
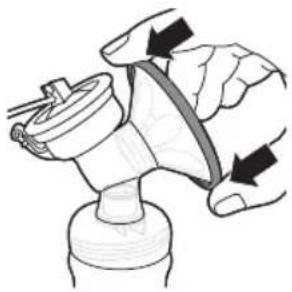
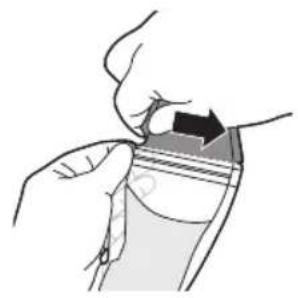
Illustration of a hand using a tool to lift a mechanical component (no text or symbols visible)6 Push in the inner part of the cushion as far as possible and make sure that it is perfectly sealed all around the rim of the pump body.
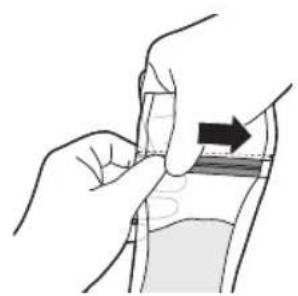
natural_image
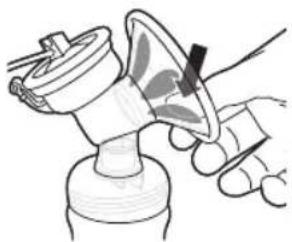
Illustration of a hand using a funnel to lift a bottle (no text or symbols visible)7 Press in between the petals to remove any trapped air.

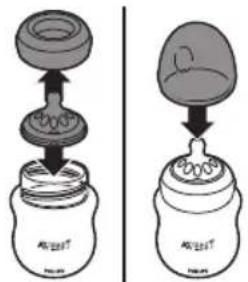
Note: Place the cover over the cushion to keep the breast pump clean while you prepare for expressing.

Warning: Always use the breast pump with a cushion.
natural_image
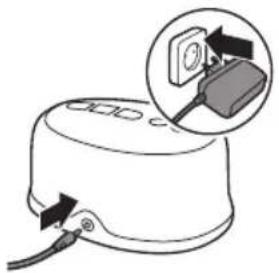
Diagram of a device with an inset showing a plug inserted into a socket (no text or symbols present)8 Insert the adapter into the wall socket and insert the plug at the other end into the motor unit. The adapter reference code is indicated on the bottom of the appliance. Only use the indicated adapter with the appliance.
text_image
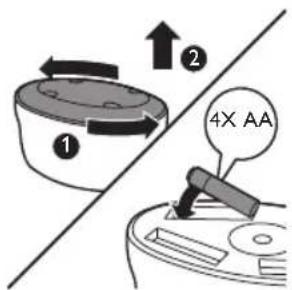
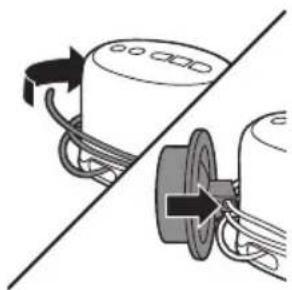
1 2 4X AA-For battery operation (SCF332, SCD223/10 and SCD292/22), turn the bottom of the motor unit in the direction indicated by the marks on the bottom (step 1) and remove it (step 2). Insert four new 1.5V AA batteries (or 1.2V, in case of rechargeable batteries) into the battery housing. Check the markings on the housing of the battery for the correct polarity. Reattach the bottom to the motor unit.

Note: A new set of batteries provides 1-3 hours of operating time. Rechargeable batteries will lose capacity over time and may cause a decrease in operating time.
16
English


Note: If you have inserted batteries in the battery housing of the motor unit and plug in the adapter, the breast pump will run from on electrical power. The batteries cannot be charged in the unit.
Warning: Do not mix different type of batteries.
Warning: Do not mix used and new batteries.
natural_image
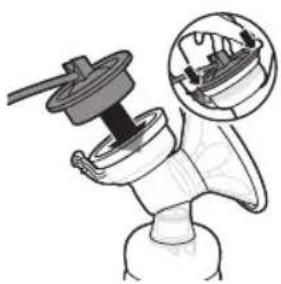
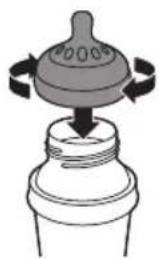
Diagram of a mechanical device with a handle and internal components, no text or symbols present9 Attach the silicone tube and cap onto the diaphragm. Push down the cap until it is securely in place.
Using the breast pump
When to express milk
If breastfeeding goes well, it is advisable (unless advised otherwise by your healthcare professional/breastfeeding advisor) to wait until your milk supply and breastfeeding schedule are established (normally at least 2 to 4 weeks after giving birth) before you start expressing.
Exceptions:
- If breastfeeding does not go well immediately, expressing regularly can help to establish and maintain your milk supply.
-If you are expressing milk for your baby to be given in hospital. - If your breasts are engorged (painful or swollen), you can express a small amount of milk before or between feeds to ease the pain and to help your baby latch on more easily.
- If you have sore or cracked nipples, you may wish to express your milk until they are healed.
- If you are separated from your baby and wish to continue to breastfeed when you are reunited, you should express your milk regularly to stimulate your milk supply.
You need to find the optimum times of the day to express your milk, for example just before or after your baby's first feed in the morning when your breasts are full, or after a feed if your baby has not emptied both breasts. If you have returned to work, you may need to express during a break. Using a breast pump requires practice and it may take several attempts before you succeed. Fortunately, the Philips Avent electric breast pump is easy to assemble and use so you will soon get used to expressing with it.
Tips
- Familiarize yourself with the breast pump and how to operate it before you use it for the first time.
- Choose a time when you are not in a rush and will not be interrupted.
-A photograph of your baby can help encourage the 'let-down' reflex.
- Warmth can also help: try to express after a bath or shower, or place a warm cloth or Philips Avent Thermopad on the breast for a few minutes before you start expressing.
- You may find it easier to express while your baby is feeding from the other breast, or immediately after a feed.
-If expressing becomes painful, stop and consult your breastfeeding advisor or healthcare professional.
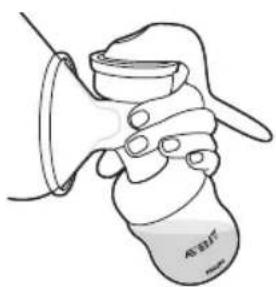
Operating the breast pump
natural_image
Illustration of a hand holding a small device with wires, no visible text or symbols1 Wash your hands thoroughly and make sure your breasts are clean.
2 Relax in a comfortable chair (you may wish to use cushions to support your back). Make sure you have a glass of water nearby.
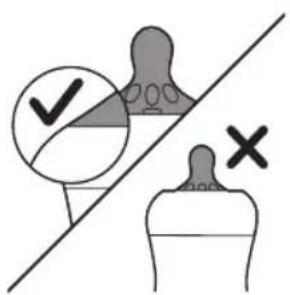
3 Press the assembled pump body against your breast. Make sure that your nipple is centered, so that the cushion creates an airtight seal.
SCF334: The twin electric breast pump enables you to express milk from both breasts at the same time. However, you can also use the appliance to express from one breast in just the same way. Attach both assembled pump bodies to the silicone tube and cap. We recommend to place the cover over the other one.
4 Make sure that your nipple fits correctly in the cushion. See for correct size of cushion, section „Find the best cushion for you”.
5 Press the on/off button.
- The breast pump automatically starts up in stimulation mode and the on/off button and the stimulation button light up.
-You begin to feel the suction on your breast.
text_image
Diagram showing a device control interface with labeled buttons and directional arrow, likely illustrating a mechanical or system adjustment.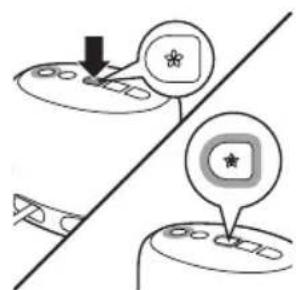
text_image
Diagram showing two configurations of a device with labeled icons and directional arrows, likely illustrating a process or setup.6 Once your milk starts flowing, you can adopt a slower rhythm by pressing the lowest suction button.
-This button lights up instead of the stimulation button.
18
English

Note: Do not worry if your milk does not flow immediately. Relax and continue pumping. The first few times you use the breast pump, you may need to use a higher suction mode to get your milk flowing.
text_image
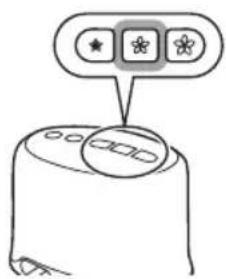
Hand-drawn diagram showing a computer mouse with three flower icons above it, one labeled with a star and three flowers.7 Depending on your own personal comfort, you may wish to use a higher suction mode that provides deeper suction. You can always return to a lower suction mode.
natural_image
Simple line drawing of a cylindrical device with a labeled component and cable, no text or symbols present.You can turn off the breast pump whenever you like by pressing the on/off button.

Note: You do not need to use all suction modes, only use the modes that are comfortable for you.

Warning: Always turn off the breast pump before you remove the pump body from your breast to release the vacuum.

Warning: Do not continue pumping for more than 5 minutes at a time if you do not succeed in expressing any milk. Try to express at another time during the day.

Warning: If the process becomes very uncomfortable or painful, stop using the pump and consult your breastfeeding advisor.

8 On average, you need to pump for 10 minutes to express 60-125ml (2-4fl oz) of breast milk from one breast. However, this is just an indication and varies from woman to woman.
Note: If you regularly express more than 125ml per session, you can purchase and use a 260ml/9fl oz Philips Avent bottle to prevent overfilling and spillage.

text_image
Diagram of an electronic component with labeled pin and connection points, showing a button labeled ①.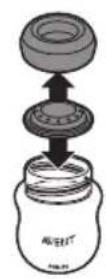
9 When you have finished expressing, turn off the breast pump and carefully remove the pump body from your breast.
10 Unscrew the bottle from the pump body. You have multiple options:
- Place a cleaned sealing disc in a cleaned screw ring, and screw the assembled screw ring onto the bottle. The expressed milk in the bottle is ready for storage.
text_image
Close-up Close-Down-Alternatively, place a cleaned nipple in a cleaned screw ring and screw the assembled screw ring onto the bottle. Seal the nipple with the dome cap.
natural_image
Diagram showing two mechanical components with rotating arrows, no text or symbols present11 Unplug the adapter from the wall outlet to disconnect the appliance from the electrical power. Unplug the motor unit from the adapter. Unplug the silicone tube and cap from the silicone diaphragm. For easy storage, wrap the silicone tube around the motor unit and clip the cap onto the tube. 12 Clean the other used parts of the breast pump according to the instructions in section 'Cleaning'.
Storing breast milk

Warning: Only store breast milk collected with a cleaned and optionally disinfected pump to ensure hygiene.
Breast milk can be stored in the fridge (not in the door) for up to 48 hours. Expressed milk should be refrigerated immediately. If you store milk in the fridge to add to during the day, only add milk that has been expressed into a cleaned bottle or storage cup. Breast milk can be stored in the freezer for up to three months as long as it is kept in either cleaned bottles fitted with a cleaned screw ring and sealing disc or cleaned storage cups. Clearly label the bottle or storage cup with the date and time of expression and use older breast milk first. If you intend to feed your baby with the expressed breast milk within 48 hours, you can store the breast milk in the fridge in an assembled Philips Avent bottle or storage cup.
Do's
-Always refrigerate or freeze expressed milk immediately.
Only store milk collected with a cleaned breast pump in cleaned bottles.
Don'ts
-Never refreeze thawed breast milk.
- Never add fresh breast milk to frozen breast milk.
Compatibility
The Philips Avent electric breast pump is compatible with Philips Avent bottles in our range and Philips Avent Storage cups. When you use other Philips Avent bottles, use the same type of nipple that was supplied with that bottle. For details on how to assemble the nipple and general cleaning instructions, see section 'Feeding' and section 'Cleaning'. These details can also be found on our website, www.philips.com/support.
- Spare nipples are available separately. Make sure you use a nipple with the correct flow rate when you feed your baby (see 'Choosing the right nipple for your baby'). To buy accessories or spare parts, visit
www.shop.philips.com/service or go to your Philips dealer.
You can also contact the Philips Consumer Care Center in your country.
- Do not mix Philips Avent Anti-colic bottle parts and nipples with parts of the Philips Avent Natural bottles. They may not fit and could cause leakage or other issues.
- The high-quality plastic Philips Avent Natural bottle is compatible with most Philips Avent breast pumps, spouts, sealing discs and cup tops.
Feeding
You can feed your baby with breast milk from Philips Avent bottles and storage cups.
For your child's safety and health
WARNING!

Warnings to prevent harm to children:
- Always use bottles and nipples with adult supervision. Do not allow your child to play with small parts or walk/run while using bottles or cups.
-Never use feeding nipples as a soother, to prevent choking hazard.
-Continuous and prolonged sucking of fluids will cause tooth decay. - Always check the temperature of the food before you feed your baby to prevent burns.
-Throw away any part at the first signs of damage or weakness.
-Keep all components not in use out of the reach of children. - Do not alter the product or parts of it in any way. This may result in unsafe functioning of the product.
-Keep the dome cap away from children to avoid suffocation
CAUTION

Cautions to avoid damage to the product:
-Do not place in a heated oven, plastic can melt.
- Plastic material properties may be affected by disinfection and high temperatures. This can affect the fit of the dome cap.
- Do not leave a feeding nipple in direct sunlight or heat, or leave in disinfectant for longer than recommended because this may damage the product.
Before first use
Before first use, disassemble all parts, clean and optionally disinfect the bottle. Inspect the bottle and feeding nipple before each use and pull the feeding nipple in all directions to prevent a choking hazard. Throw away at the first signs of damage or weakness.
Cleaning bottles
To ensure hygiene, clean the parts of the bottle mentioned in section 'Cleaning' before each use. Also clean all parts after each subsequent use. You can optionally disinfect by following the instructions in section 'Disinfection (optional)'.
Make sure that you wash your hands thoroughly and that the surfaces are clean before contact with cleaned components. Excessive concentration of detergents may eventually cause plastic components to crack. Should this occur, replace immediately. Inspect the bottle and feeding nipple before each use and pull the feeding nipple in all directions to prevent a choking hazard. Throw away any part at the first signs of damage or weakness.
natural_image
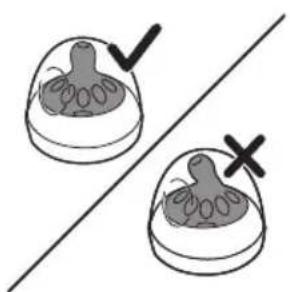
Two identical dome-shaped objects with checkmarks and a cross mark, separated by a diagonal line (no text or symbols)Assembling bottles
When you assemble the bottle, make sure you place the dome cap vertically onto the bottle so that the nipple sits upright.
22 English

natural_image
Line drawing of hands using a tool to lift or lift a cup (no text or symbols)To remove the dome cap, place your hand over the dome cap and your thumb in the dimple of the dome cap.
natural_image
Diagram of a mechanical or biological structure with no visible text, numbers, or symbolsThe nipple is easier to assemble if you wriggle it upwards instead of pulling it up in a straight line.
text_image
Diagram showing two labeled objects with check and cross symbols, possibly indicating approval or rejection actions.Make sure you pull the nipple through until its surface is level with the surface of the screw ring.

Heating breast milk
If you use frozen breast milk, let it defrost completely before you heat it.
Note: In case of an emergency, you can defrost the milk in a bowl of hot water.
Heat the bottle or storage cup with defrosted or refrigerated breast milk in a bowl of hot water or in a bottle warmer. Remove the screw ring and sealing disc from the bottle or remove the lid from the storage cup.
Always stir or shake heated food to ensure even heat distribution and test the temperature before serving. Take extra care when you heat up food in a microwave as heating food in a microwave oven may produce localized high temperatures.
Note: We do not recommend heating breast milk in the microwave because when breast milk becomes too warm, nutrients and vitamins are damaged.


Note: You can purchase and use Philips Avent bottle warmer to heat up the milk.
Maintenance and storage of bottles
Inspect the bottle and feeding nipple before each use and pull the feeding nipple in all directions to prevent a choking hazard. Throw away at the first signs of damage or weakness. For hygiene reasons, we recommend replacing nipples after 3 months. Keep nipples in a dry, covered container. When not in use, do not leave the nipples in sunlight or heat, or leave in disinfectant ('sterilizing solution') for longer than recommended, as this may weaken the nipple. Do not place in a heated oven. Store the bottles in a dry location.
Additional information
The Philips Avent nipples are available with different flow rates to help your baby with drinking. Over time, you can change the nipple to accommodate the individual needs of your baby.
Choosing the right nipple for your baby
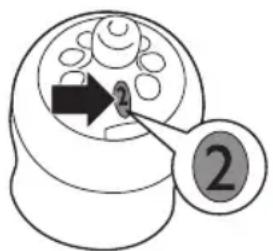
The Philips Avent nipples are available with different flow rates to help your baby with drinking. Over time you can change the nipple accommodating the individual needs of your baby. Philips Avent nipples are clearly numbered on the side to indicate flow rate (see image). Make sure you use a nipple with the correct flow rate when you feed your baby. Use a lower flow rate if your baby chokes, is leaking milk or has trouble adjusting to the drinking speed. Use a higher flow rate if your baby falls asleep during feeding, gets frustrated or when feeding takes a very long time. These Philips Avent nipples can be used on the Natural Philips Avent feeding bottle and Philips Avent storage cups. Nipples are available for 0m, 0m+, 1m+, 3m+, 6m+, variable flow (I/II/III) and thick feed (Y).
(0) The nipple for 0m can be used from day one. Extra soft silicone nipple and it is the lowest flow rate available. Ideal for newborn and breastfed babies of all ages. The number 0 is shown on the nipple.
(1) The nipple for Om+ has an extra soft silicone nipple. Ideal for newborn and breastfed babies of all ages. The number 1 is shown on the nipple.
(2) The nipple for 1m+ has an extra soft silicone nipple. Ideal for breastfed babies of all ages. The number 2 is shown on the nipple.
(3) The nipple for 3m+ has an extra soft silicone nipple. For bottle-fed babies aged 3 months and up. The number 3 is shown on the nipple.
(4) The nipple for 6m+ has a bite-resistant silicone nipple. This sturdier nipple is ideal for bottle-fed babies aged 4 months and up. The number 4 is shown on the nipple.
(I/II/III) Variable flow is a bite-resistant silicone nipple. This sturdier nipple has an adjustable flow rate to suit your baby's need and is ideal for bottle-fed babies aged 3 months and up. The nipple has one slot in the top for fluid and the markings I, II, III on the edges of the nipple.
text_image
Diagram showing a mechanical component with labeled parts and an arrow pointing to a specific feature, marked with circled number 2.24 English
(Y) Thick feed is a bite-resistant silicone nipple. This sturdier nipple, designed for thicker feeds, is ideal for bottle-fed babies aged 6 months and up. The nipple has one Y-shaped slot in the top for fluid and the symbol Y on the nipple.

Note: Every baby is unique and your baby's individual needs may vary from the age description of flow rates.
Accessories
Manual breast pump converter
natural_image
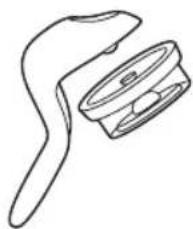
Simple line drawing of a mechanical component with a handle and central hub (no text or symbols)With the manual breast pump converter, consisting of handle and diaphragm with stem, you can assemble the manual breast pump, read the instructions for the electric breast pump (see chapter 'Preparing for use', section 'Using the breast pump'). All instructions for the electric breast pump also apply to the manual breast pump converter, except the chapters "Assembling the breast pump" and "Operating the breast pump".

Assembling the manual breast pump
Note: Make sure you have cleaned and optionally disinfected the appropriate parts of the breast pump.

1 Wash your hands thoroughly before you handle the cleaned parts.
Warning: Be careful, the cleaned parts may still be hot. Only start assembling the breast pump when cleaned parts have cooled down.

Note: You may find it easier to assemble the breast pump while it is wet.
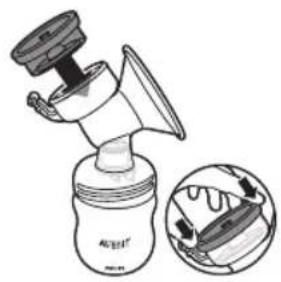
natural_image
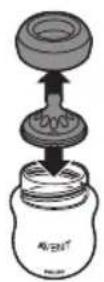
Mechanical component diagram showing a lever and base with an upward arrow (no text or symbols)2 Insert the white valve into the pump body from underneath. Push the valve in as far as possible.
natural_image
Diagram of a mechanical device with a funnel and base, showing rotational motion (no text or symbols)3 Screw the pump body clockwise onto the bottle until it is securely fixed.
natural_image
Illustration of a spray gun with a stopper and label 'AC/EEF' (no text or symbols on the diagram itself)4 Insert the silicone diaphragm into the pump body from above. Make sure it fits securely around the rim by pressing down with your fingers to ensure a perfect seal.
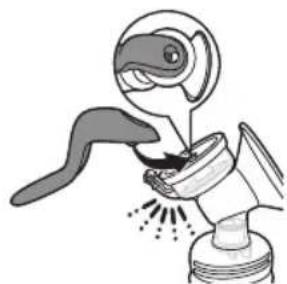
natural_image
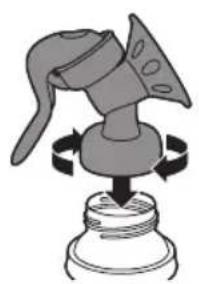
Illustration of a robotic arm with a fish inside and emitting particles from a bottle (no text or symbols)5 Attach the handle onto the diaphragm with stem by hooking the hole in the handle over the end of the stem. Push down the handle onto the pump body until it clicks into place.
natural_image
Line drawing of a hand pump device with a funnel and plastic jar (no text or symbols)6 Insert the cushion into the funnel-shaped section of the pump body.
natural_image
Illustration of hands performing a mechanical press or stamping operation on a cylindrical object (no text or symbols visible)7 Push in the inner part of the cushion as far as possible and make sure that it is perfectly sealed all around the rim of the pump body.
natural_image
Illustration of a hand using a tool to lift a mechanical component (no text or symbols visible)8 Press in between the petals to remove any trapped air.

Note: Place the cover over the cushion to keep the breast pump clean while you prepare for expressing.


Warning: Always use the breast pump with a cushion.
Operating the manual breast pump
1 Wash your hands thoroughly and make sure your breasts are clean.
2 Relax in a comfortable chair (you may wish to use cushions to support your back). Make sure you have a glass of water nearby.
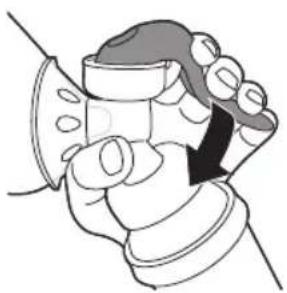
3 Press the assembled pump body against your breast. Make sure that your nipple is centered, so that the massage cushion creates an airtight seal.
4 Make sure that your nipple fits correctly in the cushion. See for correct size of cushion, section „Find the best cushion for you”.
natural_image
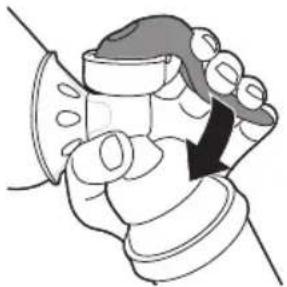
Illustration of a hand holding a device with a bell and label 'AS 2017' (no other text or symbols)5 Gently start to press down the handle until you feel the suction on your breast. Then allow the handle to return to its resting position.
natural_image
Illustration of a hand holding a device with a black arrow pointing to the device (no text or symbols present)
Note: You do not have to press down the handle fully, only as much as is comfortable. Your milk will soon start flowing, even though you are not using all the suction the pump can generate.
6 Repeat step 5 rapidly 5 or 6 times to initiate the 'let-down' reflex.
7 Adopt a slower rhythm by pressing down the handle and keeping it pressed down for up to 3 seconds before you let it return to its resting position. Continue in this way while your milk is flowing. If your hand becomes tired, try to use the other hand to operate the breast pump or rest your arm across your body to pump from the opposite breast.
Note: Do not worry if your milk does not flow immediately. Relax and continue pumping. The first few times you use the breast pump, you may need to use a higher suction mode to get your milk flowing.

Warning: Do not continue pumping for more than 5 minutes at a time if you do not succeed in expressing any milk. Try to express at another time during the day.

Warning: If the process becomes very uncomfortable or painful, stop using the pump and consult your breastfeeding advisor.

8 On average, you need to pump for 10 minutes to express 60-125ml (2-4fl oz) of breast milk from one breast. However, this is just an indication and varies from woman to woman.

Note: If you regularly express more than 125ml per session, you can purchase and use a 260ml/9fl oz Philips Avent bottle to prevent overfilling and spillage.
9 When you have finished expressing, carefully remove the breast pump from your breast and unscrew the bottle or storage cup from the pump body. The bottle or storage cup with milk is now ready for feeding or storage.
10 Unscrew the bottle from the pump body. You have multiple options:
- Place a cleaned sealing disc in a cleaned screw ring, and screw the assembled screw ring onto the bottle. The expressed milk in the bottle is ready for storage.

- Alternatively, place a cleaned nipple in a cleaned screw ring and screw the assembled screw ring onto the bottle. Seal the nipple with the dome cap.
Clean the other used parts of the breast pump according to the instructions in section 'Cleaning'.
Storage cups
The Philips Avent storage cups are part of a reusable storage system specifically designed for mothers to express, store and feed. The Philips Avent storage cups have twist-on lids to provide leak-proof transport and storage.
With the storage cup adapter, you can use the storage cups as containers for the breast pump and as feeding bottles.
For your child's safety and health
WARNING!

Warnings to prevent harm to children:
- Always use storage cups with adult supervision. Do not allow your child to play with small parts or walk/run while using cups.
- Always check the temperature of the food before you feed your baby to prevent burns.
-Throw away at the first signs of damage or weakness.
-Continuous and prolonged sipping of fluids will cause tooth decay.
-Keep all parts not in use out of the reach of children.
- Do not alter the product or parts of it in any way. This may result in unsafe functioning of the product.

Warnings to avoid poisoning and contamination:
- Expressed breast milk and food can be stored in cleaned Philips Avent storage cups in the refrigerator for up to 48 hours (not in the door) or in the freezer for up to 3 months. Never refreeze breast milk or add fresh breast milk to already frozen milk. Write the storage date on the storage cup with a pencil or marker.
- Do not use abrasive cleaning agents or antibacterial cleaners. Do not place components directly on surfaces that have been cleaned with anti-bacterial cleaners.
- Always discard any breast milk that is left over at the end of a feed.
Cautions to avoid damage to the product:
- Do not place the storage cups in a hot oven or on any other hot surface, plastic can melt.

Cleaning storage cups
To ensure hygiene, clean the parts of the storage cups mentioned in section 'Cleaning' before each use. Also clean all parts after each subsequent use. You can optionally disinfect by following the instructions in section 'Disinfection (optional)'.
Make sure that you wash your hands thoroughly and that the surfaces are clean before contact with cleaned components. Excessive concentration of detergents may eventually cause plastic components to crack. Should this occur, replace immediately. Inspect the storage cups before each use to prevent a choking hazard. Throw away any part at the first signs of damage or weakness.
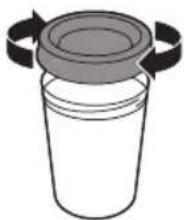
Assembling storage cups
Storage
Screw the lid onto the cup.
natural_image
Simple line drawing of a cylindrical container with a lid and two curved arrows indicating rotation (no text or symbols)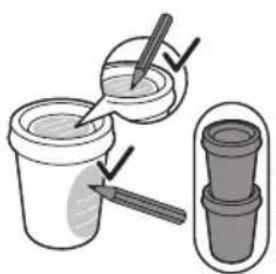
text_image
Diagram illustrating a step-by-step cooking or cleaning procedure with labeled steps and a tool.Use a pencil to write the date on the textured areas of the cup and/or lid. The cups can be stacked.
natural_image
Diagram of a container being lifted by a lid, with arrows indicating rotation (no text or symbols)Feeding
The storage cups can be used to feed your baby with Philips Avent Natural feeding nipples. Screw the cleaned storage cup adapter onto the cup.
natural_image
Illustration of a bottle with a lid and arrow indicating rotation (no text or symbols)Screw a cleaned screw ring with cleaned nipple onto the storage cup with storage cup adapter.
natural_image
Diagram of a mechanical or biological structure with concentric circles and a central arrow, no visible text or symbols.The nipple is easier to assemble if you wriggle it upwards instead of pulling it up in a straight line. Make sure you pull the nipple through until its surface is level with the surface of the screw ring. Also see section 'Feeding' for more instructions regarding feeding and bottles.
When you assemble the dome cap, cup and nipple, make sure you place the dome cap vertically onto the cup so that the nipple sits upright. To remove the dome cap, place your hand over the dome cap and your thumb in the dimple of the dome cap.

30
English
natural_image
Diagram of a container being lifted by a lid, showing rotation arrows (no text or symbols)Milk expression
The storage cups can be used to collect expressed breast milk in combination with the Philips Avent electric and manual breast pump. Screw the cleaned storage cup adapter onto the cup.
natural_image
Diagram of a hairdryer with a handle and circular motion arrows indicating rotation (no text or symbols)Screw a cleaned and assembled breast pump body onto the storage cup with storage cup adapter. It is now ready to express milk.
natural_image
Illustration of a hand holding a tool or device, with no visible text or symbolsAlso see section 'Using the breast pump' and section 'Manual breast pump converter' for more instructions regarding the breast pump.
Additional items
The following items may be included in the SCF332/21 and/or SCF334/22-26, SCD223/10 and SCD292/22, please refer to general description on page 8:
-Disposable breast pads
-Cover
-Brush
-Sealing discs
-Travel bag
-Breast milk bag
Breast milk bag
Introduction
The Philips Avent breast milk bags offer a safe and convenient way to collect your precious breast milk. They are made of dual-layer, reinforced plastic and have a strong seal, to ensure your milk remains protected while being stored. A wide and sturdy opening ensures safe and easy filling and pouring. For ultimate hygiene, every bag comes disinfected with a tamper-evident seal.
Important
Read this user manual carefully before you use the breast milk bags and save it for future reference..
Warning
Warnings to prevent harm to children:
-Keep the breast milk bags out of the reach of children.
-Always check the temperature of the milk before you feed your baby.
- To prevent the milk from overheating, do not defrost the breast milk bag with breast milk in the microwave, in freshly boiled water or in a bottle warmer.
Warnings to avoid poisoning and contamination and to ensure hygiene:
-The breast milk bags are intended for one-time use only.
- Thoroughly wash your hands before you fill and empty the breast milk bags.
- The actual amount of milk in the bag may deviate slightly from the level indications on the bag.
- Never refreeze breast milk or add fresh breast milk to already frozen breast milk.
- You can store the breast milk bag in the refrigerator for up to 48 hours (not in the door) or in the freezer for up to 3 months.
Caution
Cautions to avoid damage to the product:
-Do not microwave.


text_image
Prohibition sign showing a microwave with smoke and cooling effect, crossed out by a diagonal line
natural_image
Illustration of hands holding a small electronic device with a black arrow indicating rotation (no text or symbols)Filling the breast milk bag
Open the breast milk bag by tearing off the tamper-evident seal at the top of the breast milk bag. Keep the torn-off seal away from children and dispose of it safely.
32 English
natural_image
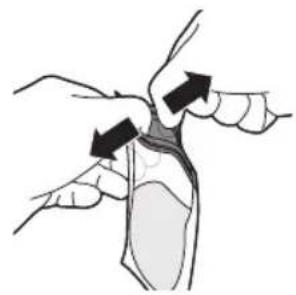
Illustration of a hand holding a kidney with arrows indicating force direction (no text or symbols)1 To open the bag, place your thumbs inside the plastic above the zip and gently pull both sides apart.
text_image
MAX 180 ml/6oz 180 62 Pour the expressed milk into the bag. Do not fill the bag beyond the 180ml/6oz level, as breast milk expands when frozen.

natural_image
Illustration of two hands holding a transparent object with arrows indicating movement or force (no text or symbols)3 Carefully remove excess air by flattening the part of the bag above the milk.
natural_image
Illustration of hands performing a medical procedure on a patient's abdomen with a black arrow indicating direction (no text or symbols present)4 Seal the bag by closing the zip.
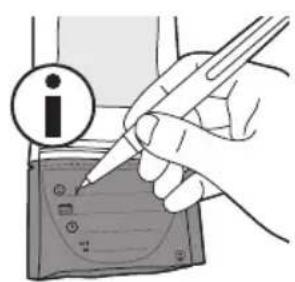
text_image
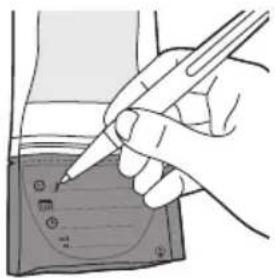
Illustration showing a hand writing on a notepad with an 'i' icon, indicating information input.5 Use a pen to write down the date of expression and other information on the labeling area. Do not write on the filling part to prevent puncturing the bag.
Defrosting breast milk
To defrost breast milk overnight, place the breast milk bag in the refrigerator.
To defrost breast milk prior to feeding, place the breast milk bag in warm water.
natural_image
Illustration of a hand holding a small object with an arrow indicating direction (no text or symbols)Pouring milk from the breast milk bag
1 Tear off the labeling area to eliminate potential contamination of the breast milk during pouring.
natural_image
Anatomical illustration of a human hand and foot with arrows indicating movement or force direction (no text or labels)2 To open the bag, place your thumbs inside the plastic above the zip and pull both sides apart.
natural_image
Illustration of hands pouring liquid from a jar into a jar (no text or symbols)3 Hold the bag by the zip and pour the milk into a container.
Tip: Lightly squeeze the zip to make pouring easier.
4 Throw away the breast milk bag after use. Do not reuse the breast milk bag.
5 To heat the milk, place the container with defrosted milk in a bottle warmer or in a bowl of hot water.
Note: Always discard any breast milk that is left over at the end of a feed.
Replacement
Batteries
When using the breast pump (SCF332, SCD223/10 and SCD292/22) on batteries, always use four 1.5 AA batteries (or 1.2V in case of rechargeable batteries). Remove the rechargeable batteries from the motor unit before charging them.
Remove exhausted batteries and dispose of them safely.
For instructions on how to replace the batteries, see chapter 'Preparing for use'.
Ordering accessories
To buy accessories or spare parts, visit www.shop.philips.com/service or go to your Philips dealer. You can also contact the Philips Consumer Care Center in your country (see the international warranty leaflet for contact details).
34 English
Disposal
For disposal or recycling information, please contact your local authorities or visit www.recycle.philips.com.
Check before disposal of the appliance on presence of batteries. Batteries need separate disposal.
- Dispose of batteries properly. Do not incinerate. Batteries may explode if overheated.
- Do not wrap in metal or aluminum foil. Tape the waste battery terminals before discarding.
- It is suggested that you contact your local town or city to determine proper battery redemption site(s) in your area.
Removing the batteries
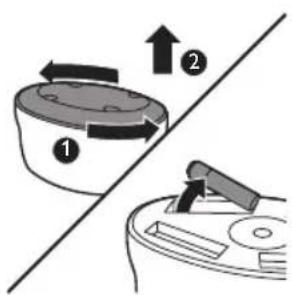
text_image
Diagram showing two mechanical components with directional arrows, labeled ① and ②, separated by a diagonal line.Follow the steps below to remove batteries from the appliance (SCF332, SCD223/10 and SCD292/22).
1 Before removing the batteries, make sure the motor unit is turned off and the adapter is unplugged.
2 To remove the batteries, turn the bottom of the motor unit in the direction indicated by the marks on the bottom (step 1) and remove it (step 2).
3 Remove the four 1.5 AA batteries (or 1.2V in case of rechargeable batteries) from the battery housing.
4 Reattach the bottom to the motor unit.
Full two year warranty
Change warranty section to:
Philips North America LLC (USA) and Philips Electronics Ltd (Canada) warrant this new product against defects in materials or workmanship for a period of two years from the date of purchase, and agree to repair or replace any defective product without charge.
IMPORTANT: This warranty does not cover damage resulting from accident, misuse or abuse, lack of reasonable care, the affixing of any attachment not provided with the product or loss of parts or subjecting the product to any but the specified voltage or batteries.*
NO RESPONSIBILITY IS ASSUMED FOR ANY SPECIAL, INCIDENTAL OR CONSEQUENTIAL DAMAGES.
In order to obtain warranty service, simply go to www.philips.com/support for assistance. It is suggested that for your protection you return shipments of product by insured mail, insurance prepaid. Damage occurring during shipment is not covered by this warranty.
NOTE: No other warranty, written or oral, is authorized by Philips North America LLC.
This warranty gives you specific legal rights, and you may also have other rights which vary from state to state, province to province or country to country. Some states do not allow the exclusion or limitation of incidental or consequential damages, so the above exclusion and limitations may not apply to you. * Read enclosed instructions carefully.
In order to obtain warranty service, simply call toll-free 1-800-54-AVENT (1-800-542-8368).
* Read enclosed instruct
Your appliance has been designed and developed with the greatest possible care and has an expected service life of 400 hours.
Troubleshooting
This chapter summarizes the most common problems you could encounter with the appliance. If you are unable to solve the problem with the information below, visit www.philips.com/support for a list of frequently asked questions or contact the Consumer Care Center in your country.
Problem Solution
| I experience pain when I use the breast pump | Stop using the breast pump and consult your breastfeeding advisor. If the pump does not come away easily from the breast, it may be necessary to break the vacuum by placing a finger between the breast and Cushion. |
| The breast pump is scratched | In case of regular use, some light scratching is normal and does not cause problems. However, if a part of the breast pump becomes badly scratched or cracks, stop using the breast pump and contact the Philips Consumer Care Center or visit www.shop.philips.com/service to obtain a replacement part. Be aware that combinations of detergents, cleaning products, sterilizing solution, softened water and temperature fluctuations may, under certain circumstances, cause the plastic to crack. Avoid contact with abrasive or antibacterial detergents as these can damage the plastic. |
| The breast pump does not work and the on/off button flashes. | First check if you have assembled the breast pump correctly and make sure that there is no kink in the tube.To prevent interference keep other electric equipment, like mobile phone or laptop, away from the breastpump while expressing.If you are using the SCF332 with batteries, replace the batteries according to the instructions in the user manual.If you are using the SCF334 or the SCF332 on electrical power, check to make sure you are using the adapter that was supplied with the product.If the problem persists, contact the Consumer Care center via www.philips.com/support. |
| I do not feel any suction. | Check if you have assembled the breast pump correctly by following the steps in section 'preparing for use'. Make sure that the silicone tube is firmly attached to the motor unit and to the cap and diaphragm.Also make sure that the pump is positioned correctly on the breast to allow for vacuum to occur. If you still do not feel any suction, please contact the Consumer Care center via www.philips.com/support. |
36
English
| The pump has too much suction. | Follow below guidelines if you experience too much suction with your breast pump: - If you are using the power cushion, try the massage cushion which will have a bit lower suction. - If possible, try a lower suction mode. - Make sure you only use the Philips Avent comfort breast pump's parts. - Make sure you have assembled the comfort breast pump with the a cushion: not using the a cushion can result in too much vacuum. - When using a breast pump for the first time, you may experience the suction level as too high at first. Practicing can help. If the problem persists, consult your breastfeeding advisor. |
| The manuel breast pump squeaks when moving the handle. | Make sure the handle is wet when assembling the manual breast pump. |
Supplemental information
Below some common breastfeeding-related conditions are described. If you experience any of these symptoms, contact a healthcare professional or breastfeeding specialist.
Symptom
| Pain sensation Perceived pain of breast or nipple. | |
| Sore nipples Persistent pain in the nipples at the beginning of the pumping period, or that lasts throughout the entire pumping period, or hurts between sessions, much similar to the pain felt during breastfeeding. | |
| Engorgement Swelling of the breast. The breast may feel hard, lumpy and tender.May include erythema (redness) of the breast area and fever. | |
| Bruise, thrombus A reddish-purple discoloration that does not blanch when pressed.When a bruise fades, it becomes green and brown. | |
| Blistering Looks like small bubbles on the surface of the skin. | |
| Injured tissue on nipple(nipple trauma) | - Fissures or cracked nipples.- Skin tissue peeling off the nipple. Normally occurs in combination with cracked nipples and/or blisters.- Nipple tear. |
| Bleeding Cracked or teared nipples can lead to bleeding of the affected area. | |
| Clogged mammary ducts | A red, tender lump on the breast. May include erythema (redness) of the breast area and fever. Can lead to Mastitis (breast inflammation) if left untreated. |
Technical information
EMC information
The Philips Avent breast pump needs special precautions regarding EMC and needs to be installed and put into service according to the EMC information provided in this section.
Portable and mobile RF communications equipment can affect the Philips Avent breast pump.
The electronic breast pump has no essential performance. Due to EMC influences, like wireless home network devices, mobile phones or cordless telephones, the breast pump can turn off or go into error mode. This will not lead to unacceptable risks. To prevent interference, keep other electric equipment at least 3.3 feet/1.0 m away from the breast pump during expressing and do not stack with other electrical equipment. Cable length of the adapter: 2.50 meter/8.2 feet. The electronic breast pump has an expected service life of 400 hours.
Electromagnetic Compatibility (EMC, IEC 60601-1-2)
Declaration – electromagnetic emissions
The Philips Avent breast pump is intended for use in the electromagnetic environment specified below. The user of the Philips Avent breast pump should assure that it is used in such an environment.
Emissions test Compliance Electromagnetic environment – guidance
| RF emissions CISPR 11 | Group 1 The Philips Avent breast pump uses RF energy only for its internal function. Therefore, its RF emissions are very low and are not likely to cause any interference in nearby electronic equipment. | |
| RF emissions CISPR 11 | Class B | |
| Harmonic emissions IEC 61000-3-2 | Class A | The Philips Avent breast pump is suitable for use in all establishments, including domestic establishments and those directly connected to the public low voltage power supply network that supplies buildings used for domestic purposes. |
| Voltage fluctuations/ flicker emissions IEC 61000-3-3 | Complies | |
Declaration – electromagnetic immunity
The Philips Avent breast pump is intended for use in the electromagnetic environment specified below. The user of the Philips Avent breast pump should assure that it is used in such an environment.
IMMUNITY test IEC 60601 test level Compliance level Electromagnetic
| environment – guidance | |||
| Electrostatic discharge (ESD) IEC 61000-4-2 | ±8 kV contact ±15 kV air | ±8 kV contact ±15 kV air | Floors should be wood, concrete or ceramic tile. If floors are covered with synthetic material, the relative humidity should be at least 30%. |
| Electrical fast transient/ burst IEC 61000-4-4 | ±2 kV for power supply lines | ±2 kV for power supply lines | Mains power quality should be that of a home healthcare environment. |
| Surge IEC 61000-4-5 | ±1 kV line(s) to line(s) ±1 kV line(s) to line(s) Mains | power quality should be that of a home healthcare environment. | |
| Voltage dips, short interruptions and voltage variations on power supply input lines IEC 61000-4-11 | <5 % UT (>95 % dip in UT) for 0,5 cycle <5% UT (>95% dip in UT) for 1 cycle 70 % UT (30 % dip in UT) for 25 cycles <5 % UT (>95 % dip in UT) for 5 s | <5 % UT (>95 % dip in UT) for 0,5 cycle <5% UT (>95% dip in UT) for 1 cycle 70 % UT (30 % dip in UT) for 25 cycles <5 % UT (>95 % dip in UT) for 5 s | Mains power quality should be that of a home healthcare environment. If the user of the Philips Avent breast pump requires continued operation during power mains interruptions, it is recommended that the Philips Avent breast pump be powered from an uninterruptible power supply or a battery. Interruptible electric supply can cause the breast pump to turn off. This is acceptable as this will not lead to unacceptable risks. |
| Power frequency (50/60 Hz) magnetic field IEC 61000-4-8 | 30 A/m 30 A/m Power frequency | magnetic fields should be at levels characteristic of a home healthcare environment. | |

Note: UT is the a.c. mains voltage prior to application of the test level.
Declaration – electromagnetic immunity
The Philips Avent breast pump is intended for use in the electromagnetic environment specified below. The user of the Philips Avent breast pump should assure that it is used in such an environment.
| Immunity test | IEC 60601 test level | Com- pliance level | Electromagnetic environment – guidance |
| Conducted RF IEC 61000-4-6 | 3 Vrms 150 kHz to 80 MHz | 3 Vrms Portable and mobile RF communications equipment should be used no closer to any part of the Philips Avent breast pump, including cables, than the recommended separation distance calculated from the equation applicable to the frequency of the transmitter.Recommended separation distance d=1,17 √P The breast pump can be turned off. | |
| Radiated RF IEC 61000-4-3 | 3 V/m 80 MHz to 2,5 Ghz | 3 V/m 80 MHz to 800 Mhz d=1,17 √P800 MHz to 2,5 GHz d=2,33 √Pwhere P is the maximum output power rating of the transmitter in watts (W) according to the transmitter manufacturer and d is the recommended separation distance in metres (m).Field strengths from fixed RF transmitters, as determined by an electromagnetic site survey, should be less than the compliance level in each frequency range.Interference may occur in the vicinity of equipment marked with the following symbol:Caution: Although the breast pump is compliant with applicable EMC directives, it may still be susceptible to excessive emissions and/or may interfere with other equipment. A consequence can be that the breast pump turns off or the on/off button starts flashing (see troubleshooting for more information), which is acceptable as this will not lead to unacceptable risks. To prevent interference, keep other electric equipment away from the breast pump during expressing. with the following symbol:Caution: Although the breast pump is compliant with applicable EMC directives, it may still be susceptible to excessive emissions and/or may interfere with other equipment. A consequence can be that the breast pump turns off or the on/off button starts flashing (see troubleshooting for more information), which is acceptable as this will not lead to unacceptable risks. To prevent interference, keep other electric equipment away from the breast pump during expressing. | |


Note 1: At 80 MHz and 800 MHz, the higher frequency range applies.
Note 2: These guidelines may not apply in all situations. Electromagnetic propagation is affected by absorption and reflection from structures, objects and people.
Field strengths from fixed transmitters, such as base stations for radio (cellular/cordless) telephones and land mobile radios, amateur radio, AM and FM radio broadcast and TV broadcast cannot be predicted theoretically with accuracy. To assess the electromagnetic environment due to fixed RF transmitters, an electromagnetic site survey should be considered. If the measured field strength in the location in which the Philips Avent breast pump is used exceeds the applicable RF compliance level above, the Philips Avent breast pump should be observed to verify normal operation.
If abnormal performance is observed, additional measures may be necessary, such as re-orienting or relocating the Philips Avent breast pump. Over the frequency range 150 kHz to 80 MHz, field strengths should be less than [3] V/m.
Recommended separation distances between portable and mobile RF communications equipment and the Philips Avent breast pump The Philips Avent breast pump is intended for use in a home healthcare environment in which radiated RF disturbances are not controlled
The user of the Philips Avent breast pump can help prevent electromagnetic interference by maintaining a minimum distance between portable and mobile RF communications equipment (transmitters) and the Philips Avent breast pump as recommended below, according to the maximum output power of the communications equipment.
Separation distance according to frequency of transmitter m
| Rated maximum output power of transmitter W | 150 kHz to 80 MHz outside ISM bands d=1,17 √P | 80 MHz to 800 MHz d=1,17 √P | 800 MHz to 2,5 GHz d=2,33 √P |
| 0,01 0,12 0,12 0,23 | |||
| 0,1 0,38 0,38 0,73 | |||
| 1 1,2 1,2 2,3 | |||
| 10 3,8 3,8 7,3 | |||
| 100 12 12 23 |

For transmitters rated at a maximum output power not listed above, the recommended separation distance d in metres (m) can be estimated using the equation applicable to the frequency of the transmitter, where P is the maximum output power rating of the transmitter in watts (W) according to the transmitter manufacturer.

Note 1: At 80 MHz and 800 MHz, the separation distance for the higher frequency range applies.
Note 2: These guidelines may not apply in all situations. Electromagnetic propagation is affected by absorption and reflection from structures, objects and people.
Usage and storage conditions
Keep the breast pump out of direct sunlight as prolonged exposure may cause discoloration. Store the breast pump and its accessories in a safe, clean and dry place.
If the appliance has been stored in a hot or cold environment, place it in the usage environment to let it reach a temperature within the usage conditions ( 41^ F / 5°C to 104^ F / 40°C) before you use it.
Usage conditions
| Temperature 41°F (+5°C) to 104°F (+40°C) |
| Relative humidity 15% to 93% (non-condensing) |
| Atmospheric pressure 700 and 1060 Pa air pressure |
| Storage conditions |
| Temperature -13°F (-25°C) to 158°F (70°C) |
| Relative humidity 15% to 93% (non-condensing) |
Technical specifications
The adapter is not a part of the medical electric equipment, but is a separate power supply within the medical electric system.
| Mains input Voltage: 100-240V | |
| Mains input Current: 1000mA | |
| Mains input Frequency: 50-60Hz | |
| Batteries(for SCF332, SCD223/10 and SCD292/22): | Non rechargeable batteries: 4 x 1.5V AARechargeable batteries: 4 x 1.2V, min. capacity 2000 mAh, max.capacity 2100 mAh. |
| SCF332, SCD223/10 and SCD292/22 | Adapter type number: VS0332 |
| Output Voltage: 5V | |
| Output Current: 1000mA | |
| Type of Current: DC | |
| Protection class: Class 2 | |
| SCF334 Adapter type number: VT0334 | |
42 English
Explanation of symbols
The warning signs and symbols are essential to ensure that you use this product safely and correctly and to protect you and others from injury. Below you find the meaning of the warning signs and symbols on the label and in the user manual.

Symbol for 'follow instructions for use'.

Indicates the need for the user to consult the instructions for use for important cautionary information such as warnings and precautions that cannot, for a variety of reasons, be presented on the medical appliance itself.

Indicates usage tips, additional information or a note.

Indicates the manufacturer, as defined in the IEC 60601-1 which contains a reference to the ISO 15223-1:2012.

This symbol means that the part of the appliance that comes into physical contact with the user (also known as the applied part) is of type BF (Body Floating) according to IEC 60601-1. The applied are part 3 and 4 of the general description overview (Fig.A)

Symbol for 'Class II Equipment'. The adapter is double insulated (Class II).

Indicates manufacturer's catalog number of the appliance.

Symbol for 'direct current'.

Symbol for 'alternating current.

Compliance to the Low Voltage Directive

Separate collection for electrical and electronic equipment in accordance with the EU directive. Electrical waste products should not be disposed of with household waste. See chapter 'disposal' for more information.

Press button to switch on and to switch off.

The first number 2: Protected against solid foreign objects of 12,5 mm ∅ and greater. The second number: Protected against vertically falling water drops when enclosure is tilted up to 15°. Vertically falling drops shall have no harmful effects when the enclosure is tilted at any angle up to 15° on either side of the vertical.

Indicates the manufacturer's serial number so that a specific medical appliance can be identified.

EurAsian Conformity Mark

Symbol for the 2 year Philips warranty.

Battery powered (for SCF332, SCD223/10 and SCD292/22)

UL (Underwriters Laboratories) testing according to the household standard

RCM Tick Mark– Australia

Lot number

Handle with care

Keep dry

Indicates the relative humidity limits to which the appliance can be safely exposed: 15% to 93%.

Indicates the storage and transportation temperature limits to which the medical appliance can be safely exposed: 41°F to 104°F / 5°C to 40°C.

Forest Stewardship Council- The FSC trademarks enable consumers to choose products that support forest conservation, offer social benefits, and enable the market to provide an incentive for better forest management
44 Español
Contenido
natural_image
Illustration of cleaning and waste disposal tools including a bottle, plastic bottles, and cleaning tools (no text or symbols)
natural_image
Circular object with five petal-like cutouts, labeled 19.5 mm at the bottom (no other text or symbols)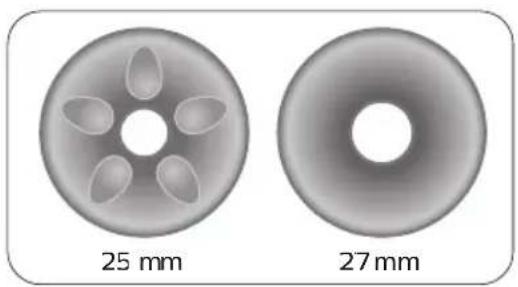
natural_image
Two grayscale circular objects with internal oval patterns, labeled 25 mm and 27 mm respectively (no text or symbols on the objects themselves)pie
| Segment | Value | | ------- | ----- | | Top Segment | 19.5 | | Bottom Segment | 27 |52 Español
natural_image
Two-panel illustration of a mechanical device with a valve and base, showing no text or symbols.natural_image
Diagram showing two identical mechanical components with a cross mark and checkmark, no text or symbols present.natural_image
Diagram of a mechanical device with a central component and an upward arrow indicating motion (no text or symbols)natural_image
Diagram of a spray bottle with a funnel and rotating arrow, no text or symbols presentnatural_image
Technical line drawing of a spray gun with a magnified inset showing internal components (no text or symbols)natural_image
Simple line drawing of a spray can with a funnel and handle (no text or symbols)natural_image
Illustration of a hand using a tool to lift a mechanical component (no text or symbols visible)natural_image
Illustration of a hand using a funnel to lift a bottle (no text or symbols visible)natural_image
Diagram of a device with an attached plug and cable, showing no text or symbolstext_image
1 2 4X AAnatural_image
Diagram of a mechanical device with a magnified inset showing internal components (no text or symbols)natural_image
Line drawing of a hand holding a device with a bulb and cable (no text or symbols)text_image
Diagram showing a device with labeled parts and a directional arrow, likely illustrating a mechanical or electrical component.text_image
Diagram showing two labeled icons with star symbols, one pointing downward and the other pointing up, separated by a diagonal line.text_image
Diagram showing a device with three flower icons above it, one labeled with a star and three others with flower symbols.natural_image
Diagram of a cylindrical electronic component with a labeled pin and cable, no text or symbols presentnatural_image
Diagram of a cylindrical electronic component with wires and a labeled pin (no text or symbols present)text_image
Diagram showing two stages of a bottle being folded, with one labeled 'AVI' and the other 'AVI' and the latter showing a lid.natural_image
Diagram showing two mechanical components with rotating arrows, no text or symbols presentnatural_image
Two identical dome-shaped objects with checkmarks and X marks, separated by a diagonal line (no text or symbols)Montaje del biberón
natural_image
Illustration of a hand holding a small object with a triangular tip, possibly a tool or device (no text or symbols present)natural_image
Diagram of a mechanical or biological structure with concentric circles and a central arrow, no visible text or symbols.text_image
Medical diagram showing a checkmark and a cross symbol on a surgical device, likely indicating a procedure or diagnostic.text_image
Diagram showing a mechanical component with a labeled arrow and number 2 pointing to it, likely indicating a step or section.natural_image
Simple line drawing of a mechanical component with a handle and central shaft (no text or symbols)natural_image
Diagram of a mechanical device with a central shaft and base, showing an upward arrow (no text or symbols)natural_image
Diagram of a mechanical device with a funnel and rotating arm, showing motion arrows (no text or symbols)natural_image
Illustration of a hand mixer device with a close-up inset showing internal components (no text or symbols)natural_image
Illustration of a robotic arm pouring liquid into a container (no text or symbols)natural_image
Line drawing of a hand pump device with a bell and handle (no text or symbols)natural_image
Illustration of hands operating a mechanical device with arrows indicating motion (no text or symbols)natural_image
Illustration of a hand holding a device with a speaker grille (no text or symbols visible)natural_image
Illustration of a hand holding a device with a bell and screen (no text or symbols)natural_image
Illustration of a hand holding a helmet and wrist, with no visible text or symbols
natural_image
Simple line drawing of a container with a lid and two curved arrows indicating rotation (no text or symbols)text_image
Diagram illustrating a step-by-step procedure for adding a cup into a container, with arrows indicating the step.natural_image
Diagram of a container being lifted by a lid, with arrows indicating rotation (no text or symbols)Alimentación
natural_image
Illustration of a bottle with a lid and arrow indicating rotation (no text or symbols)natural_image
Diagram of a mechanical or biological structure with a central upward arrow and concentric circular patterns (no text or symbols)natural_image
Diagram of a mechanical device with rotating arrows and a liquid container (no text or symbols)Extracción de leche
natural_image
Diagram of a hairdryer with a handle and base, showing rotational motion (no text or symbols)natural_image
Illustration of a hand holding a device with a black arrow pointing to the device (no text or symbols present)text_image
Prohibition sign showing a microwave with wavy lines and a diagonal line, indicating no protection or disinfection.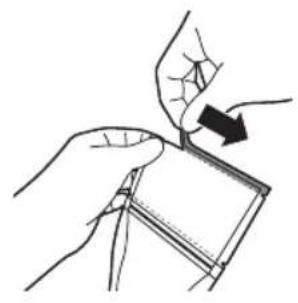
natural_image
Illustration of hands holding a card with a black arrow indicating direction (no text or symbols)natural_image
Illustration of a hand performing a medical or anatomical task with arrows indicating direction (no text or symbols present)text_image
Illustration showing hands holding a document with an information icon and arrows indicating direction or flownatural_image
Illustration of a hand holding a pen or tube with an arrow indicating direction (no text or symbols present)4 Selle la bolsa cerrando la cremallera.
72 Español
natural_image
Illustration of a hand holding a pen over a device with buttons (no text or symbols visible)natural_image
Illustration of a hand holding a small object with an arrow pointing to it, no text or symbols presentnatural_image
Illustration of a hand performing a medical or anatomical procedure with arrows indicating movement (no text or symbols present)natural_image
Illustration of a hand pouring liquid into a jar with a label 'AS 2017' (no other text or symbols)text_image
Diagram showing two mechanical components with directional arrows and numbered labels, likely illustrating a process or assembly.natural_image
Circular object with six petal-like cutouts, labeled 19.5 mm (no other text or symbols)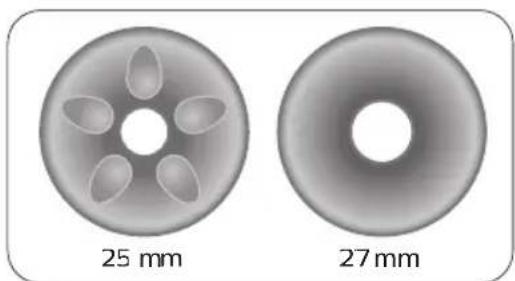
natural_image
Two grayscale circular objects with internal oval patterns, labeled 25 mm and 27 mm respectively (no additional text or symbols)natural_image
Simple 3D illustration of a speaker with a circular label containing the number 27 (no text or symbols on the speaker itself)natural_image
Two-panel illustration of a mechanical device with a valve and base, showing no text or symbols.natural_image
Diagram showing two identical mechanical components with a cross mark and checkmark, no text or symbols present.natural_image
Mechanical component diagram showing a lever and base with an upward arrow (no text or symbols)text_image
Diagram showing a mechanical device with directional arrows indicating rotation or movement, labeled in Chinese.natural_image
Technical line drawing of a spray gun with a magnified inset showing internal components (no text or symbols)natural_image
Line drawing of a spray bottle with a funnel and lid, no text or symbols presentnatural_image
Illustration of a hand turning a mechanical component with arrows indicating motion (no text or symbols)natural_image
Illustration of a hand holding a megaphone with a handle, no text or symbols presentnatural_image
Diagram of a device with an arrow pointing to a button and a magnified inset showing a switch (no text or symbols present)text_image
1 2 4X AAnatural_image
Diagram of a mechanical device with a central component and a magnified inset showing internal structure (no text or symbols)natural_image
Illustration of a hand holding a small device with a bulb and cable, no visible text or symbolstext_image
Diagram showing a device's switch mechanism with labeled parts and a droplet symbol indicating water level.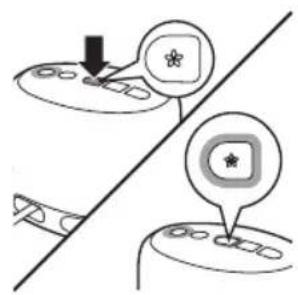
text_image
Diagram showing two steps of a device with icons and labels, including a star symbol and directional arrows.text_image
Diagram showing a computer mouse with three icons above it, one labeled with stars and three with stars inside.natural_image
Simple line drawing of a cylindrical electronic component with a circular connector and cable base (no text or symbols)natural_image
Simple line drawing of a cylindrical electronic component with a labeled pin and connection points (no text or symbols)text_image
M2201 M2202natural_image
Diagram showing two mechanical components with rotating arrows, no text or symbols presentnatural_image
Two identical dome-shaped objects with internal patterns, one marked with a checkmark and the other with a cross, separated by a diagonal line (no text or symbols)natural_image
Line drawing of a hand holding a small object with a triangular shape above it, no text or symbols presentnatural_image
Diagram of a mechanical or electrical component with a central upward arrow and surrounding circular base (no text or symbols)text_image
Diagram showing a checkmark and a cross symbol on a diagonal line, likely indicating approval or rejection actions.text_image
Diagram showing a mechanical component with labeled parts and directional arrow, marked with number 2.natural_image
Simple line drawing of a handheld device with a handle and spool (no text or symbols)natural_image
Diagram of a mechanical device with a central shaft and upward arrow, no text or symbols presenttext_image
Diagram showing a mechanical device with directional arrows indicating rotation or movement, labeled in Chinese.natural_image
Illustration of a spray gun with a cap and nozzle, shown in two views: one close-up of internal components, the other magnified with arrows indicating flow direction (no text or symbols)natural_image
Illustration of a robotic arm with a curved tool and a magnified view of the head (no text or symbols)natural_image
Line drawing of a hand pump bottle with a funnel inserted, no text or symbols presentnatural_image
Illustration of hands operating a mechanical device with arrows indicating motion (no text or symbols)natural_image
Illustration of a hand using a tool to lift a container (no text or symbols visible)natural_image
Medical illustration of a hand holding a device with a bulbous structure (no text or symbols)natural_image
Illustration of a hand holding a helmet and wrist, with a black arrow pointing to the grip (no text or symbols)natural_image
Simple line drawing of a cylindrical container with a lid and two curved arrows indicating rotation (no text or symbols)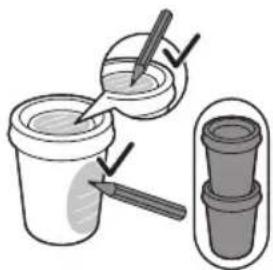
natural_image
Illustration of a glass cup being inserted into a container with a straw, alongside a separate cylindrical container (no text or symbols)natural_image
Diagram of a container being lifted by a lid, showing rotation arrows (no text or symbols)natural_image
Diagram of a bottle with a lid and arrow indicating rotation (no text or symbols)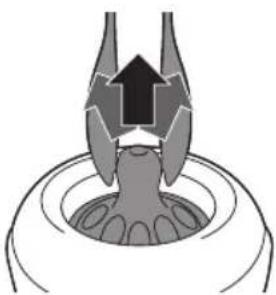
natural_image
Diagram of a mechanical or biological structure with a central arrow and surrounding circular elements (no text or symbols)natural_image
Diagram of a mechanical device with rotating arrows and a liquid container (no text or symbols)Extraction du lait
natural_image
Diagram of a hairdryer with rotating hands and base, no text or symbols presentnatural_image
Illustration of a hand holding a helmet and wrist, with no visible text or symbolstext_image
Prohibition sign showing a microwave with a diagonal line crossed out, indicating no protection or disinfection.112 Français (Canada)
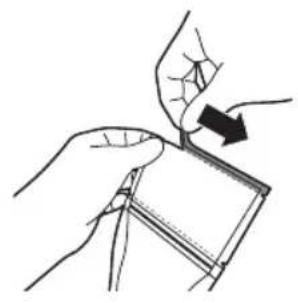
natural_image
Illustration of hands holding a card with a black arrow indicating direction (no text or symbols)natural_image
Illustration of a hand holding a kidney with arrows indicating force direction (no text or symbols)natural_image
Illustration of two hands holding a transparent object with arrows indicating movement or force (no text or symbols)natural_image
Illustration of hands performing a medical procedure on a patient's abdomen with a black arrow indicating direction (no text or symbols present)natural_image
Hand holding a pen pointing at a device with buttons and display (no text or symbols visible)natural_image
Illustration of hands performing a medical procedure on a patient's abdomen (no text or symbols present)natural_image
Illustration of a hand performing a medical or anatomical procedure with arrows indicating movement (no text or symbols present)natural_image
Illustration of a hand pouring liquid into a jar labeled 'A#T#1' (no text or symbols on the diagram itself)text_image
Diagram showing two steps of a device operation: first with rotating component, second with tool and switch.Trademarks owned by the Philips Group /
Manufacturer: Philips Electronics UK Limited,
Lower Road, Glemsford, Suffolk, CO10 7QS, UK
In US manufactured for: Philips Personal Health
a division of Philips North America LLC
P.O. Box 10313
Stamford, CT 06904
United States of America
In Canada imported for: Philips Electronics Ltd,
281 Hillmount Road, Markham, ON L6C 2S3.
Specifications are subject to change without notice.