1456S - Home automation COMELIT - Free user manual and instructions
Find the device manual for free 1456S COMELIT in PDF.

| Product Type | Apartment Gateway for VIP System |
| Brand | Comelit |
| Model | 1456S |
| Power Supply | 40-56 Vdc via Art. 1441 |
| Power Consumption | Approx. 5 W (estimate) |
| Dimensions (W x D x H) | 140 x 85 x 30 mm (estimate) |
| Weight | 200 g (estimate) |
| Connectivity | 4 Ethernet ports: HOME 1 PoE, HOME 2 (adjustable PoE), HOME 3 (adjustable PoE), HOME 4 NO PoE |
| Default IP Address | 192.168.1.200 |
| Supported Protocols | TCP/IP, UDP, DDNS (Comelit, No-IP, DynDNS) |
| Main Functions | Gateway for Intercall Remote VIP app, web configuration, VIP address management, video routing |
| Max Number of Video Streams | 4 over wired network, 1 over tunnel (configurable) |
| Operating Mode | Slave in VIP system |
| Installation | For qualified electrician only; cut power before intervention |
| Configuration | Via web browser at 192.168.1.200:8080, password "comelit" |
| Maintenance and Cleaning | Disconnect power before cleaning; use a dry cloth |
| Spare Parts and Repairability | Contact Comelit after-sales service or authorized dealer |
| Standards | Compliant with Directive 2006/95/EC (CE marking) |
| Warranty | Legal 2-year warranty (subject to terms and conditions) |
| Operating Temperature | 0°C to +40°C (estimate) |
Frequently Asked Questions - 1456S COMELIT
User questions about 1456S COMELIT
0 question about this device. Answer the ones you know or ask your own.
Ask a new question about this device
Download the instructions for your Home automation in PDF format for free! Find your manual 1456S - COMELIT and take your electronic device back in hand. On this page are published all the documents necessary for the use of your device. 1456S by COMELIT.
USER MANUAL 1456S COMELIT
natural_image
Technical line drawing of an electronic component housing (no text or symbols)
Manuale tecnico Gateway ViP Art. 1456 / Art. 1456S Technical manual for VIP Gateway Art. 1456 / Art. 1456S Manuel technique Gateway VIP Art. 1456 / Art. 1456S
www.comelitgroup.com


AVVERTENZE
Ports - Custom Services
Apply ▶
×Cancel
Service Name
InterCall Remote ViP
Service Type
TCP
External Starting Port
64100 (1-65535)
External Ending Port
64100 (1\~65535)
Use the same port range for Internal port
64100 (1\~65535)
Internal Starting Port
64100
Internal Ending Port
192 . 168 . 1 . 200|
Internal IP address
Settaggi Art. 1456 / Art. 1456S
text_image
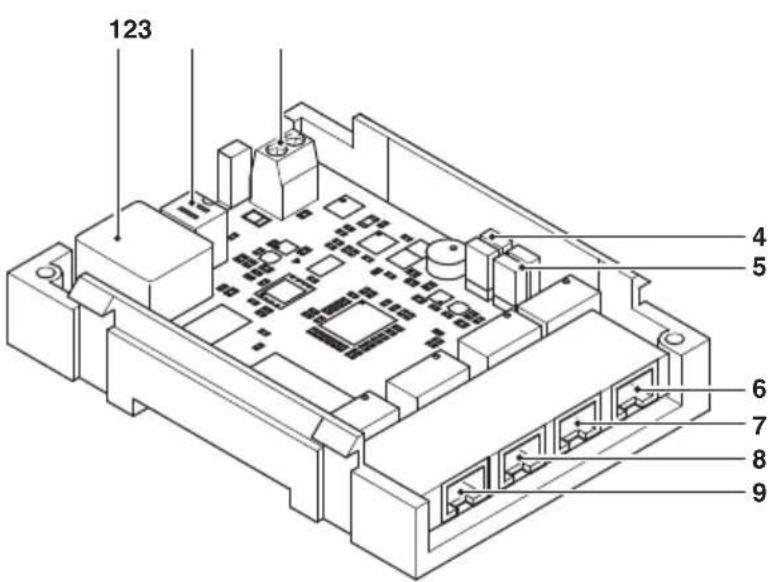
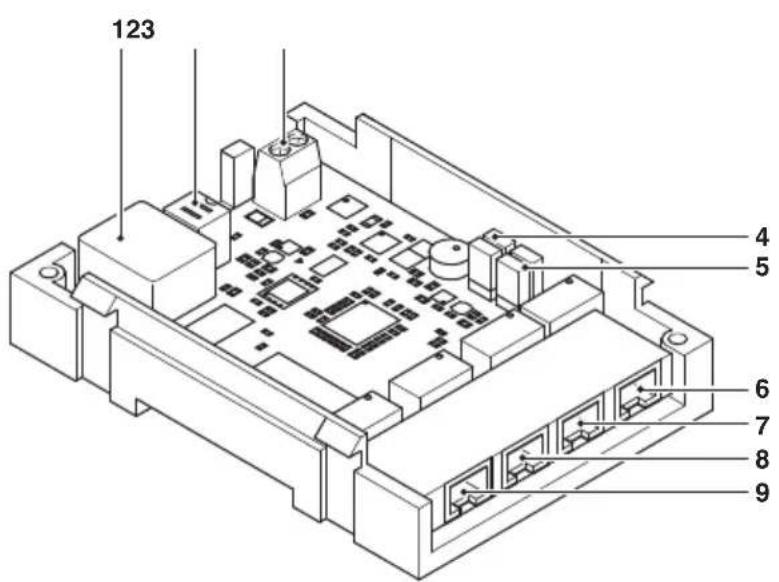
123 4 5 6 7 8 9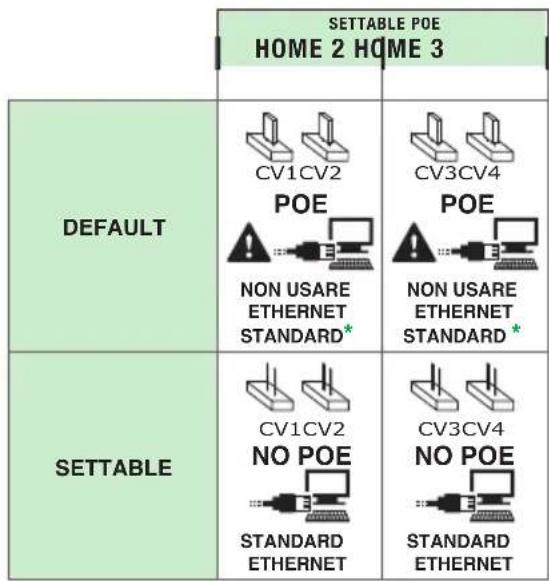
text_image
SETTABLE POE HOME 2 HOME 3 DEFAULT CV1CV2 POE NON USARE ETHERNET STANDARD* POE NON USARE ETHERNET STANDARD* SETTABLE CV1CV2 NO POE STANDARD ETHERNET CV3CV4 NO POE STANDARD ETHERNET* Connettersi al router o al PC solo con cavo rosso Comelit 2E7T000500
• Install the equipment by carefully following the instructions given by the manufacturer and in compliance with the standards in force.
- All the equipment must only be used for the purpose it was designed for. Comelit Group S.p.A. declines any responsibility for improper use of the apparatus, for any alterations made by others for any reason or for the use of non-original accessories or materials.
- All the products comply with the requirements of Directive 2006/95/EC (which replaces Directive 73/23/EEC and subsequent amendments), as certified by the CE mark they carry.
- Do not route the riser wires in proximity to power supply cables (230/400V).
• Installation, mounting and assistance procedures for electrical devices must only be performed by specialised electricians.
- Cut off the power supply before carrying out any maintenance work.

Confi guring Art. 1456 / Art. 1456S
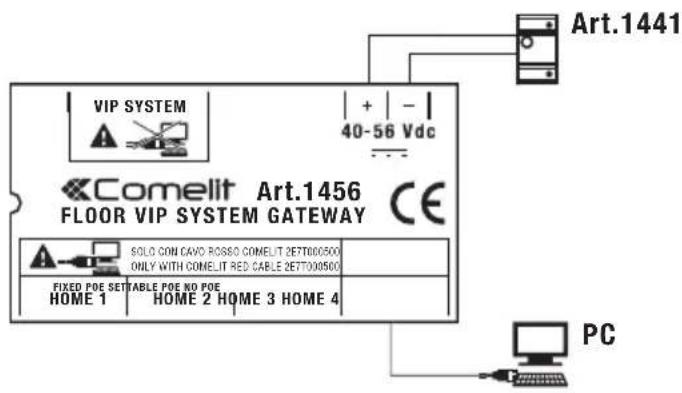
- Power up Art. 1456 / Art. 1456S using Art.1441.
- Connect Art.1456 / Art. 1456S to your PC via the HOME 4 port and standard Ethernet cable.
text_image
VIP SYSTEM + | - | 40-56 Vdc Comelit Art.1456 FLOOR VIP SYSTEM GATEWAY CE SOLO CON CAVO ROSSO COMELIT 2E7T000500 ONLY WITH COMELIT RED CABLE 2E7T000500 FIXED POE SETTABLE POE NO POE HOME 1 HOME 2 HOME 3 HOME 4 PC Art.1441- Assign the IP address (code identifying a device connected to a network) to your PC: 192.168.1.2 *
Windows 7 Windows 8 and 8.1
a. Open Start / Control Panel and select "Network and Sharing Center".
b. In "View your active networks" click the connection you want to edit and select Properties.
c. In the Networking window, select "Internet Protocol (TCP/IP)" (or TCP/IPv4 or TCP/IPv6) and click Properties.
d. Tick "Use the following IP address" and assign the following parameters:
a. On the side bar click "Search".
b. Search "Network and Sharing Center".
C. In "View your active networks" click the connection you want to edit and select Properties.
d. In the window that opens, click "Properties".
e. Select Internet Protocol (TCP/IP) (or TCP/IPv4 or TCP/IPv6) and click Properties.
f. Tick "Use the following IP address" and assign the following parameters:
text_image
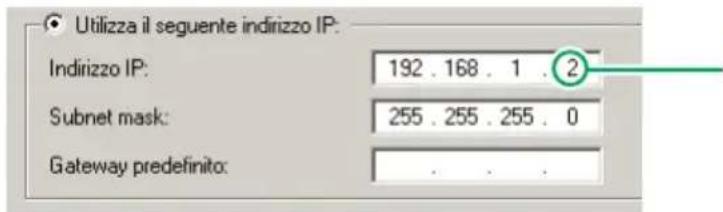
Utilizza il seguente indirizzo IP: Indirizzo IP: 192 . 168 . 1 . 2 Subnet mask: 255 . 255 . 255 . 0 Gateway predefinito:
the last value must be between 2 and 253 excluding: 200 (assigned to gateway Art. 1456 / Art. 1456S) and the values already assigned to other devices connected to the network
- Open your browser, enter 192.168.1.200:8080 in the address bar and press "Enter".
- Press "Configuration".
- Enter "comelit" in the PASSWORD field and press Login.
- Wait for a few seconds.
- Set the desired language using the drop-down menu located in the page footer.

text_image
http://192.168.1.200:8080/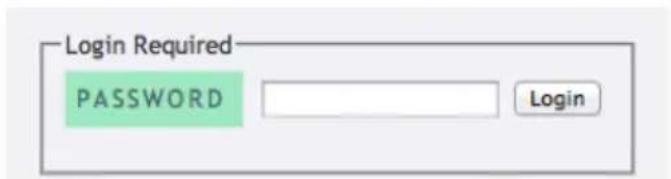
text_image
Login Required PASSWORD Login
text_image
e: 0 days 00:06:37, Used mem: 13/90 MB EnglishArt. 1456 Master Settings
- Set the VIP address (maximum 8 digits) and save.
- Click "Apply Master settings immediately" to save the new configurations.
Master Settings
| VIP ADDRESS | MAX VIDEO ON NET | MAX VIDEO ON TUNNEL |
| 00012345ViP Address for the integrated Master. This fields must be 8-numbers-long (i.e., "00001234" or "11111111") | 4Maximum number of video flows simultaneously sent to slaves connected via network | 1Maximum number of video flows simultaneously sent to slaves connected via tunnels (i.e., mobile apps)Apply Master settings immediately |
- Press "Restart" to restart Art. 1546S and follow the instructions as they appear on screen.
Once the procedure is complete, click "Configuration" and re-enter the password "comelit" if you wish to continue with the device setting process.
Art. 1456S VIP Settings
- Set the VIP address* (maximum 8 digits) and the Master VIP address (maximum 8 digits) and save. * The VIP address of Art. 1456S cannot be reached by other VIP system devices, but only a label identifying it; we therefore suggest the use of special coding (e.g. 99XXXXXX). As with all VIP addresses, it must be unique.
- Click "Apply VIP settings immediately" to save the new configurations.

text_image
ViP Settings VIP ADDRESS MASTER ADDRESS 99001040 00001040 ViP Address for this device. ViP Address for the Master device inside the apartment. Apply VIP settings immediately- Press "Restart" to restart Art. 1546 and follow the instructions as they appear on screen.
Once the procedure is complete, click "Configuration" and re-enter the password "comelit" if you wish to continue with the device setting process.
DDNS Settings
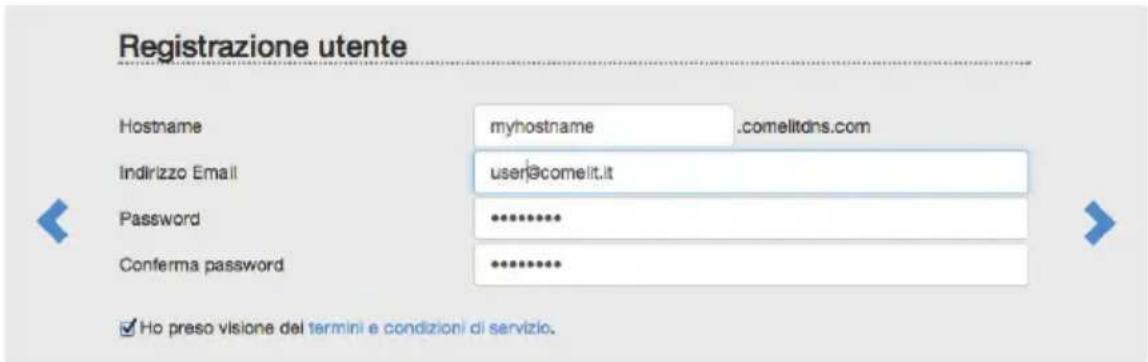
- On the item configuration screen, click "Open Comelit DDNS registration site" to access the product registration screen.
- Fill in the user registration fi elds.
N.B.: make a note of the data entered, or copy and paste the information directly onto the configuration screen for Art. 1456 / Art. 1456S (see step 15).
-
Press to register the product. A confirmation email will be sent to the email address entered during the "user registration" process; follow the instructions in the message to complete the activation procedure.
-
On the product configuration page, enter "2" as the DDNS PROVIDER and enter the USERNAME, PASSWORD and HOSTNAME used during the "user registration" process (see step 13), then save.
- Click "Apply DDNS settings immediately" to save the new configurations.
DDNS Settings
| DDNS PROVIDER | USERNAME | PASSWORD |
| 2 (Comelit) | user@comelit.it | password |
| DDNS provider (site). Available identifiers:1 DDNS disabled2 Comelit3 NO-IP4 DYN | Username required for DDNS updates, as registered on the DDNS provider site | Password required for DDNS updates, as registered on the DDNS provider site |
| HOSTNAME | DDNS CODE | ACTIVATION CODE |
| myhostname savecancel | 567ABD5CDE31 | 01BDD802FA181963 |
| Hostname required for DDNS updates, as registered on the DDNS provider site | First code required to activate the Comelit DDNS facility for this device | Second code required to activate the Comelit DDNS facility for this device |
| Open Comelit DDNS registration site | Apply DDNS settings immediately |
Port forwarding (for remote connection with Intercall Remote VIP App)
- Connect the PC to the router to which the gateway Art. 1456 / Art. 1456S is connected.
- Access the browser and enter the IP address of the router (this can be found in the router user manual) in the navigation bar, for example: 192.168.1.1

text_image
+ http://192.168.1.1- Log in by entering the username and password (these can be found in the router user manual).

The port configuration method may differ according to the brand and type of router used
- Search for the sections "Port Opening" or "Apps and games" or "Port Forwarding" (if not displayed on the main menu, search for them in Advanced settings) and add the ports you wish to configure.
- Fill in the configuration panel (see example in the figure below):
a. Enter the name of the application.
b. Select TCP protocol (if possible select both TCP/UDP protocols).
c. For the external port, enter the value 64100* (enter the same value in Start and End to open a single port).
d. For the internal port, enter the value 64100 (enter the same value in Start and End to open a single port).
e. Enter the VIP gateway IP address 192.168.1.200
f. Confirm.
g. If selecting both protocols (see step b) is not permitted, repeat the procedure to open the port with UDP protocol.
Ports - Custom Services
Apply ▶
×Cancel
Service Name
InterCall Remote ViP
Service Type
TCP
External Starting Port
64100 (1\~65535)
External Ending Port
64100 (1\~65535)
Use the same port range for Internal port
64100 (1\~65535)
Internal Starting Port
64100
Internal Ending Port
192.168.1.200
Internal IP address
Setting Art. 1456 / Art. 1456S
text_image
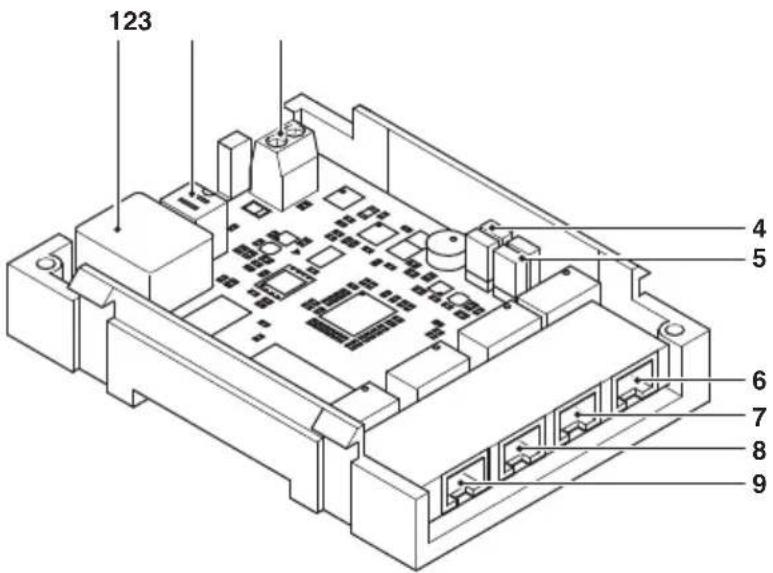
123 4 5 6 7 8 9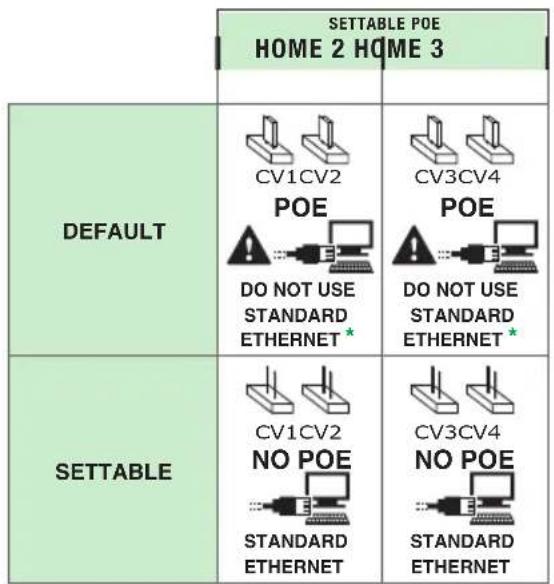
text_image
SETTABLE POE HOME 2 HOME 3 DEFAULT CV1CV2 POE DO NOT USE STANDARD ETHERNET* COV3CV4 POE DO NOT USE STANDARD ETHERNET* SETTABLE CV1CV2 NO POE STANDARD ETHERNET COV3CV4 NO POE STANDARD ETHERNET* Only connect to the router or PC using the red Comelit cable 2E7T000500
- Ethernet port for VIP system riser input (autoip addressing)
- Dip switch (for future uses)
- Power supply input via Art. 1441
- CV1 and CV2 for setting HOME 2
- CV3 and CV4 for setting HOME 3
- HOME 4 NO POE Ethernet port for PC or router connection (static address 192.168.1.200, netmask 255.255.255.0)
- HOME 3 POE Ethernet port, can be set as NO POE (static address 192.168.1.200, netmask 255.255.255.0)
- HOME 2 POE Ethernet port, can be set as NO POE (static address 192.168.1.200, netmask 255.255.255.0)
- HOME 1 POE Ethernet port (static address 192.168.1.200, netmask 255.255.255.0)
AVERTISSEMENT
Ports - Custom Services
Apply

×Cancel
Service Name
InterCall Remote ViP
Service Type
TCP
External Starting Port
64100 (1-65535)
External Ending Port
64100 (1\~65535)

Use the same port range for Internal port
64100 (1\~65535)
Internal Starting Port
64100
Internal Ending Port
192 . 168 . 1 . 200|
Internal IP address
Réglages Art. 1456 / Art. 1456S
text_image
123 4 5 6 7 8 9