Pre Expert KB790 - Blender KRUPS - Free user manual and instructions
Find the device manual for free Pre Expert KB790 KRUPS in PDF.
| Brand | Krups |
| Model | Pre Expert KB790 |
| Product type | Blender (mixer) |
| Bowl capacity | 1.75 L (60 oz) for thick preparations; 1.5 L (50 oz) for liquids |
| Bowl material | Borosilicate glass resistant to thermal shock |
| Base material | Cast metal |
| Blades | Removable, very sharp |
| Speeds | Slow, 1, 2, 3, 4 |
| Special functions | Vari-Pulse, Ice Crush (ice crusher) |
| Power supply | 120 V, 60 Hz (polarized plug) |
| Manufacturer warranty | 2 years |
| Base maintenance | Wipe with a damp cloth; never immerse |
| Bowl and lid maintenance | Dishwasher safe (lid in top rack) |
| Blade maintenance | Hand wash with care |
| Safety | Only starts if properly assembled; OFF button; lid lock |
| Spare parts available | Replacement seals at authorized KRUPS service centers |
| Optional accessory | Chopper (available at select KRUPS centers) |
| Repairability | Repairable during and after warranty; contact customer service |
Frequently Asked Questions - Pre Expert KB790 KRUPS
User questions about Pre Expert KB790 KRUPS
0 question about this device. Answer the ones you know or ask your own.
Ask a new question about this device
Download the instructions for your Blender in PDF format for free! Find your manual Pre Expert KB790 - KRUPS and take your electronic device back in hand. On this page are published all the documents necessary for the use of your device. Pre Expert KB790 by KRUPS.
USER MANUAL Pre Expert KB790 KRUPS
natural_image
Black and white photo of a modern kitchen blender with visible liquid and control buttons (no text or symbols on the device itself)EN FR ES
KRUPS

natural_image
Line drawing of a portable kitchen pot with handle and lid, showing internal flow direction (no text or symbols)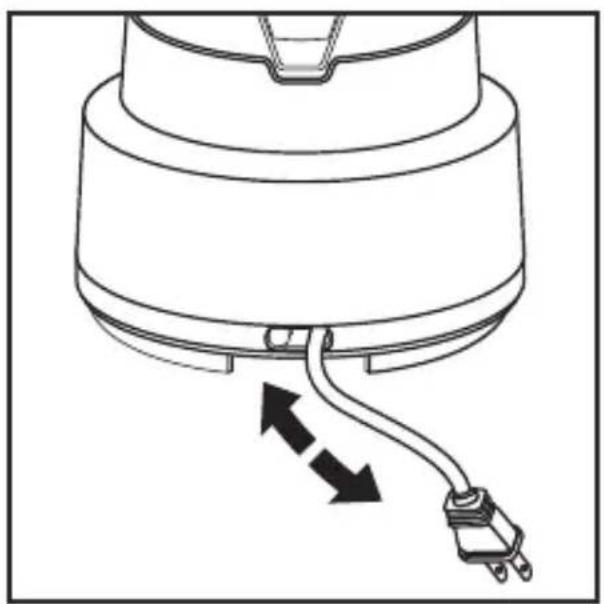
natural_image
Technical diagram of a mechanical component with two arrows indicating direction of movement or force (no text or symbols present)TABLE OF CONTENTS
IMPORTANT SAFEGUARDS.... P. 3
DESCRIPTION OF THE BLENDER.... P. 6
USING YOUR APPLIANCE.... P. 6
IMPORTANT GUIDELINES.... P. 9
CLEANING P. 10
TROUBLESHOOTING P. 11
DISPOSING OF YOUR APPLIANCE.... P. 12
WARRANTY.... P. 13
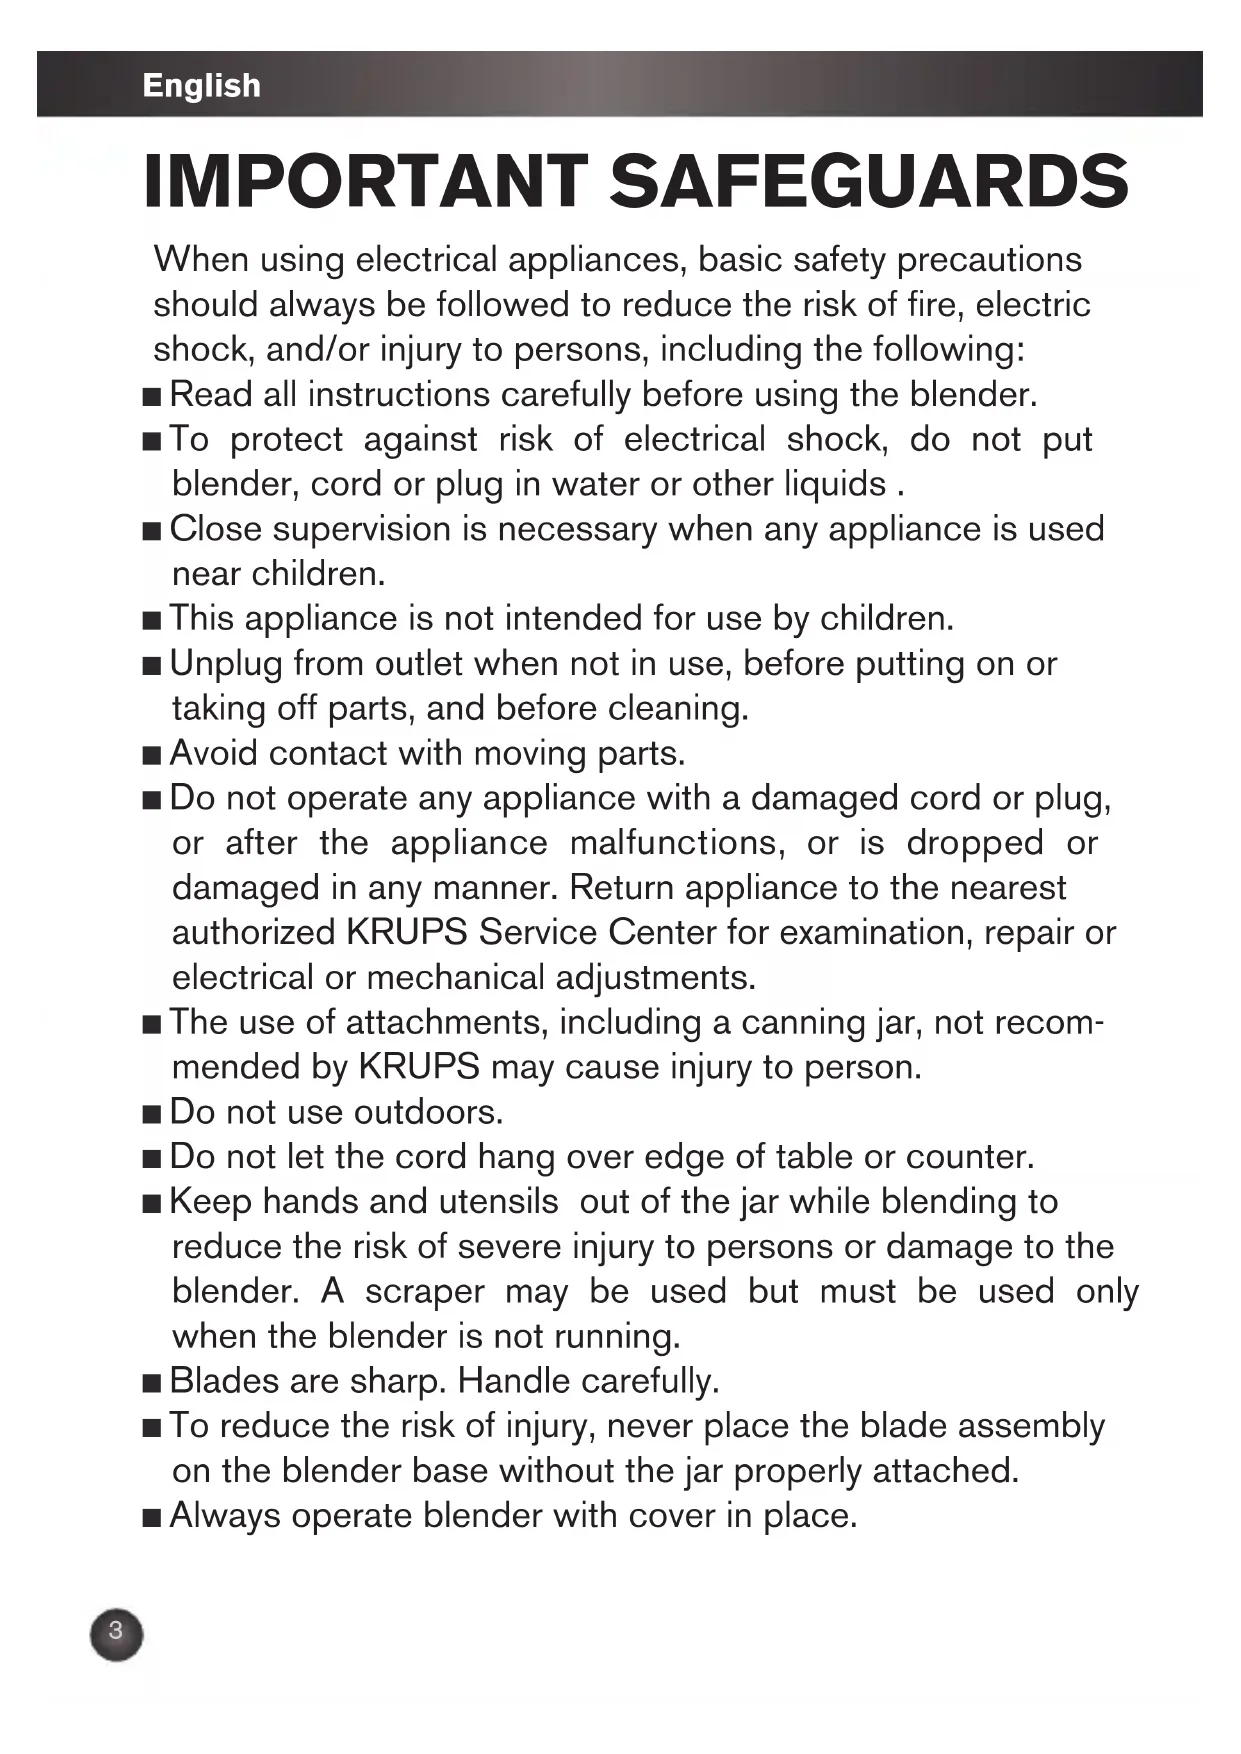
IMPORTANT SAFEGUARDS
When using electrical appliances, basic safety precautions should always be followed to reduce the risk of fire, electric shock, and/or injury to persons, including the following:
- Read all instructions carefully before using the blender.
■ To protect against risk of electrical shock, do not put blender, cord or plug in water or other liquids.
■ Close supervision is necessary when any appliance is used near children.
■ This appliance is not intended for use by children.
■ Unplug from outlet when not in use, before putting on or taking off parts, and before cleaning.
■ Avoid contact with moving parts.
■ Do not operate any appliance with a damaged cord or plug, or after the appliance malfunctions, or is dropped or damaged in any manner. Return appliance to the nearest authorized KRUPS Service Center for examination, repair or electrical or mechanical adjustments.
■ The use of attachments, including a canning jar, not recommended by KRUPS may cause injury to person.
■ Do not use outdoors.
■ Do not let the cord hang over edge of table or counter. - Keep hands and utensils out of the jar while blending to reduce the risk of severe injury to persons or damage to the blender. A scraper may be used but must be used only when the blender is not running.
■ Blades are sharp. Handle carefully.
■ To reduce the risk of injury, never place the blade assembly on the blender base without the jar properly attached.
■ Always operate blender with cover in place.
■ When blending hot liquids, remove measuring cup (center piece of cover) to allow steam to escape.
■ Make certain the voltage of the appliance is in accordance with your domestic supply.
■ Never use the blender on a hot surface or near fire.
■ Do not place ingredients bigger than one inch into the blender. They could jam the blades and overheat the motor.
■ Do not use the appliance for other than intended use.
■ Do not place the blender jar in a microwave oven.
SAVE THESE INSTRUCTIONS
CAUTION
■ This appliance is for household use only. Any servicing other than cleaning and user maintenance should be performed by the nearest authorized KRUPS Service Center.
■ Do not immerse base in water.
■ To reduce the risk of fire or electric shock, do not remove base or any parts inside. No user serviceable parts inside. Repair should be done by an authorized KRUPS Service Center only.
SPECIAL CORD SET INSTRUCTIONS
Regarding your cord set:
A. A short power-supply cord is provided to reduce risks resulting from becoming entangled in or tripping over a longer cord.
B. Longer extension cords are available and may be used if care is exercised during use.
C. (1) If a long extension cord is used, the marked electrical rating of extension cord should be at least as great as the electrical rating of the appliance, (2) if the appliance is of the grounded type, the extension cord should be of a grounded type, and (3) the longer cord should be arranged so that it will not drop over the counter top or table top where it can be pulled on by children or tripped over.
D. This appliance has a polarized plug (one blade is wider than the other). As a safety feature, this plug will fit in a polarized outlet only one way. If the plug does not fully fit in the outlet, reverse the plug. If it still does not fit, contact a qualified electrician. Do not modify the plug in any way.
DESCRIPTION
A Die cast base
B Control panel
b1 - Stop button
b2 - Slow speed
b3 - speed 1
b4 - speed 2
b5 - speed 3
b6 - speed 4
b7 - Ice crush function
b8 - Vari-Pulse function
C Cord storage
D Blender jar assembly
d1 - Locking ring base
d2 - Removable blade assembly
d3 - Seal
d4 - Graduated 60oz glass jar
E Blender jar lid
F Blender jar stopper, 2,5 oz
G Food chopper accessory (available in limited KRUPS Service Centers)
USING YOUR APPLIANCE
■Before first use, wash the blender jar, lid, and lid stopper in warm soapy water. Rinse and dry carefully. Never immerse the base of the appliance in water or put it under running water.
■The blender jar is made of borosilicate glass, which is thermal-shock and scratch resistant. As a result, both hot and cold foods can be prepared in the blender jar. However, when blending hot foods, always ensure that the lid stopper is loosened to allow steam to escape. Always double-check that the lid is correctly locked in place before processing to prevent injury, and allow boiling hot liquids to cool before blending. Temperature should not exceed 212°F
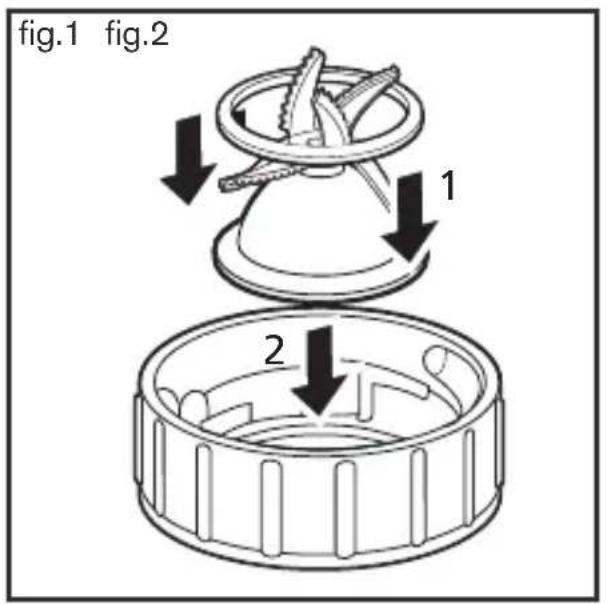
■ Place the ring seal (d3) onto the base of the removable blade carrier (d2) (diagram 1).
■ Press the assembly (d2 + d3) down into the locking ring base (d1). It will click into place.
■Hold this assembly upside down (locking ring base + blade assembly + seal) and place it onto the glass jar, which has to be held upside down too (diagram 2). Take care to ensure that the glass knobs of the jar (there are two of them) fit into the grooves in the locking ring base (diagram 2).
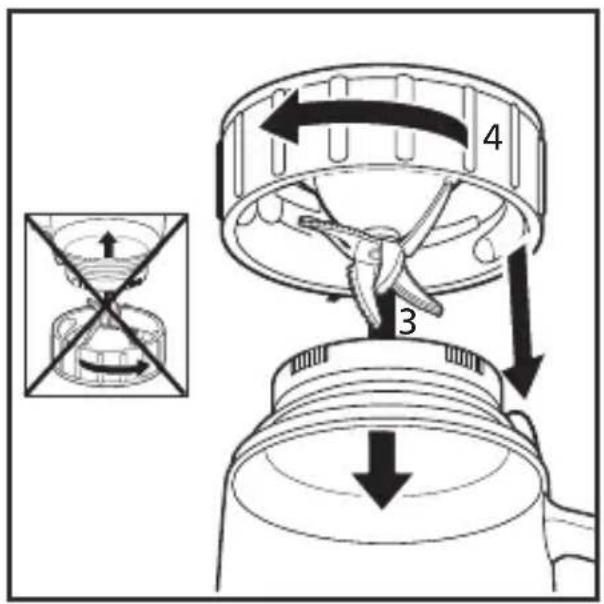
■ Hold the locking ring base (d1) firmly and give the glass jar a quarter turn to lock it in place (diagram 2). For your safety, the setting up and dismantling of the base (d2 + d3) on the bowl (d4) are possible only in the inverted position.
■ Place the assembled blender jar (D) onto the metal base (A). There are two possible positions: the jar handle can be in the left or right of the control panel(B). For your own safety, the blender will not start unless it is correctly assembled and positioned on the metal base.
■Place the ingredients to be blended in the jar. Take note of the following maximum levels:
- 60 oz for thick mixtures
- 50 oz for very liquid mixtures
- 6 to 8 large (1/3L or 3 cups max) ice cubes for ice crush.
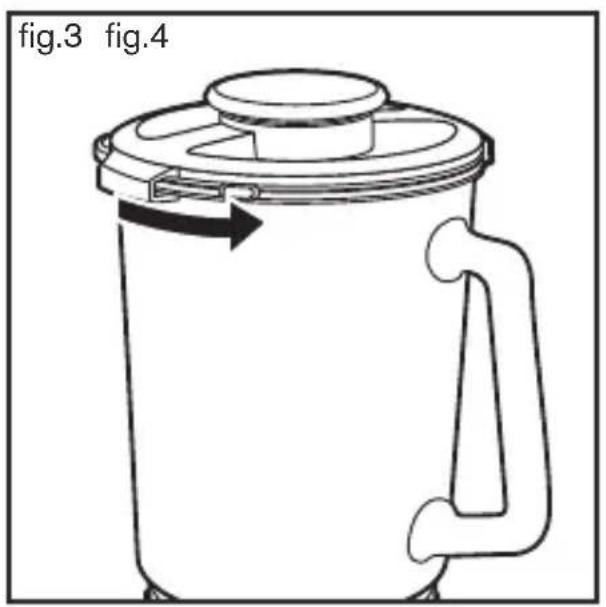
■Insert the lid stopper in the lid. Place the lid on the jar and twist counter-clockwise to lock the lid in place (diagram 3).
■Plug in the appliance. To begin blending, choose a function or speed. To stop blending at any time, press OFF.
Blending speed options are Slow - 1 - 2 - 3 - 4. (Slow is the lowest speed, 4 is the highest speed).
Start on Slow(b2) and then gradually increase to the desired speed. The selected speed button will light up. To stop processing at any time, press OFF (the indicator light for the speed selected will go out).

NOTE: The Slow speed can also be used to mix in solid ingredients that you do not wish to process, such as adding chocolate chips or nuts after blending a batter.
Always ensure the lid is securely locked in place while the blender is in use. To add ingredients while blending, carefully remove the lid stopper from the center of the lid and add ingredients through the opening. Replace the lid stopper once ingredients have been added.
Always stop blending and unplug the appliance before removing the blender lid. Never remove the blender jar from the base until the blades have come to a complete stop.
SPEED - SUGGESTED FOODS
Slow To foam milkshakes or smoothies after fruits have been blended. Blending powdered drink mixes with water. Folding liquid ingredients such as homemade mayonnaise. Mixing solid ingredients into a liquid without processing (e.g. adding chocolate chips to a pancake mix)
V1 Blending softer foods such as chickpeas for hummus. Mixing vegetable dips, preparing salad dressings
V2 Chopping small quantities of foods such as onions or nuts, crushing graham crackers
V3 Blending batters for pancakes or waffles, preparing fresh guacamole or salsa, puree cooked fruits or vegetables.
V4 Pureeing raw, uncooked fruits and vegetables into liquids.
VARI-PULSE FUNCTION
The Vari-Pulse function allows for more precise control over the degree of blending.
■Vari-Pulse can be selected for any speed from Slow to 4.
■Note that Vari-Pulse cannot be used with Ice Crush as it is already a pulsing function.
■To use Vari-Pulse, push the Vari-Pulse button first. The button will blink to show it has been selected. Then push the button for the desired speed (select from Slow - 1 - 2 - 3 - 4) and hold it down.
Blending will continue as long as the button is pushed, release the button to stop blending.
English
■To turn off the Vari-Pulse function, press OFF (the indicator light will go out).
■Always stop blending and unplug the appliance before removing the blender lid. Never remove the blender jar from the base until the blades have come to a complete stop.
ICE-CRUSH FUNCTION
This function is designed to automatically pulse to prepare crushed ice.
■To crush ice, add 6 to 8 large ice cubes (1/3L or 3 cups max) into the jar and lock on the lid.
■There is no need to add water.
■Press the Ice Crush button to start. For finely crushed ice, use less ice cubes (maximum 6-8 large ice cubes). When the ice is ready, stop the blender by pressing OFF.
■Always stop blending and unplug the appliance before removing the blender lid. Never remove the blender jar from the base until the blades have come to a complete stop.
IMPORTANT GUIDELINES
■Always ensure that the blender lid and stopper are locked in place before blending. For your safety, the blender will not start unless the blender jar is correctly assembled and positioned on the metal base.
■Always stop blending and unplug the appliance before removing the blender lid. Never remove the blender jar from the base until the blades have come to a complete stop.
■When blending solid ingredients, cut them into smaller pieces (1/2 – 1" long) before adding to the blender jar. When blending a mixture of liquid and solid ingredients, always pour the liquid ingredients into the blender jar first, then add the solid ingredients.
■When blending hot foods, always ensure that the lid stopper is loosened to allow steam to escape. Always double-check that the lid is correctly locked in place before processing to prevent injury, and allow boiling hot liquids to cool before blending.
■ To add ingredients while blending, carefully remove the lid stopper from the center of the lid and add ingredients through the opening. Replace the lid stopper once ingredients have been added.
■If you wish to scrape down the slides of the jar, press OFF and unplug the appliance before removing the blender jar from the base. Never reach into the blender jar with the jar still on the base.
Unlock the lid and use a plastic spatula to scrape down the sides. The blades at the bottom of the blender jar are very sharp, take care when scraping the jar to not damage your tools.
■ Never put hands or fingers into the glass jar or close to the blade.
■Always start blending on the lowest speed then increase to the desired speed.
■Remove the blender jar from the metal base only when it has come to a standstill.
■Cord storage: The power cord can be shortened by feeding back into the metal base through the opening in the rear (diagram 4).
CLEANING
■Always turn the blender off and unplug, then remove the blender jar from the base before cleaning.
■Wipe the metal base with a damp cloth and dry before using.
■Never immerse the base in water or place under running water.
■Do not clean base with harsh or abrasive chemical cleaners or sponges.
■The blender jar and lid can be washed in the dishwasher. The blender lid should be washed on the top rack only to prevent deformation.
■When washing by hand, use warm water and a gentle dishwashing liquid.
■Always remove the blade assembly from the bottom of the blender jar before washing.
■To clean the blade assembly, empty the jar and hold upside down, with the locking ring base on top, then release the locking ring base, and carefully remove the blade assembly and seal from the locking ring base.

CAUTION: USE EXTREME CAUTION WHEN HANDLING BLADE ASSEMBLY. BLADES ARE EXTREMELY SHARP!!
■Wash the locking ring base, blade assembly, and seal carefully by hand with warm water and gentle dishwashing liquid, then dry before re-assembling to the blender jar.
TROUBLESHOOTING
| Problem: Cause: Solution: | ||
| Blender does not work. | Blender is unplugged Plug in the blender | |
| The blender jar is not properly assembled or positioned on the base | Confirm that the blade assembly is properly assembled to the blender jar, and that the jar is correctly positioned in the base. | |
| Excessive vibration | The blender is placed on an uneven surface. | Place on a flat surface. |
| The blender jar is not properly positioned on the base. | Confirm that the jar is correctly assembled and positioned in the base. | |
| Blender jar contents leaking from lid. | Maximum capacity exceeded | Note maximum levels as follows- 60 oz for thick mixtures- 50 oz for very liquid mixtures- 6 to 8 ice cubes for ice crush |
| Blender lid is not properly locked in place. | Lock the blender lid in place before blending. | |
| Leaking from bottom of blender jar | Silicone seal missing or incorrectly assembled. | Check that the seal is in place and correctly positioned. |
| Seal deformed or damaged. | Replace seal. Replacement seals are available from KRUPS certified service centers. | |
| Blades are jammed. | Pieces of food are too big or too hard. | Reduce size of pieces of food, blend in smaller quantities, or blend with liquids. |
DISPOSING OF YOUR APPLIANCE
①Your appliance contains valuable materials which can be recycled.
Consult your local waste collection center for correct disposal procedure and recycling options.
MANUFACTURER'S WARRANTY

: www.krups.com
With a strong commitment to the environment, most of Krups products are repairable during and after the warranty period. Before returning any defective products to the point of purchase, please call Krups consumer service directly at the phone number below for repair options.
Your help to sustain the environment is appreciated!
The Warranty
This product is guaranteed by Krups for a period of 2 years against any manufacturing defect in materials or workmanship, starting from the initial date of purchase.
The manufacturer's warranty by Krups is an extra benefit which does not affect consumer's Statutory Rights.
The Krups warranty covers all costs related to restoring the proven defective product so that it conforms to its original specifications, through the repair or replacement of any defective part and the necessary labor. A replacement product may be provided instead of repairing a defective product. Krups's sole obligation and your exclusive resolution under this warranty are limited to such repair or replacement.
Conditions & Exclusions
The Krups warranty only applies within USA, Canada & Mexico, and is valid only on presentation of a proof of purchase. The product can be taken directly in person to an authorized service centre or must be adequately packaged and returned, by recorded delivery (or equivalent method of postage), to a Krups authorized service centre. Full address details for each country's authorized service centre are listed on the Krups website (www.krups.com) or by calling the appropriate telephone number listed below to request the appropriate postal address.
Krups shall not be obliged to repair or replace any product which is not accompanied by a valid proof of purchase.
This warranty will not cover any damage which could occur as a result of misuse, negligence, failure to follow Krups instructions, use on current or voltage other than as stamped on the product, or a modification or unauthorized repair of the product. It also does not cover normal tear and wear, maintenance or replacement of consumable parts, and the following:
- using the wrong type of water
- scaling (any de-scaling must be carried out according to the instructions for use);
- ingress of water, dust or insects into the product;
- mechanical damages, overloading
- damages or bad results due to wrong voltage or frequency
- accidents including fire, flood, lightning, etc
- professional or commercial use
- damage to any glass or porcelain ware in the product
This warranty does not apply to any product that has been tampered with, or to damages incurred through improper use and care, faulty packaging by the owner or mishandling by any carrier.
The Krups manufacturer's warranty applies only for products purchased and used in USA, Canada & Mexico. Where a product purchased in one country and then used in another one:
a) The Krups guarantee duration is the one in the country of usage of the product, even if the product was purchased in another listed country with different guarantee duration.
b) The Krups guarantee does not apply in case of non conformity of the purchased product with the local standards, such as voltage, frequency, power plugs, or other local technical specifications.
c) The repair process for products purchased outside the country of use may require a longer time if the product is not locally sold by Krups
d) In cases where the product is not repairable in the new country, the Krups guarantee is limited to a replacement by a similar product or an alternative product at similar cost, where possible.
Consumer Statutory Rights
This Krups manufacturer's warranty does not affect the statutory rights a consumer may have or those rights that cannot be excluded or limited, nor rights against the retailer from which the consumer purchased the product. This warranty gives a consumer specific legal rights, and the consumer may also have other legal rights which vary from State to State or Country to Country or Province to Province. The consumer may assert any such rights at his sole discretion.
Additional information
Accessories, Consumables and end-user replaceable parts can be purchased, if locally available, as described in Krups internet site.
| CANADA | GROUPE SEB CANADA345 Passmore AvenueToronto, ONM1V 3N8 | MEXICO(01800) 1 | G.S.E.B. MEXICANA,S.A. de C.V. Goldsmith38 Desp. 401, Col.Polanco ChapultepecDelegacionMiguel Hildalgo11 560 Mexico D.F. | U.S.A. | GROUPE SEB USA2121 Eden RoadMillville,NJ 08332 |
| 1-800-418-3325 | 12 83 25 800-526-5 | 377 |

: www.krups.com
TABLE DES MATIÈRES
MISES EN GARDE IMPORTANTES.... P. 17
DESCRIPTION DU MÉLANGEUR.... P. 20
UTILISATION DE VOTRE APPAREIL.... P. 20
CONSIGNES IMPORTANTES.... P. 23
NETTOYAGE P. 24
DÉPANNAGE P. 25
DISPOSER DE L'APPAREIL P. 26
GARANTIE P. 27