
Freshmix 6 Combi - Blender KRUPS - Free user manual and instructions
Find the device manual for free Freshmix 6 Combi KRUPS in PDF.


| Product type | Blender with juicer (depending on model) |
| Brand | KRUPS |
| Model | Freshmix 6 Combi |
| Bowl material | Glass |
| Maximum capacity (blending) | 1.5 liters |
| Power | 800 W (estimated) |
| Voltage | 220-240 V |
| Frequency | 50/60 Hz |
| Main functions | Blending, crushed ice (Auto Ice), pulse (Vari Pulse), juicer (depending on model) |
| Number of speeds | Automatic programs + pulse |
| Included accessories | Glass bowl, lid with measuring cap, silicone seal, base with stainless steel blade, juicer (pusher, lid, grating filter, pulp container, spout) |
| Cleaning of bowl and accessories | Dishwasher safe (glass bowl, disassembled accessories) |
| Cleaning of motor base | Damp cloth (do not immerse) |
| Safety | Locking lid required, juicer safety if lid not properly installed |
| Weight | Approximately 3 kg |
| Dimensions (estimated) | 20 x 20 x 40 cm |
| Cord length | Approximately 1 m |
| Cord storage | Yes, built-in |
| After-sales service | KRUPS authorized center |
Frequently Asked Questions - Freshmix 6 Combi KRUPS
User questions about Freshmix 6 Combi KRUPS
0 question about this device. Answer the ones you know or ask your own.
Ask a new question about this device
Download the instructions for your Blender in PDF format for free! Find your manual Freshmix 6 Combi - KRUPS and take your electronic device back in hand. On this page are published all the documents necessary for the use of your device. Freshmix 6 Combi by KRUPS.
USER MANUAL Freshmix 6 Combi KRUPS
GB Instructions for use
F Mode d'emploi
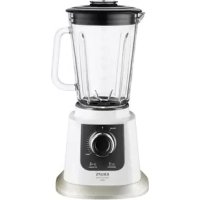
a: graduated lid stopper b: lid with filling hole c: glass mixing beaker d: silicon seal e: plinth with cutting knife f: rubber-buffered drive g: motor unit h: flex storage
Juicer attachment
(dependant on model)
i: pusher
j: juicer lid
k: filter sieve
I: pulp container
m: juice pourer
n: function key "juicer"
F



Important Safety Precautions

The following basic safety precautions are always to be observed when using electrical appliances.
■ Carefully read the operating instructions before using the appliance. ■ Make sure that the voltage stated on the rating plate of the appliance corresponds with that of your mains supply. ■ To avoid the danger of electric shock, never dip the appliance into water or any other liquid.
Never place the appliance on a hot surface, such as a stove hotplate, or in the vicinity of a naked flame.
Never use the appliance if the mains flex or the mains plug is damaged; if any fault has become apparent during use; if the appliance has accidentally fallen; or if any other damage is visible.
Send the appliance to the KRUPS Customer Service Unit for check-up, for repair, or for electrical or mechanical adjustment.
If the mains lead or the plug are damaged, do not use your appliance. In order to avoid any accident, they must be replaced by an approved KRUPS Centre (see list in the leaflet «KRUPS Service»).
Avoid any contact with moving parts. When in operation, never allow the hands, the hair or clothing to come near to the cutting knife or, if in use, the filter basket of the juicer. Never put a spatula or other tool anywhere near the moving parts, so as to avoid possible damage to the appliance.
Do not use the mixing beaker in the microwave.
The lid must always be firmly fixed when the appliance is in use.
Do not put pieces longer than 2 cm into the appliance, as this could cause knife blockage and consequent overheating.
This appliance is intended only for household use. Use the appliance only for the stated purposes. Never use the appliance outdoors. The cutting knife is very sharp, so be extremely careful when handling it. Always pull out the mains plug after each time the appliance is used and before every cleaning operation. The use of unauthorised and other than KRUPS-supplied attachments and spare parts can lead to fire, electric shock or to personal injury. Always keep the appliance outside the reach of children and never allow the flex to hang down.
Safety Precautions During Operation
When treating solid foodstuffs, cut them first into 2cm cubes.
Put all fluids first into the mixing beaker, give them a short quick mix, and only then add the solid or dry ingredients.
To add further materials during the mixing operation, remove the stopper from the beaker lid, feed in the materials and return the stopper.
If any ingredients stick to the wall of the beaker during the mixing operation, switch off the appliance, pull out the mains plug and then remove the entire mixing beaker from the motor unit. Then carefully push the stuck ingredients onto the knife blade before continuing. NEVER put your fingers or hands into the beaker or in the vicinity of the cutting knife.
Before First Use
Before using the appliance for the first time, clean the beaker, the lid, and the lid stopper, as well as the juicer parts if supplied, in warm water with washing-up liquid to remove any possible manufacturing residues. Then rinse the parts and dry them thoroughly.
Never clean the motor unit under running water or dip it into water - just wipe it down gently with a moist cloth.
Instructions for Use
Mixing beaker
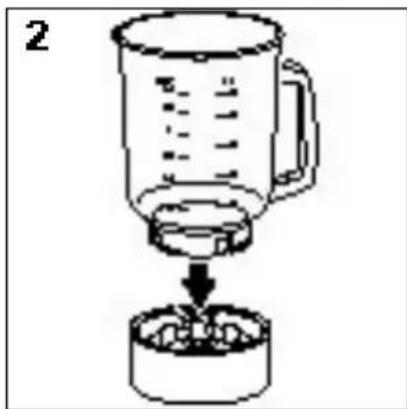
■ Lay the silicon seal on the stainless steel surface in the beaker plinth (1). ■ Place the mixing beaker on the plinth and secure it firmly with a 1/4 turn (2, 3).
For easy assembly of the mixing beaker on the plinth, we recommend that you dampen the silicon seal, in position inside the plinth, with a wet sponge.
Make sure that the mixing beaker is correctly screwed onto the plinth.
Place the motor unit on a level, dry, and clean working surface.
■ Then place the already assembled mixing beaker onto it (4).
It is not necessary to press the beaker downwards or to twist it, as it will automatically locate itself correctly on the rubber buffer of the drive mechanism.
Never place the beaker unit onto the running appliance.
Note: For reasons of safety, the beaker plinth will not locate on the appliance if the mixing beaker has not already been mounted on it.
■ Put all the ingredients into the mixing beaker. For good, even results, put all the liquids in first, switch on the appliance for just a moment, and only then add the solid ingredients. ■ Place the lid on the mixing beaker and lock it into position. To make locking easier, dampen the seal on the lid. Insert the mains plug. The lid must remain on the beaker as long as the appliance is in operation. Switch on the appliance by depressing the appropriate function key. It is possible to change the function during operation by simply depressing a different function key, without switching off the appliance.
To add further ingredients during the mixing operation, just take the stopper out of the lid and simply put them in.
■ To utilise the momentary function, first press the “Vari Pulse” key. The control light will start to blink and the desired control function key should then be pressed. The appliance will then run only as long as the function key is pressed and will stop as soon as it is released. If this key is pressed several times momentarily, the appliance will operate in short intervals, thus making it easier to judge the result achieved. To end the momentary function, just press the “Vari Pulse” key again and the control light will be extinguished, indicating that the “Vari Pulse” function is no longer in action.
To chop ice, put the ice cubes in the mixing beaker and put on the lid. It is not necessary to add any liquid. Use the ice chopping function by pressing the AUTO ICE key.
As soon as the required results have been achieved, end the function either by pressing the OFF key, or by pressing the function key just used a further time. Then pull out the mains plug. DO NOT remove the mixing beaker from the motor unit before the cutting knife has come fully to rest.
Practical Tips
| KEY RECIPE COMMENTARY | ||
 | CHOPPING ICE For finely | crusher ice, use only 6 to 10 large ice cubes (level 1/3 L). |
| GARAM MASALA Put all (Asian spice paste) desired | the ingredients into the beaker and mix to the result using the function. To achieve a finer result, switch over to finish the preparation. | |
 | VARIOUS SOUPS Put all | the ingredients, raw and cooked together, into the beaker, but not exceeding the maximum amount of 1.5 litres. Let the appliance run for about one minute. |
| COCKTAILS MADE Peel OF FRESH FRUITS Cut the | the fruit and remove stones and large pips. The fruit into large cubes. Put all ingredients into the mixer and switch on the appliance until the contents are evenly mixed, usually about a minute. | |
| COCKTAILS WITH Put all ALCOHOL into the beaker | the ingredients, liquids first, and mix for about a minute. | |
 | TOMATO SAUCE OR Put TOMATO COULIS quant | all the ingredients, liquids first, into the beaker. The type prepared should be at least enough to cover the knife blade, so as to avoid splashing. |
| VEGETABLE PUREES Put | the cooked vegetables with a little of the cooking water into the beaker and mix to the required consistency. If the material is very stiff, mix using the “Vari Pulse” momentary action function. If necessary, interrupt the work to push the foodstuff towards the knife blade with a spatula. Due to the extremely fine results achieved by mixers, they are NOT suitable for preparing mashed potatoes. | |
| VEGETABLE Put the ingSTUFFINGS | redients, liquids first, into the beaker and mix to the required consistency. If the material is very stiff, mix using the “Vari Pulse” momentary action function. If necessary, interrupt the work to push the foodstuff towards the knife blade with a spatula. | |
| PARMESAN AND HARD CHEESES | Cut the cheese into large cubes and chop it to the desired condition. Start with several momentary “Vari Pulse” treatments until the cheese is coarsely chopped. | |
| KEY RECIPE COMMENTARY | ||
 | FISH PASTES Put all ingredients, liquids first, into the beaker. If the material is very stiff, mix using the “Vari Pulse” momentary action function.If necessary, interrupt the work to push the foodstuff towards the knife blade with a spatula. | |
| STEWED FRUITS AND RAW FRUIT SAUCES Put all the ingredients into the mixer. The quantity prepared should be at least enough to cover the knife blade, so as to avoid splashing. | ||
 | PANCAKES, Put all ingredients, the flour last, into the mixer. The WAFFLES AND flour can be added all at once or in several portions through the feeding hole in the lid. Do not exceed the maximum amount of 1.5 litres. | |
| SPREADS FOR BREAD Begin the chopping of the hard ingredients AND SAUCES WITH herbs with function . YOGHURT OR CURD Then add the yoghurt or curd cheese and CHEESE treat with function until the mixture even. If necessary, interrupt the treatment and push the foodstuff towards the knife blade. | ||
| MILK-SHAKES Put all ingredients into the beaker and treat until WITH FRUIT evenly mixed. The best result will be achieved with 1/2 litre of cold milk. As the milk increases its volume during mixing, the maximum fill is 1 litre of milk. | ||
 | ONIONS AND Quarter the onions and chop them to the SHALLOTS required degree of fineness. If necessary, interrupt the process and push the foodstuff towards the knife blade with a spatula. Maximum amount treated is 300g. | |
| WALNUTS, HAZELNUTS AND ALMONDS Put the nuts into the mixer and chop them to the desired fineness. For a very fine result, use for a few seconds towards the end of the operation. It is advisable to work with small quantities between 50 and 100g. | ||
| STALE BREAD, CRACKERS AND SUNDRY BISCUITS Cut or break the material into large pieces, put them into the mixer and chop them to the desired fineness. For a very fine result, use for a few seconds towards the end of the operation. It is advisable to work with small quantities between 40 and 50g. | ||
| [44YS] | GUACAMOLE Put all ing (Mexican avocado dip) till ingredients into the beaker, liquids first, and mixThen homogenise for a few seconds using [2TZS] | |
| [5KKS] | MILK-SHAKES Put all ing wth COFFEE mix until they are smooth and frothy.OR VANILLA The best results are achieved with 1/2 litre of cold milk.As the milk increases its volume during mixing, fill 1 litre of milk at most. | |
| MAYONNAISE Put 75 ml oil, 1 egg, mustard, 1 tablespoon vinegar or lemon juice and salt into the beaker. Mix until stiff.Add a further 200 ml oil in small portions through the filling hole with the appliance switched off, and work each portion in before the next is added. | ||
 | FROZEN FRUIT JUICES OR CONCENTRATES and Put the frozen block of juice or concentrate the necessary quantity of water into the beaker.Mix them together for a few seconds only, so as to avoid the production of froth. | |
| INSTANT Put all the ing PREPARATIONS, simply DESSERT POWDERS 15 AND MILK POWDER even #edients into the beaker and mix them together for 10 to seconds, just long enough to make an mixture.The “Vari Pulse” momentary function can be used to avoid over-production of froth. | ||
| VINAIGRETTES Start by (vinegar and oil sauces) chopping hard ingredients and herbs using function . Add the other ingredients and mix for 10 to 20 seconds using function .The liquid, about 250ml, should cover the knife blade to avoid splashes. | ||
Cleaning
Always pull out the mains plug before any cleaning operation.
Wash the mixing beaker and its various parts (see the list) in warm water with washing-up liquid and then rinse them. Do not use any abrasive cleaning agents which could scratch the materials.
Thoroughly dry all the parts.
Both mixing beaker and juicer (when in use) can be cleaned in the dishwasher, but should be separated before doing so.
Note:
Handle the cutting knife with extreme care, as it is very sharp and could cause injury.
Never dip the motor unit into water or hold it under running water.
Just clean it with a moist cloth.
Juicer Equipment (dependant on model)
Do not process more than normal household quantities.
Using the juicer
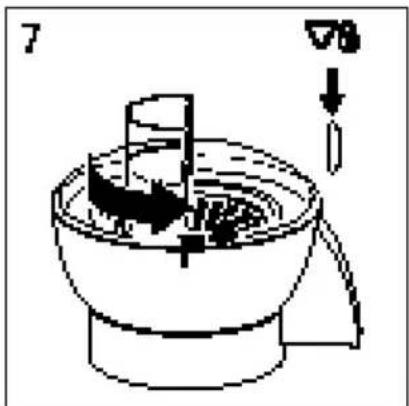
Place the filter sieve in the pulp container (5) and put the lid on. The mark on the lid must be opposite the mark on the casing (6). Lock the lid by turning it anti-clockwise until the mark is opposite the mark on the casing (7). Locate the juicer instead of the mixing beaker on the motor unit (8).
Insert the mains plug.
Feed the foodstuffs into the filling funnel and press them down with the pusher.
Then switch on the appliance by pressing the key marked juicer (n).
Whilst the juicer is in use, other functions, including the “Vari Pulse” key, are not active and cannot be used.
A safety device prevents the juicer from functioning if the lid has not been properly secured.
De-juicing
Preparation of the fruit:
No special preparation is necessary for apples, pears, quinces, carrots, celery sticks (without leaves), radishes and grapes.
Remove the stones from plums and peaches.
Remove the peel from oranges, lemons, grapefruit, mandarin oranges, melons (the pips as well), pineapple (and the hard core).
Soft fruits such as blackberries, strawberries, raspberries, bilberries, blackcurrants and red-currants can be prepared in small quantities for use in making cocktails.
Wash the fruit and, if necessary, cut it into pieces.
Catch the juice in a receptacle with ice cubes and a few drops of lemon juice.
To get all the juice out of the filter, allow the appliance to run for 15 to 20 seconds after the last fill of fruit has been added.
Enjoy the juice immediately: It has more flavour and loses no vitamins.
If the amount of juice running out unexpectedly diminishes, the filter is blocked or the pulp container is full. Empty the pulp container and clean the filter sieve (see section Dismantle and Clean).
Dismantle and Clean
Pull out the mains plug.
Wait until the filter basket is completely still.
Remove the juicer complete and dismantle it over the sink or a bowl.
Twist the lid clockwise and lift it off.
Take out the filter sieve.
Empty the pulp container.
Clean (in the dishwasher if so desired).
After cleaning, it is advisable to re-assemble the juicer, locate it on the motor unit and to let it run for a few moments, so as to throw out remaining water.
Eventual discoloration of the plastic, from carrots for instance, can be removed using a cloth soaked in salad oil.
Disposal

The packaging consists entirely of environmentally friendly materials, which should be passed on to the local recycling department.
Arrangements for the disposal of the appliance when it is finished with can be enquired for at the local council offices.
- JUICER ATTACHMENT
- (DEPENDANT ON MODEL)
- F
- IMPORTANT SAFETY PRECAUTIONS
- SAFETY PRECAUTIONS DURING OPERATION
- BEFORE FIRST USE
- INSTRUCTIONS FOR USE
- MIXING BEAKER
- NEVER PLACE THE BEAKER UNIT ONTO THE RUNNING APPLIANCE
- NOTE: FOR REASONS OF SAFETY, THE BEAKER PLINTH WILL NOT LOCATE ON THE APPLIANCE IF THE MIXING BEAKER HAS NOT ALREADY BEEN MOUNTED ON IT
- CLEANING
- NOTE
- JUICER EQUIPMENT (DEPENDANT ON MODEL)
- USING THE JUICER
- DE-JUICING
- DISMANTLE AND CLEAN
- DISPOSAL
Brand : KRUPS
Model : Freshmix 6 Combi
Category : Blender