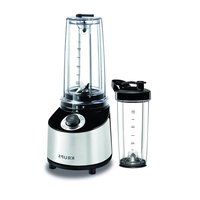
Prep Expert S7000 - Blender KRUPS - Free user manual and instructions
Find the device manual for free Prep Expert S7000 KRUPS in PDF.
| Brand | Krups |
| Model | Prep Expert S7000 |
| Appliance type | Blender |
| Bowl capacity | 1.75 L (thick mixtures) / 1.5 L (liquid preparations) |
| Bowl material | Graduated glass |
| Base material | Metal |
| Number of continuous speeds | 5 (Slow, 1, 2, 3, 4) |
| Special function | Vari-Pulse (pulse function) and Ice Crush (crushed ice) |
| Safety mechanism | Bowl locks onto base, only starts if bowl is properly assembled |
| Included accessories | Lid with measuring cap (75 ml), sealing ring, removable blade holder |
| Grinder attachment | Available as an option at authorized centers |
| Care and cleaning | Bowl, lid, measuring cap and grinder attachment are dishwasher safe; base wiped with a damp cloth |
| Usage tip | Never start at full speed, increase gradually |
| Power supply | Check on the appliance (voltage suitable for installation) |
| Cord storage | Compartment located at the back of the metal base |
| Repairability | Repairs by Krups authorized center only |
Frequently Asked Questions - Prep Expert S7000 KRUPS
User questions about Prep Expert S7000 KRUPS
0 question about this device. Answer the ones you know or ask your own.
Ask a new question about this device
Download the instructions for your Blender in PDF format for free! Find your manual Prep Expert S7000 - KRUPS and take your electronic device back in hand. On this page are published all the documents necessary for the use of your device. Prep Expert S7000 by KRUPS.
USER MANUAL Prep Expert S7000 KRUPS
natural_image
Line drawing of a KRUPS blender with handle and control panel (no text or symbols on the device itself)Deutsch p 1
Français p 5
English p 9
Nederlands p 13
Italiano p 17
Portugûes p 21
Español p 25
Dansk p 29
Svenska p 33
Norsk p 37
Suomi p 41
Русскийр 45
natural_image
Diagram of a mechanical component with a plug and cable, showing directional arrows indicating movement (no text or symbols)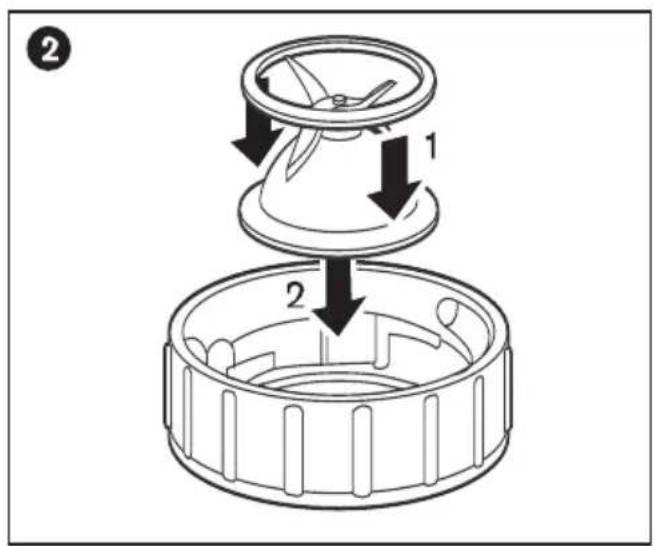

natural_image
Line drawing of a thermospan with a lid and handle, showing internal flow direction (no text or symbols)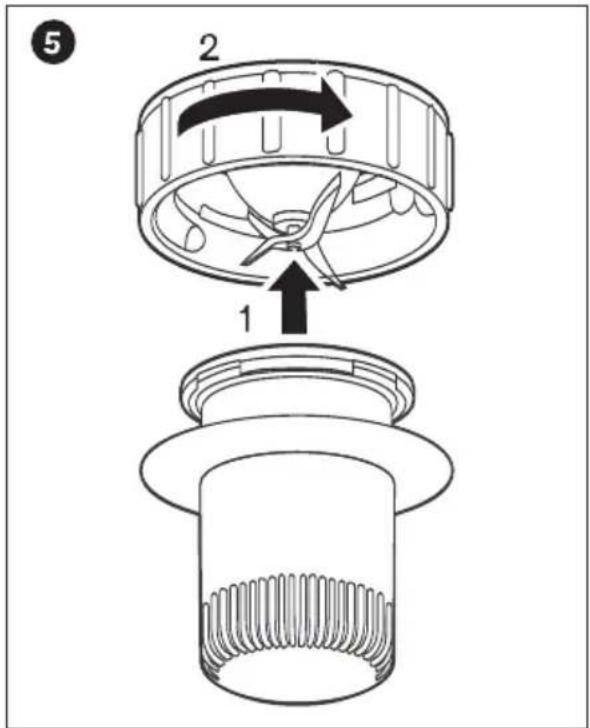
Deutsch
Thank you for choosing a product from the KRUPS range exclusively designed for food preparation.
Safety instructions
When using electrical appliances, there are certain basic rules that should always be respected, especially the following:
DO:
- Carefully read the instructions before using your appliance and follow them during use.
- This product has been designed for domestic use only. Any commercial use, inappropriate use or failure to comply with the instructions, the manufacturer accepts no responsibility and the guarantee will not apply.
- Check that the voltage rating of the appliance matches that of your electrical system.
- Any connection error will negate the guarantee.
- Your appliance is intended only for indoor, domestic use.
- Always use your blender with its cover (E) correctly fitted to the glass jug (D).
- Always unplug your appliance as soon as you have finished using it, when cleaning it or in the event of a power cut.
- For your safety, only use KRUPS accessories and spare parts that correspond to your appliance.
- Use your blender on a flat, stable clean and dry worksurface.
DO NOT:
- Leave the appliance to run unattended, especially when young children or severely disabled persons are present.
- Put your fingers or any other object in the jug while the blender is in operation.
- Handle the blades carelessly, the blades can be very sharp.
- Use your appliance if it is not working correctly, if it has been damaged or the supply cord or plug are damaged.
- To avoid any danger, it is imperative that you have them replaced by a KRUPS approved service centre (see list in the service booklet).
- Carry out any work on the appliance other than normal care and cleaning any further work must be carried out by a KRUPS approved service centre.
- (Never) immerse the appliance, the supply cord or the plug in water or in any other liquid.
- (Do not) allow the supply cord to hang within the reach of children, to come close to or into contact with the hot parts of your appliance, any other source of heat or any sharp edge.
- (Do not) operate the blender empty or with only dry materials and do not pour in boiling liquids into the blender jug.
- (Do not) put any accessories in a microwave oven.
- (Do not) allow long hair, scarves, ties etc. to dangle over accessories during operation.
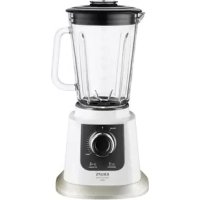
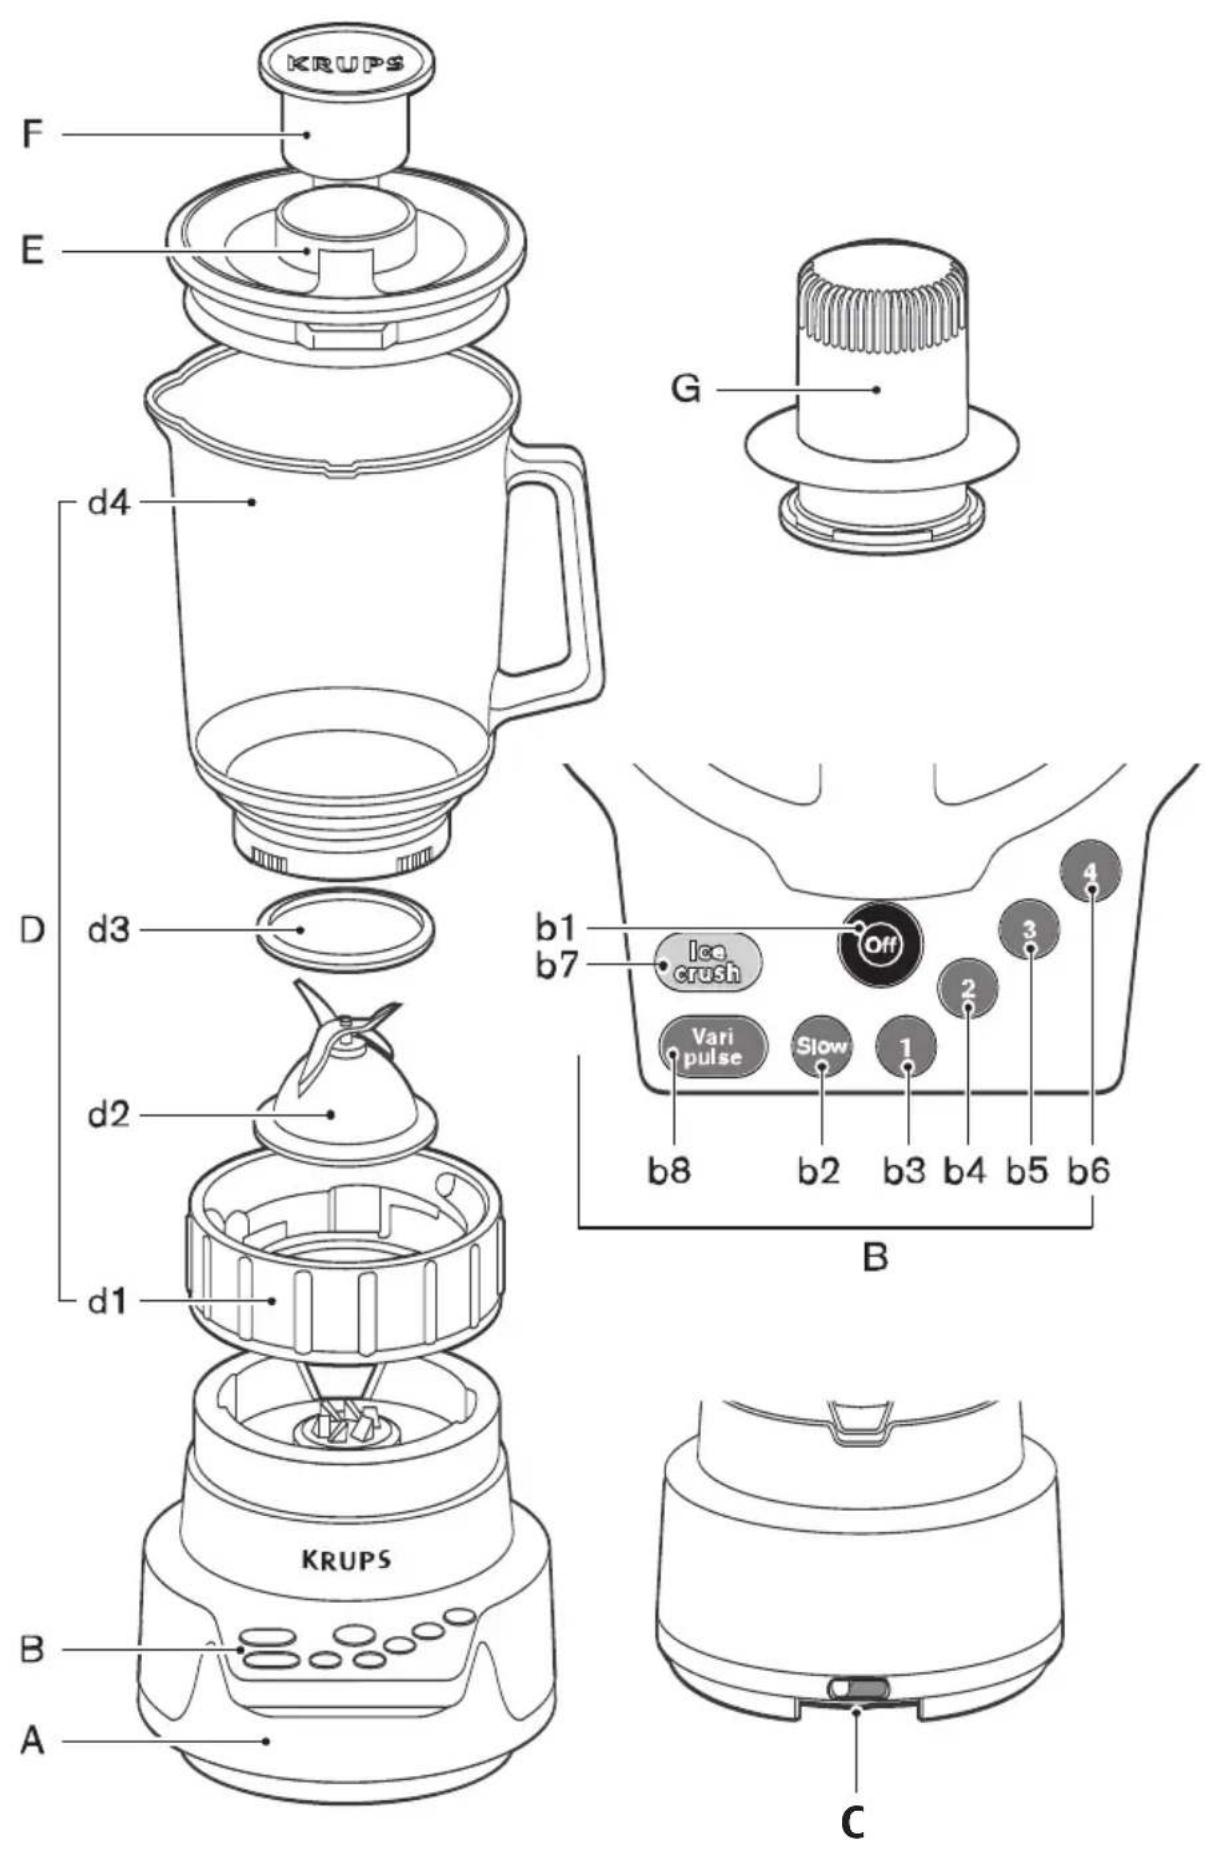
Description of the blender
A Metal base
B Speed selection panel
b1 - Stop button
b2 - Slow speed
b3 - speed 1
b4 - speed 2
b5 - speed 3
b6 - speed 4
b7 - Ice crush function
b8 - Vari-Pulse function
C Cord tidy cavity
D Blender jug assembly
d1 Locking ring base
d2 Removable blade carrier
d3 Seal
d4 Graduated 1.75-l glass jug
E Blender jug cover
F Measuring stopper, 75 ml
G Grinder accessory depending on model
Important advice
Important: Ensure that the blender cover (E) with measuring stopper (F) are correctly fitted on the blender jug (D).
- Never start the appliance on its highest speed.
- Always increase speed progressively.
- Remove the blender jug or accessory from the motor unit only when it has come to a standstill.
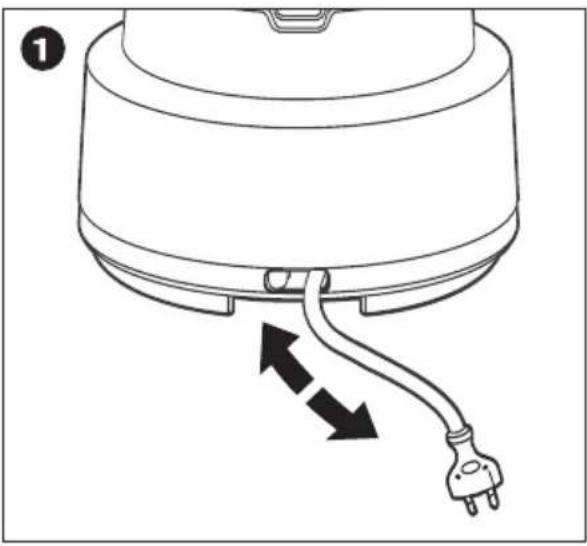
- For greater convenience or storage, the length of the supply cord can be reduced by pushing it into the metal base (A) through the opening at the rear (C) (diagram 1).
Using your appliance
- Before use, clean the blender jug, the cover, the measuring stopper and the grinder accessory in warm soapy water. Rinse and dry them carefully.
1. USING THE BLENDER
The capacity of the jug allows you great freedom in your preparations. Furthermore, as it is made of glass you can make a variety of ice-based preparations in complete safety.
1/ Place the ring seal (d3) in position over the base of the removable blade carrier (d2) (diagram 2).
2/ Clip the assembly (d2 + d3) into the locking ring base (d1) .
3/ Place this assembly under the glass jug (d4), taking care to fit the hemispheres on the lower part of the jug (d4) into the seatings in the base (d1) (diagram 3).
4/ Lock the base in position by giving it a quarter turn.
- Place the assembled blender jug (D) on the metal base (A). There are two possible positions with the handle to the left or the right of the speed selection panel (B).
-For your own safety, the blender will not start unless it is correctly assembled and positioned on the metal base (A).
- Ensure that the glass jug is properly screwed into its base.
- Put the ingredients to be mixed into the jug (D) without exceeding the maximum level:
-1.75 l for thick mixtures,
-1.5 l for very liquid mixtures.
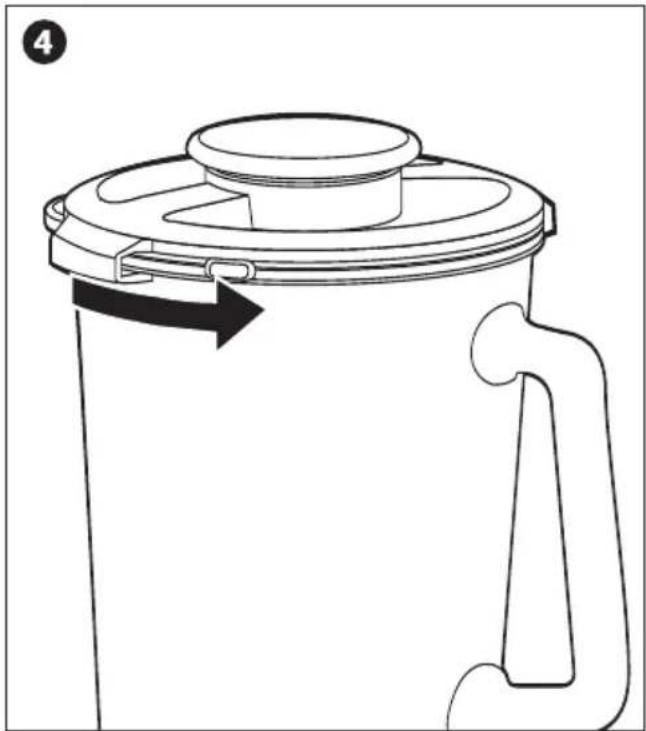
- Fit the measuring stopper (F) in the cover (E). Latch the cover assembly onto the jug (D), engaging the lugs in the seatings provided in the cover (diagram 4).
- Plug in the appliance and choose the function that you wish to use.
- Continuous operation: Speed Slow to 4 (b2, b3, b4, b5 and b6).
Start at Slow speed (b2) and then gradually increase to the most suitable speed for your preparation. The button for the selected speed will light. Press Off (b1) to stop the appliance. The indicator light for the speed in use will go out.
NB: The Slow speed can be used to finish off recipes by adding solid ingredients that you do not wish to blend, such as chocolate or nut chips.
The cover must always be in place while the appliance is in operation. To add ingredients while blending, remove the measuring stopper (F) from the cover and pour the ingredients through the opening.
| Speed | Recipe |
| Slow | Incorporating chocolate chips |
| 1 | Hummus, mayonnaise |
| 2 | Brownies |
| 3 | Pancake batter |
| 4 | Soups |
| Ice Crush | Crushed ice, onions |
- "Vari-Pulse" function:
This function gives finer control over the degree of blending and homogenisation of your recipe.
To use this short burst function, press the "Vari-Pulse" button (b8). The indicator light will then blink. Press the button for the desired speed (from Slow (b2) to speed 4 (b6)). The blender will run for as long as you keep the button pressed. Release it and the appliance stops.
To turn off or change the function, press the "Off" button (b1). The indicator light will go out.
- "Ice Crush" function:
This function operates the motor intermittently for the preparation of crushed ice, smoothies or granitas.
To crush ice, put the ice cubes into the jug and replace the cover. There is no need to add water. Press the "Ice Crush" button (b7). The indicator light will come on.
For finely crushed ice, use a maximum of 6 to 8 large ice cubes (1/3 l level).
When the ice is ready, stop the blender by pressing the "Off" button (b1). The indicator lamp will go out.
Unplug the appliance. Only remove the accessories when the appliance has come to a complete stop.
2. USING THE GRINDER ACCESSORY
- Turn the cover (G) upside down and place the ingredients in it. Place the cover (G) on the assembled base (d1 + d2 + d3) and give it a quarter turn to latch (diagram 5). Turn over the complete assembly and position it on the metal base (A)
| Recipes | Quantity Speed Operating time | ||
| dried apricots | 80 g | 4 | 5 s |
| parsley | 10 g | 2 or 3 | Vari-Pulse |
| cooking crumbs | 2 rusks | 4 | 30 s |
| onions | 80 g | 1 or 2 | Vari-Pulse |
| shelled hazel nuts | 80 g | 3 or 4 | Vari-Pulse |
Cleaning
- Unplug the blender and take off the jug or accessory assembly.
- Clean the metal base (A) with a damp cloth. Dry carefully.
- Never immerse the motor unit (A) in water.
- Rinse the blender jug (D), its cover and the measuring stopper (F) under running water.
- For greater ease of cleaning, release the base (d1), blade unit (d2) and seal (d3) from the jug (D) and clean them all separately.
- Handle the blades with care, they are very sharp.
- The blender jug (D), the cover (E), the measuring stopper (F) and the grinder (G) can be put in the dishwasher.
- Attention: avoid stress on the cover (E) when placing it in the dishwasher basket (risk of deformation).
What to do if your blender does not work
Contact a KRUPS approved service centre (see list in the service booklet
Recycling

Environment protection first!
① Your appliance contains valuable materials which can be recovered or recycled.
Leave it at a local civic waste collection point.
HELPLINE:
If you have any product problems or queries, please contact our Customer Relations Team first for expert help and advice:
0845 602 1454 - UK
(01) 4751947 - Ireland
or consult our website – www.krups.co.uk