
SKGL 2000 A1 - Grill plate SILVERCREST - Free user manual and instructions
Find the device manual for free SKGL 2000 A1 SILVERCREST in PDF.
| Product Type | Multi-purpose grill plate |
| Brand | SilverCrest |
| Model | SKGL 2000 A1 |
| Power Supply | 220 - 240 V ~, 50/60 Hz |
| Power Consumption | 2000 W |
| Protection Class | I (with earth connection) |
| Temperature Range | 90 °C to 230 °C |
| Integrated Timer | 1 to 90 minutes |
| Usage Modes | Contact grill, panini grill, tabletop grill (180° opening) |
| Plate Coating | Non-stick |
| Heating Plates | Removable (RELEASE buttons) |
| Grease Collection Tray | Removable, dishwasher safe |
| Cleaning Scraper | Included |
| Safety Lock | Yes (for locking and adjusting distance) |
| Automatic Shut-off | After one hour without operation |
| Cord Storage | Under base, with retaining clip |
| Heating Indicator | Green "Ready" light and blue LED strip |
| Warranty | 3 years (Kompernass Handels GmbH) |
Frequently Asked Questions - SKGL 2000 A1 SILVERCREST
User questions about SKGL 2000 A1 SILVERCREST
0 question about this device. Answer the ones you know or ask your own.
Ask a new question about this device
Download the instructions for your Grill plate in PDF format for free! Find your manual SKGL 2000 A1 - SILVERCREST and take your electronic device back in hand. On this page are published all the documents necessary for the use of your device. SKGL 2000 A1 by SILVERCREST.
USER MANUAL SKGL 2000 A1 SILVERCREST
KONTAKTGRILL
CONTACT GRILL
GRIL MULTI-USAGE SKGL 2000 A1
DE AT CH
KONTAKTGRILL
Bedienungsanleitung
FR BE
GRIL MULTI-USAGE
Mode d'emploi
CZ
KONTAKTNÍ GRIL
Návod k obsluze
PT
GRELHADOR ELÉCTRICO
Operating instructions
NL BE
CONTACTGRILL
Gebruiksaanwijzing
ES
GRILL DE CONTACTO
Before reading, unfold the page containing the illustrations and familiarise yourself with all functions of the device.
FR BE
GB/IE Operating instructions Page 31
natural_image
Silhouette of a fork-shaped food item with a numbered label '13' pointing to its body (no text or symbols on the object itself)Inhaltsverzeichnis
Einführung 2
Abb.1
natural_image
Line drawing of a portable air conditioner unit with a circular dial indicator (no text or symbols)Abb. 2
natural_image
Technical line drawing of a mechanical device with internal components and directional arrows (no text or symbols)Abb. 3
KOMPERNASS HANDELS GMBH
BURGSTRASSE 21
DE-44867 BOCHUM
DEUTSCHLAND
www.kompernass.com
Rezepte
HINWEIS
1 TL Worcestershiresauce
120 g Bacon, in Streifen
Information about these operating instructions .... 3 2
Copyright 32
Intended use 32
Warnings 32
Safety 34
Basic safety instructions 34
Operating components 38
Unpacking and installation 38
Safety information 38
Package contents and transport inspection 39
Unpacking 39
Disposal of the packaging 39
Handling and use 40
Before first use 40
Control panel 41
Operation 42
Temperature settings 43
"Contact grill" position 44
"Panini grill" position 45
"Table grill" position 46
Tips and tricks....47
Cleaning and care 48
Safety instructions 48
Storage 49
Troubleshooting 50
Disposal....50
Attachment 51
Technical data 51
Information about these operating instructions
Congratulations on the purchase of your new appliance.
You have selected a high-quality product. The operating instructions are part of this product. They contain important information about safety, usage and disposal. Before using the product, please familiarise yourself with all operating and safety instructions. Use the product only as described and for the range of applications specified. Please also pass these operating instructions on to any future owner.
Copyright
This documentation is protected by copyright.
Any copying or reproduction, including in the form of extracts, or any reproduction of images (even in a modified state), is permitted only with the written authorisation of the manufacturer.
Intended use
This appliance is intended exclusively for grilling food indoors. It is not intended for any other use or use beyond that specified. The appliance is not intended for use in commercial or industrial environments.
The manufacturer accepts no responsibility for damage caused by failure to observe these instructions, improper use or repairs, unauthorised modifications or the use of unapproved replacement parts. The operator bears sole liability.
Warnings
The following types of warning are used in these operating instructions:

DANGER
A warning notice at this hazard level indicates an imminently hazardous situation.
If the hazardous situation is not avoided, it could result in death or serious physical injury.
▶ Follow the instructions in this warning to prevent a fatality or serious personal injury.
WARNING
A warning at this hazard level indicates a potentially hazardous situation.
Failure to avoid this hazardous situation could result in injury.
▶ Follow the instructions in this warning notice to prevent injury.
CAUTION
A warning notice of this hazard level indicates a risk of property damage.
Failure to avoid this situation could result in property damage.
▶ Follow the instructions in this warning to prevent material damage.
NOTE
▶ A note provides additional information that makes handling the appliance easier for you.
Safety
This section contains important safety instructions for handling the appliance.
This appliance complies with statutory safety regulations.
Improper use may result in personal injury and property damage.
Basic safety instructions
To ensure safe operation of the appliance, follow the safety guidelines set out below:
■ Prior to use, check the appliance for visible external damage. Do not use an appliance that has been damaged or dropped.
■ Arrange for defective power plugs and/or cables to be replaced as soon as possible by a qualified technician or by our Customer Service Department to avoid the risk of injury.
■ This appliance may be used by children over the age of 8 and by persons with reduced physical, sensory or mental abilities or by those without experience and/or knowledge, if they are supervised or have been instructed in the safe use of the appliance and have understood the potential risks.
■ Children must not play with the appliance.
■ Cleaning and user maintenance must not be performed by children unless they are older than 8 years of age and are supervised.
■ Children younger than 8 years of age must be kept away from the appliance and the mains cable.
■ All repairs must be carried out by authorised specialist companies or by the Customer Service department. Improper repairs may put the user at risk. They will also invalidate any warranty claims.
■ Repairs to the appliance during the warranty period may only be carried out by a customer service department authorised by the manufacturer. Otherwise, no warranty claims will be held for any subsequent damages.
■ Defective components must always be replaced with original replacement parts. Compliance with safety requirements can only be guaranteed if original replacement parts are used.
■ Protect the mains cable from contact with hot appliance parts. NEVER use the appliance adjacent to open flames, a hotplate or a heated oven.
■ After use, allow the appliance to cool down completely before cleaning it! Risk of burns!
■ Unwind all of the mains cable from the cable retainer when you use the appliance!
■ Install the appliance as close as possible to an electrical power socket. Ensure that the power plug is quickly reachable in case of danger, and that the cable poses no risk of tripping.
■ Provide a stable location for the appliance.

RISK OF ELECTRICAL SHOCK!
The appliance should only be connected to correctly installed and earthed mains power sockets. Ensure that the rating for your local power supply corresponds with the details on the rating plate of the appliance.
- Arrange for Customer Services to repair or replace connecting cables and/or appliances that are not functioning properly or have been damaged.
- Do not expose the appliance to rain, and never use it in a humid or wet environment.
▶ Take steps to ensure the mains cable never becomes wet or moist during use.
▶ Never immerse the appliance in water or other liquids! There is a risk of a potentially fatal electric shock if residual moisture comes into contact with live components during operation.
▶ Always take hold of the plug when handling the mains cable. Do not pull on the cable itself and never touch the mains cable with wet hands. This could result in either a short circuit or an electric shock.
- Do not place the appliance itself, furniture items or similar objects on the mains cable and take steps to ensure it cannot become jammed or trapped in any way.
- Do not open the appliance housing or attempt to repair or modify the appliance. If the housing is opened or improper modifications are made, you run the risk of receiving a potentially fatal electric shock and the warranty will be void.

RISK OF ELECTRICAL SHOCK!
- Protect the appliance from water droplets or spray. Do not place any vessels containing liquid (e.g. flower vases) on or near the appliance.
▶ Always pull the plug out of the power socket during each break in use, as well as after use and before any cleaning.

RISK OF BURNS!
Caution! Hot surface!
The surface of the appliance can become extremely hot during use. Touch the appliance using only the handle.

CAUTION! PROPERTY DAMAGE!
▶ Do not use an external timer switch or a separate remote control system to operate the appliance.
▶ Never leave the appliance unattended during operation.
▶ Ensure that the appliance, the mains cable and the plug do not come into contact with heat sources such as hotplates or naked flames.
▶ Do not use charcoal or similar fuels to operate the appliance!
▶ To protect the non-stick coating, do not use metallic tools such as knives, forks, etc. If the non-stick coating is damaged, stop using the appliance.
▶ Operate the appliance only with the original accessories supplied.
Operating components
Figure A:
① Support feet
② Safety catch
③ Unlocking button 180°
4 Fat outlet
5 Cable retainer
6 Light element
⑦ Green "Ready" control lamp
8 Control panel
⑨ RELEASE button (lower hotplate)
10 Fat drip tray
⑪ Hotplates
12 RELEASE button (upper hotplate)
Figure B:
⑬ Cleaning scraper
Unpacking and installation
Safety information
WARNING
While using the appliance, there is a risk of injury and/or damage to property!
To avoid risks, observe the following safety instructions:
- Do not allow children to play with packaging materials. Risk of suffocation.
▶ Please follow the instructions regarding the electrical connection of the appliance to avoid damage to property.
Package contents and transport inspection
This appliance is supplied with the following components as standard (see fold-out page):
- Contact Grill
- Fat drip tray
- Cleaning scraper
- Operating instructions
NOTE
▶ Check the package for completeness and signs of visible damage.
▶ If the delivery is incomplete or damage has occurred as a result of defective packaging or during transport, contact the Service hotline (see section Service).
Unpacking
◆ Remove all parts of the appliance and the operating instructions from the box.
◆ Remove all packaging materials and any films and labels.
Disposal of the packaging
The packaging protects the appliance from damage during transport. The packaging materials have been selected for their environmental friendliness and ease of disposal, and are therefore recyclable.

Returning the packaging to the material cycle conserves raw materials and reduces the amount of waste that is generated. Dispose of packaging materials that are no longer needed in accordance with applicable local regulations.
NOTE
If possible, keep the original packaging during the warranty period so that the appliance can be properly packed for returning in the event of a warranty claim.
Handling and use
This section provides you with important information on handling and using the appliance.
Before first use
1) Clean all accessories as described in the section "Cleaning and care" to remove any production residues.
2) Read these operating instructions carefully.
3) Set up the appliance in accordance with the safety instructions.
4) Unlock the appliance by moving the safety catch ② to the position 🔒.
5) Open the appliance.
6) Wipe the hotplates ⑪ with a damp cloth.
7) Close the appliance.
8) Insert the mains cable plug into a properly connected and earthed mains power socket which supplies the voltage stated in the "Technical data" section. Allow the appliance to heat up for about 5 minutes to maximum temperature by making the appropriate settings on the control panel ⑧.
NOTE
The first time the appliance heats up, a small amount of smoke and odour may result from production-related residues. This is normal and is completely harmless. Ensure sufficient ventilation; for example, by opening a window.
9) After heating, pull the plug from the mains socket and allow the appliance to cool down completely.
10) Clean the appliance again with a damp cloth.
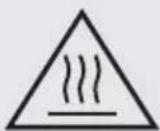
Control panel
You can use the control panel ⑧ to make temperature and time settings.
A “+” button: Increase the temperature or duration of heating
B On/Off button: Switch the appliance on and off
C T/MIN button: Select temperature or duration of heating
D Display: LCD display
E "-" button: Decrease the temperature or duration of heating
NOTE
The green "Ready" control lamp ⑦ lights up as soon as the set temperature is reached. It may switch off again in the interim. This indicates that the temperature has briefly fallen under the set temperature and the appliance is heating itself back up.
▶ Please note that there will be a beep every time you make an entry.
Operation

RISK OF BURNS!
Caution! Hot surface!
The surface of the appliance can become extremely hot during use. Touch the appliance using only the handle.
NOTE
▶ Unwind all of the mains cable from the cable retainer ⑤ when you use the appliance.
1) Close the appliance lid using the handle.
2) Slide the fat drip tray 10 into the appliance.
3) Insert the plug into the mains power socket. You will hear a beep and "OFF" will appear on the display D. The display lights up blue and goes out automatically after 1 minute if no further entries are made.
4) Switch on the appliance using the On/Off button ⏻ B. The display D lights up blue, there will be a beep and the appliance starts to heat up to the preset temperature of 90^ C (keep-warm mode). Once the temperature has been reached, you will hear three beeps and the green "Ready" control lamp ⑦ lights up. The light element ⑥ lights up blue during operation.
5) Press T/MIN button C and set the desired temperature (90–230°C) by pressing the "+" A and "-" E buttons. If the set temperature has not yet been reached, the green "Ready" control lamp ⑦ goes out and the appliance heats up. If the appliance has already reached the set temperature, you will hear two beeps and the green "Ready" control lamp ⑦ will light up.
6) If required, press the T/MIN button C again to adjust the heating duration (1-90 min.) using the "+" A and "-" E buttons. The green "Ready" control lamp ⑦ lights up again as soon as the set heating level is reached and the temperature is maintained. As soon as the heating period is over, you will hear two beeps and the appliance will switch back into keep warm mode (90°C). The appliance switches off automatically after 1 hour if no entries are made.
7) Switch the appliance off by pressing the On/Off button ⏻ and pull the mains power plug from the wall socket.
8) Clean the appliance again as described in "Cleaning and care".
CAUTION
▶ Always remove the plug from the mains power socket when the appliance is not in use. It is not sufficient to switch off the appliance using the On/Off button ⏻ Ⓑ!
NOTE
- The green "Ready" control lamp ⑦ lights up as soon as the set temperature is reached. It may switch off again in the interim. This indicates that the temperature has briefly fallen under the set temperature and the appliance is heating itself back up. - Please note that there will be a beep every time you make an entry.
NOTE
You can use this grill in 3 different ways:
- fully open so that both hotplates ⑪ can be used as a table grill.
- with movable upper hotplate ⑪ as a contact grill so that meat, for instance, is grilled from both sides.
- with fixed upper hotplate ⑪ as a panini grill, for instance, for cooking cheese-topped baguettes.
Temperature settings
Set the temperature level to an appropriate setting for the food. Use the following information as a guideline:
90°C: Keep warm mode
150-175°C: Low temperature, e.g. for vegetables or panini
175-200°C: Medium temperature, e.g. for fish
200-230°C: High temperature, e.g. for meat
NOTE
The temperature settings provided are merely recommendations. They can vary depending on the characteristics of the ingredients!
"Contact grill" position
1) Insert the plug into a mains power socket and switch on the appliance using the On/Off button ⏻ B.
2) Set the desired temperature and heating duration, if necessary, as described in the section "Operation" and wait until the set temperature has been reached.
3) Open the appliance lid and place the food to be grilled on the lower hotplate ⑪.
4) Close the appliance lid using the handle.
5) The upper hotplate ⑪ always lies parallel to the lower hotplate ⑪ on account of its movable hinges, even when cooking large quantities of food. This guarantees an optimal grilling result.
6) Check the browning of the food after a while. To do this, open the appliance lid using the handle.
NOTE
Start with short grilling times and increase these until you have found the correct duration.
7) When you are satisfied with the level of browning, remove the food.
CAUTION
Damage to the appliance!
▶ Do not use pointed or sharp objects to remove the food. These could damage the surfaces of the hotplates ⑪!
8) Use the On/Off button ⏻ B to switch the appliance off and pull the mains power plug from the wall socket.
CAUTION
▶ Always remove the plug from the mains power socket when the appliance is not in use. It is not sufficient to switch off the appliance using the On/Off button ⏻ Ⓑ!
"Panini grill" position
1) Insert the plug into a mains power socket and switch on the appliance using the On/Off button ⏻ B.
2) Set the desired temperature and heating duration, if necessary, as described in the section "Operation" and wait until the set temperature has been reached.
3) Open the appliance lid and place the food to be grilled on the lower hotplate ⑪.
4) Close the upper hotplate ⑪ and lock it at the desired height by pushing the safety catch ② backwards (position MIN, II, III, IV, V). The further back you press the safety catch ②, the greater the distance between the hotplates ⑪.
5) Check the browning of the food after a while. To do this, open the appliance lid using the handle.
NOTE
Start with short grilling times and increase these until you have found the correct duration.
6) When you are satisfied with the level of browning, remove the food.
CAUTION
Damage to the appliance!
▶ Do not use pointed or sharp objects to remove the food. These could damage the surfaces of the hotplates ⑪!
7) Use the On/Off button ⏻ B0 switch the appliance off and pull the mains power plug from the wall socket.
CAUTION
▶ Always remove the plug from the mains power socket when the appliance is not in use. It is not sufficient to switch off the appliance using the On/Off button ⏻ Ⓑ!
"Table grill" position
1) Insert the plug into a mains power socket and switch on the appliance using the On/Off button ⏻ B.
2) Set the desired temperature and heating duration, if necessary, as described in the section "Operation" and wait until the set temperature has been reached.
3) Fold out both support feet ① (fig.1).
4) Press the unlocking button 180° ③ (fig.1) and open the appliance lid until both hotplates ⑪ can be used as a table grill.
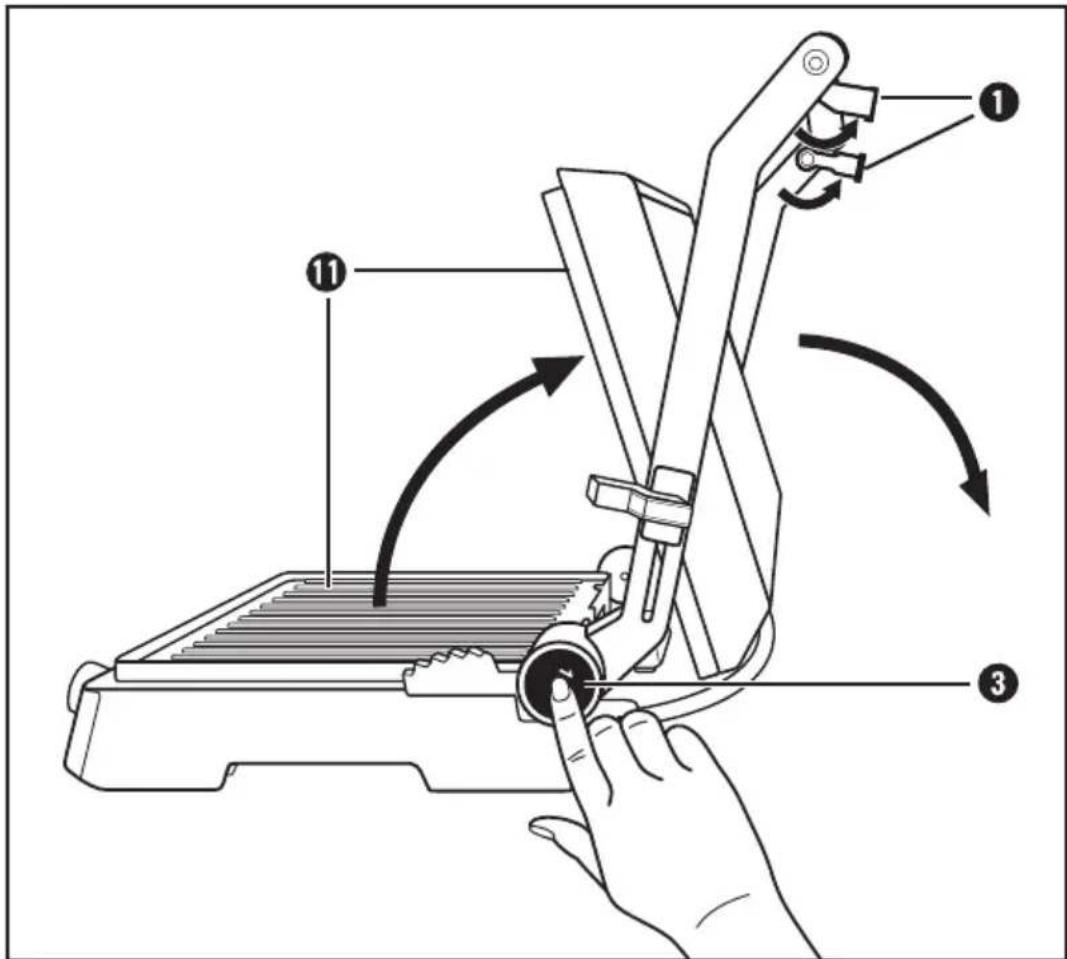
Fig. 1
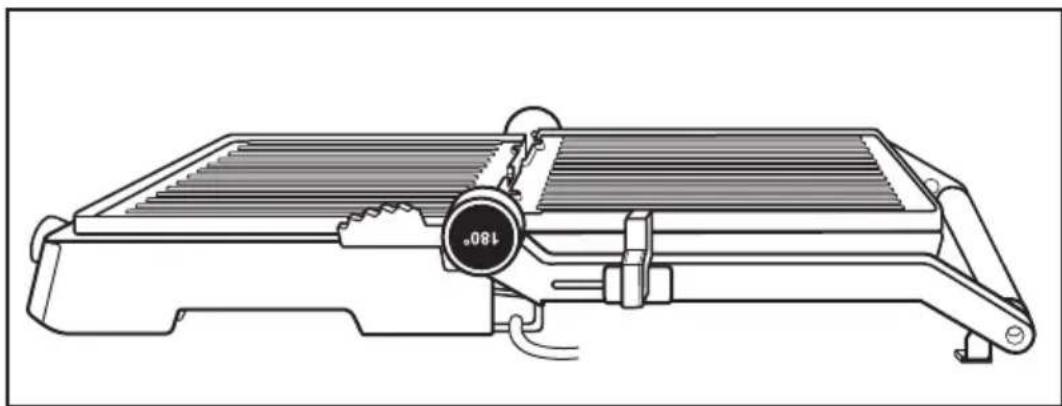
5) The hotplates ⑪ are now positioned next to each other and can be used as a table grill (Fig. 2).
natural_image
Line drawing of a portable heater with a digital scale and temperature reading (no text or symbols on the device itself)Fig. 2
6) Place the food to be grilled onto the hotplates ⑪.
7) Turn the food being grilled from time to time and remove it from the hotplates ⑪ once it is cooked.
CAUTION
Damage to the appliance!
▶ Do not use pointed or sharp objects to turn or remove the grilled food. These could damage the surfaces of the hotplates ⑪!
8) Use the On/Off button ⏻ B0 switch the appliance off and pull the mains power plug from the wall socket.
CAUTION
▶ Always remove the plug from the mains power socket when the appliance is not in use. It is not sufficient to switch off the appliance using the On/Off button ⏻ Ⓑ!
Tips and tricks
To make meat more tender and speed up the grilling process, you can marinate it beforehand. An ideal basis for this can be sour cream, red wine, vinegar, buttermilk or fresh papaya or pineapple juice, for example. Add herbs and spices according to taste. Do not add salt as this can draw water out of the meat and make it dry. Place the meat in the marinade so that it is completely covered and close the container. Ideally, leave it overnight.
The hotplates ⑪ have a non-stick coating, making extra fat unnecessary. If you still wish to use fat, please ensure that the fat/oil is suitable for grill-roasting, e.g. rapeseed oil.
■ To ensure that the food is evenly cooked, make sure that it has a uniform thickness.
If you are not sure whether the food is cooked all the way through, you can use a commercially available meat thermometer.
Cleaning and care
Safety instructions

WARNING!
RISK OF FATAL ELECTRIC SHOCK!
Risk of bodily injury when cleaning the appliance!
To avoid risks, observe the following safety instructions:
Before cleaning, pull out the plug and wait until the appliance has completely cooled down. Risk of injury!
▶ Never clean the appliance under running water and never immerse it in water. The appliance could be irreparably damaged!
CAUTION
Damage to the appliance!
▶ To avoid irreparable damage to the appliance, ensure that no moisture can penetrate the appliance during cleaning.
- When cleaning the surfaces use neither abrasive or chemical cleaners, nor sharp or scratchy objects.
Draw the cleaning scraper 13 over the hotplates 11 after the hotplates 11 have cooled down so that fat and residues are aggregated, then slide them into the fat drip tray 10.
■ Empty and clean the fat drip tray 10 in warm water with a little detergent.
Wipe the hotplates ⑪ with a damp cloth. Do not use any harsh cleaning agents, rough sponges or sharp objects for cleaning as these could damage the non-stick coating.
For more stubborn soiling or hardened residue, remove the hotplates ⑪:
-Open the appliance.
- Hold the upper hotplate ⑪ in place to prevent it from falling and press the RELEASE button ⑫. The upper hotplate ⑪ is released from the appliance.
- Press the RELEASE button ⑨ and at the same time, remove the lower hotplate ⑪.
Clean the hotplates ⑪ which have been removed in warm water with a little detergent in it. For severe incrustations, leave the hotplates ⑪ to soak for a while in the water. After washing, rinse the hotplates ⑪ with clean water to remove all detergent residues. Dry everything properly. The hotplates ⑪ must be dry before you put them back in the appliance!
To refit the hotplates 11, place the hotplates 11 onto the base so that the two notches next to the fat outlet 4 grip onto the hooks on the base. Then, press down the front part of the hotplate 11 until you hear it engage.
Proceed in the same way with the second hotplate ⑪.
■ Clean the surfaces of the appliance with a damp cloth. For stubborn soiling, use a mild detergent on the cloth.
■ Wipe the cleaning scraper ⑬ with a damp cloth. For more stubborn soiling, add some mild detergent to the cloth or rinse it in warm water and detergent.
■ Ensure that all parts are completely dry before reusing the appliance.
NOTE
The hotplates ⑪, the fat drip tray ⑩ and the cleaning scraper ⑬ are all dishwasher safe. To protect the material, however, we recommend cleaning it as described above.
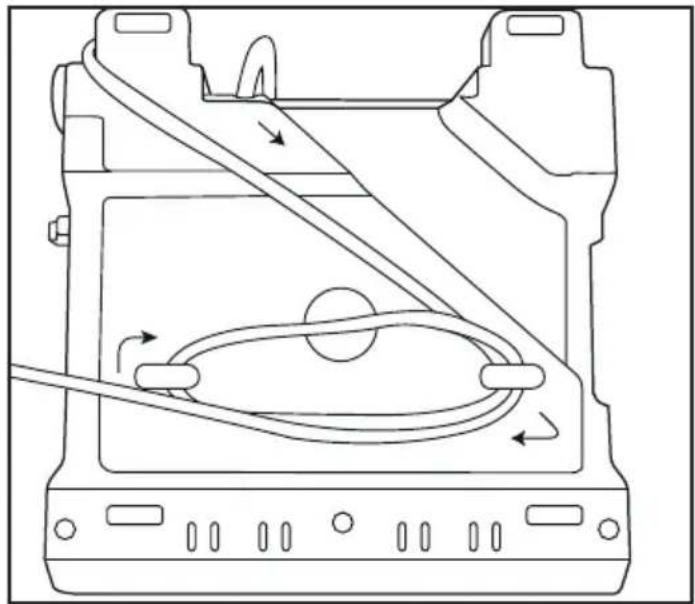
Storage
Lock the appliance by pushing the safety catch ② to the position 📋. Wind the mains cable clockwise around the cable retainer ⑤ on the underside of the appliance and fasten it in place with the cable clip:
natural_image
Technical line drawing of a mechanical device with internal components and directional arrows (no text or symbols)Fig. 3
Store the cleaned appliance in a dry location.
Troubleshooting
This section contains important information on fault identification and rectification. The following table will help you to identify and rectify minor malfunctions.
NOTE
If the appliance malfunctions, the corresponding error code will be shown on the display. You hear beeps and all buttons are locked. It is not possible to make any entries via the control panel ⑧. Please follow the instructions below.
| Fault Possible cause | Remedy | |
| The plug is not connected. | Connect the mains adapter correctly to the appliance. | |
| The appliance will not switch on. | The socket is not supplying any power. | Check the house mains fuse. |
| The appliance is damaged. | Contact the Customer Service department. | |
| ER1 appears on the display. | There is a short circuit in the system. | Disconnect the plug from the mains power socket and contact the Customer Service department. |
| ER2 appears on the display. | The lower hotplate 11 has not been correctly attached. | Ensure that the lower hotplate 11 is correctly fitted. |
| ER3 appears on the display. | The temperature of the hotplates 11 is over 320°C. The appliance has overheated. | Remove the plug from the mains power socket. Wait until the appliance has cooled down completely and then reconnect the appliance to a mains power socket. |
NOTE
▶ If you are unable to resolve the problem by applying any of the aforementioned methods, please contact the Customer Service department.
Disposal
Never dispose of the appliance in your normal domestic waste. This product is subject to the provisions of European Directive 2012/19/EU-WEEE (Waste Electrical and Electronic Equipment).
Dispose of the appliance via an approved disposal company or your municipal waste facility. Please observe the currently applicable regulations. Please contact your waste disposal facility if you are in any doubt.
Attachment
Technical data
| Power supply 220-240 V | ~ | 50/60 Hz |
| Power consumption 2000 W | |
 | All of the parts of this appliance that come into contact with food are food-safe. |
| Protection class | I ( protective earth) |
This appliance has a 3-year warranty valid from the date of purchase. If this product has any faults, you, the buyer, have certain statutory rights. Your statutory rights are not restricted in any way by the warranty described below.
Warranty conditions
The validity period of the warranty starts from the date of purchase. Please keep your original receipt in a safe place. This document will be required as proof of purchase.
If any material or production fault occurs within three years of the date of purchase of the product, we will either repair or replace the product for you at our discretion. This warranty service is dependent on you presenting the defective appliance and the proof of purchase (receipt) and a short written description of the fault and its time of occurrence.
If the defect is covered by the warranty, your product will either be repaired or replaced by us. The repair or replacement of a product does not signify the beginning of a new warranty period.
Warranty period and statutory claims for defects
The warranty period is not prolonged by repairs effected under the warranty. This also applies to replaced and repaired components. Any damage and defects present at the time of purchase must be reported immediately after unpacking. Repairs carried out after expiry of the warranty period shall be subject to a fee.
Scope of the warranty
This appliance has been manufactured in accordance with strict quality guidelines and inspected meticulously prior to delivery.
The warranty covers material faults or production faults. The warranty does not extend to product parts subject to normal wear and tear or fragile parts such as switches, batteries, baking moulds or parts made of glass.
The warranty does not apply if the product has been damaged, improperly used or improperly maintained. The directions in the operating instructions for the product regarding proper use of the product are to be strictly followed. Uses and actions that are discouraged in the operating instructions or which are warned against must be avoided.
This product is intended solely for private use and not for commercial purposes. The warranty shall be deemed void in cases of misuse or improper handling, use of force and modifications / repairs which have not been carried out by one of our authorised Service centres.
Warranty claim procedure
To ensure quick processing of your case, please observe the following instructions:
■ Please have the till receipt and the item number (e.g. IAN 12345) available as proof of purchase.
■ You will find the item number on the type plate, an engraving on the front page of the instructions (bottom left), or as a sticker on the rear or bottom of the appliance.
If functional or other defects occur, please contact the service department listed either by telephone or by e-mail.
■ You can return a defective product to us free of charge to the service address that will be provided to you. Ensure that you enclose the proof of purchase (till receipt) and information about what the defect is and when it occurred.

You can download these instructions along with many other manuals, product videos and software on www.lidl-service.com.
Service
GB Service Great Britain
Tel.: 0871 5000 720 (£ 0.10/Min.)
E-Mail: kompernass@lidl.co.uk
IE Service Ireland
Tel.: 1890 930 034
(0,08 EUR/Min., (peak))
(0,06 EUR/Min., (off peak))
E-Mail: kompernass@lidl.ie
IAN 290943
Importer
Please note that the following address is not the service address. Please use the service address provided in the operating instructions.
KOMPERNASS HANDELS GMBH
BURGSTRASSE 21
DE-44867 BOCHUM
GERMANY
www.kompernass.com
Recipes
NOTE
The cooking times and temperature settings given in the recipes are recommendations only. They can vary depending on the characteristics of the ingredients!
"Contact grill" position
Tex-Mex burger
900 g minced beef
6 tbsp. BBQ sauce
6 tbsp. finely chopped onions
3 tbsp. fresh or ready-made salsa
1/2 tsp chilli powder
4 large hamburger buns
1) Mix the minced meat, onions, salsa, chilli powder and BBQ sauce in a large bowl.
2) Shape the minced meat into four evenly sized hamburgers that are approx. 2 cm thick.
3) Heat up the appliance (200-230°C).
4) Grill the hamburgers for 8–10 minutes on the preheated appliance, having set this to the contact position. Then serve the hamburgers in the hamburger buns together with the ingredients and herbs of your choice.
Rump steak with spring onion & herb sauce
500 g lean rump steaks (125 g each)
120 g margarine
1 tsp. Worcestershire sauce
1 finely chopped garlic clove
4 tbsp. finely chopped parsley
4 finely chopped spring onions
1) Mix the margarine and Worcestershire sauce in a small bowl and mix in the garlic, parsley and spring onions.
2) Heat up the appliance to the maximum temperature (230°C).
3) Grill the steak for around 3 min.
4) Brush the spring onion and herb sauce onto the steak and cook it for another 4 minutes at around 200°C.
NOTE
The herb sauce collecting in the fat drip tray can be poured over the steak before serving.
Tuna with slices of orange
(4 people)
4 fresh tuna steaks (170 g each)
1 orange
1 tbsp. finely chopped parsley
Salt
Pepper
1) Peel the oranges and cut them into slices approx. 5 mm thick.
2) Preheat the appliance (approx. 200^ C).
3) Place the tuna steaks onto the preheated grill, scatter the parsley on top and season with salt and pepper.
4) Place the slices of orange onto the tuna steaks and grill everything for approx. 6–8 minutes.
5) Remove the grilled orange slices before serving.
"Panini grill" position
Spinach and cheese panini
250 g spinach leaves
1 onion
1 clove of garlic
1 tbsp. cooking oil
2 tsp. lemon juice
1 pinch of salt (and pepper)
4 slices of toasting bread/white bread
40 g herb butter
75 g mozzarella
20 g pine nuts
1) Sort and wash the spinach leaves.
2) Peel and finely chop the onion and garlic, stew in hot oil. Add the spinach. Season with lemon juice, salt and pepper.
3) Spread the herb butter onto the toast.
4) Cut the mozzarella into slices.
5) Divide the mozzarella and drained spinach onto 2 slices of toast and scatter the pine nuts on top.
6) Top the panini with a second slice of bread.
7) Preheat the appliance (approx. 175°C).
8) Carefully place the panini onto the preheated grill.
9) Using the safety catch ②, set the desired gap to the upper hotplate ⑪ and close the lid.
10) The panini should be roasted to a golden brown.
Chicken breast panini
400 g chicken breast
20 g butter
Pepper, salt, paprika powder
120 g bacon, in strips
6 slices of toasting bread
3 tbsp. salad dressing yoghurt
30 g of iceberg lettuce
2 tomatoes
1 avocado
1 tsp. lime juice
50 g cucumber
1) Rinse the chicken breast under running tap water and pat dry with kitchen paper.
2) Preheat the appliance to the maximum temperature (230°C) and cook the breast fillet for a short while in the contact position.
3) Roast at approx. 175°C for around 10 minutes. After grill-roasting, season with salt, pepper and paprika and set aside.
4) Fry the strips of bacon in a pan until crispy.
5) Spread the yoghurt dressing onto 3 slices of toasting bread or white bread, add the iceberg lettuce, cut the tomatoes into slices, season them and arrange them on top.
6) Cut the chicken breasts along their length and lay them on top of the tomatoes.
7) Lay the strips of bacon on the chicken breasts.
8) Cut open the avocados vertically and use a turning movement to remove the halves from the stone. Peel and cut the avocado into slices. Drizzle the lime juice onto the avocado to prevent from going brown. Lay the slices onto the panini.
9) Cut the cucumber into slices and place them on the avocado.
10) Top the panini with a second slice of bread.
11) Carefully place the panini onto the hotplate ⑪.
12) Using the safety catch ②, set the desired gap to the upper hotplate ⑪ and close the lid.
13) The panini should be roasted to a golden brown.
Mustard baguette
1 baguette
1 garlic clove
50 g mustard-pickled gherkins
40 g pecorino
1 tbsp. hot mustard
2 tbsp. sweet mustard
50 g butter
2 tbsp. chopped chives
Salt, pepper
1) Cut into the baguette at 2–3 centimetre intervals but do not cut all the way through.
2) Peel and crush the garlic, dice the gherkins and grate the pecorino cheese.
3) Mix the hot and sweet mustards with the soft butter, garlic, gherkins, Pecorino cheese and chives, and season with salt and pepper. Fill the mustard butter into the slits in the baguette and wrap the baguettes in aluminium foil.
4) Preheat the appliance (175-200°C).
5) Lay the baguettes onto the hotplate ⑪.
6) Using the safety catch ②, set the desired gap to the upper hotplate ⑪ and close the lid.
7) The baguette should be golden-brown.
"Table grill" position
Chicken/turkey breast
200 g chicken/turkey breast
A little flour
1) Coat the hotplates ⑪ with a little oil that is suitable for grill-roasting and heat the appliance to maximum temperature (230°C).
2) Cut the 200 g of chicken/turkey breast into slices and lightly dust with flour.
3) Grill-roast on one side for around 4 minutes, then turn, sprinkle with a little salt and grill the other side for about 4 minutes.
Grilled vegetables
2 peppers
1 courgette
1 aubergine
Olive oil
Salt
Pepper
Herbs de Provence (seasoning mix)
1) Wash the vegetables thoroughly. Cut the peppers in half, remove the seeds and cut them into strips. Cut the aubergine and courgette in half along their length and then into pieces measuring around 0.5 cm.
2) Brush the vegetables with a little olive oil.
3) Preheat the appliance (150-175°C).
4) Place the vegetables onto the preheated hotplate ⑪ and grill them on both sides, allowing around 8-10 minutes for each side, until they are light brown in colour.
5) Season the vegetables with salt, pepper and herbs de Provence according to taste.
Coconut curry prawns
100 g red curry paste
50 ml coconut milk
400 g prawns (alternatively crab or shrimps)
200 g sugar snaps
2 peppers
2 onions
2 garlic cloves
Salt and pepper
Aluminium foil
1) Mix the curry paste and the coconut milk.
2) Wash the prawns, the sugar snaps and the peppers.
3) Peel the onions and garlic cloves.
4) Chop the onions, the garlic cloves and peppers into small pieces.
5) Spread the prawns and the vegetables evenly over four pieces of aluminium foil. The aluminium foil must be big enough so that it is possible to wrap up the ingredients in little packages. Drip the coconut curry sauce over the food and season everything with salt and pepper.
6) Seal the packages well so that no liquid can escape.
7) Preheat the appliance (150-175°C).
8) Place the filled packages onto the preheated hotplates ⑪ and cook from both sides, allowing around 15 minutes per side.
Grilled corn on the cob
2 sweet corn cobs
100 g herb butter
Garlic salt
Salt
Pepper
Aluminium foil
1) Brush a piece of aluminium foil with the herb butter.
2) Salt the corn cobs and wrap them in the aluminium foil.
3) Preheat the appliance (150-175°C).
4) Place the package onto the hotplates ⑪.
5) Turn the package after 15 minutes and cook the cobs for another 15 minutes.
6) Season the corn cobs with garlic salt and pepper.
Table des matières
Introduction 62
Fig. 1
natural_image
Line drawing of a portable heater with a circular dial indicator showing 180° (no text or symbols on the device itself)Fig. 2
natural_image
Technical line drawing of a mechanical device with internal components and directional arrows (no text or symbols)KOMPERNASS HANDELS GMBH
BURGSTRASSE 21
DE-44867 BOCHUM
ALLEMAGNE
www.kompernass.com
Recettes
REMARQUE
OPMERKING
natural_image
Line drawing of a portable air conditioner unit with a circular dial indicator (no text or symbols)Afb. 2
6) Leg de levensmiddelen die u wilt grillen op de grillplaten ⑪.
natural_image
Technical line drawing of a mechanical device with internal components and directional arrows (no text or symbols)Afb. 3
KOMPERNASS HANDELS GMBH
BURGSTRASSE 21
DE-44867 BOCHUM
DUITSLAND
www.kompernass.com
Recepten
OPMERKING
1 tl Worcestershiresauce
120 g bacon, in reepjes
6 plakjes witbrood/tostibrood
3 el saladedressing (yoghurt)
30 g ijsbergsla
2 tomaten
1 avocado
1 tl citroensap
50 g komkommer
Obr. 1
natural_image
Line drawing of a portable heater with a circular dial indicator showing 180° (no text or symbols on the device itself)Obr. 2
natural_image
Technical line drawing of a mechanical device with internal components and directional arrows (no text or symbols)Obr. 3
KOMPERNASS HANDELS GMBH
BURGSTRASSE 21
DE-44867 BOCHUM
NĚMECKO
www.kompernass.com
Recepty
UPOZORNĚNÍ
Fig. 1
natural_image
Line drawing of a portable heater with a circular dial indicator showing 180° (no text or symbols on the device itself)Fig. 2
natural_image
Technical line drawing of a mechanical device with internal components and directional arrows (no text or symbols)KOMPERNASS HANDELS GMBH
BURGSTRASSE 21
DE-44867 BOCHUM
ALEMANIA
www.kompernass.com
Recetas
INDICACIÓN
Fig. 1
natural_image
Line drawing of a portable heater with a circular dial indicator showing 180° (no text or symbols on the device itself)Fig. 2
natural_image
Technical line drawing of a mechanical device with internal components and directional arrows (no text or symbols)Fig. 3 Guarde o aparelho limpo num local seco.
Resolução de falhas
KOMPERNASS HANDELS GMBH
BURGSTRASSE 21
DE-44867 BOCHUM
ALEMANHA
www.kompernass.com
Receitas
NOTA
KOMPERNASS HANDELS GMBH
BURGSTRASSE 21
DE-44867 BOCHUM
GERMANY
www.kompernass.com
Stand der Informationen · Last Information Update · Version des informations
Stand van de informatie · Stav informací · Estado de las informaciones · Estado das informações:
09/2017·Ident.-No.: SKGL2000A1-092017-3


- KONTAKTGRILL
- CONTACT GRILL
- GRIL MULTI-USAGE SKGL 2000 A1
- GRIL MULTI-USAGE
- KONTAKTNÍ GRIL
- GRELHADOR ELÉCTRICO
- CONTACTGRILL
- GRILL DE CONTACTO
- FR BE
- Inhaltsverzeichnis
- Einführung 2
- Rezepte
- HINWEIS
- Safety 34
- Operating components 38
- Unpacking and installation 38
- Handling and use 40
- Tips and tricks....47
- Cleaning and care 48
- Storage 49
- Troubleshooting 50
- Disposal....50
- Attachment 51
- Information about these operating instructions
- Copyright
- Intended use
- Warnings
- DANGER
- A warning notice at this hazard level indicates an imminently hazardous situation.
- WARNING
- A warning at this hazard level indicates a potentially hazardous situation.
- CAUTION
- A warning notice of this hazard level indicates a risk of property damage.
- NOTE
- Safety
- Basic safety instructions
- RISK OF ELECTRICAL SHOCK!
- RISK OF BURNS!
- CAUTION! PROPERTY DAMAGE!
- Operating components
- Figure A:
- Figure B:
- Unpacking and installation
- Safety information
- While using the appliance, there is a risk of injury and/or damage to property!
- Package contents and transport inspection
- Unpacking
- Disposal of the packaging
- Handling and use
- Before first use
- Control panel
- Operation
- Caution! Hot surface!
- Temperature settings
- "Contact grill" position
- Damage to the appliance!
- "Panini grill" position
- "Table grill" position
- Tips and tricks
- Cleaning and care
- Safety instructions
- WARNING!
- RISK OF FATAL ELECTRIC SHOCK!
- Risk of bodily injury when cleaning the appliance!
- Storage
- Troubleshooting
- Disposal
- Attachment
- Technical data
- Warranty conditions
- Warranty period and statutory claims for defects
- Scope of the warranty
- Warranty claim procedure
- Service
- Importer
- Recipes
- Tex-Mex burger
- Rump steak with spring onion & herb sauce
- Tuna with slices of orange
- Spinach and cheese panini
- Chicken breast panini
- Mustard baguette
- Chicken/turkey breast
- Grilled vegetables
- Coconut curry prawns
- Grilled corn on the cob
- Table des matières
- Introduction 62
- Recettes
- REMARQUE
- OPMERKING
- Recepten
- Obr. 2
- Recepty
- UPOZORNĚNÍ
- Recetas
- INDICACIÓN
- Resolução de falhas
- Receitas
- NOTA
Brand : SILVERCREST
Model : SKGL 2000 A1
Category : Grill plate