HTJ5550WK - Home Theater System SAMSUNG - Free user manual and instructions
Find the device manual for free HTJ5550WK SAMSUNG in PDF.

Frequently Asked Questions - HTJ5550WK SAMSUNG
User questions about HTJ5550WK SAMSUNG
0 question about this device. Answer the ones you know or ask your own.
Ask a new question about this device
Download the instructions for your Home Theater System in PDF format for free! Find your manual HTJ5550WK - SAMSUNG and take your electronic device back in hand. On this page are published all the documents necessary for the use of your device. HTJ5550WK by SAMSUNG.
USER MANUAL HTJ5550WK SAMSUNG
Thank you for purchasing this Samsung product.
To receive more complete service, please register your product at
www.samsung.com/register
CAUTION
RISK OF ELECTRIC SHOCK. DO NOT OPEN
CAUTION: TO REDUCE THE RISK OF ELECTRIC SHOCK, DO NOT REMOVE THE COVER (OR BACK). THERE ARE NO USER SERVICEABLE PARTS INSIDE. REFER ALL SERVICING TO QUALIFIED PERSONNEL.
- The slots and openings in the cabinet and in the back or bottom are provided for necessary ventilation. To ensure reliable operation of this apparatus, and to protect it from overheating, these slots and openings must never be blocked or covered.
- Do not place this apparatus in a confined space, such as a bookcase, or built-in cabinet, unless proper ventilation is provided.
- Do not place this apparatus near or over a radiator or heat register, or where it is exposed to direct sunlight.
- Do not place vessels (vases etc.) containing water on this apparatus. A water spill can cause a fire or electric shock.
- Do not expose this apparatus to rain or place it near water (near a bathtub, washbowl, kitchen sink, or laundry tub, in a wet basement, or near a swimming pool, etc.). If this apparatus accidentally gets wet, unplug it and contact an authorized dealer immediately.
- This apparatus uses batteries. In your community, there might be environmental regulations that require you to dispose of these batteries properly. Please contact your local authorities for disposal or recycling information.
- Do not overload wall outlets, extension cords or adaptors beyond their capacity, since this can result in fire or electric shock.
- Route power-supply cords so that they are not likely to be walked on or pinched by items placed on or against them. Pay particular attention to cords at the plug end, at wall outlets, and the point where they exit from the apparatus.
- To protect this apparatus from a lightning storm, or when it is left unattended and unused for long periods of time, unplug it from the wall outlet and disconnect the antenna or cable system. This will prevent damage to the set due to lightning and power line surges.
- Before connecting the AC power cord to the DC adaptor outlet, make sure the voltage designation of the DC adaptor corresponds to the local electrical supply.
- Never insert anything metallic into the open parts of this apparatus. Doing so may create a danger of electric shock.

This symbol indicates that high voltage is present inside. It is dangerous to make any kind of contact with any internal part of this product.

This symbol indicates that important literature concerning operation and maintenance has been included with this product.
- To avoid electric shock, never touch the inside of this apparatus. Only a qualified technician should open this apparatus.
- Make sure to plug the power cord in until it is firmly seated. When unplugging the power cord from a wall outlet, always pull on the power cord's plug. Never unplug by pulling on the power cord. Do not touch the power cord with wet hands.
-
If this apparatus does not operate normally - in particular, if there are any unusual sounds or smells coming from it - unplug it immediately and contact an authorized dealer or service center.
-
Maintenance of Cabinet.
-
Before connecting other components to this product, be sure to turn them off.
-
If you move your product suddenly from a cold place to a warm place, condensation may occur on the operating parts and lens and cause abnormal disc playback. If this occurs, unplug the product, wait for two hours, and then connect the plug to the power outlet. Then, insert the disc, and try to play back again.
-
Be sure to pull the power plug out of the outlet if the product is to remain unused or if you are leaving the house for an extended period of time (especially when children, elderly, or disabled people will be left alone in the house).
- Accumulated dust can cause an electric shock, an electric leakage, or a fire by causing the power cord to generate sparks and heat or the insulation to deteriorate.
- Contact an authorized service center for information if you intend to install your product in a location with heavy dust, high or low temperatures, high humidity, chemical substances, or where it will operate 24 hours a day such as in an airport, a train station, etc. Failing to do so may lead to serious damage of your product.
-
Use only a properly grounded plug and wall outlet.
-
An improper ground may cause electric shock or equipment damage. (Class I Equipment only.)
-
To turn this apparatus off completely, you must disconnect it from the wall outlet. Consequently, the wall outlet and power plug must be readily accessible at all times.
-
Do not allow children to hang on the product.
- Store the accessories (battery, etc.) in a location safely out of the reach of children.
- Do not install the product in an unstable location such as a shaky self, a slanted floor, or a location exposed to vibration.
- Do not drop or strike the product. If the product is damaged, disconnect the power cord and contact a service center.
- To clean this apparatus, unplug the power cord from the wall outlet and wipe the product using a soft, dry cloth. Do not use any chemicals such as wax, benzene, alcohol, thinners, insecticide, air fresheners, lubricants, or detergent. These chemicals can damage the appearance of the product or erase the printing on the product.
- Do not expose this apparatus to dripping or splashing.
Do not put objects filled with liquids, such as vases on the apparatus. - Do not dispose of batteries in a fire.
- Do not plug multiple electric devices into the same wall socket. Overloading a socket can cause it to overheat, resulting in a fire.
- There is danger of an explosion if you replace the batteries used in the remote with the wrong type of battery. Replace only with the same or equivalent type.
WARNING:
TO PREVENT THE SPREAD OF FIRE, KEEP CANDLES AND OTHER ITEMS WITH OPEN FLAMES AWAY FROM THIS PRODUCT AT ALL TIMES.
- To reduce the risk of fire or electric shock, do not expose this appliance to rain or moisture.

CLASS 1 LASER PRODUCT
This product is classified as a CLASS 1 LASER product. Use of controls, adjustments or performance of procedures other than those specified herein may result in hazardous radiation exposure.
Complies with 21CFR 1040.10 except for deviations pursuant to Laser Notice No. 50, dated June 24, 2007.
CAUTION :
- INVISIBLE LASER RADIATION WHEN OPEN AND INTERLOCKS DEFEATED, AVOID EXPOSURE TO BEAM.
CLASS 1 LASER PRODUCT
KLASSE 1 LASER PRODUKT
LUOKAN 1 LASER LAITE
KCLASS 1 LASER APPARAT
PRODUCTO LÁSER CLASE 1
3D Precautions
IMPORTANT HEALTH AND SAFETY INFORMATION FOR 3D PICTURES.
Read and understand the following safety information before using the 3D function.
- Some viewers may experience discomfort while viewing 3D TV such as dizziness, nausea, and headaches. If you experience any such symptom, stop viewing 3D TV, remove the 3D Active Glasses, and rest.
- Watching 3D images for an extended period of time may cause eye strain. If you feel eye strain, stop viewing 3D TV, remove your 3D Active Glasses, and rest.
- A responsible adult should frequently check on children who are using the 3D function. If there are any reports of tired eyes, headaches, dizziness, or nausea, have the child stop viewing 3D TV and rest.
- Do not use the 3D Active Glasses for other purposes (such as general eyeglasses, sunglasses, protective goggles, etc.)
- Do not use the 3D function or 3D Active Glasses while walking or moving around. Using the 3D function or 3D Active Glasses while moving around may cause you to bump into objects, trip, and/or fall, and cause serious injury.
- If you want to enjoy 3D content, connect a 3D device (3D compliant AV receiver or TV) to the product's HDMI OUT port using a high-speed HDMI cable. Put on 3D glasses before playing the 3D content.
- The product outputs 3D signals only through an HDMI cable connected to the HDMI OUT port.
- The video resolution in 3D play mode is limited to the resolution of the original 3D video. You cannot change the resolution to your preference.
- Some functions such as BD Wise, screen size adjustment, and resolution adjustment may not operate properly in 3D play mode.
- You must use a high-speed HDMI cable for proper output of the 3D signal.
- Stay at least three times the width of the screen from the TV when watching 3D images. For example, if you have a 46 inch screen, stay 3.5 meters from the screen.
- Place the 3D video screen at eye level for the best 3D picture.
- When the product is connected to some 3D devices, the 3D effect may not function properly.
- This product does not convert 2D content into 3D.
- "Blu-ray 3D" and "Blu-ray 3D" logo are trademarks of the Blu-ray Disc Association.
Contents
GETTING STARTED
4 Accessories
5 Speaker Components
7 Front Panel
7 Rear Panel
8 Remote Control
CONNECTIONS
9 Connecting the Speakers
13 Connecting to a TV and External Devices
14 Connecting to a Network Router
SETTINGS
15 The Initial Settings Procedure
16 The Home Screen at a Glance
16 Accessing the Settings Screen
17 Settings Menu Functions
20 Radio Setup
21 Network Setup
24 Wi-Fi Direct
25 Upgrading Software
26 Setting Up DLNA
PLAYING CONTENT
27 Switching the Source Device
27 Playing Commercial Discs
27 Playing a Disc with User Recorded Content
28 Playing Files on a USB Device
29 Controlling Video Playback
31 Playing a Pre-Recorded Commercial Audio Disc
31 Controlling Music Playback
33 Playing Photo Content
33 Using Karaoke
34 Using Bluetooth
35 Using the Special Effects Remote Control Buttons
NETWORK SERVICES
37 Using BD-LIVETM
37 Using DLNA
37 Apps
38 Using Opera TV Store
39 Screen Mirroring
APPENDIX
40 Additional Information
41 Disk and Format Compatibility
46 Troubleshooting
49 Specifications
51 Licenses
- Figures and illustrations in this User Manual are provided for reference only and may differ from actual product appearance.
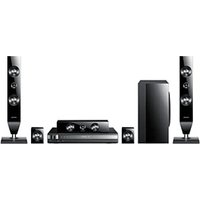
Check the box for the accessories and speaker components listed or shown below.
Accessories
Remote Control
- User Manual
- Batteries (AAA size)

Power Cable

FM Antenna
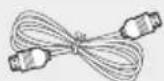
HDMI Cable
Speaker Components
HT-J5500K

Front x 2 Surround x 2


Center

Subwoofer Speaker Cable x 6

HT-J5530K


Screw (5× 15)× 2


Center Screw (5x20) x 8 Speaker Cable x 6


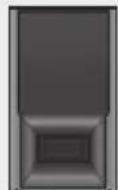
Front x 2 Stand x 2 Stand Base x 2 Surround x 2 Subwoofer
HT-J5550K


Screw (5x15) x 4


Center Screw (5x20) x 16 Speaker Cable x 6


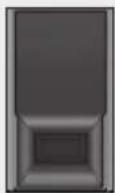
Front x 2 Stand x 4 Stand Base x 4 Surround x 2 Subwoofer
Getting Started
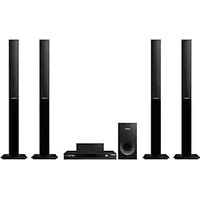
HT-J5550WK


Screw (5x15) x 4


Front x 2 Screw (5x20) x 16 Centre Stand Base x 4


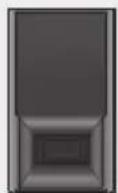

Surround x 2 Stand x 4 Subwoofer Speaker Cable x 6
Wireless Receiver Module (SWA-7000)
Front Panel
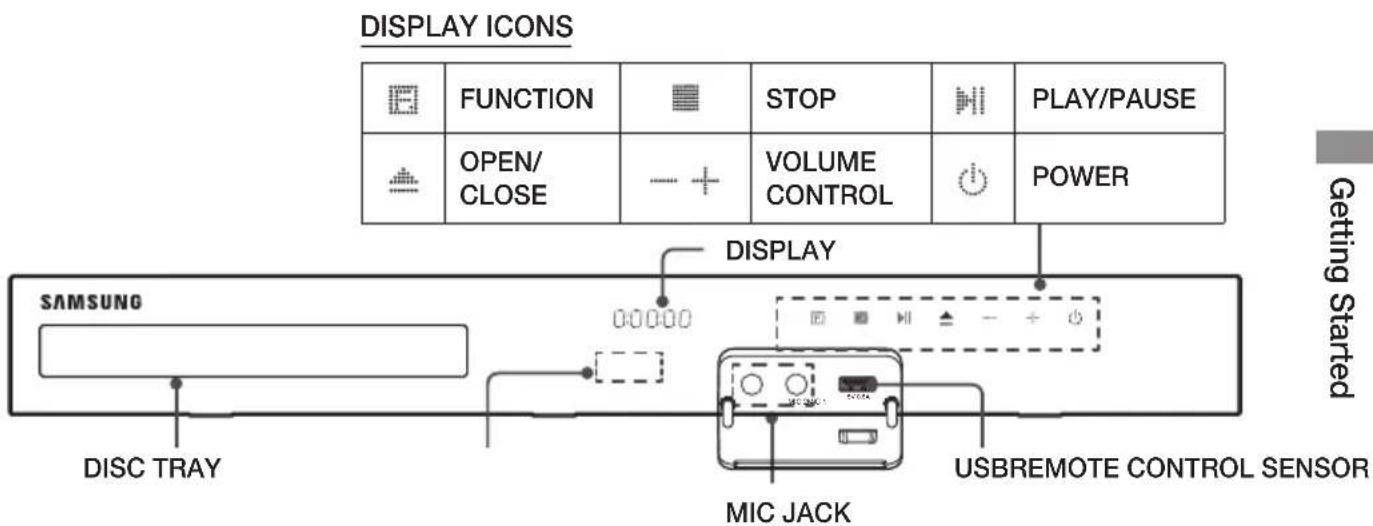
When the product is on, do not let children touch the product's surface. It will be hot.
To upgrade the product's software through the USB jack, you must use a USB flash drive.
When the product displays a Blu-ray Disc menu, you cannot start the movie by pressing the button on the product or the remote. To play the movie, you must select Play Movie or Start in the disc menu, and then press the button.
If you are using the Internet or are playing content from a USB device on your TV through the home theater, you cannot select the BD/DVD mode with the FUNCTION button. To select the BD/DVD mode, exit the Internet or stop the content you are playing on the TV, and then select the BD/DVD mode.
Plug the microphone jack before using Karaoke function.
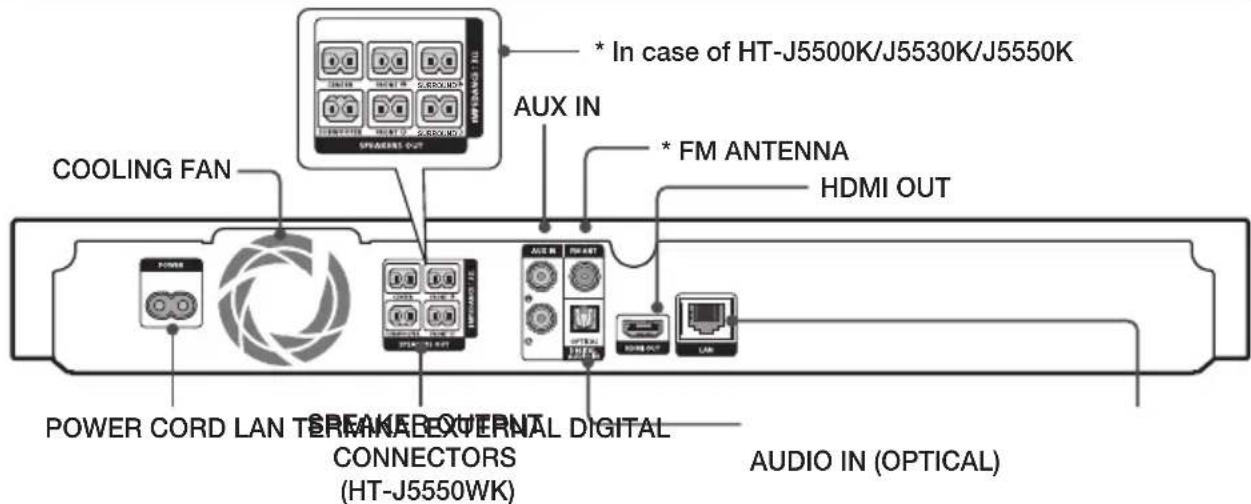
Rear Panel
-
Connecting the FM Antenna
-
Connect the supplied FM antenna to the FM ANT Jack.
- Slowly move the antenna wire around until you find a location where reception is good, then fasten it to a wall or other rigid surface.
Maintain a minimum of 10 cm of clear space on all sides of the home theater to ensure adequate ventilation. Do not obstruct the cooling fan or ventilation holes.
This product does not receive AM broadcasts.
Remote Control
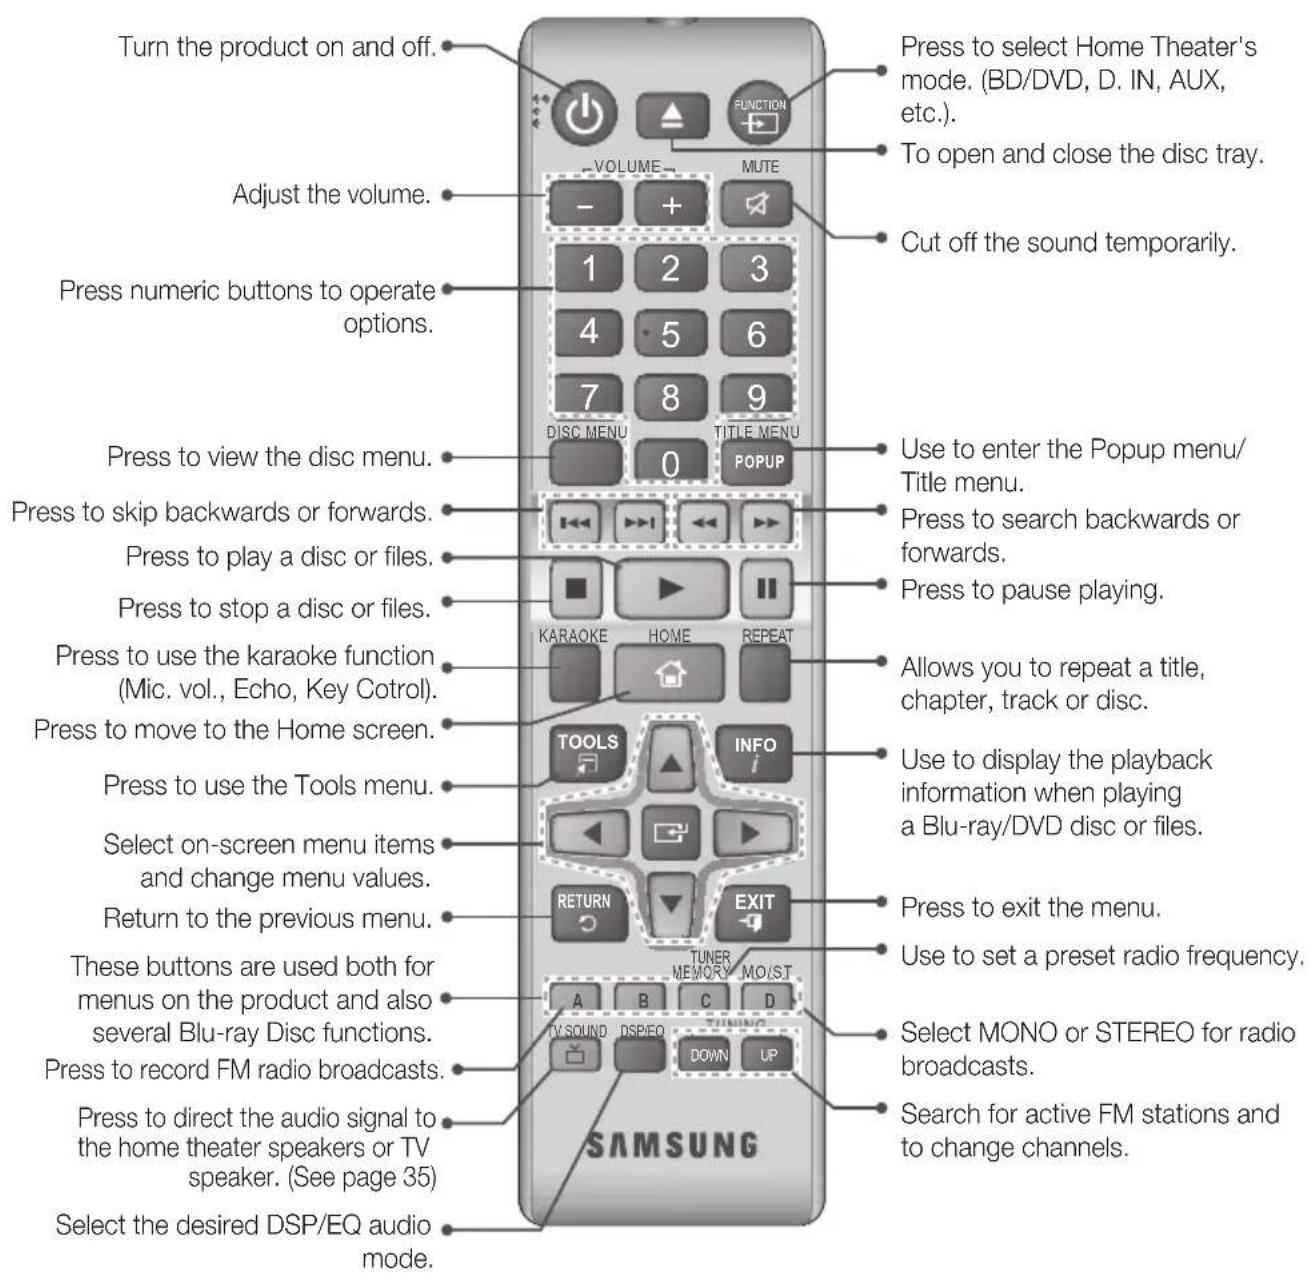
Tour of the Remote Control
Installing batteries in the Remote Control
Make sure to match the "+" and "-" ends of the batteries with the diagram inside the compartment.
Assuming typical usage, the batteries last for about one year.
The remote control can be used up to approximately 7 meters from the product in a straight line.

Connections
This section describes various methods of connecting the product to other external components. Before moving or installing the product, be sure to turn off the power and disconnect the power cord.
Connecting the Speakers
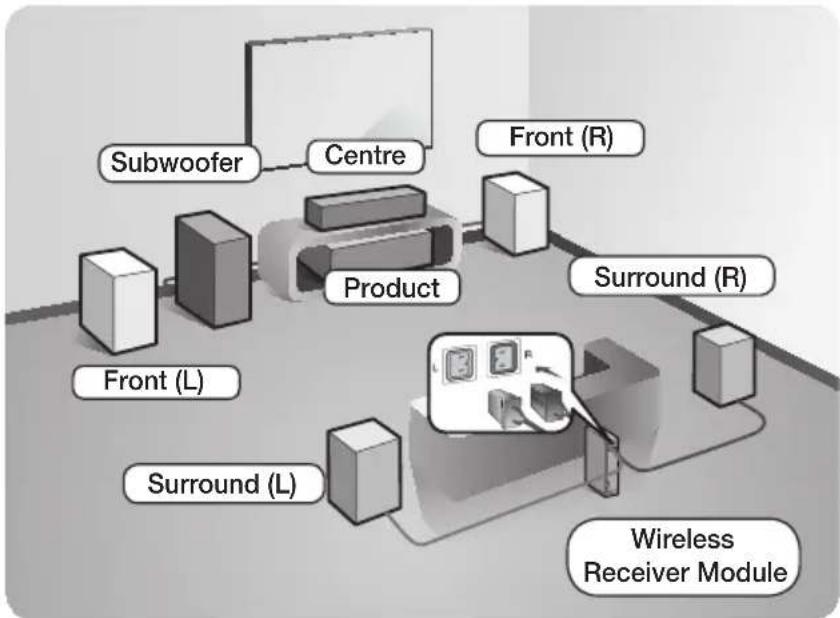
Position of the product
Place it on a stand or cabinet shelf, or under the TV stand.
Selecting the Listening Position
The listening position should be located about 2.5 to 3 times the TV's screen size away from the TV. For example, if you have a 46 inch screen, locate the listening position 2.92 to 3.50 meters from the screen.
- The Wireless Receiver Module applies to HT-J5550WK only.
| Front Speakers | Place these speakers in front of your listening position, facing inwards (about 45°) toward you. Place the front speakers so that their tweeters will be at the same height as your ear. Align the front face of the front speakers with the front face of the centre speaker or place them slightly in front of the centre speakers. |
| Centre Speaker | It is best to install the centre speaker at the same height as the front speakers. You can also install it directly over or under the TV. |
| Surround Speakers | Place these speakers to the side of your listening position. If there isn't enough room, place these speakers so they face each other. Position them about 60 to 90cm above your ear, facing slightly downward. * Unlike the front and centre speakers, the surround speakers are used mainly for sound effects. Sound will not come from them all the time. |
| Subwoofer | The position of the subwoofer is not so critical. Place it anywhere you like. |
- Surround speakers must be connected to the wireless receiver module. (HT-J5550WK only)
- The appearance of your speakers may differ from the illustrations in this manual.
- Each speaker has a coloured label on its back or underside. Each cable has a single coloured band near its end. Match the band on each cable to the speaker label by colour, and then connect the cable to the speaker. See page 10 for exact instructions.
Connections
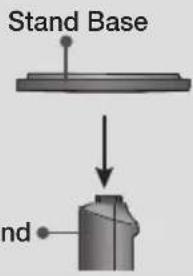
Installing the Speakers on the Tallboy Stand
- HT-J5530K only - Front Speakers
HT-J5550K/J5550WK only - Front/Surround Speakers
- Turn the Stand Base upside-down and connect it to the Stand.
-
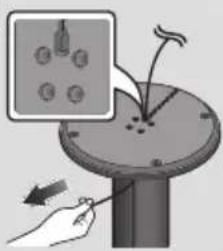
Use the driver to fasten the screws (5x20) on the 4 marked holes.
-
Straighten the provided speaker cable and run it through the center hole of the Stand Base.
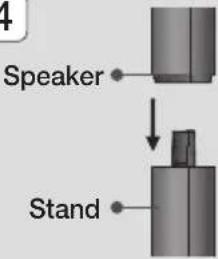
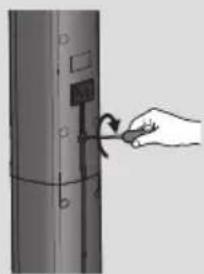
- Connect the upper Speaker to the assembled Stand.
- Insert a screw (5x15) and fasten it clockwise through the hole on the rear of the speaker using a screwdriver.
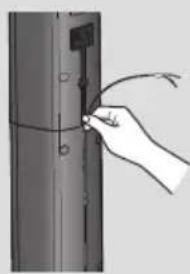
- Arrange the speaker cable along the groove on the rear side of the stand pole.
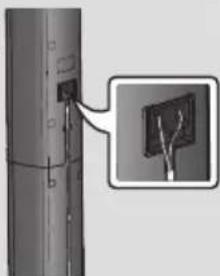
- Connect the arranged speaker cables to the port on the speaker's rear side while matching their colors.
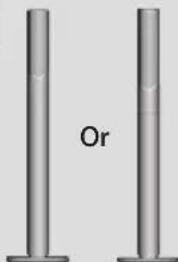
- This is the appearance after the speaker is installed. Follow this steps to install other speaker.
1

2
3
4
5
6
7
8
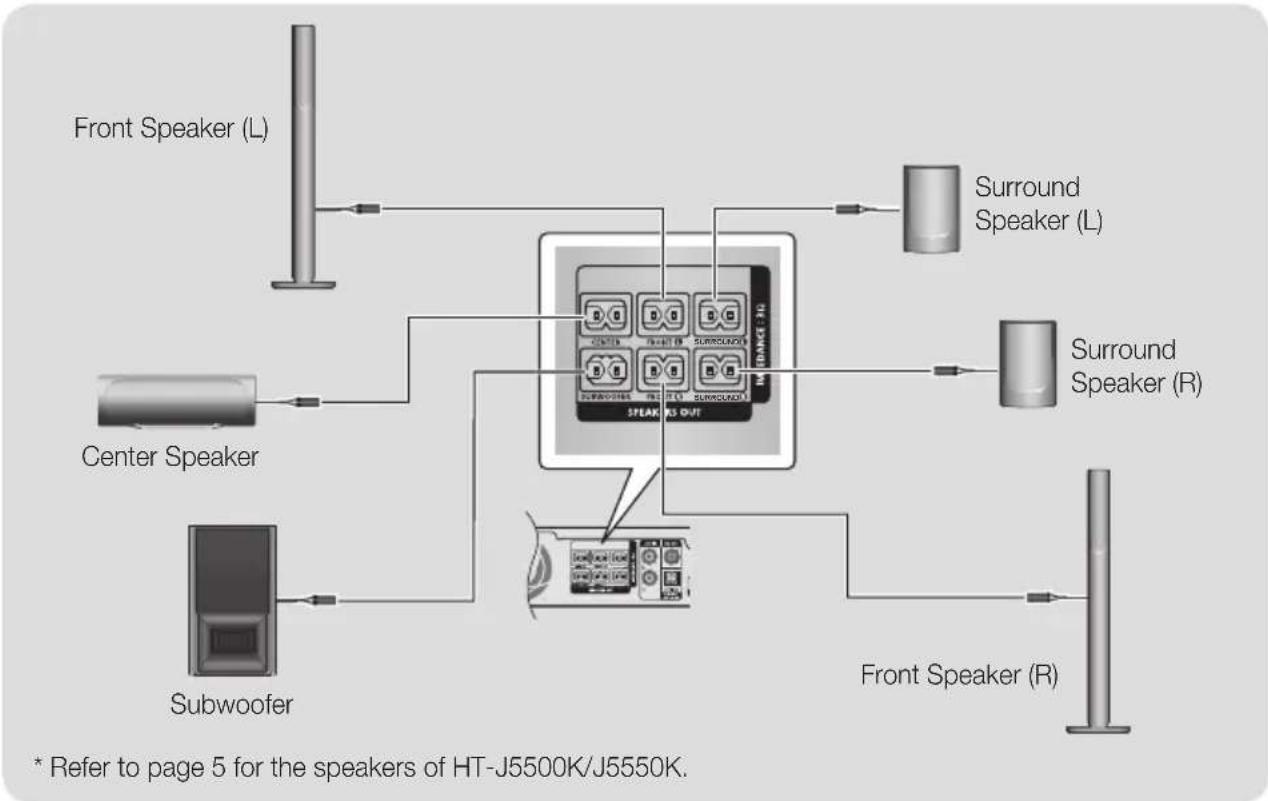
Speaker Cable Connections
- Match each speaker cable bundle to the correct speaker by matching the colored band on each bundle to the colored sticker on the bottom or back of each speaker.
- Connect the speaker wire plugs from each speaker to the back of the product by matching the colored band on each cable to the colors of the speaker jacks. When connecting, make sure to match label color on the back of speaker.
In case of HT-J5530K
If you place a speaker near your TV set, the screen color may be distorted because of the magnetic field.
CAUTION
If you want to install the speakers on the wall, fasten screws or nails (not provided) firmly to the wall wherever you want to hang a speaker, and then, using the hole in the rear of each speaker, carefully hang each speaker on a screw or nail.
Do not let children play with or near the speakers. They could get hurt if a speaker falls.
When connecting the speaker wires to the speakers, make sure that the polarity (+ / -) is correct.
- Keep the subwoofer speaker out of reach of children to prevent children from inserting their hands or alien substances into the duct (hole) of the subwoofer speaker.
Do not hang the subwoofer on the wall by the duct (hole).
HT-J5550WK
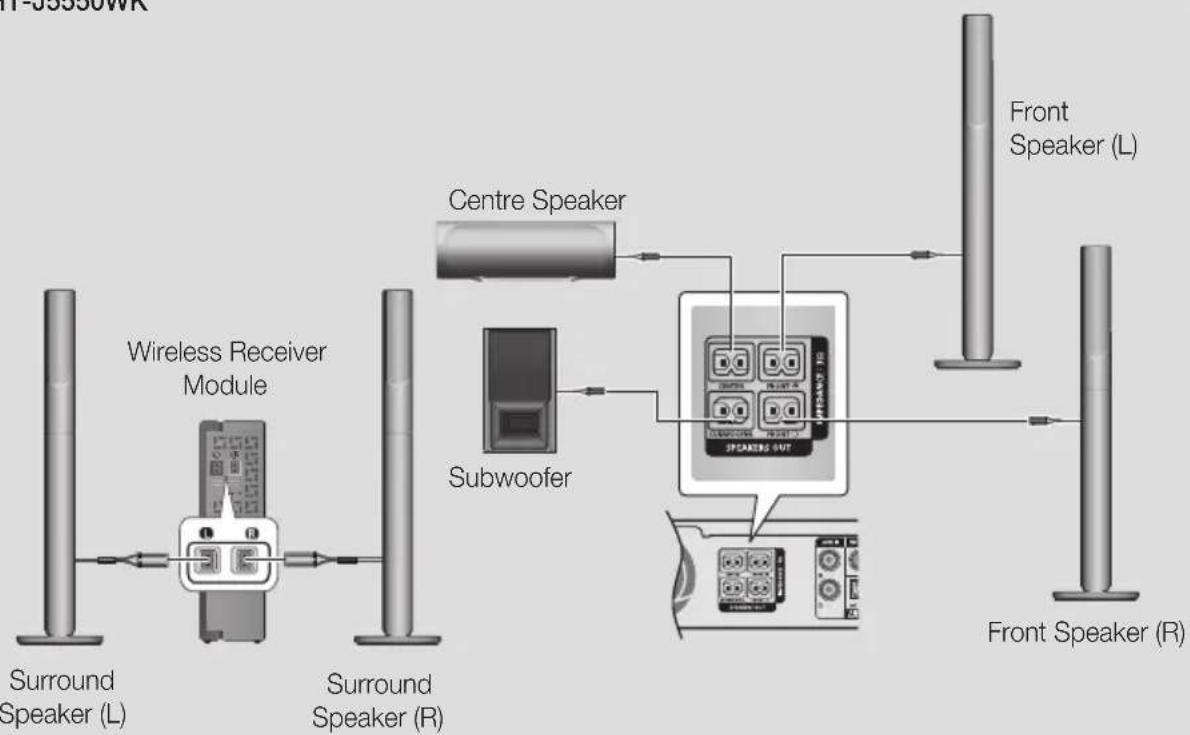
* This product should be connected with the SWA-7000 only.
If you place a speaker near your TV set, the screen colour may be distorted because of the magnetic field.
Place the wireless receiver module at the rear of the listening position. If the wireless receiver module is too close to the product, sound from the speakers may be disrupted because of interference.
If you use a device such as a microwave oven, wireless LAN Card, Bluetooth device, or any other device near the product, sound from the speakers may be disrupted because of interference.
The maximum transmission distance from the product to the wireless receiver module is about 10m , but may vary depending on your operating environment. If a steel-concrete wall or metallic wall is between the product and the wireless receiver module, the system may not operate at all, because the radio waves cannot penetrate metal.
If the product doesn't make a wireless connection, you need to run an ID Set between the product and wireless receiver module. With the product turned off, press "0"→"1"→"3"→"5" on the remote control. Turn on the wireless receiver module. Then, press and hold the "ID SET" button on the back of the wireless receiver module for 5 seconds, and then turn the product on.
CAUTION
If you want to install the speakers on the wall, fasten screws or nails (not provided) firmly to the wall wherever you want to hang a speaker, and then, using the hole in the rear of each speaker, carefully hang each speaker on a screw or nail.
Do not let children play with or near the speakers. They could get hurt if a speaker falls.
When connecting the speaker wires to the speakers, make sure that the polarity (+ / - ) is correct.
- Keep the subwoofer speaker out of reach of children to prevent children from inserting their hands or alien substances into the duct (hole) of the subwoofer speaker.
Do not hang the subwoofer on the wall by the duct (hole).
The wireless receiving antenna is built into the wireless receiver module. Keep it away from water and moisture.
For optimal listening performance, make sure that the area around the wireless receiver module location is clear of any obstructions.
In 2-CH mode, you will hear no sound from the wireless surround speakers.
Connecting to a TV and External Devices

Connecting to a TV
Connect an HDMI cable from the HDMI OUT jack on the back of the product to the HDMI IN jack on your TV. If the TV supports ARC, you can hear the audio from your TV through the home theater with only this cable connected. See page 18 in this manual and the section on ARC in your TV's user's manual for details.
Connecting to External Devices
Two methods of connecting external devices to your home theater are explained below.
Method 1 AUX IN: Connecting an External Analog Component
Using an RCA audio cable (not supplied), connect the AUDIO In jack on the product to the AUDIO Out jack on the external analog component. Select the AUX mode.
- Be sure to match the colors on the cable plugs to the colors on the input and output jacks.
Method 2 OPTICAL: Connecting an External Digital Audio Component
Use to connect the digital audio output of digital signal components such as Cable Boxes and Satellite Receivers (Set-Top-Boxes) to the home theater. Using a digital optical cable (not supplied), connect the Optical Digital Audio In jack on the product to the Digital Optical Out jack of the external digital device using a digital optical cable. Select the D. IN mode.
To see video from your Cable Box/Satellite receiver, you must connect its video output directly to your TV.
This system supports Digital sampling frequencies of 32kHz or higher from external digital components.
This system supports only DTS and Dolby Digital audio. MPEG audio, a bitstream format, is not supported.
Selecting an External Device to Use
To select an external device after you have connected it, press the FUNCTION button. Each time you press the button, the mode changes in this order: BD/DVD D. IN AUX FM BT
Connecting to a Network Router
You can connect your product to your network router using one of the methods illustrated below.
Wired Network
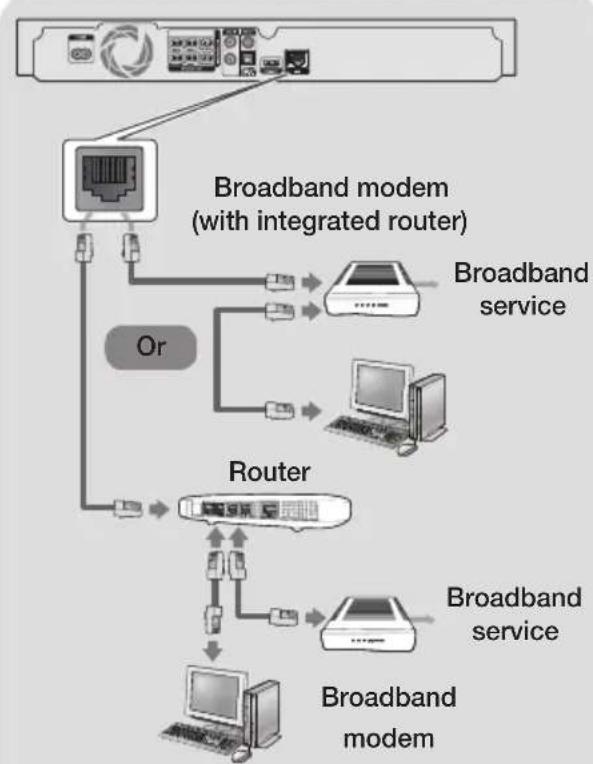
Your router or your Internet Service Provider's policies may prevent the product from accessing Samsung's software update server. If this occurs, contact your Internet Service Provider (ISP) for more information.
DSL users, please use a router to make a network connection.
Try to use the CAT 7 cable to connect.
You cannot use the product if the network speed is slower than 10Mbps.
To use the DLNA function, you must connect your PC to your network as shown in the illustrations above. The connection can be wired or wireless.
Wireless Network

If your wireless IP router supports DHCP, this product can use a DHCP or static IP address to connect to the wireless network.
Set your wireless IP router to Infrastructure mode. Ad-hoc mode is not supported.
The product supports only the following wireless security key protocols: - WEP (OPEN/SHARED), WPA-PSK (TKIP/AES), WPA2-PSK (TKIP/AES)
Select a channel on the wireless IP router that is not currently being used. If the channel set for the wireless IP router is currently being used by another device nearby, it will result in interference and communication failure.
In compliance with the newest Wi-Fi certification specifications, Samsung home theaters do not support WEP, TKIP, or TKIP-AES (WPS2 Mixed) security encryption in networks running in the 802.11n mode.
Wireless LAN, by its nature, may cause interference, depending on the operating conditions (AP performance, distance, obstacles, interference by other radio devices, etc.).
The Initial Settings Procedure
- The Home menu will not appear if you do not configure the initial settings.
- The OSD (On Screen Display) may change in this product after you upgrade the software version.
-
The access steps may differ depending on the menu you selected.
-
Turn on your TV after connecting the product, and then turn on the product. When you turn on the product for the first time, the product automatically displays the Setup Language screen.
- Press the buttons to select the desired language, and then press the button.
- Press the button to start function setup.
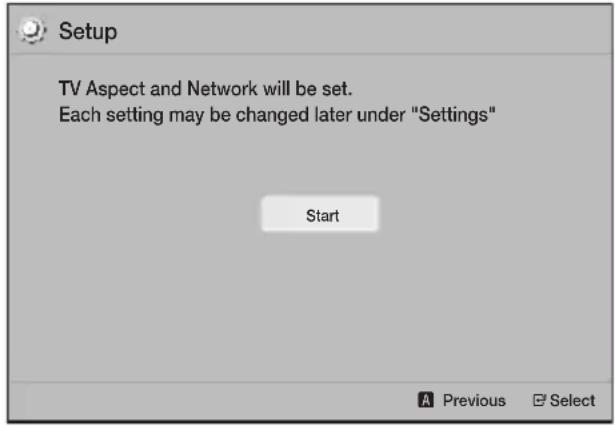
- The TV Aspect Ratio screen appears. Press the buttons to select a TV aspect ratio, and then press the button. You have four choices:
16:9 Original - For widescreen TVs. Displays widenscreen pictures in their original 16:9 format and 4:3 pictures (the old, standard format) in 4:3 pillar box format with black bars on the left and right.
16:9 Full - For widescreen TVs. Displays widenscreen pictures in their original 16:9 format and expands 4:3 pictures to fill the 16:9 screen.
4:3 Letter Box - For older, standard screen, analog TVs. Displays 4:3 pictures in full screen and 16:9 pictures in letter box format that retains the 16:9 aspect ratio but puts black bars above and below the picture.
4:3 Pan-Scan - For older, standard screen, analog TVs. Displays 4:3 pictures in full screen and 16:9 pictures in Pan-Scan format that fills the screen, but cuts off the left and right sides of the picture and enlarges the middle vertically.
-
The Network screen appears.
-
Before you begin, confirm that the product is connected to your router.
- Set to wired or wireless depending on your network environment.
- If your wireless network has a security code, you will need to enter the code to complete the network connection.
- If you have a network with static IP addresses, we suggest you select Skip by pressing the BLUE (D) button.
If you skip network setup here or the setup does not work correctly, you can set up the product's network connection later. (See page 21)
- The product verifies the network connection and then connects to the network. When it is done, press the button. The "Initial settings completed." screen appears, and then the Home screen appears.
If you want to display the Setup screen again and make changes, select the Reset option. (See page 20)
If you use an HDMI cable to connect the product to an Anynet+ (HDMI-CEC)-compliant Samsung TV and 1.) You have set the Anynet+ (HDMI-CEC) feature to On in both the TV and the product and 2.) You have set the TV to a language supported by the product, the product will select that language as the preferred language automatically.

The Home Screen at a Glance
1 PLAY DISC
The disc currently in the tray is displayed. Press G to start playing the disc.
Play photos, videos, or music content from a Disc, USB, PC, or mobile device.
3 Apps
Access various for pay or free-of-charge applications.
Opera TV Store
Access the on-line Opera TV Store where you will find high-quality video streaming, music streaming, gaming, and social network apps.
5 More
A list of useful and popular apps we recommend.
The item may be not displayed depending on different country.
6 Screen Mirroring
Set up the wireless mirroring function between the home theater and a smart phone or tablet.
7 Change Device
Displays a list of external devices connected to the main unit. Switch to the desired device.
8 Function
Use for switching to an external device, and for radio and mode switching for a Bluetooth connection. You can use the remote control's FUNCTION button and the main unit's button for mode switching.
Settings
Set various functions to suit your personal preferences.
To play or view video, photo, or music files located on your PC, you must connect your home theater and PC to a home network and have DLNA software installed on your PC. See page 26 and 37.
Accessing the Settings Screen
- Select Settings on the Home screen, and then press . The Settings screen appears.
| Settings | ||
| Picture | 3D Settings | |
| Sound | TV Aspect Ratio : 16:9 Original | |
| Network | BD Wise : Off | |
| System | Resolution : Auto | |
| Language | Movie Frame (24Fs) : Off | |
| Security | HDMI Color Format : Auto | |
| General | HDMI Deep Color : Off | |
| Support | Progressive Mode : Auto | |
- To access the menus, sub-menus, and options on the Settings screen, please refer to the remote control illustration. (See page 17)
If you leave the product in the stop mode for more than 5 minutes without using it, a screen saver appears on your TV. If the product is left in the screen saver mode for more than 20 minutes, the power automatically turns off.
Buttons on the Remote Control Used for the Settings Menu
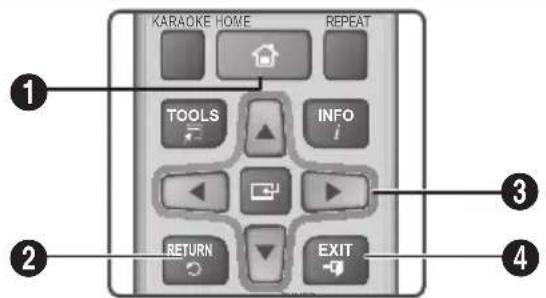
| 1 | HOME Button:Press to move to the Home screen. |
| 2 | RETURN Button:Press to return to the previous menu. |
| 3 | (ENTER)/DIRECTION Button: • Press▲▼▲▶to move the cursor or select an item. • Press the G button to activate the currently selected item or confirm a setting. |
| 4 | EXIT Button:Press to exit the current menu. |
Detailed Function Information
Each Settings function, menu item, and individual option is explained in detail on-screen. To view an explanation, use the buttons to select the function, menu item, or option. The explanation will usually appear on the bottom of the screen.
A short description of each Settings function starts on this page. Additional information on some of the functions is also in the Appendix of this manual.
Settings Menu Functions
Picture
3D Settings
Set up the 3D related functions.
3D Blu-ray Playback Mode: Select whether to play a Blu-ray Disc with 3D contents in 3D Mode. If you move to the Home menu while in 3D mode, the product will switch to 2D automatically.
Screen Size: Enter the size of the TV attached to the product. The product will automatically adjust the 3D output to the screen size of the TV.
Carefully read the health and safety information before viewing 3D content. (See page 3)
TV Aspect Ratio
Lets you adjust the output of the product to the screen size of your TV. (See page 40)
BD Wise
BD Wise is Samsung's latest inter-connectivity feature. When you connect a Samsung product and a Samsung TV with BD Wise to each other via HDMI, and BD Wise is on in both the product and TV, the product outputs video at the video resolution and frame rate of the Blu-ray/DVD Disc.
Resolution
Lets you set the output resolution of the HDMI video signal to BD Wise, Auto, 1080p, 1080i, 720p, 576p/480p. The number indicates the number of lines of video per frame. The i and p indicate interlaced and progressive scan, respectively. The more lines, the higher quality.
Movie Frame (24Fs)
Setting the Movie Frame (24Fs) feature to Auto lets the product adjust its HDMI output to 24 frames per second automatically for improved picture quality if attached to a 24Fs compatible TV.
- You can enjoy the Movie Frame (24Fs) feature only on a TV supporting this frame rate.
- Movie Frame is only available when the product is in the HDMI 1080p output resolution modes.
Settings
HDMI Color Format
Lets you set the color space format for the HDMI output to match the capabilities of the connected device (TV, monitor, etc).
HDMI Deep Color
Lets you set the product to output video from the HDMI OUT jack with Deep Color. Deep Color provides more accurate color reproduction with greater color depth.
Progressive Mode
Lets you improve picture quality when viewing DVDs.
Sound
Karaoke Scoring
This feature rates your singing ability and gives you a score for each song you sing.
My Karaoke
Set the volume of the vocals when using the karaoke feature.
Original Vocals: Volume is set to the level of the original sound.
Reduce Vocals: Volume is set to a level lower than that of the original sound.
Speaker Settings
Lets you adjust the following speaker settings and turn the speaker test on and off so you can test the speakers.
Level: Lets you adjust the relative loudness of each speaker from 6dB to -6dB. For example, if you like deep bass, you can increase the loudness of the subwoofer by 6dB.
Distance: Lets you adjust the relative distance of each speaker from the listening position up to 9 meters. The farther the distance, the louder the speaker will be.
Speaker Test Lets you run the Speaker Test function so you can test your adjustments. Setting Speaker Test to On turns the Speaker Test on. Setting it to Off turns it off.
Speaker Selection
Lets you select which speakers you want active, either the TV's speakers or the home theater's speakers.
Equalizer Mode
Set Equalizer Mode on to use the equalizer.
Equalizer Settings
Lets you set the equalizer.

Equalizer Settings only appears when Equalizer Mode is On.
Audio Return Channel
Lets you direct the sound from the TV to the Home Theater speakers. Requires an HDMI connection and an Audio Return Channel (ARC) compatible TV.
- If Audio Return Channel is set to on and you are using an HDMI cable to connect the product to the TV, digital optical input will not work.
- If Audio Return Channel is set to Auto and you are using an HDMI cable to connect the product to the TV, ARC or digital optical input is selected automatically.
Digital Output
Lets you set the Digital Output to match the capabilities of the AV receiver you've connected to the product. For more details, please refer to the digital output selection table. (See page 45)
Dynamic Range Control
Lets you apply dynamic range control to Dolby Digital, Dolby Digital Plus, and Dolby TrueHD audio.
Auto: Automatically controls the dynamic range of Dolby TrueHD audio, based on information in the Dolby TrueHD soundtrack. Also turns dynamic range control off for Dolby Digital and Dolby Digital Plus.
Off: Leaves the dynamic range uncompressed, letting you hear the original sound.
On: Turns dynamic range control on for all three Dolby formats. Quieter sounds are made louder and the volume of loud sounds is reduced.
Downmixing Mode
Lets you select the multi-channel downmix method that is compatible with your stereo system. You can choose to have the product downmix to Normal Stereo or to Surround Compatible.
Audio Sync
When the product is attached to a digital TV, lets you adjust the audio delay so that the audio syncs with the video. You can set the delay between 0 and 300 milliseconds.
Network
Network Settings
Lets you configure the network connection so you can enjoy various features such as Internet services or DLNA Wi-Fi functionality, and perform software upgrades.
Network Test
Lets you test the Internet Protocol setup to see if it is working correctly.
Network Status
Lets you check the current network and Internet status.
Wi-Fi Direct
Lets you connect a Wi-Fi Direct device to the product using a peer-to-peer network, without the need for a wireless router. Note that if the product is connected to a wireless network, it may be disconnected when you use Wi-Fi Direct. (See page 24)
Text files, such as files with a.TXT or .DOC extension, will not display when you are using the Wi-Fi Direct function.
Screen Mirroring
The Screen Mirroring function lets you view the screen of your smart phone or smart device on the TV you have connected to the home theater system. (See page 39)
Device Name
Lets you assign an identifying name to the product. You use this name to identify the product when you are connecting external Wi-Fi devices (smart phones, tablets, etc.) to it.
BD-Live Internet Connection
Lets you allow or prohibit an Internet connection for the BD-Live service.
System
Setup
Lets you re-run the Setup procedure. (See page 15)
Quick Start
You can turn on the power quickly by decreasing the boot time.
If this function is set to On, Standby power consumption will be increased. (About 12W ~ 20W)
Anynet+ (HDMI-CEC)
Anynet+ is a convenient function that offers linked operations with other Samsung products that have the Anynet+ feature and lets you control those products with one Samsung TV remote. To operate this function, you must connect this product to an Anynet+ Samsung TV using an HDMI cable.
BD Data Management
Lets you manage the contents you downloaded through a Blu-ray disc that supports the BD-Liv service. You can view information about the USB device you are using for BD Live data storage including the available storage space. You can also delete BD Live data and change the device.
DivX© Video On Demand
View DivX® VOD Registration Codes to purchase and play DivX® VOD contents.
Language
Lets you select the language you prefer for the OnScreen Menu, Disc Menu, etc.
- The selected language will only appear if it is supported on the disc.
Security
The default PIN is 0000. Enter the default PIN to access the security function if you haven't created your own PIN.
BD Parental Rating
Prevents playback of Blu-ray Discs with a rating equal to or above a specific age rating unless you enter the PIN.
DVD Parental Rating
Prevents playback of DVDs with a rating above a specific numerical rating unless you enter the PIN.
Change PIN
Changes the 4-digit PIN used to access security functions.
General
Time Zone
Lets you specify the time zone that is applicable to your area.
Support
Software Upgrade
For more information about this function, see page 25.
Contact Samsung
Provides contact information for assistance with your product.
Terms of Service Agreement
View the general disclaimer regarding third party contents and services.
Reset
Reverts all settings to their defaults except for the network. Requires that you enter your security PIN. The default security PIN is 0000.
Radio Setup
- To listen to the radio, you must connect the supplied FM antenna.
Operating the Radio with the Remote Control
-
Press the FUNCTION button to select FM.
-
Tune to the desired station.
-
Preset Tuning 1: Press the button to select PRESET, and then press the TUNING UP, DOWN button to select a preset station.
-
Before you can tune to preset stations, you must add preset stations to the product's memory.
-
Manual Tuning: Press the button to select MANUAL, and then press the TUNING UP, DOWN button to tune in to a lower or higher frequency.
Automatic Tuning: Press the button to select MANUAL, and then press and hold the TUNING UP, DOWN button for a few seconds to automatically search the band.
Selecting Mono or Stereo
Press the MO/ST button.
Each time you press the button, the sound switches between STEREO and MONO.
- In a poor reception area, select MONO for a clear, interference-free broadcast.
Presetting Stations
Example : Presetting FM 89.10 into memory.
- Press the FUNCTION button to select FM.
- Press the TUNING UP, DOWN button to scroll the FM frequencies, and then select <89.10> .
- Press the TUNER MEMORY button (the yellow C button at the bottom of the remote).
- Press the TUNER MEMORY button again within about 5 seconds. The station is stored in memory.
If you press the TUNER MEMORY button repeatedly without changing the station, the inputted station may be overwritten. -
To preset another station, repeat steps 2 to 4.
-
To tune in to a preset station, press the TUNING UP, DOWN button.
To delete all Preset FM stations at once, press the TITLE MENU button for about 5 seconds in FM Manual mode until DEFAULT PRESET appears on the display.
Recording FM Radio
You can record your favorite radio broadcast on a USB storage device.
- Insert a USB device into the USB jack on the front of the product.
- Press the FUNCTION button to select FM, and then press the TUNING UP, DOWN button to select the station you want to record.
-
Press the RED (A) button to start recording. The recording process begins.
-
The recorded time is displayed on the left and the recording time still available, based on the amount of free space in the USB storage device, is displayed on the right.
-
Press the EXIT button to finish your recording. The recording is stopped and saved as an .mp3 file at the same time. To play the recorded file, refer to "Playing Files on a USB Device".
The recorded file is saved in the Tuner folder which is created automatically.
Only the (OPEN/CLOSE), (POWER), EXIT, MUTE, and VOLUME + / - buttons are operable while FM radio is being recorded.
If you don't press any buttons while recording, the screen saver will be enabled.
Sound effects, such as DSP, EQ, etc., are not recorded during FM radio recording.
The radio is recorded at a set, default volume even if you change the volume or press the MUTE button during the recording process.
If you remove the USB device or Power Cable during the recording process, the portion of the file which has already been recorded may not play back.
Recording will not start if the remaining free space in the USB storage device is less than 2MB.
If the USB device is removed or has insufficient space (under 2MB), the appropriate message is displayed and the recording stops.
Network Setup
When you connect this product to a network, you can use network based applications and functions such as BD-LIVE and upgrade the product's software through the network connection.
Configuring Your Network Connection
To begin configuring your network connection, follow these steps:
- In the Home screen, select Settings, and then press the button.
- Select Network, and then press the button.
- Select Network Settings, and then press the button.
- Go to the instructions for Wired networks starting below or the instructions for Wireless networks. (See page 22)
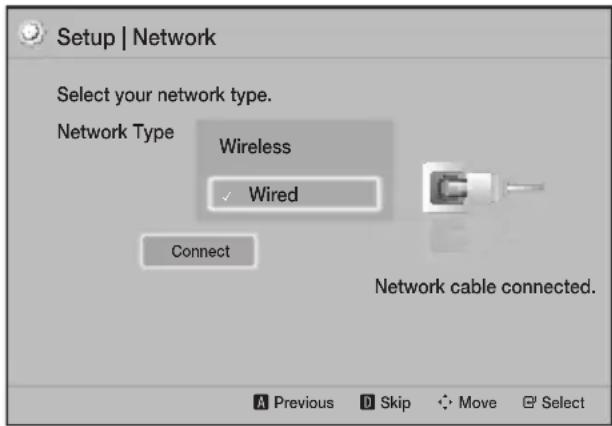
Wired Network
Wired-Automatic
After following Steps 1 to 3 above:
- In the Network Settings screen, change Network Type to Wired. Then, select Connect and press the button. The product detects the wired connection, verifies the network connection, and then connects to the network.
- When it is done, highlight OK, and then press button.
Wired - Manual
If you have a static IP address or the automatic procedure does not work, you'll need to set the Network Settings values manually.
After following Steps 1 to 3 above:
- In the Network Settings screen, change Network Type to Wired. Then, select Connect and press the button. The product searches for a network, and then displays the connection failed message.
If it is possible to connect the home theater to your network wirelessly, select Change Network at this point, change the Network Type to Wireless, and then go to the instructions for wireless networks. (See page 22)

- Use the buttons to select IP Settings, and then press the button. The IP Settings screen appears.
- Select the IP Setting field, and then set it to Enter manually.
- Select a parameter to enter (IP Address, for example), and then press G.Use the number keypad on your remote control to enter the numbers for the parameter. You can also enter numbers using the buttons. Use the buttons on the remote control to move from entry field to entry field within a parameter. When done with one parameter, press the button.
- Press the or button to move to another parameter, and then enter the numbers for that parameter following the instructions in Step 4.
- Repeat Steps 4 and 5 until you have filled in all parameters.
You can get the network parameter values from your Internet provider. - When finished entering all the parameter values, select Return (O), and then press the button. The home theater verifies the network connection and then connects to the network.
Wireless Network
You can set up a wireless network connection in three ways:
- Wireless Automatic
- Wireless Manual
- WPS(PBC)
Before you configure the wireless network connection, disconnect any wireless network devices currently connected to the product or, if applicable, the product's current wired connection.
Wireless - Automatic
Follow the Steps 1 to 3 in "Configuring Your Network Connection". (See page 21)
- In the Network Settings screen, change Network Type to Wireless. The product searches for and then displays a list of the available networks.
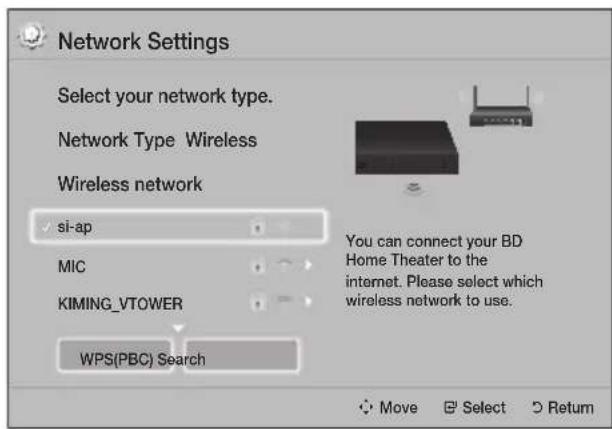
-
Select the desired network, and then press the button.
-
On the Security Key screen, enter your network's security code or pass phrase. Enter numbers directly using the number buttons on your remote control. Enter letters by selecting a letter with buttons, and then pressing button.
-
When finished, select Done, and then press the button. The product verifies the network connection and then connects to the network.
You should be able to find the security code or pass phrase on one of the set up screens you used to set up your router or modem.
Wireless - Manual
If you have a static IP address or the Automatic procedure does not work, you'll need to set the Network Settings values manually.
Follow the Steps 1 to 3 in "Configuring Your Network Connection". (See page 21)
- In the Network Settings screen, change Network Type to Wireless. The product searches for and then displays a list of the available networks.
- Scroll through the list, select the desired network or Add Network, and then press the button.
-
If you selected a network in Step 2, go to Step 6. If you selected Add Network, go to Step 4.
-
Enter your wireless network or wireless router's name.
-
Enter numbers directly using the number buttons on your remote control.
- Enter letters by selecting a letter with the buttons, and then pressing the button.
- To display capital letters (or redisplay lower case letters if capital letters are displayed), select and then press the button.
- To display symbols and punctuation, select 123#&, and then press the button. To redisplay letters, select 123#&, and then press the button.
When finished, select Done, and then press the button.
-
On the Security method screen that appears, use the buttons to select the network's Security method, and then press the button. On the next screen, enter your network's security code or pass phrase.
-
Enter numbers directly using the number buttons on your remote control.
- Enter letters by selecting a letter with the buttons, and then pressing the button.
When finished, select Done, and then press the button. The product searches for the network.
- The Network connection fail screen appears. Use buttons to select IP Settings, and then press the button.
- Select the IP Setting field, and then set it to Enter manually.
- Select a network parameter to enter (IP Address, for example), and then press button. Use the number keypad on your remote control to enter the numbers for the parameter. You can also enter numbers using the buttons. Use the buttons on the remote control to move from entry field to entry field within a parameter. When done with one value, press the button.
- Press the or button to move to another parameter, and then enter the numbers for that parameter following the instructions in Step 8.
- Repeat Steps 8 and 9 until you have filled in all parameters.
You can get the Network parameter values from your Internet provider.
- When finished, select Return (5), and then press the button. The Security Key screen appears.
- On the Security Key screen, enter your network's Security Code or Pass Phrase. Enter numbers directly using the number buttons on your remote control. Enter letters by selecting a letter with the buttons, and then pressing the button.
- When finished, select Done at the right of the screen, and then press the button. The product verifies the network connection and then connects to the network.
- After the home theater verifies the network, select OK, and then press the button.
You can also begin the Manual Network setup by going to Settings > Network > Network Status.
WPS(PBC)
One of the easiest ways to set up the wireless network connection is using the WPS(PBC) function. If your wireless router has a WPS(PBC) button, follow these steps:
Follow the Steps 1 to 3 in "Configuring Your Network Connection". (See page 21)
- In the Network Settings screen, change Network Type to Wireless. The product searches for and then displays a list of the available networks.
- Scroll the list down, select WPS(PBC), and then press the button.
- Press the WPS(PBC) button on your router within two minutes. Your product automatically acquires all the network settings values it needs and connects to your network after the network connection is verified.
- When it is done, highlight OK, and then press the button.
For a WPS connection, set your wireless router's security encryption to AES. WEP security encryption does not support a WPS connection.
Wi-Fi Direct
The Wi-Fi Direct function allows you to connect Wi-Fi Direct devices to the product and each other using a peer-to-peer network, without a wireless router.
Some Wi-Fi Direct devices may not support the DLNA function if connected via Wi-Fi Direct. If this is the case, change the network connection method you used to connect the device to the home theater.
Wi-Fi Direct transmissions can interfere with Bluetooth signals. Before you use the Bluetooth function, we strongly recommend that you turn off the Wi-Fi Direct function on any device in which it is currently on.
1. Turn on the Wi-Fi Direct device and activate its Wi-Fi Direct function.
2. In the Home screen, select Settings, and then press the button.
3. Select Network, and then press the button.
4. Select Wi-Fi Direct, and then press the button. The Wi-Fi Direct devices that you can conn to appear.
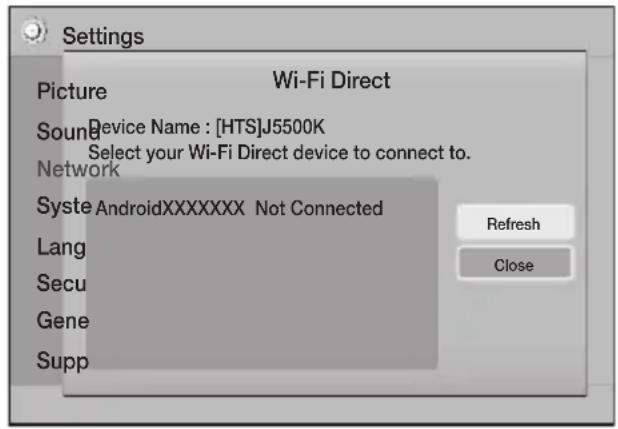
-
You have three ways to complete the Wi-Fi connection:
-
Through the Wi-Fi device.
- Through the product using PBC.
- Through the product using a PIN.
Each is covered below.
Through the Wi-Fi Device
-
On the Wi-Fi device, follow the device's procedure for connecting to another Wi-Fi Direct device. See the device's user manual for instructions.
-
When you have completed the procedure, you should see a pop-up on your TV screen saying that a device that supports Wi-Fi Direct has requested to connect. Confirm that the device that is making the request is your device, select Yes in the pop up, and then press the button to accept.
-
The Connecting pop-up appears, followed by the Connected pop-up. When it closes, you should see the device listed as connected on the Wi-Fi Direct screen.
-
The PBC and PIN procedures connect devices automatically.
Through the Product Using PBC
- Select the Wi-Fi Direct device you want to connect to this product, and then press the button.
- The Connecting pop-up appears, followed by the Connected pop-up. When it closes, you should see the device listed as connected on the Wi-Fi Direct screen.
Through the Product Using a PIN
- Select the Wi-Fi Direct device you want to connect to this product, and then press the button.
- The PIN pop-up appears.
- Note the PIN code in the pop-up, and then enter it into the appropriate field in the Wi-Fi Direct device you want to connect.
- The Connecting pop-up appears, followed by the Connected pop-up. When it closes, you should see the device listed as connected on the Wi-Fi Direct screen.
The current wired or wireless network connection will be disconnected when you use the Wi-Fi Direct function.
Text files, such as files with a.TXT or .DOC extension, will not display when you are using the Wi-Fi Direct function.
Upgrading Software
The Software Upgrade menu allows you to upgrade the product's software for performance improvements or additional services.
- Never turn the product off or back on manually during the update process.
-
The update is complete when the product turns off after restarting. Press the POWER button to turn on the updated product for your use.
Samsung Electronics takes no legal responsibility for product malfunction caused by an unstable Internet connection or consumer negligence during a software upgrade. -
In the Home menu, select Settings, and then press the button.
- Select Support, and then press the button.
- Select Software Upgrade, and then press the button.
-
Select one of the following methods:
-
By Online
-
By USB
-
Auto Upgrade Notification
-
Press the button.
Directions for each method begin below.
If you want to cancel the upgrade while the upgrade software is downloading, press the button.
By Online
Your product must be connected to the Internet to use the By Online function. Remove all discs before you begin.
- Select By Online, and then press the button. The Connecting to Server message appears.
- If an update is available, a popup message appears asking if you want to upgrade. If you select Yes, the product turns off automatically, turns on, and then begins the upgrade.
- The update progress popup appears. When the update is completed, the product turns off automatically again.
- Press the POWER button to turn on the product.
By USB
- Visit www.samsung.com.
- Click OWNERS & SUPPORT on the top right of the page, and then select Manuals & Downloads from the drop down that appears.
- On the next screen, enter the product's model number into the search field. As you enter the model number, a drop down will display products that match the model number.
- Left click your product's model number in the drop down list.
- On the page that appears, select Downloads.
- Find the Upgrade File (USB type) in the Description column. Click the ZIP icon in the Download File column on the right.
- Click Send in the pop-up that appears. The file downloads to your PC.
- Unzip the zip archive to your computer. You should have a single folder with the same name as the zip file.
- Copy the folder to a USB flash drive.
- Make sure no disc is inserted in the product, and then insert the USB flash drive into the USB port of the product.
- In the product's menu, go to Settings > Support > Software Upgrade.
- Select By USB.
- The home theater searches for the software on the USB drive. When it finds the software, the Update Request pop-up appears.
- Select OK. The home theater turns off, turns on, and then begins the upgrade. When the upgrade is done, the home theater turns off.
- Press the POWER button to turn on the home theater.
There should be no disc in the product when you upgrade the software using the USB Host jack.
When the software upgrade is done, check the software details in the Software Upgrade menu.
Auto Upgrade Notification
If your product is connected to the network and you set Auto Upgrade Notification on, the product will notify you if a new software version is available with a pop-up message.
- Turn on the product.
- In the Software Upgrade menu, set Auto Upgrade Notification to On.
If there is a new software version available, the product will notify you with a pop-up message.
- To upgrade the firmware, select Yes. The product turns off automatically, turns on, and then begins the upgrade.
- The update progress popup will appear. When the update is complete, the product will turn off automatically again.
- Press the POWER button to turn on the product.
Setting Up DLNA
DLNA lets you play music, video, and photo files stored in your PC through your home theater. To use DLNA, you must install DLNA software or already have DLNA software installed on your PC and connect the home theater to your PC via your network (See page 14).
PCs running Windows 7 and Windows 8 have DLNA software (Play To) built in.
Playing Content
Your home theater can play content located on Blu-ray/DVD/CD discs, USB devices, PCs, smart phones, tablets, and in Apps.
To play content located on your PC or a mobile device, you must connect the PC or mobile device and the product to your network. To play content on your PC, you must also download and install DLNA network software or already have DLNA network software on your PC.
PCs running Windows 7 and Windows 8 have DLNA software (Play To) built in.
Switching the Source Device
If two or more external devices are connected to the main unit, you can use any of the three methods described below to change the source device.
Method 1
From the Home screen, use the buttons to move to Change Device, and then press
The Change Device popup window will appear. Use the buttons to move to the desired device, and then press
Method 2
If you move to PHOTOS,VIDEOS,MUSIC or other file-based contents, a list of folders and files will appear. Press the RED (A) button to display the Change Device popup window, use the buttons to move to the desired device, and then press
Method 3
When a device is connected for the first time, a popup window appears. In the popup, you can change the source device by using the buttons, and then pressing .
Playing Commercial Discs
- Press the button to open the disc tray.
- Place a disc gently into the disc tray with the disc's label facing up.
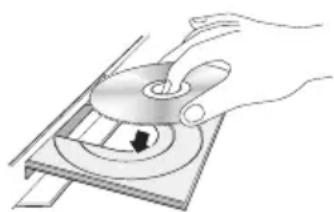
- Press the button to close the disc tray. Playback starts automatically.
- If playback does not start automatically, press the button on the remote.
Disc Storage & Management
-
Holding Discs
-
Fingerrprints or scratches on a disc may reduce sound and picture quality or cause skipping.
- Avoid touching the surface of a disc where data has been recorded.
- Hold the disc by the edges so that fingerprints will not get on the surface.
-
Do not stick paper or tape on the disc.
-
Cleaning Discs
-
If you get fingerprints or dirt on a disc, clean it with a mild detergent diluted in water and wipe with a soft cloth.
-
When cleaning, wipe gently from the inside to the outside of the disc.
-
Disc Storage
-
Do not keep in direct sunlight.
- Keep in a cool ventilated area.
- Keep in a clean protective jacket and store vertically.
Playing a Disc with User Recorded Content
You can play multimedia files you have recorded on Blu-ray, DVD, or CD discs.
- Place a user recorded disc into the disc tray with the disc's label facing up, and then close the tray.
- Use the buttons to select the type of content you want to view or play - PHOTOS, VIDEOS, or MUSIC - and then press the button.
OR
2-1. Select PLAY DISC from the Home screen. The PLAY DISC screen appears. Use the buttons to select the desired content type, Photos, Videos, or Music.
Playing Content
- A screen appears listing the contents of the disc. Depending on how the contents are arranged, you will see either folders, individual files, or both.
- If necessary, use the buttons to select a folder, and then press the button.
- Use the buttons to select a file to view or play, and then press the button.
- Press the RETURN button one or more times to exit a current screen, exit a folder, or to return to the Home screen.
Press the EXIT button to return directly to the Home Screen.
- Go to pages 29~33 for instructions that explain how to control playback of videos, music, and pictures on a disc.
Playing Files on a USB Device
There are two methods you can use to play or view multimedia files located on a USB device through your product.
Method 1: If you connect a USB device while the product is turned on
- The "New device connected." pop-up appears.
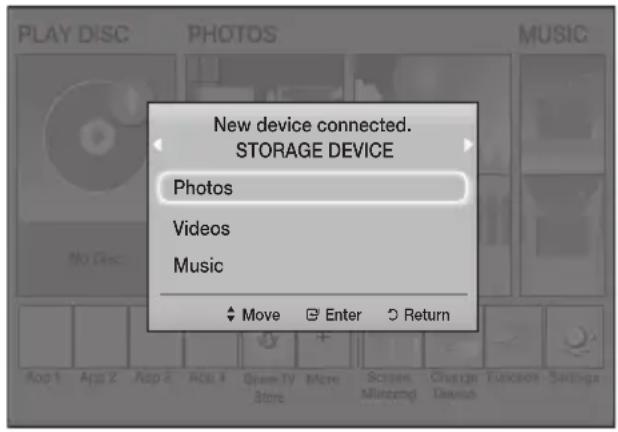
If the pop-up does not appear, go to Method 2.
-
Use the buttons to select Photos, Videos, or Music and then press the button. Depending on how the contents are arranged, you will see either folders, individual files, or both.
-
If necessary, use the buttons to select a folder, and then press the button.
- Select a file to view or play, and then press the button.
- Press the RETURN button to exit a folder or the EXIT button to return to the Home screen.
- Go to pages 29~33 for instructions that explain how to control playback of videos, music, and pictures on a USB device.
Method 2: If the product is turned on after you connect a USB device
- Turn the product on.
- Press Change Device and select a USB device.
- Use the buttons to select PHOTOS, VIDEOS, or MUSIC on the Home screen, and then press the button.
- If necessary, use the buttons to select a folder, and then press the button.
- Select a file to view or play, and then press the button.
- Press the RETURN button to exit a folder or the EXIT button to return to the Home screen.
- Go to pages 29~33 for instructions that explain how to control playback of videos, music, and pictures on a USB device.
If you insert a disc while playing a USB device or phone, the device mode changes to "Disc" automatically.
If your cellular phone is DLNA compatible, you can play content on the phone without connecting a USB cable. (See page 37)
Controlling Video Playback
You can control the playback of video content located on a Blu-ray/DVD disc, USB device, mobile device, or PC. Depending on the disc or contents, some of the functions described in this manual may not be available.
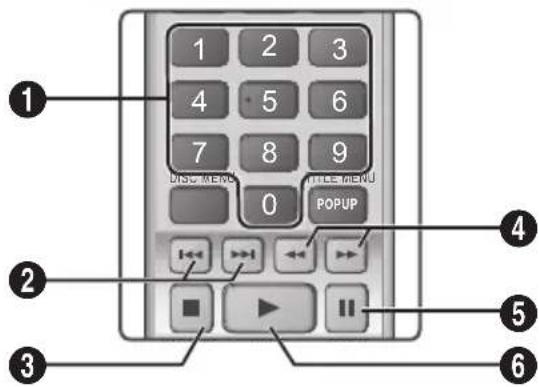
Buttons on the Remote Control used for Video Playback
1Playback related buttons
The product does not play sound in Search, Slow, or Step mode.
- To return to normal speed playback, press the button.
| → | Starts playback. |
| □ | Stops playback. |
| IT | Pauses playback. |
| Fast Motion Play | During playback, press the ↓ or button. Each time you press the ↓ or button, the playback speed will change. |
| Slow Motion Play | In pause mode, press the ↓ button. Each time you press the ↓ button, the playback speed will change. |
| Step Motion Play | In pause mode, press the IT button. Each time you press the IT button, a new frame appears. |
| Skip Motion Play | During playback, press the ↓ or ↓ button. Each time you press the ↓ or ↓ button, the disc moves to the previous or next chapter or file. |
Using the disc menu, title menu, popup menu, and title list
DISC MENU
During playback, press this button to display the Disc menu.
TITLE MENU
During playback, press this button to display the Title menu.
- If your disc has a playlist, press the GREEN (B) button to go to the playlist.
POPUP MENU
During playback, press this button to display the Popup menu.
Repeat Playback
- During playback, press the REPEAT button on the remote control.
- Press the buttons to select Off, Title, Chapter, All or Repeat A-B, and then press the button.
Repeat A-B
- Press the button at the point where you want repeat play to start (A).
- Press the button at the point where you want repeat play to stop (B).
-
To return to normal play, press the REPEAT button again.
-
Press the button.
Depending on the disc, the screen may not display all repeat options.
The screen may not display Chapter or Title immediately. Continue to press the buttons until your choice is inside the applicable field.
To return to normal play, press the REPEAT button again, press the buttons to select Off, and then press the button.
The screen may not display Repeat A-B immediately. Continue to press the buttons until Repeat A-B is inside the applicable field.
You must set point (B) at least 5 seconds of playing time after point (A).
Playing Content
Using the TOOLS Menu
During playback, press the TOOLS button.
Title
If there is more than one title on a disk or device, lets you move to or select a desired title.
When searching DVD title, in stop mode, enter the TOOLS button and title number (01,02,...) you want.
Playing Time
Lets you go to a specific playback point. Use the numeric buttons to input the playback point.
Repeat Mode
Lets you repeat a specific title, chapter, or marked section.
Audio Sync
Lets you adjust the audio delay so that the audio syncs with the video. You can set the delay from 0 to 300 milliseconds.
Equalizer Mode
Set Equalizer Mode on to use the equalizer.
Equalizer Settings
Lets you set the equalizer.
Equalizer Settings only appears when Equalizer Mode is On.
Picture Settings
Lets you set the picture mode.
Mode
- User: Go to Advanced Settings, and then press the button. Lets you adjust the Brightness, Contrast, Color, and Sharpness functions manually.
- Dynamic : Choose this setting to increase sharpness.
- Normal : Choose this setting for most viewing applications.
- Movie : This is the best setting for watching movies.
Menu selections that appear only when a
BD/DVD disc plays
Chapter
Lets you move to a chapter that you want to watch.
Audio
Lets you set the desired audio language.
Subtitle
Lets you set the desired subtitle language.
Angle
To view a scene from another angle. The Angle option displays the number of angles available to view (1/1, 1/2, 1/3, etc.).
BONUSVIEW Video BONUSVIEW Audio
Lets you set the desired Bonusview option.
Menu selections that appear only while a file plays
Full Screen
Lets you set the desired full screen size. You can select Original, Mode1 (larger), and Mode2 (largest).
Information
Select to view video file information.
Depending on the disc or storage device, the Tools menu may differ. All options may not be displayed.
Creating a Video Playlist
You can create a playlist of video files in nearly the same way you create a playlist of music files. See page 32 for instructions. Select video files instead of music files.
Playing a Pre-Recorded Commercial Audio Disc
-
Insert an Audio CD (CD-DA) or an MP3 Disc into the disc tray.
-
For an Audio CD (CD-DA), the first track will be played automatically. Tracks on a disc are played in the order in which they were recorded on the disc.
- For an MP3 disc, press the buttons to select MUSIC, then press the button.
- To play a particular track, use the buttons on the remote to select the track, and then press the button.
For more information about playing music, see Controlling Music Playback below.
Controlling MusicPlayback
You can control the playback of music content located on a DVD, CD, USB, mobile device, or PC. Depending on the disc or contents, some of the functions described in this manual may not be available.
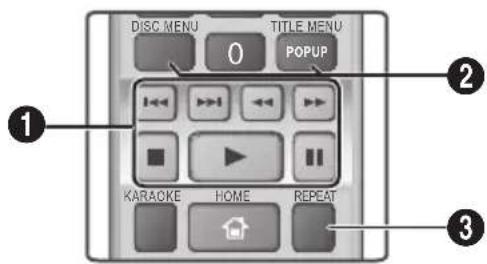
Buttons on the Remote Control used for Music Playback
| 1 | Number buttons: During Playlist playback, press the desired track number. The selected track is played. |
| 2 | Skip: During playback, press the ↓ or button to move to the previous or next music track. |
| 3 | □ button: Stops a track. |
| 4 | Fast Play (Audio CD [CD-DA] only): During playback, press the ↓ or button. Each time you press the ↓ or button, the playback speed will change. |
| 5 | □ button: Pauses a track. |
| 6 | ▶ button: Plays the currently selected track. |
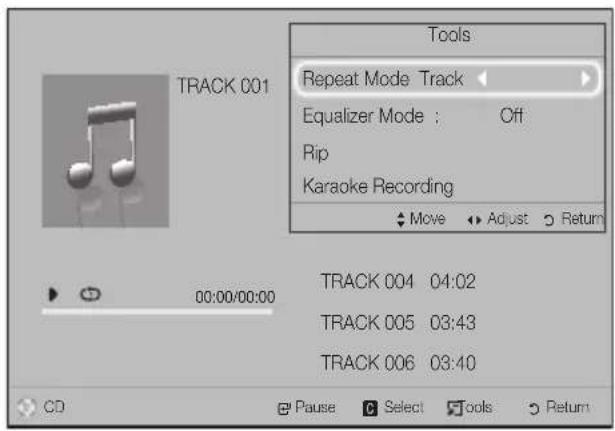
Repeating Tracks
You can set the product to repeat tracks.
- During music playback, press the TOOLS button.
- Select Repeat Mode, then use the buttons to select Off, Track or One, All or Shuffle, and then press the button.
Playing Content
Creating a Music Playlist
- If you are playing music from a commercial CD or DVD, press the or RETURN button. The Music List Screen appears. If you are creating a playlist from music on a user created disk or USB device, access the Music list as described on page 27 or 28.
- Press the buttons to move to a desired file, and then press the YELLOW (C) button to select it. Repeat this procedure to select additional files.
- If you want to select all files, press the TOOLS button, use the buttons to select Select All, and then press . If you want to deselect all files, press the TOOLS button, select Deselect All, and then press .
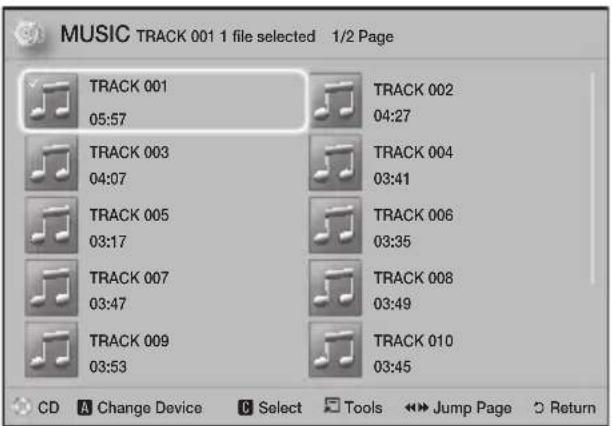
- To remove a file from the Playlist, move to the file, and then press the YELLOW (C) button.
- Press the button to play the selected files. The Playlist screen appears.
- To go to the Music List, press the or RETURN button.
- To go back to the Playlist, press the button.
You can create a playlist with up to 99 tracks on Audio CDs (CD-DA).
If you go to the Music List from the Playlist, and then return to the Playlist, the Playlist will start playing again from the beginning.
Ripping
- Insert a USB device into the USB jack on the front of the product.
- With the Playback screen displayed, use the buttons to select a track, and then press the YELLOW (C) button. A check appears to the left of the track.
- Repeat Step 2 to select and check additional tracks.
- To remove a track from the list, move to the track, and then press the YELLOW (C) button again. The check on the track is removed.
- When done, press the TOOLS button. The Tools menu appears.
- Use the buttons to select Rip, and then press the button. The Rip screen appears.
- Use the buttons to select the device to store the ripped files on, and then press the button.
Do not disconnect the device while ripping is in progress. - If you want to cancel ripping, press the button, and then select Yes. Select No to continue ripping.
- When ripping is complete, the "Ripping is completed." message appears.
-
Press the button to go back to the Playback screen.
This function is not available for DTS Audio CDs.
This function may not be supported by some discs.
Ripping encodes music in the .mp3 format at 192kbps.
On the Track list screen, you can choose Select All or Deselect All. -
Use Select All to select all tracks, and then press the button. This cancels your individual track selections.
- Use Deselect All to deselect all selected tracks at once.
Playing Photo Content
You can play photo content located on a DVD, USB, mobile device, or PC.
Using the Tools Menu
During playback, press the TOOLS button.
Start/Stop Slide Show
Select to play/pause the slide show.
Slide Show Speed
Select to adjust the slide show speed.
Background Music
Select to listen to music while viewing a slide show.
Zoom
Select to enlarge the current picture.
(Enlarge up to 4 times)
Rotate
Select to rotate a picture. (This will rotate the picture either clockwise or counter clockwise.)
Information
Shows the picture information including the file name and size, etc.
Depending on the disc or storage device, the Tools menu may differ. All options may not be displayed.
To enable the background music function, the photo file must be in the same storage media as the music file. However, the sound quality can be affected by the bitrate of the MP3 file, the size of the photo, and the encoding method.
Creating a Photo Playlist
You can create a photo playlist in nearly the same way you create a music playlist. See page 32 for instructions. Select photo files instead of music files.
Using Karaoke
You can enjoy the Karaoke with music.
- Connect the microphone on the front of the product.
- In the Home menu, select the Settings, and then press the button.
- Select the Sound, and then press the button.
-
Select My Karaoke, and then press the button.
-
You can check the Karaoke score and adjust the volume of playback music's vocal.
- Your Karaoke score is automatically displayed if Karaoke Scoring is set to On and a microphone is connected. If you don't want to see the score, set Karaoke Scoring to Off.
- If you want to decrease the volume of the vocals in the original sound, select Reduce Vocals in My Karaoke settings.
Recording
You can make a recording of karaoke with music.
- During the playback, press the TOOLS button to select Karaoke Recording, and then press button.
- Press button if you want to finish recording.
- When recording is done, KARAOKE folder is created in the USB storage driver and saved as the form of KARAOKE.mp3.
To save recording file, USB storage driver must be inserted.
Recording file is shown if you re-entry to Photos, Videos, and Music.
If you hear strange noises (squealing or howling) while using the Karaoke feature, move the microphone away from the speakers. Turning down the microphone's volume or the speaker volume is also effective.
The microphone does not operate in the D. IN, AUX, FM and BT mode.
The karaoke scoring displays the score automatically when the Karaoke Scoring is set to On and a microphone is connected. Disconnect the microphone if you do not want to display the score.
The mic becomes available 10 seconds after the Home menu appears on the screen.
Using Bluetooth
You can use a Bluetooth device to enjoy music with high quality stereo sound, all without wires!
- Pairing distance: max. 2M, Operating distance: max. 10M
- Actual Bluetooth performance may differ depending on your environment, even if you use your Bluetooth device within the specified operating distance.
What is Bluetooth?
Bluetooth is a technology that enables Bluetooth-compliant devices to interconnect with each other easily using a short, wireless connection.
-
A Bluetooth device may hum or malfunction:
-
When a part of your body is in contact with the receiving/transmitting system of the Bluetooth device or the Home Theater.
- When the device is subject to electrical variation from obstructions caused by a wall, corner, or office partitioning.
-
When the device is exposed to electrical interference from same frequency-band devices including medical equipment, microwave ovens, and wireless LANs.
-
Pair the Home Theater with the Bluetooth device while the two are close together.
- The further the distance is between the Home Theater and the Bluetooth device, the worse the quality is.
If the distance exceeds the Bluetooth operational range, the connection is lost.
- In poor reception-sensitivity areas, the Bluetooth connection may not work properly.
- The Home Theater has an effective reception range of up to 10 meters in all directions if there are no obstacles. The connection will be automatically cut off if the device is out of this range. Even within this range, the sound quality may be degraded by obstacles such as walls or doors.
- This wireless device may cause electrical interference. during its operation.
To Connect the Home Theater to a Bluetooth
Device
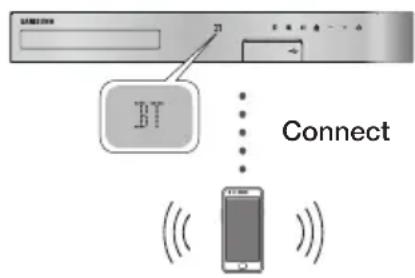
Bluetooth device
Before you begin, confirm that the Bluetooth device supports the Bluetooth compliant stereo headset function.
- Press the FUNCTION button on the remote control to display the BT message.
-
Select the Bluetooth menu on the Bluetooth device you want to connect. For instructions, refer to the Bluetooth device's manual.
-
Select "[HTS]JXXXXX" from the list.
-
When the Home Theater is connected to the Bluetooth device, the device name of the connected Bluetooth device, followed by the name of the home theater, will appear on the front display of the home theater.
-
Play music on the connected device.
-
You can listen to the music playing on the connected Bluetooth device over the Home Theater system.
The Home Theater only supports Middle Quality SBC data (up to 237kbps@48kHz), and does not support High Quality SBC data (328kbps@44.1kHz).
The AVRCP feature is supported. It's functionality will differ, depending on the specifications of the connected device.
Connect only to a Bluetooth device that supports the A2DP Profile.
Only one Bluetooth device can be paired at a time. The search or connection functions may not work properly in the following cases:
- If there a strong electric field near or around the home theater.
-
If several Bluetooth devices are simultaneously paired with product.
-
If the Bluetooth device is turned off, not in place, or malfunctions.
Note that such devices as microwave ovens, wireless LAN adapters, fluorescent lights, and gas stoves use the same frequency range as the Bluetooth device, and can cause electric interference.
For the best operational compatibility between the home theater and a Bluetooth device or any other device, such as a Mobile Phone, we recommend you update the device's OS to the latest version.
To Disconnect the Bluetooth Device from the
Home Theater
You can disconnect the Bluetooth device from the Home Theater. For instructions, refer to the Bluetooth device's manual.
- When the Home Theater is disconnected from the Bluetooth device, the Home Theater will display DISCONNECTED on the front display.
To Disconnect the Home Theater from the
Bluetooth Device
Press the button on the front panel of the Home Theater to switch from BT to another mode or turn off the Home Theater.
Except when you disconnect the Home Theater by changing functions, the connected Bluetooth device will wait a certain amount of time for a response from the Home Theater before terminating the connection. (Disconnection time may differ, depending on the Bluetooth device.)
In Bluetooth connection mode, the Bluetooth connection will be lost if the distance between the Home Theater System and the Bluetooth device exceeds 10 meters. When the Bluetooth device comes back into effective range or you restart the Bluetooth device, you will have to pair the device and home theater again to reconnect.
In Bluetooth mode, the screen saver will start if the Bluetooth device stays in the Ready state for 5 minutes. To reconnect the Bluetooth device, turn off the screen saver, and then connect the device. To turn off the screen saver, press any button on the remote control (the Volume button, a number button, etc.)
Using the Bluetooth Quick Start
When the home theater is turned off, connecting your smart device to the product via a Bluetooth connection can turn the home theater on.
The Quick Start function is available when the home theater's power cord is plugged into an AC wall outlet.
To use this function, set Settings > System > Quick Start to On.
To use this function, the Bluetooth connection between the home theater and your smart device should have been established before. In other words, the home theater should be found on the list of Bluetooth devices your smart device has already connected to.
1. Connect your smart device to the product via Bluetooth. (For information on Bluetooth connections, refer to your smart device's manual.)
2. Once connected, the home theater will turn itself on automatically in BT mode.
- Select the desired music to play on your smart device.
Using the Special Effects Remote Control Buttons
TV SOUND

If you have a TV that supports Anynet+ (HDMI-CEC), the TV SOUND button lets you direct the TV's audio to the Home Theater Speakers or the TV Speakers. To use this function, follow these steps:
- Connect an HDMI cable to the TV and home theater. (See page 13)
- Set Anynet+ (HDMI-CEC) On in the home theater and TV.
-
Press the TV SOUND button on the remote control. TV SOUND ON flashes on the display on the front panel, and then changes to D.IN.
-
When TV SOUND is on, TV audio outputs through the Home Theater speakers.
-
Press the TV SOUND button again to turn TV SOUND off.
- When TV SOUND is off, TV audio outputs through the speakers of the connected Anynet+ TV.
Playing Content
Use TV SOUND:
1) When you want to listen to the TV's audio through the home theater speakers.
2) When you want to listen to the audio from a USB device plugged into the TV through the home theater speakers.
TV SOUND ON/OFF support specifications:
| Anynet+ (HDMI-CEC) Setting | TV Sound ON TV | Sound OFF |
| ON | HTS Speaker Output | HTS Speaker Mute |
| TV Speaker Mute | TV Speaker Output | |
| OFF | HTS Speaker Output | HTS Speaker Mute |
| TV Speaker Output | TV Speaker Output | |
| No Operation | HTS Speaker Output | HTS Speaker Mute |
| TV Speaker Output | TV Speaker Output |
DSP/EQ

You can adjust the sound with various sound modes.
DSPOFF: Select for normal listening.
CINEMA: Produces realistic and powerful sound for movies.
MUSIC:Suitable for all music sources.
GAME:Revs up video games with powerful and realistic sound.
M-STEREO (Multi Stereo) : Produces surround sound from 2 channel input sources.
POWER BASS : Pumps up the bass sound.
LOUD: Improves bass sound characteristics according to output level.
NIGHT: Optimizes sound for night time listening by compressing the dynamic range and softening the sound.
USER EQ: Provides a user adjustable equalizer so you can adjust music to your liking.
LOCAL EQ: It provides a unique EQ curve for fitting to local music.
Using BD-LIVE
- Connect the product to your network. (See page 14)
- Configure the network settings. (See pages 21~23)
Once the product is connected to your network, you can enjoy various movie-related service contents available on BD-LIVE compliant discs.
- Attach a USB memory stick to the USB jack on the front of the product, and then use BD Data Management to check its remaining memory. The memory device must have at least 1GB of free space to accommodate the BD-LIVE services.
- Select Settings on the Home screen, and then press the button.
- Select System, and then press the button.
- Select BD Data Management, and then press the button.
- Select Change Device, and then press the button.
- Select STORAGE DEVICE, and then press the button.
- Insert a Blu-ray Disc that supports BD-LIVE.
- Select an item from the list of BD-LIVE service contents provided by the disc manufacturer.
The way you use BD-LIVE and the provided contents may differ, depending on the disc manufacturer.
Using DLNA
DLNA lets you access and play files located on your PC through your home theater.
Follow the directions in the DLNA user's guide to set up DLNA on your PC and to tag folders and files you want to share with the home theater.
To access and play files located on your PC after you have set up DLNA, follow these steps:
- Turn on your PC, your TV, and the home theater.
-
Make sure the DLNA Shared server is running on your PC.
-
On your home theater, select Change Device.
- Use the button to select your PC in the Device List.
- Select the kind of file you want to view or play, PHOTOS,VIDEOS,or MUSIC and then press
- Use the button to select the folder with the kind of files you selected, and then press The File List is displayed.
- Select the file you want to view or play, and then press
You can create Playlists from files on your PC in the same way you create playlists from files on USB devices and discs.
With a few exceptions, you can control the playback of files on your PC in the same fashion you control the playback of files on USB devices and discs.
You can also access files on your PC by first selecting PHOTOS, VIDEOS, or MUSIC on the Home screen, and then selecting your PC from the device list that appears.
Apps
Your home theater offers an extensive collection of news, movies, weather, and other content you can download directly to and enjoy on your home theater. First, check the network and make sure the home theater is connected to the Internet. Your home theater must be connected to the Internet to use the Apps feature.
The apps offered through the Apps feature work much like their on-line versions or, if different, are easy to use.
Some apps require you to create an account before you can use them. Although you can create an account for most of these apps through your home theater, it is easier and quicker to create an account by visiting the app sites on line using a PC, laptop, or tablet with Internet access. Note that in some cases, you will need to use the home theater and a PC, laptop, or tablet to establish an account. The main difference between the regular on-line versions and the versions you can access through your home theater is that with the home theater versions, you use your remote to enter letters and numbers as opposed to a keyboard.
Network Services
Using Apps
The first time you access any one of the apps, the home theater displays two agreements. You must accept both agreements to download and use any apps.
By default, the home theater displays four popular apps on the Home screen. You can view more apps and change the apps the home theater displays on the Home screen by selecting the More button.
To start an app, highlight the app, double click it, and then follow the directions displayed on the screen.
Viewing Additional Apps
- Select the More button on the Home screen, and then press the button. The More Apps screen appears displaying a bank of apps.
- To view additional apps, move the highlight to the right or left until another group of apps appears.
- To exit the More Apps screen, select Close or press the RETURN button or EXIT button on your remote.
Changing the Apps Displayed on the Home
Screen
- Select the More button, and then press the button.
- Select the Edit button on the More Apps screen, and then press the button.
- Apps that the home theater displays on the Home page are marked with a check. Deselect apps you want to remove from the Home screen by highlighting each app, and then pressing the button.
- Select apps by highlighting each app, and then pressing the button. A check mark appears on each app you select. You can have up to four apps selected at a time.
- When done, select OK, and then press the button. The Home screen re-appears.
To exit an application, press the EXIT button on your remote.
To delete the login information for all Apps, press the button for 5 seconds or more in Home Screen, No Disc Status.
Using Opera TV Store
At the Opera TV Store, you will find high-quality Internet video streaming, social network, and music streaming services.
Accessing Opera TV Store
To access Opera TV Store, select the Opera TV Store button on the Home screen, and then press the button.
To exit the Opera TV Store screen, press the EXIT or HOME button on your remote.
Navigating in Opera TV Store
When the Opera TV Store screen appears, it displays a bank of assorted apps. Use the buttons on your remote to move the highlight from app to app.
Selecting an App
Move the highlight to the app you want, and then press the button.
In the pop-up that appears, select OPEN to open the app immediately or ADD TO MY APPS to add the app to MY APPS. Press the RETURN button on your remote to go back to the Opera TV Store screen.
Selecting Apps by Category
To make searching for apps easier, you can view apps by categories such as New, Popular, All, Games, Music, etc.
To select a category, use the button on your remote to move the highlight to the top of the screen. Then, use the buttons to select a category.
Using the My Apps Screen
To access the My Apps screen, highlight MY APPS, and then press the button. The My Apps screen appears displaying all the apps you have saved with the MY APPS designation.
Deleting Apps from MY APPS
- Highlight the MENU button on the top of the My Apps screen, and then press the button on your remote.
- Select REMOVE APPS in the menu, and then press the button. A red rectangle appears around one of the apps.
- Move the rectangle to the app you want to delete, and then press the button.
- Repeat this process to delete additional apps.
- When finished, select DONE, and then press the button.
- Press the RETURN button to go back to the Main screen.
Searching for Apps
- Select SEARCH at the top of the screen, and then press the button.
- To search quickly for popular items, click one of the popular search tabs at the top of the screen.
-
To search for an app by name, enter the app name using the onscreen keyboard. Opera TV Store will search as you type and display apps with names that match the letters you enter.
-
To cancel a current search, press the RETURN button on your remote or select BACK on the screen, and then press .
Screen Mirroring
Screen Mirroring lets you display the screen of a smart phone or other compatible device on the TV screen using Miracast™ technology. Screen Mirroring does not require a cable or a wireless router.
- From the Home screen, use the buttons to select Screen Mirroring, and then press
- Launch AllShare Cast on your smart phone or device.
-
On your device, find the name of the home theater system in the list of available devices, and then select it.
-
The TV displays a connecting message (for example, Connecting to Android_92gb...) and then displays the connected message.
-
In a few moments, the screen of your device appears on the TV screen.
-
When you are using the Screen Mirroring function, video stuttering or audio dropouts may occur, depending on your environment.
- The Home Theater can connect to devices that support AllShare Cast. Note that all devices that have AllShare Cast may not be fully supported, depending on the manufacturer. For further information on mobile connection support, refer to the manufacturer's web site.
- Bluetooth transmissions can interfere with the Screen Mirroring signal. Before using the Screen Mirroring function, we strongly recommend that you turn off the Bluetooth function on your smart phone or smart device.
Additional Information
Notes
Connections
HDMI OUT
- Certain HDMI output resolutions may not work, depending on your TV.
- You must have an HDMI connection to enjoy videos with 3D technology.
- A long HDMI cable may cause screen noise. If this occurs, set HDMI Deep Color to Off in the menu.
Settings
3D Settings
- For some 3D discs, to stop a movie during 3D playback, press the button once. The movie stops and the 3D mode option is de-activated. To change a 3D option selection when you are playing a 3D movie, press the button once. The Blu-ray menu appears. Press the button again, then select 3D Settings in the Blu-ray menu.
- Depending on the content and the position of the picture on your TV screen, you may see vertical black bars on the left side, right side, or both sides.
TV Aspect Ratio
- Depending on the disc type, some aspect ratios may not be available.
- If you select an aspect ratio and option which is different than the aspect ratio of your TV screen, the picture might appear to be distorted.
- If you select 16:9 Original, your TV may display 4:3 Pillarbox (black bars on the sides of the picture).
BD Wise (Samsung Products only)
- When BD Wise is on, the Resolution setting automatically defaults to BD Wise and BD Wise appears in the Resolution menu.
If the product is connected to a device that does not support BD Wise, you cannot use the BD Wise function. - For proper operation of BD Wise, set the BD Wise option in both the product and the TV to On.
Digital Output
- Be sure to select the correct Digital Output or you will hear no sound or just loud noise.
- If the HDMI device (AV receiver, TV) is not compatible with compressed formats (Dolby Digital, DTS), the audio signal outputs as PCM.
- Regular DVDs do not have BONUSVIEW audio and Navigation Sound Effects.
- Some Blu-ray Discs do not have BONUSVIEW audio and Navigation Sound Effects.
- This Digital Output setup does not affect the analog (L/R) audio or HDMI audio output to your TV. It affects the optical and HDMI audio output when your product is connected to an AV receiver.
- If you play MPEG audio soundtracks, the audio signal outputs as PCM regardless of your Digital Output selections (PCM or Bitsstream).
- Digital Output can be activated when Speaker Selection is set to TV Speaker.
BD-Live Internet Connection
The Internet connection may be restricted while you are using BD-LIVE contents.
Anynet+ (HDMI-CEC)
Depending on your TV, certain HDMI output resolutions may not work. Please refer to the user manual of your TV.
- This function is not available if the HDMI cable does not support CEC.
- If your Samsung TV has an Anynet+ logo, then it supports the Anynet+ function.
BD Data Management
- In the external memory mode, disc playback may be stopped if you disconnect the USB device in the middle of playback.
- Only those USB devices formatted in the FAT file system (DOS 8.3 volume label) are supported. We recommend you use USB devices that support the USB 2.0 protocol with 4 MB/sec or faster read/write speeds.
- The Resume Play function may not work after you format the storage device.
- The total memory available to BD Data Management may differ, depending on conditions.
DivX® Video On Demand
- For more information about DivX(R) VOD, visit "http://vod.divx.com".
Speaker Settings
- When Speaker Selection is set to TV Speaker, audio is produced by the TV speakers.
HDMI audio
- When HDMI audio is output to the TV speakers, it is automatically down-mixed to 2 channels.
Audio Return Channel
- When Anynet+ (HDMI-CEC) is Off, the Audio Return Channel function is not available.
- Using an HDMI cable not certified for ARC (Audio Return Channel) may cause a compatibility problem.
- The ARC function is only available if an ARC-compliant TV is connected.
Playback
Playing Video files
Video files with high bitrates of 20Mbps or more strain the product's capabilities and may stop playing during playback.
Selecting the Audio Language
- The indicator will not appear on the screen if the BONUSVIEW section does not contain any BONUSVIEW audio settings.
- The languages available through the Audio Language function depend on the languages that are encoded on the disc. This function or certain languages may not be available.
- Some Blu-ray Discs may allow you to select either the PCM or Dolby Digital audio English soundtrack.
Selecting the Subtitle Language
Depending on the Blu-ray Disc / DVD, you may be able to change the subtitle language in the Disc Menu. Press the DISC MENU button.
- This function depends on the selection of subtitles that are encoded on the disc and may not be available on all Blu-ray Discs/DVDs.
Information about the main feature BONUSVIEW mode will also appear if the Blu-ray Disc has a BONUSVIEW section.
- This function changes both the primary and secondary subtitles at the same time.
- The total number of primary and secondary subtitles, respectively, is displayed.
Playing JPEG files
- You can't enlarge the subtitle and PG graphics in the full screen mode.
Playing Content
Using the TOOLS button while playing pictures
- If the home theater is connected to a BD Wise compliant TV that has BD Wise On, the Picture Settings menu will not appear.
- The Background Music function will not work unless the music file and the photo file are located on the same storage media. Also, sound quality can be impacted by the bitrate of the MP3 music file, the size of the photos, and the encoding method.
Disk and Format Compatibility
Disc types and content your Product can Play
| Media Disc Type Details | ||
| VIDEO | Blu-ray Disc3D Blu-ray Disc | BD-ROM or BD-RE/-R disc recorded in the BD-RE format. |
| DVD-VIDEO, DVD-RW, DVD-R, DVD+RW, DVD+R, VCD 1.1 | DVD-VIDEO, recorded DVD+RW/DVD-RW(V)/DVD-R/+R discs that have been recorded and finalized, or a USB storage media containing DivX, MKV, MP4, VCD 1.1 contents. | |
| MUSIC | CD-RW/-R, DVD-RW/-R, BD-RE/-R | Music recorded on CD-RW/-R, DVD-RW/-R, BD-RE/-R discs or a USB storage media containing MP3 or WMA contents. |
| PHOTO | CD-RW/-R, DVD-RW/-R, BD-RE/-R | Photos recorded on CD-RW/-R, DVD-RW/-R, BD-RE/-R discs or a USB storage media containing JPEG contents. |
The product may not play certain CD-RW/-R and DVD-R because of the disc type or recording conditions.
Appendix
If a DVD-RW/-R disc has not been recorded properly in DVD video format, it will not be playable.
Your product will not play content that has been recorded on a DVD-R at a bitrate that exceeds 10 Mbps.
Your product will not play content that has been recorded on a BD-R or USB device at a bitrate that exceeds 30 Mbps.
Playback may not work for some types of discs, or when you use specific operations, such as angle change and aspect ratio adjustment. Information about the discs is written in detail on the disc box. Please refer to this if necessary.
When you play a BD-J title, loading may take longer than a normal title or some functions may perform slowly.
Disc Types your Product cannot Play
HD DVD DVD-RAM
DVD-ROM/PD/MV-Disc, Super Audio CD etc (except CD layer)
DVD-RW(VR mode)
CVD/CD-ROM/CDV/ CD-G/CD-I/LD (CD-Gs play audio only, not graphics.)
This product may not respond to all operating commands because some Blu-ray Disc, DVD, and CD discs allow specific or limited operation and provide only certain features during playback. Please note that this is not a defect in the product.
Samsung cannot guarantee that this product will play every disc bearing the Blu-ray Disc, DVD, or CD logo because disc formats evolve, and problems and errors may occur during the creation of Blu-ray Disc, DVD, and CD software and/or the manufacture of discs.
Please contact the SAMSUNG Customer Care Center at, if you have questions or encounter difficulty when playing Blu-ray Discs, DVD, or CD discs in this product. Also, refer to the rest of this user manual for additional information on playback restrictions.
Some commercial discs and DVD discs purchased outside your region may not play on this product.
Logos of Discs the Product can Play
| Blu-rayDisc | Blu-ray 3D TM |
| Blu-ray Disc 3D Blu-ray Disc | |
| BDLIVE™ | DOLBY TRUE HD DIGITAL PLUS |
| BD-LIVE Dolby | |
| dts-hD Master Audio | Essential | Java POWERED |
| DTS | Java |
| PAL | DIVX. HD |
| PAL broadcast system in U.K. France, Germany, etc. | DivX |
Region Code
Both products and discs are coded by region. These regional codes must match for a disc to play. If the codes do not match, the disc will not play. The Region Number for this product is displayed on the rear panel of the product.
| Disc Type | Region Code | Area |
| Blu-ray Disc | North America, Central America, South America, Korea, Japan, Taiwan, Hong Kong and South East Asia. | |
| Europe, Greenland, French territories, Middle East, Africa, Australia and New Zealand. | ||
| India, China, Russia, Central and South Asia. | ||
| DVD-VIDEO | 1 | The U.S., U.S. territories and Canada |
| 2 | Europe, Japan, the Middle East, Egypt, Africa, Greenland | |
| 3 | Taiwan, Korea, the Philippines, Indonesia, Hong Kong | |
| 4 | Mexico, South America, Central America, Australia, New Zealand, Pacific Islands, Caribbean | |
| 5 | Russia, Eastern Europe, India, North Korea, Mongolia | |
| 6 | China |
If the Region number of a Blu-ray Disc/DVD does not correspond to the Region number of this product, the product cannot play the disc.
AVCHD (Advanced Video Codec High Definition)
- This product can play back AVCHD format discs. These discs are normally recorded and used in camcorders.
- The AVCHD format is a high definition digital video camera format.
- The MPEG-4 AVC/H.264 format compresses images with greater efficiency than the conventional image compressing format.
- Some AVCHD discs use the "x.v.Color" format. This product can play back AVCHD discs that use the "x.v.Color" format.
"X.v.Color" is a trademark of Sony Corporation. - "AVCHD" and the AVCHD logo are trademarks of Matsushita Electronic Industrial Co., Ltd. and Sony Corporation.
Some AVCHD format discs may not play, depending on the recording conditions.
AVCHD format discs need to be finalized.
"X.v.Color" offers a wider color range than normal DVD camcorder discs.
Some DivX, MKV and MP4 format discs may not play, depending on their video resolution and frame rate.
Supported Formats
Notes on the USB connection
- Your product supports USB storage media, MP3 players, digital cameras, and USB card readers.
- The product does not support folder or file names longer than 128 characters.
- Some USB/digital camera devices may not be compatible with the product.
- Your product supports the FAT 16, FAT 32, and NTFS file systems.
- Connect USB devices directly to the product's USB port. Connecting through a USB cable may cause compatibility problems.
- Inserting more than one memory device into a multi-card reader may cause the reader to operate improperly.
- The product does not support the PTP (Peer to Peer) protocol.
- Do not disconnect a USB device while it is transferring or recording data.
- The bigger the image resolution, the longer the image takes to display.
- This product cannot play MP3 files with DRM (Digital Rights Management) downloaded from commercial sites.
- Your product only supports video that is under 30fps (frames per second).
- Your product only supports USB Mass Storage Class (MSC) devices such as thumb drives and USB HDD. (HUB is not supported.)
- Certain USB HDD Devices, multi-card readers and thumb drives may not be compatible with this product.
- If some USB devices require excessive power, they may be limited by the circuit safety device.
- If playback from a USB HDD is unstable, provide additional power by plugging the HDD into a wall socket. If the problem continues, contact the USB HDD manufacturer.
- SAMSUNG is not responsible for any data file damage or data loss.
Video File Support
| File Extension | Container Video | Codec Audio Codec Resolution | ||
| *.avi | AVI | DivX 3.11/4/5/6 MP4v3 H.264 BP/MP/HP | MP3, Dolby Digital, DTS, WMA, PCM | 1920x1080 |
| *.mkv | MKV | VC-1 AP, DivX 5/6 H.264 BP/MP/HP | MP3, Dolby Digital, DTS | |
| *.wmv | WMV (wmv9) | VC-1 AP VC-1 SM | WMA | |
| *.mp4 | MP4 | MP4 (mp4v) H.264 BP/MP/HP | AAC | |
| *.mpg / *.mpeg | PS | MPEG1 MPEG2 H.264 BP/MP/HP | MP1, 2 Dolby Digital, DTS | |
- Limitations
- Even when a file is encoded by a supported codec listed above, the file might not play if its content has a problem.
- Normal playback is not guaranteed if the file's container information is wrong or the file itself is corrupted.
- Files having a higher bitrate/frame rate than standard may stutter during sound/video playback.
- The Seek (skip) function is not available if the file's index table is damaged.
Video decoder
Supports up to H.264 Level 4.1 and AVCHD
- Does not support H.264 FMO/ASO/RS and VC1 SP/MP/AP L4
-MPEG4SP,ASP:
Below 1280 × 720:60 frames max
Above 1280 × 720:30 frames max
- Does not support GMC 2 or higher
Audio decoder
Supports WMA 7,8,9 and STD
- Does not support WMA sampling rate of 22050Hz mono.
- AAC: Max sampling rate: 96Khz (8, 11, 12, 16, 22, 24, 32, 44.1, 48, 64, 88.2, 96) Max bitrate: 320kbps
Supported DivX subtitle file formats
-.txt, .smi, .srt, .sub, *.txt
Music File Support
| File Extension Container Audio Codec Support Range | |||
| *.mp3 | MP3 | MP3 - | |
| *.wma | WMA | WMA | * Sampling rates (in kHz) - 8, 11, 16, 22, 32, 44.1, 48 * Bitrates - All bitrates from 5kbps to 384kbps |
Picture File Support
| File Extension Type Resolution | ||
| *.jpg / *.jpeg / *.jpe | JPEG | 15360x8640 |
| *.png | PNG | |
Digital Output Selections
| Setup PCM | Bitstream (Unprocessed) | Bitstream (Re-encoded DTS) | Bitstream (Re-encoded Dolby D) | ||
| Connection HDMI supported AV receiver | |||||
| Audio Stream on Blu-ray Disc | PCM Up to | PCM 7.1ch PCM | DTS re-encoded | Re-encoded Dolby Digital * | |
| Dolby Digital | Dolby TrueHD Up to PCM 5.1ch | Dolby Digital | |||
| Dolby Digital Plus | Dolby Digital Plus | ||||
| Dolby TrueHD DTS | Up to PCM 5.1ch | ||||
| DTS DTS | |||||
| DTS-HD High Resolution Audio | DTS-HD High Resolution Audio | ||||
| DTS-HD Master Audio | DTS-HD Master Audio | ||||
| Audio Stream on DVD | PCM PCM 2ch | ||||
| Dolby Digital | Up to PCM 5.1ch | Dolby Digital | |||
| DTS DTS | |||||
| Definition for Blu-ray Disc | Any | Decodes the main feature audio and BONUSVIEW audio stream together into PCM audio and adds Navigation Sound Effects. | Outputs only the main feature audio stream so that your AV receiver can decode the audio bitstream. You will not hear BONUSVIEW audio or Navigation Sound Effects. | Decodes the main feature audio and BONUSVIEW audio stream together into PCM audio and adds Navigation Sound Effects, then re-encodes the PCM audio into DTS bitstream. | Decodes the main feature audio and BONUSVIEW audio stream together into PCM audio and adds Navigation Sound Effects, then re-encodes the PCM audio into Dolby Digital bitstream or PCM. |
If the Source Stream is 2ch or mono, "Re-encoded Dolby D" Setting are not applied. Output will be PCM 2ch.
Blu-ray Discs may include three audio streams :
- Main Feature Audio : The audio soundtrack of the main feature.
- BONUSVIEW audio : An additional soundtrack such as the director or actor's commentary.
- Navigation Sound Effects : When you choose some menu navigation options, Navigation Sound Effects may sound. Navigation Sound Effects are different on each Blu-ray Disc.
Resolution according to the output mode
| Blu-ray Disc/E-contents/Digital Contents playback DVD playback | |||
| Setup\Output | HDMI Mode | HDMI Mode | |
| Blu-ray Disc | E-contents/Digital contents | ||
| BD Wise | Resolution of Blu-rayDisc | 1080p@60F 480i | |
| Auto | Max. Resolution of TV input Max. Resolution of TV input | ||
| 1080p@60F 1080p@60F - | |||
| 1080p - 1080p | |||
| Movie Frame : Auto (24Fs) 1080p@24F - | |||
| 1080i 1080i 1080i | |||
| 720p 720p 720p | |||
| 576p/480p 576p/480p | 576p/480p | ||
Troubleshooting
Refer to the table below when this product does not function properly. If the problem you are experiencing is not listed below or if the instructions below do not help, turn off the product, disconnect the power cord and contact the nearest authorized dealer or Samsung Electronics Service Center.
| Symptom | Check/Remedy |
| You cannot eject the disc. | ·Is the power cord plugged securely into the outlet? ·Turn off the power, and then turn it back on. |
| Playback does not start. | ·Check the region number of the Blu-ray/DVD disc. A Blu-ray/DVD disc purchased from abroad may not be playable. ·CD-ROMs and DVD-ROMs cannot be played on this product. ·Make sure that the rating level is correct. |
| Playback does not start immediately when you press the ☐ button. | ·Are you using a deformed disc or a disc with scratches on the surface? ·Wipe the disc clean. |
| No sound. | ·The home theater does not play sound during fast playback, slow playback, and step motion playback. ·Are the speakers connected properly? Is the speaker setup correctly customized? ·Is the disc severely damaged? |
| You can only hear sound from a few speakers, but not all 6. | ·On certain Blu-ray/DVD discs, sound is output from the front speakers only. ·Check if the speakers are connected properly. ·Adjust the volume. ·When playing audio from a CD, the radio, or a TV, the unit outputs sound to the front speakers only. |
| Symptom Check/Remedy | |
| Dolby Digital 5.1 CH Surround Sound is not produced. | ·Is there "Dolby Digital 5.1 CH" mark on the disc? Dolby Digital 5.1 CH Surround Sound is produced only if the disc is recorded with 5.1 channel sound. ·Is the audio language correctly set to Dolby Digital 5.1-CH in the information display? |
| The remote control does not work. | ·Are you operating the remote within its operational range and within the proper angle relative to the sensor? ·Are the batteries drained? ·Have you selected the correct mode? Press the function button to change the mode (BD/DVD, D. IN, AUX, etc.) |
| ·The disc is rotating but there is no picture. ·Picture quality is poor and the picture is shaking. | ·Is the TV power on? ·Are the video cables connected properly? ·Is the disc dirty or damaged? ·A poorly manufactured disc may not be playable. |
| Audio language and subtitles do not work. | ·The Audio Language and subtitle functions will not work if the disc does not contain multiple language sound tracks or subtitles. |
| The menu screen does not appear even when you select the menu function. | ·Are you using a disc that does not contain menus? |
| The aspect ratio cannot be changed. | ·The home theater can play 16:9 Blu-ray/DVD discs in 16:9 Full mode, 4:3 Letter Box mode, or 4:3 Pan-Scan mode, but plays 4:3 Blu-ray/DVD discs in 4:3 mode only. Refer to the Blu-ray Disc jacket, and then select the appropriate aspect ratio. |
| ·The product is not working. (Example: The power goes off or you hear a strange noise.) ·The Product is not working normally. | ·Press and hold the remote control's button for 5 seconds in STANDBY mode. This will reset the unit. - Using the RESET function will erase all stored settings. Do not use this function unless necessary. |
| You have forgotten the rating level password. | ·With no disc in the product, press and hold the product's button for longer than 5 seconds. INIT appears on the display and all settings will return to their default values. - Using the RESET function will erase all stored settings. Do not use this function unless necessary. |
| Can't receive radio broadcasts. | ·Is the antenna connected properly? ·If the antenna's input signal is weak, install an external FM antenna in an area with good reception. |
| There is no sound when you try to listen to TV audio through the home theater speakers. | ·If you press the▲ button while listening to TV audio using the D. IN or AUX functions, the Blu-ray/DVD disc functions are turned on and the TV audio is muted. |
| "Not Available" appears on screen. | ·The feature is unavailable or the action cannot be completed at this time because: 1. The Blu-ray/DVD disc's software restricts it. 2. The Blu-ray/DVD disc's software doesn't support the feature (e.g., angles) 3. The feature is not available at the moment. 4. You've requested a title or chapter number or search time that is out of range. |
HT-J5500K/HT-J5530K/HT-J5550K
| Symptom Check/Remedy | |
| If the HDMI output is set to a resolution your TV cannot support (for example, 1080p), you may not see a picture on your TV. | Press and hold the button on front panel for more than 5 seconds with no disc in the product. All settings will revert to their factory settings. |
| No HDMI output. | Check the connection between the TV and the HDMI jack of the product. Check if your TV supports 576p/480p/720p/1080i/1080p HDMI input resolution. |
| Abnormal HDMI output appears on the screen. | If random noise appears on the screen, it means that TV does not support HDCP (High-bandwidth Digital Content Protection). |
| DLNA function | |
| You can see folders shared through DLNA, but cannot see the files. | DLNA shows only Photo, Music, and Movie files. It does not display other kinds of files. |
| Video plays intermittently. | Check if the network is stable. Check if the network cable is properly connected and if the network is overloaded. |
| The DLNA connection between the TV and PC is unstable. | IP addresses under the same subnetwork should be unique, otherwise IP collision can cause an unstable connection. Check if you have a firewall enabled. If so, disable the firewall function. |
| BD-LIVE | |
| The home theater cannot connect to the BD-LIVE server. | Test whether the network connection is active by using the Network Status function. Check whether a USB memory device is connected to the product. The memory device must have at least 1GB of free space to accommodate the BD-LIVE service. You can check the available size in BD Data Management. (See pages 37 and 40.) See if the BD-Live Internet Connection option is set to Allow(All). If all above fails, contact the content provider or update to the latest firmware. |
| When using the BD-LIVE service, an error occurs. | The USB memory device must have at least 1GB of free space to accommodate the BD-LIVE service. You can check the available size in BD Data Management. (See pages 37 and 40.) |
When the factory default settings are restored, all stored user BD data is deleted.

Hereby, Samsung Electronics, declares that this equipment is in compliance with the essential requirements and other relevant provisions of Directive 1999/5/EC.
The original Declaration of Conformity may be found at http://www.samsung.com, go to Support > Search Product Support and enter the model name.
This equipment may be operated in Jordan.
Specifications
| General | Weight 1.90 kg | |
| Dimensions 430.0 (W) x 55.0 (H) x 224.0 (D) mm | ||
| Operating Temperature Range +5°C to +35°C | ||
| Operating Humidity Range 10 % to 75 % | ||
| FM Tuner | Signal/noise ratio 55 dB | |
| Usable sensitivity 12 dB | ||
| Total harmonic distortion 1.0 % | ||
| HDMI | Video 1080p, 1080i, 720p, 576p/480p | |
| Audio PCM multichannel audio, Bitstream audio, PCM audio | ||
| Amplifier | Front speaker output 165W x 2 (3Ω) | |
| Center speaker output 170W (3Ω) | ||
| Surround speaker output 165W x 2 (3Ω) | ||
| Subwoofer speaker output 170W (3Ω) | ||
| Frequency response 20Hz~20kHz (±3dB) | ||
| S/N Ratio | 70dB | |
| Channel separation | 60dB | |
| Input sensitivity | (AUX) 500mV | |
HT-J5500K
| Speaker system | Impedance | Frequency range Rated input | Dimensions (W x H x D) (Unit : mm) | Weights (Unit : kg) | |
| Front | 3 Ω | 200Hz ~ 20kHz | 165W | 83.4 x 170.5 x 101.0 | 0.45 |
| Surround | 83.4 x 129.0 x 101.0 | 0.40 | |||
| Centre | 170W | 268.8 x 87.6 x 101.0 | 0.58 | ||
| Subwoofer | 20Hz ~ 200Hz | 220.6 x 380.6 x 364.7 | 6.50 | ||
HT-J5550WK

Hereby, Samsung Electronics, declares that this equipment is in compliance with the essential requirements and other relevant provisions of Directive 1999/5/EC.
The original Declaration of Conformity may be found at http://www.samsung.com, go to Support > Search Product Support and enter the model name.
This equipment may only be used indoors. This equipment may be operated in Jordan.
Appendix
| HT-J5530K | |||||
| Speaker system | Impedance | Frequency range Rated input | Dimensions (W x H x D) (Unit : mm) | Weights (Unit : kg) | |
| Front | 83.4 x 3129.0 x 101.0 0.40 20kHz | 200Hz~20kHz | 165W | 83.4 x 1053.0 x 101.0 (Stand base: Φ255.0) | 3.15 |
| Surround | |||||
| Centre | 170W | 268.8 x 87.6 x 101.0 0.58 | |||
| Subwoofer | 20Hz ~ 200Hz 220 | 0.6 x 380.6 x 364 | .7 6.50 | ||
| HT-J5550K | |||||
| Speaker system | Impedance | Frequency range Rated input | Dimensions (W x H x D) (Unit : mm) | Weights (Unit : kg) | |
| Front | .983 Ω | 200Hz ~ 20kHz | 165W | 83.4 x 1053.0 x 101.0 (Stand base: Φ255.0) | 3.15 |
| Surround 2 | |||||
| Centre | 170W | 268.8 x 87.6 x 101.0 0.58 | |||
| Subwoofer | 20Hz ~ 200Hz 220 | 0.6 x 380.6 x 364 | .7 6.50 | ||
| HT-J5550WK | |||||
| Speaker system | Impedance | Frequency range Rated input | Dimensions (W x H x D) (Unit : mm) | Weights (Unit : kg) | |
| Front | 3 Ω | 200Hz ~ 20kHz | 165W | 83.4 x 1053.0 x 101.0 (Stand base: Φ255.0) | 3.15 |
| Surround | 83.4 x 1053.0 x 101.0 (Stand base: Φ255.0) | 2.98 | |||
| Centre | 170W | 268.8 x 87.6 x 101.0 0.58 | |||
| Subwoofer | 20Hz ~ 200Hz 220 | 0.6 x 380.6 x 364 | .7 6.50 | ||
Network speeds equal to or below 10Mbps are not supported.
Samsung Electronics Co., Ltd reserves the right to change the specifications without notice.
Weight and dimensions are approximate.
Design and specifications are subject to change without prior notice.
For the power supply and Power Consumption, refer to the label attached to the product.
SWA-7000 (HT-J5550WK only)
| Weight 0.73 kg | |
| Dimensions (W x H x D) 50.0 x 201.3 X | 132.0 mm |
| Operating Temperature Range +5°C to | +35°C |
| Operating Humidity Range 10 % to 75 % | |
| Output 165W x 2 CH | |
| Frequency range 20Hz~20KHz | |
| S/N Ratio | 65dB |
Licenses

TRUE:
DIGITAL PLUS
Manufactured under license from Dolby Laboratories. Dolby and the double-D symbol are trademarks of Dolby Laboratories.


Master Audio | Essential
For DTS patents, see http://patents.dts.com. Manufactured under license from DTS Licensing Limited. DTS, DTS-HD, the Symbol, & DTS and the Symbol together are registered trademarks, and DTS-HD Master Audio | Essential is a trademark of DTS, Inc. © DTS, Inc. All Rights Reserved.


This DivX Certified® device has passed rigorous testing to ensure it plays DivX® video.
To play purchased DivX movies, first register your device at vod.divx.com. Find your registration code in the DivX VOD section of your device setup menu.
DivX Certified® to play DivX® video up to HD 1080p, including premium content.
DivX®, DivX Certified® and associated logos are trademarks of DivX, LLC and are used under license.
Covered by one or more of the following U.S. patents: 7,295,673; 7,460,668; 7,515,710; 7,519,274.


CERTIFIED
DLNA®, the DLNA Logo and DLNA CERTIFIED® are trademarks, service marks, or certification marks of the Digital Living Network Alliance.

The terms HDMI and HDMI High-Definition Multimedia Interface, and the HDMI Logo are trademarks or registered trademarks of HDMI Licensing LLC in the United States and other countries.

Java
POWERED
Oracle and Java are registered trademarks of Oracle and/or its affiliates. Other names may be trademarks of their respective owners.
This item incorporates copy protection technology that is protected by U.S. patents and other intellectual property rights of Rovi Corporation. Reverse engineering and disassembly are prohibited.
Blu-ray Disc^TM , Blu - ray^TM , and the logos are trademarks of Blu-ray Disc Association.
This product uses Cinavia technology to limit the use of unauthorized copies of some commercially-produced film and videos and their soundtracks. When a prohibited use of an unauthorized copy is detected, a message will be displayed and playback or copying will be interrupted.
More information about Cinavia technology is provided at the Cinavia Online Consumer Information Center at http://www.cinavia.com. To request additional information about Cinavia by mail, send a postcard with your mailing address to: Cinavia Consumer Information Center, P.O. Box 86851, San Diego, CA, 92138, USA."
This product incorporates proprietary technology under license from Verance Corporation and is protected by U.S. Patent 7,369,677 and other U.S. and worldwide patents issued and pending as well as copyright and trade secret protection for certain aspects of such technology. Cinavia is a trademark of Verance Corporation. Copyright 2004-2010 Verance Corporation. All rights reserved by Verance. Reverse engineering or disassembly is prohibited.
- Open Source License Notice
In the case of using open source software, Open Source Licenses are available on the product menu.
piaaai
TM5.1CHBlu-ray
jll jilip
iila iil
Samsung
alolio 1
www.samsung.com/register
J 12 J 12

aill jia aide clogao 1jai li i jai jai jai jai jai jai jai jai jai jai jai jai jai jai jai jai jai jai jai jai jai jai jai jai jai jai jai jai jai jai jai jai jai jai jai jai jai jai jai jai jai jai jai jai jai jai jai jai jai jai jali

4
i 1
y.(y)o 10000000000000000000000000000000000000000000
1a 1
y. lall jn aaii daiy 2gall y gll jilll jin no aiall
aikn jy aiall jLs Jn kly Ayn Dla n Jll Jn
- - giaia jia jial all Jaa jai
jay jilll jnil jna jiall Jala - ia jia jaiy jae ai j
Jai all jy jaiai
Jg 15000000000000000000000000000000000000000000000000000
Jabal 1 Jia 1 Jai 1 Jia 1 Jai 1 Jai 1 Jai 1 Jai 1 Jai 1 Jai 1
J 1 1 1 1 1 1 1 1 1 1 1 1 1 1 1 1 1 1 1 1 1 1 1 1 1 1 1 1 1 1 1 1 1 1 1 1 1 1 1 1 1 1 1 1 1 1 1 1 1 1 0
y 1
aaii j 1jaii i jaii jaii jaii jaii jaii jaii jaii jaii jaii jaii jaii jaii jaii jaii jaii jaii jaii jaii jaii jaii jaii jaii jaii jaii jaii jaii jaii jaii jaii jaii jaii jaii jaii jaii
Jaiy jay aal Jally Cjll bai o jao jaliill 1aie 1 jaijall jao jaliill ciae ie Jauell aaii 1aai
a 1 1 1 1 1 1 1 1 1 1 1 1 1 1 1 1 1 1 1 1 1 1
J 1
a 1
J 1
a
aaiy
aal aal alal alal alal
aaii iiaii aiee ie eae iie eie
y jn jaiil sall aiei i 11 11 11 11 11 11 11 11 11
g jj jll aal j 100000000000000000000000000000000000000000000000
a j 1000000000000000000000000000000000000000000000000000
JlaljIg Jn Jn Jnnn nn nnnnnnnnnnnnnnnnnnnnnnnnnnnnnnnnnnnnnnnnnnnnnnnnnnnnnnnnnnnnnnnnnnnnnnnnnnnnnnnnnnnnnnnnnnnnnnnnnnnnnnnnnnnnnnnnnnnnnnnnnnnnnnnnnnnnnnnnnnnnnnn
jgl 1 jgl 1 g 1 g 1 g 1 g 1 g 1 g 1 g 1 g 1 g 1 g 1 g 1 g 1 g 1 g 1 g 1 g 1 g 1 g 1 g 1 g 1 g 1 g 1 g 1 g 1 g 1 g 1 g 1 g 1 g 1 g 1 g 1 g 1 g 1 g
jll jai jy jai jay jay jay jay jay jay jay jay jay jay jay jay jay jay jay jay jay jay jay jay jay jay jay jay jay jay jay jay jay jay jay jay jay jay jay jay jay jay jay jay jay jay jay jay jay jay jay jay jay jay j
ylll alllll lal yolil yolill yall yall yall ylll ylll ylll ylll ylll ylll ylll ylll ylll ylll ylll ylll
g 10000000000000000000000000000000000000000000000000000000000000000000
HDMI JSSJn jnnnnaa aee
y
a 1
HDMJ
LASER PRODUKT KLASSE 1
LASER LAITE LUOKAN 1
LASER APPARAT KCLASS 1
LASER CLASE 1 PRODUCTO
- 1
a_5 · 2n^11 · _2n^2
^TM BD-LIVE 37
DLNA 37
aill 37
Opera TV Store 38
Screen Mirroring 39
g = x^2 - | x - 1|
40
41
46
cal 49
51
yaleal laii jho ie logwJia oiiisig hao
aIg aIg aIg aIg aIg aIg aIg aIg aIg aIg aIg aIg aIg aIg aIg aIg aIg aIg aIg aIg aIg aIg aIg aIg aIg aIg aIg aIg aIg aIg aIg aIg aIg aIg a
(1)
JIO) ciioJIy icic cIIIO JSLQIg ILOIg ILOIg ILOIg
1.100 pssssssll 100 o5y puc
.
a aal aal alal alal
olal
| L_2| = | L_1|
Pssimol J
AAA:

AolbJjLs

FM

HDMI LS
J
4
5
7
7
8
x_1 = 2,x_2 = - 4
9
13
4 14
#
15
16
16
17
20
21
Jg Jlccj p 123456789011234567890123456789012345678901234567890123456789012345678901234567890123456789012345678901234567890123456789
25
DLNA 26
50-11
jdaal jzj 27
27
pssuall 12n aalusu uusu 27
USB jg 28
29
J 31
31
Jusll 33
33
34
35
aLgS
HT-J5500K


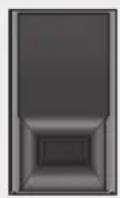

aolaiacLaw 2 scc aIolaiacLaw 2 scc ayjso ogwai oLcLawx U L6
HT-J5530K

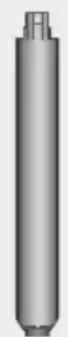

(15×5) L2


22s(20x5)L8CcLcLs6


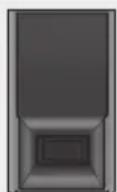
clow 2.0c oLoi
Jolg2 Jolgsu jLcL2
clow 2 sec
HT-J5550K


(15×5) L4


(20x5)16LcLu 6


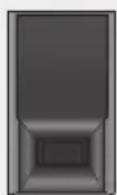
clow 2 scc ooloi
Jolg4 Jolgsu JLc4
clow 2 scc
HT-J5550WK
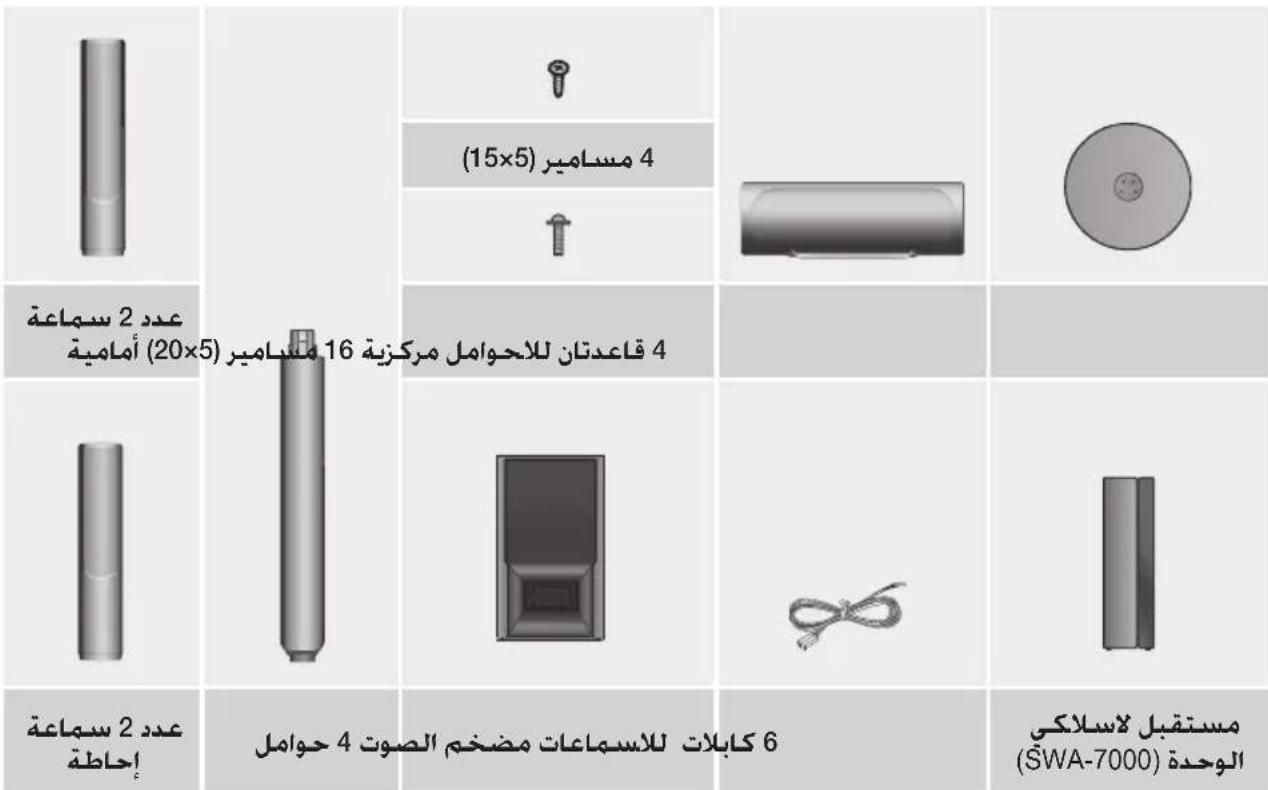
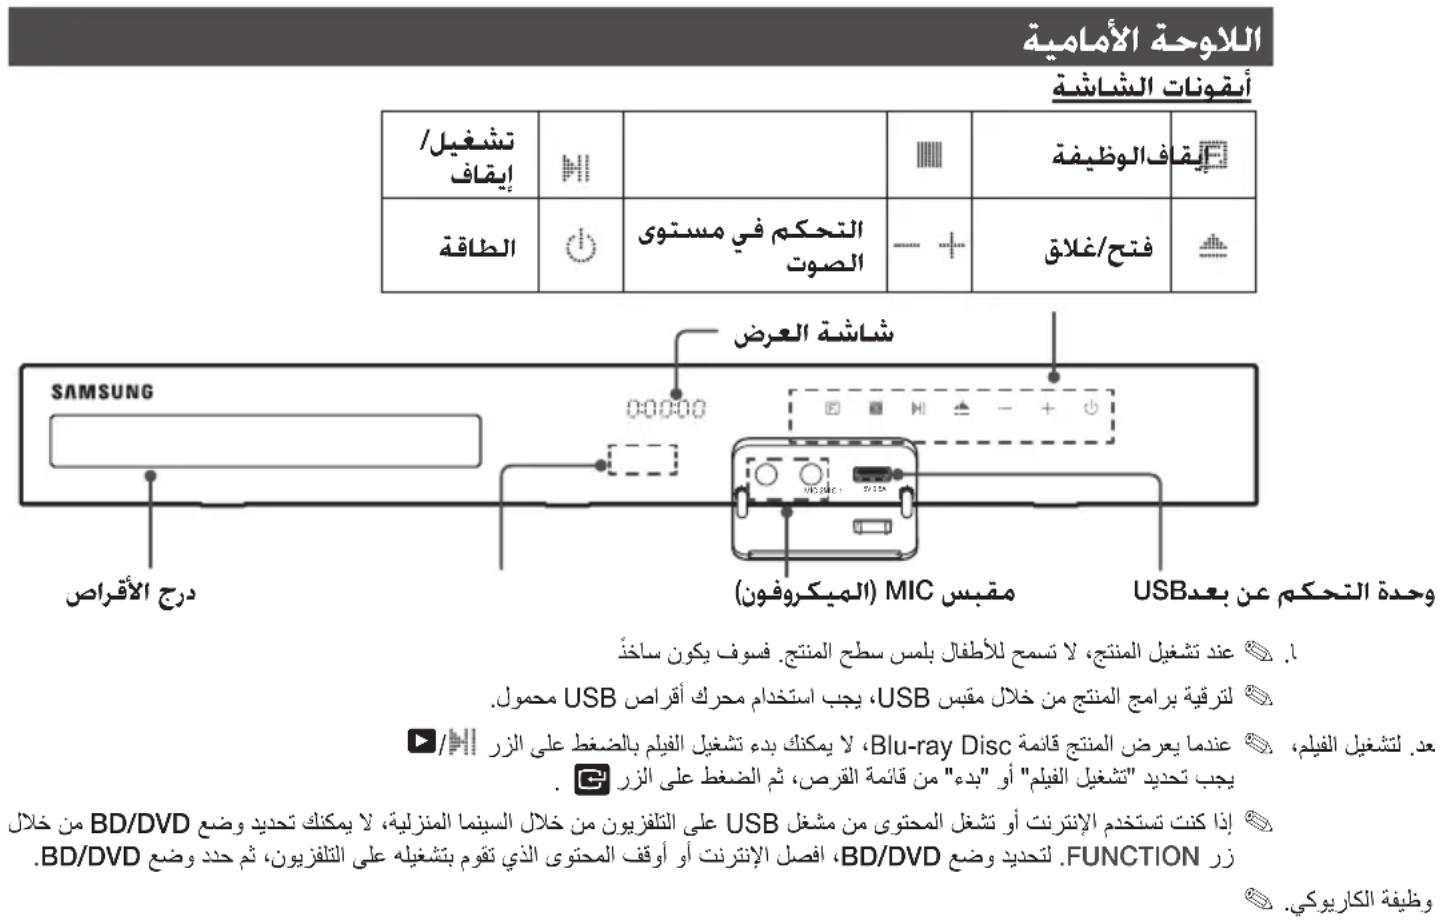
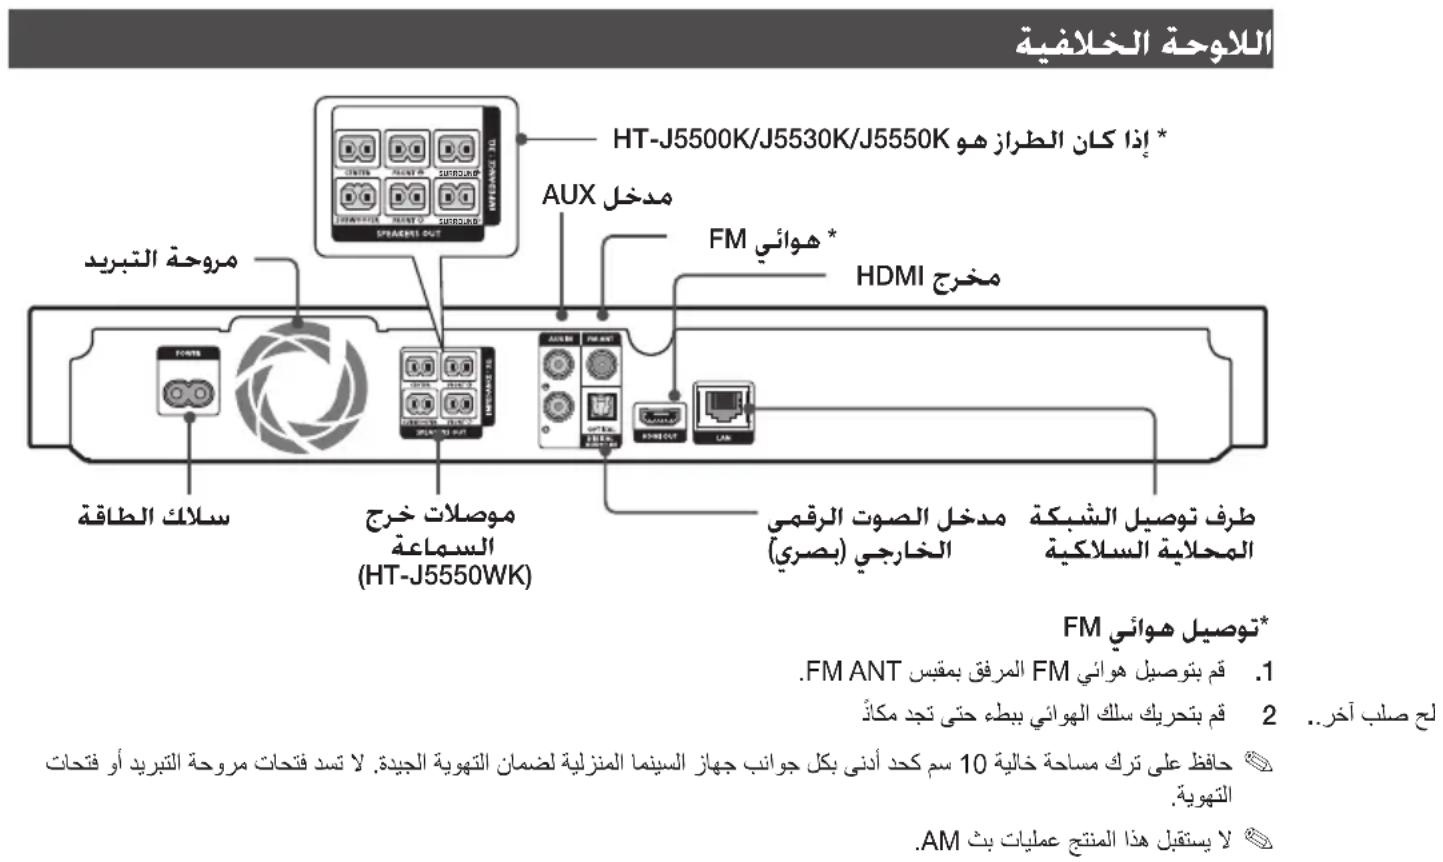
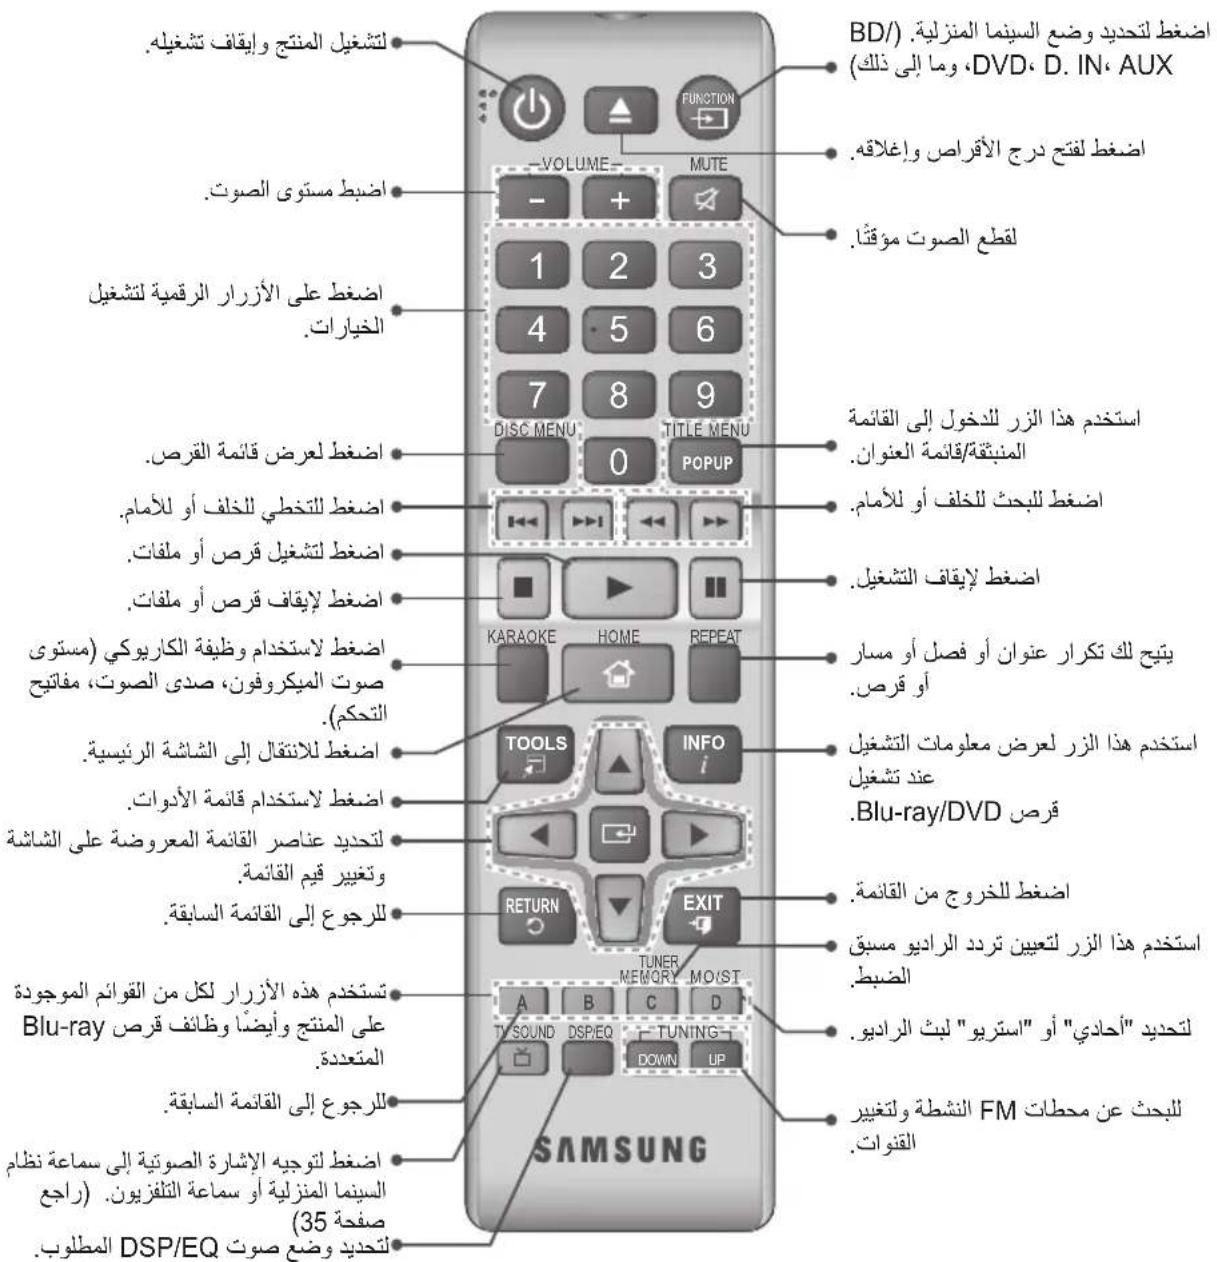
1
e 1
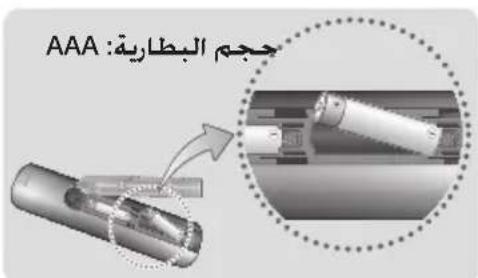
a 1
gall plaii 1ie iiaa aal yjll Jac sdo jn jiaial .
7 1 1 1 1 1 1 1 1 1 1 1 1 1
s
ailll lss, aaii iai 10 slls j j jaiall Jia
LcLwJ
CioiO1
jai jial
. jy jilil Jolj
EcoaiwXgogo
e e
3 2.5 a a
g 1
aL 1
46
2.92 2
A. 3.50

HT-J5550WK jIJIyLc kSLSUJ JIJIaIwIg
即 b^2 - 4ac = 1
3.
4
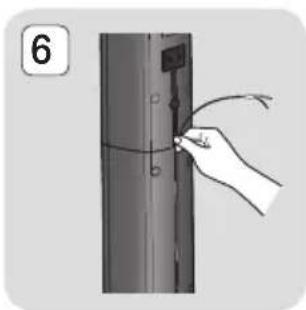
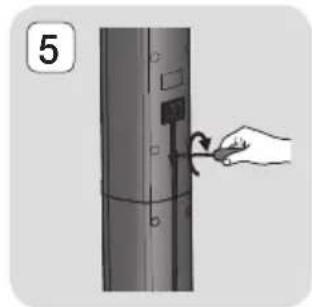
JxieLwIjieol(15x5)g j
.5
6
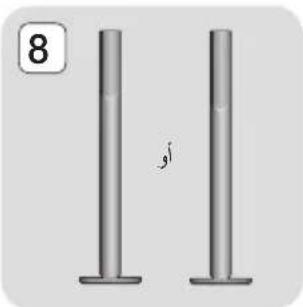
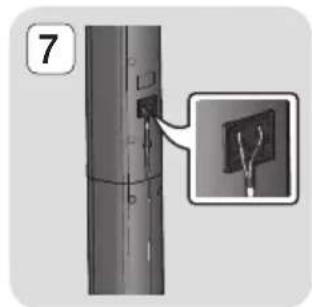
7 . 10
.8
aclawlJLS
g glaal a jally aagall gall galsl baa Jy jn glall gall gglal gglal gglal aclaually aclaually 1
clawJus gialj
aclall jn jy gall ygall ygall ygall ygall ygall ygall ygall ygall ygall ygall ygall ygall ygall ygall ygall ygall ygall ygall ygall ygall ygall ygall ygall ygall ygall ygall ygall ygall ygall ygall ygall ygall ygall ygell ygell ygell ygell ygell ygell ygell ygell ygell ygell ygell ygell ygell ygell ygell ygell ygell ygell ygell ygell ygell ygell y
yulilallll lllllllllllllllllllllllllllll
J 1
Bee 111111111111111111111111111111111111
jaiill 1 jbi clll l jilal all
10 10
10 SET" jll 5" "0"
4
g jy jll kssall g bllalge kslaly (aao y) culll gailbbsj y wall cill alll gclle lcs
Ae aee ae ae ae ae ae ae ae ae ae ae ae ae ae ae ae ae ae ae ae ae ae ae ae ae ae ae ae ae ae ae ae ae ae ae ae ae ae ae ae ae ae ae ae ae ae ae ae ae ae ae ae ae ae ae ae ae ae ae ae ae ae ae ae ae ae ae ae ae ae ae ae ae ae ae ae ae ae ae ae ae ae ae ae ae ae ae ae ae ae aa
Aclalllbawalw yepywlal w dylu yjdy jcllally jn jy
- / + ) juii slai aao n dci elauy elal u
-,(WEP (OPEN/SHARED)
WPA-PSK (TKIP/AES), WPA2-PSK (TKIP/AES)
Lgolssy SsUIP 4g y slq 22
Jj J j 11111111111111111111111111111
Ji jai liai wu WFi 5000000000000000000000000000000000000000000000000000000000000000000000000000000000
LALAN 1 1 1 1 1 1 1 1 1 1 1 1
中
Samsung
dss
CAT7JSL
10 1y 1y 1y 1y 1y 1y 1y 1y
L 1
Network 5
A
Aaill iie ci lii lslw g lslw cgl waiy bawal
aJzj 1
aaiy jaiy jaiy jaiy jaiy jaiy jaiy
1234567890123456789012345678901234567890123456789012345678901234567890123456789012345678901234567890123456789
.(D) 3j jj jj Skip
i
(21 a

A. 4500000000000000000000000000000000000000000000
Initial."lll j.
"settings completed
Setup
(20 1. Reset
J 1HDMI JLS
(.1(Anynet+ (HDMI-CEC
jzjbll jk Anynet+ (HDMI-CEC)
jll jno 2o 10 10 10 10 10 10 10 10
y
jlll jlll jjj jll
·
138 2
.
Setup all jlll jlll jlll jlll
-
Li jiu liu.
-
jilie
3
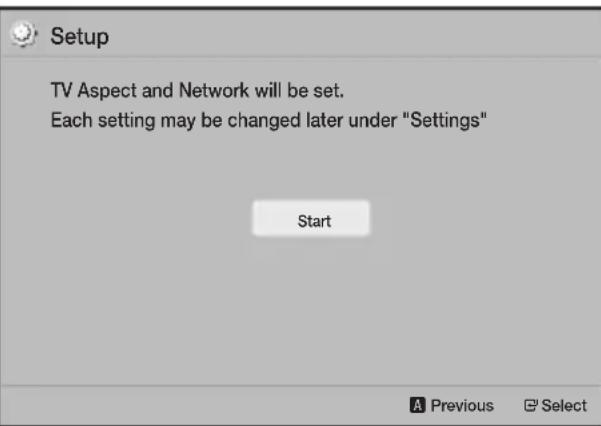
▼▲ jzj. TV Aspect Ratio 4
jglbe bai jn jyai y
1 1
J 16:9 Original
(2)4:3 16:9
AaBbBbBbBbBbBbBbBbBbBbBbBbBbBbBbBbBbBbBbBbBbBbBbBbBbBbBbBbBbBbBbBbBbBbBbBbBbBbBbBbBbBbBbBbBbBbBbBbBbBbB
16:9 4:3
15:16:9 4 1234567890
Jaae aee
4:3 Pan-Scan
16:9 15:3
0
(1) 2,3,4 (2) 5,6
Function 8
J 1 J 1 J 1 J 1 J 1 J 1 J 1 J 1 J 1 J 1 J 1 J 1 J 1 J 1 J 1 J 1 J 1 J 1 J 1 J 1 J 1 J 1 J 1 J 1 J 1 J 1 J 1 J 1 J 1 J 1 J 1 J 1 J 1 J 1 J
Settings 9
aaii i 1
jlll jlll lglg 1 g 1 jssS
JL DLAN 21 y 1 1 1 1 1 1 1 1
.37 aall 26 aall
Jg
Settings. Settings
1
| Settings | ||
| Picture | 3D Settings | |
| Sound | TV Aspect Ratio : 16:9 Original | |
| Network | BD Wise : Off | |
| System | Resolution : Auto | |
| Language | Movie Frame (24Fs) : Off | |
| Security | HDMI Color Format : Auto | |
| General | HDMI Deep Color : Off | |
| Support | Progressive Mode : Auto | |
2 1
J 20 20
A
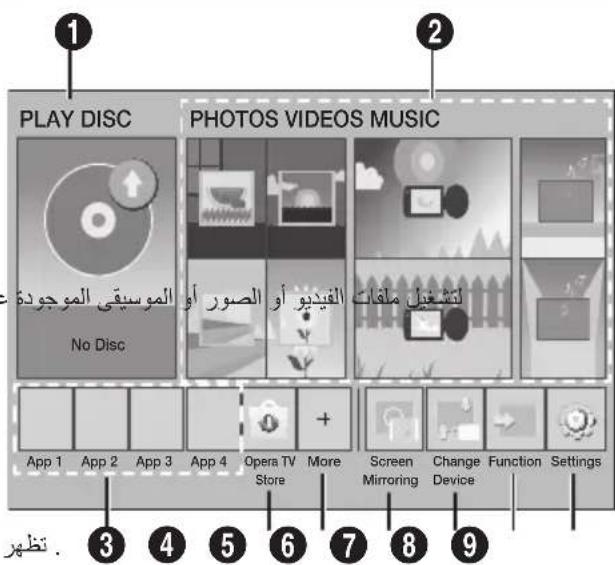
PLAY DISC 1
J 1
a 1 aaiiall caiiiill n ae gaae gaae gaae
Opera TV Store 4
Opera TV Store Jg jg jg jg jg jg jg jg jg jg jg jg jg jg jg jg jg jg jg jg jg jg jg jg jg jg jg jg jg jg jg jg jg jg jg jg jg jg jg jg jg jg jg jg jg jg jg jg jg jg jg
More 5
aaii aiee

Screen Mirroring 6
iell jllai laiuill yjilai iill ayib, slaip
Change Device 7
a a a a a a a a a a a a a a a a
g jai jia jia jia li xia li xia li xia li
(3)
TV Aspect Ratio
(40
BD Wise
Samsung 100000000000000000000000000000000000000000000000000000000000000000000
Samsung 150 Samsung
BDHDMI yBwBbBbBDWise
Wise
. Blu-ray/DVD Disc
Resolution
BD Wise HDMI
576p/480pg 720pg 1080ig 1080pg Auto
all p,i j k l
aill j. aiaial all j lalk. gill gl (g yj) jill, alilall
.52
Movie Frame (24Fs)
Auto Movie Frame (24Fs)
24 124 HDMI
j 1
A. 1 / 2 124
le la Movie Frame (24Fs) 1
Jbbl Jaaepey jyjai
.HDMI 1080p
aasssssssssssssssssssssssssssssssssssssssssssssssssssssssssssssssssssssssssssssssssss
151 1
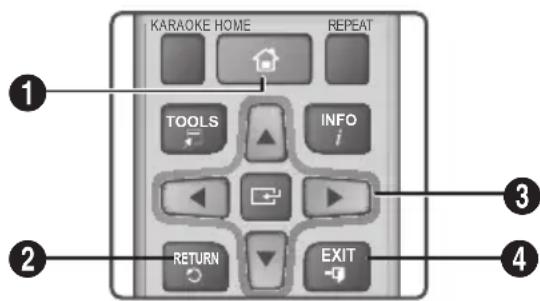
ailll 10 glll c jll g sle
aiee alio 8c Settings 15, joo 8j 0
aalll aal lal
1
3: eluai y iiaial oys laic y jy
Speaker Selection
j jaii iiee aiee eae eae eae eae eae eae eae eae eae eae eae eae eae eae eae eae eae eae eae eae eae eae eae eae eae eae eae eae eae eae eae eae eae eae eae eae eae eae eae eae eae eae eae eae eae eae eae eae eae eae eee
(c) Equalizer Mode
on (C) Equalizer Mode 1
Equalizer Settings
Cswll jjgo bbsnclswll
Equalizer Settings y Equalizer Mode 2 On
Audio Return Channel
Dynamic Range Control
Dolby Digital 1234567890
Dolby Digital 1234567890
Dolby Digital 1234567890
Dolby Digital 1234567890
Dolby Digital 1234567890
Dolby Digital 1234567890
Dolby Digital 1234567890
DolbyDigital 1234567890
Dolby Digital 1234567890
Dolby Digital 1234567890
Dolby Digital 1234567890
Dolby Digital 1234567890
Dolby Digital 1234567890
Dolby Digital 12
HDMI Colour Format
HDMI jj j j j j j j j j j j j j j j j j j j j j j j j j j j j j j j j j j j j j j j j j j j j j j j j j j j j j
HDMI Deep Colour
HDMIOUT 1000000000000000000000000000000000000000
Progressive Mode
. DVD jai jali sallie iie glll
Sound
Karaoke scoring
iie iie jie ie ie ie ie ie ie ie ie ie ie ie ie ie ie ie ie ie ie ie ie ie ie ie ie ie ie ie ie ie ie ie ie ie ie ie ie ie ie ie ie ie ie ie ie ie ie ie ie ie ie ie ie ie ie ie ie ie ie ie ie ie ie ie ie ie ie ie ie ie ie ie ie ie ie ie ie ie ie ie ie ie ie ie ie ie ie ie ie ie ie ie ie ie ie ie ie ie ie ie ie
My karaoke
Ss jll o jy pdsil iie g yall s gssbs
Audiogeturn-Gharmel:Original Vocals 1
C
Reduce Vocals
Speaker Settings
Jaii Jaii jaii, aill lalauu cll aaiy iaiy
Ji gallgai jyj yj 6 Jn Jn Jn Jn Jn Jn Jn Jn Jn Jn Jn Jn Jn Jn Jn Jn Jn Jn Jn Jn Jn Jn Jn Jn Jn Jn Jn Jn Jn Jn Jn Jn Jn Jn Jn Jn Jn Jn Jn Jn Jn Jn Jn Jn Jn Jn Jn Jn Jn Jn J n
aclaw kll aalwll bany ell gws:Distance 9 9 9
Speaker Test
Speaker On Speaker Test
Speaker
BD-Live Internet Connection
BD-Live 1
System
Setup
(15.4.2) .Setup 1
Quick start
On 10
(20 12).
Anynet+ (HDMI-CEC)
a +Anynet
Samsung
jolalalal 100
J. Samsung
.HDMI Anynet Samsung
BD Data Management
Blu- 100000000000000000000000000000000000000000000000000000000000000000000000000000000000
jll BD Live 1i j
DivX® Video On Demand
DivXVOD
DivX® VOD
Language
aaii aiee
.
Downmixing Mode
(aill lill lill) Screen Mirroring a b g
aagall jyjaiill gie sill i jge jgail aia
aJiJIaiLiWiPi
(39)
Device Name
aill 1
jssll jz (sill yell) jks o jusj ic
A()
#
Security
PIN jorj0000 10000 jolalpin jorj
FMRnnaa aae
山
#
FM FUNCTION jie bai
BD Parental Rating
Jn Jn Jn Jn Jn Jn Jn Jn Jn Jn Jn Jn Jn Jn Jn Jn Jn Jn Jn Jn Jn Jn Jn Jn Jn Jn Jn Jn Jn Jn Jn Jn Jn Jn Jn Jn Jn Jn Jn Jn Jn Jn Jn Jn Jn Jn Jn Jn Jn Jn Jn
2 1
□jglbciai:1huiy
PRESSET
TUNING UP:DOWN
aallllall lgl 1. Bnssj jilip la aaiy ciis
sSlll bial aiaa cibaaaii
i
□jillie bial: gai
Terms of Service Agreement
a
Reset
auii ci 1i iuiuuiy aai yai yai
P (PIN) 1
.0000 1 jn PIN
A
aBb, aBbBbB bbs BcBbBbB bBbBbB bBbBbB bBbBbB bBbBbB bBbBbB bBbBbB bBbBbB bBbBbB bBbBbB bBbBbB bBbBbB bBbBbB bBbBbB bBbBbB bBbBbB bBbBbB bBbB
yJLJI JIJI
aaii iiaai
G. 1
C. jll gl bial Network 2
Network Settings 3
L 4 (22a
a.sLwJ1 aS.
jL -
13 1
Network Type Network Settings .1
Jz Connect .Wired
Jusai jia jia jia jia jia jia jia jia jia jia jia jia jia jia jia jia jia jia jia jia jia jia jia jia jia jia jia jia jia jia jia jia jia jia jia jia jia
a
2
g- -aSLLwJ aS-
1
Network Settings
13 1 1
Network Type Network Settings .1
Ie Icual Connect .Wired
G
a aaa
JAA
Sly 2y 1y jai jaiaiaiaiai ai jai jai ai
Network Change Network
C Wireless Type
(22 a
FM
FM (a) (a) (a) (a) (a) (a) (a) (a) (a) (a) (a) (a) (a) (a) (a) (a) (a)
j (i) TUNING UP, DOWN jll
Jauu Jui jai aai (Jau)
jdiic y. jai (A) (RED A) jil 3
Jaswill aiee
aaii
jll jy jll jll jll jbi (cylj
aLx - aSxw8 aS
(214a)
Network Type Network Settings
aaii ciiee ie eiee iiee aee. Wireless
1
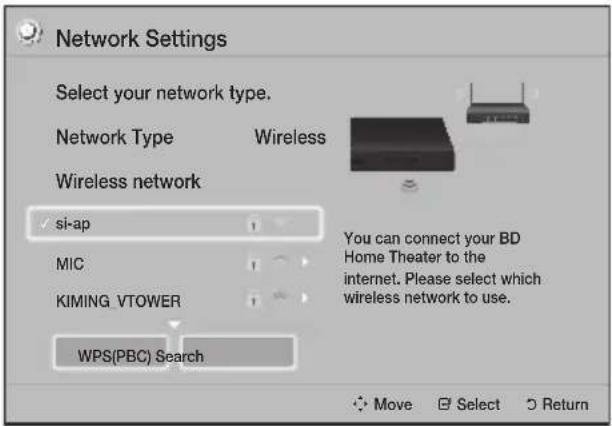
jllbciaai jiejai
Security Key
S OBC = S AOB + S_ BOC
a 1
a
jll bciaol Done yiey
Jauu Jauu Jauu Jauu Jauu
a 1
gall 14 gall 15
a+g-5xw8a5
1
Network Settings
(214a)
Network Type Network Settings .1
Wireless
- 二、四、五、六、七、八、九、十
Add 21 21111111111111111111111111111.2
Network
.6gblal 2gblal
4.4 Add Network
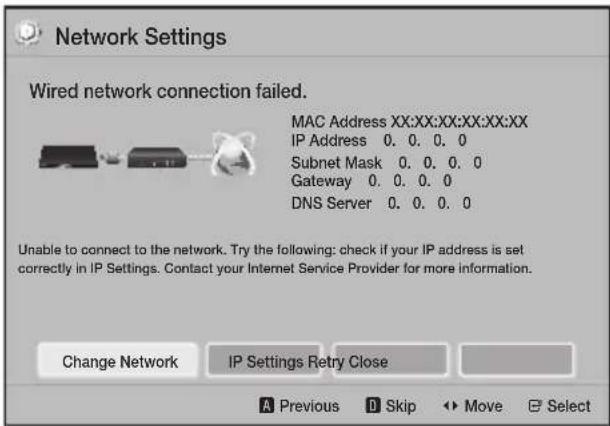
ip Settings 2
. IP Settings
ip setting jll 3
.Enter manually
biolip (Jlll IP Address) 4
aill 2g 2g gall pJ jgl poal.
aiei yiey jiey iiey ie yie
J 1
C
4.8a#
534 1
5
.6
Arau Jalali
biid) Return 224 15
aui juaai jiai jialai laai iai jia.
1
S_ AOB = S_ COD + S_ BOC - S_ BOC
gj 1
ai a ai
4y4y4y4y4y4y4y4y4y4y4y4y4y4y4y4y4y4y4y4y4y4y4y4y4y4y4y4y4y4y4y4y4y4y4y4y4y4y4y4y4y4y4y4y4
WPS(PBC) -
a
i j 1
.
.10
Aao Jalee
5) Return
. Security Key
Security Key
Done 1eaiyie
bokOK 14
G 2j1
Network Type Network Settings .1
aillll ailll jc nlll Wireless
.
jWPS(PBC) 2
G
WPS(PBC) 3
a 1
jillge baiol oK 100
slll aagall ylaal WPS Jauy ayill
Jauil WEP ylaa jao 1e baial pay.AES le
.WPS
i j 1
- 1
a 1
le baiol 123#& jyj
.
JlIe baiol Done yupe cllj no eaiy iie
aaiiie aie iie 100000000000000000000000000000000000000000000
120 120
4
-2g
12j11a1
- y
jllbcbiia 12
5.
-2g
12j51 1
G jll 1b2n
JJIe baiol Done ydiy dilln o clll l iie
IP 14 2023.6
Settings
Enter IP setting manually
ip Address) 111111111111111111111111111111111111111111111111
.7
.8
9.
8.8sbsal gssjgllll 1g lgl aagall
Wifi-Fi Direct p 1000000000000000000000000000000000000000000000000000000000000000000000000000000000000
PIN PBC
PBC 1
Wi-Fi Direct 1
jll bai
aaii aai iie 1jgNkaiiaai jai
Lagn jalil s jy aai aiiaai oiae iic g Jaiy Wi-Fi Direct aie
PIN jao piaiuiy 1 Jds no
Wi-Fi Direct 1
jll bai
.PIN 2
i 1
Wi-Fi Direct
aaiiiaai iaiii Ijaiyaiiaai aiai jaii
Lioe jaii y jui aaiil oie! ie, Jaiyai
Jaiyai Wi-Fi Direct aai
pduu yie Lue GsUd 1 gSul iJuaI Juai Wi-Fi Direct a
j.TXT 1
.Wi-Fi Direct 1
Wi-Fi Direct
Wi-Fi Direct Wi-Fi Direct
3 Wi-Fi Direct AllShare
Wi-Fi Direct Wi-Fi Direct
2
C Network
2
3
Wi-Fi Direct
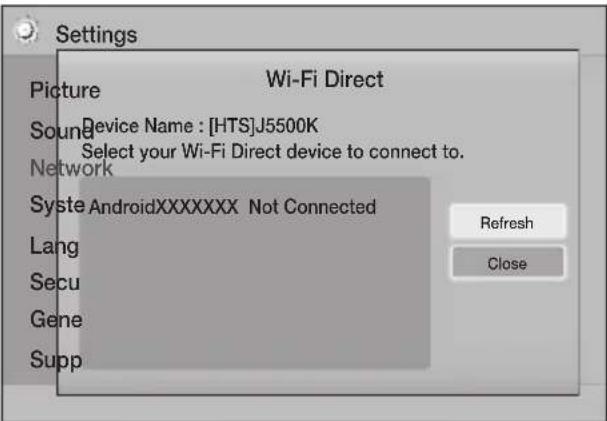
5
.Wi-Fi
.PBC
.PIN jor
a 1
Wi-Fi jLg:JLs 20
Jjuiu jiu Jaiyai Jaiyi Jaiyi Wi-Fi Jia 1
jiayi pi i jiyi jiyi Wi-Fi Direct
USB
.1
(,)OWNERS & SUPPORT .2
Manuals 1234567890123456789012345678901234567890123456789012345678901234567890123456789012345678901234567890123456789
y = 6x + 1
iG. 3
.Settings > Support > Software Upgrade. By USB .12
13
Jolaoaai jiaai laiuiu piai Jiaei caijokOK 14.
paai jiaai cai jia i jil no eigiiie ie aai aaiae i,
ai jiaai laiu
.15
a a 1.USB
J 1 J 1 J 1 J 1 J 1 J 1
- aJus cIiI
Jue 1
- 4jglg jsi
1
Support
Software Upgrade 3
4
-
(C) By On
-
(USB 2023) By
-
Auto Upgrade No.
(a)
C
aJbKjLc
G
5
baicali ciui j
By Online 4g, p
JJI JIJI. By Online 1
1.
2.
iJy jay a ciall Jaa 1. Yes 13
y 1 y 1 1 1 1 1 1 1 1 1 1 1 1 1 1 1 1 1
aill aaii 1
.3
.4
aJLALJI a,JIa
Auto 8 Jn BnBn BnBn BnBn BnBn BnBn BnBn BnBn BnBn BnBn BnBn BnBn BnBn BnBn BnBn BnBn BnBn BnBn BnBn BnBn BnBn BnBn BnBn BnBn BnBn BnBn Bn
1
Auto Software Upgrade On upgradenfication
.2
a
3.
Ji 1
4.
5
DLNA
J 1
DLNA DLNA LDAIy JNJLALJILI JLLI. (14)
Windows 8 Windows 7 (Play To) DLNA
alj 1
Lilalis Jusill
jie baiolai jilai jiaill lal
4 1

g 1
.3
Jal jil gic s gaii all jiaai laaiail ai
gll jjSsUGBu-ray/DVD/CD
a1 = 2,an + 1 = n1 + n2 - _n1
jssssssssssssssssssssssssssssss
sall jlll jlll jlll jlll jlll
DLNA 1
SLDLNA 5
Windows8Windows7
Play To) DLNA
-1
- 1
i 1
1 1
Jg81 a a,b 1
-
Change Device
jll jie baiol ai jyball jzai
aJilil aJbJI
aally 1000 1000
Aac.lijuaa aal
i 1
4
-
aal
Aegill sss ss jyabio g a bina
gag aay jaa gaiy aay aay
S = S
aagaae
pssssj joo a
aljglg jaiyuiu gill sssial bilwgl llae jia
CD DVD,Blu-ray
1
.
2
VIDEOS PHOTOS -
MUSIC
g
PLAY DISC 2-1
gall gaiy 1 DISC
Music Photos: Videos
PHOTOS,VIDEOS,MUSIC
j 21 jll bc biall lalall y aill
▼▲ Jzj Change Device (A)
g jaiiaai
aJ1JJ aJbJJ
diill 0i jia aiaia iai jai jai jai jai
G
J 1
1 ..J
2.
S OBC = S COD + S_ BOC
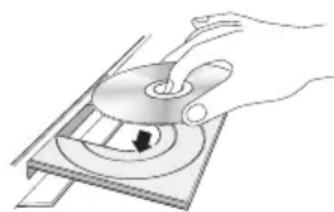
jllbcia
G jll bc baiol p aalai g aaiy alld 2
JREURRREERREERREERREERREERREERREERREERREERREERREERREERREERREERREERREERREERREERREERREERREERREERREERREER
J 33 29 J
J
J
J
J
J
J
J
J
J
J
J
1111 1111
USB ;L4> L300g
J
.USB Change Device 2
jPHOTOS jVIDEOS 3
MUSIC
jillie biirial
jllbcbiol
JREETRNN
33 29 1
USB
1 1
j
L
(37.2) USB
3 3
1.5
1.6
".New device connected" 1
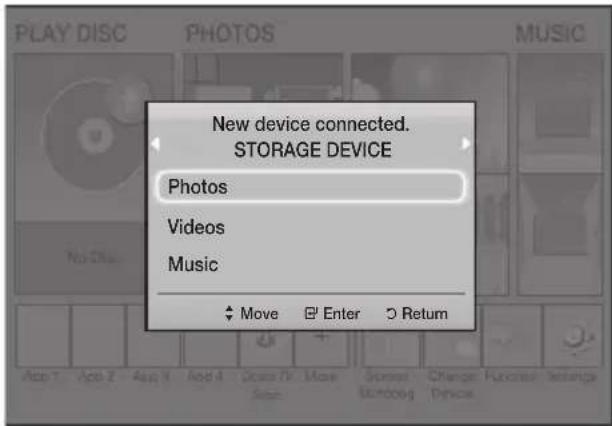
y
Photos Videos 2
Jitill aai JiiDu (B)
POPUP MENU
aaii aaii i jai jll iie biaii
1 3
REPEAT jllie bial. 1
EC = BC = 3
jTitle jOff △njjge biiai .2
Repeat A-B All Chapter
C. 2018 d.e
Repeat A-B
1
(1) Laic nJ Jxi
2
.()loic
on (CwJz) Equalizer Mode
Equalizer Settings
aalll jlaa baa clall
Equalizer Settings
()EqualizerMode
(1) On
Picture Settings
Full Screen
()
Original, Mode1 (J), Mode2
Information
yilolololojgao jia jiali
y
Mode
Advanced Settings User
i 1
,() Contrast (_上) Brightness
Sharpness (J) Color
-0.215 g jinnn 0.215
jolalil jll jll jnal -Normal -
S ADE = S COD + S_ BDO
1 1 1 1 1 1 1 1 1 1 1 1 1 1 1 1
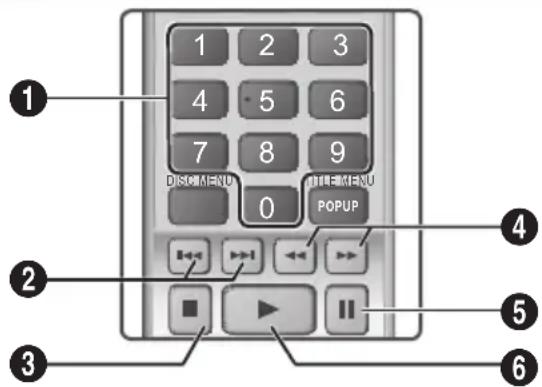
| الإستعمال الحرفية الحرفية الحرفية الحرفية الحرفية الحرفية الحرفية الحرفية الحرفية الحرفية الحرفية الحرفية الحرفية الحرفية الحرفية الحرفية الحرفية الحرفية الحرفية الحرفية الحرفية الحرفية الحرفية الحرفية الحرفية الح註冊 الإستعمال الحرفية الح註冊 الإستعمال الح註冊 الإستعمال الح註冊 | 1 |
| [+] [+] [+] [+] [+] [+] [+] [+] [+] [+] [+] [+] [+] [+] [+] [+] [+] [+] [+] [+] [+] [+] [+] [+] [+] [+] [+] [+] [+] [+] [+] [+] [+] [+] [+] [+] [+] [+] [+] [+] [+] [+] [+] [+] [+] [+] [+] [+] [+] [+] [+] | 2 |
| .الإستعمال الح註冊: رز鸥 | 3 |
| (الإستعمال (CD-DA) ادعاني بعساني ادعاني بعساني) . . . . . . . . . . . . . . . . . . . . . . . . . . . . . . . . . . . . . . . . . . . . . . . . . . . . . . . . . . . . . . . . . . . . . . . . . . . . . . . . . . . . . . . . . . . . . . . . . . . . - . . . . . . . . . . . . . . . . . . . . . . . . . . . . . . . . . . . . . . . . . . . . . . . . . . . . . . . . . . . . . . . . . . . . . . . . . . . . . . . . . . . . . . . . . . . . . . . . . . . ? . . . . . . . . . . . . . . . . . . . . . . . . . . . . . . . . . . . . . . . . . . . . . . . . . . . . . . . . . . . . . . . . . . . . . . . . . . . . . . . . . . . . . . . . . . . . . . . . . . . ; . . . . . . . . . . . . . . . . . . . . . . . . . . . . . . . . . . . . . . . . . . . . . . . . . . . . . . . . . . . . . . . . . . . . . . . . . . . . . . . . . . . . . . . . . . . . . . . . . . . \. . . . . . . . . . . . . . . . . . . . . . . . . . . . . . . . . . . . . . . . . . . . . . . . . . . . . . . . . . . . . . . . . . . . . . . . . . . . . . . . . . . . . . . . . . . . . . . . . . . • r • l • m • n • o • p • q • r • s • t • u • v • w • x • y • z • w • x • y • z • w • x • y • z • w • x • y • z • w • x • y • z • w • x • y • z • w • x • y • z • w • x • y • z • w • x • y • z • w | 4 |
| [+] [+] [+] [+] [+] [+] [+] [+] [+] [+] [+] [+] [+] [+] [+] [+] [+] [+] [+] [+] [+] [+] [+] [+] [+] [+] [+] [+] [+] [+] [+] [+] [+] [+] [+] [+] [+] [+] [+] [+] [+] [+] [+] [+] [+] [+] [+] [+] | 5 |
| [+] [+] [+] [+] [+] [+] [+] [+] [+] [+] [+] [+] [+] [+] [+] [+] [+] [+] [+] [+] [+] [+] [+] [+] [+] [+] [+] [+] [+] [+] [+] [+] [+] [+] [+] [+] [+] [+] [+] [+] [+] [+] [+] [+] [+] [+] [+] [+] | |
| [+] [+] [+] [+] [+] [+] [+] [+] [+] [+] [+] [+] [+] [+] [+] [+] [+] [+] [+] [+] [+] [+] [+] [+] [+] [+] [+] [+] [+] [+] [+] [+] [+] [+] [+] [+] [+] [+] [+] [+] [+] [+] [+] [+] [+] [+] [+] [+] [+] [+] [+] [+] [+] [+] [+] [+] [+] [+] [+] [+] [+] [+] [+] [+] [+] [+] [+] [+] [+] [+] [+] [+] [+] [+] [+] [+] [+] [+] [+] [+] [+] [+] [+] [+] [+] [+] [+] [+] [+] [+] [+] [+] [+] [+] [+] [+] [+] [] [+] [+] [+] [+] [+] [+] [+] [+] [+] [+] [+] [+] [+] [+] [+] [+] [+] [+] [+] [+] [+] [+] [+] [+] [+] [+] [+] [+] [+] [+] [+] [+] [+] [+] [+] [+] [+] [+] [+] [+] [+] [+] [+] [+] [+] [+] [+] [+] [+] [?] | 6 |
L
Culjll
.TOOLS 1
Reepat Mode 2
(2) One ^ (Jw) Track ^ (Jy) Off
jglge baleal (g) Shuffle j (Jlll) All

g
y y
yI yI yI yI yI yI yI yI yI yI yI yI yI yI yI yI yI yI yI yI yI yI yI yI yI yI yI yI yI yI yI yI yI yI yI yI yI
gall cale no yy ylll cale 32 aill
J J
MP3 (CD-DA) 1
J
Jauall
pss s s s s s s s s s s s s s
≤ + 12 ≤
y 1 MP3
MUSIC
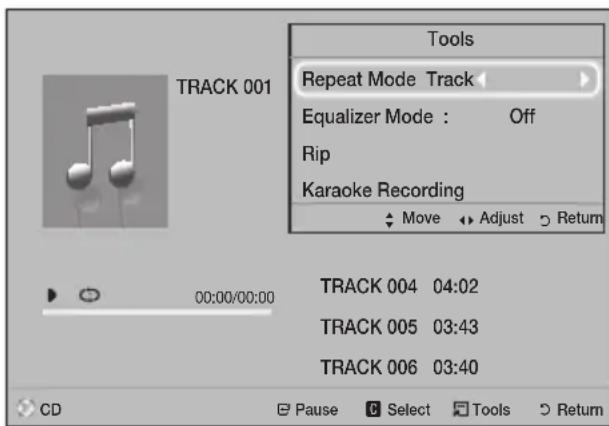
Sollg 2
jglde baiol jlll yie
2.

olid
gai jie
DVD CD gall gall jia kill sas
12 12
中
11111111111111111111111111111
aie ybi. (C) jai jai jil jlc biai ai jali
jua juii 1 aie all jui .s jai oju (C) jai jai jai jai jai jai jai jai jai jai jai jai jai jai jai jai jai jai jai jai jai jai jai jai jai jai jai jai jai jai jai jai jai jai jai jai jai jai jai jai jai
TOOLS
. Tools
Rip
aigiall cial l jjil jieill 1
jill gle biol piuie
aannnnae aee
C jjie baiolj Jaiil 1i jiiis No Yes
.Ripping completed" 100
Jgill
DTS 0
aai jao aiae 0a eaae
192 Jmp3. gai jgai jie jil Jao
Select All
.Deselect All
124.vj baiol ai Jauall JS yui Select Allpiai -
Deselect All -
aalalalalalalalalalalalalalalalalalalalalalalalalalalal
C
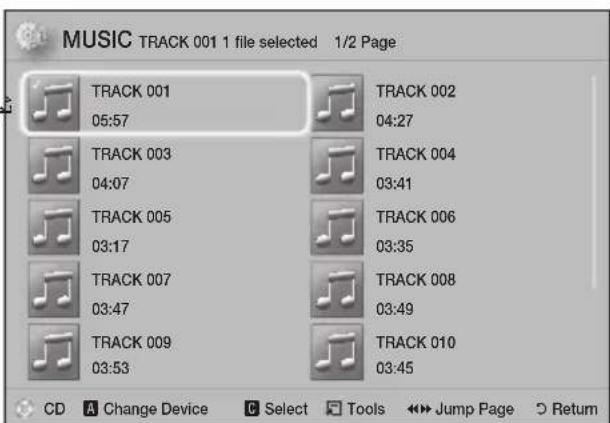
jbjbe bai jlll Jli. Playlist 1a allj .4
(C)
5.
. Playlist
□
- 2j
. RETURN
7
7
.(CD-DA) aolal yol al yol
y,PlaylistJnJg
Playlist,Playlist
SgLddg p
a
G
Sound
G JJ bai My karaoke
1
2
3
4
J
USB s DVD 10
..
1g5 1 aai p1
. TOOLS 1
stop Slide Show
J
a a a a a a a a a a a a a a
On Kakaek scoring
Karaoke 1
Off scoring
My Reduce Vocals
. karaoke
1
gally 5y11
Karaoke TOOLS 1
. Rcording
2
jss s 3
.mp3.
.USB jssj sll jsl 1
Photos.
Music Videos
jia piai iaiuiol ai (oiic i) ay jie ciaa gaaai
s jss sss. dclall 1 1
1 1
. BT FM AUX D.IN
a
JauaOn Karkoek scoring
1111 1111 1111 1111 1111
a 10 1 jg jg jg jg jg jg jg jg jg jg jg jg jg jg
aie
a
Slide Show Speed
gall glll lgl 1234567890 Background Music
aee eae aee
Zoom
aalll aalll
(4)
Rotate
y j 1 1 1
jie o jie jie jie jie jie jie jie jie jie jie jie jie jie jie jie jie jie jie jie jie jie jie jie jie jie jie jie
(4cLdl)
Information
- 1111111111111111111111111111
y 2. 1 . j 1 . 1 . 1 . 1 . 1 . 1 . 1 . 1 . 1 . 1 . 1 . 1 . 1 . 1 . 1 . 1 . 1 . 1 . 1 . 1 . 1 . 1 . 1 . 1 . 1 . 1 . 1 . 1 . 1 . 1 . 1 . 1 . 1 . 1 .

a
j j j j j j j j j j j j j j j j j j j j j j j j j j j j j j j j j j j j j j j j j j j j j j j
yR 3 MP3 CIL JJU
J 1
g y
Cldio 32
a
gjg jLg jai jai Laiuul pui Jua
[\therefore \left| {x}{1}\right| = \left| {x}{2}\right| = 1]
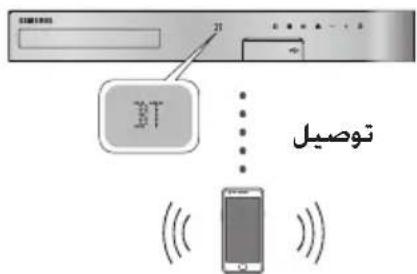
gjgJLg
y j 1
JFONCIO 1
.BT
[HTS]JXXXXX" 3
Suliai jiall laill pabi jyLaiie
puii piu ayj yuaaiy jiy jzj jzj pui
aijialaiiailaiyaiyaiyaiyaiyaiyaiyaiyaiyaiyaiyaiyaiyaiyaiyaiyaiyaiyaiyaiyaiyaiyaiyaiyaiyaiyaiyaiyaiyaiyaiyaiyaiyaiyaiyaiyaiyaiyaiyaiyaiyaiyaiyai
ai jiall laiailaipaiyie Jiaaiy
)IaSbSBCiJIyjiaaiLaiWulipbi
148 237
44.1 328) SBC
(2)
Claal 10000000000000000000000000000000000000000000000000000000000
jiasai jiu
L
gglp
y
1111111111111111
10:1234567890 2:1234567890
.
13
sall jlll lnnnnae Bluetooth jessss
:gjxlaa aLo
- 2015 JSSS JSSS JSSS JSSS JSSS
m : x = 1 或 3x + 4y + 1 = 0
LOUD
1
jLgE LaiuLi: (y)NIGHT
aannnnnns
j:(pissall j 1000)USEREQ
iSAs yu, uaiuall jy juyuailll jy g uj y
EQ:LOCAL EQ
aal
TV SOUND 4
jai jia
·
+Anynet 0j jai dcl Jd jai
.
USB jia jia gaoall eaiy jie liouie
Jai jiala liaiwclleaw Jxj yj jyj
POWERBASS
:TV SOUN
1
TV SOUN
ailll lllllllllllllllllll
y j 1 j j j j j j j j
i 1
j j j j j j j j j j j j j j j j j j j j
J 1
LgUgUgUgUgUgUgUgUgUgUgUgUgUgUgUgUgUgUgUgUgUgUgUgUgUgUgUgUgUgUgUgUgUgUgUgUgUgUgUgUgUgUgUgUgUgUgUgUgUgUg
s y plisal all ay jial laill ayall ayjial laill y
a
TMBD-LIVE
(14)
1
2
G JI G I S T O S A R G E D V I E C E
.DB-LIVE Blu-ray
BD-LIVE aiaa
.
BD-LIVE 1
Jnll 1
DLNA
jssll jzjgjgjglalldl jydl DLNA dl
ai jiallaijll 1
e DLNA 1DLNA
e 1
aijialaii
12 12 jj j j j j j j j j j j j j j j j j j j j j j j j j j j j j j j j j j j j j j
:DLNA
1.
jssll jge djlal DLNA 2
Opera TV Store
Opea TV Store
Opera TV Store
Opera TV JrJrOpera TV Store Jg Jg Jg Jg Jg Jg Jg Jg Jg Jg Jg Jg Jg Jg Jg Jg Jg Jg Jg Jg Jg Jg Jg Jg Jg Jg Jg Jg Jg Jg Jg Jg Jg Jg Jg Jg Jg Jg Jg Jg Jg Jg Jg Jg Jg Jg Jg Jg Jg Jg J g J g J g J g J g J g J g J g J g J g J g J g J g J g J g J g J g J g J g J g J g J g J g J g
Opera TV Store
Jc Jopn Jopn Jopn Jopn Jopn Jopn Jopn Jopn Jopn Jopn Jopn Jopn Jopn Jopn Jopn Jopn Jopn Jopn Jopn Jopn Jopn Jopn Jopn Jopn Jopn Jopn Jopn Jopn Jopn Jopn Jopn Jopn Jopn Jopn
gbi
. My Apps add TO MY APPS RETURN.Opera TV Store
aaii
Ae 14 14 14 14 14 14 14 14 14 14 14 14 14 14 14 14 14 14 14 14 14 14 14 14 14 14 14 14 14 14 14 14 14 14
jLb
My APPs My Apps Jg. My Apps My Apps My Apps My Apps
Laihui pss
Jl jll Laiuul u 10000000000000000000000000000000000000000000000000000000000000000000000000000000000000000
aLx1 Laxhll
G jllg lal a aaiy jll ailll More jj
1.
2.
i 1
Close 2345678901234567890123456789012345678901234567890123456789012345678901234567890123456789012345678901234567890
.3
aaii iaiLil 15c aioe ooi laih j
#
C
jglbail .More jjj
gE bial p, caiill j 2joll g Edit j
.
2
1
.2
3 .
i 1
4.
Jll bcai jui jilbi cai bii 122
jui li kuyu uui jie du yiu oju bi
duyol rall gci ci
5.
0K 000000000000
eEILI 10 EXIT jllle bailil jzj
)Home Screen 5 5 No Disc Status.

AllShare
Speaker Selection Digital Output TV Speaker
BD-Live Internet Connection
Aa 1
Anynet+ (HDMI-CEC)
HDMI 1
Jzj Jzj Jzj Resume jzj, jzj
BD Data 1
DivX® Video On Demand
http://vod.divx.com
Aolal oLogLo
| L - L| = | | | - | | |
s sssall gssall jiej)HDMI jies jis 1
M
DVD
HDMI
Blu-ray
HDMI
Digital Output
HDMI Deep bai, dai y jy, aaii
Settings
3D Settings
□j13D 3D jy
.3D 1
3D 3D
blua.Blu-ray aiai yaiy iiai yaiy
3D Settings
.Blu-ray
a
TV Aspect Ratio
a a a a a a a a a a a a a a a a a a a a a
16:9 Original 12
(5) Pillarbox 4:3
(Samsung) BD Wise
Bd Wisi biaie
BD Wise Resolution
Resolution BD Wise
BD Wise 100000000000000000000000000000000000000000000000000000
BDJbBwBDWise
DivX(R) VOBn
S OBC = S COD + S_ BOC
a a a a a a a a a a a a a a a a a a a a a a a a
Jie Jie is jiali
()PTPJg
LJU JNJL USBJ
Lggepe gie a jwglll 1j oovall 2j Ia
()DRM-MP3
aill gall jol ljj jil gll (aas)
a a a a a a a a a a a a a a a a
.USB
HUB)
a USB
100 100
jssssssssssssssssssssssssssssssssssssssssssssssssssssssssssssssssssssssssssssssss
.
125
12] 1
.USB 4
SAMSUNG
一
125, 225
Jaaa Jaaa Jaaa Jaaa Jaaa
中


.
gawwll 15yaj, yjzjj 15yaj, yjzjj
15 15 15 15
1
LgSg 111
1
DVDVIDEO


Blu-rayDisc/DVD
aaii iiaai Saaie aai aiai
PdAoljLjR)AVCHD
(204
AVCHD
aaiy jyaiy ai yaiy 1yaiy
Jg 1 AVCHD
ydiis
gilll lgl ."x.v.Color" gav AVCHD jai
".x.v.Color" AVCHD
. Corporation
AVCHD"AVCHD
Sony, Matsushita Electronic Industrial Co., Ltd
. Corporation
AVCHD
- Sony

.AVCHD
DVDJnJnJnJnJnJnJnJnJnJnJnJnJnJnJnJnJnJnJnJnJnJnJnJnJnJnJnJnJnJnJnJnJnJnJnJnJnJnJnJnJnJnJnJn
a
( 0,14) ,( 0,14) ,( 0,14)
| الإستعمال IMMEDIATELY | ||||
| 1080×1920 | MP3, Dolby Digital, DTS, WMA, PCM | DivX 3.11/4/5/6 MP4v3 H.264 BP/MP/HP | AVI | avi.* |
| MP3, Dolby Digital, DTS | VC-1 AP, DivX 5/6 H.264 BP/MP/HP | MKV | mkv.* | |
| WMA | WMV (wmv9)V | C-1 ARmRc*1 SM | ||
| AAC | MP4 (mp4v) H.264 BP/MP/HP | MP4 | mp4.* | |
| MP1, 2 Dolby Digital, DTS | MPEG1 MPEG2 H.264 BP/MP/HP | PS | mpg / *.mpeg.* |
2g
j 1
111 1
yll/1yall jiei yalee jao gleil ljla JnJnCtllg
J
g+
AVCHD.4.1 5 H.264
-VC1 SP/MP
60:720×1280MPEG4SP,ASP
30:720×1280m
GMC2
gai jj
STD, WMA7, 8, 9
220501
320:1896,88.2,64,48,44.1,32,24,22,16,12,11,8) 96AAC -
y
logc0 DivX a0jill 1
txt.*sub.*srt.*smi.*ttxt.
aagaae
| بسته | بسته الله周转 | الله周转 | الله周转 |
| - | MP3 | MP3 | mp3.* |
| 48.44.1.32.22.16.11.8-(الله رزام بعسانيت محيى)* 384 384 | WMA | WMA | wma.* |
gaaolulaaoc
a a a a a a a a a a a a a a a a a a a
DTS Licensing is a www.tds.com http://patents.dts.com. DTS Limited. DTS. DTSHD. DTS © 2017 The copyright holder for this article is the author/funder, who has granted dts to display the material in perpetuity and distribution. Terms & Conditions of access and use can be found at http://www.tds.org

dtshD
Master Audio | Essential
DivX® 1234567890 DivX Certified® 1234567890
jL jL jL jL jL jL jL jL jL jL jL jL jL jL jL jL jL jL jL jL jL jL jL jL jL jL jL jL jL jL jL jL jL jL jL jL jL jL jL jL jL jL jL jL jL jL jL jL jL jL jL
.1080p 111111111111111111111111111111111111111111111111111111
DIVX. HD
DLNA CERTIFIED, DLNA JEA 已 DLNA (Digital Living Network Alliance)

dlna CERTIFIED
HMI (HDMI High-Definition Multimedia) (HDMI)
HOMI
As glaa aiaa cnae 8n 10000000000000000000000000000000000000000000000000000000000000000

Rovicorporation 45
. Blu-ray Disc Association 45
Cinavia Consumer Information : Cineavia 7,369,677 Centre, P.O. Box 86851, San Diego, CA, 92138, USA Verance Corporation 450-2-2-2-2-2-2-2-2-2-2-2-2-2-2-2-2-2-2-2-2-2-2-2-2-2-2-2-2-2-2-2-2-2-2-2-2-2-2-2-2-2-2-2-2-2-2-2-2-2-2- 7,369,677 Cinavia Co. 450-2-2-2-2-2-2-2-2-2-2-2-2-2-2-2-2-2-2-2-2-2-2-2-2-2-2-2-2-2-2-2-2-2-2-2-2-2-2-2
gaiaii jai
RISQUES D'ÉLECTROCUTION. NE PAS OUVRIR.
ATTENTION: POUR LIMITER LES RISQUES DE DECHARGE ÉLECTRIQUE, NE RETIREZ JAMAIS LE Cache (NI L'ARRÊRÉ DE L'APPAREIL). CERTAINES PIEÇES QU'IL CONTIENT NE SONT PAS REPARABLES PAR L'UTILISATEUR. VEUILLEZ CONTACTER UN TECHNICIEN QUALIFIÉ POUR TOUTE RÉPARATION.
CLASS 1 LASER PRODUCT
KLASSE 1 LASER PRODUKT LUOKAN 1 LASER LAITE
KCLASS 1 LASER APPARAT PRODUCTO LÁSER CLASE 1
Master Audio | Essential
© 2015 Samsung Electronics Co., Ltd. All rights reserved.
Samsung Electronics Co., Ltd 2015
If you have any questions or comments relating to Samsung products, please contact the SAMSUNG customer care centre.
SAMSUNG WORLD WIDE
.SAMSUNG.