HTH5550WK - Home Theater System SAMSUNG - Free user manual and instructions
Find the device manual for free HTH5550WK SAMSUNG in PDF.

User questions about HTH5550WK SAMSUNG
0 question about this device. Answer the ones you know or ask your own.
Ask a new question about this device
Download the instructions for your Home Theater System in PDF format for free! Find your manual HTH5550WK - SAMSUNG and take your electronic device back in hand. On this page are published all the documents necessary for the use of your device. HTH5550WK by SAMSUNG.
USER MANUAL HTH5550WK SAMSUNG
Home Entertainment System user manual
imagine the possibilities
Thank you for purchasing this Samsung product.
To receive more complete service,
please register your product at
www.samsung.com/register
CAUTION
RISK OF ELECTRIC SHOCK DO NOT OPEN
CAUTION: TO REDUCE THE RISK OF ELECTRIC SHOCK, DO NOT REMOVE THE COVER (OR BACK). THERE ARE NO USER SERVICEABLE PARTS INSIDE. REFER ALL SERVICING TO QUALIFIED PERSONNEL.
-
The slots and openings in the cabinet and in the back or bottom are provided for necessary ventilation. To ensure reliable operation of this apparatus, and to protect it from overheating, these slots and openings must never be blocked or covered.
-
Do not place this apparatus in a confined space, such as a bookcase, or built-in cabinet, unless proper ventilation is provided.
- Do not place this apparatus near or over a radiator or heat register, or where it is exposed to direct sunlight.
-
Do not place vessels (vases etc.) containing water on this apparatus. A water spill can cause a fire or electric shock.
-
Do not expose this apparatus to rain or place it near water (near a bathtub, washbowl, kitchen sink, or laundry tub, in a wet basement, or near a swimming pool, etc.). If this apparatus accidentally gets wet, unplug it and contact an authorized dealer immediately.
- This apparatus uses batteries. In your community, there might be environmental regulations that require you to dispose of these batteries properly. Please contact your local authorities for disposal or recycling information.
- Do not overload wall outlets, extension cords or adaptors beyond their capacity, since this can result in fire or electric shock.
- Route power-supply cords so that they are not likely to be walked on or pinched by items placed on or against them. Pay particular attention to cords at the plug end, at wall outlets, and the point where they exit from the apparatus.
- To protect this apparatus from a lightning storm, or when it is left unattended and unused for long periods of time, unplug it from the wall outlet and disconnect the antenna or cable system. This will prevent damage to the set due to lightning and power line surges.
- Before connecting the AC power cord to the DC adaptor outlet, make sure the voltage designation of the DC adaptor corresponds to the local electrical supply.
- Never insert anything metallic into the open parts of this apparatus. Doing so may create a danger of electric shock.

This symbol indicates that high voltage is present inside. It is dangerous to make any kind of contact with any internal part of this product.

This symbol indicates that important literature concerning operation and maintenance has been included with this product.
- To avoid electric shock, never touch the inside of this apparatus. Only a qualified technician should open this apparatus.
- Make sure to plug the power cord in until it is firmly seated. When unplugging the power cord from a wall outlet, always pull on the power cord's plug. Never unplug by pulling on the power cord. Do not touch the power cord with wet hands.
- If this apparatus does not operate normally - in particular, if there are any unusual sounds or smells coming from it - unplug it immediately and contact an authorized dealer or service centre.
- Maintenance of Cabinet.
Before connecting other components to this product, be sure to turn them off.
- If you move your product suddenly from a cold place to a warm place, condensation may occur on the operating parts and lens and cause abnormal disc playback. If this occurs, unplug the product, wait for two hours, and then connect the plug to the power outlet. Then, insert the disc, and try to play back again.
-
Be sure to pull the power plug out of the outlet if the product is to remain unused or if you are leaving the house for an extended period of time (especially when children, elderly, or disabled people will be left alone in the house).
-
Accumulated dust can cause an electric shock, an electric leakage, or a fire by causing the power cord to generate sparks and heat or the insulation to deteriorate.
-
Contact an authorized service centre for information if you intend to install your product in a location with heavy dust, high or low temperatures, high humidity, chemical substances, or where it will operate 24 hours a day such as in an airport, a train station, etc. Failing to do so may lead to serious damage of your product.
-
Use only a properly grounded plug and wall outlet.
-
An improper ground may cause electric shock or equipment damage. (Class I Equipment only.)
-
To turn this apparatus off completely, you must disconnect it from the wall outlet. Consequently, the wall outlet and power plug must be readily accessible at all times.
-
Do not allow children to hang on the product.
-
Store the accessories (battery, etc.) in a location safely out of the reach of children.
- Do not install the product in an unstable location such as a shaky self, a slanted floor, or a location exposed to vibration.
- Do not drop or strike the product. If the product is damaged, disconnect the power cord and contact a service centre.
- To clean this apparatus, unplug the power cord from the wall outlet and wipe the product using a soft, dry cloth. Do not use any chemicals such as wax, benzene, alcohol, thinners, insecticide, air fresheners, lubricants, or detergent. These chemicals can damage the appearance of the product or erase the printing on the product.
- Do not expose this apparatus to dripping or splashing.
Do not put objects filled with liquids, such as vases on the apparatus. - Do not dispose of batteries in a fire.
- Do not plug multiple electric devices into the same wall socket. Overloading a socket can cause it to overheat, resulting in a fire.
- There is danger of an explosion if you replace the batteries used in the remote with the wrong type of battery. Replace only with the same or equivalent type.
WARNING:
TO PREVENT THE SPREAD OF FIRE, KEEP CANDLES AND OTHER ITEMS WITH OPEN FLAMES AWAY FROM THIS PRODUCT AT ALL TIMES.

CLASS 1 LASER PRODUCT
This product is classified as a CLASS 1 LASER product. Use of controls, adjustments or performance of procedures other than those specified herein may result in hazardous radiation exposure.
CAUTION :
- INVISIBLE LASER RADIATION WHEN OPEN AND INTERLOCKS DEFEATED, AVOID EXPOSURE TO BEAM.
CLASS 1 LASER PRODUCT
KLASSE 1 LASER PRODUKT
LUOKAN 1 LASER LAITE
KCLASS 1 LASER APPARAT
PRODUCTO LÁSER CLASE 1
3D Precautions
IMPORTANT HEALTH AND SAFETY INFORMATION FOR 3D PICTURES.
Read and understand the following safety information before using the 3D function.
- Some viewers may experience discomfort while viewing 3D TV such as dizziness, nausea, and headaches. If you experience any such symptom, stop viewing 3D TV, remove the 3D Active Glasses, and rest.
- Watching 3D images for an extended period of time may cause eye strain. If you feel eye strain, stop viewing 3D TV, remove your 3D Active Glasses, and rest.
- A responsible adult should frequently check on children who are using the 3D function. If there are any reports of tired eyes, headaches, dizziness, or nausea, have the child stop viewing 3D TV and rest.
- Do not use the 3D Active Glasses for other purposes (such as general eyeglasses, sunglasses, protective goggles, etc.)
- Do not use the 3D function or 3D Active Glasses while walking or moving around. Using the 3D function or 3D Active Glasses while moving around may cause you to bump into objects, trip, and/or fall, and cause serious injury.
- If you want to enjoy 3D content, connect a 3D device (3D compliant AV receiver or TV) to the product's HDMI OUT port using a high-speed HDMI cable. Put on 3D glasses before playing the 3D content.
- The product outputs 3D signals only through an HDMI cable connected to the HDMI OUT port.
- The video resolution in 3D play mode is fixed to the resolution of the original 3D video. You can not change the resolution.
- Some functions such as BD Wise, screen size adjustment, and resolution adjustment may not operate properly in 3D play mode.
- You must use a high-speed HDMI cable for proper output of the 3D signal.
- Stay at least three times the width of the screen from the TV when watching 3D images. For example, if you have a 46 inch screen, stay 3.5 meters from the screen.
- Place the 3D video screen at eye level for the best 3D picture.
- When the product is connected to some 3D devices, the 3D effect may not function properly.
This product does not convert 2D content into 3D. - "Blu-ray 3D" and "Blu-ray 3D" logo are trademarks of the Blu-ray Disc Association.
GETTING STARTED
5 Accessories
5 Speaker Components
7 Front Panel
7 Rear Panel
8 Remote Control
CONNECTIONS
9 Connecting the Speakers
12 Attaching the Toroidal Ferrite Core to the Power Cord of the Wireless Receiver Module (SWA-6000)
13 Connecting to a TV and External Devices
14 Connecting to a Network Router
SETTINGS
15 The Initial Settings Procedure
16 The Home Screen at a Glance
16 Accessing the Settings Screen
17 Settings Menu Functions
20 Network Setup
23 Wi-Fi Direct
24 Upgrading Software
25 Setting Up DLNA
PLAYING CONTENT
26 Switching the Source Device
26 Playing Commercial Discs
26 Playing a Disc with User Recorded Content
27 Playing Files on a USB Device
28 Controlling Video Playback
29 Playing a Pre-Recorded Commercial Audio Disc
30 Controlling Music Playback
31 Playing Photo Contents
32 Listening to the Radio
32 Using Karaoke
33 Using Bluetooth
35 Using the Special Effects Remote Control Buttons
NETWORK SERVICES
36 Using BD-LIVE
36 Using DLNA
36 Apps
37 Using Opera TV Store
38 Screen Mirroring
APPENDIX
39 Additional Information
40 Disk and Format Compatibility
45 Troubleshooting
48 Specifications
50 Licences
- Figures and illustrations in this User Manual are provided for reference only and may differ from actual product appearance.
An administration fee may be charged if either a. an engineer is called out at your request and there is no defect in the product (i.e. where you have failed to read this user manual) b. you bring the unit to a repair centre and there is no defect in the product (i.e. where you have failed to read this user manual).
The amount of such administration charge will be advised to you before any work or home visit is carried out.
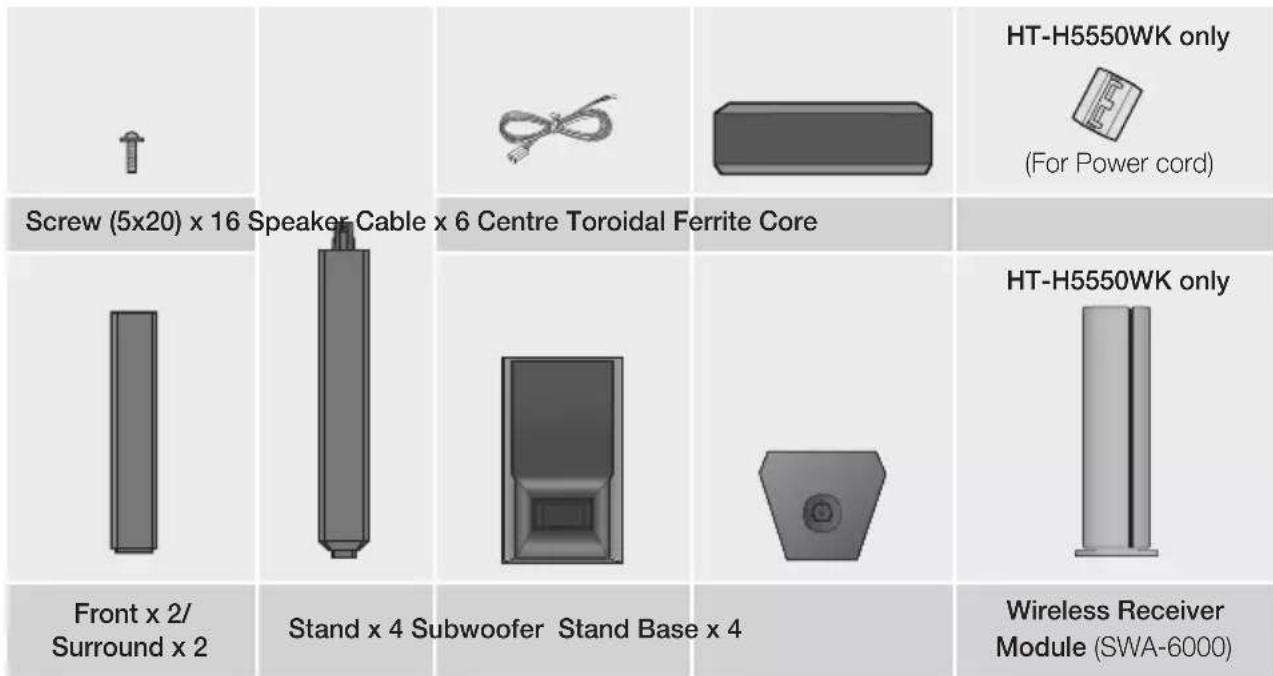
Check the box for the accessories and speaker components listed or shown below.
Accessories
- Remote Control • User Manual • Batteries

Power Cable FM Antenna HDMI Cable


Speaker Components
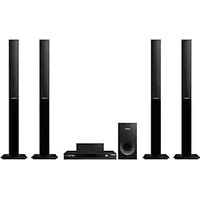
HT-H5500K


Centre


Front x 2 Surround x 2 Speaker Cable x 6 Subwoofer
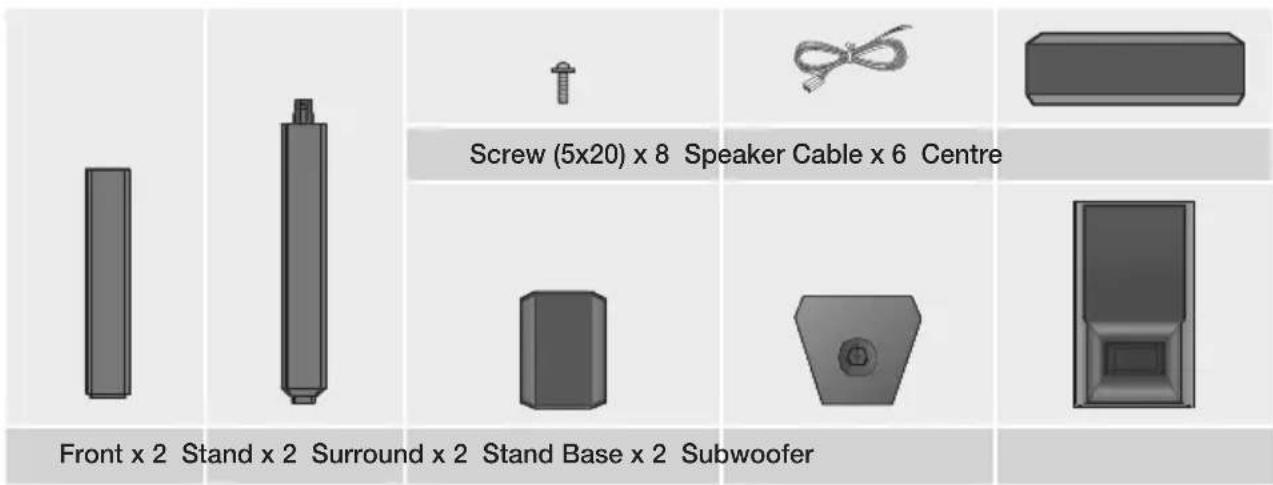
HT-H5530HK


Screw (5x20) x 8 Stand Base x 2


Front x 2 Surround x 2 Centre Speaker Cable x 6
Subwoofer
Getting Started
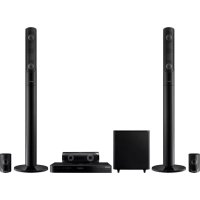
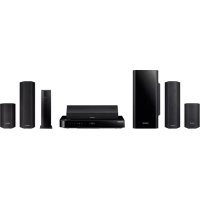
HT-H5530K
HT-H5550K/HT-H5550WK
Front Panel
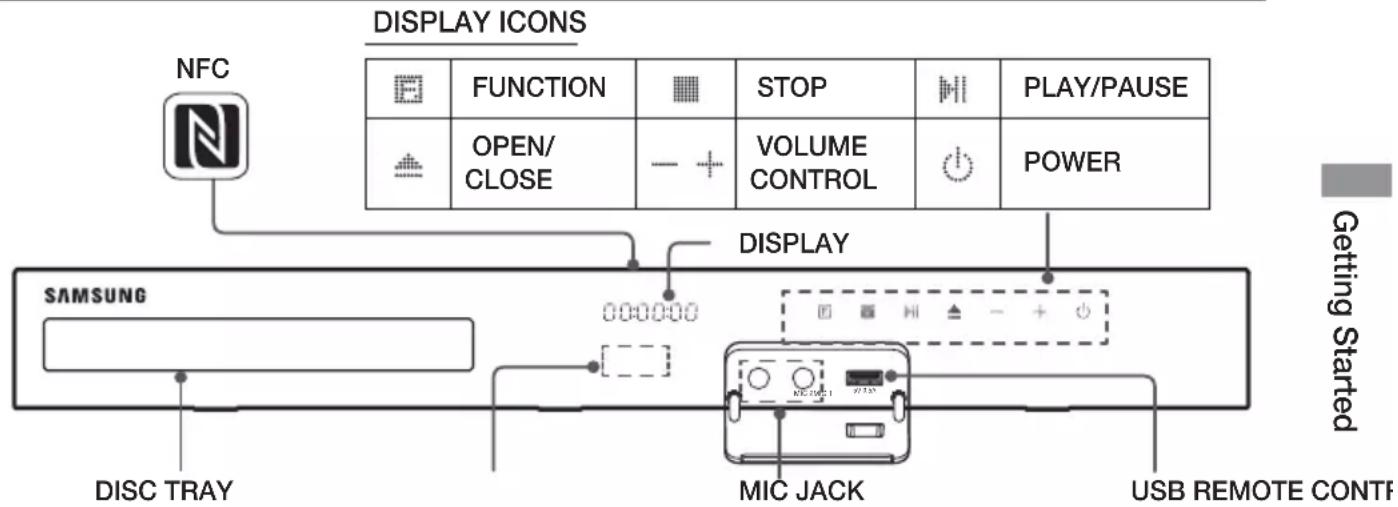
When the product is on, do not let children touch the product's surface. It will be hot.
To upgrade the product's software through the USB jack, you must use a USB flash drive.
When the product displays the Blu-ray Disc menu, you cannot start the movie by pressing the button on the product or the remote. To play the movie, you must select Play Movie or Start in the disc menu, and then press the button.
If you are using the Internet or are playing content from a USB device on your TV through the home cinema, you cannot select the BD/DVD mode with the FUNCTION button. To select the BD/DVD mode, exit the Internet or stop the content you are playing on the TV, and then select the BD/DVD mode.
Plug the microphone jack before using Karaoke function.
To use the NFC function, tag the compatible Bluetooth source device to the on the top of the product (See page 34).
Rear Panel
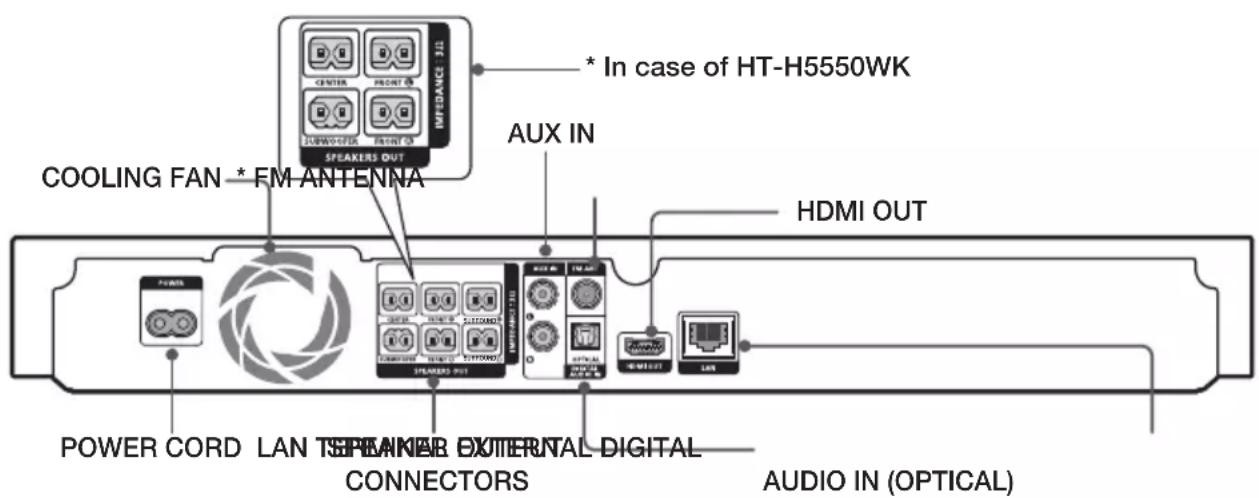
* Connecting the FM Antenna
- Connect the supplied FM antenna to the FM ANT Jack.
- Slowly move the antenna wire around until you find a location where reception is good, then fasten it to a wall or other rigid surface.
Maintain a minimum of 10cm of clear space on all sides of the home cinema to ensure adequate ventilation. Do not obstruct the cooling fan or ventilation holes.
This product does not receive AM broadcasts.
Remote Control
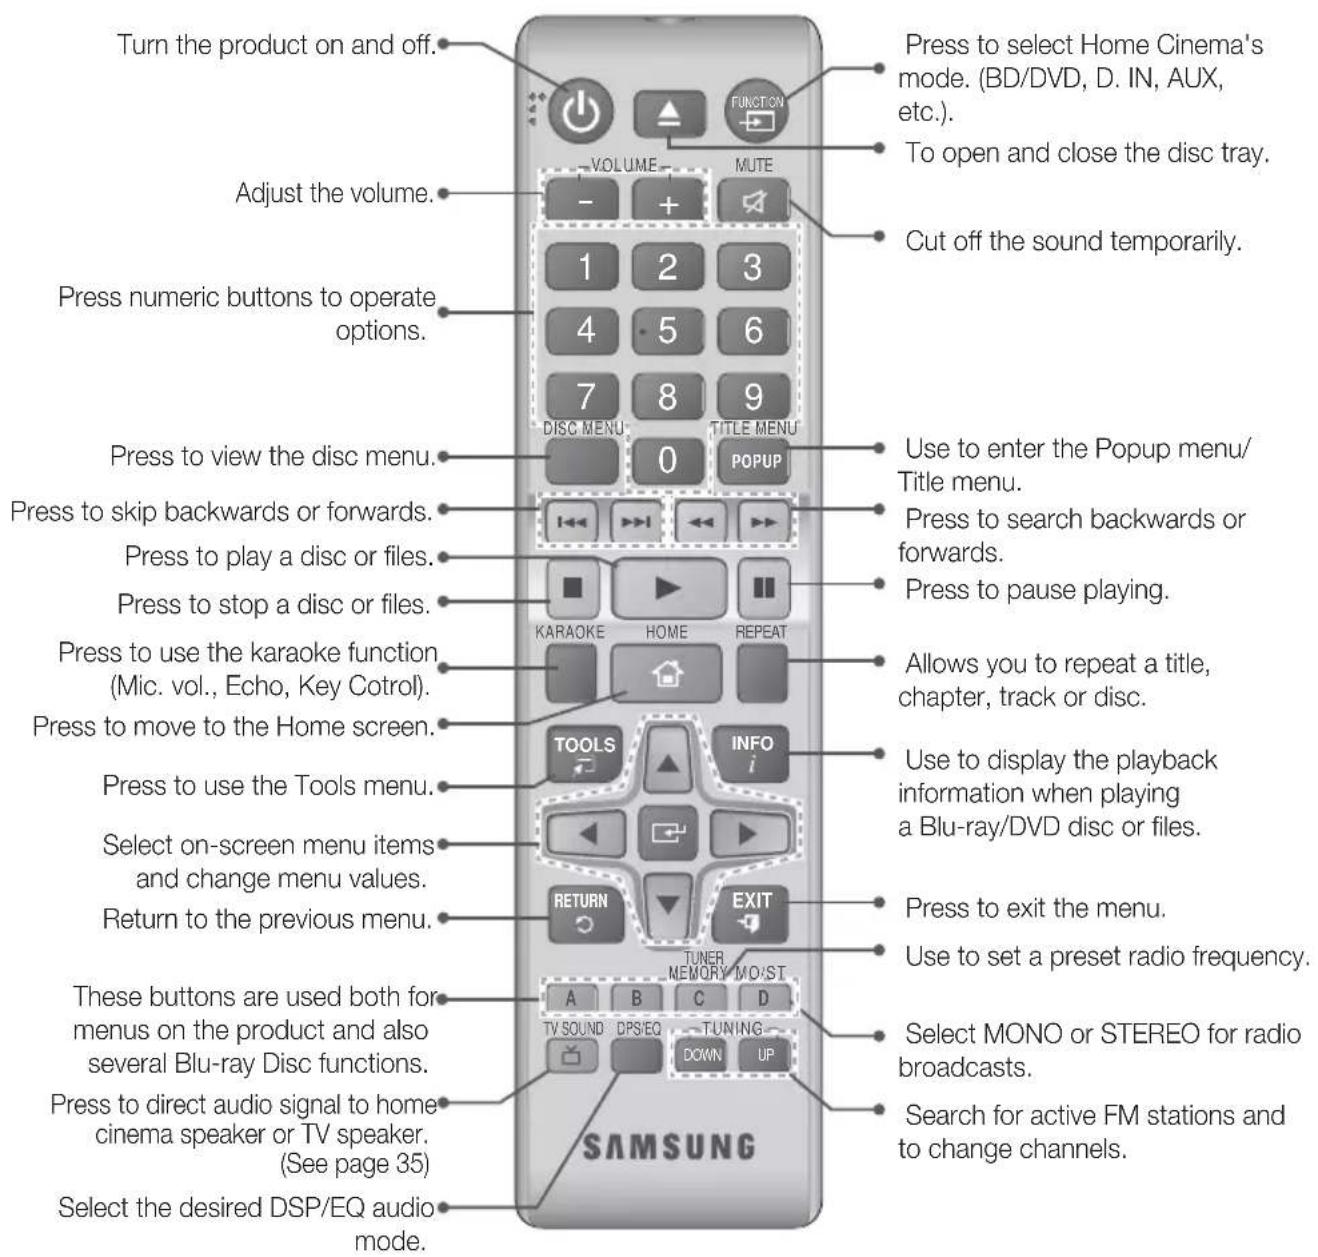
Tour of the Remote Control
Installing batteries in the Remote Control

Make sure to match the "+" and "-" ends of the batteries with the diagram inside the compartment.

Assuming typical usage, the batteries last for about one year.

The remote control can be used up to approximately 7 meters from the product in a straight line.

This section describes various methods of connecting the product to other external components. Before moving or installing the product, be sure to turn off the power and disconnect the power cord.
Connecting the Speakers
* HT-H5500K/HT-H5530HK/HT-H5530K/ HT-H5550K
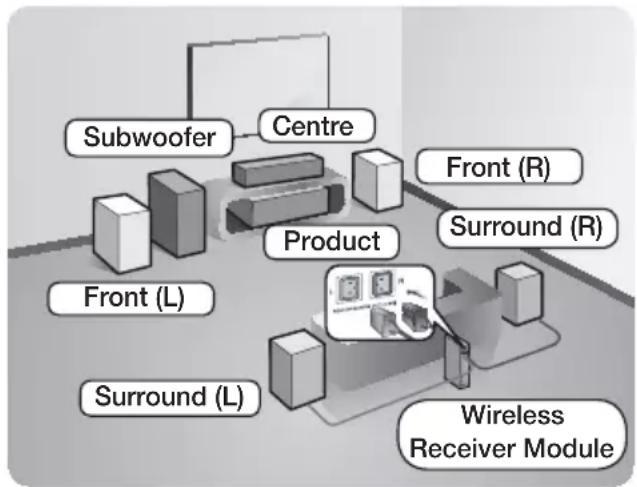
* HT-H5550WK
Surround speakers must be connected to the wireless receiver module.
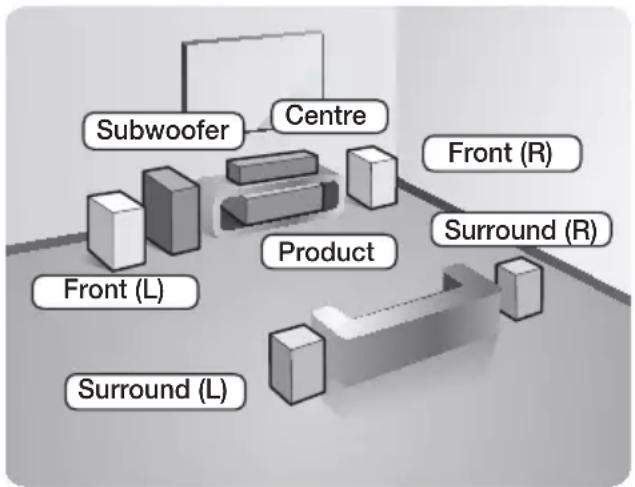
Position of the product
Place it on a stand or cabinet shelf, or under the TV stand.
Selecting the Listening Position
The listening position should be located about 2.5 to 3 times the TV's screen size away from the TV. For example, if you have a 46 inch screen, locate the listening position 2.92 to 3.50 meters from the screen.
| Front Speakers | Place these speakers in front of your listening position, facing inwards (about 45°) toward you. Place the front speakers so that their tweeters will be at the same height as your ear. Align the front face of the front speakers with the front face of the centre speaker or place them slightly in front of the centre speakers. |
| Centre Speaker | It is best to install the Centre Speaker at the same height as the front speakers. You can also install it directly over or under the TV. |
| Surround Speakers | Place these speakers to the side of your listening position. If there isn't enough room, place these speakers so they face each other. Position them about 60 to 90cm above your ear, facing slightly downward. * Unlike the front and centre speakers, the surround speakers are used mainly for sound effects. Sound will not come from them all the time. |
| Subwoofer | The position of the subwoofer is not so critical. Place it anywhere you like. |
- The appearance of your speakers may differ from the illustrations in this manual.
- Match the speaker cables to the coloured label on the back of the speaker, and then plug them into the jack of the same colour. See page 11 for exact instructions.
Installing the Speakers on the Half Tallboy Stand
* HT-H5530HK only - Front Speakers
- Turn the Stand Base upside-down and connect it to the Speaker.
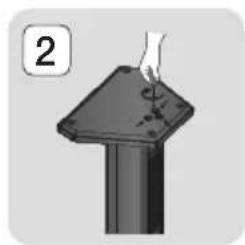
- Use the driver to combine the screws on the 3 marked holes. Installing a speaker is finished. Follow the same steps to install other speakers.
- If you want to adjust the height of the speaker, loosen a screw on the rear of the speaker base first.
- Pull up the speaker in the arrow direction. (Be careful as an excessive force may result in a physical damage.)
- Fit the speaker in a height adjusting a hole, and then use a screw to fasten a speaker.
- This is appearance of after the speaker is installed and height adjusted. To adjust height of other speakers, follow the step 3 5
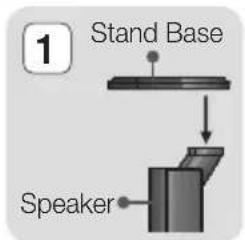
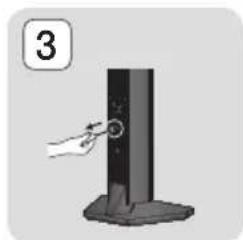
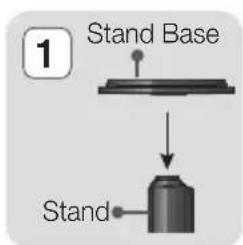
Installing the Speakers on the Tallboy Stand
- HT-H5530K only - Front Speakers
-
HT-H5550K/HT-H5550WK only - Front/Surround Speakers
-
Turn the Stand Base upside-down and connect it to the Stand.
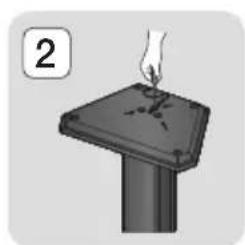
- Use the driver to combine the screws on the 3 marked holes.
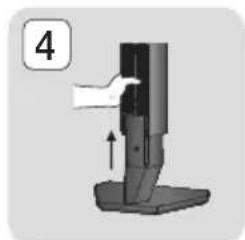
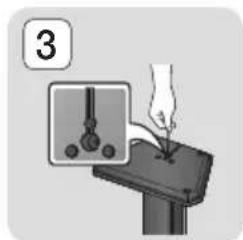
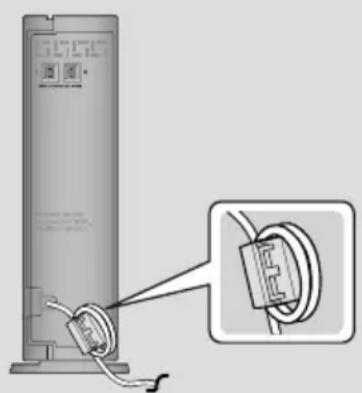
- Straighten a supplied speaker wire to the gravity direction and put in the hole on the centre of Stand Base.
- Connect the upper Speaker to the assembled Stand.
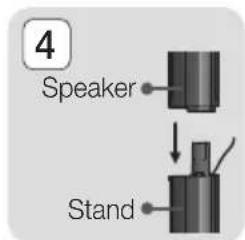
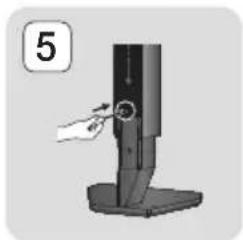
- Insert a screw clockwise into the hole on the rear of the speaker using a screwdriver. And then connect a speaker cable.
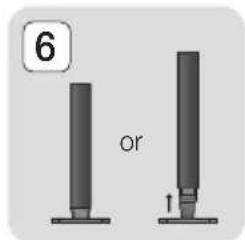
- This is the appearance after the speaker is installed. Follow this steps to install other speaker.

Speaker Cable Connections
- Match each speaker cable bundle to the correct speaker by matching the colour coded plug on each bundle to the coloured sticker on the bottom of each speaker.
- Connect the speaker wire plugs from each speaker to the back of the product by matching the colours of the speaker plugs to the colours of the speaker jacks.
In case of HT-H5500K
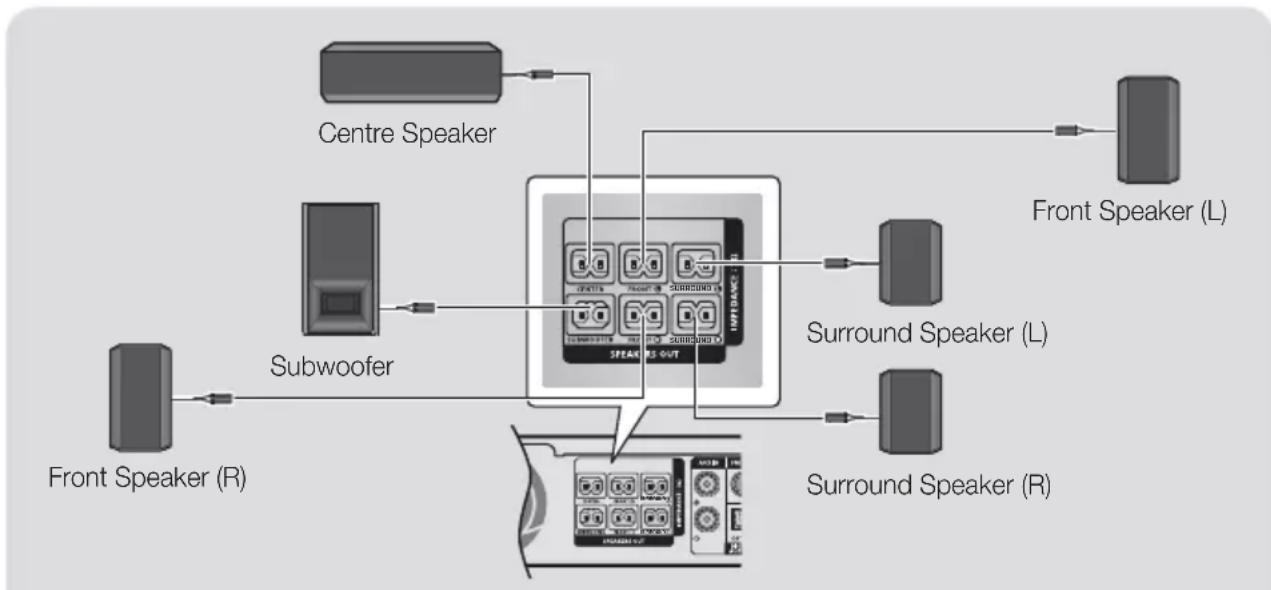
* Refer to page 5~6 for the speakers of HT-H5530HK/HT-H5530K/HT-H5550K.
In case of HT-H5550WK
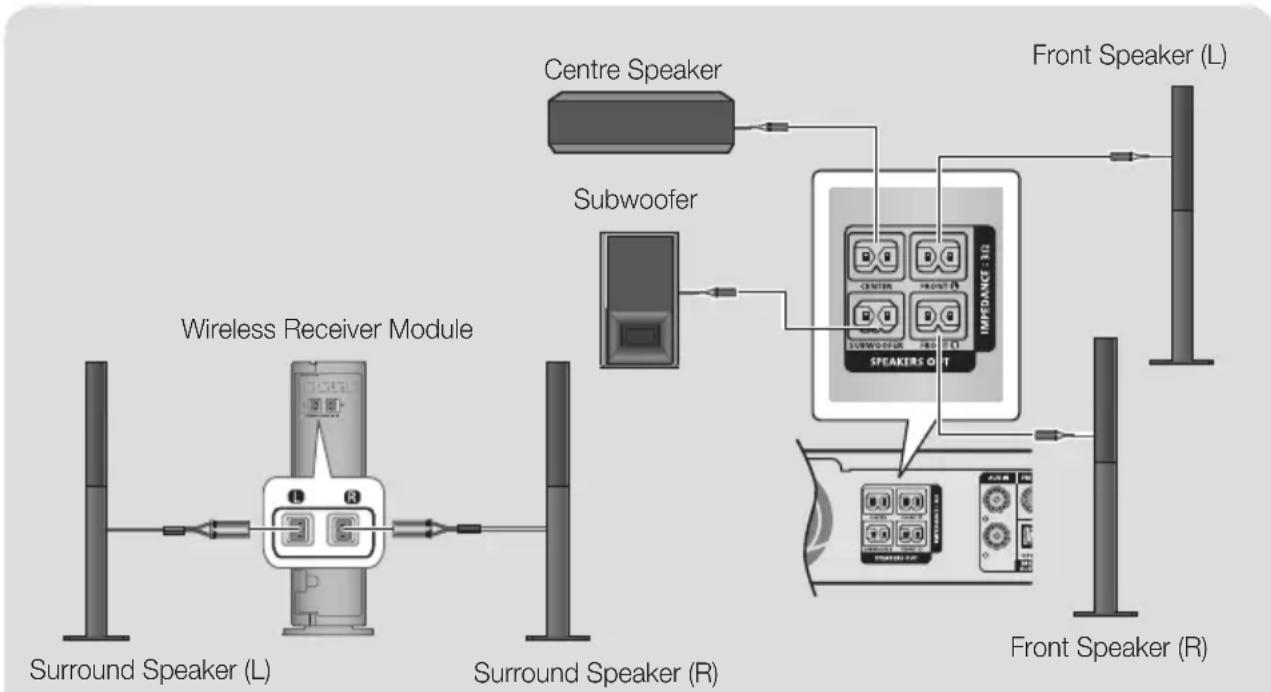
* This product should be connected with the SWA-6000 only.
If you place a speaker near your TV set, the screen colour may be distorted because of the magnetic field.
Place the wireless receiver module at the rear of the listening position. If the wireless receiver module is too close to the product, sound from the speakers may be disrupted because of interference.
If you use a device such as a microwave oven, wireless LAN Card, Bluetooth device, or any other device that uses the 2.4/5.8GHz frequencies near the product, sound from the speakers may be disrupted because of interference.
The maximum transmission distance from the product to the wireless receiver module is about 10m, but may vary depending on your operating environment. If a steel-concrete wall or metallic wall is between the product and the wireless receiver module, the system may not operate at all, because the radio waves cannot penetrate metal.
If the product doesn't make a wireless connection, you need to run an ID Set between the product and wireless receiver module. With the product turned off, press "0"→"1"→"3"→"5" on the remote control. Turn on the wireless receiver module. Then, press and hold the "ID SET" button on the back of the wireless receiver module for 5 seconds, and then turn the product on.
CAUTION
If you want to install the speakers on the wall, fasten screws or nails (not provided) firmly to the wall wherever you want to hang a speaker, and then, using the hole in the rear of each speaker, carefully hang each speaker on a screw or nail.
Do not let children play with or near the speakers. They could get hurt if a speaker falls.
When connecting the speaker wires to the speakers, make sure that the polarity (+ / -) is correct.
- Keep the subwoofer speaker out of reach of children to prevent children from inserting their hands or alien substances into the duct (hole) of the subwoofer speaker.
Do not hang the subwoofer on the wall using the duct (hole).
The wireless receiving antenna is built into the wireless receiver module. Keep it away from water and moisture.
For optimal listening performance, make sure that the area around the wireless receiver module location is clear of any obstructions.
In 2-CH mode, you will hear no sound from the wireless surround speakers.
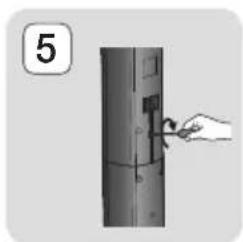
Attaching the Toroidal Ferrite Core to the Power Cord of the Wireless Receiver Module (SWA-6000)
* HT-H5550WK only
If you attach a Toroidal ferrite core to the power cord of the wireless receiver module, it will help prevent RF interference from radio signals.
- Pull the fixing tab of the Toroidal ferrite core to open it.
- Make two loops in the wireless receiver module power cord.
- Attach the Toroidal ferrite core to the wireless receiver module power cord as shown in the figure on the right, and then close it by pressing it until it clicks.
- Attach the ferrite core as close to the Wireless Receiver Module as possible.
Connecting to a TV and External Devices
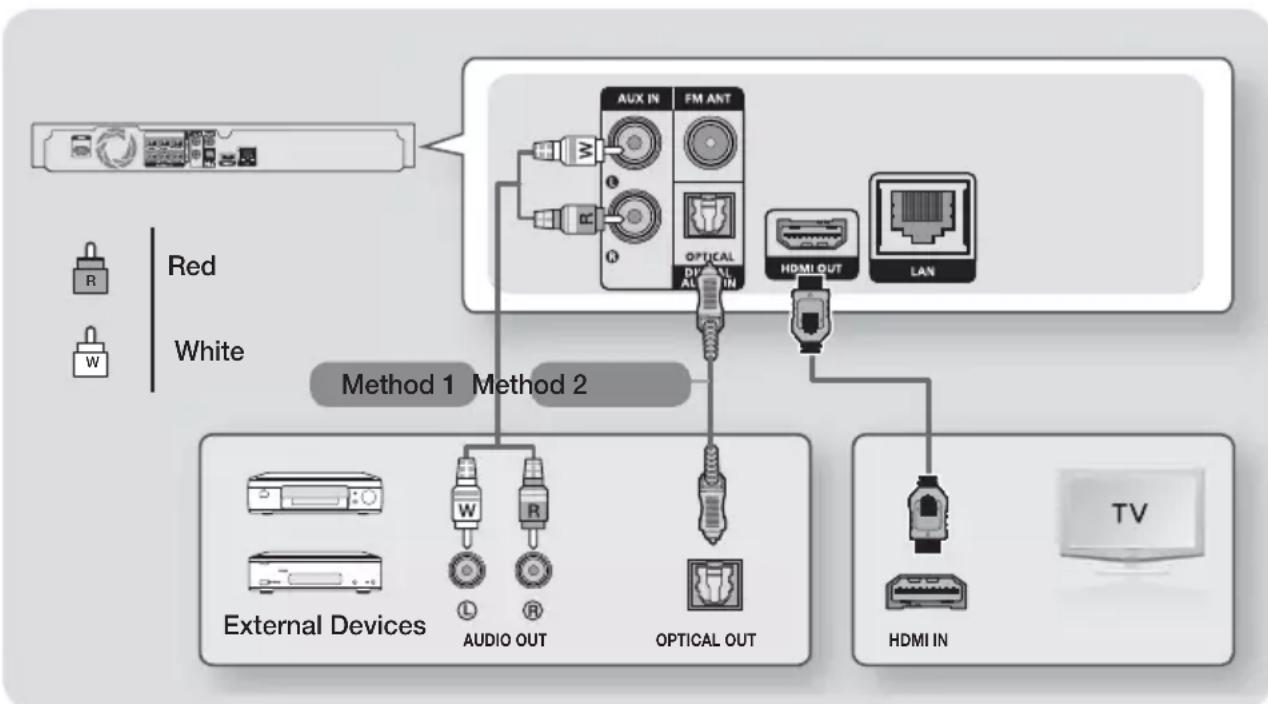
Connecting to a TV
Connect an HDMI cable from the HDMI OUT jack on the back of the product to the HDMI IN jack on your TV. If the TV supports ARC, you can hear the audio from your TV through the home cinema with only this cable connected. See page 18 in this manual and the section on ARC in your TV's user's manual for details.
Connecting to External Devices
To select the correct mode for an external device after you have connected the device, press the FUNCTION button. Each time you press the button, the mode changes in this order :
BD/DVD D.IN AUX FM BT
Two methods of connecting external devices to your home cinema are explained below.
Method 1 AUX IN: Connecting an External Analogue Component
Using an RCA audio cable (not supplied), connect the AUDIO IN jack on the product to the AUDIO OUT jack on the external analogue component. Select the AUX mode.
- Be sure to match the colours on the cable plugs to the colours on the input and output jacks.
Method 2 OPTICAL: Connecting an External Digital Audio Component
Use to connect the digital audio output of digital signal components such as Cable Boxes and Satellite Receivers (Set-Top-Boxes): Using a digital optical cable (not supplied), connect the Optical Digital Audio In jack on the product to the Digital Optical Out jack of the external digital device using a digital optical cable.
Select the D.IN mode.
To see video from your Cable Box/Satellite receiver, you must connect its video output directly to your TV.
This system supports Digital sampling frequencies of 32kHz or higher from external digital components.
This system supports only DTS and Dolby Digital audio. MPEG audio, a bitstream format, is not supported.
Connecting to a Network Router
You can connect your product to your network router using one of the methods illustrated below.
Wired Network

Your router or your Internet Service Provider's policies may prevent the product from accessing Samsung's software update server. If this occurs, contact your Internet Service Provider (ISP) for more information.
DSL users, please use a router to make a network connection.
To use the DLNA function, you must connect your PC to your network as shown in the illustrations above. The connection can be wired or wireless.
Wireless Network
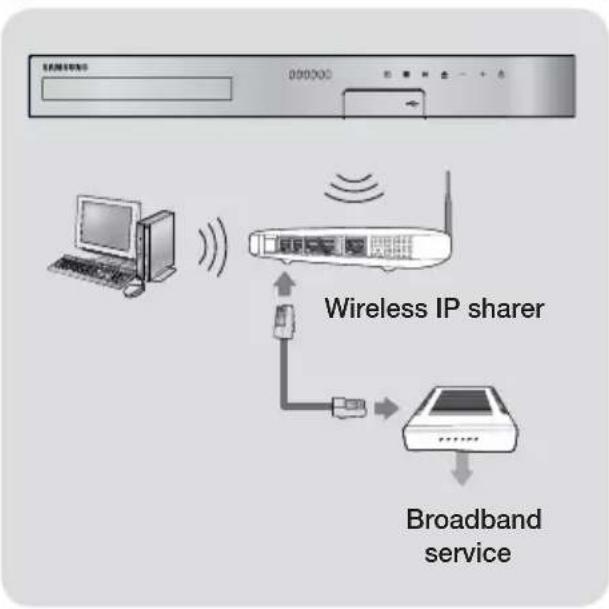
If your wireless IP router supports DHCP, this product can use a DHCP or static IP address to connect to the wireless network.
Set your wireless IP router to Infrastructure mode. Ad-hoc mode is not supported.
The product supports only the following wireless security key protocols: - WEP (OPEN/SHARED), WPA-PSK (TKIP/AES), WPA2-PSK (TKIP/AES)
Select a channel on the wireless IP router that is not currently being used. If the channel set for the wireless IP router is currently being used by another device nearby, it will result in interference and communication failure.
In compliance with the newest Wi-Fi certification specifications, Samsung home Cinemas do not support WEP, TKIP, or TKIP-AES (WPS2 Mixed) security encryption in networks running in the 802.11n mode.
Wireless LAN, by its nature, may cause interference, depending on the operating conditions (AP performance, distance, obstacles, interference by other radio devices, etc).
The Initial Settings Procedure
- The Home menu will not appear if you do not configure the initial settings.
- The OSD (On Screen Display) may change in this product after you upgrade the software version.
-
The access steps may differ depending on the menu you selected.
-
Turn on your TV after connecting the product, and then turn on the product. When you turn on the product for the first time, the product automatically displays the Initial Settings Language screen.
- Press the buttons to select the desired language, and then press the button.
- Press the button to start function setup.
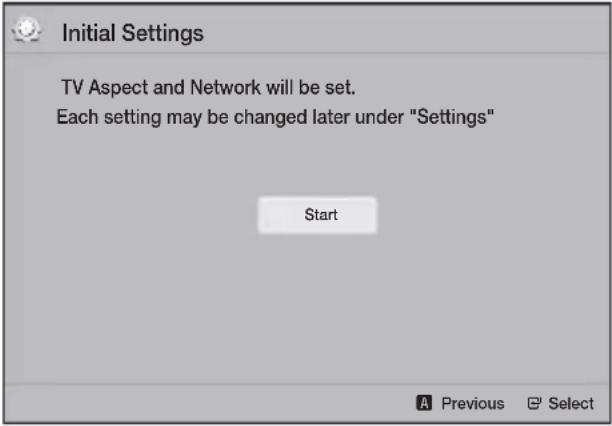
- The TV Aspect screen appears. Press the buttons to select a TV aspect ratio, and then press the button.
You have four choices:
16:9 Original - For widescreen TVs. Displays widenscreen pictures in their original 16:9 format and 4:3 pictures (the old, standard format) in 4:3 pillar box format with black bars on the left and right.
16:9 Full - For widescreen TVs. Displays widenscreen pictures in their original 16:9 format and expands 4:3 pictures to fill the 16:9 screen.
4:3 Letter Box - For older, standard screen, analogue TVs. Displays 4:3 pictures in full screen and 16:9 pictures in letter box format that retains the 16:9 aspect ratio but puts black bars above and below the picture.
4:3 Pan-Scan - For older, standard screen, analogue TVs. Displays 4:3 pictures in full screen and 16:9 pictures in Pan-Scan format that fills the screen, but cuts off the left and right sides of the picture and enlarges the middle vertically.
- The Network screen appears.
Before you begin, confirm that the product is connected to your router.
- Set to wired or wireless depending on your network environment.
- If you have a network with static IP addresses, we suggest you select Skip by pressing the BLUE (D) button.
If you skip network setup here or the setup does not work correctly, you can set up the product's network connection later. (See page 20)
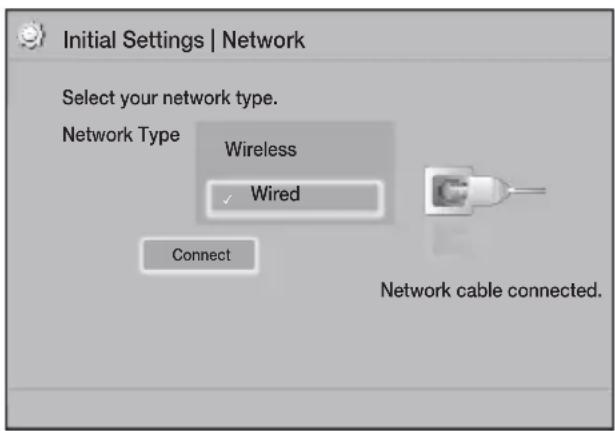
- The product verifies the network connection and then connects to the network. When it is done, press the button. The "Initial settings completed." screen appears, and then the Home screen appears.
If you want to display the Initial Settings screen again and make changes, select the Reset option. (See page 20)
If you use an HDMI cable to connect the product to an Anynet+ (HDMI-CEC)-compliant Samsung TV and 1.) You have set the Anynet+ (HDMI-CEC) feature to On in both the TV and the product and 2.) You have set the TV to a language supported by the product, the product will select that language as the preferred language automatically.
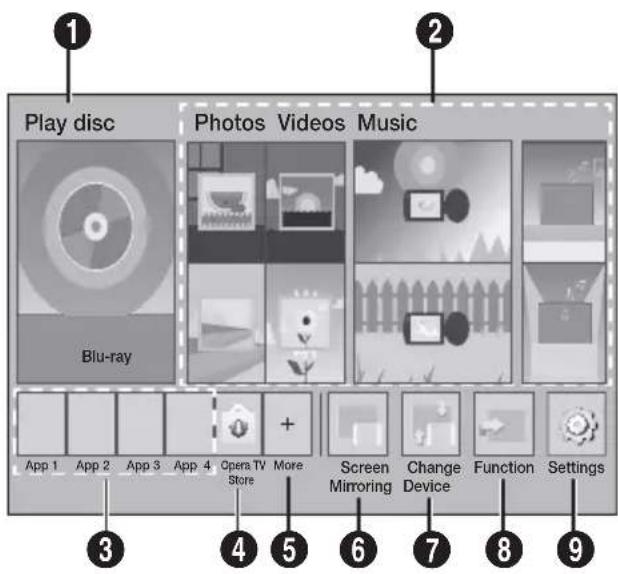
The Home Screen at a Glance
1 Play disc
The disc currently in the tray is displayed. Press to start playing the disc.
Photos/Videos/Music
Play photos, videos, or music content from Disc, USB, PC, or mobile devices.
3 Apps
Access various for pay or free-of-charge applications.
4 Opera TV Store
Makes the Web-based App for TV available for use.
5 More
A list of useful and popular apps we recommend.
6 Screen Mirroring
Set up the wireless mirroring function between the home cinema and a smart phone or tablet.
7 Change Device
Displays a list of external devices connected to the main unit. Switch to the desired device.
8 Function
Use for switching to an external device, and for radio and mode switching for a Bluetooth connection. You can use the remote control's FUNCTION button and the main unit's button for mode switching.
9 Settings
Set various functions to suit your personal preferences.
To play or view video, photo, music files located on your PC, you must connect your home cinema and PC to a home network and you must download, install, and configure the DLNA software on your PC. (See page 25)
Accessing the Settings Screen
- Select Settings on the Home screen, and then press . The Settings screen appears.

- To access the menus, sub-menus, and options on the Settings screen, please refer to the remote control illustration. (See page 17)
If you leave the product in the stop mode for more than 5 minutes without using it, a screen saver will appear on your TV. If the product is left in the screen saver mode for more than 20 minutes, the power automatically turns off.
Buttons on the Remote Control Used for the Settings Menu
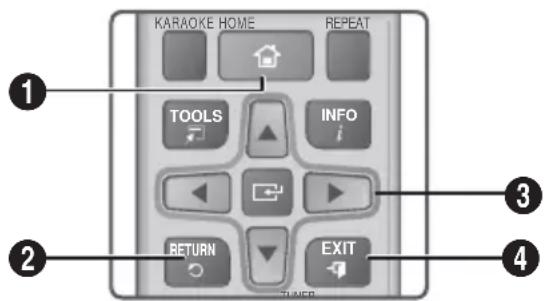
| 1 | HOME Button:Press to move to the Home screen. |
| 2 | RETURN Button:Press to return to the previous menu. |
| 3 | ENTER / DIRECTION Button: • Press▲▼▲▶to move the cursor or select an item. • Press the button to activate the currently selected item or confirm a setting. |
| 4 | EXIT Button:Press to exit the current menu. |
Detailed Function Information
Each Settings function, menu item, and individual option is explained in detail on-screen. To view an explanation, use the buttons to select the function, menu item, or option. The explanation will usually appear on the bottom of the screen.
A short description of each Settings function starts on this page. Additional information on some of the functions is also in the Appendix of this manual.
Settings Menu Functions
Display
3D Settings
Set up the 3D related functions.
3D Blu-ray Playback Mode: Select whether to play a Blu-ray Disc with 3D contents in 3D Mode. If you move to the Home menu while in 3D mode, the product will switch to 2D automatically.
Screen Size: Enter the size of the TV attached to the product. The product will automatically adjust the 3D output to the screen size of the TV.
Carefully read the health and safety information before viewing 3D content. (See page 3)
TV Aspect Ratio
Lets you adjust the output of the product to the screen size of your TV. (See page 39)
BD Wise
BD Wise is Samsung's latest inter-connectivity feature. When you connect a Samsung product and a Samsung TV with BD Wise to each other via HDMI, and BD Wise is on in both the product and TV, the product outputs video at the video resolution and frame rate of the Blu-ray/DVD Disc.
Resolution
Lets you set the output resolution of the HDMI video signal to BD Wise, Auto, 1080p, 1080i, 720p, 576p/480p. The number indicates the number of lines of video per frame. The i and p indicate interlaced and progressive scan, respectively. The more lines, the higher quality.
Movie Frame (24 fps)
Setting the Movie Frame (24 fps) feature to Auto lets the product adjust its HDMI output to 24 frames per second automatically for improved picture quality if attached to a 24Fs compatible TV.
- You can enjoy the Movie Frame (24 fps) feature only on a TV supporting this frame rate.
- Movie Frame is only available when the product is in the HDMI 1080p output resolution modes.
HDMI Colour Format
Lets you set the colour space format for the HDMI output to match the capabilities of the connected device (TV, monitor, etc).
HDMI Deep Colour
Lets you set the product to output video from the HDMI OUT jack with Deep Colour. Deep Colour provides more accurate colour reproduction with greater colour depth.
Progressive Mode
Lets you improve picture quality when viewing DVDs.
Audio
Karaoke scoring
This feature rates your singing ability and gives you a score for each song you sing.
My karaoke
Set the volume of the vocals when using the karaoke feature.
Original Vocals: Volume is set to the level of the original sound.
Reduce Vocals: Volume is set to a level lower than that of the original sound.
Speaker Settings
Lets you adjust the following speaker settings and turn the test tone on and off so you can test the speakers.
Level Lets you adjust the relative loudness of each speaker from 6dB to -6dB. For example, if you like deep bass, you can increase the loudness of the subwoofer by 6dB.
Distance Lets you adjust the relative distance of each speaker from the listening position up to 9 meters. The farther the distance, the louder the speaker will be.
Test Tone Lets you run the Test Tone function so you can test your adjustments. Setting Test Tone to On turns the Test Tone on. Setting it to Off turns it off.
Speaker Selection
Lets you select which speakers you want active, either the TV's speakers or the home cinema's speakers.
Audio Return Channel
Lets you direct the sound from the TV to the Home Cinema speakers. Requires an HDMI connection and an Audio Return Channel (ARC) compatible TV.
- If Audio Return Channel is set to on and you are using an HDMI cable to connect the product to the TV, digital optical input will not work.
- If Audio Return Channel is set to Auto and you are using an HDMI cable to connect the product to the TV, ARC or digital optical input is selected automatically.
Digital Output
Lets you set the Digital Output to match the capabilities of the AV receiver you've connected to the product. For more details, please refer to the digital output selection table. (See page 44)
Dynamic Range Control
Lets you apply dynamic range control to Dolby Digital, Dolby Digital Plus, and Dolby TrueHD audio.
Auto: Automatically controls the dynamic range of Dolby TrueHD audio, based on information in the Dolby TrueHD soundtrack. Also turns dynamic range control off for Dolby Digital and Dolby Digital Plus.
Off: Leaves the dynamic range uncompressed, letting you hear the original sound.
On: Turns dynamic range control on for all three Dolby formats. Quieteter sounds are made louder and the volume of loud sounds is reduced.
Downmixing Mode
Lets you select the multi-channel downmix method that is compatible with your stereo system. You can choose to have the product downmix to Normal Stereo or to Surround Compatible.
Audio Sync
When the product is attached to a digital TV, lets you adjust the audio delay so that the audio syncs with the video. You can set the delay between 0 and 300 milliseconds.
Network
Network Settings
Lets you configure the network connection so you can enjoy various features such as Internet services or DLNA Wi-Fi functionality, and perform software upgrades.
Network Test
Lets you test the Internet Protocol setup to see if it is working correctly.
Network Status
Lets you check the current network and Internet status.
Wi-Fi Direct
Lets you connect a Wi-Fi Direct device to the product using a peer-to-peer network, without the need for a wireless router.
Note that if the product is connected to a wireless network, it may be disconnected when you use Wi-Fi Direct. (See page 23)

Text files, such as files with a .TXT or .DOC extension, will not display when you are using the Wi-Fi Direct function.
Screen Mirroring
The Screen Mirroring function lets you view the screen of your smart phone or smart device on the TV you have connected to the home cinema system. (See page 38)
Device Name
Lets you assign an identifying name to the product. You use this name to identify the product when you are connecting external devices (smart phones, tablets, etc.) to it.
BD-Live Internet Connection
Lets you allow or prohibit an Internet connection for the BD-Live service.
System
Initial Settings
Lets you re-run the Initial Settings procedure. (See page 15)
Quick start
You can turn on the power quickly by decreasing the boot time.

If this function is set to On, Standby power consumption will be increased. (About 12W ~ 20W)
Anynet+ (HDMI-CEC)
Anynet+ is a convenient function that offers linked operations with other Samsung products that have the Anynet+ feature and lets you control those products with one Samsung TV remote. To operate this function, you must connect this product to an Anynet+ Samsung TV using a HDMI cable.
BD Data Management
Lets you manage the contents you downloaded through a Blu-ray disc that supports the BD-Liv service. You can view the information about the USB device you are using for BD Live data storage including the storage space. You can also delete BD Live data and change the device.
DivX® Video On Demand
View DivX® VOD Registration Codes to purchase and play DivX® VOD contents.
Language
Lets you select the language you prefer for the OnScreen Menu, disc menu, etc.
- The selected language will only appear if it is supported on the disc.
Security
The default PIN is 0000. Enter the default PIN to access the security function if you haven't created your own PIN.
BD Parental Rating
Prevents playback of Blu-ray Discs with a rating equal to or above a specific age rating unless you enter the PIN.
DVD Parental Rating
Prevents playback of DVDs with a rating above a specific numerical rating unless you enter the PIN.
Change PIN
Changes the 4-digit PIN used to access security functions.
General
Time Zone
Lets you specify the time zone that is applicable to your area.
Support
Software Upgrade
For more information about this function see page 24.
Contact Samsung
Provides contact information for assistance with your product.
Terms of Service Agreement
View the general disclaimer regarding third party contents and services.
Reset
Reverts all settings to their defaults except for the network. Requires that you enter your security PIN. The default security PIN is 0000.
Network Setup
When you connect this product to a network, you can use network based applications and functions such as BD-LIVE and upgrade the product's software through the network connection.
Configuring Your Network Connection
To begin configuring your network connection, follow these steps:
- In the Home screen, select Settings, and then press the button.
- Select Network, and then press the button.
- Select Network Settings, and then press the button.
- Go to the instructions for Wired networks starting below or the instructions for Wireless networks. (See page 21)
Wired Network
Wired-Automatic
After following Steps 1 to 3 above:
- In the Network Settings screen, change Network Type to Wired. Then, select Connect and press the button. The product detects the wired connection, verifies the network connection, and then connects to the network.
- When it is done, highlight OK, and then press button.
Wired-Manual
If you have a static IP address or the automatic procedure does not work, you'll need to set the Network Settings values manually.
After following Steps 1 to 3 above:
- In the Network Settings screen, change Network Type to Wired. Then, select Connect and press the button. The product searches for a network, and then displays the connection failed message.
If it is possible to connect the home cinema to your network wirelessly, select Change Network at this point, change the Network Type to Wireless, and then go to the instructions for wireless networks. (See page 21)

Network Settings
Wired network connection failed.

MAC Address XX:XX:XX:XX:XX
IP Address 0.0.0.0
Subnet Mask 0.0.0.0
Gateway 0.0.0.0 DNS Server 0.0.0.0
IP auto setting failed. Try the following to set up the IP automatically, or set up the IP manually by selecting IP Settings.
- Ensure that the DHCP server is enabled on the wireless network, then unplug and plug the wireless network in again.
- Contact your internet service provider for more info.
Change Network
IP Settings Retry


Previous

Move

- Use the buttons to select IP Settings, and then press the button. The IP Settings screen appears.
- Select the IP setting field, and then set it to Enter manually.
- Select a parameter to enter (IP Address, for example), and then press . Use the number keypad on your remote control to enter the numbers for the parameter. You can also enter numbers using the buttons. Use the buttons on the remote control to move from entry field to entry field within a parameter. When done with one parameter, press the button.
- Press the or button to move to another parameter, and then enter the numbers for that parameter following the instructions in Step 4.
- Repeat Steps 4 and 5 until you have filled in all parameters.

You can get the network parameter values from your Internet provider.
7. When finished entering all the parameter values, select Return (O), and then press the button. The home cinema verifies the network connection and then connects to the network.
Wireless Network
You can set up a wireless network connection in three ways:
- Wireless Automatic
- Wireless Manual
WPS(PBC)
Before you configure the wireless network connection, disconnect any wireless network devices currently connected to the product or, if applicable, the product's current wired connection.
Wireless - Automatic
Follow the Steps 1 to 3 in "Configuring Your Network Connection". (See page 20)
- In the Network Settings screen, change Network Type to Wireless. The product searches for and then displays a list of the available networks.
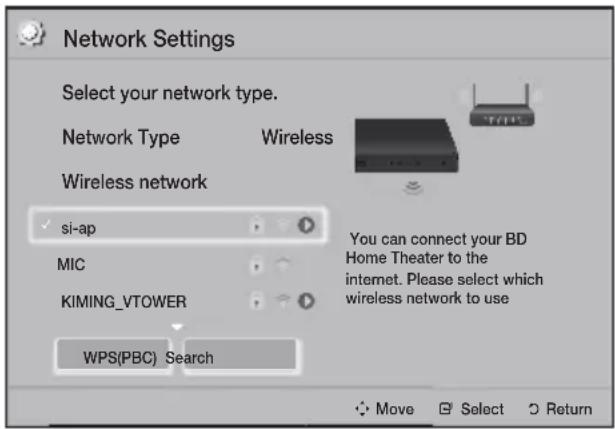
- Select the desired network, and then press the button.
- On the Security screen, enter your network's security code or pass phrase. Enter numbers directly using the number buttons on your remote control. Enter letters by selecting a letter with buttons, and then pressing button.
- When finished, select Done, and then press the button. The product verifies the network connection and then connects to the network.
You should be able to find the security code or pass phrase on one of the set up screens you used to set up your router or modem.
Wireless - Manual
If you have a static IP address or the Automatic procedure does not work, you'll need to set the Network Settings values manually.
Follow the Steps 1 to 3 in "Configuring Your Network Connection". (See page 20)
- In the Network Settings screen, change Network Type to Wireless. The product searches for and then displays a list of the available networks.
- Scroll through the list, select the desired network or Add Network, and then press the button.
-
If you selected a network in Step 2, go to Step 6. If you selected Add Network, go to Step 4.
-
Enter your wireless network or wireless router's name.
-
Enter numbers directly using the number buttons on your remote control.
- Enter letters by selecting a letter with the buttons, and then pressing the button.
- To display capital letters (or redisplay lower case letters if capital letters are displayed), select , and then press the button.
- To display symbols and punctuation, select 123#, and then press the button. To redisplay letters, select 123#, and then press the button.
When finished, select Done, and then press the button.
-
On the Security method screen that appears, use the buttons to select the network's Security method, and then press the button. On the next screen, enter your network's security code or pass phrase.
-
Enter numbers directly using the number buttons on your remote control.
- Enter letters by selecting a letter with the buttons, and then pressing the button.
When finished, select Done, and then press the button. The product searches for the network.
- The Network connection fail screen appears. Use buttons to select IP Settings, and then press the button.
- Select the IP setting field, and then set it to Enter manually.
- Select a network parameter to enter (IP Address, for example), and then press button. Use the number keypad on your remote control to enter the numbers for the parameter. You can also enter numbers using the buttons. Use the buttons on the remote control to move from entry field to entry field within a parameter. When done with one value, press the button.
-
Press the or button to move to another parameter, and then enter the numbers for that parameter following the instructions in Step 8.
-
Repeat Steps 8 and 9 until you have filled in all parameters.
You can get the Network parameter values from your Internet provider. - When finished, select Return (O), and then press the button. The Security Key screen appears.
- On the Security Key screen, enter your network's Security Code or Pass Phrase. Enter numbers directly using the number buttons on your remote control. Enter letters by selecting a letter with the buttons, and then pressing the button.
- When finished, select Done at the right of the screen, and then press the button. The product verifies the network connection and then connects to the network.
- After the home cinema verifies the network, select OK, and then press the button.
You can also begin the Manual Network setup by going to Settings > Network > Network Status.
WPS(PBC)
One of the easiest ways to set up the wireless network connection is using the WPS(PBC) function. If your wireless router has a WPS(PBC) button, follow these steps:
Follow the Steps 1 to 3 in "Configuring Your Network Connection". (See page 20)
- In the Network Settings screen, change Network Type to Wireless. The product searches for and then displays a list of the available networks.
- Scroll the list down, select WPS(PBC), and then press the button.
- Press the WPS(PBC) button on your router within two minutes. Your product automatically acquires all the network settings values it needs and connects to your network after the network connection is verified.
- When it is done, highlight OK, and then press the button.
For a WPS connection, set your wireless router's security encryption to AES. WEP security encryption does not support a WPS connection.
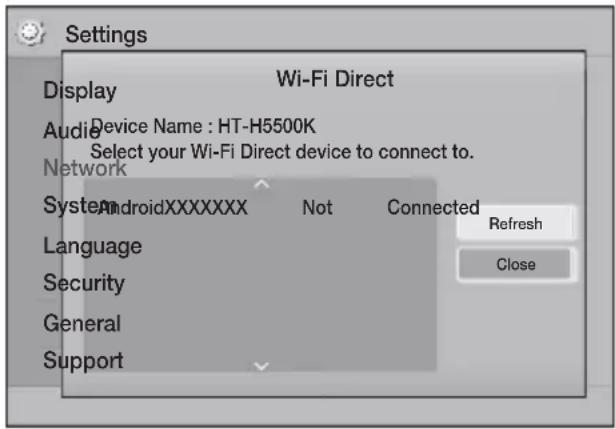
Wi-Fi Direct
The Wi-Fi Direct function allows you to connect Wi-Fi Direct devices to the product and each other using a peer-to-peer network, without a wireless router.

Some Wi-Fi Direct devices may not support the DLNA function if connected via Wi-Fi Direct. If this is the case, change the network connection method you used to connect the device to the home cinema.

Wi-Fi Direct transmissions can interfere with Bluetooth signals. Before you use the Bluetooth function, we strongly recommend that you turn off the Wi-Fi Direct function on any device in which it is currently on.
- Turn on the Wi-Fi Direct device and activate its Wi-Fi Direct function.
- In the Home screen, select Settings, and then press the button.
- Select Network, and then press the button.
- Select Wi-Fi Direct, and then press the button. The Wi-Fi Direct devices that you can connect to appear.
-
You have three ways to complete the Wi-Fi connection:
-
Through the Wi-Fi device.
- Through the product using PBC.
- Through the product using a PIN.
Each is covered below.
Through the Wi-Fi Device
-
On the Wi-Fi device, follow the device's procedure for connecting to another Wi-Fi Direct device. See the device's user manual for instructions.
-
When you have completed the procedure, you should see a pop-up on your TV screen saying that a device that supports Wi-Fi Direct has requested to connect. Select OK, and then press the button to accept.
-
The Connecting pop-up appears, followed by the Connected pop-up. When it closes, you should see the device listed on the Wi-Fi Direct screen as connected.
-
The PBC and PIN procedures connect devices automatically.
Through the Product Using PBC
- Select the Wi-Fi Direct device you want to connect to this product, and then press the button.
- The Connecting pop-up appears, followed by the Connected pop-up. When it closes, you should see the device listed on the Wi-Fi Direct screen as connected.
Through the Product Using a PIN
- Select the Wi-Fi Direct device you want to connect to this product, and then press the button.
- The PIN pop-up appears.
- Note the PIN code in the pop-up, and then enter it into the appropriate field in the Wi-Fi Direct device you want to connect.
- The Connecting pop-up appears, followed by the Connected pop-up. When it closes, you should see the device listed on the Wi-Fi Direct screen as connected.
The current wired or wireless network connection will be disconnected when you use the Wi-Fi Direct function.
Text files, such as files with a.TXT or .DOC extension, will not display when you are using the Wi-Fi Direct function.
Upgrading Software
The Software Upgrade menu allows you to upgrade the product's software for performance improvements or additional services.
- Never turn the product off or back on manually during the update process.
-
The update is complete when the product turns off after restarting. Press the POWER button to turn on the updated product for your use.
Samsung Electronics takes no legal responsibility for product malfunction caused by an unstable Internet connection or consumer negligence during a software upgrade. -
In the Home menu, select Settings, and then press the button.
- Select Support, and then press the button.
- Select Software Upgrade, and then press the button.
-
Select one of the following methods:
-
By Online
- By USB
-
Auto Upgrade Notification
-
Press the button.
Directions for each method begin below.
If you want to cancel the upgrade while the upgrade software is downloading, press the button.
By Online
Your product must be connected to the Internet to use the By Online function. Remove all discs before you begin.
- Select By Online, and then press the button. The Connecting to Server message appears.
- If an update is available, a popup message appears asking if you want to upgrade. If you select Yes, the product turns off automatically, turns on, and then begins the upgrade.
- The update progress popup appears. When the update is completed, the product turns off automatically again.
- Press the POWER button to turn on the product.
By USB
- Visit www.samsung.com.
- Click SUPPORT on the top right of the page.
- Enter the product's model number into the search field. As you enter the model number, a drop down will display products that match the model number.
- Left click your product's model number in the drop down list.
- On the page that appears, scroll down to and then click Firmware Manuals & Downloads.
- Click Firmware in the centre of the page.
- Click the ZIP icon in the File column on the right side of the page.
- Click Send in the first pop-up that appears. Click OK in the second pop-up to download and save the firmware file to your PC.
- Unzip the zip archive to your computer. You should have a single folder with the same name as the zip file.
- Copy the folder to a USB flash drive.
- Make sure no disc is inserted in the product, and then insert the USB flash drive into the USB port of the product.
- In the product's menu, go to Settings > Support > Software Upgrade.
- Select By USB.
- The home cinema searches for the software on the USB drive. When it finds the software, the Update Request pop-up appears.
- Select OK. The home cinema turns off, turns on, and then begins the upgrade. When the upgrade is done, the home cinema turns off.
- Press the POWER button to turn on the home cinema.
There should be no disc in the product when you upgrade the software using the USB Host jack.
When the software upgrade is done, check the software details in the Software Upgrade menu.
Auto Upgrade Notification
If your product is connected to the network and you set Auto Upgrade Notification on, the product will notify you if a new software version is available with a pop-up message.
- Turn on the product.
- In the Software Upgrade menu, set Auto Upgrade Notification to On. If there is a new software version available, the product will notify you with a pop-up message.
- To upgrade the firmware, select Yes. The product turns off automatically, turns on, and then begins the upgrade.
- The update progress popup will appear. When the update is complete, the product will turn off automatically again.
- Press the POWER button to turn on the product.
Setting Up DLNA
DLNA enables you to play music, video, and photo files located in your PC using this product. To use DLNA, you must connect the product to your PC via the network (See page 14) and install the SAMSUNG PC Share Manager on the PC.
To Download the DLNA Software
To use DLNA with your PC, you must install DLNA software on your PC. You can download the PC software and get detailed instructions for using DLNA from the Samsung.com website.
- Go to www.samsung.com.
- Click SUPPORT at the top of the page.
- Enter the product's model number into the search field. As you enter the model number, a drop down will display products that match the model number.
- Left click your product's model number in the drop down list.
-
On the page that appears, scroll down to and then click Firmware Manuals & Downloads.
-
Click the Software tab.
- On the software tab, click the EXE icon on the right side of the DLNA line.
- In the first pop-up that appears, click Send. In the second pop-up, click Save File.
- Find the DLNA install file on your disk, and then double click the file.
- In the pop-up that appears, click Run, and then follow the directions that appear on your screen.
Download the DLNA Installation/Instruction manual from the same Software Tab by clicking the corresponding PDF file symbol in the File column on the right. The file, in PDF format, will download and open. Follow the directions to install and setup DLNA. You can view and/or save the file.
To use DLNA with your smart phone, you need to connect your home cinema and smart phone to the same network.
Your home cinema can play content located on Blu-ray/DVD/CD discs, USB devices, PCs, smart phones, tablets, and in Apps.
To play content located on your PC or a mobile device, you must connect the PC or mobile device and the product to your network. To play content on your PC, you must also download and install DLNA network software or already have DLNA network software on your PC.
PCs running Windows 7 and Windows 8 have DLNA software (Play To) built in.
Switching the Source Device
If two or more external devices are connected to the main unit, you can use any of the three methods described below to change the source device.
Method 1
From the Home screen, use the buttons to move to Change Device, and then press
The Change Device popup window will appear. Use the buttons to move to the desired device, and then press C.
Method 2
If you move to Photos, Videos, Music or other file-based contents, a list of folders and files will appear. Press the RED (A) button to display the Change Device popup window, use the buttons to move to the desired device, and then press
Method 3
When a device is connected for the first time, a popup window appears on which you can change the source device by using the buttons.
Playing Commercial Discs
- Press the button to open the disc tray.
- Place a disc gently into the disc tray with the disc's label facing up.
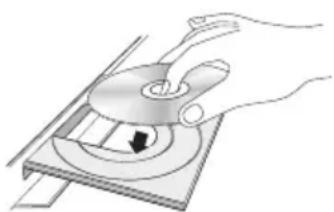
- Press the button to close the disc tray. Playback starts automatically.
- If playback does not start automatically, press the button on the remote.
Disc Storage & Management
-
Holding Discs
-
Fierprints or scratches on a disc may reduce sound and picture quality or cause skipping.

- Avoid touching the surface of a disc where data has been recorded.
Hold the disc by the edges so that fingerprints will not get on the surface. -
Do not stick paper or tape on the disc.
-
Cleaning Discs
If you get fingerprints or dirt on a disc, clean it with a mild detergent diluted in water and wipe with a soft cloth.

- When cleaning, wipe gently from the inside to the outside of the disc.
-
Disc Storage
-
Do not keep in direct sunlight.
- Keep in a cool ventilated area.
- Keep in a clean protective jacket and store vertically.
Playing a Disc with User Recorded Content
You can play multimedia files you have recorded on Blu-ray, DVD, or CD discs.
- Place a user recorded disc into the disc tray with the disc's label facing up, and then close the tray.
- Use the buttons to select the type of content you want to view or play - Photos, Videos, or Music - and then press the button.
OR
-
Select Play disc from the Home screen. The Play disc screen appears. Use the buttons to select the desired content type, Photos, Videos, or Music.
-
A screen appears listing the contents of the disc. Depending on how the contents are arranged, you will see either folders, individual files, or both.
- If necessary, use the buttons to select a folder, and then press the button.
- Use the buttons to select a file to view or play, and then press the button.
- Press the RETURN button one or more times to exit a current screen, exit a folder, or to return to the Home screen.
Press the EXIT button to return directly to the Home Screen.
- Go to pages 28~32 for instructions that explain how to control playback of videos, music, and pictures on a disc.
Playing Files on a USB Device
There are two methods you can use to play or view multimedia files located on a USB device through your product.
Method 1: If you connect a USB device while the product is turned on
- The "New device connected." pop-up appears.
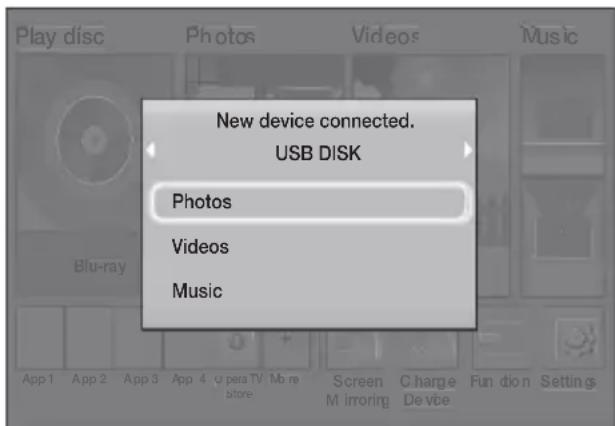
If the pop-up does not appear, go to Method 2.
- Use the buttons to select Photos, Videos, or Music and then press the button.
Depending on how the contents are arranged, you will see either folders, individual files, or both.
- If necessary, use the buttons to select a folder, and then press the button.
- Select a file to view or play, and then press the button.
- Press the RETURN button to exit a folder or the EXIT button to return to the Home screen.
- Go to pages 28~32 for instructions that explain how to control playback of videos, music, and pictures on a USB device.
Method 2: If the product is turned on after you connect a USB device
- Turn the product on.
- Press Change Device and select a USB device.
- Use the buttons to select Photos, Videos, or Music on the Home screen, and then press the button.
- If necessary, use the buttons to select a folder, and then press the button.
- Select a file to view or play, and then press the button.
- Press the RETURN button to exit a folder or the EXIT button to return to the Home screen.
- Go to pages 28~32 for instructions that explain how to control playback of videos, music, and pictures on a USB device.
If you insert a disc when playing a USB device or phone, the device mode changes to "Disc" automatically.
If your cellular phone is DLNA compatible, you can play contents without connecting a USB cable. (See page 36)
Controlling Video Playback
You can control the playback of video content located on a Blu-ray/DVD disc, USB device, mobile device, or PC. Depending on the disc or contents, some of the functions described in this manual may not be available.
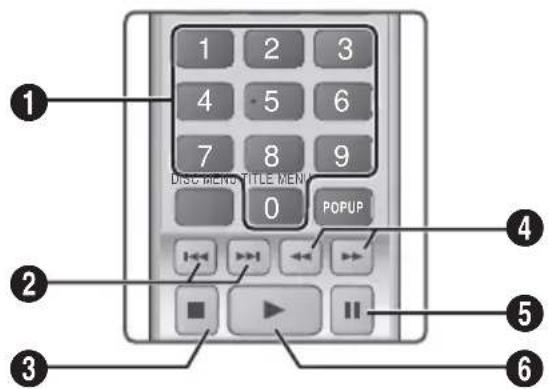
Buttons on the Remote Control used for Video Playback
1Playback related buttons
The product does not play sound in Search, Slow, or Step mode.
- To return to normal speed playback, press the button.
| \( \square \) | Starts playback. |
| \( \square \) | Stops playback. |
| II | Pauses playback. |
| Fast Motion Play | During playback, press the \( \blacktriangleright \) or button. Each time you press the \( \blacktriangleright \) or \( \blacktriangleright \) button,the playback speed will change. |
| Slow Motion Play | In pause mode, press the \( \blacktriangleright \) button. Each time you press the \( \blacktriangleright \) button, the playback speed will change. |
| Step Motion Play | In pause mode, press the \( \square \) button. Each time you press the \( \square \) button, a new frame appears. |
| Skip Motion Play | During playback, press the \( \blacktriangleright \) or \( \blacktriangleright \) button. Each time you press the \( \blacktriangleright \) or \( \blacktriangleright \) button,the disc moves to the previous or next chapter or file. |
Using the disc menu, title menu, popup menu, and title list
DISC MENU
During playback, press this button to display the Disc menu.
TITLE MENU
During playback, press this button to display the Title menu.
- If your disc has a playlist, press the GREEN (B) button to go to the playlist.
POPUP MENU
During playback, press this button to display the Popup menu.
Repeat Playback
- During playback, press the REPEAT button on the remote control.
- Press the buttons to select Off, Title, Chapter, All or Repeat A-B, and then press the button.
Repeat A-B
- Press the button at the point where you want repeat play to start (A).
- Press the button at the point where you want repeat play to stop (B).
- To return to normal play, press the REPEAT button again.
- Press the button.
Depending on the disc, the screen may not display all repeat options.
The screen may not display Chapter or Title immediately. Continue to press the buttons until your choice is inside the applicable field.
To return to normal play, press the REPEAT button again, press the buttons to select Off, and then press the button.
The screen may not display Repeat A-B immediately. Continue to press the buttons until Repeat A-B is inside the applicable field.
You must set point (B) at least 5 seconds of playing time after point (A).
Using the TOOLS Menu
During playback, press the TOOLS button.
Title
If there is more than one title on a disk or device, lets you move to or select a desired title.
Playing Time
Lets you go to a specific playback point. Use the numeric buttons to input the playback point.
Repeat Mode
Lets you repeat a specific title, chapter, or marked section.
Audio Sync
Lets you adjust the audio delay so that the audio syncs with the video. You can set the delay from 0 to 300 milliseconds.
Picture Settings
Lets you set the picture mode.
Mode
- User: Lets you adjust the Brightness, Contrast, Colour, and Sharpness functions manually.
- Dynamic : Choose this setting to increase sharpness.
- Normal : Choose this setting for most viewing applications.
- Movie : This is the best setting for watching movies.
Menu selections that appear only when a
BD/DVD disc plays
Chapter
Lets you move to a chapter that you want to watch.
Audio
Lets you set the desired audio language.
Subtitle
Lets you set the desired subtitle language.
Angle
To view a scene from another angle. The Angle option displays the number of angles available to view (1/1, 1/2, 1/3, etc.).
BONUSVIEW Video BONUSVIEW Audio
Lets you set the desired Bonusview option.
Menu selections that appear only while a file plays
Full Screen
Lets you set the desired full screen size. You can select Original, Mode1 (larger), and Mode2 (largest).
Information
Select to view video file information.
Depending on the disc or storage device, the Tools menu may differ. All options may not be displayed.
Creating a Video Playlist
You can create a playlist of video files in a way that is nearly identical to the way you create a playlist of music files. See page 30 for instructions.
Playing a Pre-Recorded Commercial Audio Disc
-
Insert an Audio CD (CD-DA) or an MP3 Disc into the disc tray.
-
For an Audio CD (CD-DA), the first track will be played automatically. Tracks on a disc are played in the order in which they were recorded on the disc.
- For an MP3 disc, press the buttons to select Music, then press the button.
- To play a particular track, use the buttons on the remote to select the track, and then press the button.
For more information about playing music, see Controlling Music Playback below.
Controlling MusicPlayback
You can control the playback of music content located on a DVD, CD, USB, mobile device, or PC. Depending on the disc or contents, some of the functions described in this manual may not be available.
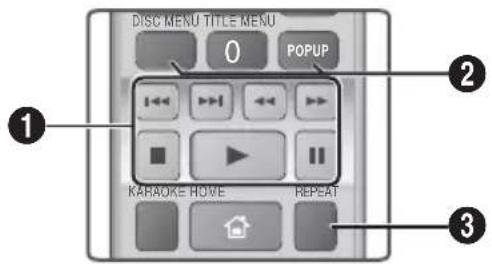
Buttons on the Remote Control used for Music Playback
| 1 | Number buttons : During Playlist playback, press the desired track number. The selected track is played. |
| 2 | Skip : During playback, press the×or × button to move to the previous or next music track. |
| 3 | × button : Stops a track. |
| 4 | Fast Play (Audio CD [CD-DA] only): During playback, press the▶ or ➔ button. Each time you press the▶ or ➔ button, the playback speed will change. |
| 5 | ■ button: Pauses a track. |
| 6 | ▶ button: Plays the currently selected track. |
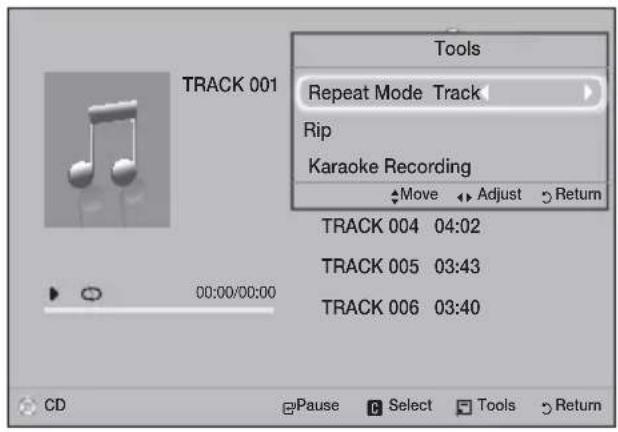
Repeating Tracks
You can set the product to repeat tracks.
- During music playback, press the TOOLS button.
- Use button to select Off, Track or One, All or Shuffle in Repeat Mode, and then press the G button.
Creating a Music Playlist
- If playing music from a commercial CD or DVD, press the or RETURN button. The Music List Screen appears. If you are creating a playlist from music on a user created disk or USB device, access the Music list as described on page 26 or 27.
- Press the buttons to move to a desired file, and then press the YELLOW (C) button to select it. Repeat this procedure to select additional files.
- If you want to select all files, press the TOOLS button, use the buttons to select Select All, and then press . If you want to deselect all files, press the TOOLS button, select Deselect All, and then press .
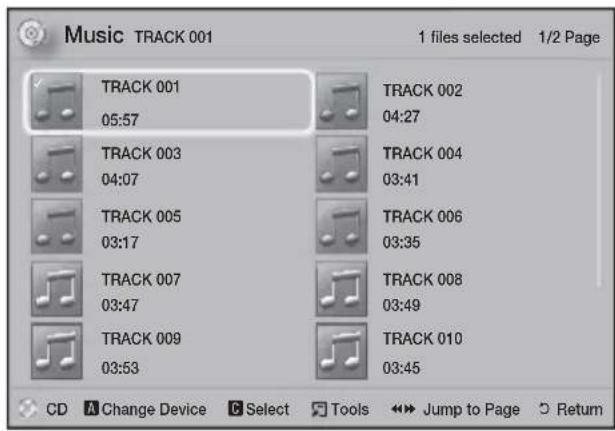
- To remove a file from the Playlist, move to the file, and then press the YELLOW (C) button.
- Press the button to play the selected files. The Playlist screen appears.
- To go to the Music List, press the or RETURN button.
- To go back to the Playlist, press the button.
You can create a playlist with up to 99 tracks on Audio CDs (CD-DA).
If you go to the Music List from the Playlist, and then return to the Playlist, the Playlist will start playing again from the beginning.
Ripping
- Insert a USB device into the USB jack on the front of the product.
- With the Playback screen displayed, use the buttons to select a track, and then press the YELLOW (C) button. A check appears to the left of the track.
- Repeat Step 2 to select and check additional tracks.
- To remove a track from the list, move to the track, and then press the YELLOW (C) button again. The check on the track is removed.
- When done, press the TOOLS button. The Tools menu appears.
- Use the buttons to select Rip, and then press the button. The Rip screen appears.
- Use the buttons to select the device to store the ripped files on, and then press the button.
Do not disconnect the device while ripping is in progress. - If you want to cancel ripping, press the button and then select Yes. Select No to continue ripping.
- When ripping is complete, the "Ripping completed." message appears.
- Press the button to go back to the Playback screen.
This function is not available for DTS Audio CDs.
This function may not be supported by some discs.
Ripping encodes music in the .mp3 format at 192kbps.
On the Track list screen, you can choose Select All or Deselect All.
- Use Select All to select all tracks, and then press the button. This cancels your individual track selections.
- Use Deselect All to deselect all selected tracks at once.
Playing Photo Contents
You can play photo contents located on a DVD, USB, mobile device, or PC.
Using the Tools Menu
During playback, press the TOOLS button.
Start/Stop Slide Show
Select to play/pause the slide show.
Slide Show Speed
Select to adjust the slide show speed.
Background Music
Select to listen to music while viewing a slide show.
Zoom
Select to enlarge the current picture. (Enlarge up to 4 times)
Rotate
Select to rotate a picture. (This will rotate the picture either clockwise or counter clockwise.)
Information
Shows the picture information including the name and size, etc.
Depending on the disc or storage device, the Tools menu may differ. All options may not be displayed.
To enable the background music function, the photo file must be in the same storage media as the music file. However, the sound quality can be affected by the bit rate of the MP3 file, the size of the photo, and the encoding method.
Creating a Photo Playlist
You can create a photo playlist in nearly the same way you create a music playlist. See page 30 for instructions. Select photo files instead of music files.
Listening to the Radio
- To listen to the radio, you must connect the supplied FM antenna.
Operating the Radio with the Remote Control
- Press the FUNCTION button to select FM.
-
Tune to the desired station.
-
Preset Tuning 1: Press the button to select PRESET, and then press the TUNING UP, DOWN button to select a preset station.
Before you can tune to preset stations, you must add preset stations to the product's memory. See Presetting Stations below.
- Manual Tuning: Press the button to select MANUAL, and then press the TUNING UP, DOWN button to tune in to a lower or higher frequency.
Automatic Tuning: Press the button to select MANUAL, and then press and hold the TUNING UP, DOWN button to automatically search the band.
Setting Mono/Stereo
Press the MO/ST button.
Each time you press the button, the sound switches between STEREO and MONO.
- In a poor reception area, select MONO for a clear, interference-free broadcast.
Presetting Stations
Example : Presetting FM 89.10 into memory.
- Press the FUNCTION button to select FM.
- Press the TUNING UP, DOWN button to select < 89.10> .
-
Press the TUNER MEMORY button.
-
NUMBER flashes on the display.
-
Press the TUNER MEMORY button again.
-
Press the TUNER MEMORY button before NUMBER disappears from the display on its own.
-
After you press the TUNER MEMORY button, NUMBER disappears from the display and the station is stored in memory.
-
To preset another station, repeat steps 2 to 4.
- To tune in to a preset station, press the TUNING UP, DOWN button.
Using Karaoke
You can enjoy the Karaoke with music.
- Connect the microphone on the front of the product.
- In the Home menu, select the Settings, and then press the button.
- Select the Audio, and then press the button.
-
Select My karaoke, and then press the button.
-
You can check the Karaoke score and adjust the volume of playback music's vocal.
- Your Karaoke score is automatically displayed if Karaoke scoring is set to On and a microphone is connected. If you don't want to see the score, set Karaoke scoring to Off.
- If you want to decrease the volume of the vocals in the original sound, select Reduce Vocals in My karaoke settings.
Recording
You can make a recording of karaoke with music.
- During the playback, press the TOOLS button to select Karaoke Recording, and then press button.
- Press button if you want to finish recording.
- When recording is done, KARAOKE folder is created in the USB storage driver and saved as the form of KARAOKE.mp3.
To save recording file, USB storage driver must be inserted.
Recording file is shown if you re-entry to Photos, Videos, and Music.
If you hear strange noises (squealing or howling) while using the Karaoke feature, move the microphone away from the speakers. Turning down the microphone's volume or the speaker volume is also effective.
The microphone does not operate in the D. IN, AUX, FM and BT mode.
The karaoke scoring displays the score automatically when the Karaoke scoring is set to On and a microphone is connected. Disconnect the microphone if you do not want to display the score.
The mic becomes available 10 seconds after the Home menu appears on the screen.
Using Bluetooth
You can use a Bluetooth device to enjoy music with high quality stereo sound, all without wires!
What is Bluetooth?
Bluetooth is a technology that enables Bluetooth-compliant devices to interconnect with each other easily using a short, wireless connection.
-
A Bluetooth device may hum or malfunction:
-
When a part of your body is in contact with the receiving/transmitting system of the Bluetooth device or the Home Cinema.
- When it is subject to electrical variation from obstructions caused by a wall, corner, or office partitioning.
-
When it is exposed to electrical interference from same frequency-band devices including medical equipment, microwave ovens, and wireless LANs.
-
Pair the Home Cinema with the Bluetooth device while the two are close together.
- The further the distance is between the Home Cinema and the Bluetooth device, the worse the quality is.
If the distance exceeds the Bluetooth operational range, the connection is lost.
- In poor reception-sensitivity areas, the Bluetooth connection may not work properly.
- The Home Cinema has an effective reception range of up to 10 meters in all directions if there are no obstacles. The connection will be automatically cut off if the device is out of this range. Even within this range, the sound quality may be degraded by obstacles such as walls or doors.
- This wireless device may cause electrical interference. during its operation.
To Connect the Home Cinema to a Bluetooth
Device
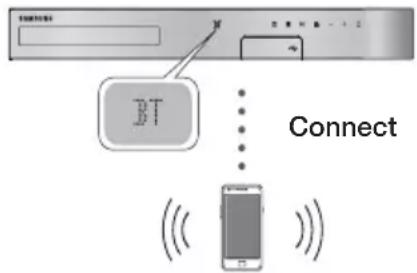
Bluetooth device
Before you begin, confirm that the Bluetooth device supports the Bluetooth compliant stereo headset function.
- Press the FUNCTION button on the remote control to display the BT message.
- Select the Bluetooth menu on the Bluetooth device you want to connect. For instructions, refer to the Bluetooth device's manual.
-
Select the Stereo headset menu on the Bluetooth device.
-
You will see a list of devices.
-
Select "[HTS]HXXXXX" from the searched list.
-
When the Home Cinema is connected to the Bluetooth device, the device name of the connected Bluetooth device, followed by the name of home cinema will appear on the front display of home cinema.
-
Play music on the connected device.
-
You can listen to the music playing on the connected Bluetooth device over the Home Cinema system.
The Home Cinema only supports Middle Quality SBC data (up to 237kbps@48kHz), and does not support High Quality SBC data (328kbps@44.1kHz).
The AVRCP feature is supported. It's functionality will differ, depending on the specifications of the connected device.
Connect only to a Bluetooth device that supports the A2DP Profile.
Only one Bluetooth device can be paired at a time.
The search or connection functions may not work properly in the following cases: -
If there a strong electric field near or around the home cinema.
- If several Bluetooth devices are simultaneously paired with product.
If the Bluetooth device is turned off, not in place, or malfunctions.
Note that such devices as microwave ovens, wireless LAN adapters, fluorescent lights, and gas stoves use the same frequency range as the Bluetooth device, and can cause electric interference.
For the good compatibility of Bluetooth or any other devices like Mobile Phone, we recommend you update the device's latest version.
To Disconnect the Bluetooth Device from the
Home Cinema
You can disconnect the Bluetooth device from the Home Cinema. For instructions, refer to the Bluetooth device's manual.
- When the Home Cinema is disconnected from the Bluetooth device, the Home Cinema will display DISCONNECTED on the front display.
To Disconnect the Home Cinema from the
Bluetooth Device
Press the button on the front panel of the Home Cinema to switch from BT to another mode or turn off the Home Cinema.
- Except when you disconnect the Home Cinema by changing functions, the connected Bluetooth device will wait a certain time for a response from the Home Cinema before terminating the connection. (Disconnection time may differ, depending on the Bluetooth device.)
In Bluetooth connection mode, the Bluetooth connection will be lost if the distance between the Home Cinema System and the Bluetooth device exceeds 10 meters. When the Bluetooth device comes back into effective range or you restart the Bluetooth device, you have to pair the device and home cinema again to reconnect.
In Bluetooth mode, the screen saver will start if the Bluetooth device stays in the Ready state for 5 minutes. To reconnect the Bluetooth device, turn off the screen saver, and then connect the device. To turn off the screen saver, press any button on the remote control (the Volume button, a number button, etc.)
Using the Bluetooth Power On
When the home cinema is turned off, connecting your smart device to the product via a Bluetooth connection can turn the home cinema on.
Quick start function is available when AC Power Cord is connected to AC Source.
To use this function, set Settings > System > Quick start to On.
To use this function, Bluetooth connection between the Home cinema and your smart device should have been established before. In other words, the Home cinema should be found from the list of known Bluetooth devices of your smart device.
1. Connect your smart device to the product via Bluetooth. (For information on Bluetooth connections, refer to your smart device's manual.)
2. Once connected, the home cinema will turn itself on automatically in BT mode.
- Select the desired music to play on your smart device.
Using NFC (Near Field Communication)
Connect your NFC compatible device via Bluetooth to the Home Cinema using this simple set-up procedure. You can play music from the smart phone through the Home Cinema.
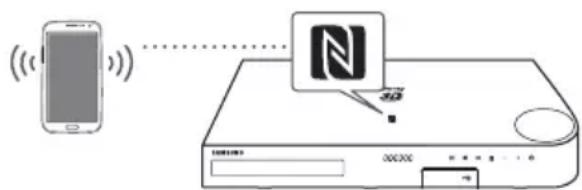
- Turn on the NFC function on the smart phone and make sure the screen lock function on the smart phone is off. The smart phone's NFC function will not work if screen lock is on.
- Gently touch the NFC logo the top of the Home Cinema with the NFC supported device.
-
A pop-up asking whether to proceed with the Bluetooth connection appears on the smart phone. Select 'Yes'.
-
When the connection is complete, the 'connected' message appears.
-
To disconnect the NFC device, touch the device to the Home Cinema's top panel again.
-
To connect another NFC device while the first smart phone is still connected, touch that device to the Home Cinema's top panel. The Home Cinema will disconnect the first smart phone and connect to the second smart phone.
The NFC function is built into Android devices running Android OS 4.1 Jellybean or later.
If your device is running an Android OS earlier than Android OS 4.1 Jellybean, you must download the 'Samsung NFC Connection' application from Android market to use the NFC function.
The position of the NFC antenna differs on smart phones. Check where the NFC antenna is located before connecting. Refer to the user manual of your mobile phone to check the antenna's location before making the connection.
If your smart phone is covered with a thick case, the connection may not succeed.
NFC connection works even when the Home Cinema is turned off, if Quick start is set to On. However, NFC connection will work only after the Home Cinema is turned on if the power cord had been disconnected and reconnected.
There is a trademark or registered trademark of NFC Forum, Inc. in the United States and in other countries.
NFC tagging for Bluetooth connection cannot be established while powering on and off.
NFC tagging for Bluetooth connection will not work while the battery indicator is blinking.
Using the Special Effects Remote Control Buttons
TV SOUND
TV SOUND
If you have a TV that supports Anynet+ (HDMI-CEC), the TV SOUND button lets you direct the TV's audio to the Home Cinema Speakers or the TV Speakers. To use, follow these steps:
- Connect an HDMI cable to the TV and home cinema. (See page 13)
- Set Anynet+ (HDMI-CEC) On in the home cinema and TV.
-
Press the TV SOUND button on the remote control. TV SOUND ON flashes on the display on the front panel, and then changes to D.IN.
-
When TV SOUND is on, TV audio outputs through the Home Cinema speakers.
-
Press the TV SOUND button again to turn TV SOUND off.
-
When TV SOUND is off, TV audio outputs through the speakers of the connected Anynet+ TV.
Use TV SOUND:
1) When you want to listen to the TV's audio through the home cinema speakers.
2) When you want to listen to the audio from a USB device plugged into the TV through the home cinema speakers.
TV SOUND ON/OFF support specifications:
| Anynet+ (HDMI-CEC) Setting | TV Sound ON | TV Sound OFF |
| ON | HTS Speaker Output | HTS Speaker Mute |
| TV Speaker Mute | TV Speaker Output | |
| OFF | HTS Speaker Output | HTS Speaker Mute |
| TV Speaker Output | TV Speaker Output | |
| No Operation | HTS Speaker Output | HTS Speaker Mute |
| TV Speaker Output | TV Speaker Output |
DSP/EQ

You can enjoy various sound mode.
DSPOFF:Select for normal listening.
CINEMA: Reproduces realistic and powerful sound for movie sources.
MUSIC:Suitable for whole music sources.
GAME:Suited for playing video games and produces powerful sound.
M-STEREO (Multi Stereo) : Produces surround sound for 2 channel input sources.
POWER BASS: Reinforce bass sound effect.
LOUD: Improves bass sound characteristics according to output level.
NIGHT: Optimizes to night by compress dynamic range (soft sound).
LOCAL EQ: It provides a unique EQ curve for fitting to local music.
Using BD-LIVE™
- Connect the product to the network. (See page 14)
- Configure the network settings. (See pages 20~22)
Once the product is connected to your network, you can enjoy various movie-related service contents available on BD-LIVE compliant discs.
- Attach a USB memory stick to the USB jack on the front of the product, and then use BD Data Management to check its remaining memory. The memory device must have at least 1GB of free space to accommodate the BD-LIVE services.
- Select Settings on the Home screen, and then press the button.
- Select System, and then press the button.
- Select BD Data Management, and then press the button.
- Select Change Device, and then press the button.
- Select USB DISK, and then press the button.
- Insert a Blu-ray Disc that supports BD-LIVE.
- Select an item from the list of BD-LIVE service contents provided by the disc manufacturer.
The way you use BD-LIVE and the provided contents may differ, depending on the disc manufacturer.
Using DLNA
DLNA lets you access and play files located on your PC through your home cinema.
Follow the directions in the DLNA user's guide to set up DLNA on your PC and to tag folders and files you want to share with the home cinema.
To access and play files located on your PC after you have setup DLNA, follow these steps:
- Turn on your PC, your TV, and the home cinema.
-
Make sure the DLNA Shared server is running on your PC.
-
On your home cinema, select Change Device.
- Use the button to select your PC in the Device List.
- Select the kind of file you want to view or play. Photos, Videos, or Music and then press
- Use the button to select the folder with the kind of files you selected, and then press The File List is displayed.
- Select the file you want to view or play, and then press
You can create Playlists from files on your PC in the same way you create playlists from files on USB devices and discs.
With a few exceptions, you can control the playback of files on your PC in the same fashion you control the playback of files on USB devices and discs.
You can also access files on your PC by first selecting Photos, Videos, or Music on the Home screen, and then selecting your PC from the device list that appears.
Apps
Your home cinema offers an extensive collection of news, movies, weather, and other content you can download directly to and enjoy on your home cinema. First, check the network and make sure the home cinema is connected to the Internet. Your home cinema must be connected to the Internet to use the Apps feature.
The apps offered through the Apps feature work much like their on-line versions or, if different, are easy to use.
The apps require you to create accounts before you can use them. Although you can create an account at most of these sites through your home cinema, it is easier and quicker to create an account by visiting the sites on line using a PC, laptop, or tablet with Internet access. Note that in some cases, you will need to use the home cinema and a PC, laptop, or tablet to establish an account. The main difference between the regular on-line versions and the versions you can access through your home cinema is that with the home cinema versions, you use your remote to enter letters and numbers as opposed to a keyboard.
Using Apps
The first time you access any one of the apps, the home cinema displays two agreements. You must accept both agreements to download and use any apps.
By default, the home cinema displays four popular apps on the Home screen. You can view more apps and change the apps the home cinema displays on the Home screen by selecting the More button.
To start an app, highlight the app, double click it, and then follow the directions displayed on the screen.
Viewing Additional Apps
- Select the More button on the Home screen, and then press the button. The More Apps screen appears displaying a bank of apps.
- To view additional apps, move the highlight to the right or left until another group of apps appears.
- To exit the More Apps screen, select Close or press the RETURN button or EXIT button on your remote.
Changing the Apps Displayed on the Home
Screen
- Select the More button, and then press the button.
- Select the Edit button on the More Apps screen, and then press the button.
- Apps that the home cinema displays on the Home page are marked with a check. Deselect apps you want to remove from the Home screen by highlighting each app, and then pressing the button.
- Select apps by highlighting each app, and then pressing the button. A check mark appears on each app you select. You can have up to four apps selected at a time.
- When done, select OK, and then press the button. The Home screen re-appears.
To exit an application, press the EXIT button on your remote.
To delete the login information for all Apps, press the button for 5 seconds or more.
Using Opera TV Store
At the Opera TV Store, you will find high-quality Internet video streaming, social network, and music streaming services.
Accessing Opera TV Store
To access Opera TV Store, select the Opera TV Store button on the Home screen, and then press the button.
To exit the Opera TV Store screen, press the EXIT or RETURN button on your remote.
Navigating in Opera TV Store
When the Opera TV Store screen appears, it displays a bank of assorted apps. Use the buttons on your remote to move the highlight from app to app.
Selecting an App
Move the highlight to the app you want, and then press the button.
In the pop-up that appears, select OPEN to open the app immediately or ADD TO MY APPS to add the app to My Apps. Press the RETURN button on your remote to go back to the Opera TV Store screen.
Selecting Apps by Category
To make searching for apps easier, you can view apps by categories such as Popular, Watch, Listen, Play, etc.
To select a category, use the button on your remote to move the highlight to the top of the screen. Then, use the buttons to select a category.
Using the My Apps Screen
To access the My Apps screen, highlight MY APPS, and then press the button. The My Apps screen appears displaying all the apps you have saved with the My Apps designation.
Deleting Apps from My Apps
-
Highlight the MENU button on the top of the My Apps screen, and then press the button on your remote.
-
Select REMOVE APPS in the menu, and then press the button. A red rectangle appears around one of the apps.
- Move the rectangle to the app you want to delete, and then press the button.
- Repeat this process to delete additional apps.
- When finished, select DONE, and then press the button.
- Press the RETURN button to go back to the Main screen.
Searching for Apps
- Select SEARCH at the top of the screen, and then press the button.
- To search quickly for popular items, click one of the popular search tabs at the top of the screen.
-
To search for an app by name, enter the app name using the onscreen keyboard. Opera TV Store will search as you type and display apps with names that match the letters you enter.
-
To cancel a current search, press the RETURN button on your remote or select BACK on the screen, and then press
Screen Mirroring
Screen Mirroring lets you display the screen of a smart phone or other compatible device on the TV screen using Miracast™ technology. Manual Screen Mirroring does not require a cable or a wireless router.
- From the Home screen, use the buttons to select Screen Mirroring, and then press G.
- Launch AllShare Cast on your smart phone or device.
- On your device, find the name of the home cinema system in the list of available devices, and then select it.
- The TV displays a connecting message (for example, Connecting to Android_92gb...) and then displays the connected message.
-
In a few moments, the screen of your device appears on the TV screen.
-
When you are using the Screen Mirroring function, video stuttering or audio dropouts may occur, depending on your environment.
-
The Home Cinema can connect to devices that support AllShare Cast. Note that all devices that have AllShare Cast may not be fully supported, depending on the manufacturer. For further information on mobile connection support, refer to the manufacturer's web site.
- Bluetooth transmissions can interfere with the Screen Mirroring signal. Before using the Screen Mirroring function, we strongly recommend that you turn off the Bluetooth function on your smart phone or smart device.
Additional Information
Notes
Connections
HDMI OUT
Certain HDMI output resolutions may not work, depending on your TV.
- You must have an HDMI connection to enjoy videos with 3D technology.
- A long HDMI cable may cause screen noise. If this occurs, set HDMI Deep Colour to Off in the menu.
Settings
3D Settings
- For some 3D discs, to stop a movie during 3D playback, press the button once. The movie stops and the 3D mode option is de-activated. To change a 3D option selection when you are playing a 3D movie, press the button once. The Blu-ray menu appears. Press the button again, then select 3D Settings in the Blu-ray menu.
- Depending on the content and the position of the picture on your TV screen, you may see vertical black bars on the left side, right side, or both sides.
TV Aspect Ratio
Depending on the disc type, some aspect ratios may not be available.
- If you select an aspect ratio and option which is different than the aspect ratio of your TV screen, the picture might appear to be distorted.
If you select 16:9 Original, your TV may display 4:3 Pillarbox (black bars on the sides of the picture).
BD Wise (Samsung Products only)
- When BD Wise is on, the Resolution setting automatically defaults to BD Wise and BD Wise appears in the Resolution menu.
If the product is connected to a device that does not support BD Wise, you cannot use the BD Wise function. - For proper operation of BD Wise, set the BD Wise option in both the product and the TV to On.
Digital Output
- Be sure to select the correct Digital Output or you will hear no sound or just loud noise.
- If the HDMI device (AV receiver, TV) is not compatible with compressed formats (Dolby Digital, DTS), the audio signal outputs as PCM.
- Regular DVDs do not have BONUSVIEW audio and Navigation Sound Effects.
Some Blu-ray Discs do not have BONUSVIEW audio and Navigation Sound Effects. - This Digital Output setup does not affect the analogue (L/R) audio or HDMI audio output to your TV. It affects the optical and HDMI audio output when your product is connected to an AV receiver.
- If you play MPEG audio soundtracks, the audio signal outputs as PCM regardless of your Digital Output selections (PCM or Bitstream).
- Digital Output can be activated when Speaker Selection is set to TV Speaker.
BD-Live Internet Connection
The Internet connection may be restricted while you are using BD-LIVE contents.
Anynet+ (HDMI-CEC)
Depending on your TV, certain HDMI output resolutions may not work. Please refer to the user manual of your TV.
- This function is not available if the HDMI cable does not support CEC.
- If your Samsung TV has an Anynet+ logo, then it supports the Anynet+ function.
BD Data Management
- In the external memory mode, disc playback may be stopped if you disconnect the USB device in the middle of playback.
- Only those USB devices formatted in the FAT file system (DOS 8.3 volume label) are supported. We recommend you use USB devices that support the USB 2.0 protocol with 4 MB/sec or faster read/write speeds.
- The Resume Play function may not work after you format the storage device.
The total memory available to BD Data Management may differ, depending on conditions.
DivX® Video On Demand
- For more information about DivX(R) VOD, visit "http://vod.divx.com".
Speaker Settings
- When Speaker Selection is set to TV Speaker, audio is produced by the TV speakers.
HDMI audio
- When HDMI audio is output to the TV speakers, it is automatically down-mixed to 2 channels.
Audio Return Channel
- When Anynet+ (HDMI-CEC) is Off, the Audio Return Channel function is not available.
- Using an HDMI cable not certified for ARC (Audio Return Channel) may cause a compatibility problem.
- The ARC function is only available if an ARC-compliant TV is connected.
Playback
Playing Video files
Video files with high bit rates of 20Mbps or more strain the product's capabilities and may stop playing during playback.
Selecting the Audio Language
- The indicator will not appear on the screen if the BONUSVIEW section does not contain any BONUSVIEW audio settings.
- The languages available through the Audio Language function depend on the languages that are encoded on the disc. This function or certain languages may not be available.
- Some Blu-ray Discs may allow you to select either the PCM or Dolby Digital audio English soundtrack.
Selecting the Subtitle Language
Depending on the Blu-ray Disc / DVD, you may be able to change the subtitle language in the Disc Menu. Press the DISC MENU button.
- This function depends on the selection of subtitles that are encoded on the disc and may not be available on all Blu-ray Discs/DVDs.
Information about the main feature BONUSVIEW mode will also appear if the Blu-ray Disc has a BONUSVIEW section.
This function changes both the primary and secondary subtitles at the same time.
- The total number of primary and secondary subtitles, respectively, is displayed.
Playing JPEG files
- You can't enlarge the subtitle and PG graphics in the full screen mode.
Playing Content
Using the TOOLS button while playing pictures
- If the home cinema is connected to a BD Wise compliant TV that has BD Wise On, the Picture Settings menu will not appear.
- The Background Music function will not work unless the music file and the photo file are located on the same storage media. Also, sound quality can be impacted by the bit rate of the MP3 music file, the size of the photos, and the encoding method.
Disk and Format Compatibility
Disc types and content your Product can Play
| Media | Disc Type Details | Is |
| VIDEO | Blu-ray Disc3D Blu-ray Disc | BD-ROM or BD-RE/-R disc recorded in the BD-RE format. |
| DVD-VIDEO, DVD-RW, DVD-R, DVD+RW, DVD+R | DVD-VIDEO, recorded DVD+RW/DVD-RW(V)/DVD-R/+R discs that have been recorded and finalised, or a USB storage media containing DivX, MKV, MP4 contents. | |
| MUSIC | CD-RW/-R, DVD-RW/-R, BD-RE/-R | Music recorded on CD-RW/-R, DVD-RW/-R, BD-RE/-R discs or a USB storage media containing MP3 or WMA contents. |
| PHOTO | CD-RW/-R, DVD-RW/-R, BD-RE/-R | Photos recorded on CD-RW/-R, DVD-RW/-R, BD-RE/-R discs or a USB storage media containing JPEG contents. |
The product may not play certain CD-RW/-R and DVD-R because of the disc type or recording conditions.
If a DVD-RW/-R disc has not been recorded properly in DVD video format, it will not be playable.
Your product will not play content that has been recorded on a DVD-R at a bit rate that exceeds 10 Mbps.
Your product will not play content that has been recorded on a BD-R or USB device at a bit rate that exceeds 30 Mbps.
Playback may not work for some types of discs, or when you use specific operations, such as angle change and aspect ratio adjustment. Information about the discs is written in detail on the disc box. Please refer to this if necessary.
When you play a BD-J title, loading may take longer than a normal title or some functions may perform slowly.
Disc Types your Product cannot Play
HD DVD
DVD-ROM/PD/MV-Disc, etc
DVD-RW(VR mode)
CVD/CD-ROM/CDV/ CD-G/CD-I/LD (CD-Gs play audio only, not graphics.)
DVD-RAM
Super Audio CD (except CD layer)
3.9 GB DVD-R Disc for Authoring.
This product may not respond to all operating commands because some Blu-ray Disc, DVD, and CD discs allow specific or limited operation and provide only certain features during playback. Please note that this is not a defect in the product.
Samsung cannot guarantee that this product will play every disc bearing the Blu-ray Disc, DVD, or CD logo because disc formats evolve, and problems and errors may occur during the creation of Blu-ray Disc, DVD, and CD software and/or the manufacture of discs.
Please contact the SAMSUNG Customer Care Centre at, if you have questions or encounter difficulty when playing Blu-ray Disc, DVD, or CD discs in this product. Also, refer to rest of this user manual for additional information on playback restrictions.
Some commercial discs and DVD discs purchased outside your region may not play on this product.
Logos of Discs the Product can Play
| Blu-rayDisc 3D Blu-ray Disc | |
| BD-LIVE™ | DOLBY TRUEHD DIGITAL PLUS |
| BD-LIVE Dolby | |
| dtts-HD Master Audio | Essential | Java- POMED |
| DTS Java | |
| PAL | DIVX. HD |
| PAL broadcast system in U.K. France, Germany, etc. | DivX |
Region Code
Both products and discs are coded by region. These regional codes must match for a disc to play. If the codes do not match, the disc will not play. The Region Number for this product is displayed on the rear panel of the product.
| Disc Type | Region Code | Area |
| Blu-ray Disc | A | North America, Central America, South America, Korea, Japan, Taiwan, Hong Kong and South East Asia. |
| B | Europe, Greenland, French territories, Middle East, Africa, Australia and New Zealand. | |
| C | India, China, Russia, Central and South Asia. | |
| DVD- VIDEO | 1 | The U.S., U.S. territories and Canada |
| 2 | Europe, Japan, the Middle East, Egypt, Africa, Greenland | |
| 3 | Taiwan, Korea, the Philippines, Indonesia, Hong Kong | |
| 4 | Mexico, South America, Central America, Australia, New Zealand, Pacific Islands, Caribbean | |
| 5 | Russia, Eastern Europe, India, North Korea, Mongolia | |
| 6 | China |
If the Region number of a Blu-ray Disc/DVD does not correspond to the Region number of this product, the product cannot play the disc.
AVCHD (Advanced Video Codec High Definition)
- This product can play back AVCHD format discs. These discs are normally recorded and used in camcorders.
- The AVCHD format is a high definition digital video camera format.
- The MPEG-4 AVC/H.264 format compresses images with greater efficiency than the conventional image compressing format.
- Some AVCHD discs use the "x.v.Color" format. This product can play back AVCHD discs that use the "x.v.Color" format.
"X.v.Colour" is a trademark of Sony Corporation. - "AVCHD" and the AVCHD logo are trademarks of Matsushita Electronic Industrial Co., Ltd. and Sony Corporation.
Some AVCHD format discs may not play, depending on the recording conditions.
AVCHD format discs need to be finalised.
"X.v.Colour" offers a wider colour range than normal DVD camcorder discs.
Some DivX, MKV and MP4 format discs may not play, depending on their video resolution and frame rate.
Supported Formats
Notes on the USB connection
- Your product supports USB storage media, MP3 players, digital cameras, and USB card readers.
The product does not support folder or file names longer than 128 characters. - Some USB/digital camera devices may not be compatible with the product.
- Your product supports the FAT 16, FAT 32, and NTFS file systems.
- Connect USB devices directly to the product's USB port. Connecting through a USB cable may cause compatibility problems.
- Inserting more than one memory device into a multi-card reader may cause the reader to operate improperly.
The product does not support the PTP (Peer to Peer) protocol. - Do not disconnect a USB device while it is transferring or recording data.
- The bigger the image resolution, the longer the image takes to display.
- This product cannot play MP3 files with DRM (Digital Rights Management) downloaded from commercial sites.
- Your product only supports video that is under 30fps (frames per second).
- Your product only supports USB Mass Storage Class (MSC) devices such as thumb drives and USB HDD. (HUB is not supported.)
- Certain USB HDD Devices, multi-card readers and thumb drives may not be compatible with this product.
- If some USB devices require excessive power, they may be limited by the circuit safety device.
- If playback from a USB HDD is unstable, provide additional power by plugging the HDD into a wall socket. If the problem continues, contact the USB HDD manufacturer.
- SAMSUNG is not responsible for any data file damage or data loss.
Video File Support
| File Extension | Container Video | Codec Audio Codec Resolution | ||
| *.avi | AVI | DivX 3.11/4/5/6 MP4v3 H.264 BP/MP/HP | MP3, Dolby Digital, DTS, WMA, PCM | 1920x1080 |
| *.mkv | MKV | VC-1 AP, DivX 5/6 H.264 BP/MP/HP | MP3, Dolby Digital, DTS | |
| *.wmv | WMV (wmv9) | VC-1 AP, VC-1 SM | WMA | |
| *.mp4 | MP4 | MP4 (mp4v) H.264 BP/MP/HP | AAC | |
| *.mpg / *.mpeg | PS | MPEG1 MPEG2 H.264 BP/MP/HP | MP1, 2 Dolby Digital, DTS | |
- Limitations
- Even when a file is encoded by a supported codec listed above, the file might not play if its content has a problem.
- Normal playback is not guaranteed if the file's container information is wrong or the file itself is corrupted.
- Files having a higher bit rate/frame rate than standard may stutter during sound/video playback.
- The Seek (skip) function is not available if the file's index table is damaged.
Video decoder
Supports up to H.264 Level 4.1 and AVCHD
- Does not support H.264 FMO/ASO/RS and VC1 SP/MP/AP L4
- MPEG4 SP, ASP : Below 1280 x 720 : 60 frames max
Above 1280 x 720 : 30 frames max
- Does not support GMC 2 or higher
Audio decoder
Supports WMA 7,8,9 and STD
- Does not support WMA sampling rate of 22050Hz mono.
- AAC: Max sampling rate: 96Khz (8, 11, 12, 16, 22, 24, 32, 44.1, 48, 64, 88.2, 96) Max bit rate: 320kbps
Supported DivX subtitle file formats
- .txt, .smi, .srt, .sub, .txt
Music File Support
| File Extension | Container | Audio Code | Support Range |
| *.mp3 | MP3 | MP3 - | |
| *.wma | WMA | WMA | * Sampling rates (in kHz) - 8, 11, 16, 22, 32, 44.1, 48 * Bit rates - All bit rates from 5kbps to 384kbps |
Picture File Support
| File Extension | Type | Resolution |
| *.jpg / *.jpeg / *.jpe | JPEG | 15360x8640 |
| *.png | PNG |
Digital Output Selections
| Setup PCM | Bitstream(Unprocessed) | Bitstream(Re-encoded DTS) | Bitstream(Re-encoded Dolby D) | ||
| Connection HDMI supported AV receiver | |||||
| Audio Stream on Blu-ray Disc | PCM Up to PCM 7.1ch PCM | DTS re-encoded | Re-encoded Dolby Digital* | ||
| Dolby Digital | Dolby TrueHDUp to PCM 5.1ch | Dolby Digital | |||
| Dolby Digital Plus | Dolby Digital Plus | ||||
| Dolby TrueHD | |||||
| DTS DTS | |||||
| DTS-HD High Resolution Audio | DTS-HD High Resolution Audio | ||||
| DTS-HD Master Audio | DTS-HD Master Audio | ||||
| Audio Stream on DVD | PCM PCM | 2ch PCM 2ch PCM | 2ch PCM 2ch | ||
| Dolby Digital | Up to PCM 5.1chDTS DTS | Dolby Digital Dolby Digital | |||
| DTS DTS | |||||
| Definition for Blu-ray Disc | Any | Decodes the main feature audio and BONUSVIEW audio stream together into PCM audio and adds Navigation Sound Effects. | Outputs only the main feature audio stream so that your AV receiver can decode the audio bitstream.You will not hear BONUSVIEW audio or Navigation Sound Effects. | Decodes the main feature audio and BONUSVIEW audio stream together into PCM audio and adds Navigation Sound Effects, then re-encodes the PCM audio into DTS bitstream. | Decodes the main feature audio and BONUSVIEW audio stream together into PCM audio and adds Navigation Sound Effects, then re-encodes the PCM audio into Dolby Digital bitstream or PCM. |
If the Source Stream is 2ch or mono, "Re-encoded Dolby D" Setting are not applied. Output will be PCM 2ch.
Blu-ray Discs may include three audio streams :
- Main Feature Audio : The audio soundtrack of the main feature.
- BONUSVIEW audio : An additional soundtrack such as the director or actor's commentary.
- Navigation Sound Effects : When you choose some menu navigation options, Navigation Sound Effects may sound. Navigation Sound Effects are different on each Blu-ray Disc.
Resolution according to the output mode
| Blu-ray Disc/E-contents/Digital Contents playback DVD playback | |||
| Setup\Output | HDMI Mode | HDMI Mode | |
| Blu-ray Disc | E-contents/Digital contents | ||
| BD Wise | Resolution of Blu-rayDisc | 1080p@60F 480i | |
| Auto Max. Resolution of TV input Max. Resolution of TV input | |||
| 1080p@60F 1080p@60F - | |||
| 1080p - | 1 | ||
| Movie Frame : Auto (24Fs) 1080p@24F - | |||
| 1080i 1080i 1080i | |||
| 720p 720p 720p | |||
| 576p/480p 576p/480p | 10p 576p/480p | ||
Troubleshooting
Refer to the table below when this product does not function properly. If the problem you are experiencing is not listed below or if the instructions below do not help, turn off the product, disconnect the power cord and contact the nearest authorized dealer or Samsung Electronics Service Centre.
| Symptom | Check/Remedy |
| You cannot eject the disc. | • Is the power cord plugged securely into the outlet? • Turn off the power, and then turn it back on. |
| Playback does not start. | • Check the region number of the Blu-ray/DVD disc. Blu-ray/DVD disc purchased from abroad may not be playable. • CD-ROMs and DVD-ROMs cannot be played on this product. • Make sure that the rating level is correct. |
| Playback does not start immediately when you press the ☐/☐ button. | • Are you using a deformed disc or a disc with scratches on the surface? • Wipe the disc clean. |
| No sound. | • The home cinema does not play sound during fast playback, slow playback, and step motion playback. • Are the speakers connected properly? Is the speaker setup correctly customized? • Is the disc severely damaged? |
| You can only hear sound from a few speakers, but not all 6. | • On certain Blu-ray/DVD discs, sound is output from the front speakers only. • Check if the speakers are connected properly. • Adjust the volume. • When playing audio from a CD, the radio, or a TV, the unit outputs sound to the front speakers only. |
| Symptom Check/Remedy | |
| Dolby Digital 5.1 CH Surround Sound is not produced. | ·Is there "Dolby Digital 5.1 CH" mark on the disc? Dolby Digital 5.1 CH Surround Sound is produced only if the disc is recorded with 5.1 channel sound. ·Is the audio language correctly set to Dolby Digital 5.1-CH in the information display? |
| The remote control does not work. | ·Are you operating the remote within its operational range and within the properangle relative to the sensor? ·Are the batteries drained? ·Have you selected the mode (TV/BD) functions of the remote control (TV or BD) correctly? |
| ·The disc is rotating but there is no picture. ·Picture quality is poor and the picture is shaking. | ·Is the TV power on? ·Are the video cables connected properly? ·Is the disc dirty or damaged? ·A poorly manufactured disc may not be playable. |
| Audio language and subtitles do not work. | ·The Audio Language and subtitle functions will not work if the disc does not contain multiple language sound tracks or subtitles. |
| The menu screen does not appear even when you select the menu function. | ·Are you using a disc that does not contain menus? |
| The aspect ratio cannot be changed. | ·You can play 16:9 Blu-ray/DVD discs in 16:9 Full mode, 4:3 Letter Box mode, or 4:3 Pan-Scan mode, but 4:3 Blu-ray/DVD discs are played in 4:3 mode only. Refer to the Blu-ray Disc jacket, and then select the appropriate function. |
| ·The product is not working. (Example: The power goes off or you hear a strange noise.) ·The Product is not working normally. | ·Press and hold the remote control's button for 5 seconds in STANDBY mode. This will reset the unit. - Using the RESET function will erase all stored settings. Do not use this function unless necessary. |
| You have forgotten the rating level password. | ·With no disc in the product, press and hold the product's button for longer than 5 seconds. INIT appears on the display and all settings will return to their default values. - Using the RESET function will erase all stored settings. Do not use this function unless necessary. |
| Can't receive radio broadcasts. | ·Is the antenna connected properly? ·If the antenna's input signal is weak, install an external FM antenna in an area with good reception. |
| There is no sound when you try to listen to TV audio through the home cinema speakers. | ·If you press the▲ button while listening to TV audio using the D. IN or AUX functions, the Blu-ray/DVD disc functions are turned on and the TV audio is muted. |
| "Not Available" appears on screen. | ·The features or action cannot be completed at this time because: 1. The Blu-ray/DVD disc's software restricts it. 2. The Blu-ray/DVD disc's software doesn't support the feature (e.g., angles) 3. The feature is not available at the moment. 4. You've requested a title or chapter number or search time that is out of range. |
HT-H5500K/HT-H5530HK/HT-H5530K/HT-H5550K
| Symptom Check/Remedy | |
| If the HDMI output is set to a resolution your TV cannot support (for example, 1080p), you may not see a picture on your TV. | Press and hold the button on front panel for more than 5 seconds with no disc in the product. All settings will revert to their factory settings. |
| No HDMI output. | Check the connection between the TV and the HDMI jack of the product. Check if your TV supports 576p/480p/720p/1080i/1080p HDMI input resolution. |
| Abnormal HDMI output appears on the screen. | If random noise appears on the screen, it means that TV does not support HDCP (High-bandwidth Digital Content Protection). |
| DLNA function | |
| You can see folders shared through DLNA, but cannot see the files. | DLNA shows only Photo, Music, and Movie files. It does not display other kinds of files. |
| Video plays intermittently. | Check if the network is stable. Check if the network cable is properly connected and if the network is overloaded. |
| The DLNA connection between the TV and PC is unstable. | IP addresses under the same subnetwork should be unique, otherwise IP collision can cause an unstable connection. Check if you have a firewall enabled. If so, disable the firewall function. |
| BD-LIVE | |
| The home cinema cannot connect to the BD-LIVE server. | Test whether the network connection is active by using the Network Status function. Check whether a USB memory device is connected to the product. The memory device must have at least 1GB of free space to accommodate the BD-LIVE service. You can check the available size in BD Data Management. (See page 39) See if the BD-Live Internet Connection option is set to Allow(All). If all above fails, contact the contents provider or update to the latest firmware. |
| When using the BD-LIVE service, an error occurs. | The USB memory device must have at least 1GB of free space to accommodate the BD-LIVE service. You can check the available size in BD Data Management. (See page 39) |
When the factory default settings are restored, all stored user BD data is deleted.

Hereby, Samsung Electronics, declares that this equipment is in compliance with the essential requirements and other relevant provisions of Directive 1999/5/EC.
The original Declaration of Conformity may be found at http://www.samsung.com, go to Support > Search Product Support and enter the model name.
This equipment may be operated in Jordan.
HT-H5550WK

Hereby, Samsung Electronics, declares that this equipment is in compliance with the essential requirements and other relevant provisions of Directive 1999/5/EC.
The original Declaration of Conformity may be found at http://www.samsung.com, go to Support > Search Product Support and enter the model name.
This equipment may only be used indoors.
This equipment may be operated in Jordan.
Specifications
| General | Weight 1.90 kg | ||||
| Dimensions 430.0 (W) x 55.0 (H) x 224.0 (D) mm | |||||
| Operating Temperature Range | +5°C to +35°C | ||||
| Operating Humidity Range | 10 % to 75 % | ||||
| FM Tuner | Signal/noise ratio 55 dB | ||||
| Usable sensitivity 12 dB | |||||
| Total harmonic distortion 1.0 % | |||||
| HDMI | Video 1080p, 1080i, 720p, 576p/480p | ||||
| Audio PCM multichannel audio, Bitstream audio, PCM audio | |||||
| Amplifier | Front speaker output 165W x 2 (3Ω) | ||||
| Centre speaker output 170W (3Ω) | |||||
| Surround speaker output 165W x 2 (3Ω) | |||||
| Subwoofer speaker output 170W (3Ω) | |||||
| Frequency response | Analogue input : 20Hz~20kHz (±3dB) | ||||
| Digital input : 20Hz~40kHz (±4dB) | |||||
| S/N Ratio 70dB | |||||
| Channel separation 60dB | |||||
| Input sensitivity (AUX) 500mV | |||||
| Speaker | Speaker system | 5.1ch speaker system | |||
| Front | Surround | Centre | Subwoofer | ||
| Impedance | 3 Ω | 3 Ω | 3 Ω | 3 Ω | |
| Frequency range | 200Hz ~ 20kHz | 200Hz ~ 20kHz | 200Hz ~ 20kHz | 50Hz ~ 200Hz | |
| Output sound pressure level | 84dB/W/M | 84dB/W/M | 84dB/W/M | 84dB/W/M | |
| Rated input | 165W | 165W | 170W | 170W | |
| Maximum input | 330W | 330W | 340W | 340W | |
| Speaker | Dimensions (W x H x D) (Unit : mm) | HT-H5500K | |||
| 95.0 x 146.0 x 74.0 | 95.0 x 116.0 x 74.0 | 227.0 x 95.0 x 74.0 | 220.6 x 380.6 x 364.7 | ||
| HT-H5530HK | |||||
| 95.0 x 502.8 (Max: 610.8) x 74.5 (Stand base: 234.0 x 16.3 x 171.7) | 95.0 x 116.0 x 74.0 | 227.0 x 95.0 x 74.0 | 220.6 x 380.6 x 364.7 | ||
| HT-H5530K | |||||
| 95.0 x 1113.0 x 74.0 (Stand base: 276.0 x 23.0 x 189.0) | 95.0 x 116.0 x 74.0 | 227.0 x 95.0 x 74.0 | 220.6 x 380.6 x 364.7 | ||
| HT-H5550K/HT-H5550WK | |||||
| 95.0 x 1113.0 x 74.0 (Stand base: 276.0 x 23.0 x 189.0) | 227.0 x 95.0 x 74.0 | 220.6 x 380.6 x 364.7 | |||
| Weights (Unit : kg) | HT-H5500K | ||||
| 0.44 0.40 0.56 6.50 | |||||
| HT-H5530HK | |||||
| 1.58 0.40 0.56 6.50 | |||||
| HT-H5530K | |||||
| 2.94 0.40 0.56 6.50 | |||||
| HT-H5550K/HT-H5550WK | |||||
| 2.94 2.94 0.56 6.50 | |||||
Network speeds equal to or below 10Mbps are not supported.
Samsung Electronics Co., Ltd reserves the right to change the specifications without notice.
Weight and dimensions are approximate.
Design and specifications are subject to change without prior notice.
For the power supply and Power Consumption, refer to the label attached to the product.
SWA-6000 (HT-H5550WK only)
| Weight 1.1 kg | |
| Dimensions (W x H x D) 76.2 x 228.6 x 152.4 mm | |
| Operating Temperature Range +5°C to +35°C | |
| Operating Humidity Range 10% ~ 75% | |
| Output 165W x 2 CH | |
| Frequency range 20Hz~20KHz | |
| S/N Ratio 65dB | |
Licences
DOLBY
TRUE:
DIGITAL PLUS
Manufactured under license from Dolby Laboratories. Dolby and the double-D symbol are trademarks of Dolby Laboratories.

dtshD
Master Audio | Essential
For DTS patents, see http://patents.dts.com. Manufactured under license from DTS Licensing Limited. DTS, DTSHD, the Symbol, & DTS and the Symbol together are registered trademarks, and DTS-HD Master Audio | Essential is a trademark of DTS, Inc. © DTS, Inc. All Rights Reserved.
DIVX.
HD
ABOUT DIVX VIDEO: DivX® is a digital video format created by DivX, LLC, a subsidiary of Rovi Corporation. This is an official DivX Certified® device that has passed rigorous testing to verify that it plays DivX video. Visit divx.com for more information and software tools to convert your files into DivX videos.
ABOUT DIVX VIDEO-ON-DEMAND: This DivX Certified® device must be registered in order to play purchased DivX Video-on-Demand (VOD) movies. To obtain your registration code, locate the DivX VOD section in your device setup menu. Go to vod.divx.com for more information on how to complete your registration.
DivX Certified® to play DivX® video up to HD 1080p, including premium content.
DivX®, DivX Certified® and associated logos are trademarks of Rovi Corporation or its subsidiaries and are used under licence.
Covered by one or more of the following U.S. patents : 7,295,673; 7,460,668; 7,515,710; 7,519,274

dlna
CERTIFIED
DLNA®, the DLNA Logo and DLNA CERTIFIED® are trademarks, service marks, or certification marks of the Digital Living Network Alliance.
HDMI
The terms HDMI and HDMI High-Definition Multimedia Interface, and the HDMI Logo are trademarks or registered trademarks of HDMI Licensing LLC in the United States and other countries.

Java
Oracle and Java are registered trademarks of Oracle and/or its affiliates. Other names may be trademarks of their respective owners.
This item incorporates copy protection technology that is protected by U.S. patents and other intellectual property rights of Rovi Corporation. Reverse engineering and disassembly are prohibited.
Blu-ray Disc^TM , Blu rayTM, and the logos are trademarks of Blu-ray Disc Association.
This product uses Cinavia technology to limit the use of unauthorized copies of some commercially-produced film and videos and their soundtracks. When a prohibited use of an unauthorized copy is detected, a message will be displayed and playback or copying will be interrupted.
More information about Cinavia technology is provided at the Cinavia Online Consumer Information Centre at http:// www.cinavia.com. To request additional information about Cinavia by mail, send a postcard with your mailing address to: Cinavia Consumer Information Centre, P.O. Box 86851, San Diego, CA, 92138, USA."
This product incorporates proprietary technology under licence from Verance Corporation and is protected by U.S. Patent 7,369,677 and other U.S. and worldwide patents issued and pending as well as copyright and trade secret protection for certain aspects of such technology. Cinavia is a trademark of Verance Corporation. Copyright 2004-2010 Verance Corporation. All rights reserved by Verance. Reverse engineering or disassembly is prohibited.
- Open Source Licence Notice
In the case of using open source software, Open Source Licences are available on the product menu.
HT-H5500K
HT-H5530HK
HT-H5530K
HT-H5550K
HT-H5550WK
TM 5.1 CH Blu-ray
Jzll 1
polynomials
ai a ai 的最小值为 k .
Samsung
a( 1) = a( 2) = 2
gogc
www.samsung.com/register
Jc 5 2009 11 11 11 11 11 11 11 11 11 11 11 11

- aIaIaIaIaIaIaIaIaIaIaIaIaIaIaIaIaIaIaIaIaIaIaIaIaIaIaIaIaIaIaIaIaIaIaIaIaIaIaIaIaIaIaIaIaIaIaIaIaIaIaIaa I aaiiaaiiaaiiaaiiaaiiaaiiaaiiaaiiaaiiaaiiaaiiaaiiaaiiaaiiaaiiaaiiaaiiaaiiaaiiaaiiaaiiaaiiaaiiaaiiaaiiaaiiaaiiaaiiaaiiaaiiaaiiaaiiaaiiaaiiaaiiaaiiaaiiaaiiaaiiaaiiaaiiaaiiaaiiaaiiaaiiaaiiaaiiaaiiaaiiaaiiaaiie aalaaalaaalaaalaaalaaalaaalaaalaaalaaalaaalaaalaaalaaalaaalaaalaaalaaalaaalaaalaaalaaalaaalaaalaaalaaalaaalaaalaaalaaalaaalaaalaaalaaalaaalaaalaaalaaalaaalaaalaaalaaalaaalaaalaaalaaalaaalaaalaaalaaalaaal aa aII aII aII aII aII aII aII aII aII aII aII aII aII aII aII aII aII aII aII aII aII aII aII aII aII aII aII aII aII aII aII aII aII aII aII aII aII aII aII aII aII aII aII aII aII aII aII aII aII aII aIl aII aII aII aII aII aII aII aII aII aII aII aII aII aII aII aII aII aII aII aII aII aII aII aII aII aII aII aII aII aII aII aII aII aII aII aII aII aII aII aII aII aII aII aII aII aII aII aII aII aI I I I I I I I I I I I I I I I I I I I I I I I I I I I I I I I I I I I I I I I I I I I I I I I I I I I I I I I I I I I I I I I I I I I I I I I I I I I I I I I I I I I I I I I I I I I I I II II II II II II II II II II II II II II II II II II II II II II II II II II II II II II II II II II II II II II II II II II II II II II II II II II II II II II II II II II II II II II II II II II II II II II II II II II II II II II II II II II II II II II II II II II II II II II II II II II II II III III III III III III III III III III III III III III III III III III III III III III III III III III III III III III III III III III III III III III III III III III III III III III III III III III III III III III III III III III III III III III III III III III III III III III III III III III III III III III III III III III III III III III III III III III III III III III III III III III III III 1111111111111111111111111111111111111111111111111111111111111111
1
Lg21 a211 gJg aolgl aoLwlg aonll Loglo 10
a log plssil Jg Lcgwlg a2120LwI Logo 10
.
Llal lal pue Lwau! jaoaol aai 120 aag
Elaal ng Jgall Jio sLx yjzai jai Ioo Llo
oaloo n c agia oia oio y 5y Cuyoi
a alloall loa aay i aiai gslg loy jay alil
aJll no hawgiai
aIgIO aJiaI aJiaI gaiI axoloo Jc jyj
OoLuo Jc aagio . 1000 1000
aIeao Ieao Ieao Ieao Ieao Ieao Ieao Ieao Ieao Ieao Ieao Ieao Ieao Ieao Ieao Ieao Ieao Ieao Ieao Ieao Ieao Ieao Ieao Ieao Ieao Ieao Ieao Ieao Ieao Ieao Ieao Ieao Ieao Ieao I.eo
Jg 1000000000000000000000000000000000000000000000000000000000000000000
BD Wise Jia 2
Jai
Jai
Jai
Jai
aai 100
1.0:
JlIaJI JIeJc.5e21 aIgWJGdLwSic aIwJI IaIaJI ic 46 wLa aIwL WJILsI J3.5AeLw
Jgss Jbi 80s gio s 81 y 82 a Lw g 83.
Joo 8 .sLg.21 aLi g-21 j00i iioI Jwosic
y 1111111111111 2
"Blu-ray 3D", "Blu-ray 3D", "Blu-ray 3D", "Blu-ray 3D", "Blu-ray 3D", "Blu-ray 3D", "Blu-ray 3D", "Blu-ray 3D", "Blu-ray 3D", "Blu-ray 3D", "Blu-ray 3D", "Blu-ray 3D", "Blu-ray 3D", "Blu-ray
LASER PRODUKT KLASSE 1
LASER LAITE LUOKAN 1
LASER APPARAT KCLASS 1
LASER CLASE 1 PRODUCTO
aL 1
saaalj
jll jgjj 26
26
Joo aolw wuogin 26
USBjLg>Jcogal JLaJl 27
28
LJ 29
gagall jie wjw gao 30
gJl clogoo 31
JgJgLgZ1 32
SgLda log paxi 32
gjgl 33
35
aS 二 JLO2
TMBD-LIVE 36
DLNA 36
36
Opera TV Store 37
aLwIuSc 38
[{\ddot{g}}_{2} = {\left( 1 - \frac{1}{g}\right) }^{2}]
L! Log20 39
alwii1golj golg 40
45
Lalgall 48
50
J
LaLal5
aLwll Lg So 5
aolo81 a-gu11 7
a aLJI a>gLI 7
8
#
JcLawl Jw9
a aallll aaiiaa aaii 12
(SWA-6000) a.≤LwJU JI.
13
aL aJgJ1121 14
y
15
aWJl aWulj Jg> aayw axoJ 16
16
17
a<.1110sc! 20
Wi-Fi Direct 23
24
DLNA 25
eall gai all jao clogwll ao elisi agaes s lae paaal Jgs aagagll clogwlg Jc
(1io poaill Jol oJg jg aill alg 50) clll lgc g
(1) 2000000000000000000000000000000000000000000000
aJzio 0,1g JLaI gJ LJI aJI JJI aJI SJI OJI oJI oJI
1 12!
olai aaggag aclawll LgSog Lall g


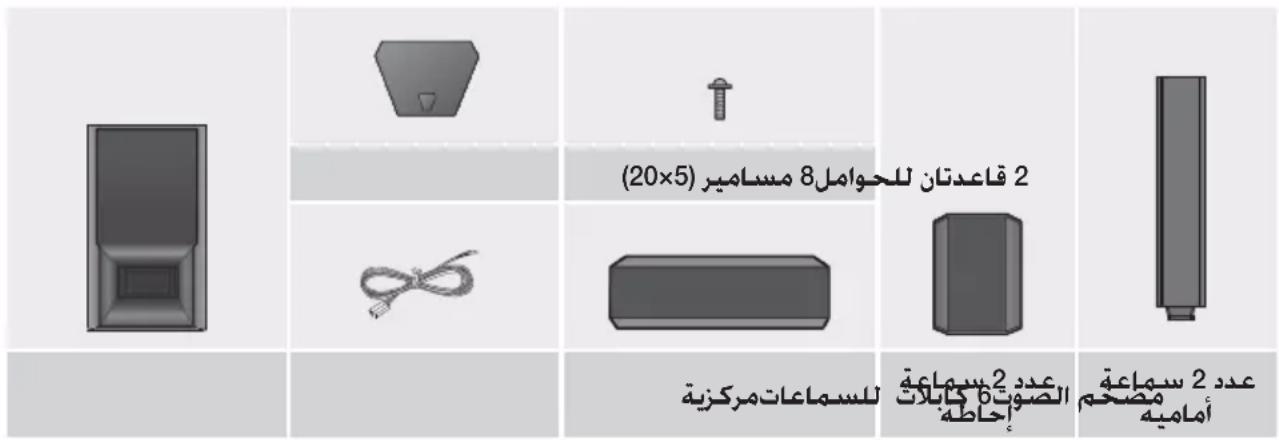
HT-H5530HK
HT-H5530K
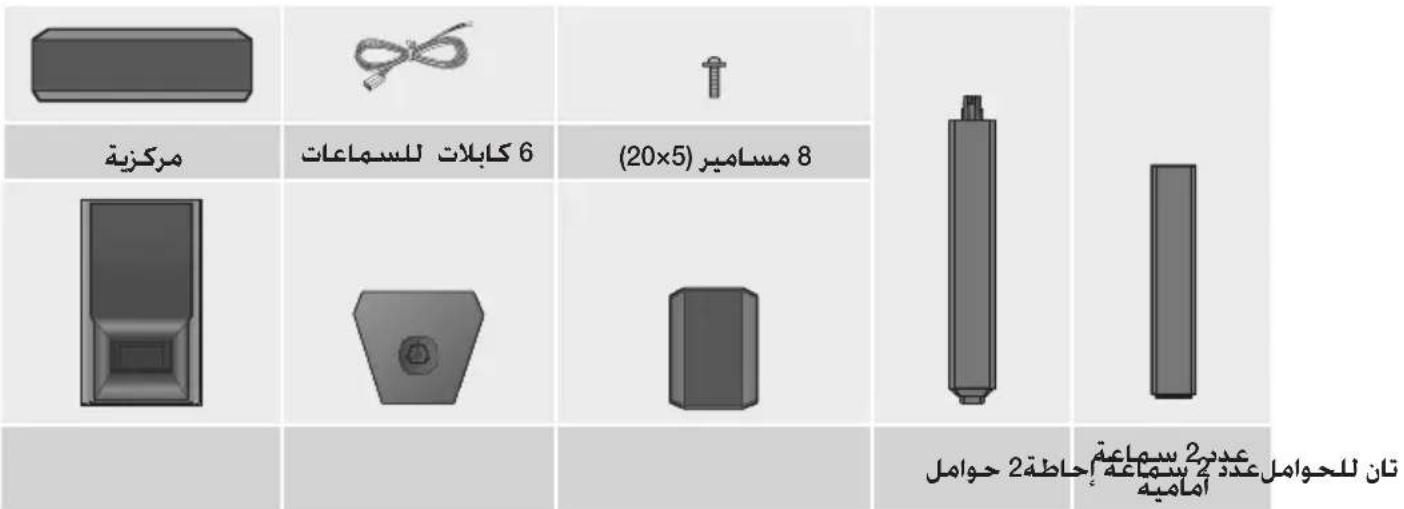
HT-H5550K/HT-H5550WK
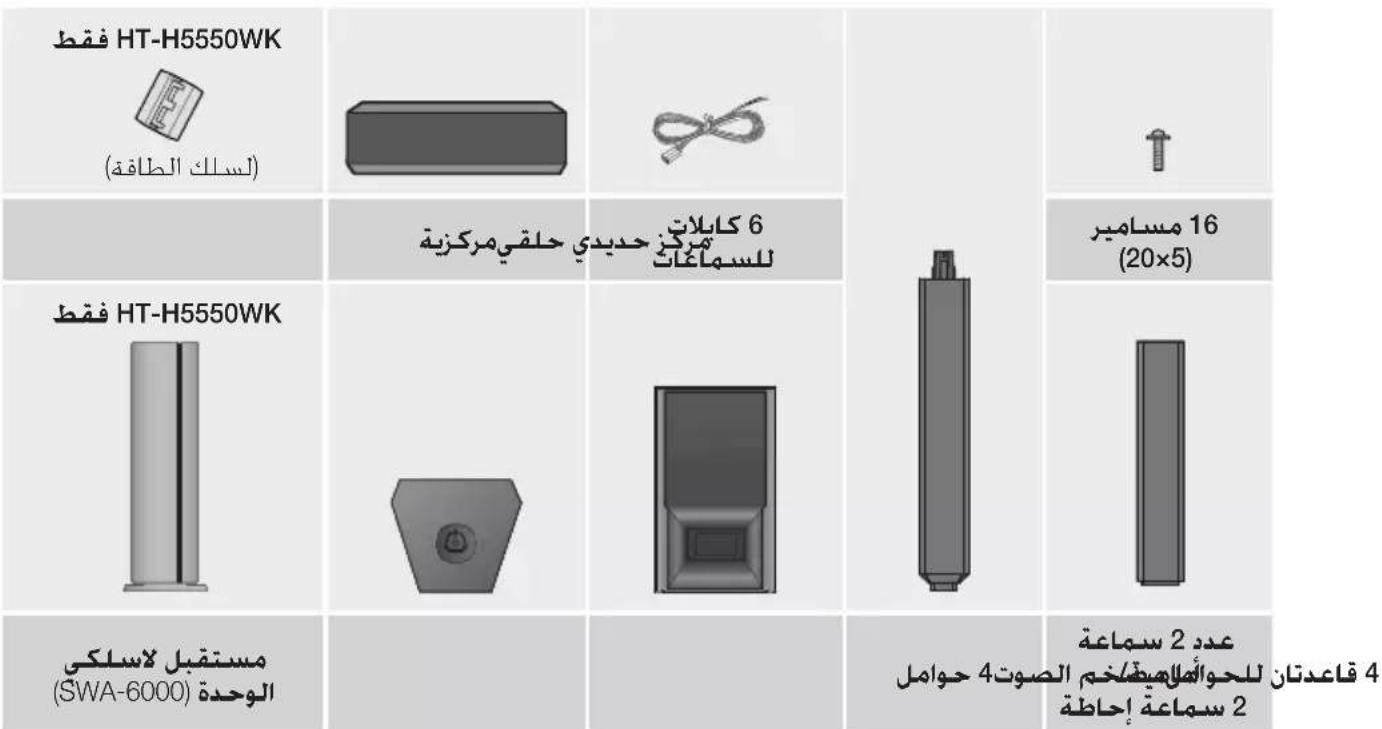

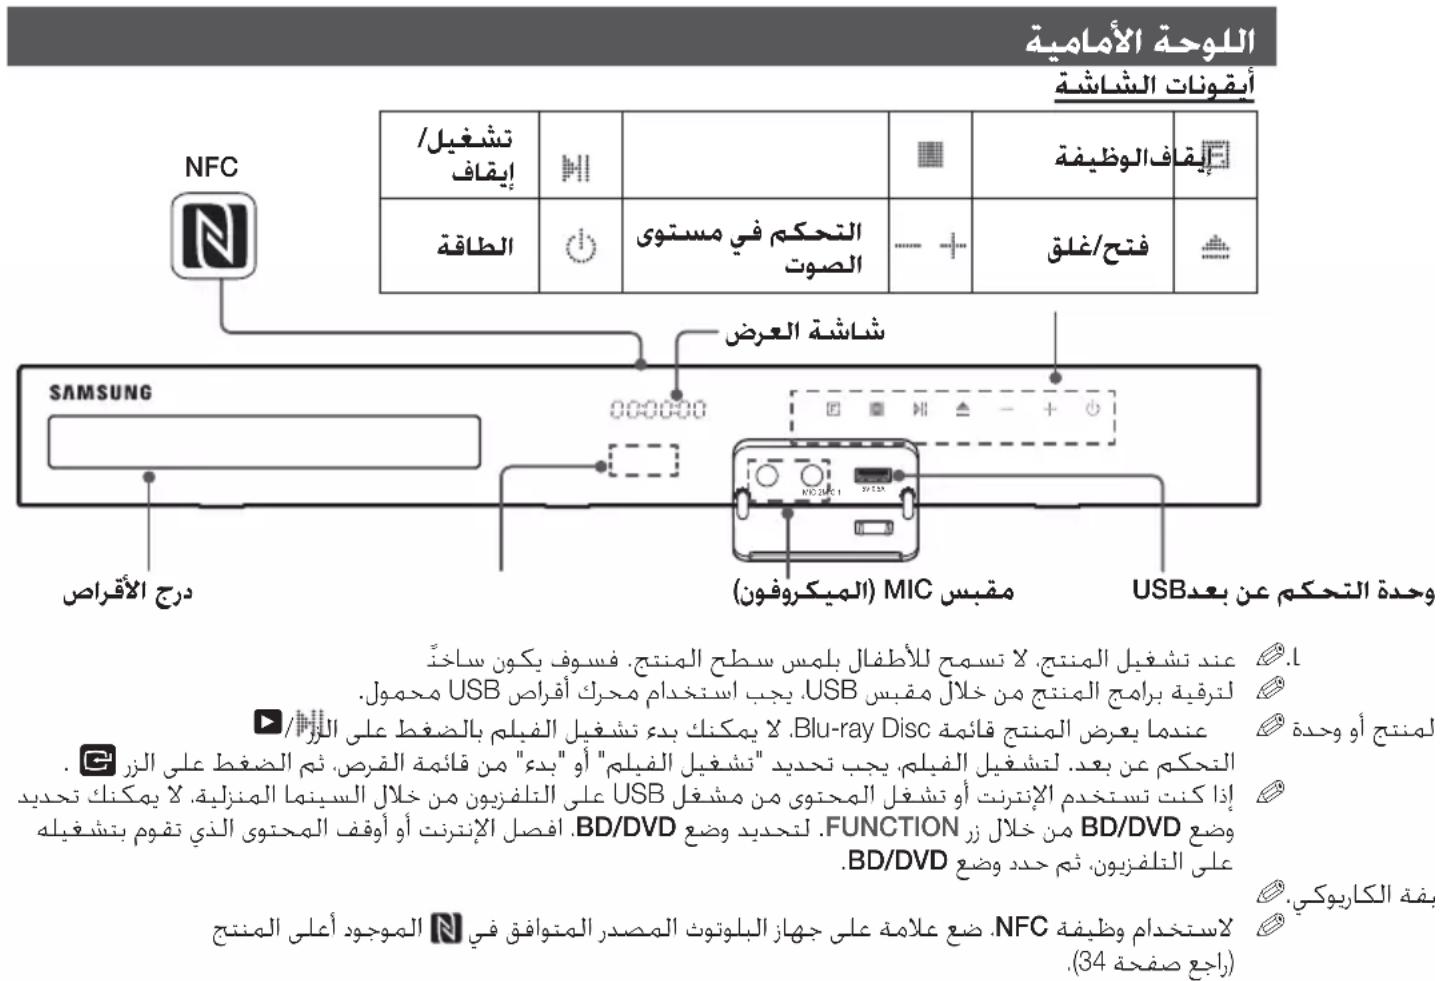
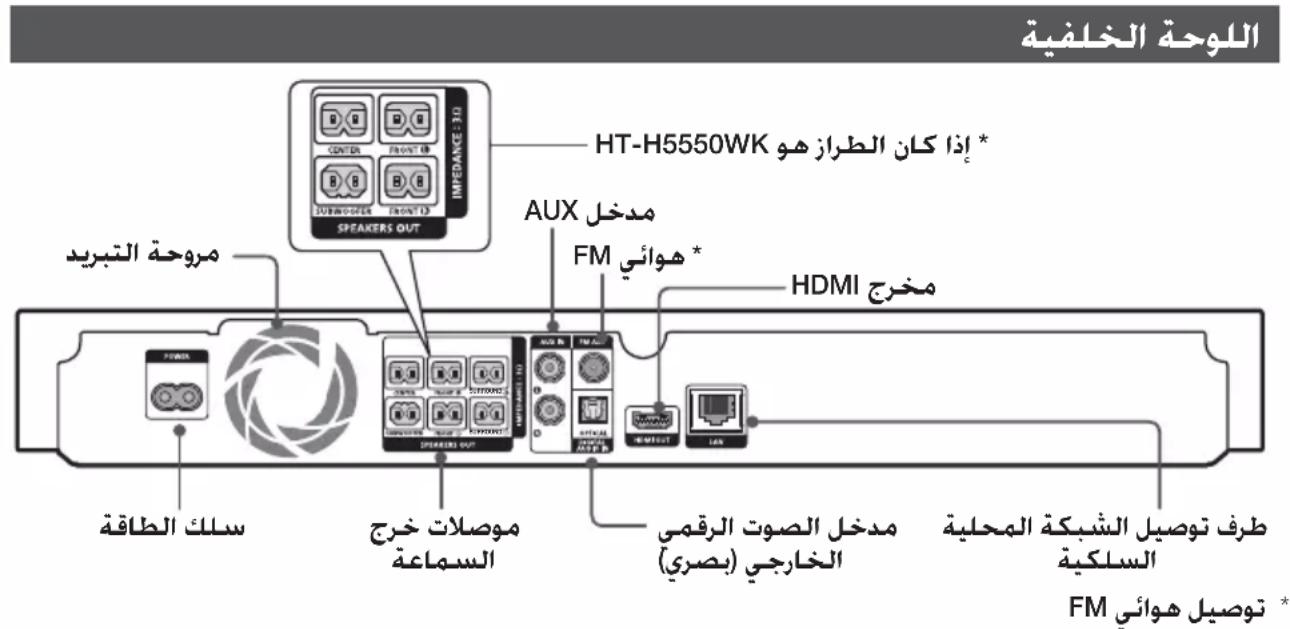

#
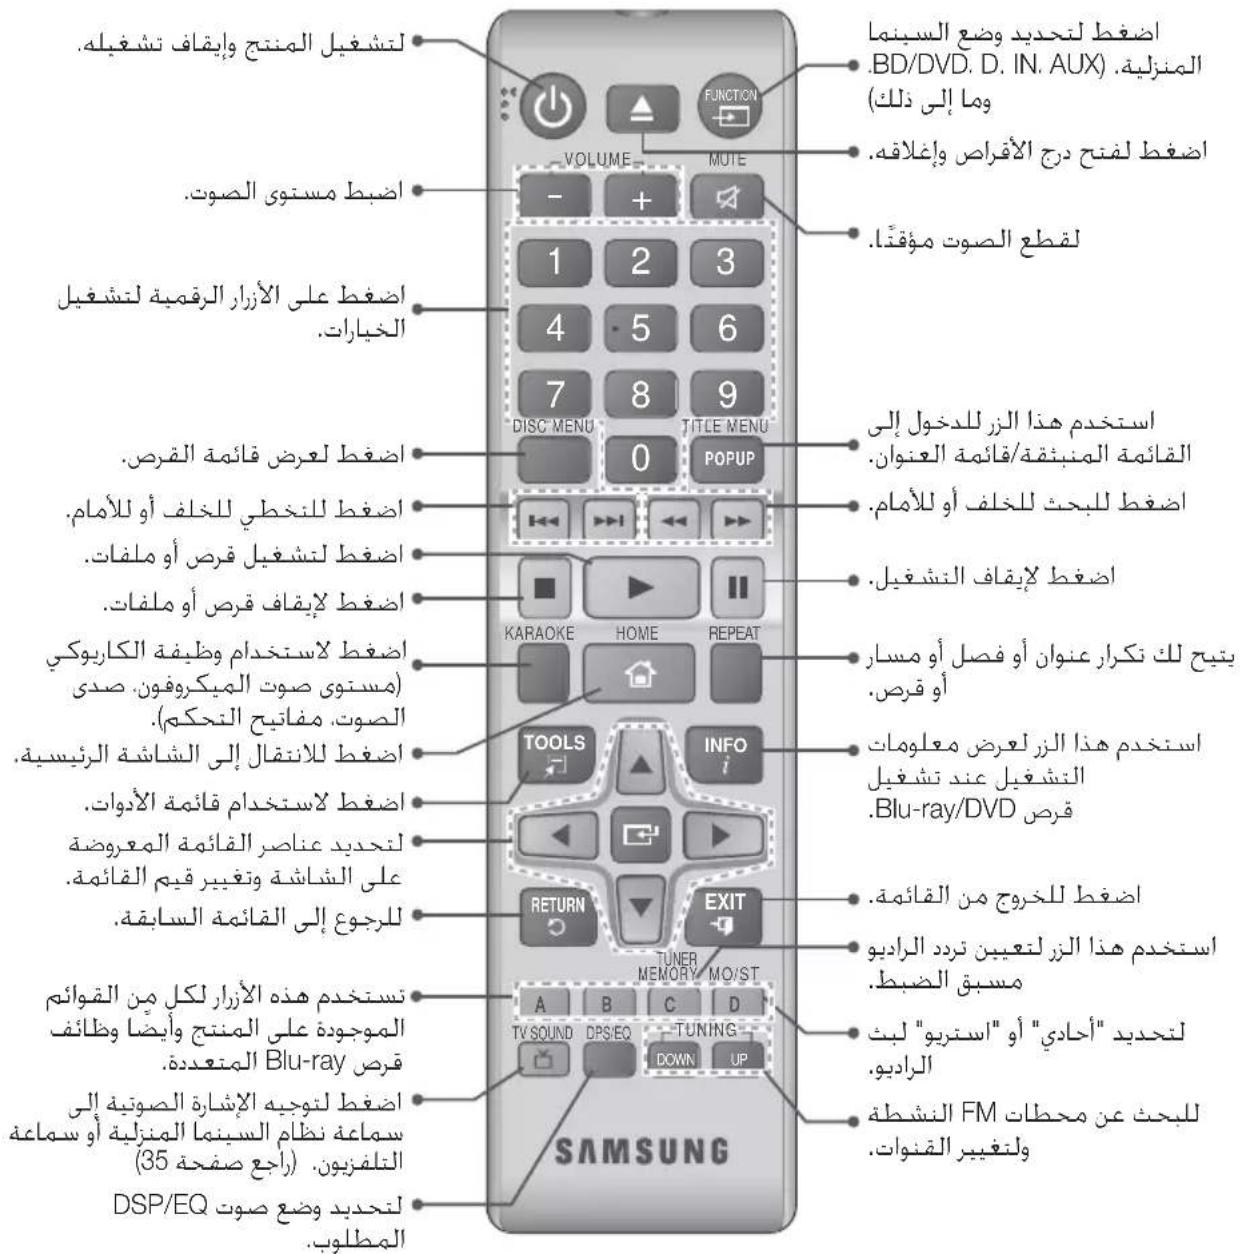
#
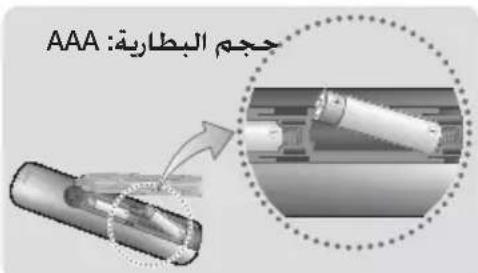
gJ gJ gJ 11111111111111111111111111
,
sic Ljaiw osa Jyblal Joc oo pgi j jrall no
00000000000000000000
7
Aaioo I aie 10
1.1_2^3 ≤ L ≤ 80,1. L ≤ L ≤ 100,J ≤ 2
JLWU
0
4:3 Pan-Scan
aLJ4:3 1
Jg aLl 16:9 g
y 1
J 1
5 . .Network
- aagall jao gaiall joo 5
山
< Lw g] <Lw sglw JlwlJc
aolal aS
1
.(D) jj jll Jck
15 15
iJ 1
( 20 - 8 - 6 - 5) · 12 = 108
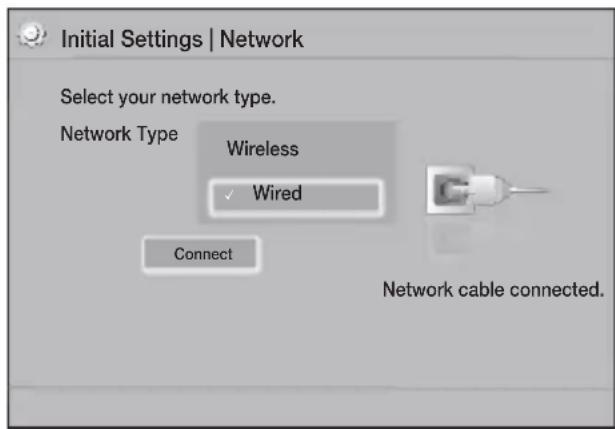
JUaXy gao: aS. JuaJ no ciai jia xin
gbs. jI Jc hovol.sglxixicg.acs
"Initial settings completed."
a uu
Ig 0 Initial Settings Lw
(20 1j).Reset j
HDMI JLS
Anynet+ (HDMI- a log g golg c wogLwigjL)
Anynet+ (HDMI-CEC) 19
J.2g 1.2g J
a aaii jao oagcdo aolgcogjgal
LALALALALALAL
.6
aannnnnne nnnnnnnnnnnnnnnnnnnnnnnnnnnnnnnnnnnnnnnnnnnnnnnnnnnnnnnnnnnnnnnnnnnnnnnnnnnnnnnnnnnnnnnnnnnnnnnnnnnnnnn
.Initial Settings

1

111 1
(aLJI Lc a
aJd
- In( ) n
3.

▼▲jijlchbiol.TV Aspect aulw,
G
1
a 16:9 Original
16:9 Lgaii Li aaiy ai yai Lai
()4:3
yJ 1 JnLJI Jc sIgaw aHwSsogac ggiin
y = 19
.16:9 Full
16:9 Lg a wit aenell y
.16:9 aLJI 4:3
aJL LwL WJL - 4:3 Letter Box
4:3 1
gdi 16:9 gjy jy
16:9 a.
aogwJawgJcIgawab
Function 8
gJ J LaiuU g J J LaaU aas
FJg
LgJyJLaJUaJyJy
Settings 9
Laiuill pIbui jwgi jj yjgocSll lc oogol all
yjgacal all kwluy jogocSll g jyolall aJzall
yogocSll lc attgig DLNA cgtg (25
Jg
1 Settings
| Settings | ||
| Display | 3D Settings | |
| Audio | TV Aspect Ratio : 16:9 Original | |
| Network | BD Wise : Off | |
| System | Resolution : Auto | |
| Language | Movie Frame (24 fps) : Off | |
| Security | HDMI Colour Format : Auto | |
| General | HDMI Deep Colour : Off | |
| Support | Progressive Mode : Auto | |
aLbIg aGall gagllg Jgol. 2
ddgl g gll gll gggg Settings (17 aG>). aJIJI aAALJ 2 cSill
J 15
aalil Jie waiol 20 2
A
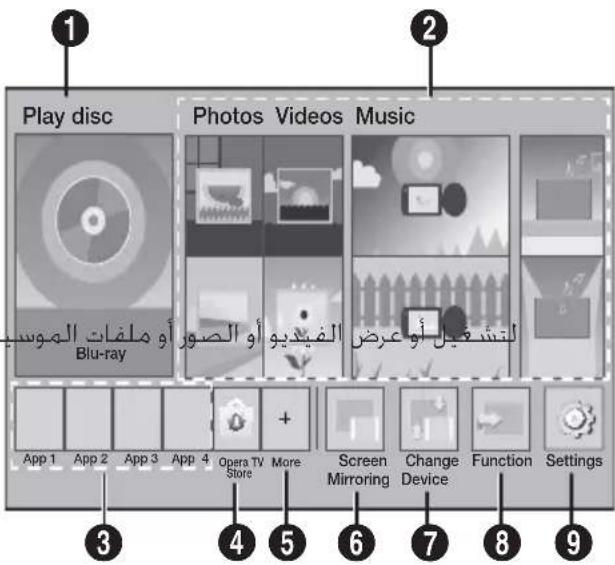
Play disc 1
J 1
Photos/Videos/Music 2
gagall gagall gagagagagagagagagagagagagagagagagagagagagagagagagagagagagagagagagagagagagagagagagagagagagagagagagagagagagagagagagagagagagagagagagagagagagagagag
Lihil 3
aillal laihll no acgio aegno JgogJ.
Opera TV Store 4
pssu u aLio gill jc aLiai claill Jy
More 5
y jll aelilg odell Lohill aie
Screen Mirroring 6
Laiuill jlll lalll aag lgl a
Change Device 7
aagll alalall aajgjx jao aaley
1
Display
3D Settings
aaii I aaiiaai iil 3D Blu-ray Playback Mode
1211111111111111111111111111111111111111111111111111111111111111
Lalalalalalalalalalalalalalalalalalalalalalalalalalalalalalalalal
TV Aspect Ratio
111 111 111 111 111 (39 aee e)
BD Wise
BD Wise
Samsung
Samsung
Samsung
Samsung
Samsung
Samsung
Samsung
Samsung
Samsung
Samsung
Samsung
Samsung
Samsung
Samsung
Samsung
Samsung
Samsung
Samsung
Samsung
Samsung
Samsung
Samsung
Samsung
Samsung
Samsung
Samsung
Samsung
Samsung
Samsung
Samsung
Samsung
Samsung
Samsung
Samsung
Samsung
Samsung
Samsung
Samsung
Samsung
Samsung
Samsung
Samsung
Samsung
Samsung
Samsung
Samsung
Samsung
Samsung
Samsung
Samsung
Samsung
Samsung
Samsung
Samsung
Samsung
Samsung
Samsung
Samsung
Samsung
Samsung
Samsung
Samsung
Samsung
Samsung
Samsung
Samsung
Samsung
Samsung
Samsung
Samsung
Samsung
Samsung
Resolution
HDMI 720pg 1080ig 1080pog Autog BD Wise L5Jg Ioghs .576p/480pg.
Movie Frame (24 fps)
Auto Movie Frame (24 fps) 24 HDMI JgJLal
- iLjUxI Jueo paocu juyolgln
.HDMI 1080p
aassssssssssssssssssssssssssssssssssssssssssssssssssssssssssssssssssssssssssssssssssssssssssssssssssssssssssssssssssssssss
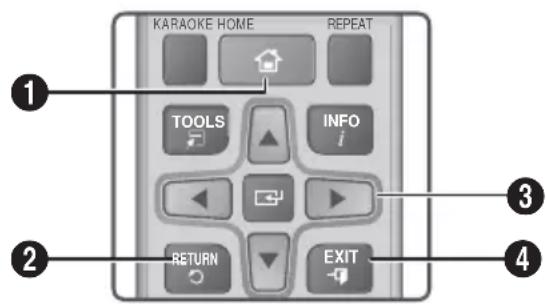
| الله الحرفية : (الله الحرفية) HOME jj .الله الحرفية : (الله الحرفية) HOME .الله الح註冊 : (الله الح註冊) HOME .الله الح註冊 : (الله الح註冊) HOME .الله الح註冊 : (الله الح註冊) HOME .الله الح註冊 : (الله الح註冊) HOME .الله الح註冊 : (الله الح註冊) HOME .الله الح註冊 : (الله الح註冊) HOME .الله الح註冊 : (الله الح註冊) HOME .الله الح註冊 : (الله الح註冊) Home .الله الح註冊 : (الله الح註冊) Home .الله الح註冊 : (الله الح註冊) Home .الله الح註冊 : (الله الح註冊) Home .الله الح註冊 : (الله الح註冊) Home .الله الح註冊 : (الialelele) EXIT .الialelele | 1 |
| الله الح註冊 : (الialelele) RETURN .الialelele | 2 |
| :الialelele / (الialelele) • .الialelele | | | | | | | | | | | | | | | | | | | | | | | | | | | | | | | | | | | | | | | | | | | | | | | | | | | | | | | | | | | | | | | | | | | | | | | | | | | | | | | | | | | | | | | | | | | | | | | | | | | | | 3 .الialelele | | | | | | | | | | | | | | | | | | | | | | | | | | | | | | | | | | | | | | | | | | | | | | | | | | | | | | | | | | | | | | | | | | | | | | | | | | | | | | | | | | | | | | | | | | | | | |
| الialelele | | | | | | | | | | | | | | | | | | | | | | | | | | | | | | | | | | | | | | | | | | | | | | | | | | | | | | | | | | | | | | | | | | | | | | | | | | | | | | | | | | | | | | | | | | | | | | | | 4 |
aaiiiaaiBgl Loglo
ailll Settings aIb g no aabbg Jc w g y 1. laiy aaiwllg c g y a Ls w y b sllg uic g aabgll d y 1 ▲▼▲ jj21 pdswL .g 11 111111111111111111111111111111111111111111111111111
Movie Frame (24 fps)
- 2100sLioic 2!pALlUbIgq
Speaker Selection
Lo! Lgblw w gll cLawl, liss L Cawy. aJzIaI Laiw w cLaw g jyjzI Lcaw
Audio Return Channel
LalwJnogdIJI no oWJHg JyBjQJ Lcws LaIgIgIgHDMl aLog uBj.ajzJl LaiJl Audio Return Channel (ARC)
JH HDMI JLS Pssu w C5g J 1
S JLsX1 Jao Jla. gjai Ii
J a
Digital Output 11
JIOIy iOg jI J
J! J
(44 aon)
Dynamic Range Control
Dolby TrueHD , Dolby Digital .Dolby Digital Plus
Dolby 10000000000000000000000000000000000000000000000000000000000000000000000000000000000000000000000000000
Looal 1111111111111111111111111111111111111111111
Looal 111111111111111111111111111
Dolby TrueHD
Dolby 222222222222222222222222222222222222222222222222222222222222222222222222222222222
. Dolby Digital Plus Digital
Loa 333333333333333333333333333333333333333333333333333333333333
Downmixing Mode
Sio yai jai aaiy bai yai Cao
sll sai ayi yai yai yai yai yai yai yai yai yai yai yai yai yai yai yai yai yai yai yai yai yai yai yai yai yai yai yai yai yai yai yai yai yai yai yai yai yai yai yai yai yai yai yai yai yai yai yai yai yai yai yaliyaiyaliyaliyaliyaliyaliyaliyaliyaliyaliyaliyaliyaliyaliyaliyaliyaliyaliyaliyaliyaliyaliyaliyaliyaliyaliyaliyaliyaliyaliyaliyaliyaliyaliyaliyaliyaliyaliyaliyaliyaliyaliyaliyaliyaliyaliyaliyaliyaliyaliyaliyall
HDMI Colour Format
HDMI JgJgJgJgJgJgJgJgJgJgJgJgJgJgJgJgJgJgJgJgJgJgJgJgJgJgJgJgJgJgJgJgJgJgJgJgJgJgJgJgJgJgJgJgJgJgJgJgJgJgJg
HDMI Deep Colour
a a a a a a a a a a a a a a a a a a a a a a a a a a a a a a a a a a a a a a a a a a a
Progressive Mode
J Audio Return Channel DVD
Audio
Karaoke scoring
Jsc a, c hos g slll 1c c, o all o
My karaoke
plssilwicagwogallgogwbsn
Speaker Settings
Jiig aill acawll lsc! Jn ciwi Jss1 ciSao g Lgai wolag Jisx21 aei
Level
6 6 6 aLaw J
6 6 6 6 6
6 6 6 6 6
6 6 6 6 6
√
aLalal:Distance
La9eLaiWgogao aLwJS
acLoWgagajl.
√
Test Tone
I I I I I I I I I I I I I I I I I I I I I I I I I I I I I I I I I I I I I I I I I I I I
I On Test Tone
J Off Lg. Test Tone
Test
BD-Live Internet Connection
aJ 1 Jau Jb>gJauu JauuL So! u BD-Live
System
Initial Settings
).Initial Settings !
Quick start
iag Jla jLs j0 g yu uJsc uJgJgJgJgJg
On aI bI oI bI 12 Ig> .JIO:Wl dIb Jg:W (20
Anynet+ (HDMI-CEC)
JLwocpaaaawlaag+Anynet
Samsung Lxiaaahy
Samsung JyssIaog+Anynet
HDMI Ls+Anynet Samsung
BD Data Management
LgJbI bI gJbI aJI bI LcI I
GcBIDLive aI bI Blu-ray
JbI USB JbI aLI bLI LogJI
LiKbI aLI bLI BD Live Li bLI
DivX® Video On Demand
LgJDivX@VOD gJgJgJgJgJgJgJgJgJgJgJgJgJgJgJgJgJgJgJgJgJgJgJgJgJgJgJgJgJgJgJgJgJgJgJgJgJgJgJgJgJgJg
Language
aagaaal aasllgai jill aell yanj caiy .
Audio Sync
JzjIy jaiiJI 1s JIaJgJ .DLNA Wi-Fi aBog J I Loo Jao aLio JI.
Network Test
13|LaSlllJg5ggybLjisll 2pJ<J0
Network Status
aaii aaii aaii aai iia
Wi-Fi Direct
Wi-Fi Direct jg Jy g Cw
Jl aJll n 0j y j Jnai a k p h x w Lw8
. aLWuA k, jy j Jnai Jy aJx JnB X
.Wi-Fi Direct pRsi Wic dNp (23
jll lalol jio. auiil lalol yc pnn J aagb plssiwic .DOC gTXT saiol Jw Wi-Fi Direct
Screen Mirroring
Screen Mirroring aag cww s Jg y gaiiaa aaww (aaLluu. aJaiI LaiWl pbi jwglj (38 a
Device Name
plsiwl ci:ay. yll ayell yll yll g aas
aJL 0jagj ic ziiil jyai i1i
a (LL) Log aagll jao<jj a.aJJ aalg)
aogcio cIe Jae oan Jaaill jgth
S OBC = S ACD = S COD + S BDO
pLsaii ci:Sc, aS, jy Cii:ll iJusgi nic BD-LIVE Jia 5, jI jc oioaieoJI ai Ilogjg cLaoiJI JLxJl Jx no ci:ciolj y aic So! aoiy. .
J 1
aJlJI 1ghJgJLcJUJLJxJgS Jc h Jai Settings .1
Network 2
Network Settings 3
(21 a>0g>0) a<1wU U L, uU UaLg 1
S_ OBC = S_ COD + S_ BOC - S_ BOC
3 1 0
Network Network Settings a w Wied Type JIJI JIJI JIJI JIJI JIJI JIJI JIJI
JJI Jc Ibaol PO OK 22.2
Lalil Jgip IP gic 153
Lg Network Settings 111
Network Network Settings aLw .1 Connect Wied Type
J. Wires Network Type
Security
PIN 0000 PIN jRjL JI PIN jRjL
BD Parental Rating
Blu-ray Disc Jy j 1
Lo Jy j y j 1
.PIN jJy j
DVD Parental Rating
i 1 i 1 i 1 i 1 i 1 i 1 i 1 i 1 i 1 i 1 i 1 i 1 i 1 i 1 i 1 i 1 i 1 i 1 i 1 i 1 i 1 i 1 i 1 i 1 i 1 i 1 i 1 i 1 i 1 i 1 i 1 i 1 i 1 i 1 i
Change PIN
JgogU psswol JpLaj4 0o oJgSOLPIN jor
General
Time Zone
Terms of Service Agreement
Lssgssssssssssssssssssssssssssssssssssssssssssssssssssssssssssssssssssssssssssssssssssssssssssssssssssssssssss
Reset
Llilwlyaiaiaiaiaiaiaiaiaiaiaiaiaiaiaiaiaiaiaiaiaiaiaiaiaiaiaiaiaiaiaiaiaiaiaiaiaiaiaiaiaiaiaiaiaiaiaiaiaiaiaiaiaiaiaiaiaiaiaiaiaiaiaiaiaiaiaiaiaiaiaiaiaiaiaiaiaiaiaiaiaiaiaiaiaiaiaiaia
aL aL - aLw8 aL
(20
Network Network Settings .1
J. Wireless Type
Lg, p a Lla
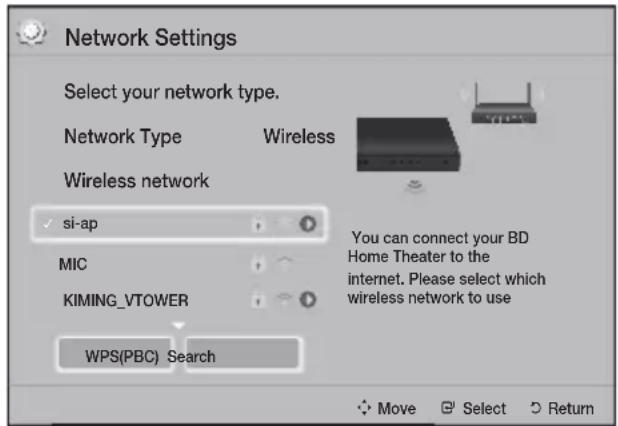
2
a<biyollJolSecurity. 3
0gall pLpLg 1
1c 1
Done 4.4
gJgJgJgJgJgJgJgJgJgJgJgJgJgJgJgJgJgJgJgJgJgJgJgJgJgJgJgJgJgJgJgJgJgJgJgJgJg
-2.5Lw8 4
LalJl Jao gip IP jgic Jls! Network Settings 1 2 Lixi
eJ). "aSjU JLai aigj"3 1 no alghsll (20
Network Network Settings .1
J. Wireless Type
Lg y aai i aia
giagll ai .2
- Add Network
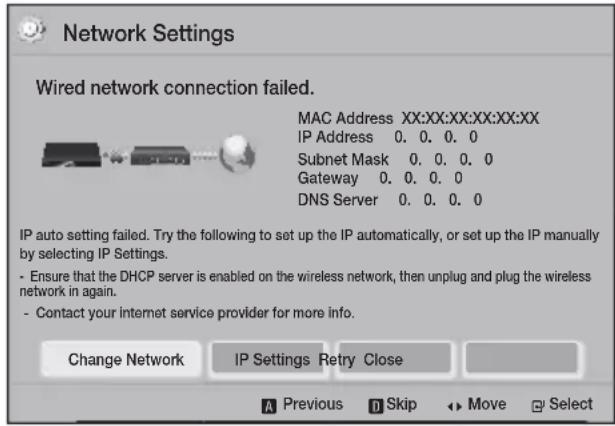
ip. IP Settings 一 _ 一 .2 IP Settings
.2
- 12 · 10 · 10 + 12 · 10 · 10 + 10 · 10
.4
5.
6.
.(JlJI JIJI IP Address)LJIJIaQa
pJJIaJPGaJU. 1JIJIcJbJUa
pJIJIJIS2JUeJcPSSJIL aQgQgQJU
JJIJIPLAeJUaJLJIaJUcLLaS.aQJI
1JUcJcPSSJLQB ▲JUeJUaJLpssJU. ▲
JICG.AiQaQgJLJUaJUaJIJIJI U
g 4
a0s j00 a5i11 1c Jgai li5o .ao Joloo gill iji
Return aALL aLs JIs! no slgii 1iic
Laill pki gaxy. jll lc hwi ai,(0)
Jlai2ly pgs ai a<,uLL JIa21 no aJjiail
. ai
.7
a.s1w8 a5.
:aLi L aLwUaL JLwUaLc!LsO
ai a ai ≤ a
a_1g = 2( a^2 + 1)
WPS(PBC) -
Jg>gl Jn a.5LwUaS, jy JLxj y JxJ 11111111111111111111111
6aghsJ J1 Jalee 2 aghsJg aK
a00 Joloss
3) Return 4.
Security Key 5.
Security Key 6.
Security Key 7.
Security Key 8.
Security Key 9.
Security Key 10.
Security Key 11.
Security Key 12.
Security Key 13.
Security Key 14.
Security Key 15.
Security Key 16.
Security Key 17.
Security Key 18.
Security Key 19.
Security Key 20.
OK
Settings > Network > Network Status
WPS(PBC)
WPS(PBC) a,bg plssil w
wJ Slll aJL aSll JIaI 10 WPS(PBC)
]."aKJJJIaI"3J1o alghjgl (20 a
Network Network Settings .1
Wires Wireless Type
Lg WPS(PBC) a aIaI JwJai 2
WPS(PBC) JI Lc b w J
P G JI Lc
JL WPS(PBC) JI Lc b w J
P g JI Lc JI Lc J Ie JwJ
Ji J Ie JI Lc J
Ji J Ie JI Lc J
Ji J Ie JI Lc J
Ji J Ie JI Lc J
Ji J Ie JI Lc J
Ji J Ie JI Lc J
Ji J Ie JI Lc J
Ji J Ie JI Lc J
Ji J Ie JI Lc J
Ji J Ie JI Lc J
- 98
- .
- Done .
- 24.
aaiia aaii s j j j j j j j j j j j j j j j j j j j j j j j j j j j j j j j j j j j j j j j j j j j j j j j j j j j jj Jgai Jai Jai Jai Jai Jai Jai Jai Jai Jai Jai Jai Jai Jai Jai Jai Jai Jai Jai Jai Jai Jai Jai Jai Jai Jai Jai Jai Jai Jai Jai Jai Jai Jai Jai Jai Jai Jai Jai Jai Jai Jai Jai Jai Jai Jai Jai Jai Jai Jai Jai
Lalai gPINg PBC
PBC 1
Wi-Fi Direct jgs 1
G Jc Inaol p CiaiJ
Lg. JdXkaiJ aiWuJg
WuWuJoo g Lc .Jua21 aaiJ
Wi-Fi Direct a Ww Jc Lgjg JgJg Jua21
PIN joo
Wi-Fi Direct jgs 1
Wi-Fi Direct .1 Wi-Fi Direct a log Settings.2
Network 3
Wi-Fi Direct 4
Wi-Fi Direct
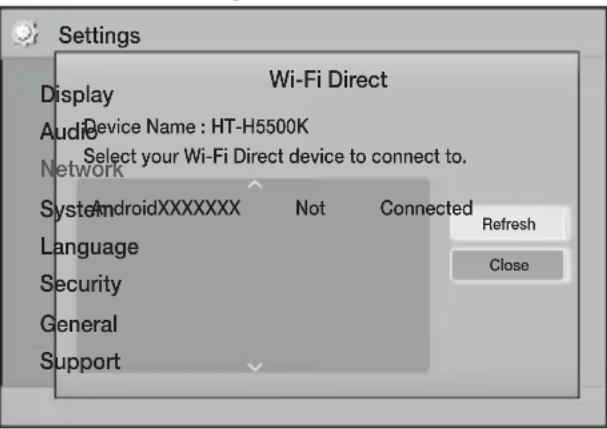
5.
Wi - Fi;lg - Jl( 0 < 0)
.PBC
. PIN JOYOWLY
.
Wi-Fi jLg jLs j0
JLJgJy JgJy JgJyWi-Fi JgJy 1 JgJy JgJy Wi-Fi Direct JgJy JgJy
USB
. www.samsung.com 1
SUPPORT 2
Jlsjicg Jz Jz aal jy 3
Jz aai Jz aia oaoa oaoo y 11
Jz bll 00 wll
aJwaiJ aiJai
Jai Jawy Jwaiy Jy jaiy aann .5 .Firmware Manuals & Downloads
.6
JzI sJJI g JALI 2goc ZIP aigaj Ic jai .7
JgA aai aasell Send 1c jai
jll aai aai aai ai oK ok jai jki
jLg Jl Cai jol jao Jao joi jho
jgssllc lognall allll hao c 9
aloll waiy bgs Lg jy
lognall
.USB JLaJgJ! JGJ C
jLgJxJy 100000000000000000000000000000000000000000000000
.110J USB 120 USB
JL Jaii ciiaai aoi 12.
. Settings > Support > Software Upgrade
By USB .13
.USB jg joljll jll g 14
jll lla ola y h jol jc lj
.
aJiaol Laiwll pLi jiejok .OK .15
jglgixiic.ajyill aLac iJig lao Joo jai jia!
16.
J 1
Jus Jn j 1suii. Software Upgrade
C
Software Upgrade aJc Jc Jc Jc Jc
= = 35
aLacslg
a1 = 253,a2 = - 535,b2b1 = 0
4k + 3 = 2k + 2
1
·a1g+wo
auii iJ 1 Juaigla aei jll Jaa Jlaa Jlaa Jlaa
1
Support
2.
Software Upgrade
3.
4.
-(y1y+c)By
-
(USB 3204) I
-
Auto Upgrade
(a.1Lol;Jl a.a.j.J1 a..i3)
C
a_i a b j S ; a b c = a b c
5.
a
11
21
aBg aW y Jia x Li 1iigjai j By Online
By Online
.0sJL JgJgJgJg
1.
2.
JaiiJI JaiiJai! Yes 1a. aaijll Lio .aijll Aoc jao Jao Lai
JlaiS1 ic .waii piai wgi aatio allw gbi
Laii ciiaill iiee eai! ay
J 1 J 1
.3
4.
6
7 .DLNA
8 Save File g f. Send 9 Run g f.
DLNA
PDF
PDF
PDF
DLNA
Software
.
.
.
.
.
.
.
.
.
.
.
.
.
.
.
.
.
.
.
.
.
.
.
.
.
.
.
.
.
.
.
.
.
.
.
.
.
.
.
.
.
.
.
.
.
.
.
.
.
.
.
.
.
.
.
.
.
.
.
.
.
.
.
.
.
.
.
.
.
.
.
.
.
.
.
.
.
.
.
.
.
.
.
.
.
.
.
.
.
.
.
.
.
.
.
.
.
.
.
.
.
.
.
.
.
.
.
.
.
.
.
.
.
.
.
.
.
.
.
.
.
.
.
.
.
.
.
.
.
.
.
.
.
.
.
1
Auto
On
g
JL
JL
JL
JL
JL
JL
JL
JL
JL
JL
JL
JL
JL
JL
JL
JL
JL
JL
JL
JL
JL
JL
JL
JL
JL
JL
JL
JL
JL
JL
JL
JL
JL
JL
DLNA
gall.
glal DlNA 1L
11
11
11
11
11
11
11
11
11
11
11
11
11
11
11
11
11
11
11
11
11
11
11
11
11
11
11
11
11
11
SAMSUNG PC Share Manager
DLNA
JL DLNA JI JL DLNA JI JL Jc Jc Jc Jc Jc Jc Jc Jc Jc Jc Jc Jc Jc Jc Jc Jc Jc Jc Jc Jc Jc Jc Jc Jc Jc Jc Jc Jc Jc Jc Jc Jc Jc Jc Jc Jc Jc Jc Jc Jc Jc Jc Jc Jc Jc Jc Jc Jc Jc Jc JC
1 . .www.sa
2
3.
4.山
5
Lalj 1
421g 1
3 1
4. 1gIg USB gBlu-ray/DVD/CD 1g Ig JgJgJgJgJgJgJgJgJgJgJgJgJgJgJgJgJgJgJgJgJgJgJgJgJgJgJgJgJgJgJgJgJgJgJgJgJgJgJgJgJgJgJgJgJgJgJgJgJgJgJg

JL JLaJU ▲▼▲ JjJ jPssW aWuJlA uU L U 1 Change Device Js JnJnJnJnJnJnJnJnJnJnJnJnJnJnJnJnJnJnJnJnJnJnJnJnJnJnJnJnJnJnJnJnJnJnJnJnJnJnJnJnJnJnJnJnJnJnJnJnJnJnJn
aJJI aJIJIJIJIJI
J 1
1 2


G JJI Lc hJU 1
G JJI Lc hJU 1
Lc g JI JI
RETURN JJI Lc hJU
. JI JI JI JI JI JI EXIT
a<11 Jgogal a.5 C 11 Logl all
Lgagol g wogol g yol gl bao J. USB jLg
1111 1111
USB ;LG
ColjJ1 J
.USB Change Device .2
Photos Videos 3
Music
jllgcl Inol
C 1c Inol alg g aol Ldo 1c g RETURN JI I cInol AaiiAaiiEJ EXIT
a<11 Jgoggl a<23 11 Logloal
Lc gagwagllg ydaI gLao J
.USB jlg
Lg USB Jg Jg Jg Jg Jg Jg Jg
L. DLNA g o g o g o L a J L S I J) USB J L S J uu u u u u u u u u u u u u u u u u u u u u u u u u u u u u u u u u u u u u u u u u u u u u u u u u u u u u u
- Lgagai gA LgaxL piaovdo ayod gllid 4. gai Iol LoI solw w.ogicai I yj A S
.5 - 32 28
RETURN 1c In
aLlOg 1.11 all 20 g 11 11 11
.
A Ll J
EXIT 1c In
5ll Jgoggl a c 5 wlogle all
1c gagagwagglg gla o
4.
- 6 1oJgLagolsswIc5yjLgJg JUs USB Lc ooggall JSLwgJ 7 . 32 28 0aiaa Jai
LUI USB jgJ Jwogj Lol JgJgJgJgJgJg
211
1 . New de
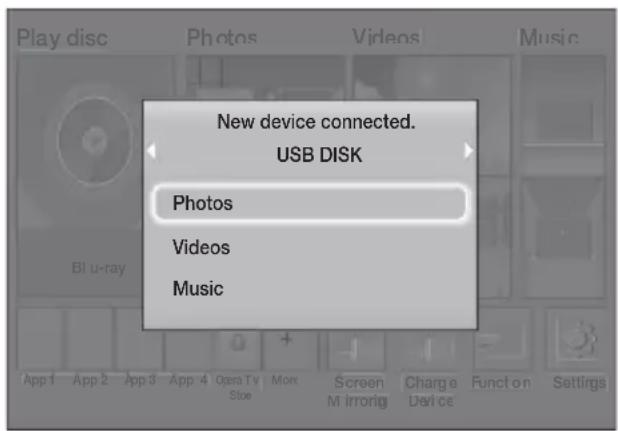
gwlwJ JaiIe aaiiaai aiaiai gbi j 1
Photos Videos 2 Music
Lo Lg Lo Lg Lg Lg Lg
aalg jglg aalg soal alalplai 2
DISC MENU
TITLE MENU
gglal aol jj1 lclnl
aL JLa:SU (B) 1Jl Ie L
POPUP MENU
aaii jil iie Jie aii sl
J 3
REPEAT jll lncnol.
Title Off ▲ 2
Repeat A-B All .Chapter
G
(1)Ldsc00j
G jll gl Ineial
()LoicL
REPEAT
G
1.5:11 1
Title Chapter 12
Jc hao jao Joo REPEAT
GjIgIeIaIeIe Off
Repeat A-B 10
RepeataB 10
10
5 10
#
Jgagall ggs Jgss Jgss Jgss Jgss Jgss Jgss Jgss Jgss Jgss Jgss Jgss Jgss Jgss Jgss Jgss Jgss Jgss Jgss Jgss Jgss Jgss Jgss Jgss Jgss Jgss Jgss Jgss Jgss Jgss Jgss Jgss Jgss Jgss Jgss
a 1
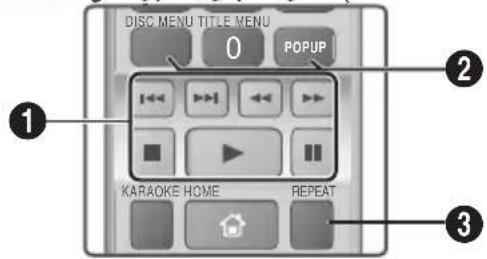
1
Search, g w y w 1 j 8 .Step ,Slow
10 : 173
Repeat A-B
| 1. | ### | |
| 2. | ### | |
| 3. | ### | |
| 4. | ### | |
| 5. | ### | |
| 6. | ### | |
| 7. | ### | |
| 8. | ### | |
| 9. | ### | |
| 10. | ### | |
| 11. | ### | |
| 12. | ### | |
| 13. | ### | |
| 14. | ### |

| Subtitle . Angle Angle ( ) | ( ) TOOLS ( ) TOOLS ( ) TOOLS |
| . TOOLS ( ) TOOLS ( ) TOOLS | |
| Title | |
| . TOOLS ( ) TOOLS ( ) TOOLS | |
| Playing Time | |
| BONUSVIEW VideoBONUSVIEW Audio . Angle 1/3g 1/2g 1/1) | . TOOLS ( ) TOOLS ( ) TOOLS |
| . TOOLS ( ) TOOLS ( ) TOOLS | |
| RePEAT Mode | |
| . TOOLS ( ) TOOLS ( ) TOOLS | |
| Audio Sync | |
| Full Screen . Original, Mode1 ( ) . Mode2 ( ) . | |
| Information . Original, Mode1 , Mode2 , Mode2 , Mode1 | Picture Settings |
| . Original, Mode1 , Mode2 , Mode1 | . Mode |
| . Original, Mode1 , Mode2 , Mode1 | . Mode |
| . Original, Mode1 , Mode2 , Mode1 | . Mode |
| . Original, Mode1 , Mode2 , Mode1 | . Mode |
| . Original, Mode1 , Mode2 , Mode1 | . Mode |
| . Original, Mode1 , Mode2 , Mode1 | . Mode |
| . Original, Mode1 , Mode2 , Mode1 . Original, Mode1 , Mode2 , Mode1 | . Mode |
| . Original, Mode1 , Mode2 , Mode1 . Original, Mode1 , Mode2 , Mode1 | . Mode |
| . Original, Mode1 , Mode2 , Mode1 . Original, Mode1 , Mode2 , Mode1 | . Mode |
| . Original, Mode1 , Mode2 , Mode1 . Original, Mode1 , Mode2 , Mode1 | . . Mode |
| . Original, Mode1 , Mode2 , Mode1 . Original, Mode1 , Mode2 , Mode1 | . . Mode |
| . Original, Mode1 , Mode2 , Mode1 . Original, Mode1 , Mode2 , Mode1 | . . Mode |
| . Original, Mode1 , Mode2 , Mode1 . Original, Mode1 , Mode2 , Mode1 | . . Mode |
| . Original, Mode 1 , Mode 2 , Mode 1 . Original, Mode 1 , Mode 2 , Mode 1 | . . Mode |
| . Original, Mode 1 , Mode 2 , Mode 1 . Original, Mode 1 , Mode 2 , Mode 1 | . . Mode |
| . Original, Mode 1 , Mode 2 , Mode 1 . Original, Mode 1 , Mode 2 , Mode 1 | . . Mode |
| . Original, Mode 1 , Mode 2 , Mode 1 . Original, Mode1 , Mode2 , Mode1 | . . Mode |
| . Original, Mode 1 , Mode 2 , Mode 1 . Original, Mode 1 , Mode 2 , Mode 1 | . . Mode |
| . Original, Mode 1 , Mode 2 , Mode 1 . Original, Mode 1 , Mode 2 , Mode 1 | . . Mode |
| . Original, Mode 1 , mode 2 , mode 1 . Original, mode 1 , mode 2 , mode 1 | . . Mode |
| . Original, mode 1 , mode 2 , mode 1 . Original, mode 1 , mode 2 , mode 1 | . . Mode |
| . Original, mode 1 , mode 2 , mode 1 . Original, mode 1 , mode 2 , mode 1 | . . Mode |
| . Original, mode 1 , mode 2 , mode 1 . Original, mode 1 , mode 2 , mode 1 | . . . Mode |
| . Original, mode 1 , mode 2 , mode 1 . Original, mode 1 , mode 2 , mode 1 | . . . Mode |
| . Original, mode 1 , mode 2 , mode 1 . Original, mode 1 , mode 2 , mode 1 | . . . Mode |
| . Original, mode 1 , mode 2 , mode 1 . Original, mode1 , mode 2 , mode 1 | . . . Mode |
| . Original, mode 1 , mode 2 , mode 1 . Original, mode 1 , mode 2 , mode 1 | . . . Mode |
| . Original, mode 1 , mode 2 , mode 1 . Original, mode 1 , mode 2 , mode 1 | . . . Mode |
| . Original, mode 1 , mode2 , mode 1 . Original, mode 1 , mode 2 , mode 1 | . . . Mode |
| . Original, mode 1 , mode 2 , mode 1 . Original, mode 1 , mode 2 , mode 1 | . . . Mode |
| . Original, mode 1 , mode 2 , mode 1 . Original, mode 1 , mode 2 , mode 1 | . . . Mode. |
| . Original, mode 1 , mode 2 , mode 1 . Original, mode 1 , mode 2 , mode 1 | . . . Mode |
| . Original, mode 1 , mode 2 , mode 1 . Original, mode 1 , mode 2 , mode 1 | . . . Mode |
| . Original, mode 1 , mode 2 , mode 1 . Original, mode 1 ,mode 2 , mode 1 | . . . Mode |
| . Original, mode 1 , mode 2 , mode 1 . Original, mode 1 , mode 2 , mode 1 | . . . Mode |
| . Original, mode 1 , mode 2 , mode 1 . Original, mode 1 , mode 2 , mode 1 | . . . Mode |
| . Original, mode 1 , mode 2 , MODE 1 . Original, mode 1 , mode 2 , MODE 1 | . . . Mode |
| . Original, mode 1 , mode 2 , MODE 1 . Original, mode 1 , mode 2 , MODE 1 | . . . Mode |
| . Original, mode 1 , mode 2 , MODE 1 . Original, mode 1 , mode 2 , MODE 1 | . . . Mode |
| . Original, mode 1 , mode 2 , MODE 1 Original, mode 1 , mode 2 , MODE 1 | . . . Mode |
| . Original, mode 1 , mode 2 , MODE 1 . Original, mode 1 , mode 2 , MODE 1 | . . . Mode |
| . Original, mode 1 , mode 2 , MODE 1 . Original, mode 1 , mode 2 , MODE 1 | . . . Mode |
| . Original, mode 0 , mode 2 , mode 1 . Original, mode 0 , mode 2 , mode 1 | . . . Mode |
| . Original, mode 0 , mode 2 , mode 1 . Original, mode 0 , mode 2 , mode 1 | . . . Mode |
| . Original, mode 0 , mode 2 , mode 1 . Original, mode 0 , mode 2 , mode 1 | . . . Mode |
| . Original, mode 0 , mode 2 , mode 1 Original, mode 0 , mode 2 , mode 1 | . . . . Mode |
| . Original, mode 0 , mode 2 , mode 1 . Original, mode 0 , mode 2 , mode 1 | . . . . Mode |
| . Original, mode 0 , mode 2 , mode 1 . Original, mode 0 , mode 2 , mode 1 | . . . . Mode |
| . Original, mode 0 , mode 2 , mode 1 . Original, mode 0 , mode 2 , mode 1 | . . . . . . . . . . . . . . . . . . . . . . . . . . . . . . . . . . . . . . . . . . . . . . . . . . . . . . . . . . . . . . . . . . . . . . . . . . . . . . . . . . . . . . . . . . . . . . . . . . . . = = = = = = = = = = = = = = = = = = = = = = = = = = = = = = = = = = = = = = = = = = = = = = = = = = = = = = = = = = = = = = = = = = = = = = = = = = = = = = = = = = = = = = = = = = = = = = = = = = = = = = . . . . . . . . . . . . . . . . . . . . . . . . . . . . . . . . . . . . . . . . . . . . . . . . . . . . . . . . . . . . . . . . . . . . . . . . . . . . . . . . . . . . . . . . . . . . . . . . . . . ; . . . . . . . . . . . . . . . . . . . . . . . . . . . . . . . . . . . . . . . . . . . . . . . . . . . . . . . . . . . . . . . . . . . . . . . . . . . . . . . . . . . . . . . . . . . . . . . . . . . - . . . . . . . . . . . . . . . . . . . . . . . . . . . . . . . . . . . . . . . . . . . . . . . . . . . . . . . . . . . . . . . . . . . . . . . . . . . . . . . . . . . . . . . . . . . . . . . . . . . \... . \... \... \... \... \... \... \... \... \... \... \... \... \... \... \... \... \... \... \... \... \... \... \... \... \... \... \... \... \... \... \... \... = = = = = = = = = = = = = = = = = = = = = = = = = = = = = = = = = = = = = = = = = = = = = = = = = = = = = = = = = = = = = = = = = = = = = = = = = = = = = = = = = = = = = = = = = = = = = = = = = = = = = = = = = = = = = = = = = = = = = = = = = = = = = = = = = = = = = = = = = = = = = = = = = = = = = = = = = = = = = = = = = = = = = = = = = = = = = = = = = = = = = = = = = = = = = = = = = = = = = = == = = = = = = = = = = = = = = = = = = = = = = = = = = = = = = = = = = = = = = = = = = = = = = = = = = = = = = = = = = = = = = = = = = = = = = = = = = = = = = = = = = = = = = = = = = = = = = = = = = |
One. All Off. Track 2
aWgJ 1
aL Wb:RETURn 0 Jc h aLs Lj
Joaas oosuus uo 15j. wgall aas
Jooogui joi y 1c oogagll gwagll
aasle Jc Jss USB Jg 1c no g pssimall
27g26 axw e agwgall gaxill lc wgal
sIyI I S (C) 1c b a o yIaJI aIol
Select 1 1 TOOLS Jc
sll j c s l jlc h a All
TOOLS Jc h ool ool all dselect All
| Music TRACK 001 | 1 files selected | 1/2 Page | ||
| TRACK 001 | TRACK 002 | |||
| 05:57 | 04:27 | |||
| TRACK 003 | TRACK 004 | |||
| 04:07 | 03:41 | |||
| TRACK 005 | TRACK 006 | |||
| 03:17 | 03:35 | |||
| TRACK 007 | TRACK 008 | |||
| 03:47 | 03:49 | |||
| TRACK 009 | TRACK 010 | |||
| 03:53 | 03:45 | |||
| CD | A Change Device | B Select | C Tools | → Jump to Page → Return |
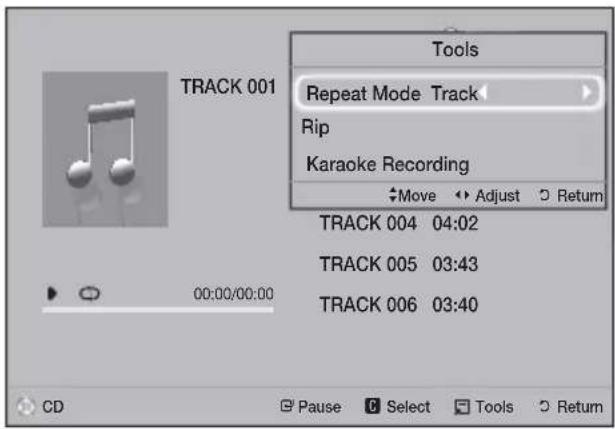
100000000000000000000000000000000000000000000
2.
.
a1 = 2,an + 1 = n2 + n3 + ·s + _1n
Lgagall gao gao Jusu 0sui Lc sui Lgog jgsaJg Jgao jg USB gDv CD aagai lalglj jz cagao gao Jl JLa iJ
.
100 11 100 100 100 100 100 100
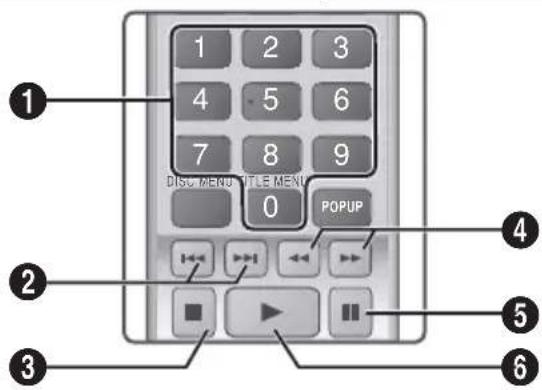
jie jie jie wai jie LaoWJ Jia Jia
C. a3 + a4 + a_5 = 6
Zoom
aJLJI aJGJ 1
4 1
Rotate
JcJssll (JaeW).gJSSJJ Jssll Ioo
JscglaLlJcOaJI Joo
(.dclwJ WLaLcOJWJ
Information
Log pssg g wz1 Ls sLo g oog 0 Logo
山
Jg Jg Jg Jg Jg Jg Jg Jg Jg Jg Jg Jg Jg Jg Jg Jg Jg Jg Jg Jg Jg Jg Jg Jg Jg Jg Jg Jg Jg Jg Jg Jg Jg Jg Jg Jg Jg Jg Jg Jg Jg Jg
它恰好 x,y ≥ 0 或 y = 1.5 - 2.5 < x < 1.5
Lo 8S2 J aolilg a wgo aibg 50J
gawgaj Ljio jyssll JiaLw gaa
Lol JdJgJgJgJgJg
aill aaylog gagg MP3
Jalal. Playlist .4
(C)
G
. Playlist aLw
□
RETURN
G JI, Playlist J
5.
CD-) aJooJI aJigJU Jc JLo 99
6.
7.
Jus Jluu
.(DA
,PaIylist 1
Playlist,Playlist
S_4 = 12 · 4 + 12 · 4 + 4 = 3
#
.(C)jai jai jll jlc Iaai pJ Lwai
JLauJI Jai Jai Jai OAL
1.
- △
3.
- a : a^2 + 1 = 0
5.
m : x = 1 或 3x + 4y + 1 = 0
7.
dLc 1j. (C)
JLwJ Lc JzJz81
TOOLS jll lckol sglz1
Tools
Jle Ie Jep Rip 1
.Rip
G jll lc hioi pia dlaaswio
.
Ripping" allw, gai j. aiil selgii ic
".completed
J 1
aigll DTS bglw yogio aagll oio
jolj jne jno logcvo iclogoi oog Si
.
8.
10.
TUNER MEMORY
5
.4 JI
Jl bc haoa baoa aaoa aaoa TUNING UP, DOWN
J 1
J L K Karaoke scoring J
.Off K Karaoke scoring J
J C J
J Reduce Vocals My karaoke
#
g wgl g1 1
TOOLS 1
Karaoke Recording
2
sL slwsl 3
SL wuus USB 51
.mp3
.USB 13
Jgssll Jgl aas sallalld. Music 9 Photos. Videos
1sll (slc. )a a sLg w 13
LcLqI I c I y g k all S y Ll a
yog sgol ng gog sg o
Lg jg noo
1
TUNING UP. DOWN
- 11haxall j! a:1g;
a:wo cIbxaol! b, wll a:wall
cIbxaill jbi. gaii all o5j l! hwi
oJIaI bWII JAI WO
TUNING UP, jIJI Lc Inaii .MANUAL DOWN
JJI Lc hao: JALI JI JI JI MANUAL
LALI JI TUNING UP. DOWN
1
.MO/ST
a_ij = 1 - 12
.MONO STEREO
J_ - U M
JSLJI JLc
100
FM89.10 aJol J:Jtio
FM FUNCTION 1
TUNING UP. DOWN 2 189.10>
.TUNER MEMORY 3
.
TUNER MEMORY 4
.00g a w w w 100
gjLjGjAajllLaaiwllpIjJogil
[{14} \sim {11}]
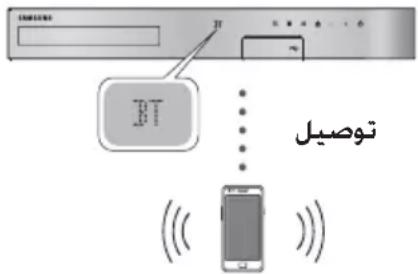
gjglg
wJll aLww aegg pcc yoggljI jg> J Sli .yll J 1.oggljll gao eolgiol yiw21
FUNCTION.1
.8TJL
jg>JJJ 1
HHTS-HXXXXX
Laio aJiaJl LaiWll pIb jgLoaic 1jg
LaiJiogjlg JgJgJgWpWgHw.iggl
aLil Jc aJiaJl LaiWll pIbJpwAlog
aJiaJl LaiWll aJoLo21
Laiwll pIbji jc Jiaolj ogigj jg>Jc.
48 acyB aIg 237 y) hao oos Jg 328) SBC 24. (jg gS 44.1 acyB aIg
Jai jg JLiag
:JLJ
pIaJoo aJIy sge gJgS JLoo gJg .Ago gaijioJI Laiu
iJ 1jIJI J
FM AUX D. IN
B
Lolalai jll LJI aaiu Jn Kaoke scoring 1i y
aLJI 10 18 18 18 18 18 18 18 18

1

#
gagJgLgJgJgJgJgJgJgJgJgJgJgJgJgJgJgJgJgJgJgJgJgJgJgJgJgJgJgJgJgJgJgJgJgJgJgJgJgJgJgJgJgJgJg
:
ai Q. = P( 1 + j = 0^maj( 1 + k = 1^jc_jk) ^j - 1)
2.
3.
. 4
gill gell no yg<ll 11 11 aoc ng< Lioic .soll paa gl. aggl glbI Lg
g<11 Llaa 2g
LAN
- a1 = 23,a2 = 58,b1 = 78,b2 = - 14
.0gJU LwLw. glgL
aegy ggljg jw jlll aLwJl 1g
SBC LJI JIJI LJIJI pJ .JI
2 2a Jiaiwl wuLg jololai
J 1
JLJI JIJIaJlaiJiaJiaJIAI LaiJiJI pIb
10 10
A2DP 1
0.02>1g|
g aui Jsiu Jua21 g 11 iil asibog Jaojia jiei ci
Loricigjgij
.
.
.
•
.
m = 311
Quick start
222
On Settings > System > Quick start
SsJy 1 Jg jLgag aJiaall Laiuill
gogjLgag aal gJiaJIaLaiuill Lgai
gJ.ogjgl Jlwl glos Loglo 1c Ebl) (SJJ
BTgJg

LHS 10 = g
x-09 1993
bwoi aie boll oio plss
i: iWgj
SLWU LAN
22.11 jIiJus
Lao 1120g
g
L
aill
1.
aJiaolaiiJjoo ggljg Jua
2
yao aajgll Laiuill pbi jgL oaic 0
joo Laii iiaa aaiil pblp gaa .saggl jgs
.aoLoxl awl lcl DISCONNECTED
(JLJI)NFC
J 1 J 1 J 1 J 1 J 1 J 1 J 1 J 1 J 1 J 1 J 1 J 1 J 1 J 1 J 1 J 1 J 1 J 1 J 1 J 1 J 1 J 1 J 1 J 1 J 1 J 1 J 1 J 1 J 1 J 1 J 1 J 1 J 1 J 1 J
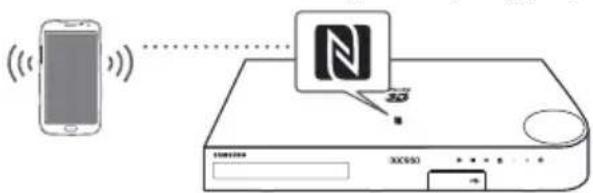
Sill aIJI Jc NFC a,bg Jc aJc Jc aJc Jc aJc Jc aJc Jc aJc Jc aJc Jc aJc Jc aJc Jc aJc Jc aJc Jc aJc Jc aJc Jc aJc Jc aJc Jc aJc Jc aJc Jc aJc Jc aJc Jc aJc Jc aJc Jc aJ
Laiuill no sglll JyNFCJyNl. NFC aagjcljgJy jiaJI
JLai aoloo cllw Jaiiaolalw jbi
"poi" 2. SAI aIgJI aIw Lc iggl
plai! Jy allw yj .Lw gil plai 2.
connected' JLaiA
LLeI a>gLL;Lg>JNFC;Lg>Jn
JLJI JIJI WNGNFC JGJ
JGLJI AGLLJGJWJSSJ
JILJI LQJWJGGJWJSSJ
JILJI LQJWJGGJWJSSJ
JILJI LQJWJGGJWJSSJ
JILJI LQJWJGGJWJSSJ
Laiuill pblai aolaoaagll (E jll lc haoi Jia x g bgBT gng no Jyill aJjiall
a
yjol Jaioll ggljg jhuiw aillbgl yj 1
aJlall Loi wll pbi no ayxwi Ic Jgnoa
Lj. Jaixl gnoag csiy) .Jaixl glj J
(uggljg
13.
jg a jzll Laiu wll pbl jy yolw lgl 10 ggl 10 10 10 10 10 10 10
0j>1b1:


ai = 1n j = 1^ma_ij
J 5
J 5
J 5
J 5
J 5
J 5
J 5
J 5
gglj 1
JL JSL g a jia JAL Lai wll Jie i Laic Jie 11 0gogal alw g qy 2 Cia JIL

TV SOUND.4
.
gag gagalilgag Jgolal
+Anynet joojL LcLJd
J
:TV SOUND (jgJ)
GJ 15aiwI g cij Loit
Jjll Laiw wclcLaw JLg jyjell
jg> jw wU ELoaiW21 g Wj Loi2
LcLwJLJL JIJU USB
aJjaiJlai
TV SOUND ON/OFF
:(jgJ LJI JgJ/
CINEMAnet+ (HDMI-CEC)
LcLawgJjzJlLaiwJlLcLawyJnJzJL
:alnll aai gai iuiu uui
1
(13 aJzIj).aJzJIqJI LaiuJI
1.
1jLJIgJjIJI Lai
- Anyr
T
3.
TV SOUND 1
TV SOUND ON
D.IN LoLgU L
NIGHT
jL
aJjioJI LooWJUcLw JUs
. Change Device
.4
Music 1 Videos 1 Photos 1
GjIe Iaai Jgai
JJIeIgOaJooJ 6
aaiie
System 3 jcbData Management. .4
Change Device 5 USB DISK 6
- 7 . BD-L
8.
BD-LIVE
gaiol l aog ayogaiol gaoa
DLNA
aagall Lalaill Jgdl DLNA 11
.ajlal Laiuill jyjgol gll
DLNA pssioo Jdydggall gll
glal Lalaill JdaiaJgol gll DLNA
.ajlal Laiuill gLgSliu o j
2jgol kll Jgol
Lalaill JgolgL DLNA
- 2.
S OBC = S COD + S_ BOC
Opera TV Store
Jogg Lc Wg. Opaer TV Store
Opera TV Store
Opera TV JJ Opera TV Store
Store
j jlc h .Opera TV Store
RETURN,EXIT
Opera TV Store
acgao wjoei.Opera TV Store aowu jgb sic
jll jle Jai jg jll jll
G
gill open 2000 1
My add TO MY APPS
RETURN JJI Jc hJ. Apps
Opera TV Store
aiai
jLsAsaJgW jsIlaIbll Jc
Popular. Watch. Listen. Jto at all wos cllhill
LJ! Log Play
Jai jie ooc sill 0g: ajjipssuiw. aie ayin
aWlJl lcl JlLl:JI
aieyjil 1 jjjipnwnp
J 1
MY APPS My Apps
My Apps aoww ghiie.
Laiis plassiwly gusy ciagill lalhll aols
.My Apps
jai b jia bii
My Apps LMenu 1
Laillll yjz jgJcIaJIhll JgJ! Uggw sic
Lai Lls
jui jai piai wlg jij
Lai lai a jai jia Jai wu Jyj
jooaill jolw lsc. aawjj aowll jlc
aaii iiai Liil gai jill laii jieig laii
.More
gai a. ale L gao jai jai. gai hui Jb. gai bi jai
aWlll lcl aaggeallg
Lol81 lalabill jsc
Je Heaai paaaill aaluLgMone 1
yai jia 1i iai hai gao.
Lolobill oacgao
LJI JI 1
Close 1
<ExitgRETURNG
有 SE = OC = 23
aaii iaii iie aigooi iiaibii
#
GjLcbol. More j
aLbll j 2000000000 Edit j sss
G
- 3.
A
a aalwulj o gdo
Jc Ie Jie Jie Jie Jie
4.
.0000j g jbj JS ljc dnnll aolc yghiaie.
a>glal y=La,b a, jL<la
.5
Ie Ie 1000000000000000000000000000000000000000000
.
EXIT jll lIaill Jnll no g
JSL
SgJ 1
AllShare Cast
pJLgCdo 2 AllShare Cast
Logall Jd. aeall Asyll
egog Jgaxall JIaI aoc
aeall Asyll
Aag Lw! gogjll Jw! Jdsy I K
aabg plxwl J .Screen Mirroring
JcLbDy Dg j Screen Mirroring
SJJg gJJ clgBgjj
- RREVEARPS
Jg Jcbio gka.
.
G
3.
4.
.5
.
RETURN
6.
.
#
G JI I c b a 1g .a Ll j l e SEARCH
aLl lcl aesll 1 Lc
.aaLilJ Lc aogagai Claolal aogj plowi y aSiLo gOpera TV Store
xslaw Jaxj jll Jai
.
RETURN
aLwIgBCAK 1
G hou1g
Screen Mirroring
Screen Mirroring
aai aiaiwi yjg jelil aaiw l c aolglj 8
4gog1 Ls ggl 1aLil 1wSc 2g. TMiracast
S L S C
Screen Mirroring
1.
2.
3.
- JL
5.
JLwJ (JLJI JI ...Android_92gb
Juaio
m = 311
Speaker Selection Digital Output TV Speaker
BD-Live Internet Connection
.BD-LIVE
Anynet+ (HDMI-CEC)
Lag.HDMI aeguog 1aJg2 Jg3
psswll JgJgJgJgJgJ gJgJgJgJgJ gJgJgJgJ gJgJgJ gJgJgJ gJgJgJ gJgJgJ gJgJgJ gJgJgJ gJgJgJ gJgJgJ gJgJgJ gJgJgJ gJgJgJ gJgJgJ gJgJgJ gJgJgJ gJgJgJ g
HDMI LLS Ls 1 a>laaagal o g S J CEC
. ^+ Anynet,LaSamsung Ls+Anynet a,bg
BD Data Management
.USB 1000000000000000000000000000000000000000000000000000000000000000000000000
JgSggyu USB 0gplssuL/uyL4 4 1 Js aL5/sy aCy uSB 2.0 Lg a
BD Data 111111111111111111111111111111111111
DivX® Video On Demand
DivX(R) JLogLeJ 1000000000000000000000000000000000000000000000000000000000000000000000000000
a, g, Jg, g, g, JI, i, w, i, L4> HDMl;L4>;L5|31
中
S_ BCD = S_ COD + S_ BDO - S_ BOC
- HDMI
3D 12000000000000000000000000000000000000000000000000000000
Jolal. Jis gds aJLg .aWJl Jc gdd Jd JI Off HDMl Deep Colour
Settings
- CsiMPEG gwiyigolao Jwai all 3D Settings
JL 3D JI JI JI JI JI JI JI JI JI JI JI JI JI JI JI JI JI JI JI JI JI JI JI JI JI JI JI JI JI JI JI JI JI JI JI JI JI JI JI JI JI JI JI JI JI JI JI JI JI JI J1
3D 1 3D 1 1
3D 3o 1000000000000000000000000000000000000000000000000000000000000000000000000000000000000
TV Aspect Ratio
28g.1Lai,21Jl, yayell 1wuyyjx J
1 1
16:9 Original 15j
Pillarbox 4:3 c Lc
(0g)
(Samsung BD Wise
BDWise bbsic BD 1cL Resolution sld BDB Wise y
Resume 2x Resolution
.BD Wise aag plsi wlaq Wise BD Wise aag jui Jg slw Jc njaiJIg CiaIaIy BDB Wise Js .On
- LaiWJ
中
·s 2^n - 1bi Li,2^i - 1
In Rt ABD
BD a log
Invl.palw
| Jpeg | ### | Speaker Settings |
| ### | ### | ### |
| ### | ### | ### |
| ### | ### | ### |
| ### | ### | ### |
| ### | ### | ### |
| ### | ### | ### |
| ### | ### | ### |
| ### | ### | ### |
| ### | ### | ### |
| ### | ### | ### |
| ### | ### | ### |
| ### | ### | ### |
| ### | ### | ### |
| ### ### | ### | ### |
J 1
[\left( {x,y,}\right) ]
J 13 LgS.DVD
P


10JgJDVD-R 1
9
9i gill
30 jLJU USB JgBD-R Lc
pIaunuiuie g

TRUEID
DIGITAL PLUS

BD-LIVE Dolby
auii Inag aigjll Jao aieo Jie wu Lloc
aiglo uay 21 jc Logleao gj .gai IeLaiy21
011 ggej y jy all aic lc Juaill
.ogwll sic Logleall

Jgj 1yie Jcill yjw BD-Jlgic Jw sic

Java

Master Audio | Essential
i 1
[\text{S上存}]

DivX
DTS

aLal PAL aclj pLi j! Log .i[al.Lwj. 0sioJI
J
a.b.sli(w)
(1ogooallol)
3.9
.
DVD-RAM
M/PPBVD
HD DVD
.
(VRg)DVC
CVD/CD-ROI
aibiojoo
j 12xg aebiaall yoljgclnniJyL jyj p 111 Jy
J 1
aalss aagll lgl aaiall iig adhiaall poj yoc po
DRM MP3 LLaLgBcIaI I aI aI aI aI gall no Lglai ai gll (aagll gaaal 1)
30fps (30 Jc Ja sill yddell aal lalll aee
aill slll lssll lslsUSB aag aal 111111111111111111111111111111111111111111111111111
(HCCHUB)
100000000000000000000000000000000000000000000000000000000
gS; aad adLb USB aag L>13 0dJLoj
USB aaiiJ 100000000000000000000000000000000000000000000000000000000000000000000
SAMSUNG 8
| ### | 1 |
| ### | 2 |
| ### | 3 |
| ### | DVD- VIDEO |
| ### | 4 |
| ### | 5 |
| ### | 6 |
X Blu-ray Disc/DVD aabiaaI aJLS 1
<ay. iill iy Jaiiai I ay, wliy
. yall
paaall l 200) AVCHD (Cg
gLgolwgl a.o.o.o.o.o. oJyj 01o Jsswi j
.AVCHD
a11c a0
·
S OBC = S COD + S BOC
. 已 _ 2 ^ 一 .X.V.
- Sony
LS S1
S L = S L = S_ L = 12 × 2t × 2t = 42
gwiis AVCHD 1111
Corporation
Sony. Matsushita Electronic Industrial Co., Ltd .Corporation
@
AVCHD
② = 1,010
a#
gluea1 aLooc
| 1080x1920 | ||||
| MP3, Dolby Digital, DTS, WMA, PCM | DivX 3.11/4/5/6 MP4v3 H.264 BP/MP/HP | AVI | avi.* | |
| MP3, Dolby Digital, DTS | VC-1 AP, DivX 5/6 H.264 BP/MP/HP | MKV | mkv.* | |
| WMA | WMV (wmv9) VC-1 ARymC*1 SM | |||
| AAC | MP4 (mp4v) H.264 BP/MP/HP | MP4 | mp4.* | |
| MP1, 2 Dolby Digital, DTS | MPEG1 MPEG2 H.264 BP/MP/HP | PS | mpg /*.mpeg.* | |
2g.
LHS = 0.1mol 0
.1g
.
gJj
-AVCHD4.1
VC1 SP/MP/AP L4, H.264 FMO/ASO/RS
60:720×1280 MPEG4 SP, ASP
30:720×1280
LgI GMC 2
gall jooj c
STD9WMA7,8,9
22050 1
J 96,88.2,64,48,44.1,32,24,22,16,12,11,8) jj0gL≤96:JI JAAAC
a 320:
aogcdo DivX aogjill alo claw
txt.*smb.*srt.*smi.*ttxt.
aagaaoloc
| .5.1 ala lal all lalall salll alal alal alal alal alal alal alal alal alal alal alal alal alal alal alal alal alal alal alal alal alal alal alal alal alal alal alal alal alal alal alal alal alal alal alal alal alal alal alal alal alal alal alal alal alal alal alal alal alal alal alall alal alal alal alal alal alal alal alal alal alal alal alal alal alal alal alal alal alal alal alal alal alal alal alal alal alal alal alal alal alal alal alal alal alal alal alal alal alal alal alal alal alal alal alal alal alal alal alal alal alAL dolby Digital 5.1 CH suc | |
| .5.2 acnll aasssssssssssssssssssssssssssssssssssssssssssssssssssssssssssssssssssssssssssssssssssssssssssssssssssssssssssssssssssssssssssssssssssssssssssssssssssssssssssssssssssssssssssssssssssssssssssssssssssssssssSS SauuauuuuauuuuuuuuuuuuuuuuuuuuuuuuuuuuuuuuuuuuuuuuuuuuuuuuuuuuuuuuuuuuuuuuuuuuuuuuuuuuuuuuuuuuuuuuuuuuuuuuuuuuuuuuuuuuuuuuuuuuuuuuuuuuuuuuuuuuuuuuuuuuuuuuuuuuuuuuuuuuuuuuuuuuuuuuuuuuuuuuuuuuuuuuuuuuuuuuuuuuuuuuuUU | |
| .5.3 g a lal lal lal lal lal lal lal lal lal lal lal lal lal lal lal lal lal lal lal lal lal lal lal lal lal lal lal lal lal lal lal lal lal lal lal lal lal lal lal lal lal lal lal lal lal lal lal lal lal lal lAL Lala lal lal lal lal lal lal lal lal lal lal lal lal lal lal lal lal lal lal lal lal lal lal lal lal lal lal lal lal lal lal lal lal lal lal lal lal lal lal lal lal lal lal lal lal lal lal lal lal lal lcal lal lal lal lal lal lal lal lal lal lal lal lal lal lal lal lal lal lal lal lal lal lal lal lal lal lal lal lal lal lal lal lal lal lal lal lal lal lal lal lal lal lal lal lal lal lal lal lal lal lall alal alal alal alal alal alal alal alal alal alal alal alal alal alal alal alal alal alal alal alal alal alal alal alal alal alal alal alal alal alal alal alal alal alal alal alal alal alal alal alal alal alal alal alal alal alal alal alal alal all alal alal alal alal alal alal alal alal alal alal alal alal alal alal alal alal alal alal alal alal alal alal alal alal alal alal alal alal alal alal alal alal alal alal alal alal alal alal alal alal alal alal alal alal alal alal alal alal alal al Lal 4:3 g a lal lal lal lal lal lal lal lal lal lal lal lal lal lal lal lal lal lal lal lal lal lal lal lal lal lal lal lal lal lal lal lal lal lal lal lal lal lal lal lal lal lal lal lal lal lal lal lal llal lal lal lal lal lal lal lal lal lal lal lal lal lal lal lal lal lal lal lal lal lal lal lal lal lal lal lal lal lal lal lal lal lal lal lal lal lal lal lal lal lal lal lal lal lal lal lal lal lal llal lAL Lala lal lal lal lal lal lal lal lal lal lal lal lal lal lal lal lal lal lal lal lal lal lal lal lal lal lal lal lal lal lal lal lal lal lal lal lal lal lal lal lal lal lal lal lal lal lal lAL Lala lal llal lal lal lal lal lal lal lal lal lal lal lal lal lal lal lal lal lal lal lal lal lal lal lal lal lal lal lal lal lal lal lal lal lal lal lal lal lal lal lal lal lal lal lal lal lal lal lal lAL Lalla lal lal lal lal lal lal lal lal lal lal lal lal lal lal lal lal lal lal lal lal lal lal lal lal lal lal lal lal lal lal lal lal lal lal lal lal lal lal lal lal lal lal lal lal lal lal lal lal lal lalg Lala lal lal lal lal lal lal lal lal lal lal lal lal lal lal lal lal lal lal lal lal lal lal lal lal lal lal lal lal lal lal lal lal lal lal lal lal lal lal lal lal lal lal lal lal lal lal lal lal llal lall alal alal alal alal alal alal alal alal alal alal alal alal alal alal alal alal alal alal alal alal alal alal alal alal alal alal alal alal alal alal alal alal alal alal alal alal alal alal alal alal alal alal alal alal alal alal alal alal all alal all alal all alal all alal all alal all alal all alal all alal all alal all alal all alal all alal all alal all alal all alal all alal all alal all alal all alal all alal all alal all alal all alal all alal all alal all alal all alal all alal all alal all alal all alal all alal all alal all all alal all alal all alal all alal all alal all alal all alal all alal all alal all alal all alal all alal all alal all alal all alal all alal all alal all alal all alal all alal all alal all alal all alal all alal all alal all alal all alal all alal all alal all alal all alal all alal all alal alal all alal all alal all alal all alal all alal all alal all alal all alal all alal all alal all alal all alal all alal all alal all alal all alal all alal all alal all alal all alal all alal all alal all alal all alal all alal all alal all alal all alal all alal all alal all alal all alAL Lala lal lal lal lal lal lal lal lal lal lal lal lal lal lal lal lal lal lal lal lal lal lal lal lal lal lal lal lal lal lal lal lal lal lAL Lala lal lal lal lal lal lal lal lal lal lal lal lal lal lal llal lAL Lala lal lal lal lal lal lal lal lal lal lal lal lal lal lal lal lAL Lala lal lal lal lal lal lal lal lal lal lal lal lAL Lala lal lal lal lal lal lal lal lal lal lal lAL Lala lal lal lal lal lal lal lal lal lAL Lala lal lal lal lal lal lal lal lAL Lala lal lal lal lal lal lal lAL Lala lal lal lal lal lal lal lAL Lala lal lal lal lal lal lAL Lala lal lal lal lal lal lAL Lala lal lal lal lal lal lAL Lala lal lal lal lal lal lAL Lala lal lal lal lal lAL Lala lal lal lal lal lAL Lala lal lal lal lal lAL Lala lal lal lal lal lAL Lala lal lal lal lal lAL Lala lal lal lal lal lAL Lala lal lal lal lal lAL Lala lal lal lal lal llAL Lala lal lal lal lal llAL Lala lal lal lal lal llAL Lala lal lal lal lal llAL Lala lal lal lal lal llAL Lala lal lal lal lal llAL Lala lal lal lal lal llAL Lala lal lal lal lal llAL Lala lal lal llal lAL Lala lal lal lal lal llAL Lala lal lal lal lal llAL Lala lal lal lal lal llAL Lala lal lal lal lal llAL Lala lal lal lal lal llAL Lala lal lal lal lal llAL Lala lal lal lal lal llAL Lala lal llal lal lal llAL Lala lal lal lal lal llAL Lala lal lal lal lal llAL Lala lal lal lal lal llAL Lala lal lal lal lal llAL Lala lal lal lal lal llAL Lala lal lal lal lal llAL Lala lal lal lal lal llAL Rala dul dul dul dul dul dul dul dul dul dul dul dul dul dul dul dul dul dul dul dul dul dul dul dul dul dul dul dul dul dul dul dul dul dul dul dul dul dul dul dul dul dul dul dul dul dul dul dul dul dul dUL Lala dul dul dul dul dul dul dul dul dul dul dul dul dul dul dul dul dul dul dul dul dul dul dul dul dul dul dul dul dul dul dul dul dul dul dul dul dul dul dul dul dul dul dul dul dul dul dul dul dul Lala dul dul dul dul dul dul dul dul dul dul dul dul dul dul dul dul dul dul dul dul dul dul dul dul dul dul dul dul dul dul dul dul dul dul dul dul dul dul dul dul dul dul dul dul dul dul dul dul Lala dlall dlall dlall dlall dlall dlall dlall dlall dlall dlall dlall dlall dlall dlall dlall dlall dlall dlall dlall dlall dlall dlall dlall dlall dlall dlall dlall dlall dlall dlall dlall dlall dlall dlall dlall dlall dlall dlall dlall dlall dlall dlall dlall dlall dlall dlall dlall dlall dlall dlall dlALL Lala dul dul dul dul dul dul dul dul dul dul dul dul dul dul dul dul dul dul dul dul dul dul dul dul dul dul dul dul dul dul dul dul dul dul dul dul dul dul dul dul dul dul dul dul dul dul dul dul dlall dlall dlall dlall dlall dlall dlall dlall dlall dlall dlall dlall dlall dlall dlall dlall dlall dlall dlall dlall dlall dlall dlall dlall dlall dlall dlall dlall dlall dlall dlall dlall dlall dlall dlall dlall dlall dlall dlall dlall dlall dlall dlall dlall dlall dlall dlall dlall dlall dlll Lala dul dul dul dul dul dul dul dul dul dul dul dul dul dul dul dul dul dul dul dul dul dul dul dul dul dul dul dul dul dul dul dul dul dul dul dul dul dul dul dul dul dul dul dul dul dul dul dul dd Lala dul dul dul dul dul dul dul dul dul dul dul dul dul dul dul dul dul dul dul dul dul dul dul dul dul dul dul dul dul dul dul dul dul dul dul dul dul dul dul dul dul dul dul dul dul dul dul dul da Lala dul dul dul dul dul dul dul dul dul dul dul dul dul dul dul dul dul dul dul dul dul dul dul dul dul dul dul dul dul dul dul dul dul dul dul dul dul dul dul dul dul dul dul dul dul dul dul dul ds Lala dul dul dul dul dul dul dul dul dul dul dul dul dul dul dul dul dul dul dul dul dul dul dul dul dul dul dul dul dul dul dul dul dul dul dul dul dul dul dul dul dul dul dul dul dul dul dul dul dc Lala dul dul dul dul dul dul dul dul dul dul dul dul dul dul dul dul dul dul dul dul dul dul dul dul dul dul dul dul dul dul dul dul dul dul dul dul dul dul dul dul dul dul dul dul dul dul dul dul dh Lala dul dul dul dul dul dul dul dul dul dul dul dul dul dul dul dul dul dul dul dul dul dul dul dul dul dul dul dul dul dul dul dul dul dul dul dul dul dul dul dul dul dul dul dul dul dul dul dul du Lala dul dul dul dul dul dul dul dul dul dul dul dul dul dul dul dul dul dul dul dul dul dul dul dul dul dul dul dul dul dul dul dul dul dul dul dul dul dul dul dul dul dul dul dul dul dul dul dul de Lala dul dul dul dul dul dul dul dul dul dul dul dul dul dul dul dul dul dul dul dul dul dul dul dul dul dul dul dul dul dul dul dul dul dul dul dul dul dul dul dul dul dul dul dul dul dul dul dul der Lala dul dul dul dul dul dul dul dul dul dul dul dul dul dul dul dul dul dul dul dul dul dul dul dul dul dul dul dul dul dul dul dul dul dul dul dul dul dul dul dul dul dul dul dul dul dul dul dul dr Lala dul dul dul dul dul dul dul dul dul dul dul dul dul dul dul dul dul dul dul dul dul dul dul dul dul dul dul dul dul dul dul dul dul dul dul dul dul dul dul dul dul dul dul dul dul dul dul dul dt Lala dul dul dul dul dul dul dul dul dul dul dul dul dul dul dul dul dul dul dul dul dul dul dul dul dul dul dul dul dul dul dul dul dul dul dul dul dul dul dul dul dul dul dul dul dul dul dul dul c Lala dul dul dul dul dul dul dul dul dul dul dul dul dul dul dul dul dul dul dul dul dul dul dul dul dul dul dul dul dul dul dul dul dul dul dul dul dul dul dul dul dul dul dul dul dul dul dul dul D Lala dul dul dul dul dul dul dul dul dul dul dul dul dul dul dul dul dul dul dul dul dul dul dul dul dul dul dul dul dul dul dul dul dul dul dul dul dul dul dul dul dul dul dul dul dul dul dul dul del Lala dul dul dul dul dul dul dul dul dul dul dul dul dul dul dul dul dul dul dul dul dul dul dul dul dul dul dul dul dul dul dul dul dul dul dul dul dul dul dul dul dul dul dul dul dul dul dul dul di Lala dul dul dul dul dul dul dul dul dul dul dul dul dul dul dul dul dul dul dul dul dul dul dul dul dul dul dul dul dul dul dul dul dul dul dul dul dul dul dul dul dul dul dul dul dul dul dUL Lala dul dlall dlall dlall dlall dlall dlall dlall dlall dlall dlall dlall dlall dlall dlall dlall dlall dlall dlall dlall dlall dlall dlall dlall dlall dlall dlall dlall dlall dlall dlall dlall dlall dlall dlall dlall dlall dlall dlall dlall dlall dlall dlall dlall dlall dlall dlall dlall dlall dlll La LALALALALALALALALALALALALALALALALALALALALALALALALALALALALALALALALALALALALALALALALALALALALALALALALALALALALALALALALALALALALALALALALALALALALALALALALALALALALALALALALALALALALALALALALALALALALALALALALALALALAL Lala dlall dlall dlall dlall dlall dlall dlall dlall dlall dlall dlall dlall dlall dlall dlall dlall dlall dlall dlall dlall dlall dlall dlall dlall dlall dlall dlall dlall dlall dlall dlall dlall dlall dlall dlall dlall dlall dlall dlall dlall dlall dlall dlall dlall dlall dlall dlall dlall DL Lala dlall dlall dlall dlall dlall dlall dlall dlall dlall dlall dlall dlall dlall dlall dlall dlall dlall dlall dlall dlall dlall dlall dlall dlall dlall dlall dlall dlall dlall dlall dlall dlall dlall dlall dlall dlall dlall dlall dlall dlall dlall dlall dlall dlall dlall dlall dlall dlall Lala dlall dlall dlall dlall dlall dlall dlall dlall dlall dlall dlall dlall dlall dlall dlall dlall dlall dlall dlall dlall dlall dlall dlall dlall dlall dlall dlall dlall dlall dlall dlall dlall dlall dlall dlall dlall dlall dlall dlall dlall dlall dlall dlall dlall dlall dlall dlall dlalldl Lala dlall dlall dlall dlall dlall dlall dlall dlall dlall dlall dlall dlall dlall dlall dlall dlall dlall dlall dlall dlall dlall dlall dlall dlall dlall dlall dlall dlall dlall dlall dlall dlall dlall dlall dlall dlall dlall dlall dlall dlall dlall dlall dlall dlall dlall dlall dlall dlallDL Lala dlall dlall dlall dlall dlall dlall dlall dlall dlall dlall dlall dlall dlall dlall dlall dlall dlall dlall dlall dlall dlall dlall dlall dlall dlall dlall dlall dlall dlall dlall dlall dlall dlall dlall dlall dlall dlall dlall dlall dlall dlall dlall dlall dlall dlall dlall dlall dlall |
| ### | |||
| 5.576p/480p/720p/1080p | HDMI JLCSJLCSJLCSJLCSJLCSJLCSJLCSJLCSJLCSJLCSJLCSJLCSJLCSJLCSJLCSJLCSJLCSJLCSJLCSJLCSJLCSJLCSJLCSJLCSJLCSJLCSJLCSJLCSJLCSJLCSJLCSJLCSJLCSJLCSJ LDAHDMI JLCSJLCSJLCSJLCSJLCSJLCSJLCSJLCSJLCSJLCSJLCSJLCSJLCSJLCSJLCSJLCSJLCSJLCSJLCSJLCSJLCSJLCSJLCSJLCSJLCSJLCSJLCSJLCSJLCSJLCSJLCSJLCSJ LDAHMI JLCSJLCSJLCSJLCSJLCSJLCSJLCSJLCSJLCSJLCSJLCSJLCSJLCSJLCSJLCSJLCSJLCSJLCSJLCSJLCSJLCSJLCSJLCSJLCSJLCSJLCSJLCSJLCSJLCSJLCSJLCSJLCSJLCSJSLSLSLSLSLSLSLSLSLSLSLSLSLSLSLSLSLSLSLSLSLSLSLSLSLSLSLSLSLSLSLSLSLSLSLSLSLSLSLSLSLSLSLSLSLSLSLSLSLSLSLSLSLSLSLSLSLSLSLSLSLSLSLSLSLSLSLSLSLSLSLSLSLSLSLSLSLSLSLSLSLSLSLSLSLSLSLSLSLSLSLSLSLSLSLSLSLSLSLSLSLLSLSLSLSLSLSLSLSLSLSLSLSLSLSLSLSLSLSLSLSLSLSLSLSLSLSLSLSLSLSLSLSLSLSLSLSLSLSLSLSLSLSLSLSLSLSLSLSLSLSLSLSLSLSLSLSLSLSLSLSLSLSLSLSLSLSLSLSLSLSLSLSLSLSLSLSLSLSLSLSLSLSLSLSLSLSLSLSLSLSLSLSLSLSLSLSLSLSLSLSFSLSLSLSLSLSLSLSLSLSLSLSLSLSLSLSLSLSLSLSLSLSLSLSLSLSLSLSLSLSLSLSLSLSLSLSLSLSLSLSLSLSLSLSLSLSLSLSLSLSLSLSLSLSLSLSLSLSLSLSLSLSLSLSLSLSLSLSLSLSLSLSLSLSLSLSLSLSLSLSLSLSLSLSLSLSLSLSLSLSLSLSLSLSLSLSLSLSLSLS LSLSLSLSLSLSLSLSLSLSLSLSLSLSLSLSLSLSLSLSLSLSLSLSLSLSLSLSLSLSLSLSLSLSLSLSLSLSLSLSLSLSLSLSLSLSLSLSLSLSLSLSLSLSLSLSLSLSLSLSLSLSLSLSLSLSLSLSLSLSLSLSLSLSLSLSLSLSLSLSLSLSLSLSLSLSLSLSLSLSLSLSLSLSLSLSLSLSLSLSHSLSLSLSLSLSLSLSLSLSLSLSLSLSLSLSLSLSLSLSLSLSLSLSLSLSLSLSLSLSLSLSLSLSLSLSLSLSLSLSLSLSLSLSLSLSLSLSLSLSLSLSLSLSLSLSLSLSLSLSLSLSLSLSLSLSLSLSLSLSLSLSLSLSLSLSLSLSLSLSLSLSLSLSLSLSLSLSLSLSLSLSLSLSLSLSLSLSLSLSLELSLSLSLSLSLSLSLSLSLSLSLSLSLSLSLSLSLSLSLSLSLSLSLSLSLSLSLSLSLSLSLSLSLSLSLSLSLSLSLSLSLSLSLSLSLSLSLSLSLSLSLSLSLSLSLSLSLSLSLSLSLSLSLSLSLSLSLSLSLSLSLSLSLSLSLSLSLSLSLSLSLSLSLSLSLSLSLSLSLSLSLSLSLSLSLSLSLSLSLESLSLSLSLSLSLSLSLSLSLSLSLSLSLSLSLSLSLSLSLSLSLSLSLSLSLSLSLSLSLSLSLSLSLSLSLSLSLSLSLSLSLSLSLSLSLSLSLSLSLSLSLSLSLSLSLSLSLSLSLSLSLSLSLSLSLSLSLSLSLSLSLSLSLSLSLSLSLSLSLSLSLSLSLSLSLSLSLSLSLSLSLSLSLSLSLSLSLSLSLASLSLSLSLSLSLSLSLSLSLSLSLSLSLSLSLSLSLSLSLSLSLSLSLSLSLSLSLSLSLSLSLSLSLSLSLSLSLSLSLSLSLSLSLSLSLSLSLSLSLSLSLSLSLSLSLSLSLSLSLSLSLSLSLSLSLSLSLSLSLSLSLSLSLSLSLSLSLSLSLSLSLSLSLSLSLSLSLSLSLSLSLSLSLSLSLSLSLSLSLSSLSSLSSLSSLSSLSSLSSLSSLSSLSSLSSLSSLSSLSSLSSLSSLSSLSSLSSLSSLSSLSSLSSLSSLSSLSSLSSLSSLSSLSSLSSLSSLSSLSSLSSLSSLSSLSSLSSLSSLSSLSSLSSLSSLSSLSSLSSLSSLSSLSSL | ||
aaiiaal BD 1i y aaiy i gaii
HT-H5500K/HT-H5530HK/HT-H5530K/HT-H5550K
CE
sS 1999/5
<(ac) Support j! Jaii. http://www.samsung.com gogai jc aiaiaiaiaiaiaiaiaiaiaiaiaiaiaiaiaiaiaiaiaiaiaiaiaiaiaiaiaiaiaiaiaiaiaiaiaiaiaiaiaiaiaiaiaiaiaiaiaiaiaiaiaiaiaiaiaiaiaiaiaiaiaiaiaiaiaiaiaiaiaiaiaiaiaiaiaiaiaiaiaiaiaiaiaiaiaiaiaiaiaiaiaiaia ia
j 1 j
HT-H5550WK
C E
Samsung Electronics 5. EC/1999/5
(a,c,s) Support http://www.samsung.com gagolc l aalbll jlc 1s2g jls
j1281 jg 11101111111 jg 2 21 jg 111
#
| JL | JL | |
| 1.90 | ||
| 224.0 × (ELaJI) | ||
| 35 JI | ||
| 75% JI 10% | ||
| 55 | ||
| EM 121g | ||
| 1.0% | ||
| HDMI Audio (sω)PCM Bitstream | ||
| x 2(3 JIg) 165 | ||
| (3 JIg) 170 | ||
| (3 JIg) 170 | ||
| JL | ||
| 70 | ||
| 60 | ||
5.1olai ayao aclaw pLi
| aclawll pIb | ||||
| golal | aclawll | |||
| ρj3 | ρj3 | ρj3 | ρj3 | aclawll |
| 200 ~ jzj50 | 20 ~ jzj200 | 20 ~ jzj200 | 20 ~ jzj200 | aclawll |
| jzj200 | jzj200 | jzj200 | jzj200 | aclawll |
| /1p/l/84 | /1p/l/84 | /1p/l/84 | /1p/l/84 | aclawll |
| jzj200 | jzj200 | jzj200 | jzj200 | aclawll |
| 1p/l 170 | 1p/l 170 | 1p/l 165 | 1p/l 165 | aclawll |
| 1p/l 340 | 1p/l 340 | 1p/l 330 | 1p/l 330 | aclawll |
| HT-H5500K | 74.0 × 146.0 × 95.074.0 × 116.0 × 95.074.0 × 95.0 × 95.0 × 95.0 × 227.0 × 227.0 × 227.0 × 227.0 × 227.0 × 227.0 × 227.0 × 227.0 × 227.0 × 227.0 × 227.0 × 227.0 × 227.0 × 227.0 × 227. | |||||||
| × 380.6 × 220.6364.7 | ||||||||
| HT-H5530HK | × 380.6 × 220.6364.7 | |||||||
| × 380.6 × 220.6364.7 | 74.0 × 116.0 × 95.074.0 × 116.0 × 95.074.0 × 116.0 × 95.074.0 × 116.0 × 95.074.0 × 116.0 × 95.074.0 × 116.0 × 95.074.0 × 116.0 × 96.074.0 × 116.0 × 95.074.0 × 116.0 × 95.074.0 × 116.0 × 95.074.0 × 116.0 × 95.074.0 × 116.0 × 95.074.0 × 116.0 ×95.074.0 × 116.0 ×95.074.0 × 116.0 ×95.074.0 × 116.0 ×95.074.0 × 116.0 ×95.074.0 × 116.0 ×95.074.0 × 116.0 ×95. | 74.0 × 116.0 × 95.074.0 × 116.0 × 95.074.0 × 116.0 × 95.074.0 × 116.0 × 95.074.0 × 116.0 × 95.074.0 × 116.0 × 1227.0 × 1227.0 × 1227.0 × 1227.0 × 1227.0 × 1227.0 × 1227.0 × 1227.0 × 1227.0 × 1227.0 × 1227.0 × 1227.0 × 1227.0 ×1227.0 ×1227.0 ×1227.0 ×1227.0 ×1227.0 ×1227.0 ×1227.0 ×1227.0 ×1227.0 ×1227.0 ×1227.0 ×1227.0 ×1227.0 ×1227.0 ×1 | ||||||
| HT-H5530K | × 380.6 × 220.6364.7 | |||||||
| × 380.6 × 220.6364.7 | 74.0 × 95.0 × 227.074.0 × 95.074.0 × 95.074.0 × 95.074.0 × 95.074.0 × 95.074.0 × 95.074.0 × 95.074.0 × 95.074.0 × 95.074.0 × 95.074.0 × 96.074.0 × 95.074.0 × 95.074.0 × 95.074.0 × 95.074.0 × 95.074.0 × 95.074.0 × 95.074.0 × 95.074.0 × 95.074.0 × 98.0x 23.0 × 276.0 × 276.0 × 276.0 × 276.0 × 276.0 × 276.0 × 276.0 × 276.0 × 276.0 × 276.0 × 276.0 × 276.0 × 276.0 × 276.0 × 276. | 74.0 × 1113.0 × 95.074.0 × 1113.0 × 95.074.0 × 1113.0 × 95.074.0 × 1113.0 × 95.074.0 × 1113.0 × 95.074.0 × 1113.0 × 95.074.0 × 1114.0 × 1227.0 × 1227.0 × 1227.0 × 1227.0 × 1227.0 × 1227.0 × 1227.0 × 1227.0 × 1227.0 × 1227.0 × 1227.0 × 1227.0 × | ||||||
| HT-H5500K | × 380.6 × 220.6364.7 | |||||||
| × 380.6 × 220.6364.7 | 74.0 × 95.0 × 227.074.0 × 95.074.0 × 95.074.0 × 98.0x 23.0 × 276.0 × 276.0 × 276.0 × 276.0 × 276.0 × 276.0 × 276.0 × 276.0 × 276 | 74.0 × 1113.0 × 95.074.0 × 1113.0 × 95.074.0 × 1113.0 × 95.074.0 × 1113.0 × 95.074.0 × 1114.0 × 1227.0 × 1227. | 74.0 × 1113.0 × 95.074.0 × 1113.0 × 95.074.0 × 1114.0 × 1227.0 × 1227. | 74.0 × 1113.0 × 95.074.0 × 1113.0 × 95.1(ρL: ρL) | ||||
| HT-H5530HK | × 380.6 × 220.6364.7 | |||||||
| × 380.6 × 220.6364.7 | 74.0 × 95.0 × 227.074.0 × 95.074.0 × 95.074.0 × 95.1(ρL: ρL) | |||||||
| HT-H5530K | × 380.6 × 220.6364.7 | |||||||
| × 380.6 × 220.6364.7 | 74.0 × 95.0 × 227.074.0 × 95.074.0 × 95.1(ρL: ρL) | |||||||
| HT-H5550K/HT-H5550WK | × 380.6 × 220.6364.7 | |||||||
| × 380.6 × 220.6364.7 | 74.0 × 95.0 × 227.074.0 × 95.074.0 × 95.1(ρL: ρL) | 74.0 × 1113.0 × 95.074.0 × 1113.0 × 95.074.0 × 1114.0 × 1227.0 × 1227.0 × 1227.0 × 1227.0 × 1227.0 × 1227.0 × 1 | ||||||
| HT-H5550K/HT-H5550WK | × 380.6 × 220.6364.7 | |||||||
| × 380.6 × 220.6364.7 | 74.0 × 95.0 × 227.074.0 × 95.0734.0 × 95.074.0 × 95.1(ρL: ρL) | |||||||
.10 电
. _n + 1b_na_n12
a.aa:aa
.
CiiioIg
a double-D Dolby Laboratories. Dolby Laboratories
DOLBY TRUE DIGITAL PLUS
DTS http://patents.dts.com gagll DTS.
DTS-HD g LgLdLg DTS .Licensing Limited. DTS. DTSHD
Jlal abgaagagagagagagagagagagagagagagagagagagagagagagagagagagagagagagagagagagagagagagagagagagagagagagagagagagagagagagagagagagagagagagagagagagagagagagagagag

dtts-HD Master Audio | Essential
Ae aee aee aee .DivX, LLC abw yogd Jy 2000 DIVX: Divx ydy Jy Rovi Corporation
DIVX. HD
DivX 1 J 12 DivX Certified 1 J 12 12 12 12 12 12 12 12 12 12 12 12 12 12 12 12 12 12 12 12 12 12 12 12 12 12 12 12 12 12 12 12 12 12
LoLc g. dLoLc .DLNA CERTIFIED DLNA ,DLNA (Digital Living Network Alliance)

dlna CERTIFIED
LoLc g dLy Lc (HDMI) Lwog. (HDMI High-Definition Multimedia) g (HDMI) 1Lc .s21 JgJg aiaa (HDMI Licensing LLC) a5jA alnae
HDMI
Lolc s2s1 sLoWgS. gJ aQLiI cS,gl/9 Oracle aS,aljao JavaOracle 20g

aS 1521 aR S011 aS S011 aLao nolgag aS R011 gssx1 cIyrae yaaonll aLaas aiaa silln aovnnr .Rovl Corporation
. Blu-ray Disc Association aJ J aJ L oLle y J Le Jg TMBlu-ray g TM Blu-ray Disc
I. Lwllg yllal glaog poln Jy Bgawall gic wll plalil Cinavia aas aglll ldo pssu
g Jy wll oagag allw, gbiw. Lg zgaww gac aswiwl gao plaiiwl alisi S ic. LjLgLai! ay biay igswll
.
http://www.cinavia. gogo 1e Cincavia 0c Loglo 5y Cincavia 23 00 Logle all no 2004-2010 . Verance Corporation aLgAaBgAaBgAaBgAaBgAaBgAaBgAaBgAaBgAaBgAaBgAaBgAaBgAaBgAaBgAaBgAaBgAaBgAaBgAaBgAaBgAaBgAaBgAaBgAaBgAaBgAa
Giaalaaa aaiy jie
5.1 CH Blu-ray™
Système audiovisuel
RISQUES D'LECTROCUTION. NE PAS OUVRIR.
ATTENTION: POUR LIMITER LES RISQUES DE DÉCHARGE ÉLECTRIQUE, NE RETIREZ JAMAIS LE Cache (NI L'ARRÊRÉ DE L'APPAREIL). CERTAINES PIEÇES QU'IL CONTIENT NE SONT PAS REPARABLES PAR L'UTILISATEUR. VEUILLEZ CONTACTER UN TECHNICIEN QUALIFIÉ POUR Toute RÉPARATION.
Trame video (24 ips)
*.txt,.smi,.srt,.sub,.txt
Master Audio | Essential
If you have any questions or comments relating to Samsung products, please contact the SAMSUNG customer care centre.
SAMSUNG WORLD WIDE
. SAMSUNG sLac aJy jLaiS .Samsung Laaay y JLae g JLaa 1