Comfortemp 21139 - Chocolate fountain TREBS - Free user manual and instructions
Find the device manual for free Comfortemp 21139 TREBS in PDF.

| Features | Details |
|---|---|
| Product type | Chocolate fountain |
| Capacity | 1 kg of chocolate |
| Material | Stainless steel |
| Dimensions | Height: 30 cm, Diameter: 20 cm |
| Weight | 2.5 kg |
| Power supply | 220-240 V, 50 Hz |
| Power | 120 W |
| Usage | Ideal for parties, events, and buffets |
| Maintenance | Easy to disassemble and clean, dishwasher-safe parts |
| Safety | Non-slip base for added stability |
| Included accessories | Wooden spoon for stirring |
| Warranty | 2 years |
Frequently Asked Questions - Comfortemp 21139 TREBS
Questions des utilisateurs sur Comfortemp 21139 TREBS
0 question sur cet appareil. Repondez a celles que vous connaissez ou posez la votre.
Poser une nouvelle question sur cet appareil
Download the instructions for your Chocolate fountain in PDF format for free! Find your manual Comfortemp 21139 - TREBS and take your electronic device back in hand. On this page are published all the documents necessary for the use of your device. Comfortemp 21139 by TREBS.
USER MANUAL Comfortemp 21139 TREBS
Manual hot chocolate dispenser
NL) Handleiding - Warme chocolademelkdispenser
Image 3 Image 4 Image 5
1. Technical specifications
Base: Stainless steel casing
Capacity: 3 liter
Dimensions: 20 × 40cm
Weight (net): 3kg
Weight (filled): 6kg
Adjustable thermostats: Two
Noise emission: Lower than 70dB
Electric specifications: See type label at the bottom of the dispenser
2. Introduction
Read the user manual carefully before using the dispenser. As for all mechanical products, keep the device clean and well maintained.
3. Installation
(xvi) Take the dispenser out of the packaging (keep original packaging for future use).
(xvii) Check the chocolate dispenser for transport damage.
(xviii) Dissemble, clean and disinfect the chocolate dispenser before use according to the instructions in chapter 5.2 CLEANING.
(xix) Install the dispenser on a table or work surface, which is able to hold the total weight after it is filled.
(xx) Ensure that your power supply corresponds with the specifications on the type label. Connect the device to a 230V, 50Hz wall outlet.
4. Controls
The dispenser is equipped with a main switch with the following functions:
Position 0 - Power is switched off
Position 1 - Heating element and stirring unit are tuned on
The dispenser is equipped with a primary thermostat at the right-hand side to set the temperature of the product. The indicator lamp on the switch lights up if the heating element is operating. The indicator lamp turns off to indicate that the hot chocolate has reached the preset temperature.
The lid is equipped with aroma vents. Opening the vents releases some of the hot chocolate aroma.
Remember that with open vents the product will slowly evaporate and thicken.
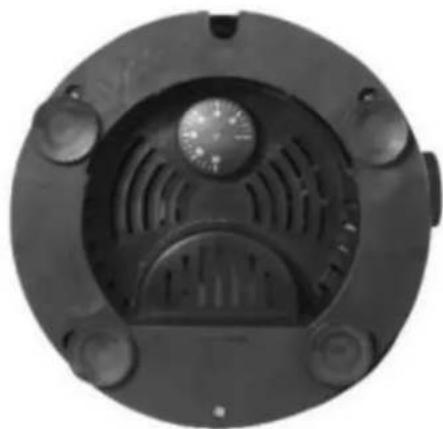
Note: The dispenser is also equipped with a secondary thermostat at the bottom to set the maximum temperature of the hot plate. This is factory-calibrated to 120^ . This thermostat is not to be adjusted without consulting the supplier. Adjusting this setting will effect the heating time of the product.
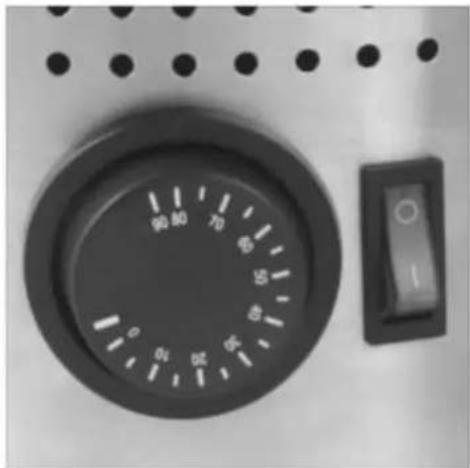
Main switch and primary thermostat Secondary thermostat
5. Use Instructions
(xxxiv) Ensure that the dispenser is cleaned and disinfected before use according to chapter 5.2 CLEANING and properly assembled afterwards.
(xxxv) Insert the stirring unit and carefully turn it counter-clockwise as far as possible until it locks in place. See Figure 2.
(xxxvi) Pour the chocolate milk into the bowl.
(xxxvii) Replace the lid on the bowl.
(xxxviii) Set the aroma vents as desired.
(xxxix) Set the primary thermostat to the desired temperature and switch the device on.
(xl) Wait until the hot chocolate has reached the desired temperature. For 3 liters of chocolate milk this takes approximately 90 minutes. The chocolate milk is heated up slowly and evenly to avoid boiling and burning at the bottom.
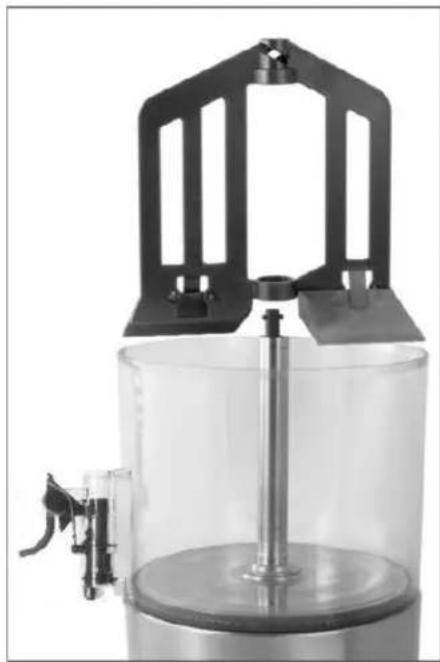
Figure 2.
(xli) Only use the dispenser with the lid placed on the bowl to avoid contamination of the product.
(xlii) The dispenser must remain switched on during operation; the heating element is thermostat-controlled to bring the product to the desired temperature and to keep the preset temperature automatically. The stirring unit must work at all times.
(xliii) Refilling. Do not immediately refill if the hot chocolate during the course of the day slowly comes to an end; wait until it is completely used up.
(xliv) At the end of the day the bowl must be emptied and thoroughly cleaned for hygienic reasons.
5.1 Safety Precautions
(xvi) Read the user manual carefully before using the hot chocolate dispenser.
(xvii) Only connect the hot chocolate dispenser to an earthed wall outlet.
(xviii) Do not connect the hot chocolate dispenser via extension cable.
(xix) Keep the bowl clean during operation.
(XX) Always switch the chocolate dispenser off and disconnect from mains power supply before opening, cleaning and maintenance.
WARNING:
Do NOT operate the device with empty bowl.
Do NOT operate the device without liquid in the bowl.
Do NOT remove the bowl from the device before the hot plate has completely cooled down.
Do NOT remove the bowl from the base if it still contains hot product.
IMPORTANT
Place the device on a level surface.
5.2 Cleaning and Disinfecting
Cleaning and disinfecting is essential to avoid bacterial contamination and to keep the perfect taste and maximum performance of your dispenser. The following instructions are kept in general terms. All remaining hot chocolate must be removed from the hot chocolate dispenser before cleaning and maintenance.
5.2.1 Disassembly Instructions
Always disconnect from mains power supply before dissembling the device.
(xix) Remove the lid for cleaning, if necessary. Loosen the screw and remove the disc with the aroma vents. Take care not to lose the screw.
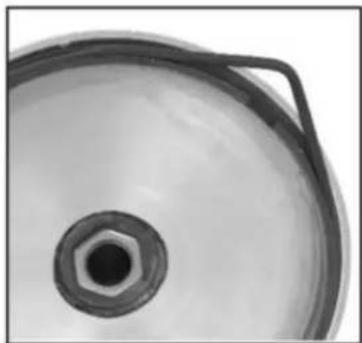
(xx) Turn the stirring unit clockwise to remove it from the center axis (see Figure 3).
(xxi) Take the bowl out of the dispenser.
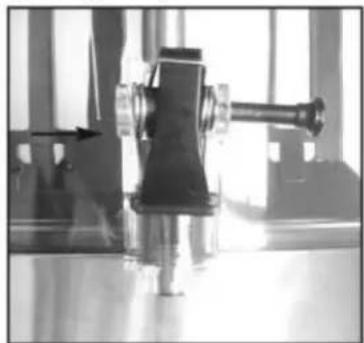
(xxii) Remove the tap by pulling out the pin (see Figure 4).
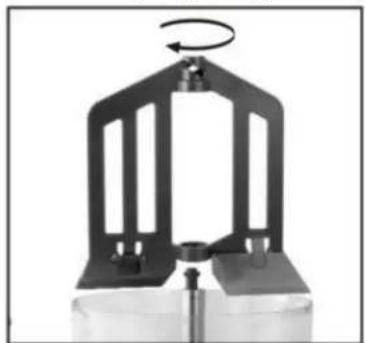
Figure 3 Figure 4 Figure 5
(xxiii) Draw the base out of the bowl to remove the rubber sealing ring (see Figure 5) and the base in the direction of the arrow (see Figure 6).
(xxiv) Remove the grating of the drip pan and then the drip pan, as shown in Figure 7.
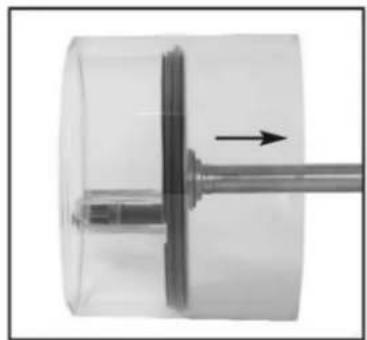
Figure 6
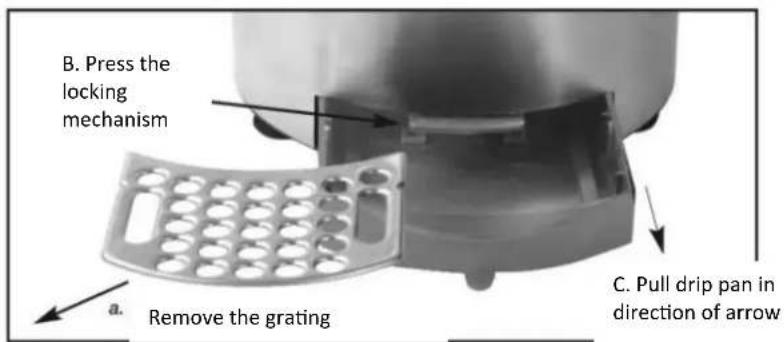
Figure 7
5.2.2 Cleaning Instructions
Always disconnect from mains power supply before dissembling the device and disassemble as described before.
(vii) Place bowl, stirring unit, disc with aroma vents and tap components in a dishwasher and ensure no components get lost (CAUTION: discoloring of components due to cleaning agents in dishwasher is possible; to avoid discoloration clean as follows), OR
(viii) Use a suitable brush and carefully clean all components manually in dishwater. Thoroughly rinse and dry all components after washing.
5.2.3 Assembly Instructions
(i) Press the base firmly back into the bowl and carefully replace the rubber sealing ring.
(ii) Assemble the tap mechanism (see Figure 8 and Figure 9).
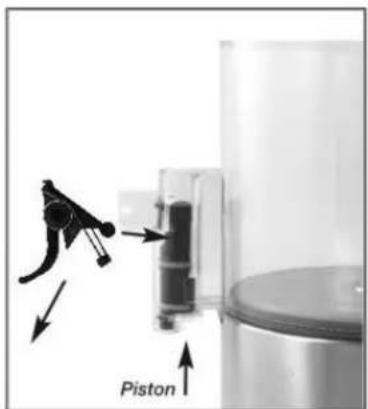
Figure 8
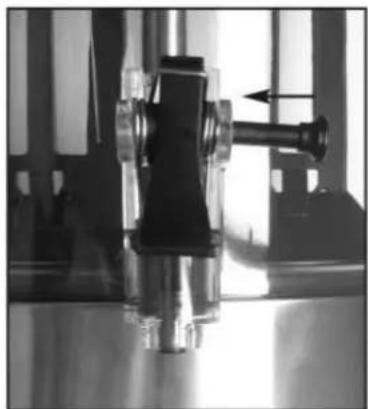
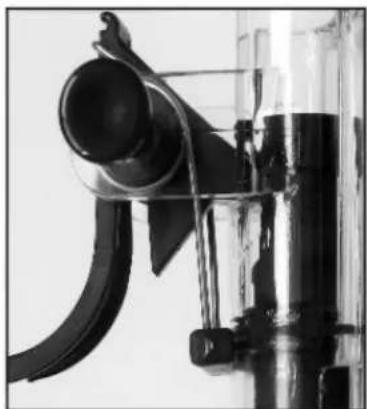
Figure 9
6. Maintenance
(iv) Daily: Check the tap of the dispenser for leakage. In case of leakage check if the tap mechanism is properly assembled. If the tap is still leaking check the rubber O-ring on the piston and replace it with a genuine spare part if it is worn.