
SPD2517BD - DVD player PHILIPS - Free user manual and instructions
Find the device manual for free SPD2517BD PHILIPS in PDF.

User questions about SPD2517BD PHILIPS
0 question about this device. Answer the ones you know or ask your own.
Ask a new question about this device
Download the instructions for your DVD player in PDF format for free! Find your manual SPD2517BD - PHILIPS and take your electronic device back in hand. On this page are published all the documents necessary for the use of your device. SPD2517BD by PHILIPS.
USER MANUAL SPD2517BD PHILIPS
How to... for Internal S-ATA ReWriters
using Nero 7
EN Install Guide
DE Installationsanleitung
FR Guide d'installation
IT Guida d'installazione
NL Installatiegids
ES Guía de instalación
PT Guia de Instalação
TR Kurulum Kilavuzu
PL Instrukcja montażu
sv Installationsguide
sc 安装指南
RU Инструкция по инсталляции
DK Installationsvejledning
TC 安装指南
natural_image
Exterior view of a Philips DVD drive with visible branding and control buttons (no readable text beyond branding)PHILIPS
EN
Contents
How to install? 5
Up to date? 13
How to make a video disc? 17
How to make a data or audio disc? 25
How to copy a disc? 29
More info or help needed 32
DE
Inhalt
How to make a video disc? 81
How to make a data or audio disc? 89
How to copy a disc? 93
More info or help needed 101

How to install?
EN This can be found in the box:
A: Your new B: This manual C: The Nero drive software disc
D: 4 screws in a small bag
natural_image
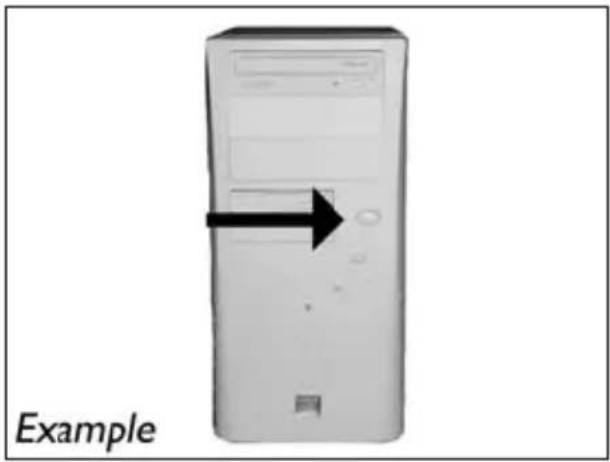
Computer tower case with monitor and control buttons, labeled 'Example' (no other text or symbols)EN Switch your computer off.
DE Schalten Sie Ihren Computer aus.
FR Éteignez l'ordinateur.
IT Spegnere il computer.
NL Zet de computer uit.
natural_image
Close-up of a computer tower with a cable inserted, showing the front panel and internal components (no text or symbols visible)EN Touch an unpainted metal part (eg, your heating or an unpainted part of your computer case). This will avoid any damage to your computer by electrostatic discharge.
DE Berühren Sie ein unlackiertes Metallteil (z.B. Ihre Heizung oder ein unlackiertes Teil Ihres Computergehäuses).
Das verhindert Schäden an Ihrem Computer aufgrund von elektrostatischer Entladung.
FR Touchez une partie métallique non peinte (p. ex. un radiateur ou une partie non peinte du boîte de l'ordinateur).
Ce contact permettra d'éviter tout endommagement de l'ordinateur par décharge d'électricité statique.
natural_image
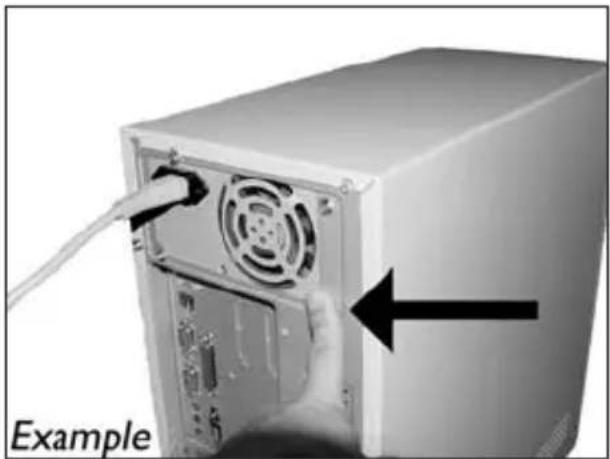
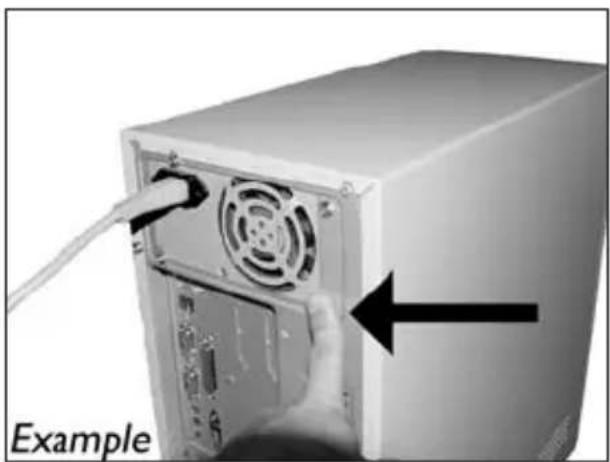
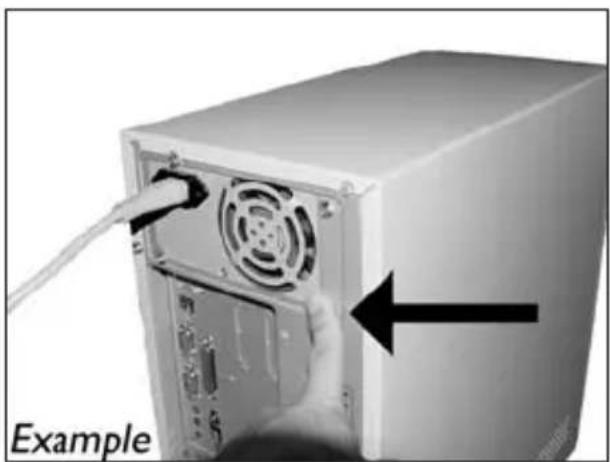
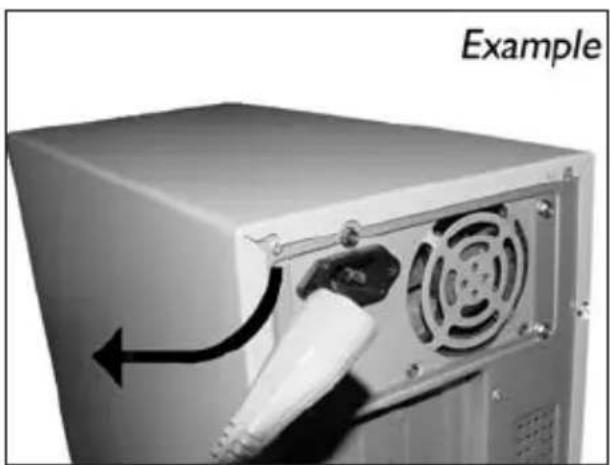
Close-up of a computer power adapter with a white plug inserted, showing airflow direction (no text or symbols on the device itself)EN Disconnect the power cable from the PC.
DE Ziehen Sie das Netzkabel vom Computer ab.
FR Débranchez le câble d'alimentation de l'ordinateur.
IT Disconnettere il cavo di alimentazione dal PC.
NL Trek de netstekker uit de PC.
5
natural_image
Exterior view of a server rack unit with an arrow pointing left, labeled 'Example' (no other text or symbols)7
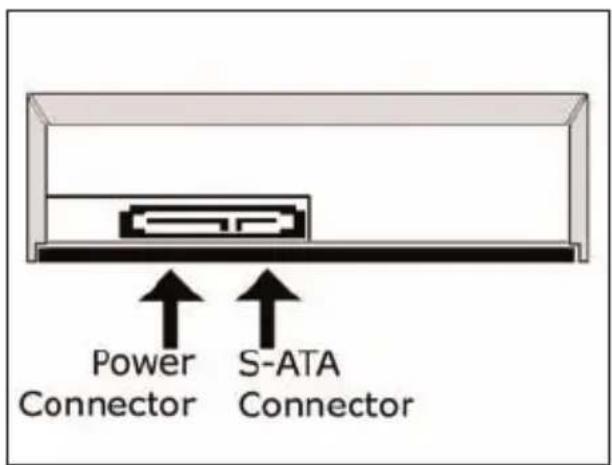
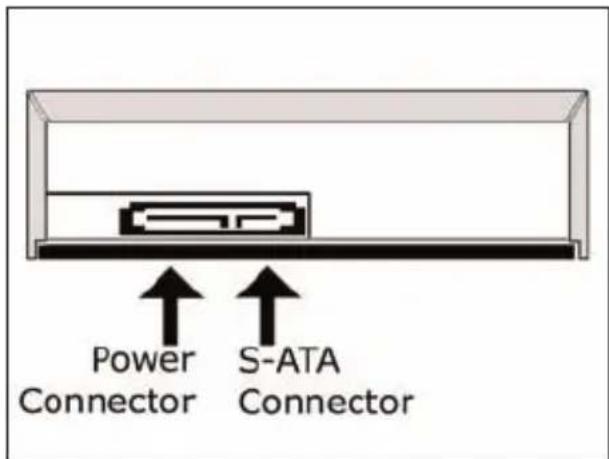
EN These are the connections (on the back of your drive) you will have to use for connecting the drive to the computer.
DE Das sind die Anschlüsse (an der Rückseite Ihres Laufwerks), die Sie für den Anschluss Ihres Laufwerks an den Computer verwenden müssen.
FR Ce sont les connecteurs (à l'arrière de votre appareil) que vous devrez utiliser pour raccorder l'unité à l'ordinateur.
IT Queste sono le connessioni (sul retro dell'unità) che dovranno essere utilizzate per collegare l'unità al computer.
NL Dit zijn de aansluitingen (op de achterkant van het station) die u gebruikt om het station op de computer aan te sluiten.
text_image
Power Connector S-ATA Connector
natural_image
Interior view of a computer tower case showing internal components and a black arrow pointing to a specific area, labeled 'Example' (no readable text or symbols beyond label)EN Put the drive into your computer.
DE Schieben Sie das Laufwerk in Ihren Computer.
FR Montez l'appareil dans l'ordinateur.
IT Mettere l'unità nel computer.
NL Schuif het station in uw computer.
text_image
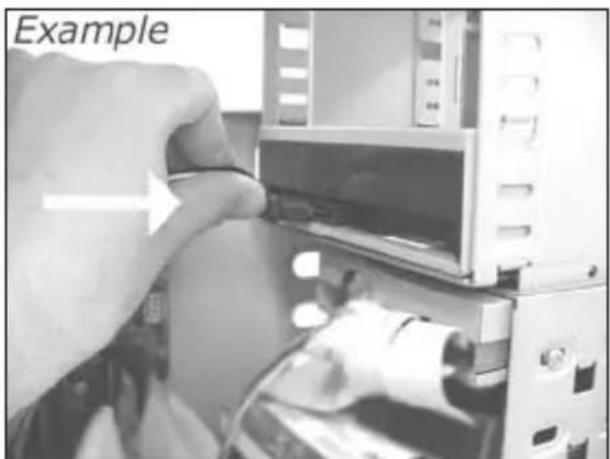
ExampleEN Attach a S-ATA Power Cable to your drive.
DE Schließen Sie ein S-ATA-Stromkabel an Ihr Laufwerk an.
FR Branchez un câble d'alimentation S-ATA à votre lecteur.
IT Collegare un cavo di alimentazione S-ATA alla propria unità.
NL Sluit een S-ATA-stroomkabel aan op uw station.

natural_image
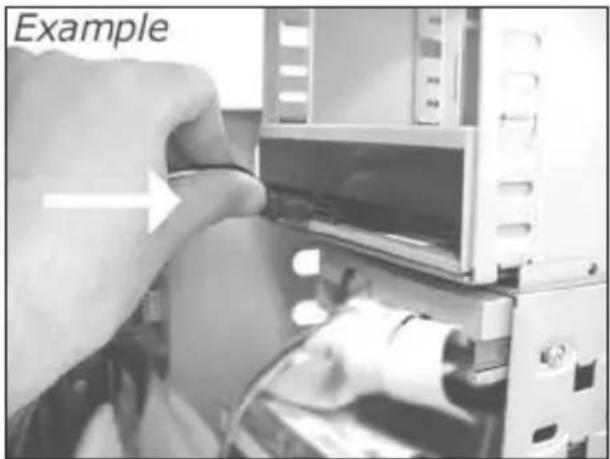
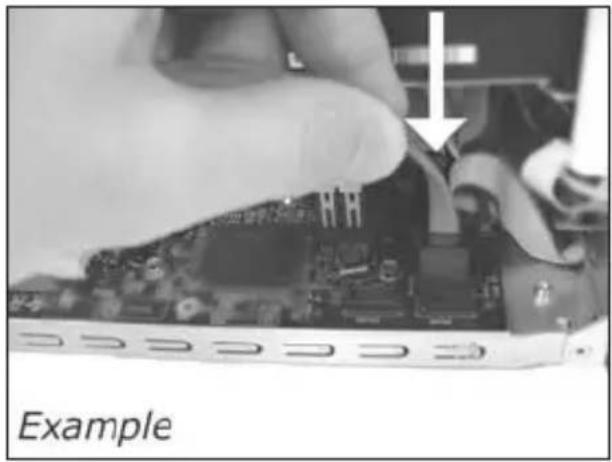
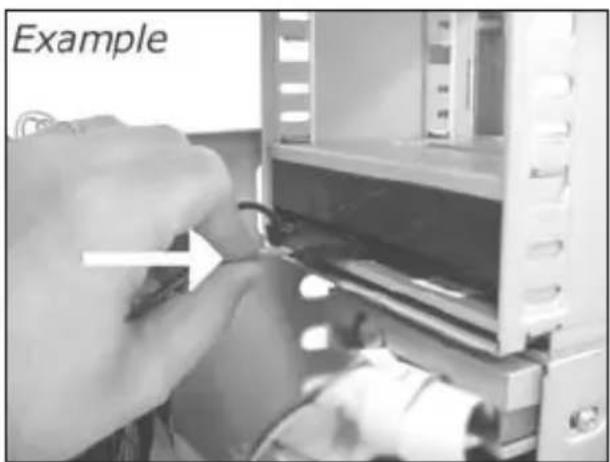
Close-up of hands installing or adjusting a mechanical component into a device (no visible text or symbols)EN Attach the S-ATA data cable to your drive.
DE Schließen Sie das S-ATA-Datenkabel an Ihr Laufwerk an.
FR Branchez le câble de données S-ATA à votre lecteur.
IT Collegare un cavo dati S-ATA alla propria unità.
NL Sluit de S-ATA-gegevenskabel aan op uw station.
11
EN Connect the S-ATA data cable to your motherboard.
DE Schließen Sie das S-ATA-Datenkabel an Ihre Hauptplatine an.
FR Connectez le câble de données S-ATA sur la carte mère.
IT Collegare il cavo dati S-ATA alla propria scheda madre.
NL Sluit de S-ATA-gegevenskabel aan op uw moederbord.
natural_image
Close-up of a hand holding an electronic circuit board with a component, labeled 'Example' (no other text or symbols visible)12
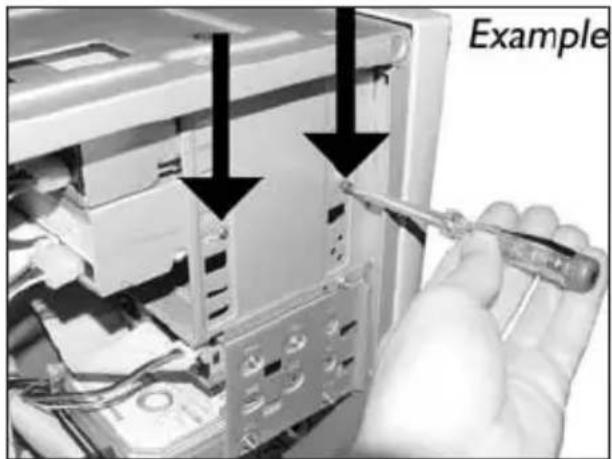
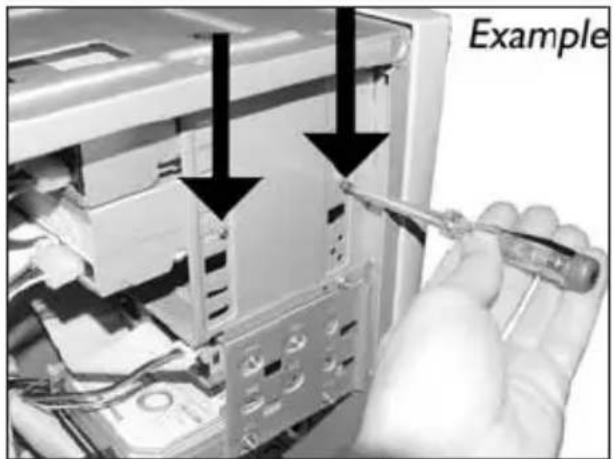
EN Secure the drive with the screws (if possible on both sides).
DE Befestigen Sie das Laufwerk mit den Schrauben (wenn möglich an beiden Seiten).
FR Fixez l'appareil à l'aide des vis (si possible des deux côtés).
IT Fissare l'unità con le viti (se possibile su entrambi i lati).
NL Schroef het station vast (zo mogelijk aan beide zijden).
text_image
Example13
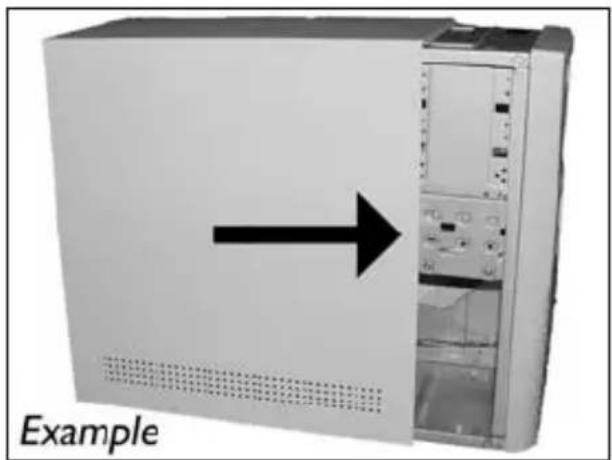
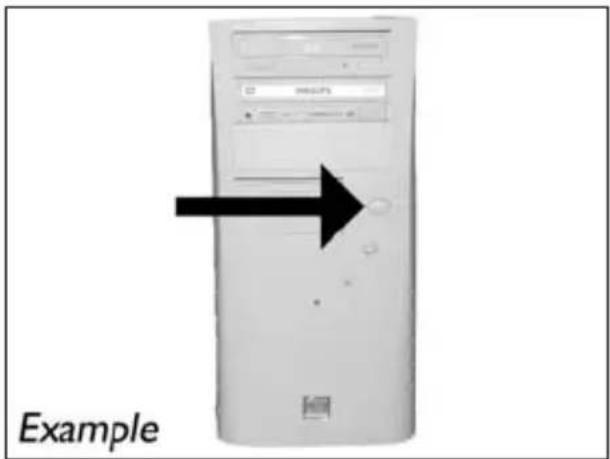
EN Put the cover you took off in step 5 back on.
DE Setzen Sie die in Schritt 5 abgenommene Abdeckung wieder auf.
FR Replacez le capot que vous avez retiré à l'étape 5.
IT Rimettere il coperchio tolto al punto 5.
NL Plaats de in stap 5 verwijderde kast weer terug.
natural_image
Exterior view of a server rack unit with an arrow pointing to the front panel (no text or symbols on the device itself)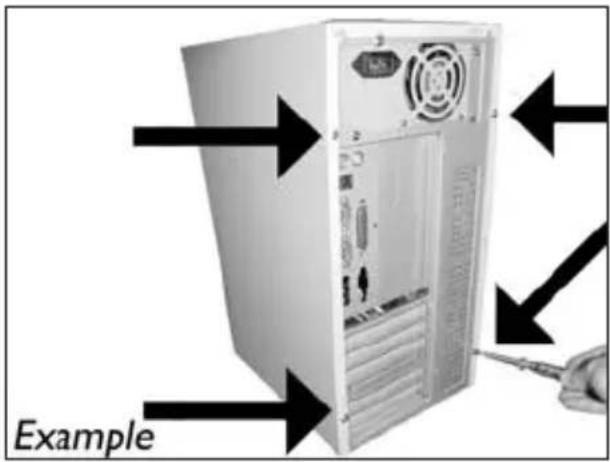
text_image
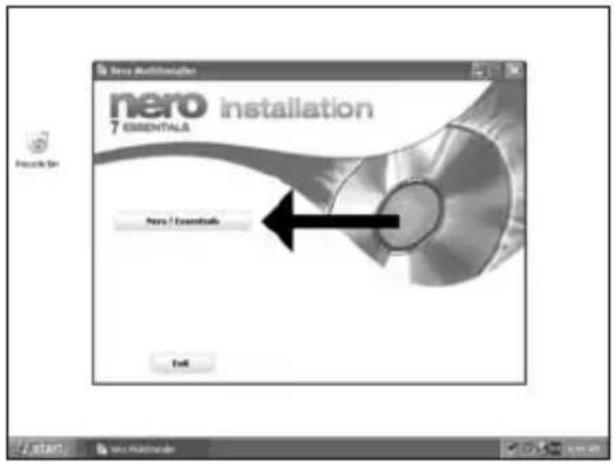
ExampleEN Choose "Nero 7 Essentials" and follow the instructions on the screen. When finished, continue with the next chapter.
text_image
start Recycle Hit New New New New New New New New New New New New New New New New New New New New New New New New New New New New New New New New New New New New New New New New New New New New New New New New New New Next2
EN Click "Check for updates".
text_image
Philips Intelligent Agent Products Options 349 Unknown for your Philips products. Product: Installed version: Latest version [ ] PHILIPS CHECKSAL - [ author ] PS.A Philips Intelligent Agent 1.0 The last successful product update check was performed on 2006-08-11 [10-40] AP The automatic product update check is validated. Check for update [349] the suitable check for product updates.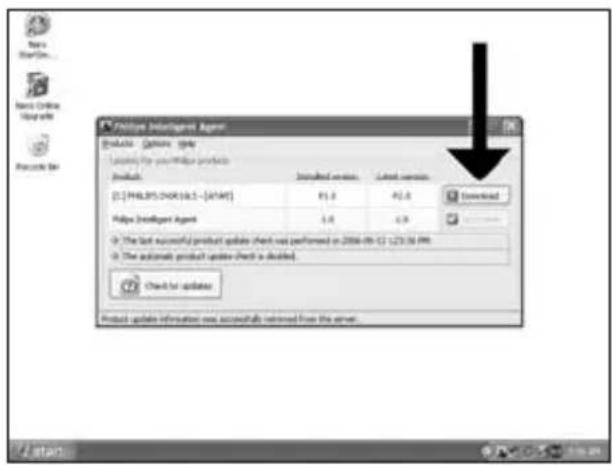
text_image
Philips Intelligent Agent Products Options Help Loading for your Philips products [0:1] PHILIPS/CHIK 16.5 - [XVAT] Installed version: P2.3 Latest version: P2.3 Philips Intelligent Agent: 1.4 Download The last successful product update check was performed on 2006-09-C1 1273.16 PM. The automatic product update (check is decided) Check for update Product update information was accessible referred from the server.EN Download the updates and install them.
DE Laden Sie die Updates herunter und installieren Sie sie.
FR Téléchargez les mises à jour et installez-les.
IT Effettuare il Download degli aggiornamenti e installarli.
NL Download de updates en installeer ze.
text_image
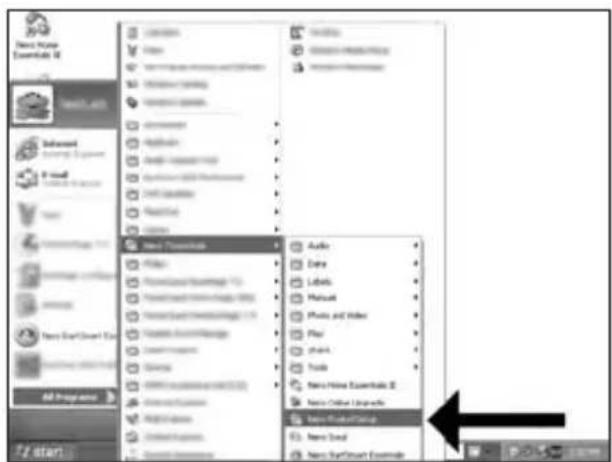
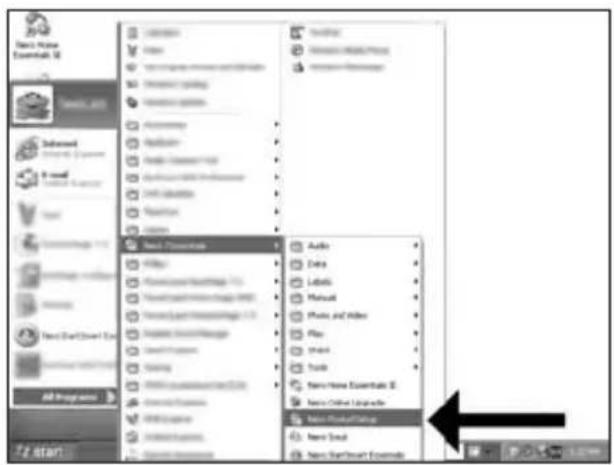
New Home Essentials II Tobacco Deferred Learning & Language New Start/Start Menu All Programs F2 stan New Community Audio Data Labels Manual Photo and Video Play Share Tools New Home Essentials II New Social Group New Social New Social GroupsEN Choose "Start", "(All) Programs", "Nero 7 Essentials", "Nero ProductSetup".
DE Wählen Sie "Start", "(Alle) Programme", "Nero 7 Essentials", "Nero ProductSetup".
FR Sélectionnez "Démarrer", "(Tous les) Programmes", "Nero 7 Essentials", "Nero ProductSetup".
IT Scegliere "Start", "Tutti i programmi", "Nero 7 Essentials", "Nero ProductSetup".
NL Kies "Start", "(Alle) Programma's", "Nero 7 Essentials", "Nero ProductSetup".
text_image
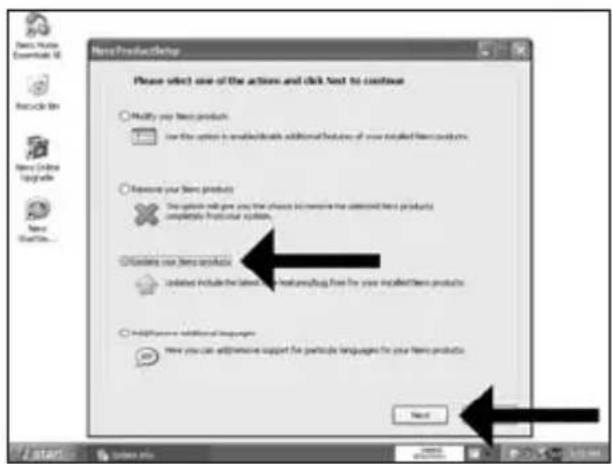
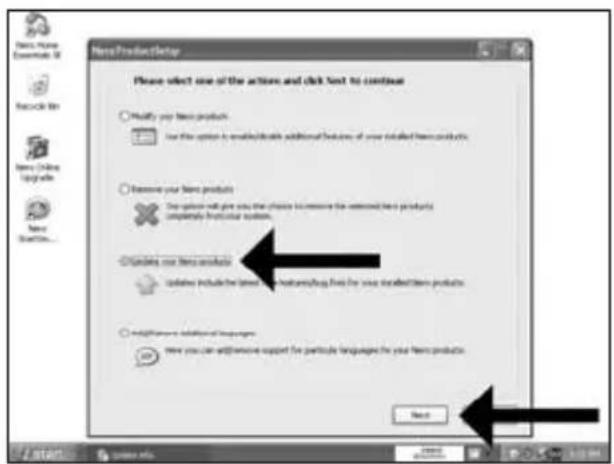
New ProductSetup Please select one of the actions and click Next to continue Modify your New products. Use this option to enable additional features of your installed new products. Remove your New products. This product will give you that should be removed the installed new products completely from your system. Browse new product files. Include include the latest version of existing files for your installed new products. Add previous additional languages. Here you can add previous support for particle languages for your new products. NextEN Choose "Update your Nero products" and "Next".
DE Wählen Sie "Nero Produkte aktualisieren" und "Weiter".
FR Sélectionnez "Mettre à jour vos produits Nero" puis cliquez sur "Suivant".
IT Scegliere "Aggioma i prodotti Nero", quindi fare clic su "Avanti".
NL Kies "Uw Nero-producten bijwerken" en "Volgende".
6
text_image
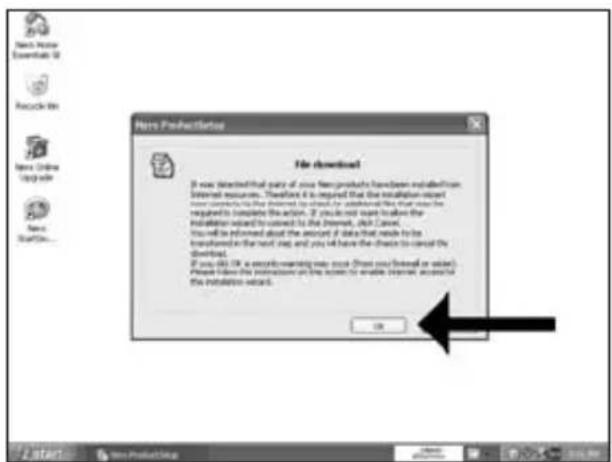
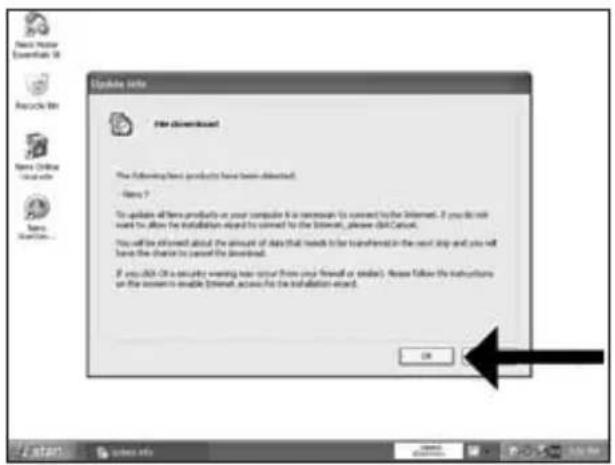
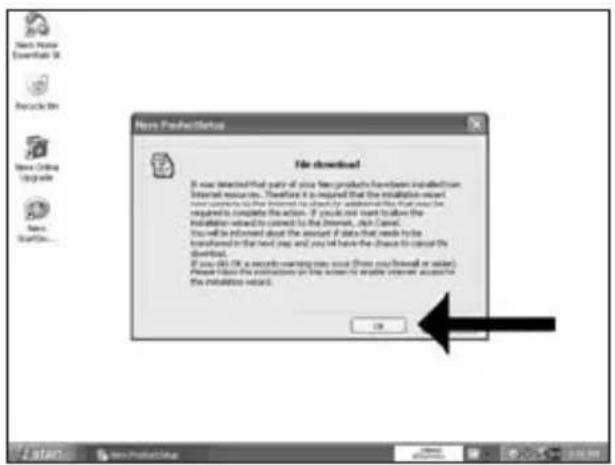
New Import Ensemble 3D Recycle Kit New Online Web sites New File download The following items products have been detected. - None ? To update all new products on your computer it is necessary to connect to the Internet. If you do not want to allow the installation signed by content to the Internet, please call Next. You will be offered about the amount of data that needs to be transferred in the next step and you will have the chance to cancel the download. If you do OK or are ready to start this user (this user's email or sender), please follow the instructions on the user to simple Internet access for the installation started. OK7
text_image
New ProductLine File download! It now started that part of your new products have been installed from Internet resources. Therefore it is required that the installation will see details to the intended to check for additional fees that may be required to complete the action. If you do not want to allow the Installation required to convert to the Internet, click Cancel. You will be informed about the amount if data that needs file transferred in the next job and you will have the access to convert the download. If you call OK a useful warning into user (that your friend or user). Please have the instructions on the screen for enable users access to the installation record. OK8
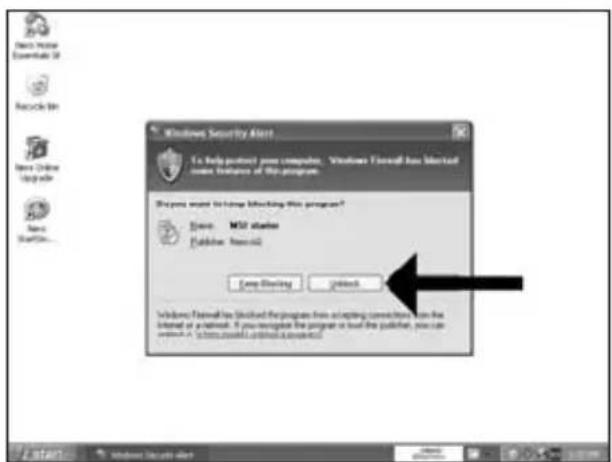
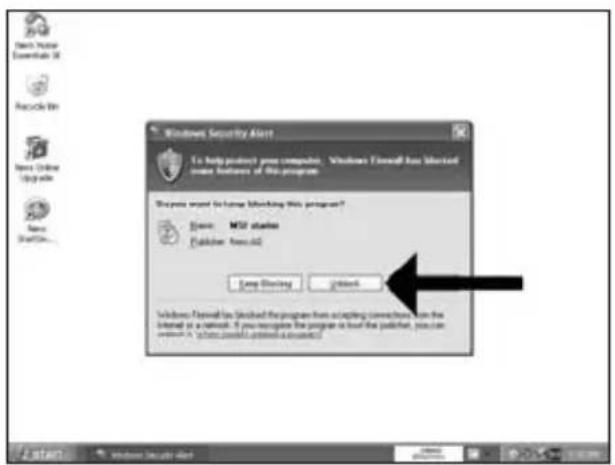
EN The Windows Firewall may warn you. Click "Unblock" to allow your Nero to be updated.
DE Sie erhalten evtl. eine Warnung von der Windows Firewall. Klicken Sie auf "Sperre deaktivieren", damit sich Nero aktualisieren kann.
FR Le pare-feu de Windows affichera peut-être un avertissement. Cliquez sur "Débloquer" pour activer la mise à jour de Nero.
IT È possibile Windows Firewall visualizzi un messaggio di avvertimento. Fare clic su "Unblock" (Sblocca) per consentire l'aggiomamento di Nero.
NL De Firewall van Windows kan een waarschuwing geven. Klik op "Uitschakelen", zodat uw Nero kan worden bijgewerkt.

text_image
Windows Security Alert To help protect your computer. Microsoft Outlook has listed some features of this program. What want to have blocking this program? Stream: MSU server Publisher: Microsoft Save Existing Get Back Windows Outlook has installed the program from executing connection, on the Internet at a network. If you recognize the program or load the publisher, you can continue in order to access any account.
text_image
Name: Newer Downloaded 36 Recycle Web Name: Online Downloading Name: Newer ProductTransfer The updates are being downloaded 1. Comwriting 2. Checking engine 3. Preparing installation 4. Optimizing download rate 5. Downloading file 6. Publishing Close Start New Product Setup Windows 2007/01/2008 Microsoft Teams © 2007-01-04EN Nero downloads and updates itself.
DE Nero führt den Download und die Aktualisierung selbstständig durch.
FR Nero télécharge et se met à jour automatiquement.
IT L'aggiornamento di Nero viene scaricato ed eseguito.
NL Nero gaat automatisch downloaden en bijwerken.

How to make a video disc?
Be responsible Respect copyrights
1
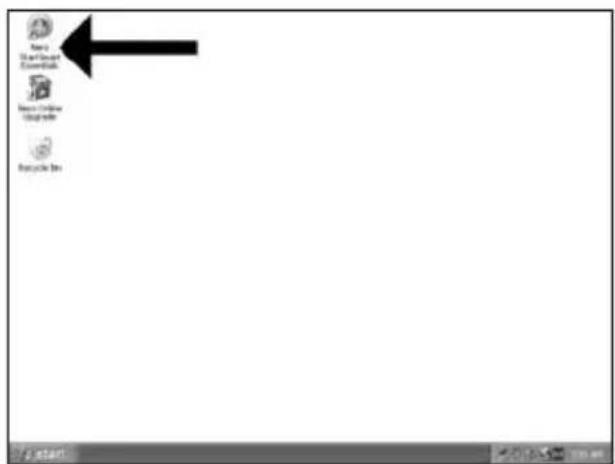
EN Start "Nero StartSmart Essentials".
DE Starten Sie "Nero StartSmart Essentials".
FR Lancez "Nero StartSmart Essentials".
IT Avviare "Nero StartSmart Essentials".
NL Start "Nero StartSmart Essentials".

text_image
Save Start Menu Enter Web Save Connection Update Web Update Bin
text_image
Photo and Video Make Image (A) Make Image (B) Make Image (C) Make Image (D) Make Image (E) Make Image (F) Capture Image Capture Image Capture Image Capture Image Capture Image Capture Image Capture Image Capture Image Capture Image Capture Image Capture Image Capture Image Capture Image Capture Image Capture Image Capture Image Capture Image Capture Image Capture Image Capture Image Capture Image Capture Image Capture Image Capture Image Capture Image Capture Image Capture Image Capture Image Capture Image Capture Image Capture Image Capture Image Capture Image Capture Image PhotoEN Choose "Photo and Video" and "Make your own DVD-Video".
natural_image
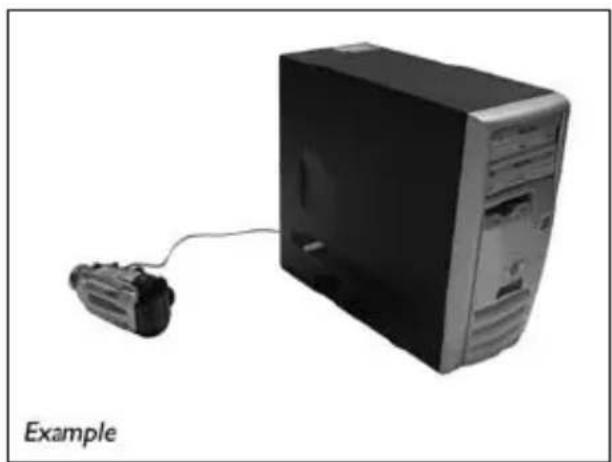
Exterior view of a desktop computer tower connected to a cable, labeled 'Example' (no other text or symbols)EN If you want to capture video from a camera, connect it to your PC. Otherwise go to step 8.
text_image
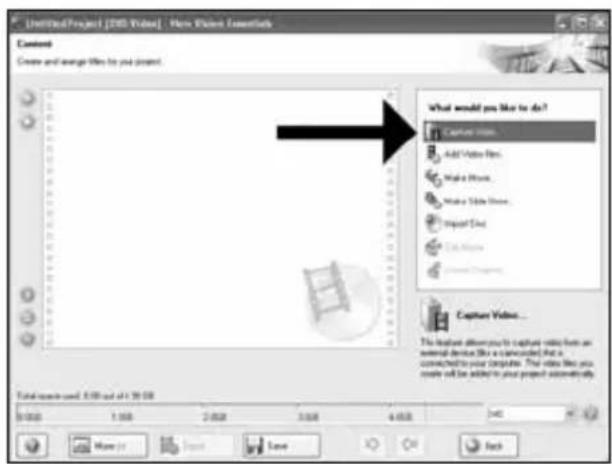
Untitled Project [200] Video - New Window Installers Content Create and manage files for your project. What would you like to do? Capture Video... Add Video Files... Make Video... Make Video Files... Project Data Get Image... Capture Video... This dialog allows you to capture video from an external device (the 2 applications) that is connected to your computer. This video then you create all the users by your project successfully. Total volume used: $100 out of 10:00 0.001.00 2.003.00 4.005.00 6.007.00 8.009.00 10.0011.00 12.0013.00 14.0015.00 16.0017.00 18.0019.00 20.0021.00 22.0023.00 24.0025.00 26.0027.00 28.0029.00 30.0031.00 32.0033.00 34.0035.00 36.0037.00 38.0039.00 40.0041.00 42.0043.00 44.0045.00 46.0047.00 48.0049.00 50.0051.00 52.0053.00 54.0055.00 56.0057.00 58.0059.00 60.0061.00 62.0063.00 64.0065.00 66.0067.00 68.0069.00 70.0071.00 72.0073.00 74.0075.00 76.0077.00 78.0079.00 80.0081.00 82.0083.00 84.0085.00 86.0087.00 88.0089.00 90.0091.00 92.0093.00 94.0095.00 96.0097.00 98.0099.00 $1, 12 nanEN Choose "Capture video".
text_image
UntitledProject [TMS Video] - Max Picture Essentials Capture Video Select a device and capture video to save hard disk. Capture devices Top: TV Driver Options Use the template to capture video in Digital Video (DVI) compatible format The application initially configures the capture devices but you can change the device settings manually by DVI type DVI Type 1 Type 1 is usually the below choice because it requires free disk speed and allows more throughput. However, option Type 2 is compatible with video for Windows(TM) If you are not used which type 3 uses, offset Type 1 Top: TV Driver Top: TV Driver Top: TV Driver Top: TV Driver Top: TV Driver Top: TV Driver Top: TV Driver Top: TV Driver Top: TV Driver Top: TV Driver Top: TV Driver Top: TV Driver Top: TV Driver Top: TV Driver Top: TV Driver Top: TV Driver Top: TV Driver Top: TV Driver Top: TV Driver Top: TV Driver Top: TV Auto Top: TV Auto Top: TV Auto Top: TV Auto Top: TV Auto Top: TV Auto Top: TV Auto Top: TV Auto Top: TV Auto Top: TV Auto Top: TV Auto Top: TV Auto Top: TV Auto Top: TV Auto Top: TV Auto Top: TV Auto Top: TV Auto Top: TV Auto Top: TV Auto Top: TV Auto Top: TV Automatior Top: TV Automatior Top: TV Automatior Top: TV Automatior Top: TV Automatior Top: TV Automatior Top: TV Automatior Top: TV Automatior Top: TV Automatior Top: TV Automatior Top: TV Automatior Top: TV Automatior Top: TV Automatior Top: TV Automatior Top: TV Automatior Bottom: Next: Back:6
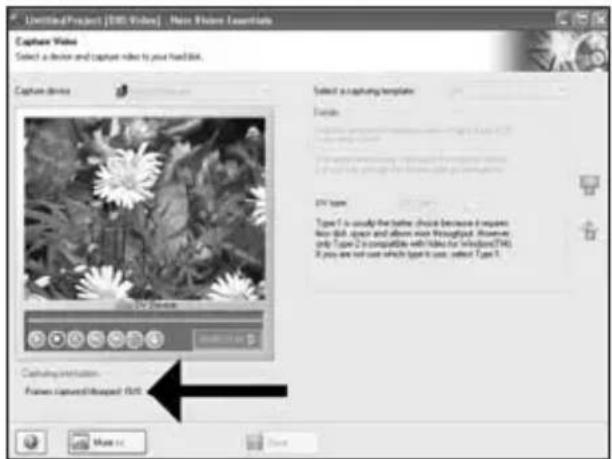
EN During capturing, you will see the progress here.
DE Während der Aufnahme sehen Sie hier den Fortschritt.
FR Pendant la capture, l'avancement s'affiche ici.
IT Durante il processo di cattura, qui sarà possibile visualizzare l'avanzamento.
NL Tijdens het laden ziet u hier de voortgang.

text_image
UntitledProject [1980 Videos] - More Picture Essentials Capture Video Select a device and capture video to your hard disk. Capture Device Select a capturing template Templates: Type 1 is useful for the better choice because it requires free disk space and allows more throughput. However, only Type 2 is compatible with type for throughput (74). If you are not sure which type is used, select Type 1. Capture Environment Frames captured/missed disk7
text_image
Untitled Project [1952-Video] - New Window Installable Capture Video Select a device and capper video to put hard disk. Capture drive: Stop UV Device Selected a capturing template: 0%+0% Format: Use this template to capture select a Digital Video (DVI) compatible format. The application also involves the capture device, but you can change the device settings manually to. DVI type: UV Type 1 Type 2 is used for the other choice because it requires box files, space and arrows have throughout. However only: Table 2 is compatible with radioactive Windows(DVI). If you are not cover which type is use select Type 2. Captured files: MNTC Capture 0007 MNTC Capture 0008 MNTC Capture 0009 Ready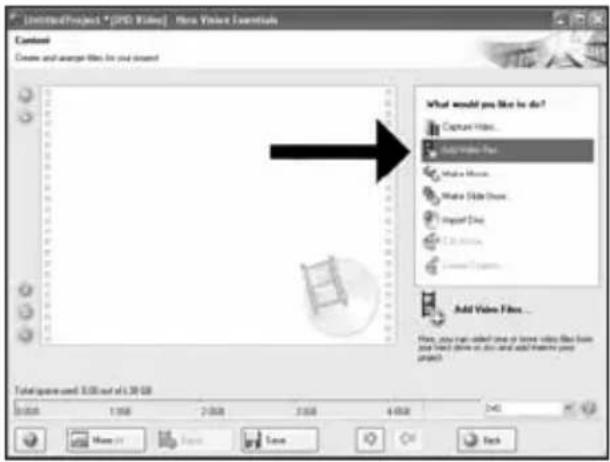
text_image
UntitledProject * [DVD Video] - New Video Essentials Context Create and analyze files for your content What would you like to do? Capture Videos... Copy Video Files Make Images... Make Slide Maps... Import Data Add Video Files... Add Video Files... New, any text is added once or less video files from you have done so, but and add more new projects. Total space used: 3.06 out of 1.30 GB 0.000 1.000 2.000 3.00 4.00 5.00 More than Save Save Backtext_image
Open Create an Modules New Solid Desktop My Documents My Computer My Options Flares Pioneer File name: File of System: All Supported Index Files Open Cancel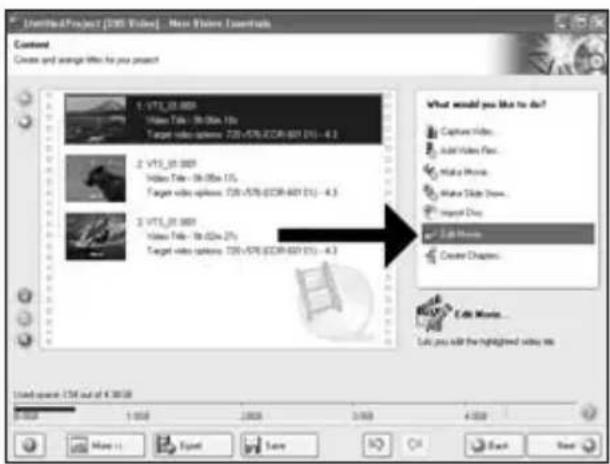
text_image
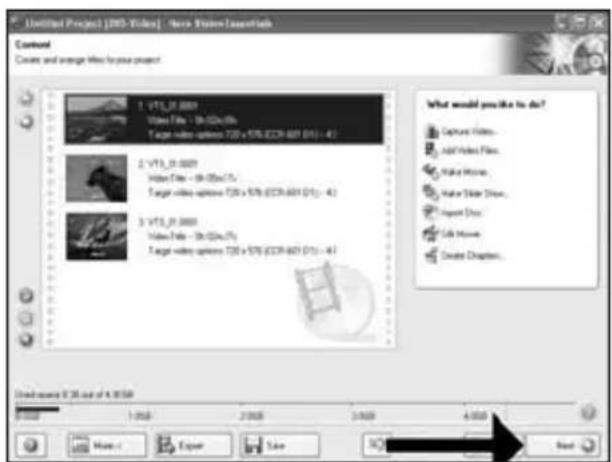
Unrealized Project [305 Video] - New Video / Increase Content Create and arrange video for you present 1. VIT_01 007 Video Title - 16.00x 10s Target video options: 728-576/DCB-601 (1%) - 4.3 2. VIT_01 007 Video Title - 16.00x 10s Target video options: 728-576/DCB-601 (1%) - 4.3 3. VIT_01 007 Video Title - 16.00x 20s Target video options: 728-576/DCB-601 (1%) - 4.3 What would you like to do? Capture Videos... Add Video Files... Make Movies... Make Slide Maps... Import Day... Edit Movies... Create Chapters... Let you add the highlighted video list Only search: 15M out of 4.300M 1:000 1:000 2:000 3:000 4:000 More... Equal Save Next Nexttext_image
Limiting Project [100 Vites] - New Vision Leavertown File Edit View Tools Help 100 Vites VIT_20.04 Movie 10 Event Save Add13
text_image
Untitled Project1 [RMS Videos] - New Vision Essentials Content Create and update files to your project. 1. VIT_0.0009 Video Files - 36.0007 Target video options T26 x 576-ECX-801 (D1) - 41 2. VIT_0.0009 Video Files - 36.0007 Target video options T26 x 576-ECX-801 (D1) - 41 3. VIT_0.0009 Video Files - 36.0007 Target video options T26 x 576-ECX-801 (D1) - 41 What would you like to do? Capture Videos... Add Video Files... Make Movies... Make Solar Views... Export Docs... Sub Movies... Create Chapters... Under search: 36 out of 4.0009 1:000 1:000 2:000 3:000 4:000 Name: Export Law Next
text_image
UnlimitedProject [VISA] Video | New Vision Essentials Select None Select main menu and file name. Select options: High Media Holiday 2005 1 VTE, 81.2007 Video: Holiday 2005 Edit Media... Save Next NextEN Enter the title in the "Header" field and click "Edit menu".
text_image
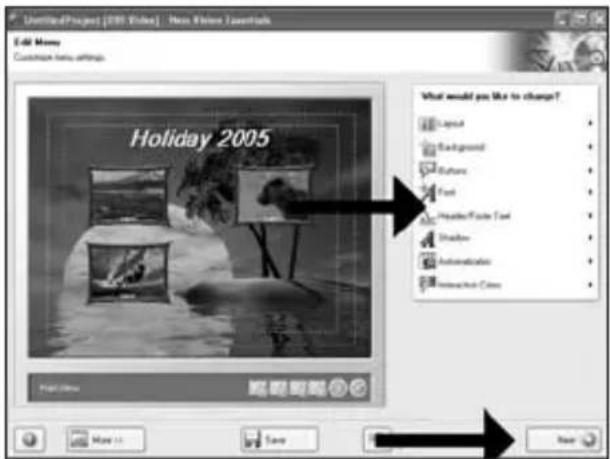
UntitledProject [1981 Videos] - New Website Zanetalk Edit Money Customize new settings. Holiday 2005 What would you like to change? Layout Background Bottles Card Presidential/Factor Card Disability Administration Information Colors Page 100 Save HomeEN You can change the layout, the background, add titles,... here. When done, choose "Next" twice.
text_image
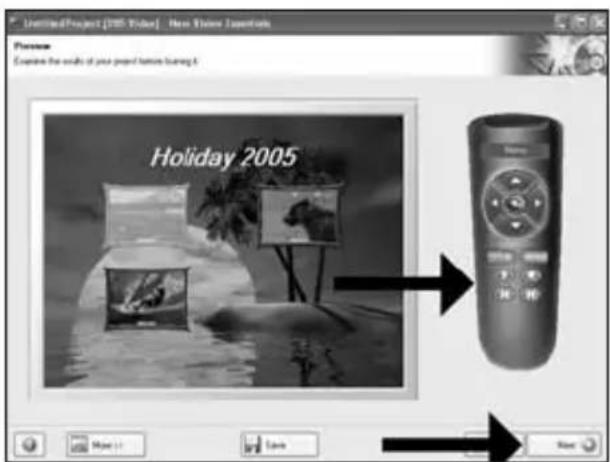
Untitled Project [300] Video | New Window Updates Preview Explore the results of your project features learning it. Holiday 2005EN Preview your movie. Click "Next" to continue.
text_image
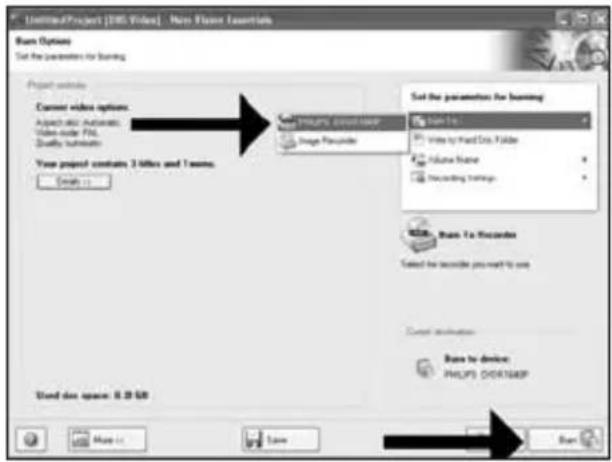
UntitledProject [EMS Video] - Max Flange Essentials Run Options Set the parameters for learning Project website Current video options Aspect also Automatic Video-rot FSL Quality Software View project contains 3 filters and 1 zoom. Send up... Save... Print to: Write by Hard Copy Folder Volume Name Recording Settings Run To Recorder Selected the recorder you want to use Cancel optimization Run to device: PHILIPS ORDERER Used disc space: 0.29 GB Save18
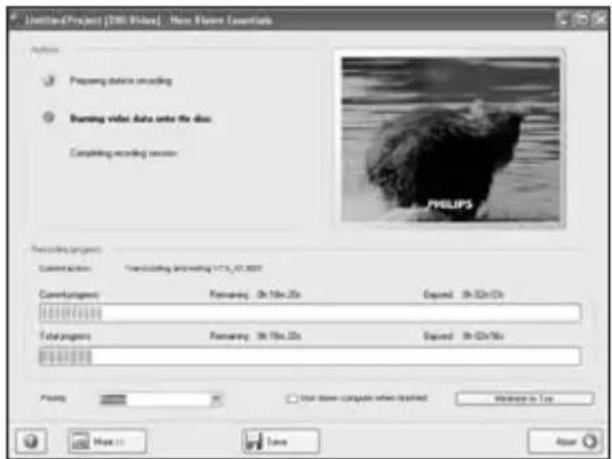
EN NeroVision Express is transcoding and burning your disc.
DE NeroVision Express führt ein Transcoding durch und brennt Ihre Disc.
FR NeroVision Express procède au transcodage et grave le disque.
IT NeroVision Express esegue la codifica intermedia e la masterizzazione del disco.
NL NeroVision Express transcodeert en brandt uw cd.
text_image
LimitedProject [100 Video] - New Future Documents Analysis Preparing default encoding Running video data onto the disc Completing recording session PHILIPS Recording project Construction: Translacing and editing V1.5_01.0007 Construction: Flowering: 3h 10m-25s Expired: 3h 02m-05s Total progress: Flowering: 3h 10m-25s Expired: 3h 02m-05s Preview: Not done computer when installed Welcome to Top Next > Save Reset19
EN Congratulations, your disc has been written successfully. You may exit the application now.
DE Glückwunsch, Ihre Disc wurde erfolgreich beschrieben. Sie können jetzt die Anwendung verlassen.
FR Félicitations, le disque a été gravé avec succès. Vous pouvez maintenant quitter l'application.
IT Congratulazioni, è stata completata la scrittura del disco. Ora è possibile uscire dall'applicazione.
NL Gefeliciteerd, uw cd is met succes geschreven. U kunt de toepassing nu verlaten.

text_image
Untitled Project [MS Video] - New Video Installants Options Preparing data for recording Burning video data into the disc Completing recording services Non-Video Express 3 New process completed successfully. What you like to save the log file: No No Recording progress Current action: Current progress: 1st progression: Expired Preview: Normal Used down computer when printed Manage to Top More... Save
How to make a data or audio disc?
Be responsible Respect copyrights
1
EN Start "Nero StartSmart".
DE Starten Sie "Nero StartSmart".
FR Lancez "Nero StartSmart".
IT Avviare "Nero StartSmart".
NL Start "Nero StartSmart".

text_image
Menu Start Menu Enter Subs Enter Print Print Info Recycle Bin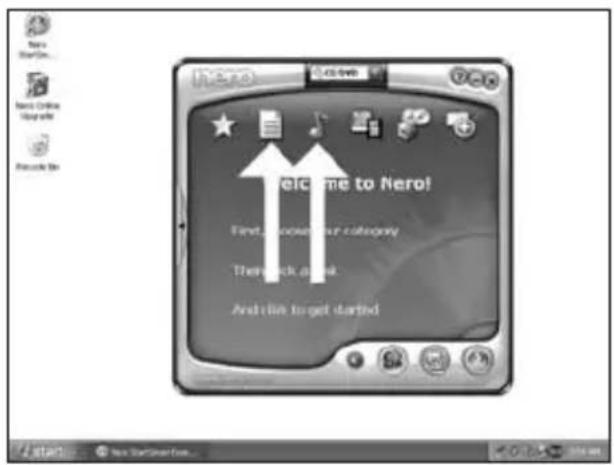
text_image
Welcome to Nero! First, you should not Category Thank you for And like to get startedEN Choose "Data" or "Audio".
DE Wählen Sie "Daten" oder "Audio".
FR Choisissez "Données" ou "Audio".
IT Selezionare "Dati" o "Audio".
NL Kies "Data" of "Audio".
text_image
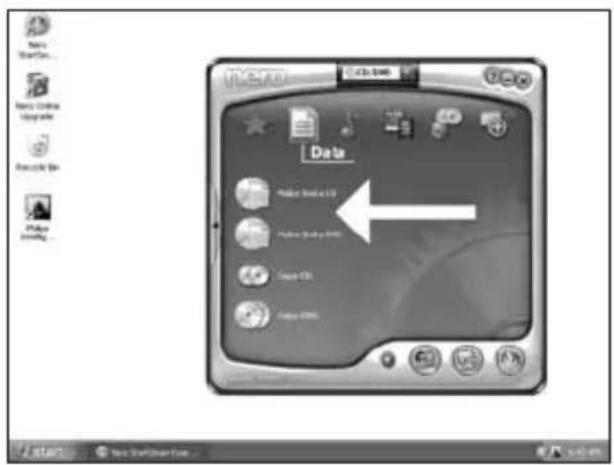
Data Make Excel 2017 Make Excel 2016 Start 15 Make 2016text_image
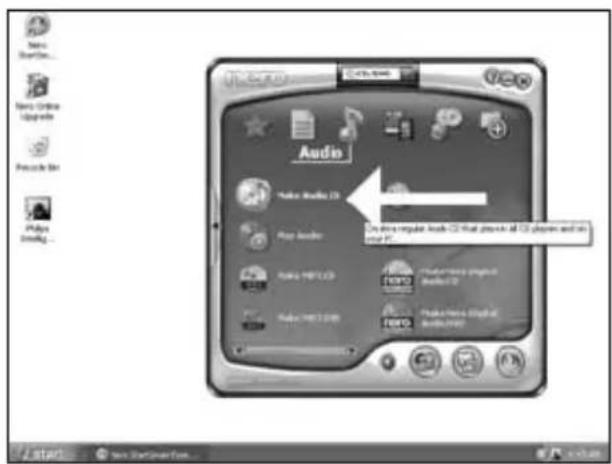
Audio Make Audio CD Play Audio Audio MP3.03 Audio MP3.04 Options to play music on all CDs, playing and running PC. Make Music Broadcast Audio 2.03EN For an audio disc, choose "Make Audio CD".
DE Für eine Audio-Disc wählen Sie "Audio-CD erstellen".
FR Pour créer un disque audio, choisissez "Créer un CD audio".
IT Per un disco audio, selezionare "Crea CD Audio".
NL Voor een audio-cd, kies "Audio-cd maken".
5
text_image
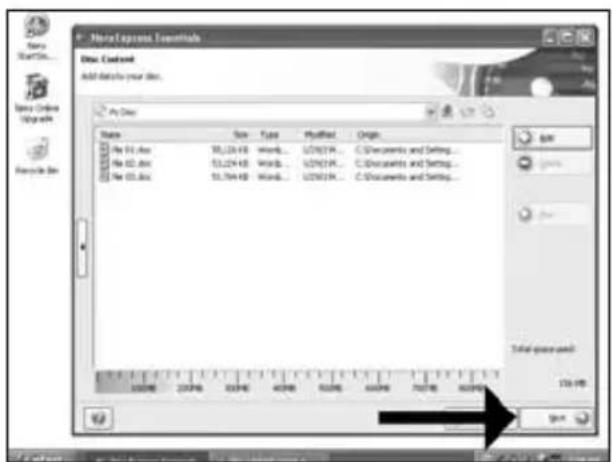
New Express Essentials Edit Content Add Existing your this... New Text Name Size Type Modified On Save Save Total extracted. 2 KB Get Get6
text_image
Add Text and Buttons Location My Documents Modules ● Refreshable New Third Device My Documents My Computer My Outlook Phone Refresher File type: "My 01.doc" "My 02.doc" "My 03.doc" File of type: Airbox (*.*)7
text_image
Next Express Elements Find Store Settings Click Start to start the recording process Doc name: My One Number of types: Modify data on disc after turning Allow file to be added time (multimension disc) OK ApplyEN Choose your recorder and click "Burn".
text_image
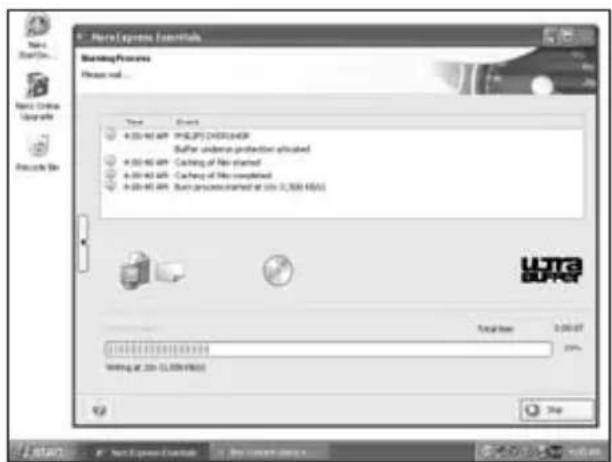
None Express Control Warning Process Please wait... Test Events 4.00-65 AP: PHILIPS CHOCOLATE Buffer undersea protection activated 4.00-65 AP: Caching of New started 4.00-65 AP: Caching of New completed 4.00-65 AP: Run uncompleted at 10x 3,500 MHz UTC B2AC Options 3:00:07 20% Writing at 10x 3,500 MHz StopEN Nero is burning your disc.
text_image
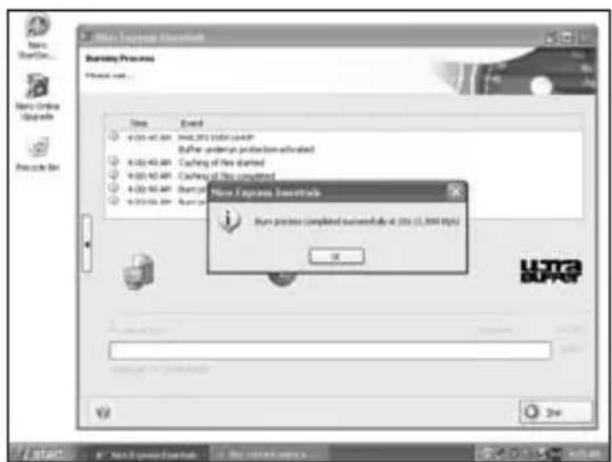
New Express Descent Starting Process File Edit • 0:00-01.00 GMT/2013/12/2014 • New Express descent was installed • New Express descent was installed • New Express descent was installed • New Express descent was installed • New Express descent was installed • New Express descent was installed • New Express descent was installed • New Express descent was installed • New Express descent was installed • New Express descent was installed • New Express descent was installed • New Express descent was installed • New Express descent was installed • New Access DESCENT • New Access DESCENT • New Access DESCENT • New Access DESCENT • New Access DESCENT • New Access DESCENT • New Access DESCENT • New Access DESCENT • New Access DESCENT • New Access DESCENT • New Access DESCENT • New Access DESCENT • New Access DESCENT • New Access DESCENT • New Access DESCENT • New Access DESCENT • New Access DESCENT • New access DESCENT • New access DESCENT • New access DESCENT • New access DESCENT • New access DESCENT • New access DESCENT • New access DESCENT • New access DESCENT • New access DESCENT • New access DESCENT • New access DESCENT • New access DESCENT • New access DESCENT • New access DESCENT • New access DESCENT • New access DESCENT • New access DESCENT USG BURGEREN Congratulations, your disc has been written successfully. You may exit the application now.
Be responsible Respect copyrights
1
EN Start "Nero StartSmart Essentials".
DE Starten Sie "Nero StartSmart Essentials".
FR Lancez "Nero StartSmart Essentials".
IT Avviare "Nero StartSmart Essentials".
NL Start "Nero StartSmart Essentials".

text_image
Menu Start Menu ExerciseButton Menu Window 启用程序 Options Menu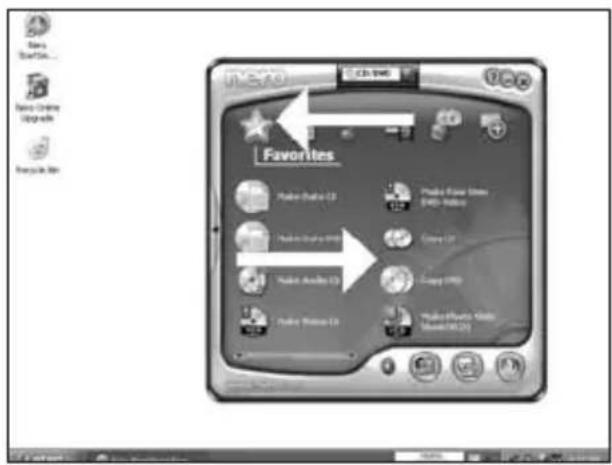
text_image
VISA0 CD: 1940 Favorites Radio Guide 13 Radio Guide 1950 Radio Guide 2000 Radio Guide 2010 Radio Guide 2020 Radio Guide 2030 Radio Guide 2040 Radio Guide 2050 Radio Guide 2060 Radio Guide 2070 Radio Guide 2080 Radio Guide 2090 Radio Guide 2100 Radio Guide 2110 Radio Guide 2120 Radio Guide 2130 Radio Guide 2140 Radio Guide 2150 Radio Guide 2160 Radio Guide 2170 Radio Guide 2180 Radio Guide 2190 Radio Guide 2200 Radio Guide 2210 Radio Guide 2220 Radio Guide 2230 Radio Guide 2240 Radio Guide 2250 Radio Guide 2260 Radio Guide 2270 Radio Guide 2280 Radio Guide 2290 Radio Guide 2300 Radio Guide 2310 Radio Guide 2320 Radio Guide 2330 Radio Guide 2340 Radio Guide 2350 Radio Guide 2360 Radio Guide 2370 Radio Guide 2380 Radio Guide 2390 Radio Guide 2400 Radio Guide 2410 Radio Guide 2420 Radio Guide 2430 Radio Guide 2440 Radio Guide 2450 Radio Guide 2460 Radio Guide 2470 Radio Guide 2480 Radio Guide 2490 Radio Guide 2500 Radio Guide 2510 Radio Guide 2520 Radio Guide 2530 Radio Guide 2540 Radio Guide 2550 Radio Guide 2560 Radio Guide 2570 Radio Guide 2580 Radio Guide 2590 Radio Guide 2600 Radio Guide 2610 Radio Guide 2620 Radio Guide 2630 Radio Guide 2640 Radio Guide 2650 Radio Guide 2660 Radio Guide 2670 Radio Guide 2680 Radio Guide 2690 Radio Guide 2700 Radio Guide 2710 Radio Guide 2720 Radio Guide 2730 Radio Guide 2740 Radio Guide 2750 Radio Guide 2760 Radio Guide 2770 Radio Guide 2780 Radio Guide 2790 Radio Guide 2800 Radio Guide 2810 Radio Guide 2820 Radio Guide 2830 Radio Guide 2840 Radio Guide 2850 Radio Guide 2860 Radio Guide 2870 Radio Guide 2880 Radio Guide 2890 Radio Guide 2900 Radio Guide 2910 Radio Guide 2920 Radio Guide 2930 Radio Guide 2940 Radio Guide 2950 Radio Guide 2960 Radio Guide 2970 Radio Guide 2980 Radio Guide 2990 Radio Guide 3000EN Choose "Favorites" and "Copy CD" or "Copy DVD".
DE Wählen Sie "Favoriten" und "CD kopieren" oder "DVD kopieren".
FR Choisissez "Favoris" et "Copier CD" ou "Copier DVD".
IT Selezionare "Preferiti" e "Copia CD" o "Copia DVD".
NL Kies "Favorieten" en "CD Kopiëren" of "DVD Kopiëren".

text_image
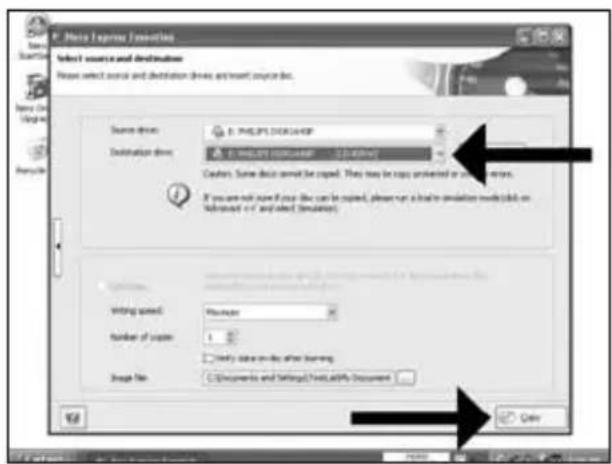
Select Source and Destination Please select source and destination drivers and insert source disk. Source drive: E:\PLGPS\H000000P Destination drive: E:\PLGPS\H000000P [14:45W] Cashout: Save data cannot be copied. Then may be saved protected at customer's. If you are not sure if your file can be copied, please run a form simulation code (eBook or Advanced) or select Simulation. Writing gained: Maximum Number of copies: 1 Find the data in the after opening. Snap No: Documents and Settings/Chips/AlkPy Documents Opentext_image
F:\Movie Express / Options Select source and destinations Name: select source and destination drives, and insert source list. Source drive: F:\MP3.P51.DXG2448P Destination drive: F:\MP3.P51.DXG2448P - 1.000000 Cauding: Some device must be copied. They may be copied or filtered at any other sites. If you can add some if you like the can be copied, please run a template simulation mode (bit on "Advanced" or "and selected Simulations") Writing speed: Number: □ Verify data on the other setting. Insert File: □ Documents and https://mtp3.p51.dxg2448P Document OKtext_image
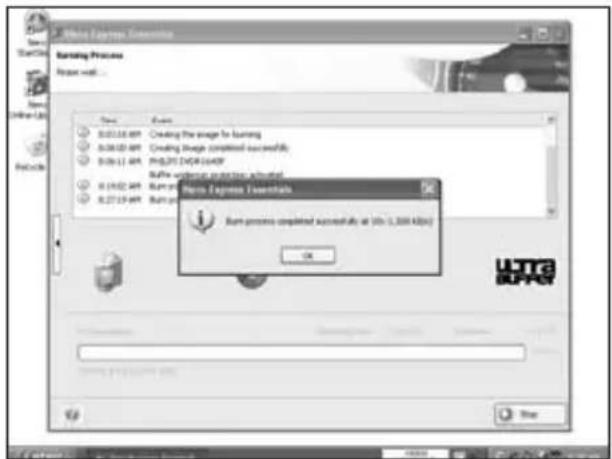
P. New Express Options Burning Process Page walk... View Next 0.01.15.497 The CD is copyrighted 0.01.16.497 Creating the image for burning 0.04.20.497 Creating images completed successfully 0.08.11.497 PAS 2013/08/2008 0.15.02.497 Rupt process diagram at 1,300 MB/s Ultrac UPPER Texting at 13x (1,300 MB/s) OK Help6
EN Congratulations, your disc has been written successfully. You may exit the application now.
DE Glückwunsch, Ihre Disc wurde erfolgreich beschrieben. Sie können jetzt die Anwendung verlassen.
FR Félicitations, le disque a été gravé avec succès. Vous pouvez maintenant quitter l'application.
IT Congratulazioni, è stata completata la scrittura del disco. Ora è possibile uscire dall'applicazione.
NL Gefeliciteerd, uw cd is met succes geschreven. U kunt de toepassing nu sluiten.
text_image
Micro Express Seminars Burning Process Bump wall... Save Finish 0.03.16.BP Creeding the image for Operating 0.08.02.BP Creeding Image completed successfully 0.09.11.BP PROPS (DOP) 100%? 0.10.02.BP Burn process completed successfully at 50x (1,000 KB) 0.27.19.BP Burn process completed successfully at 50x (1,000 KB) Micro Express Seminars Burn process completed successfully at 50x (1,000 KB) OK UTRc UPACMore info or help needed
Visit www.philips.com/storageupdates

Troubleshooting
Philips optical disc drives are manufactured with utmost care. In case of problems, it often appears that the drive itself is not defective. You can simply solve most of these problems by using the support tools offered by Philips.
When you're experiencing problems:
1 Please check the information in the "How to..." manual.
2 Check the Philips support websites www.philips.com/storageupdates and www.philips.com/support for interactive support, troubleshooting, and the newest software updates.
3 Should you encounter any more difficulties during installation or use, please contact Philips Customer Care via the e-mail address or telephone numbers that can be found at www.philips.com/contact.
Prior to claiming a drive for warranty, you must request a return reference number at www.philips.com/support or contact Philips Customer Care.
▶ Additional warranty information is available in the "Philips Warranty" folder on the Nero software disc.

"The making of unauthorised copies of copy-protected material, including computer programmes, files, broadcasts and sound recordings, may be an infringement of copyrights and constitute a criminal offence. This equipment should not be used for such purposes."
WEEE mark: Disposal of your old product
Your product is designed and manufactured with high quality materials and components, which can be recycled and reused. Please inform yourself about the local separate collection system for electrical and electronic products, including those marked by following symbol.
Please act according to your local rules and do not dispose of your old products with your normal household waste.
WARNING
Plastic bags can be dangerous.
To avoid danger of suffocation, keep this bag away from babies and small children.
text_image
Be responsible Respect copyrightsnatural_image
Computer tower case with monitor and control panel, labeled 'Example' (no text on device)ES Apague el ordenador.
PT Desligue o seu computador.
TR Bilgisayarınızı kapatın.
PL Wyłącz komputer.
SV Stäng av datom.
natural_image
Close-up of a computer tower with a cable inserted, showing ventilation slots and a hand inserting a cable (no text or symbols visible)natural_image
Close-up of a computer power adapter device with a white plug inserted, showing ventilation grille and fan (no text or symbols)ES Desconecte el cable de alimentación del PC.
PT Desligue o cabo de alimentação do PC.
TR Güç kablosunu bilgisayardan çıkann.
PL Odłącz kabel zasilający od komputera.
SV Dra ut nätsladden från datom.
5
natural_image
Exterior view of a server rack unit with an arrow pointing left and labeled 'Example' (no other text or symbols)7
text_image
Power Connector S-ATA Connector
natural_image
Interior view of a computer tower with visible CPU socket and drive bays, showing an arrow pointing to the internal structure (no text or symbols on main components)ES Ponga la unidad en el ordenador.
PT Coloque a unidade no computador.
TR Sürücüyü bilgisayannıza yerleştirin.
PL Włóż napęd do komputera.
SV Sätt i enheten i datom.

text_image
ExampleES Conecte un cable de alimentación S-ATA al equipo.
PT Conecte um cabo de alimentação S-ATA em sua unidade.
TR Sürücünüze bir S-ATA Güç Kablosu bağlayın.
PL Podłącz kabel zasilający S-ATA do napędu.
sv Anslut en S-ATA-nätkabel till enheten.

natural_image
Close-up of hands installing or adjusting a mechanical component into a device (no visible text or symbols)ES Conecte el cable de datos S-ATA al equipo.
PT Conecte o cabo de dados S-ATA em sua unidade.
TR Sürücünüze S-ATA veri kablosunu bağlayın.
PL Podłącz kabel danych S-ATA do napędu.
sv Anslut S-ATA-datakabeln till din enhet.
11
natural_image
Close-up of a hand holding a computer motherboard with an arrow pointing to a component (no visible text or symbols)12
natural_image
Exterior view of a server rack unit with an arrow pointing to the front panel (no text or symbols on the device itself)
text_image
Exampletext_image
Palo Alto Intelligent Agent Product: ( versions: 2046) Options for your Product Introduction Product: Installed version: Latest version: [ ] PAPLOSTOCHOLATE [ATM] 81.0 Palo Alto Intelligent Agent 3.5 The last successful product update check was performed in 2006-05-12 (1:40:4) AM. The automatic product update check is deleted. Check for update Click the button to check for product updates.
text_image
Philips Intelligent Agent E-mail: Options Help Loading for your Philips products Product: [01] PHILIPS/CHIKU.SLS - [MYAP] Installed version: P2.0 P2.0 Download Helps Intelligent Agent 1.0 4.0 Check for updates Product update information was successfully retrieved from the error.text_image
New Excel Essentials 3 Next-Home Essentials Next-Home Essentials Next-Home Essentials 3 Next-Home Essentials Next-Home Essentials Next-Home Essentials Next-Home Essentials Next-Home Essentials Next-Home Essentials Next-Home Essentials Next-Home Essentials Next-Home Essentials Next-Home Essentials Next-Home Essentials Next-Home Essentials Next-Home Essentials Next-Home Essentials Next-Home Essentials Next-Home Essentials Next-Home Essentials Next-Home Essentials Next-Home Essentials Next-Home Essentials Next-Home Elements Next-Home Elements Next-Home Elements Next-Home Elements Next-Home Elements Next-Home Elements Next-Home Elements Next-Home Elements Next-Home Elements Next-Home Elements Next-Home Elements Next-Home Elements Next-Home Elements Next-Home Elements Next-Home Elements Next-Home Elements Next-Home Elements Next-Home Elements Next-Home Elements Next-Home Elements Next-Home Essentials Next-Home Essentials Next-Home Essentials Next-Home Essentials Next-Home Essentials Next-Home Essentials Next-Home Essentials Next-Home Essentials Next-Home Essentials Next-Home Essentials Next-Home Essentials Next-Home Essentials Next-Home Essentials Next-Home Essentials Next-Home Essentials Next-Home Essentials Next-Home Essentials Next-Home Essentials Next-Home Essentials Next-Home Efficiency Next-Home Efficiency Next-Home Efficiency Next-Home Efficiency Next-Home Efficiency Next-Home Efficiency Next-Home Efficiency Next-Home Efficiency Next-Home Efficiency Next-Home Efficiency Next-Home Efficiency Next-Home Efficiency Next-Home Efficiency Next-Home Efficiency Next-Home Efficiency Next-Home Efficiency Next-Home Efficiency Next-Home Efficiency Next-Home Efficiency Next-Home Efficiency Next-Home Performance Next-Home Performance Next-Home Performance Next-Home Performance Next-Home Performance Next-Home Performance Next-Home Performance Next-Home Performance Next-Home Performance Next-Home Performance Next-Home Performance Next-Home Performance Next-Home Performance Next-Home Performance Next-Home Performance Next-Home Performance Next-Home Performance Next-Home Performance Next-Home Performance Next-Home Performance Next-Home Frequency Next-Home Frequency Next-Home Frequency Next-Home Frequency Next-Home Frequency Next-Home Frequency Next-Home Frequency Next-Home Frequency Next-Home Frequency Next-Home Frequency Next-Home FrequencyES Elija "Inicio", "(Todos) Programas", "Nero 7 Essentials", "Nero ProductSetup".
PT Seleccione "Iniciar", "(Todos os) Programas", "Nero 7 Essentials", "Nero ProductSetup".
text_image
New ProductSetup Please select one of the actions and click Next to continue Modify your New products. Use the option to enable additional features of your installed new products. Remove your new products. This option will give you that choices to remove the installed new products completely from your system. Browse new productset aspify include the new product set using a single file for your installed new products. Add new additional languages. Here you can add more support for particular languages for your new products. Nexttext_image
New Author Essential 3D Recycle Kit New Online Internet New Update Info File download The following text products have been detected. - Items ? To update all new products on your computer it is necessary to connect to the Internet. If you do not want to allow the installation required by command to the Internet, please call Next. You will be offered about the amount of data that needs to be transferred in the next step and you will have the danger to cancel the download. If you did OK in security working into your home (you would or close), please follow the instructions on the server to enable Internet access for the installation required. OK7
ES Haga clic en "OK".
PT Clique em "OK".
TR "Tamam"ı tıklatın.
PL Kliknij "OK".
sv Klicka på "OK".
text_image
New ProductStatus File download! If now started that part of our new products have been installed from Internet resources. Therefore it is required that the installation required will be required to be installed to check for additional items that you must be required to complete the action. If you do not want to allow the installation required to convert to the Internet, click Next. You will be informed about the amount if data that needs to be transferred in the next step, and you will have the direction to convert the downloads. If you do OK a security warning was made (that you need or valid). Please have the instructions on the system to enable access to the installation record. OK8
ES Es posible que el Firewall de Windows le dé un mensaje. Haga clic en "Unblock" (Desbloquear) para permitir que Nero se actualice.
PT A Firewall do Windows pode avisá-lo.
Clique em "Desbloquear" para permitir a actualização do Nero.
TR Windows Firewall sizi uyarabilir. Nero'nun güncellenmesi için "Unblock" (Engelleme) seçeneğini belirleyin.
PL Może pojawić się ostrzeżenie zapory systemu Windows. Kliknij "Odblokuj", aby umożliwiać aktualizację programu Nero.
SV Windows Firewall kan varna dig.
Klicka på "Sluta blockera" så att Nero kan uppdateras.
text_image
Windows Security Alert To help protect your computer. Windows Outlook has blocked user features of the program. What you want to have blocking this program? Store: M37 server Publisher: Microsoft Close-Blending Close-Blending Windows Outlook has blocked the program from accepting commands, on the Internet of a network. If you recognize the program or load the publisher, you can write it in a website or email as requested.
text_image
New ProductSet The updates are being downloaded 1. Connecting 2. Checking engine 3. Preparing installation 4. Optimating download size 5. Downloading file 6. Completing CloseBe responsible Respect copyrights
1
ES Inicie "Nero StartSmart Essentials".
PT Inicie o "Nero StartSmart Essentials".
TR "Nero StartSmart Essentials"İ başlat.
PL Uruchom program "Nero StartSmart Essentials".
sv Starta "Nero StartSmart Essentials".

text_image
Save Start Menu Enter Web Save Connection Update Web Update Bin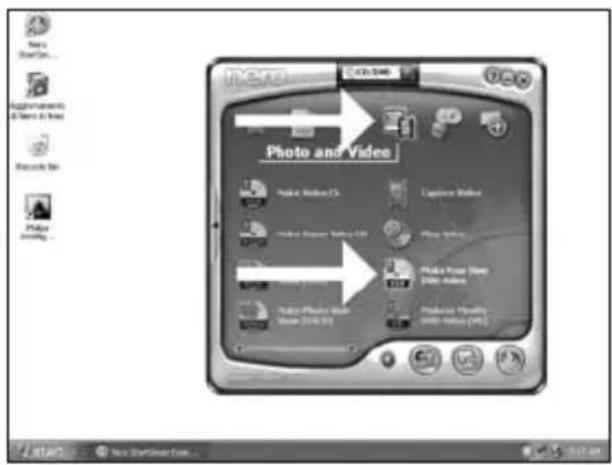
text_image
Photo and Video Make Image (C) Make Image (Image) (C) Make Image (Image) (Image) (Image)natural_image
Exterior view of a desktop computer tower connected to a cable, labeled 'Example' (no other text or symbols)text_image
Untitled/Project [TMS Video] - Max Picture Essentials Capture Video Select a device and capture video to save hard disk. Capture devices Top: TV Driver Options Use the template to capture video in Digital Video (DVI) compatible format The application will also configure the capture devices but you can change the device settings manually by DVI type DVI Type 1 Type 1 is usually the below choice because it requires free disk speed and often miss thoughts. Functions option Type 2 is compatible with video for Windows(TM) if you are not set which type 0 uses, offset Type 1 Top: TV Driver Top: TV Driver Top: TV Driver Top: TV Driver Top: TV Driver Top: TV Driver Top: TV Driver Top: TV Driver Top: TV Driver Top: TV Driver Top: TV Driver Top: TV Driver Top: TV Driver Top: TV Driver Top: TV Driver Top: TV Driver Top: TV Driver Top: TV Driver Top: TV Driver Top: TV Driver Top: TV Auto Top: TV Auto Top: TV Auto Top: TV Auto Top: TV Auto Top: TV Auto Top: TV Auto Top: TV Auto Top: TV Auto Top: TV Auto Top: TV Auto Top: TV Auto Top: TV Auto Top: TV Auto Top: TV Auto Top: TV Auto Top: TV Auto Top: TV Auto Top: TV Auto Top: TV Auto Top: TV Automatior6
text_image
UntitledProject [1980 Videos] - More Picture Essentials Capture Video Select a device and capture video to your hard disk. Capture devices Capture template Type 1 is valid that the better choice because it requires free disk space and allows more throughput. However, only Type 2 is compatible with type for network(746). If you are not sure which type is used, select Type 3. Customization: Frames captured: Microsoft Outlook7
ES Haga clic en "Siguiente" cuando se hayan capturado todas las secuencias de vídeo.
PT Clique em "Avançar" quando todas as sequências de vídeo tiverem sido capturadas.
TR Tüm video sıraları yakalandığında "İleri"ye tıklayın.
PL Po przechwyceniu wszystkich sekwencji wideo, kliknij "Dalej".
SV Klicka på "Nästa" när alla videosekvenser har hämtats.

text_image
Untitled Project [1982 Videos] - New Vision Essentials Capture Videos Select a device and capture video to post hard disk. Capture Videos http://4V-Device Selected a capturing template: 374 Forms Use file template to capture a Digital Video (DVI) compatible format The application also configures the capture devices but you can change the device settings manually to: DVI type: DVI Type 1 Type 2. It usually be the other choice because it requires box files, so does and allows more throughput. However, only 1 line 2 is compatible with wireless Windows (IIS). If you are not sure which type is used, select Type 2. Captured files MNT/Capture 0007 MNT/Capture 0006 MNT/Capture 0009 None Next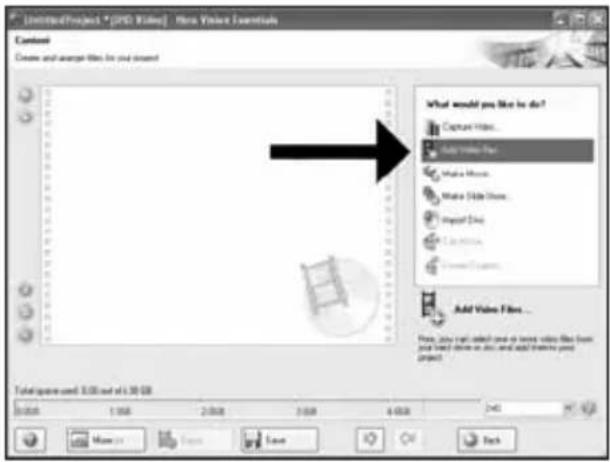
text_image
UntitledProject * [DVD Viling] - New Video Essentials Context Create and analyze files for your content What would you like to do? Capture Images... Add Video Files Make Images... Make Slide Images... Import Data Edit Images... Add Video Files... New Video Files Total volume used: 3.00 units at 1.30 GB 5,000 1,000 2,000 3,000 4,000 5,000 6,000 7,000 8,000 9,000 10,000 11,000 12,000 13,000 14,000 15,000 16,000 17,000 18,000 19,000 20,000 21,000 22,000 23,000 24,000 25,000 26,000 27,000 28,000 29,000 30,000 31,000 32,000 33,000 34,000 35,000 36,000 37,000 38,000 39,000 40,000 41,000 42,000 43,000 44,000 45,000 46,000 47,000 48,000 49,000 50,000 51,000 52,000 53,000 54,000 55,000 56,000 57,000 58,000 59,000 60,000 61,000 62,000 63,000 64,000 65,000 66,000 67,000 68,000 69,000 70,000 71,000 72,000 73,000 74,000 75,000 76,000 77,000 78,000 79,000 80,000 81,000 82,000 83,000 84, 85, 86 More...Savetext_image
Open Create an Modules Subdivisions New Store Desktop My Documents My Computer My Options Fines Favorites M802_75.1X3B FT3_30_3.1X3B FT3_30_3.1X3B FT3_30_3.1X3B FT3_30_3.1X3B FT3_30_3.1X3B FT3_30_3.1X3B FT3_30_3.1X3B FT3_30_3.1X3B File name: All Supramidal Files Open Cancel
text_image
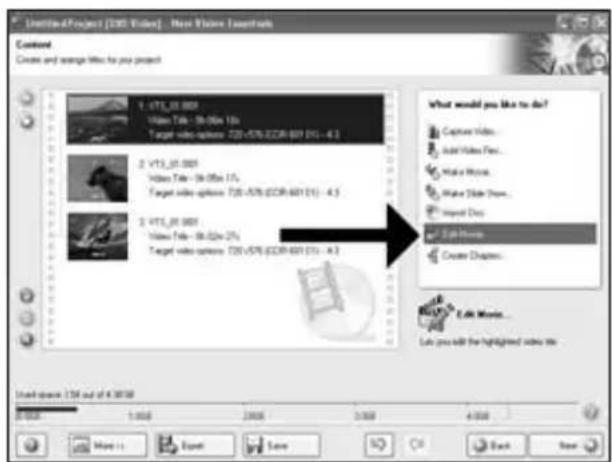
UntitledProject [100] Video - More Videos Extracts Content Create and manage files for you present 1. VIT_01 009 Video Title - 16:00:15 Target video options: 720+VIT5 (2CM-841) (1): - 4.3 2. VIT_01 009 Video Title - 16:00:15 Target video options: 720+VIT5 (2CM-841) (1): - 4.3 3. VIT_01 009 Video Title - 16:00:25 Target video options: 720+VIT5 (2CM-841) (1): - 4.3 What would you like to do? Capture Video... Add Video Files... Make Movies... Make Slide Maps... Import Docs... Edit Movies... Create Chapters... Let you add the highlighted video file. Use space: I3M out of 4.3008 0:00 1:00 2:00 3:00 4:00 More... Equal Save Next Next NextES Seleccione los ficheros y haga clic en "Abrir".
PT Selecione os arquivos e clique em "Abrir".
TR Dosyaları seçin ve "Aç"a tıklayın.
PL Wybierz pliki i kliknij "Otwórz".
sv Markera filerna och klicka på "Öppna".
ES Puede editar las películas cargadas, escogiendo "Editar película".
PT Você pode editar os filmes carregados selecionando "Editar filme".
TR "Filmi Düzenle"yi seçerek yüklenen filmleri düzenleyebilirsiniz.
PL Możesz edytować załadowane filmy, klikając "Edytuj film".
SV Du kan redigera de laddade filmerna genom att välja "Redigera film".
11
ES Aquí, puede añadir efectos de vídeo, efecto de texto y transiciones.
PT Aqui você pode adicionar efeitos de vídeo, efeitos de texto e transições.
TR Video efektlerini, metin efektlerini ve geçişleri buraya ekleyebilirsiniz.
PL Tutaj możesz dodać efekty wideo, efekty tekstowe i przejścia.
SV Här kan du lägga till videoeffekter, texteffekter och övergångar.

text_image
LimitedProject [1980] Video | New Vision Ascertainment PHILIPS PHILIPS VIE_26.0000 Movie Export Save OK Cancel12
ES Puede recortar el vídeo grabado desplazando los marcadores. Cuando haya terminado, elija "Siguiente".
PT Você também pode cortar o vídeo gravado deslizando os marcadores. Quando tiver terminado, clique em "Avançar".
TR Aynca işaretleyicileri kaydırarak kaydedilen görüntüyü kırpabilirsiniz. Bittiğinde, "İleri"yi seçin.
PL Możesz również przycinać nagrany film, przesuwając wskaźniki. Po zakończeniu kliknij "Dalej".
SV Du kan också trimma den inspelade video genom att skjuta markörerna. När du är klar väljer du "Nästa".

text_image
Limiting Project [100 Vites] - New Window Mountains File Edit View Tools Help 100 Vites VIT_20.0000 Movie 10 Event Save See13
ES Después de editar todos los ficheros, elija "Siguiente".
PT Após ter editado todos os arquivos, clique em "Avançar".
TR Tüm dosyaları düzenledikten sonra, "İleri"yi seçin.
PL Po zakończeniu edycji wszystkich plików kliknij "Dalej".
SV När du har redigerat alla filer väljer du "Nästa".
text_image
Untitled Project1 [RMS Videos] - New Vision Installations Content Create and update files to your project. 1. VIT3_0.0001 Video Files - 36.000x75 Target video options T28 x 576 (ECR-801) (1): - 41 2. VIT3_0.0001 Video Files - 36.000x75 Target video options T28 x 576 (ECR-801) (1): - 41 3. VIT3_0.0001 Video Files - 36.000x75 Target video options T28 x 576 (ECR-801) (1): - 41 What would you like to do? Capture Videos... Add Video Files... Make Movies... Make Solar View... Report Docs... Edit Movies... Create Chapters... Under search: 36 out of 4,000 AM 1:00 1:50 2:00 3:00 4:00 Next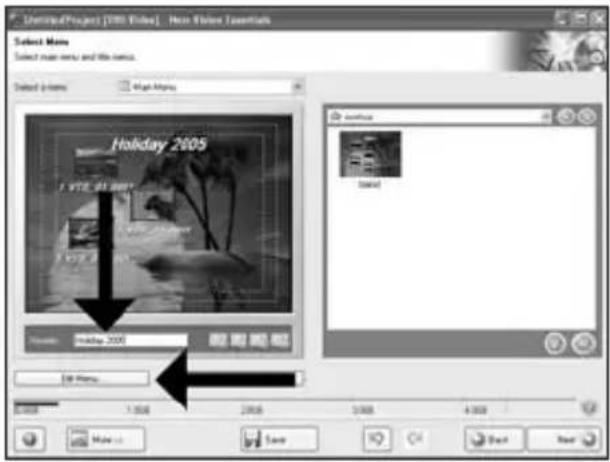
text_image
UnlimitedProject [VISA] Video | New Vision Essentials Select None Select main menu and file name. Select options: High Media Holiday 2005 1 VTE, 81.2007 Video: Holiday 2005 Edit Media... Save Next NextES Ponga el título en el campo "Cabecera" y haga clic en "Editar menú".
PT Digite o título no campo "Cabeçalho" e clique em "Editar menu".
TR "Başlık" alanına başlığı girin ve "Menü Düzenle"ye tıklayın.
PL Wpisz tytuł w polu "Nagłówek" i kliknij "Edycja menu".
SV Ange titeln i fältet "Rubrik" och klicka på "Redigera Meny".
text_image
UntitledProject [1981 Video] - New iPhone SaveInfo Edit Memory Customize new options. Holiday 2005 What would you like to change? Layout Background Balance Font Presidential/Factor Font Shadow Administration Internet-Cases Page 1/2 Save HomeES Puede cambiar el diseño, fondo, añadir títulos,... aquí. Cuando haya terminado, elija "Siguiente" dos veces.
PT Você pode alterar o layout, o fundo, adicionar títulos,... aqui. Quando tiver terminado, selecione "Avançar" duas vezes.
TR Yerleşimi, arkaplanı, başlıkları ekle'yi, ... buradan değiştirebilirsiniz. Bittiğinde, "İleri"yi iki kez seçin.
PL Tutaj możesz zmienić układ, tło oraz dodać tytuły. o zakończeniu kliknij dwukrotnie "Dalej".
SV Här kan du ändra layout, bakgrund, lägga till titlar osv. När du är klar väljer du "Nästa" två gånger.
text_image
Untitled Project [1985 Video] New Window Journals Phanyone Explore the works of your page future learning & Holiday 2005ES Previsualice su película. Haga clic en "Siguiente" para continuar.
PT Visualize seu filme. Clique em "Avançar" para continuar.
TR Filminizi önizleyin. Devam etmek için "İlen"ye tıklayın.
PL Obejrzyj fragment filmu. Kliknij "Dalej", aby kontynuować.
SV Förhandsgranska filmen. Klicka på "Nästa" för att fortsätta.
17
ES Elija "Grabar en", elija su grabador y elija "Grabar".
PT Seleccione "Gravar em", seleccione seu gravador e seleccione "Gravar".
TR "Farklı Yazdır"yu seçin, kaydedicinizi seçin ve "Yaz" seçeneğini seçin.
PL Kliknij "Nagraj na", wybierz nagrywarkę i kliknij "Nagraj".
SV Välj "Bränn med", markera din brännare och välj "Bränn".
text_image
UntitledProject [EMS Video] - Max Flange Essentials Run Options Set the parameters for learning Project website Current video options Aspect also Automatic Video-rot FSL Quality Software View project contains 3 filters and 1 name. Email: Start the parameter for learning Run To: Write by Hard Copy Folder Volume Name Recording Settings Run To Recorder Selected the recorder you want to use Start applications Run to device: PHILIPS ORDERER Used disc space: 0.29 GB Save18
ES NeroVision Express está recodificando y grabando su disco.
PT O NeroVision Express está transcodificando e gravando seu disco.
TR NeroVision Express diskinizin kod aktarımını ve yakma işlemini gerçekleştirir.
PL Program NeroVision Express transkoduje i nagrywa płytę.
sv NeroVision Express kodar om och bränner skivan.

text_image
Untitled Project | DVD Video | New Vision Essentials Preview Preparing data encoding Running video data onto the disc Completing recording session PHILIPS Preview project: Current action: Transcoding and editing V1.5, 01.0007 Current progress: Remaining: 3h 10m 20s Expend: 3h 00m 00s Total progress: Remaining: 3h 10m 20s Expend: 3h 00m 00s Preview: Start down computer when installed Welcome to Top Next Save19
ES Felicitaciones, su disco se ha grabado con éxito. Ahora puede salir de la aplicación.
PT Parabéns, seu disco foi gravado com sucesso. Você pode sair do aplicativo agora.
TR Tebrikler, diskiniz başarıyla yazdırıldı. Uygulamadan şimdi çıkabilirsiniz.
PL Gratulacje! Zapis płyty zakończył się pomyślnie. Możesz zakończyć pracę programu.
SV Grattis, du har bränt en skiva. Du kan stänga programmet nu.

text_image
Untitled Project [RMS Video] - New Vision Essentials Options Preparing data for recording Burning video data into the disk Completing recording errors Recycling progress Current action: Current progress: 1st progression Export New Vision Express 3 New process completed successfully. What you like to save the log file! No No Preview: Manual Used down computer when displayed Remove to Top More... Save
Be responsible Respect copyrights
1
ES Inicie "Nero StartSmart".
PT Inicie o "Nero StartSmart".
TR "Nero StartSmart"İ başlatın.
PL Uruchom program "Nero StartSmart".
sv Starta "Nero StartSmart".
text_image
Menu Start Menu Enter Subs Enter Print Print Info Recycle Bin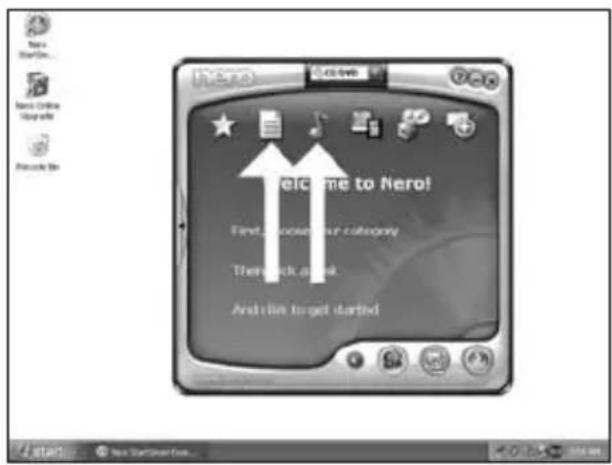
text_image
Welcome to Nero! First, you must get a category Thank you next And like to get startedES Elija "Datos" o "Audio".
PT Seleccione "Dados" ou "Áudio".
TR "Veri" veya "Ses"yu seçin.
PL Kliknij "Dane" lub "Audio".
SV Välj "Data" eller "Audio".
2

text_image
Data Public Start 173 Public Start 2000 Start 153 Open 2000ES Para datos, elija "Crear CD de datos" o "Crear DVD de datos".
PT Para dados, selecione "Criar CD de dados" ou "Criar DVD de dados".
TR Veriler için "Veri CD'si Yarat" veya "Veri DVD'si Yarat"ı seçin.
PL W przypadku danych, kliknij "Utwórz dysk CD z danymi" lub "Utwórz dysk DVD z danymi".
SV För data väljer du "Skapa Data-CD" eller "Skapa Data-DVD".
text_image
Audio Make Audio 13 Play Audio Audio - H51.03 Make H51.03 On this regular key CD that plays all CD players and is use PC. Make new project Audio 12 Make new digital Audio 2007ES Para un disco de audio, elija "Crear CD de audio".
PT Para um disco de áudio, selecione "Criar CD de áudio".
TR Ses diski için, "Müzik/Ses CD'si Yarat" seçin.
PL W przypadku płyty audio, kliknij "Utwórz Audio CD".
SV För en ljudskiva väljer du "Skapa Audio-CD".
3
4
5
ES Haga clic en "Añadir".
PT Clique em "Adicionar".
TR "Ekle"yi seçin.
PL Kliknij "Dodaj".
SV Klicka på "Lägg till".

text_image
New Express Essentials Edit Content Add Existing your this... New Text Name Size Type Modified On Save Save Total extracted. 2 KB 100KB 200KB 300KB 400KB 500KB 600KB 700KB 800KB 900KB Start Next6
ES Seleccione todos los archivos a grabar y haga clic en "Añadir". Haga clic en "Cerrar" cuando termine.
PT Seleccione todos os arquivos a serem gravados e clique em "Adicionar". Clique em "Fechar" quando tiver terminado.
TR Yakacağını tüm dosyaları seçin ve "Ekle"ye tıklayın. Bittiğinde "Kapat"a tıklayın.
PL Wybierz wszystkie pliki do nagrania i kliknij "Dodaj". Po zakończeniu kliknij "Zamknij".
SV Markera alla filer som ska brännas och klicka på "Lägg till". Klicka på "Stäng" när du är klar.

text_image
Add Size and Action Location: My Documents Modules ■ Automatics New/Forward Desktop My Documents My Computer My Internet Phone Functions File name: "The 12.doc" "The 12.doc" "The 12.doc" File of type: All-View (*.txt) Add Close Start Next Update Tools My Documents and Web... Add Close7
ES Compruebe sus archivos y haga clic en "Siguiente".
PT Verifique seus arquivos e clique em "Avançar".
TR Dosyalarınızı kontrol edin ve "İleri"ye tıklayın.
PL Sprawdź pliki i kliknij "Dalej".
SV Kontrollera dina filer och klicka på "Nästa".
text_image
New Express Terminal File Cadout Add details your files. Name Size Type Modified Origin No 01.doc 35.224 KB Word... LDN21K... C:\Documents and Settings... No 02.doc 53.224 KB Word... LDN21K... C:\Documents and Settings... No 03.doc 55.764 KB Word... LDN21K... C:\Documents and Settings... Total space used: 123 KB Save
text_image
Next Express Elements Find Store Settings Click Start to start the recording process File name: My One Number of types: Modify data on disc after turning Allow file to be added time (multiterrone disc) OK ApplyES Elija su grabador y haga clic en "Grabar".
PT Selecione seu gravador e clique em "Gravar".
TR Kaydediciyi seçin ve "Yak"a tıklayın.
PL Wybierz nagrywarkę i kliknij "Nagraj".
SV Välj din brännare och klicka på "Bränn".
text_image
New Express Event Hall Warning Process Please wait... Test Event 4:00-45 APF 19.2731 CHISS/ACER BuFin undersea protection allowed 4:00-45 APF - Caching of No started 4:00-45 APF - Caching of No completed 4:00-45 APF - Run uncompleted at site 12,000 MHz Total time 3:00:07 Writing at 25th CLDN (RMS) StopES Nero está grabando su disco.
PT O Nero está gravando seu disco.
TR Nero diskinizi yakıyor.
PL Program Nero rozpocznie nagrywanie płyty.
sv Nero bränner skivan.
text_image
New Express Running Process Start End 4:00:45:48 196.201.13/01:45/48 Buffer packets protection activated 4:00:45:48 Cashing of the started 4:00:45:48 Cashing of the second 4:00:45:48 Run process 4:00:45:48 Run process New Express Deserivals Run process completed successfully at 10x (1,000 RPM) OK LTG BUTG Start Next Generation Tools Get new service...ES Felicitaciones, su disco se ha grabado con éxito. Ahora puede salir de la aplicación.
PT Parabéns, seu disco foi gravado com sucesso. Você pode sair do aplicativo agora.
TR Tebrikler, diskiniz başarıyla yazıldı. Uygulamadan şimdi çıkabilirsiniz.
PL Gratulacje! Zapis płyty zakończył się pomyślnie. Możesz zakończyć pracę programu.
sv Grattis, du har bränt en skiva. Du kan stänga programmet nu.

Be responsible Respect copyrights
1
ES Inicie "Nero StartSmart Essentials".
PT Inicie o "Nero StartSmart Essentials".
TR "Nero StartSmart Essentials"İ başlatın.
PL Uruchom program "Nero StartSmart Essentials".
sv Starta "Nero StartSmart Essentials".

text_image
Menu Start Menu ExerciseButton Menu Window 启用程序 Options Menu
text_image
VISA0 CD: 1940 Favorites Radio Guide 13 Radio Guide 1950 Radio Guide 1960 Radio Guide 13 Radio Guide 1950 Radio Guide 13 Radio Guide 1950 Radio Guide 13 Radio Guide 1950 Radio Guide 13 Radio Guide 1950 Radio Guide 13 Radio Guide 1950 Radio Guide 13 Radio Guide 1950 Radio Guide 13 Radio Guide 1950 Radio Guide 13 Radio Guide 1950ES Elija "Favoritos" y "Copiar CD" o "Copiar DVD".
PT Seleccione "Favoritos" e "Copiar CD" ou "Copiar DVD".
TR "Sik Kullanılanlar" ve "CD Kopyala" veya "DVD Kopyala"yi seçin.
PL Kliknij "Ulubione" i "Kopiuj CD" lub "Kopiuj DVD".
sv Välj "Favoriter" och "Kopiera CD" eller "Kopiera DVD".

text_image
Here Express/Importing Select source and destination Please select source and destination drivers and render source disk. Source drive: E:\PLERT\IMPRESS Destination drive: E:\PLERT\IMPRESS [0-45%] Cautism: Save data content in copied. Then have to copy protected or continent-wide. If you are not sure if you do can be copied, please run a third simulation file (368 or Advanced -17 and select Simulation). Writing speed: Maximum Number of copies: 1 Findy data in disc after writing Group file: Documents and Settings/Tools all by success OpenES Seleccione la unidad de origen.
PT Seleccione a unidade de origem.
TR Kaynak sürücüyü seçin.
PL Wybierz napęd źródłowy.
sv Välj källenhet.
text_image
F:\Photo Express\Options Select source and destination Please select source and destination drives and insert source list. Source drive: F:\PHILIPS.DCK2449P Destination drive: C:\PHILIPS.DCK2449P - C:\DARK Customs. Some device cannot be copied. They may be copied or deleted at any time point. If you are not sure if you like can be copied, please run a library simulation mode (bit on "Subspace v1" and select Simulation) Writing speed: Number: □ Find data on file after learning Image file: □ Documents and Settings\Text\My Documents OKES Seleccione la unidad de destino y haga clic en "Copiar".
PT Seleccione a unidade de destino e clique em "Copiar".
TR Hedef sürücüyü seçin ve "Kopyala"ya tıklayın.
PL Wybierz napęd docelowy i kliknij "Kopiuj".
sv Välj målenhet och klicka på "Kopiera".
5
ES Nero está ahora copiando su disco.
PT Agora o Nero copiará seu disco.
TR Nero artık diskinizi kopyalayacaktır.
PL Program Nero rozpocznie kopiowanie płyty.
SV Nero kopierar din skiva.

text_image
P. New Express Options Burning Process Page walk... View Start Help 0:01:15:497 0:02:16:497 0:04:30:497 0:06:11:497 0:10:02:497 File 1 (C:) is copyrighted Creating the image for burning Creating images completed successfully WRITE 25 (USB) access Buffer undefined protection achieved Burst process diagnostic info (1,300 files) Ultrac UPPER Texting list 10.07.02 Total time 0:00:07 Win Writing at info (1,300 files) Stop6
ES Felicitaciones, su disco se ha grabado con éxito. Ahora puede salir de la aplicación.
PT Parabéns, seu disco foi gravado com sucesso. Você pode sair do aplicativo agora.
TR Tebrikler, diskiniz başarıyla yazıldı. Uygulamadan şimdi çıkabilirsiniz.
PL Gratulacje! Zapis płyty zakończył się pomyślnie. Możesz zakończyć pracę programu.
SV Grattis, du har bränt en skiva. Du kan stänga programmet nu.

text_image
Micro Express Seminars Starting Process Report wall... New Edit 0.03.16.497 0.08.02.497 0.06.11.497 0.15.02.497 0.27.19.497 Creating the image for running Creating Image completed successfully PROJET (DOP) 100%? Buffe & Wm: 100% completion status Burr: 100% Burr: 100% Micro Express Seminars Burn process completed successfully at 0% (1,000 KB) OK UTR UPACtext_image
Be responsible Respect copyrightstext_image
Be responsible Respect copyrightsEN This can be found in the box:
A: Your new B: This manual C: The Nero drive software disc
D: 4 screws in a small bag
natural_image
Computer tower case with monitor and control panel, labeled 'Example' (no other text or symbols)sc 关闭计算机。
RU Выключите ваш компьютер.
DK Sluk for din computer.
TC 將您的電腦關機。
EN Switch your computer off.
natural_image
Close-up of a computer tower with a cable inserted, showing ventilation slots and a hand inserting a cable (no text or symbols visible)TC 觸摸未塗漆的金屬部分(例如,您的電腦外殼發熱或未塗漆的部分)。這可避免靜電釋放而損壞您的電腦。
EN Touch an unpainted metal part (eg. your heating or an unpainted part of your computer case). This will avoid any damage to your computer by electrostatic discharge.
natural_image
Close-up of a computer power adapter with a white plug inserted, showing ventilation grille and fan (no text or symbols)sc 断开计算机电源。
RU Отсоедините кабель питания от вашего РС.
DK Tag strømkablet fra computeren ud.
TC 拔掉電腦電源線。
EN Disconnect the power cable from the PC.
5
SC 打开计算机。可能需要松开计算机最后面的螺钉。有关详细信息,请参阅您的计算机手册。
RU Откройте компьютер. Для этого нужно отпустить винты, расположенные чаще всего на задней стенке компьютера. Более подробно см. в руководстве по компьютеру.
DK Åbn computeren. Du skal muligvis løsne nogle skruer, der ofte sidder bag på computeren. Find mere information i manualen til din computer.
TC 拆開您的電腦。您可能需要拆下螺絲,通常位於您電腦的背面。請參閱您的電腦手冊以取得更多資訊。
EN Open your computer. You may have to unleash screws which are mostly located at the back of your computer. See your computer manual for more details.
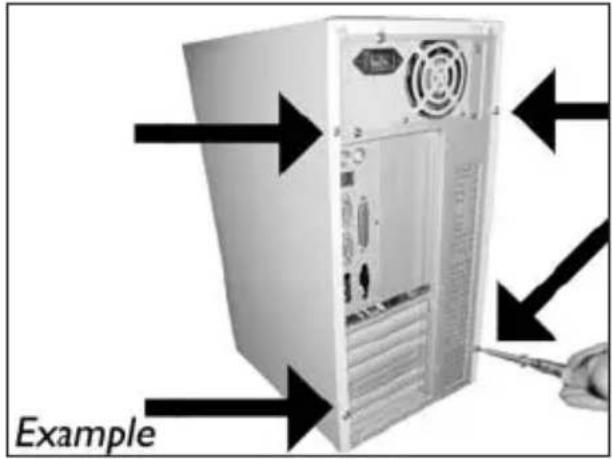
text_image
Example6
natural_image
Exterior view of a server rack unit with an arrow pointing left, labeled 'Example' (no other text or symbols)7
SC 驱动器后面有一些接口,用来将驱动器连接到计算机。
RU Здесь находятся соединения (на задней стенке вашего дисковода), которые должны использоваться для подключения дисковода к компьютеру.
DK Dette er de forbindelser (bag på drevet), som du skal bruge, när drevet skal tilsluttes computeren.
TC 這些是您將用來把光碟機連接到電腦的連接設定(在您的光碟機背面)。
EN These are the connections (on the back of your drive) you will have to use for connecting the drive to the computer.
text_image
Power Connector S-ATA Connector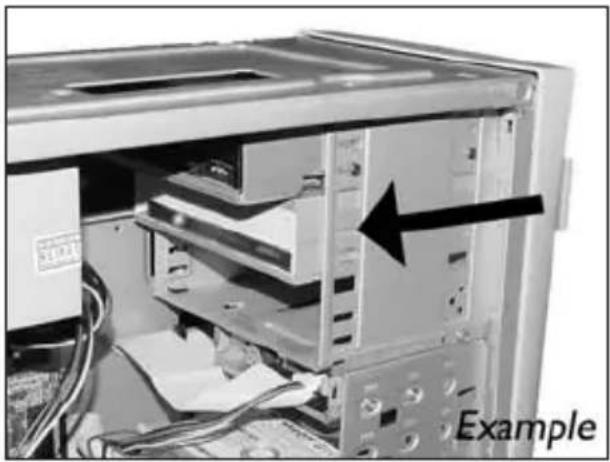
natural_image
Interior view of a computer tower with visible drive bays and an arrow pointing to a component (no text or symbols on the main structure)sc 将驱动器放入计算机。
RU Вставьте дисковод в ваш компьютер.
DK Sæt drevet ind i computeren.
TC 將光碟機放入您的電腦。
EN Put the drive into your computer.
text_image
ExampleSC 将 S-ATA 电源线连接到驱动器。
RU Присоедините кабель питания S-ATA к вашему дисководу.
DK Tilslut et S-ATA strømkabel til drevet.
TC 將 S-ATA 電源線連接至您的光碟機。
EN Attach a S-ATA Power Cable to your drive.
natural_image
Close-up of hands installing or adjusting a device component, no visible text or symbolssc 将 S-ATA 数据线连接到驱动器。
RU Присоедините кабель данных S-ATA к вашему дисководу.
DK Forbind S-ATA datakablet til drevet.
TC 將 S-ATA 數據線連接至您的光碟機。
EN Attach the S-ATA data cable to your drive.
11
SC 将 S-ATA 数据线连接到主板。
RU Присоедините кабель данных S-ATA к материнской плате вашего компьютера.
DK Forbind S-ATA datakablet til bundkortet.
TC 將 S-ATA 數據線連接至您的主機板。
EN Connect the S-ATA data cable to your motherboard.

natural_image
Close-up of a hand inserting electronic components into a computer motherboard (no visible text or symbols)12
SC 用螺钉固定驱动器(如可能,同时固定两边)。
RU Закрепите дисковод винтами (по возможности с обеих сторон).
DK Fastgør drevet med skruerne (om muligt på begge sider).
TC 使用螺絲固定光碟機(可能的話,請固定兩側)。
EN Secure the drive with the screws (if possible on both sides).
text_image
Example13
natural_image
Exterior view of a server rack unit with an arrow pointing to the front panel (no text or symbols on the device itself)
text_image
ExampleEN Put the screws (if there were any) back in and reconnect the cables.
text_image
Examplesc 重新启动计算机。
15
EN Restart your computer.
text_image
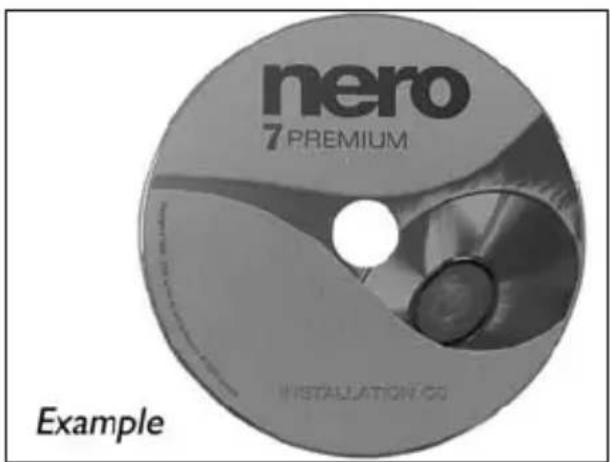
nero 7 PREMIUM INSTALLATION CO ExampleEN Insert the Nero disc when Windows is loaded.
17
SC 选择 “Nero 7 Essentials” 并按照屏幕指示操作。完成后继续下一章。
RU Выберите "Nero 7 Essentials" и следуйте инструкциям на экране дисплея. После окончания можете перейти к следующей главе.
DK Vælg "Nero 7 Essentials" og følg instruktioneme på skærmen. Gå videre til næste kapitel, när du er færdig.
TC 選擇 “Nero 7 Essentials” 並依畫面上的指示進行。完成後,請繼續進行下一章。
EN Choose "Nero 7 Essentials" and follow the instructions on the screen. When finished, continue with the next chapter.
text_image
New Multinationer nero 7 ESSENTIALS installation Next / Essentials Next End
更新?
Актуализировать?
Opdatering
如何更新?
Up to date?
1
text_image
start start stop stop stop2
text_image
Philips Intelligent Agent Products - Options - Help Options for new Philips products Product: Installed version: Latest version: [1] PHILIPSCHICK SAU - [OEM] PS 0 Philips Intelligent Agent 1.0 The last successful product update check was performed on 2500-05-12 11:40:42 AM. The automatic product update check is enabled. Check for update Check the following to check for product updates.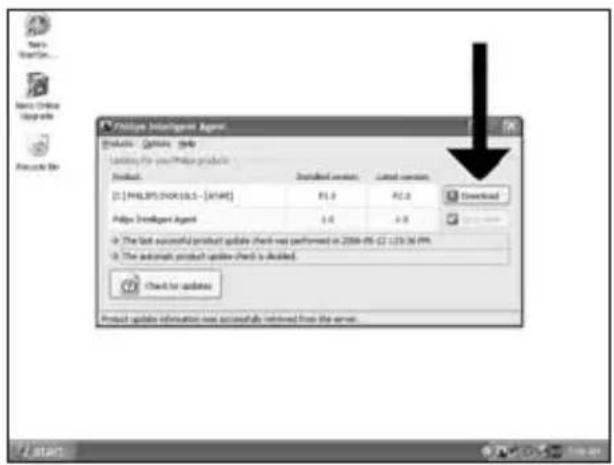
text_image
Philips Intelligent Agent Options - Options Help Loading Pin to your Philips products Product: Installed version: Latest version: [1.1] PHILIPS (NOK) (SL - [XVAT]) PSL 0 PSL 0 Download Philips Intelligent Agent 1.0 2.0 The last successful product update (check not performed in 2006-05-C2 1:23:36 PM) The automatic product update (check is decided) Check for updates Product update information was successfully retrieved from the server.SC 下载并安装更新。
RU Загрузите актуализацию (updates) и выполните ее инсталляцию.
DK Download opdateringerne og installér dem.
TC 下載並安裝更新。
EN Download the updates and install them.
text_image
New Document File Edit View Insertion and Print Edit View Insertion Edit Options AutoCAD AutoCAD AutoCAD AutoCAD AutoCAD AutoCAD AutoCAD AutoCAD AutoCAD AutoCAD AutoCAD AutoCAD AutoCAD AutoCAD AutoCAD AutoCAD AutoCAD AutoCAD AutoCAD AutoCAD AutoCAD AutoCAD AutoCAD AutoCAD AutoCAD AutoCAD AutoCAD AutoCAD AutoCAD AutoCAD AutoCAD AutoCAD AutoCAD AutoCADSC 选择 “开始”,“(所有)程序”,“Nero 7 Essentials”,“Nero ProductSetup”。
RU Выберите "Start", "(All) Programs", "Philips Intelligent Agent", "Philips Intelligent Agent".
DK Vælg "Start", "(Alle) Programmer", "Nero 7 Essentials", "Nero ProductSetup".
TC 選擇「Start (開始)」,「(All) Programs ((所有程式) 程式集)」,「Nero 7 Essentials」,「Nero ProductSetup」。
EN Choose "Start", "(All) Programs", "Nero 7 Essentials", "Nero ProductSetup".
text_image
New ProductSetup Please select one of the actions and click Next to continue Modify your New products. Use the option to enable additional features of your installed new products. Remove your new products. The garden will give you that choice to remove the installed new products completely from your system. Describe our new products. Describe include the latest version of the existing products for your installed new products. Add和完善 additional languages. Show you can add和完善 support for particular languages for your new products. NextSC 选择 “Update your Nero products(更新您的 Nero 产品)” 和 “Next(下一步)”。
RU Выберите "Update your Nero products" и "Next".
DK Vælg "Opdater dine Nero-produkter" og "Næste".
TC 選擇「Update your Nero products (更新您的 Nero 產品)」然後再按「Next (下一步)」。
EN Choose "Update your Nero products" and "Next".
6
sc 单击 “OK(确定)”。
RU Щелкните мышью на "ОК".
DK Klik på "OK".
TC 按一下「OK (確定)」。
EN Click "OK".
text_image
Update Info File Download The following item products have been deleted: - Items 7 To update all items products on your computer it is necessary to connect by the Internet. If you do not want to allow the installation agreed by password to the Internet, please call Next. You will be offered about the amount of data that needs to be transferred in the next step and you will have the chance to cancel the Internet. If you did not create version new user (this your firewall or email), please follow the instructions on the screen to enable Internet access for the installation accord. OK7
sc 单击 “OK(确定)”。
RU Щелкните мышью на "ОК".
DK Klik på "OK".
TC 按一下「OK (確定)」。
EN Click "OK".
text_image
New ProductSetup File download! It was detected that part of your new products have been installed from Internet resources. Therefore it is required that the installation required will continue to be saved by the Internet. If you are required to complete the action, if you can not want to allow the installation related to the Internet, then Cancel. You will be informed about the amount if data that needs little to be transferred in the next step and you will have the chance to cancel the download. If you do OK a record warning user now (Now your friend or user). Please have the instructions on the system to enable the installation required. OK8
sc Windows 防火墙可能会发出警告。单击“解除阻止”以允许 Nero 更新。
RU Windows Firewall может выдать
предостережение. Щелкните мышью на "Unblock",
чтобы разрешить актуализацию вашей версии Nero.
DK Windows' Firewall vil muligvis advare dig. Klik på "Fjem blokering" for at tillade, at Nero opdateres.
TC Windows 防火牆可能會提出警告。按一下「Unblock (取消封鎖)」以允許更新 Nero。
EN The Windows Firewall may warn you. Click "Unblock" to allow your Nero to be updated.
text_image
Windows Security Alert To help product's peer computer. Windows Outlook has installed some features of this program? Choose more for home blocking this program? System: MST starter Publisher: Focus32 Open Blocking Unlock Windows Outlook has installed the program from adapting connections on the Internet at a network. If you recognize the program or load the router, you can choose it "where would print a message?"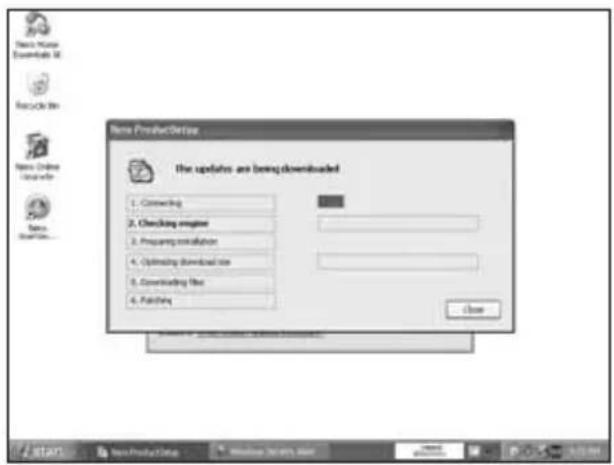
text_image
New ProductTransfer The updates are being downloaded 1. Connecting 2. Checking engine 3. Preparing installation 4. Optimizing download size 5. Downloading file 6. Fetching Closesc Nero 自行下载并更新。
RU Nero выполняет загрузку и актуализацию автоматически.
DK Nero downloades og opdateres af sig selv.
TC Nero 會自行下載和更新。
EN Nero downloads and updates itself.
如何制作视频光盘?
How to make a video disc?

Be responsible Respect copyrights
1
SC 启动 “Nero StartSmart Essentials”。
RU Запустите "Nero StartSmart Essentials".
DK Start "Nero StartSmart Essentials".
TC 啟動 “Nero StartSmart Essentials”。
EN Start "Nero StartSmart Essentials".

text_image
Menu Start Menu Options Menu Options Options Options Options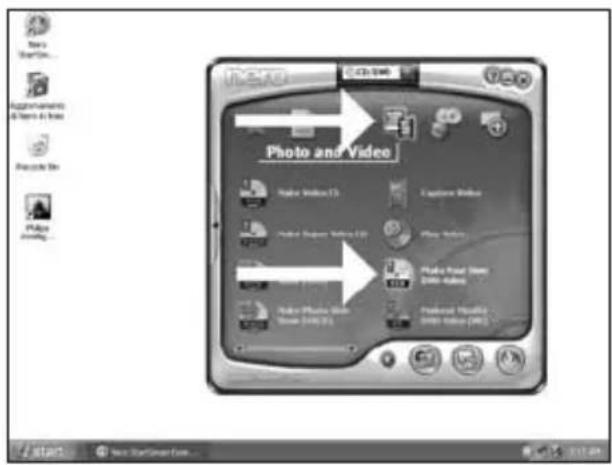
text_image
Photo and Video Photo Index 13 Capture Index Photo Express Index 12 Play Index Photo Power Index Data Index Photo Photo Index Data (000) 11 Preferences Modems (000) Index (000)EN Choose "Photo and Video" and "Make your own DVD-Video".
natural_image
Exterior view of a desktop computer tower connected to a cable, labeled 'Example' (no other text or symbols)EN If you want to capture video from a camera, connect it to your PC. Otherwise go to step 8.
text_image
Unfiltered Project [2015] Video | New Video Elements Content Create and manage files to you project. What would you like to do? Capture video Add Video Film Make Image Make Slide Image Import Info Cut Image Capture Video... The highest allows you to capture video from an external device like a connected that is connected to your computer. The video like you create it will be added to your project automatically. Total records used: 0.00 out of 10.00 0.00 1.00 2.00 3.00 4.00 5.00 More than Save Save Backtext_image
LimitfulProject [SMS Video] - Max Picture Essentials Capture Video Select a device and capture video to your hard disk. Capture Devices Use DV Device Options Use the template to capture select in Digital Video (DV) compatible format The application will be configured to capture devices, but you can change the device settings manual for DV type: DV Type 1 Type 1 is usually the online choice because it requires free disk setup and allow next throughput. Numbers option Type 2 is compatible with video for windows (TMS) If you are not used which type is used, select Type 1 Win by Switch Monitor Save Back6
sc 在捕获过程中,您将在此看到进度。
RU Во время записи здесь вы можете наблюдать за ходом процесса.
DK Under optagelsen kan du følge processen her.
TC 在擷取過程中,您會在此看到進度。
EN During capturing, you will see the progress here.
text_image
Unlimited Project [100 Video] - New Picture Essentials Capture Video Select a device and capture video to your hardlink. Capture device Select a capture template: Forma Type 7 is usually the better choice because it requires free disk space and allows much throughout. However, only Type 2 is compatible with video for window (74) If you are not sure which type 3 uses, select Type 3. Customization: Frames captured/missed Roll Make up Save7
sc 捕获所有视频片段后,单击 “Next(下一步)”。
RU После записи всего видеоряда щелкните мышью на "Next".
DK Klik på "Næste", när alle videosekvenser er optaget.
TC 當已擷取所有視訊序列後,按一下「Next (下一步)」。
EN Click "Next" when all video sequences are captured.

text_image
Unfiltered Project [1952 Videos] - New Window Installants Capture Video Select a device and capture video to put hard disk. Capture device http: 3760 Video Selected a capturing template DVR Format: Use file template to capture a Digital Video (DVR) compatible format. The application delay requires the capture device, but you can change the device settings manually to. DVR type: DVR Type 1 Type 2. It usually be the other choice because it requires two files, space and above have throughout. However only, line 2 is compatible with wireless windows (TM). If you are not used which type is use either Type 1. Captured file: mrttC Capture icon/ mrtC Capture 8000 mrtC Capture 8000 Save Next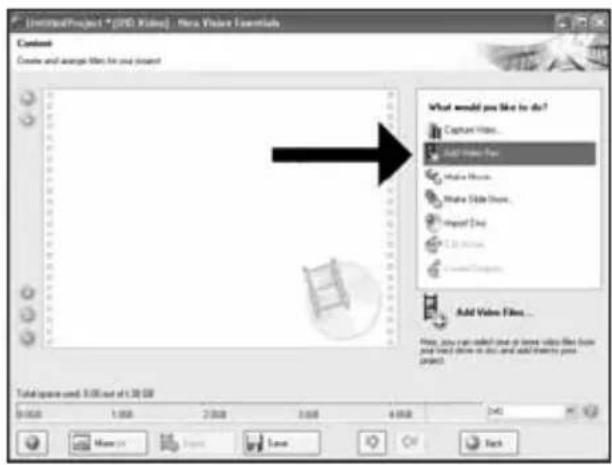
text_image
Screenshot of a software interface showing a context menu with options like 'Add Video Tree' and 'Add Video Files', alongside a progress bar and file list.SC 如要添加来自硬盘的文件,选择 “Add Video Files(添加视频文件)”。
RU Если вы хотите добавить файлы с жесткого диска, выберите "Add Video Files".
DK Vælg "Tilføj videofiler", hvis du ønsker at tilføje filer fra harddisken.
TC 如果您要從硬碟新增檔案,請選擇「AddVideo Files (新增視訊檔案)」。
EN If you want to add files from the hard disk, choose "Add Video Files".
text_image
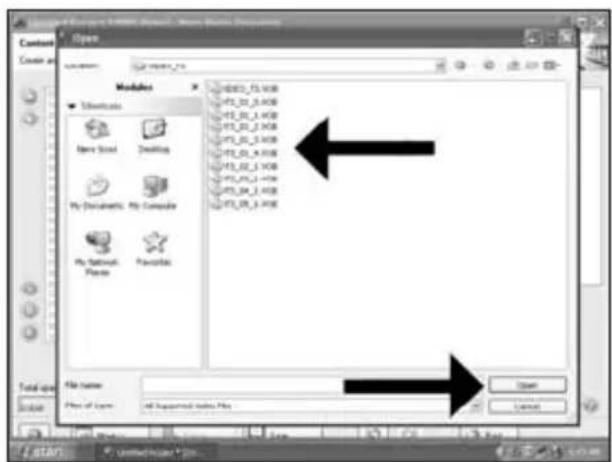
Open Create and Create and Modules ■ Downloads New Solid Desktops My Documents: My Computer My Network: Preferences File name Files of type: All Supramidal Files Files Open Cancelsc 选择文件并单击 “Open(打开)”。
RU Выберите нужные файлы и щелкните на "Open".
DK Vælg filerne og klik på "Åbn".
TC 選擇檔案然後按一下「Open (開啟)」。
EN Select the files and click "Open".
text_image
Unifine4Project [305 Video] - New Video Downloads Content Create and arrange files for your project 1. VTT_01 000 Video Title: 36.00x 10s Target video options: 220 V78 ECON 601 (1) - 4.1 2. VTT_01 000 Video Title: 36.00x 10s Target video options: 220 V78 ECON 601 (1) - 4.1 3. VTT_01 000 Video Title: 36.00x 20s Target video options: 220 V78 ECON 601 (1) - 4.1 What would you like to do? Capture Videos... Sound Videos Fines... Water Movies... Water Slide Moves... Import Disc... Edit Movies... Create Chapters... Use you add the highlighted video site... Unit space: 1.5M out of 4.0M 5.0M 1.0M 2.0M 3.0M 4.0M More... Export Save Back Savesc 可选择 “Edit Movie(编辑影片)” 编辑加载的影片。
RU
Вы можете редактировать загруженные фильмы, выбрав "Edit Movie".
DK Du kan redigere de indlæste film ved at vælge "Rediger film".
TC 您可選擇「Edit Movie (編輯影片)」來編輯載入的影片。
EN You can edit the loaded movies by choosing "Edit Movie".
11
sc 可在此处添加视频效果、文字效果和过渡。
RU Здесь вы можете добавить видеоэффекты, эффекты для текстов и переходы.
DK Her kan du tilføje videoeffekter, teksteffekter og overgange.
TC 您可在此處新增視訊效果、文字效果和轉場。
EN You can here add video effects, text effects and transitions.
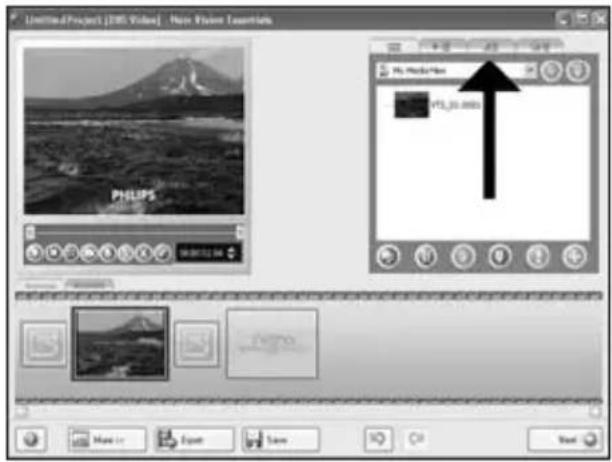
text_image
LimitedProject [1950] Video | More Vision Elements PHILIPS PS MediaView PS_30.0000 Monitor Export Save OK Cancel12
SC 您还可以通过滑动标记来剪切刻录的视频。完成后,选择“Next(下一步)”。
RU Вы можете также подготовить записанный видеоматериал для монтажа с помощью слайдов с маркерами. После завершения выберите "Next".
DK Du kan også beskære den optagede video ved at trække i markørerne. Vælg "Næste", når du er færdig.
TC 您也可以移動標記來修剪已錄製的視訊。完成後,選擇「Next (下一步)」。
EN You can also trim the recorded video by sliding the markers. When done, choose "Next".

text_image
LimitedProject [DRL Video] - New Vision L Keetech File Edit View Tools Help PTL Media Max PTL 20.3685 Name: Font: Save Next13
text_image
Untitled Project [1950 Videos] - New Vision Software Content Create and manage files by your project. 1. VTL_01 0003 Video Files - 18.02x7% Target video options: T20 x 576 (ECR-801 D1) - 41 2. VTL_01 0003 Video Files - 18.02x7% Target video options: T20 x 576 (ECR-801 D1) - 41 3. VTL_01 0003 Video Files - 18.02x7% Target video options: T20 x 576 (ECR-801 D1) - 41 What would you like to do? Capture Videos... Add Video Files... Make Movies... Make Slide Views... Report Docs... TAB Movies... Create Diagrams... Used source C38 out of A.35 GB 0:00 1:00 2:00 3:00 4:00 New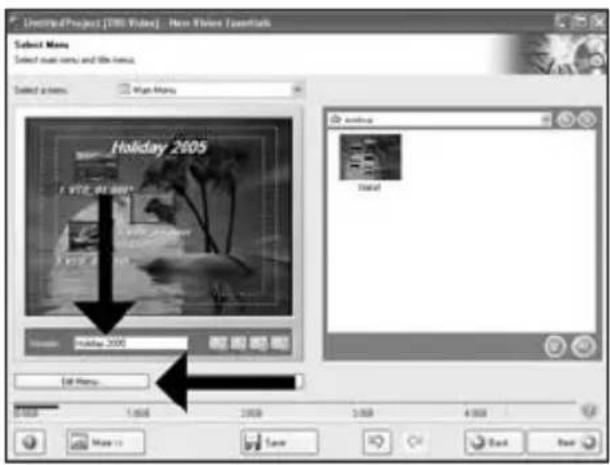
text_image
Untitled Project [VIII Video] - New Vision Transformers Select None Select more norms and file norms. Selected options: Image Maps Holiday 2005 I VTE. 68.0000 Preview: Holiday 2005 Edit Maps... Save Back NextSC 在 “Header(标题)” 字段输入标题,然后单击 “Edit menu(编辑菜单)”。
RU Введите в поле "Header" заголовок и щелкните мышью на "Edit menu".
DK Indtast titlen i feltet "Overskrift" og klik på "Rediger menu".
TC 在「Header (標頭)」欄位中輸入標題,然後按一下「Edit menu (編輯選單)」。
EN Enter the title in the "Header" field and click "Edit menu".

text_image
Unitee-Project [2005] Video - New Window SaveInfo Edit Menu Customize new settings Holiday 2005 What would you like to change? Layered Background Button Text Preventor: Focal Text Shelter Autoencoder Interometric Colors Save SaveSC 您可以在此更改布局、背景,添加标题等等。完成后,选择两次“Next(下一步)”。
RU
Вы можете изменять шаблон, фон,
добавлять заголовки,... здесь. После завершения
выберите два раза "Next".
DK Du kan ændre layout og baggrund og tilføje titler...her. Vælg "Næste" to gange, når du er færdig.
TC 您可以在此改變版面、背景、新增標題...。完成後,選擇「Next (下一步)」兩次。
EN You can change the layout, the background, add titles,... here. When done, choose "Next" twice.

text_image
Untitled Project [1987] Video | New Video Installers Preview Browse the results of your project features (using it Holiday 2005sc 预览影片。单击 “Next(下一步)” 继续。
RU Просмотрите ваш фильм. Для продолжения щелкните на "Next".
DK Kontrollér din film. Klik på "Næste" for at fortsætte.
TC 預覽您的影片。按一下「Next (下一步)」以繼續。
EN Preview your movie. Click "Next" to continue.
17
SC 选择 “Burn to(刻录到)”,选择刻录机然后再选择 “Burn(刻录)”。
RU Выберите "Burn to", ваше устройство записи, а затем "Burn".
DK Vælg "Brænd til", vælg optager og vælg "Brænd".
TC 選擇「Burn to (燒錄至)」,選擇您的燒錄器並選擇「Burn (燒錄)」。
EN Choose "Burn to", choose your recorder and choose "Burn".

text_image
UntitledProject [100 Video] - New Picture Essentials Bam Options Set the parameters for learning. Project settings Current video options: Append after Automatic Main route: TTL Quality software View project contains 3 filters and 1 name: Send to: Bam to: Write by Fixed Copy Folder Volume Name Recording Settings Bam To: Selected for decoder you want to use Save optimization Bam to device: PHILIPS ODBCMAP Used this space: 9.28 GB Save18
sc NeroVision Express 将转换代码并刻录到您的光盘。
RU NeroVision Express выполняет перекодировку и прожигает ваш диск.
DK NeroVision Express kodeomsætter og brænder din disc.
TC NeroVision Express 正進行光碟的轉碼和燒錄。
EN NeroVision Express is transcoding and burning your disc.

text_image
UntitledProject | DVD Video | News Features Essentials Analysis Preparing data recording Running video data sets for disc. Completing recording series: PHILIPS Recording project: Construction: To be editing and editing V1.5_07_0037 Cancel progress: Preview: 0h 10m 20s Expand: 0h 30m 60s Total progress: Preview: 0h 10m 20s Expand: 0h 30m 50s Preview: Start down computer when installed Welcome to Web Map... Save Add19
SC 祝贺您,您的光盘已成功写入。现在可以退出应用程序了。
RU Поздравляем, ваш диск был успешно записан. Теперь вы можете выйти из программы.
DK Tillykke – din disc er blevet brændt. Du kan nu afslutte programmet.
TC 恭喜,您的光碟已成功寫入。您現在可以離開應用程式。
EN Congratulations, your disc has been written successfully. You may exit the application now.

text_image
Untitled Project [RMS Video] - New Vision Masterarch Options Preparing data for recording Running video data into the disc Completing recording services Next-Process Complete What you like to save the log file! Next-Process Completed is required to. Find you like to save the log file! Next-Process Complete Find you like to save the log file! Next-Process Completed is required to. Find you like to save the log file!
如何制作数据或音频光盘
How to make a data or audio disc?

Be responsible Respect copyrights
1
text_image
Welcome to Nero! First, now your category Thank back at least And close to get startedtext_image
New StartUp... New Online Upgrade... Recorded Web P50 www.p50.com Data Public Data 123 Public Data 124 Copy 125 Copy 126sc 对于数据光盘,选择“Make Data CD(制作数据光盘)”或“Make Data DVD(制作数据DVD)”。
RU Для данных выберите "Make Data CD" или "Make Data DVD".
DK Vælg for data "Lav data-cd" eller "Lav data-dvd".
TC 若要製作資料光碟,請選擇「Make Data CD (製作資料 CD)」或「Make Data DVD (製作資料 DVD)」。
EN For data, choose "Make Data CD" or "Make Data DVD".

text_image
Audio Audio Audio CS Any Audio Audio - MP3.00 Audio - MP3.00 Audio - MP3.00 Audio - MP3.00 Audio - MP3.00 Audio - MP3.00 Audio - MP3.00 Audio - MP3.00 Audio - MP3.00 Audio - MP3.00 Audio - MP3.00 Audio - MP3.00 Audio - MP3.00 Audio - LP Audio - LP Audio - LP Audio - LP Audio - LP Audio - LP Audio - LP Audio - LP Audio - LP Audio - LP Audio - LP Audio - LP Audio - LP Audio - LP Audio - LP Audio - LP Audio - LP Audio - LP Audio - LP Audio - LP Audio - LP Audio - LP Audio - LP Audio - LP Audio - LP Audio - NP Audio - NP Audio - NP Audio - NP Audio - NP Audio - NP Audio - NP Audio - NP Audio - NP Audio - NP Audio - NP Audio - NP Audio - NP Audio - NP Audio - NP Audio - NP Audio - NP Audio - NP Audio - NP Audio - NP Audio - NP Audio - NP Audio - NP Audio - NP Audio - NP Audio - LP Audio - LP Audio - LP Audio - LP Audio - LP Audio - LP Audio - LP Audio - LP Audio - LP Audio - LP Audio - LP Audio - LP Audio - LP Audio - LP Audio - LP Audio - LP Audio - LP Audio - LP Audio - LP Audio - LP Audio - LP Audio - LP Audio - LP Audio - LP Audio - L12567888888888888888888888888888888888888888888888888888888888888888888888888888888888888888text_image
New Express Essentials Disc Coded Add to other key... File Edit Name Size Type History Ctrl Add Save Total size used: 21KB Edit Get Help6
SC 选择要刻录的文件,然后单击“Add(添加)”。
完成后单击“Close(关闭)”。
RU Выберите все нужные файлы для прожигания и щелкните на "Add".
После окончания щелкните на "Close".
DK Vælg alle de filer, der skal brændes, og klik på "Tilføj". Klik på "Luk", när du er færdig.
TC 選擇所有要燒錄檔案,然後按一下「Add (新增)」。
完成後,按一下「Close (關閉)」。
EN Select all the files to burn and click "Add". Click "Close" when finished.
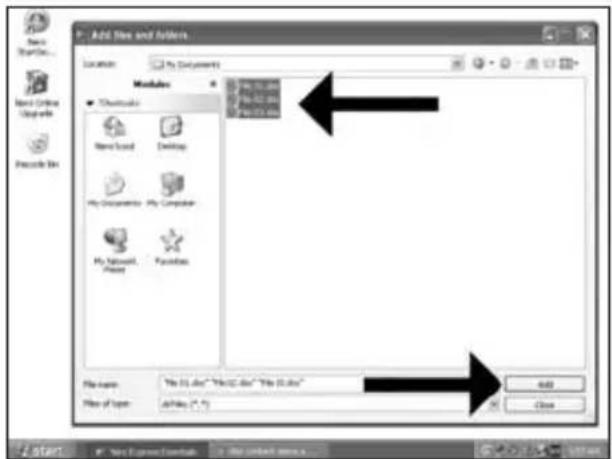
text_image
Add Size and Action Location: My Documents Modules ● Channels New Book Desktop My Documents - My Computer My Desktop - Facebook File name: "My 12.doc" "My 12.doc" "My 12.doc" File type: Active (*.f) Add Close Start Next Options... My Start Window... Save As... Help Add7
text_image
Home Express Temetalls One Command Add Existing your files... My Date Name See Type Modified Orange File 01.doc 32.124 KB Word... 12961K... C:\Documents and Settings... File 02.doc 32.224 KB Word... 12961K... C:\Documents and Settings... File 03.doc 32.784 KB Word... 12961K... C:\Documents and Settings... Total page unit: 154 KB Win Win Win Win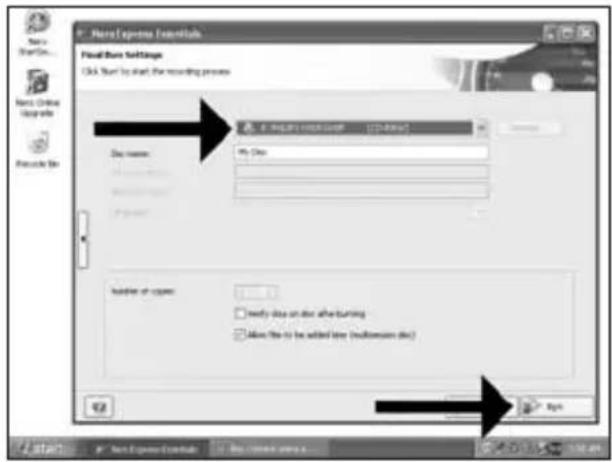
text_image
New Express Framework Fixed Start Settings Click Start to start the recording process File name: My Date Number of copies: □ ready data on later after Turning □ allow file to be added later (default version desc) OK RunSC 选择刻录机,然后单击“Burn(刻录)”。
RU Выберите ваше устройство записи и щелкните на "Вит".
DK Vælg optager og klik på "Brænd".
TC 選擇您的燒錄器並按「Burn (燒錄)」。
EN Choose your recorder and click "Burn".
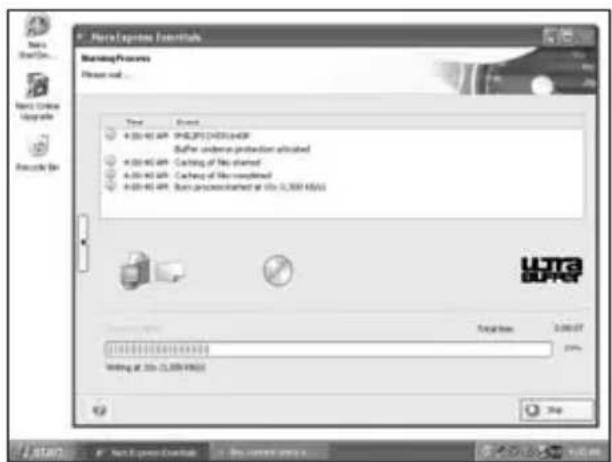
text_image
New Express StartHub Starting Process Press out... Time Event 4:00-01 AP 2000/01/2001 Buffer ordera protection activated 4:00-01 AP Cache of No started 4:00-01 AP Cache of No completed 4:00-01 AP Bus uncompleted at 50s (3,300 MHz) UTC B2AC Start Time Start duration 2:00:07 20% Writing at 50s (3,300 MHz) Stopsc Nero 开始刻录光盘。
RU Nero прожигает ваш диск.
DK Herefter brænder Nero din disc.
TC Nero 會開始燒錄您的光碟。
EN Nero is burning your disc.

text_image
New Express Essentials Options Show Event 4:00-41:49 HAC2013/05/20 Buffer period on position activated 4:00-41:49 Cushing of the started 4:00-41:49 Cushing of the completed 4:00-41:49 Barri 4:00-41:49 Barri New Express Essentials Barri process completed successfully at 25% (1,800 KB) OK UHUA BUFFER StartSC 祝贺您,您的光盘已成功写入。现在可以退出应用程序了。
RU Поздравляем, ваш диск был успешно записан. Теперь вы можете выйти из программы.
DK Tillykke – din disc er blevet brændt. Du kan nu afslutte programmet.
TC 恭喜,您的光碟已成功寫入。您現在可以離開應用程式。
EN Congratulations, your disc has been written successfully. You may exit the application now.

如何复制光盘?
Be responsible Respect copyrights
text_image
Options Search Sales Online Upgrade Recycle Bin UF500 CD (198) Favorites Make Date 12 Make Date 13 Make Date 14 Make Date 15 Make Date 16 Make Date 17 Make Date 18 Make Date 19 Make Date 20 Make Date 21 Make Date 22 Make Date 23 Make Date 24 Make Date 25 Make Date 26 Make Date 27 Make Date 28 Make Date 29 Make Date 30 Make Date 31 Make Date 32 Make Date 33 Make Date 34 Make Date 35 Make Date 36 Make Date 37 Make Date 38 Make Date 39 Make Date 40 Make Date 41 Make Date 42 Make Date 43 Make Date 44 Make Date 45 Make Date 46 Make Date 47 Make Date 48 Make Date 49 Make Date 50 Make Date 51 Make Date 52 Make Date 53 Make Date 54 Make Date 55 Make Date 56 Make Date 57 Make Date 58 Make Date 59 Make Date 60 Make Date 61 Make Date 62 Make Date 63 Make Date 64 Make Date 65 Make Date 66 Make Date 67 Make Date 68 Make Date 69 Make Date 70 Make Date 71 Make Date 72 Make Date 73 Make Date 74 Make Date 75 Make Date 76 Make Date 77 Make Date 78 Make Date 79 Make Date 80 Make Date 81 Make Date 82 Make Date 83 Make Date 84 Make Date 85 Make Date 86 Make Date 87 Make Date 88 Make Date 89 Make Date 90 Make Date 91 Make Date 92 Make Date 93 Make Date 94 Make Date 95 Make Date 96 Make Date 97 Make Date 98 Make Date 99 Make Date 100EN Choose "Favorites" and "Copy CD" or "Copy DVD".
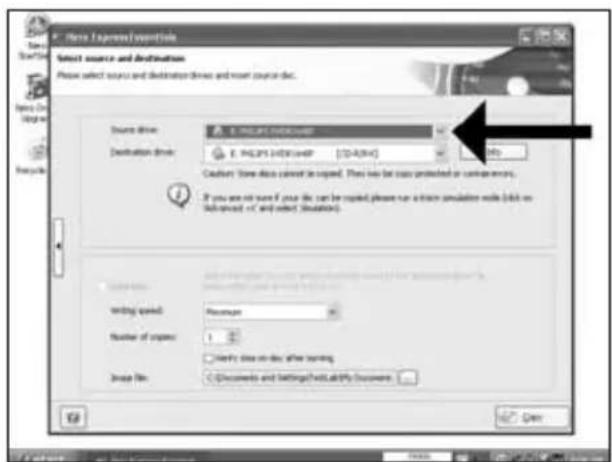
text_image
Store Express/destination Select source and destination Please select source and destination drives and root source disk. Source drive: Destination drive: E.PILIPS ENTERMODE E.PILIPS ENTERSHOP [DATA] Custom: Store data cannot be copied. Then you can copy protected or contain errors. If you are not sure if your die can be copied, please run a form simulation code (edit on file format or select situation). Writing speed: Number of copies: 1 No data is done after writing. Image file: Documents and Settings will add/Modify Document Edit Opensc 选择源驱动器。
EN Select the source drive.
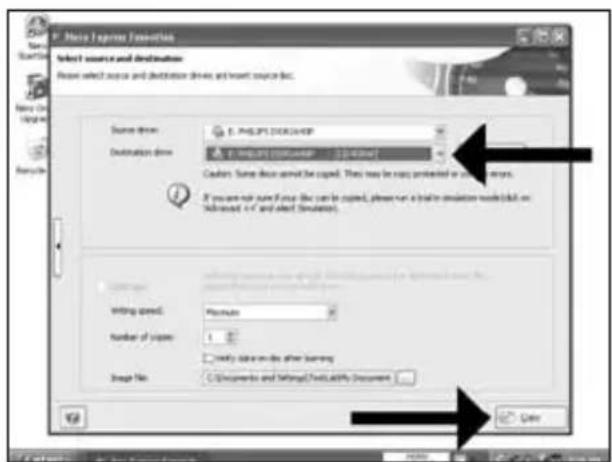
text_image
F:\Movie Express Function Select source and destination Please select source and destination drive, and insert source disk. Source drive: E.PHILIPS DISCUA45P Destination drive: E.PHILIPS DISCUA45P - 1.0 (2.0) Custom: Same device must be copied. They may be now protected or used in any way. If you need to run Froup like can be copied, please run a train simulation model built on Advanced + C and effect Simulation. Writing speed: Maximize Number of papers: 1 Notify data on the other learning Image No: C:\Documents and Settings\Text\Lab\My Documents CancelEN Select the destination drive and click "Copy".
5
sc Nero 将开始复制光盘。
RU Nero будет затем копировать ваш диск.
DK Nero kopierer herefter din disc.
TC Nero 將會開始複製您的光碟。
EN Nero will now copy your disc.
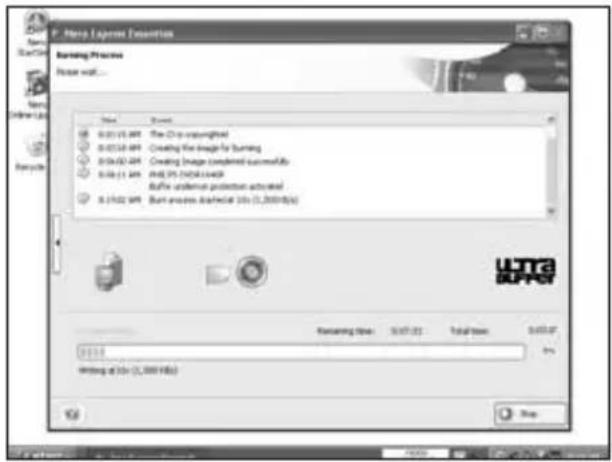
text_image
P. New Express Definition Burning Process Please wait... Size View 0.0215.497 0.0215.497 0.04-0.02.497 0.06-0.1.497 AVR: 35 (AVR) 1.0x8 Buffer undefined protection advanced 0.15/0.2.497 Bunt process schematic job (1,000 jobs) UFTR UPPER Texting time 10:07:02 Total time 0:00:02 5% Writing at job (1,000 jobs) Stop6
sc 祝贺您,您的光盘已成功写入。现在可以退出应用程序了。
RU Поздравляем, ваш диск был успешно записан. Теперь вы можете выйти из программы.
DK Tillykke – din disc er blevet brændt. Du kan nu afslutte programmet.
TC 恭喜,您的光碟已成功寫入。您現在可以離開應用程式。
EN Congratulations, your disc has been written successfully. You may exit the application now.

text_image
Burning Process Reset wall... Start StartUp StartUp Next Next 0:01:03:00 PM 0:04:00:00 PM 0:06:11:00 PM 0:14:02:00 PM 0:27:19:00 PM Burning Process Burning Process completed successfully at 15x (1,000 KB) OK Burning Process Burning Process completed successfully at 15x (1,000 KB)需要更多信息或帮助
访问 www.philips.com/storageupdates
sc
故障排除
Be responsible Respect copyrights
O: Indicates that this toxic or hazardous substance contained in all of the homogeneous materials for this part is below the limit requirement in SJ/T11363 - 2006.
X: Indicates that this toxic or hazardous substance contained in at least one of the homogeneous materials used for this part is above the limit requirement in SJ/T11363 - 2006.

环使用期限 Environmental Protection Use Period
This logo refers to the period (10 years)
This logo refers to the period (10 years) during which the toxic or hazardous substances or elements contained in electronic information products will not leak or mutate so that the use of these substances or elements will not result in any severe environmental pollution, any bodily injury or damage to any assets.
text_image
Be responsible Respect copyrightstext_image
Be responsible Respect copyrightsBe responsible Respect copyrights
More info or help needed
Visit www.philips.com/storageupdates

Troubleshooting
Philips optical disc drives are manufactured with utmost care. In case of problems, it often appears that the drive itself is not defective. You can simply solve most of these problems by using the support tools offered by Philips.
When you're experiencing problems:
1 Please check the information in the "How to..." manual.
2 Check the Philips support websites www.philips.com/storageupdates and www.philips.com/support for interactive support, troubleshooting, and the newest software updates.
3 Should you encounter any more difficulties during installation or use, please contact Philips Customer Care via the e-mail address or telephone numbers that can be found at www.philips.com/contact.
Prior to claiming a drive for warranty, you must request a return reference number at www.philips.com/support or contact Philips Customer Care.
▶ Additional warranty information is available in the "Philips Warranty" folder on the Nero software disc.

"The making of unauthorised copies of copy-protected material, including computer programmes, files, broadcasts and sound recordings, may be an infringement of copyrights and constitute a criminal offence. This equipment should not be used for such purposes."
WEEE mark: Disposal of your old product
Your product is designed and manufactured with high quality materials and components, which can be recycled and reused. Please inform yourself about the local separate collection system for electrical and electronic products, including those marked by following symbol.
Please act according to your local rules and do not dispose of your old products with your normal household waste.
WARNING
Plastic bags can be dangerous.
To avoid danger of suffocation, keep this bag away from babies and small children.
FCC Compliance
FCC 15.105 rule:
This equipment has been tested and found to comply with the limits for a Class B digital device, pursuant to Part 15 of the FCC Rules. These limits are designed to provide reasonable protection against harmful interference in a residential installation. This equipment generates, uses and can radiate radio frequency energy and, if not installed and used in accordance with the instructions, may cause harmful interference to radio communications. However, there is no guarantee that interference will not occur in a particular installation. If this equipment does cause harmful interference to radio or television reception, which can be determined by turning the equipment off and on, the user is encouraged to try to correct the interference by one or more of the following measures:
- Reorient or relocate the receiving antenna.
- Increase the separation between the equipment and receiver.
- Connect the equipment into an outlet on a circuit different from that to which the receiver is connected.
- Consult the dealer or an experienced radio/TV technician for help.
Warning: Changes or modifications made to this equipment not expressly approved by Philips may void the FCC authorization to operate this equipment.
FCC 15.19 rule:
This device complies with Part 15 of the FCC Rules and with RSS-210 of Industry Canada. Operation is subject to the following two conditions:
(1) this device my not cause harmful interference, and
(2) this device must accept any interference received, including interference that may cause undesired operation.

text_image
CEElectric-, Magnetic- and Electromagnetic Fields ("EMF")
- Philips Royal Electronics manufactures and sells many products targeted at consumers, which, like any electronic apparatus, in general have the ability to emit and receive electro magnetic signals.
- One of Philips' leading Business Principles is to take all necessary health and safety measures for our products, to comply with all applicable legal requirements and to stay well within the EMF standards applicable at the time of producing the products.
- Philips is committed to develop, produce and market products that cause no adverse health effects.
- Philips confirms that if its products are handled properly for their intended use, they are safe to use according to scientific evidence available today.
- Philips plays an active role in the development of international EMF and safety standards, enabling Philips to anticipate further developments in standardization for early integration in its products.
Safety Precautions
USA/Canada: This player is for use only with IBM compatible UL listed Personal Computers or Macintosh UL listed workstations, weighing less than 18 kg.
LASER SAFETY
This unit employs a laser. Do not remove the cover or attempt to service this device when connected due to the possibility of eye damage.
LASER-SICHERHEIT
USE OF CONTROLS OR ADJUSTMENTS OR PERFORMANCE OF PROCEDURES OTHER THAN THOSE SPECIFIED HEREIN MAY RESULT IN HAZARDOUS LASER RADIATION EXPOSURE.
WARNUNG
text_image
CLASS 1 LASER PRODUCT
text_image
LUOKAN I LASERLAITE
text_image
KLASSE 1 LASER-PRODUKTCAUTION INVISIBLE LASER RADIATION. WHEN OPEN AVOID EXPOSURE TO BEAM VARO! AVATTAESSA OLET ALTTIINA NÄKYVÄLLE JA NÄKYMÄTTÖMÄLLE LASER SÄTEILYLLE. ÄLÄ KATSO SÄTEESEEN WARNING OSYNLIG LASERSTRÅLNING NÄR DENNA DEL ÄR ÖPPNAD BETRAKTA EJ STRÅLEN ADVERSEL USYNLIG LASERSTRÅLING NÄR DEKSEL ÅPNES UNNGÅ EKSPONERING FOR STRÅLEN DANGER INVISIBLE LASER RADIATION. WHEN OPEN AVOID DIRECT EXPOSURE TO BEAM VORSICHT UNSICHTBARE LASERSTRAHLUNG WENN ABDECKUNG GEÖFFNET NICHT DEM STRAHL AUSSETZEN
LASER
Type Semiconductor laser GaAlAs
Wave length 775-795 nm (CD) - 660 nm (DVD)
Output power (measured above the objective lens)
Read: 1,4 mW - 2,5 mW
Write: 90 mW (CD) - 27 mW (DVD)
Beam divergence 60 degree
Additional information available on our website: www.philips.com/storageupdates www.philips.com/storage
Specifications subject to change without notice. All dimensions shown are approximate. © 2007 Koninklijke Philips Electronics N.V.
All rights reserved.
Reproduction, copying, usage, modifying, hiring, renting, public performance, transmission and/or broadcasting in whole or part is prohibited without the written consent of Philips Electronics N.V.