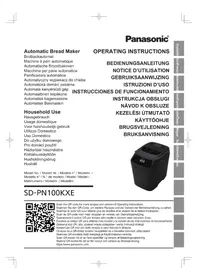
SDYR2500 - Bread maker PANASONIC - Free user manual and instructions
Find the device manual for free SDYR2500 PANASONIC in PDF.
| Product type | Automatic bread maker |
| Brand | Panasonic |
| Model | SD-YR2500 |
| Power | 120 V, 60 Hz, 550 W |
| Dimensions (H x W x D) | Approx. 37.0 x 28.2 x 32.5 cm |
| Weight | Approx. 6.9 kg |
| Max flour capacity (all-purpose) | 620 g |
| Capacity of dried fruit dispenser | 150 g max |
| Timer | Digital, up to 13 hours |
| Number of programs | 16 (basic bread, rapid, French, gluten-free, dough, cakes, etc.) |
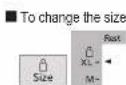
| Options | Size selection (M/XL), crust color (light/medium/dark), delayed start |
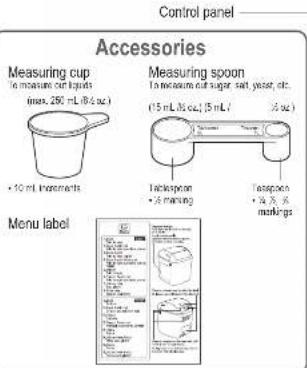
| Included accessories | Measuring cup, measuring spoon, menu label |
| Main functions | Kneading, rising, baking, automatic ingredient dispenser (yeast and dried fruit) |
| Safety | Automatic shut-off after 10 min power failure, motor protection, hot surfaces, child safety instructions |
| Care and cleaning | Bread pan and kneading blade washable by hand (not dishwasher safe), wipe with soft sponge. Yeast dispenser: wipe with a damp cloth. |
| Spare parts and repairability | Bread pan, kneading blade, yeast dispenser. Contact Panasonic after-sales service for repairs. |
| General information | One-year limited warranty. Household use only. Manual available as PDF. |
Frequently Asked Questions - SDYR2500 PANASONIC
User questions about SDYR2500 PANASONIC
0 question about this device. Answer the ones you know or ask your own.
Ask a new question about this device
Download the instructions for your Bread maker in PDF format for free! Find your manual SDYR2500 - PANASONIC and take your electronic device back in hand. On this page are published all the documents necessary for the use of your device. SDYR2500 by PANASONIC.
USER MANUAL SDYR2500 PANASONIC
Thank you for purchasing this Ponsesic product.
Please state those instructions carefully before using this product and save this managel for future use.
This product is intended for household use only.
Nous yous rernions daacr chisi pmdui Panasric
- You'll be given more information about utilising our products on asenior basis than the other companies.
- Creditei deing a. a. paticuies unquentment.
Panasonic Canada Inc.
5770 Ambler Drive
Mississauga, Ontario, L4W 2T3
www.panasonic.ca
Panasonic Corporation of North America
Two Riverfront Plaza, Newark, NJ 07102-5490
PanaasopMnaphcng (Xian) Co.12015
02504194
MX61570
P
IMPORTANT SAFEGUARDS
When using electrical appliances, basic safety precautions should always be followed including the following:
- READ ALL INSTRUCTIONS BEFORE USE
- Follow all warnings and instructions marked on the product
-
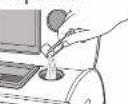
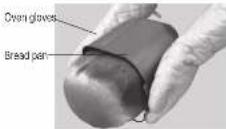
Do not touch hot surfaces. Use oven gloves when handling hot materials, and allow metal parts to cool before cleaning or taking off parts.
-
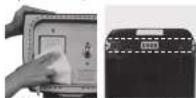
To protect against electrical shock do not immerse unit, cord or plug in water or other liquid. Use a soft sponge and mild detergent when cleaning the inside of the bread pan or kneading blade. The cabinet may be cleaned with a don, dampened with a mild soap and water solution.
- Close supervision is necessary when any appliance is used by or near children.
- Unplug this product from outlet when not in use, before putting on or taking off parts, and before cleaning.
- Do not operate any appliance with a damaged cord or plug or after the appliance malfunctions or is dropped or has been damaged in any
manner. Rurn appliion to an authorized Parasoric service center for examination, repair, or electrical or mechanical adjustment - The use of attachments not recommended or sold by the manufacturer may cause fire, electric shock, damage or injuries.
- Do not use outdoors.
- Do not let cord hang over edge of table or counter, or touch hot surfaces.
- Do not place on or near a hot gas or electric burner, or in a heated oven.
- Extreme caution must be used when moving an appliance containing hot contents or liquids.
- To disconnect, turn any control to "off", then grip plug and pull from wall outlet.
Never pull on card. - Do not touch moving parts.
- Do not use appliance for other than intended use.
- The unit may vibrate or move during the kneading process. Do NOT place the unit near the edge of a countertop. Place the unit on a flat, stable surface where movement of the unit will not cause it to fall off the countertop. (See P. EN5)
- Do not allow anything to rest on power cord. Do not plug in cord where persons may walk on or trip over it.
- This appliance is not intended for commercial use. It is for household use only.
SAVE THESE INSTRUCTIONS
Warning:
A. A short power-supply cord is provided to reduce the risk resulting from becoming entangled in or tripping over a longer cord.
B. Extension cords are available and may be used if care is exercised in their use.
C. If extension ord is used:
(1) the marked electrical rating of the extension cord should be at least as great as the electrical rating of the appliance,
and
(2) the longer cord should be arranged so that it will not drape over the countertop or tabletop where it can be pulled on by children or tripped over unintentionally.
D. This appliance has a polarized plug (one blade is wider than the other). As a safety feature, this plug will fit in a polarized outlet only one
way. If the plug does not fit fully in the outlet, reverse the plug. If it still does not fit contact a qualified electrician.
Do not attempt to defeat this safety feature.
PRECAUTIONS IMPORTANTES
Important Safeguards E2
List of Bread Types and Baking Options EN
- Accessories/Parts Identification EN8
How to Use
Bread-making Ingredients EN10
Baking bread EN12
- When adding extra ingredients -E15
Making Pasta EN16
Baking Cake EN17
Baking Gluten Free Bread Making Gluten Free Dough EN24
Recipes
Bread Recipes EN18
Dough Recipes EN20
Cate Recipes EN23
Gutten Free Breed EN25
- Gluten Free Pizza EN26
Guten Free Pasta EN28


How to Clean
Care & cleaning EN27
To Protect the Non-stick Finish
To protect the non-stick finish EN28
Troubleshooting
Troubleshooting EN28
Contact Information
- Contact Information EN31
Specifications
- Specifications EN31
Warranty
Limited Warranty (ONLY FOR U.S.A.) FR30
LIMITED WARRANTY
Safety Precautions
Please make sure to follow these instructions.
In order to prevent accidents or injuries to the user, other people, and damage to property, please follow the instructions below.
The following chart indicates the degree of damage caused by improper operation.
WARNING: Indicates serious injury or death. CAUTION: Indicates risk of injury properly damage.
The symbols are classified and explained as follows.
This symbol indicates prohibition. This symbol indicates requirement that must be followed.
WARNING
To prevent electric shock, fire or serious injury:
Do not damage the power cord or power plug.
- Do not use the appliance if the power cord or power plug is damaged or the power plug is loosely connected to the power outlet.
If the power cord or power plug is damaged, it must be replaced. Please see 'Contact Information' P. EN31.
- Do not plug or unplug the power cord with wet hands.
- Do not immerse the appliance in water or splash it with water.
- Do not disassemble, repair or modify this appliance.
For the repair, please see 'Contact Information' P. EN31 - Do not touch, block or cover the steam vent holes during use.
This appliance is not intended for use by persons (including children) with reduced physical, sensory or mental capabilities, or lack of experience and knowledge, unless they have been given supervision or instruction concerning use of the appliance by a person responsible for their safety. Children should be supervised to ensure that they do not play with the appliance.
- Fully insert the power plug.
- Clean the power plug regularly.
This product is intended for use only on a 120 V, 60 Hz supply. - Discontinue use the appliance immediately in the unlikely event that this appliance stops working properly.
Examples: for abnormal or breaking down
The power plug and/or the power cord become abnormally hot.
The power cord is damaged or power failure.
The main body is deformed or is abnormally hot.
The appliance makes abnormal turning noise during use.
Unplug the appliance immediately and contact our Customer Care Center. Please see 'Contact Information' P. EN31.
Safety Precautions Please make sure to follow these instructions.
CAUTION
To prevent electric shock, smoke, fire, injury or property damage:

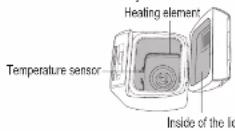
- Do not touch hot area such as bread pan, main body, heating element or inside of lid while the appliance is in use or soon after use.
To avoid burns, always use oven gloves when removing the bread pan or the finished bread. (Do not use wet oven gloves) Also take care when removing the kneading blade. Be careful when removing the kneading blade if hot.
-
Do not use the appliance on following places.
-
Do not use the appliance outdoors, in the immediate vicinity of heat sources or in rooms of high humidity.
- Position the breadmaker on a firm, dry, clean, flat heatproof worktop at least 10 cm (4 inches) from the edge of the worktop.
- Do not place on unstable surfaces on electrical appliances such as a refrigerator, on materials such as tableclothes or on carpet, etc.
-
During baking the unit heats up. The breadmaker should be placed at least 5cm (2 inches) from adjacent walls and other objects.
-
Do not allow the power cord to hang over the edge of the worktop or touch a hot surface.
- Do not remove the bread pan or unplug the breadmaker during its operation. (If the program is stopped midway, operation will discontinue unless the breadmaker is restarted or the power is restored within 10 minutes.)

- Allow the appliance to cool down before cleaning it.
- Be sure to grasp the power plug when unplugging the unit.
- Unplug the power plug when the appliance is not in use.
Always keep the inside of the unit and the bread pan clean to ensure proper performance. (To ensure programs work successfully) - This product is only intended to be used to make bread, dough and cakes as detailed in these instructions.
- It is not intended to be operated by means of an external timer or separate remote control system.
Important Information
CAUTION
Do not place dislodhs etc. on the appliance. It may cause a malfunction or it may deform.

- Do not use excessive force on the parts below: It may cause a malfunction or it may deform.
EN6 EN7
List of Bread Types and Baking Options
Function Availability and Time Required
Time required for each process will differ according to room temperature.
| Options Processes | |||||||||
| Menu | Size Crust | Timer | Rest Khead Rise Bake | Total | |||||
| Bake | 1 | Basic | ●●● | 30 min-60 min | 15 min-30 min | 1 hr 55 min-2 hr 10 min | 50 min 4 hours | ||
| 2 | Basic Raisin nut | ●●● | 30 min-60 min | 15 min-30 min | 1 hr 55 min-2 hr 10 min | 50 min 4 hours | |||
| 3 | Basic Rapid | ●● | — | — | 20 min-25 min | 55 min-60 min | 35 min 1 hr 55 min | ||
| 4 | Basic Rapid Raisin nut | ●● | — | — | 20 min-25 min | 55 min-60 min | 35 min 1 hr 55 min | ||
| 5 | French | — | ●● | 40 min-1 hr 65 min | 15 min-25 min | 2 hr 55 min-4 hr | 55 min 8 hours | ||
| 6 | French Raisin nut | — | ●● | 40 min-1 hr 55 min | 15 min-25 min | 2 hr 55 min-4 hr | 55 min 8 hours | ||
| 7 | Gluten Free | — | — | — | 20 min-25 min*1 | 45 min-50 min | 50 min 2 hours | ||
| 8 | Bake only | — | — | — | — | — | 30 min-1 hr 30 min | 30 min-1 hr 30 min | |
| Dough | 9 | Basic | — | — | 30 min-50 min | 15 min-30 min | 1 hr 15 min-1 hr 20 min | — | 2 hr 20 min |
| 10 | Basic Raisin nut | — | — | 30 min-50 min | 15 min-30 min | 1 hr 15 min-1 hr 20 min | — | 2 hr 20 min | |
| 11 | French | — | — | 40 min-1 hr 35 min | 15 min-25 min | 1 hr 45 min-2 hr 30 min | — | 3 hr 35 min | |
| 12 | French Raisin nut | — | — | 40 min-1 hr 35 min | 15 min-25 min | 1 hr 45 min-2 hr 30 min | — | 3 hr 35 min | |
| 13 | Pizza | — | — | — | 20 min-25 min | 20 min-25 min | — | 45 min | |
| 14 | Gluten-Free Pizza | — | — | — | 20 min-30 min*1 | 15 min-25 min | — | 45 min | |
| 15 | Pasta | — | — | — | 20 min | — | — | 20 min | |
| 16 | Gluten-Free Pasta | — | — | — | 20 min*1 | — | — | 20 min | |
1 There is a period of scrape off the flour, press Start after 2 minutes.
The breadmaker wil operates for a short time during the rise period (to ensure optimal gluten development).
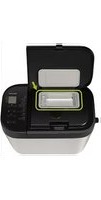
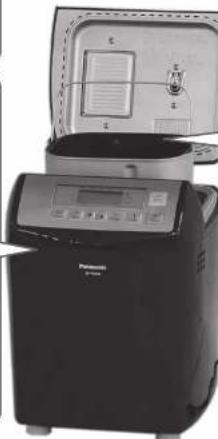
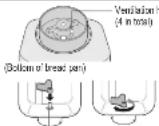
Accessories/Parts Identification
Main Unit
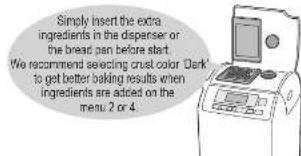
Place the extra ingredients in the raisin/nut dispenser if you wish to add them in.
The ralsin'nut dispenser will open automatically for all programs.
Turn to P. EN15 for ingredients which may be placed in the raisin/hut dispenser.

Raisin/nut dispenser

Dispenser lid
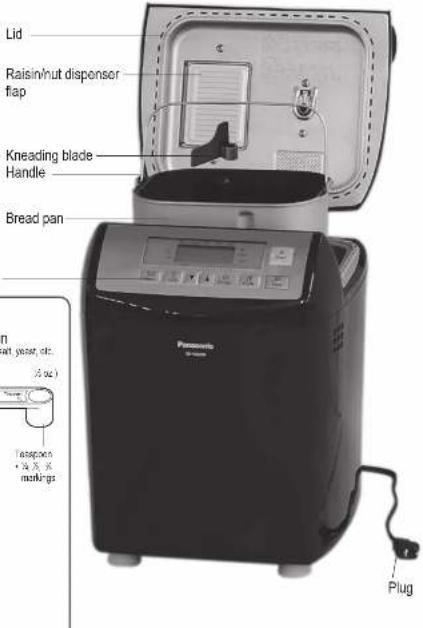
Yeast dispenser
EN8 EN9
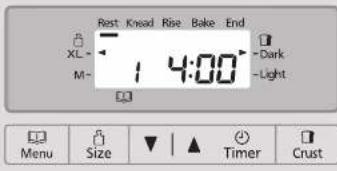
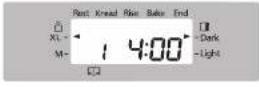
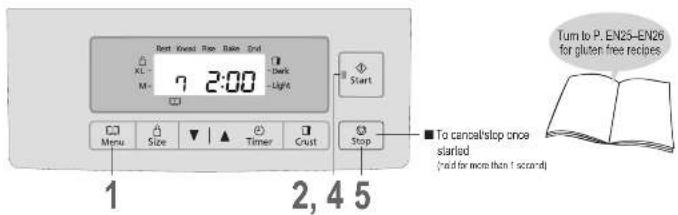
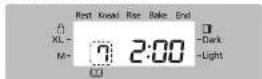
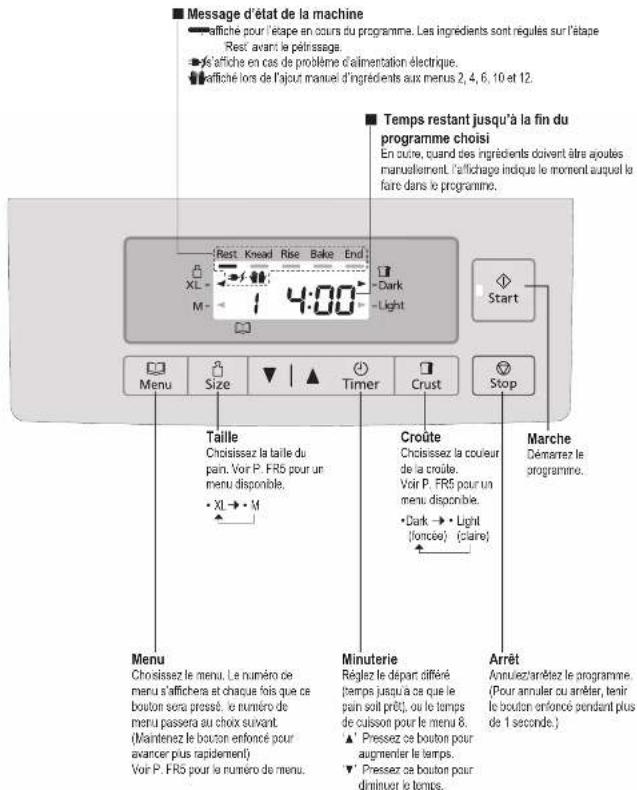
Control Panel
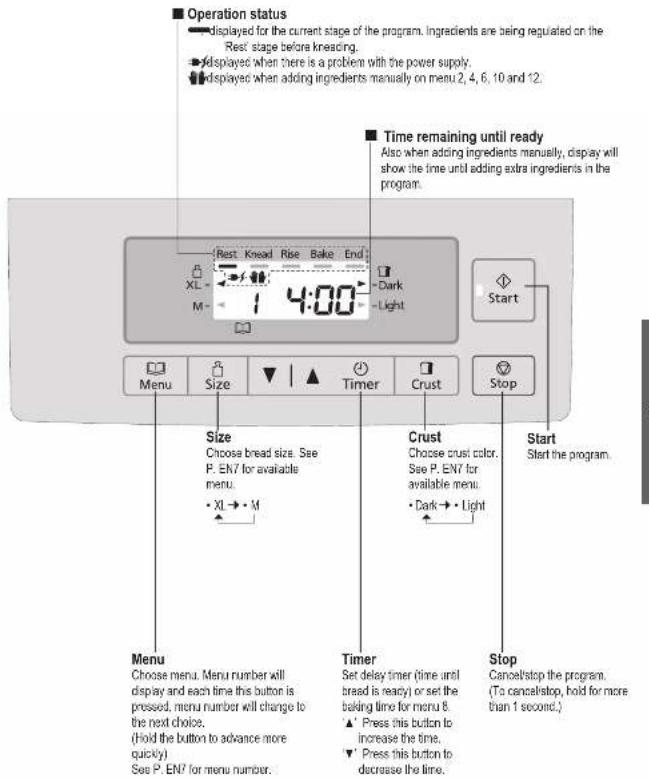
This plicum shows all words and symbols but during operation only relevant ones will be displayed
Bread-making Ingredients
Flour
Main ingredient of bread, produces gluten. (helps the bread to rise,
givest it a firm texture)
Use bread flour and all-purpose flour.
Iou not use or slain hour.
Bread flour and all-purpose flour are milled from hard wheat and have a high content of protein which is necessary for the
development of gluten. Carbon dioxide produced during fermentation is traits within the elastic network gluten, thus making the dough rise.
White flour
Made by grinding wheat kernel, excluding bran and germ. The best kind of flour for baking bread is a flour marked "for bread baking". Using bread flour, instead of all-purpose flour, will produce a much better quality bread loaf.
Do not use plain or self-casing flour as a substitute for bread flour.
Whole wheat flour
Made by grinding entire wheat kernel, including bran and germ. Makes very healthy bread.
This bread is lower in height and heavier than bread baked with white flour.
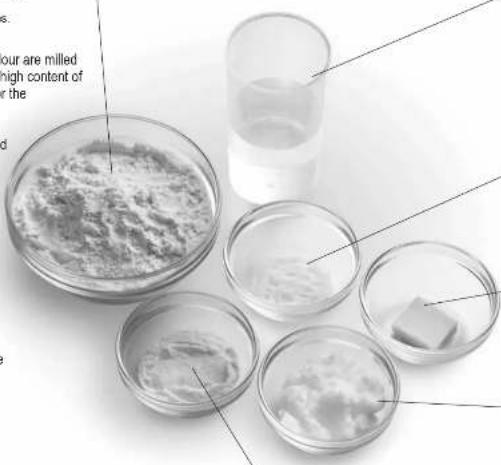
Water
Use plain tap water.
Use tepid water if using menu 3 or 4 in a cold room.
Use chilled water if using menu 3,4,5,6,11 or 12 in a hot room. Always measure out liquids using the measuring cup provided.
Salt
Improves the flavour and strengthens gluten to help the bread rise.
The bread may lose size/flavour if measuring is inaccurate.
Fat
Adds flavour and softness to the bread.
Using butler (unsated) or margarine is recommended.
Sugar
(granulated sugar, brown sugar, honey, treame etc)
Food for the yeast, sweetens and adds flavour to
the bread, changes the color of the crust
- Use less sugar if using raisins or other fruits, which contain fructose.
If using a bread mix...
Bread mixes including yeast
(1) Place the mix in the bread pan, then add water. (Follow
instructions on the packet for the quantity of water
(2) Select the menu 3, choose a size according to the
you me of the mix, and start the baking
600g/21.2oz-XL·400g/4.1oz-M
With some mixes, it is not clear how much yeast is
included, so some trial and error may be required to obtain better results.
Bread mix with separate yeast sachet
① First place the yeast in the bread pan, then the bread
mb, then the water
(2) Set the machine on menu 1 and start the baking
- You can make your bread taste better by adding other ingredients:
| Eggs | Improve the nutritional value and coloring of the bread. (Water amount must be reduced proportionally) Beat eggs when adding them. |
| Bran | Increases the bread's fibre content. Use max. 75 mL (5 tbsp). |
| Wheat germ | Gives the bread a fluffier flavour. Use max. 80 mL (4 tbsp). |
| Spices | Enhance the flavour of the bread. Only use a small amount (1-2 tbsp). |
Dry Yeast
Enables the bread to rise.
- Be sure to use dry yeast that does not require pre-farmmentation (do not use fresh yeast or dry yeast requiring
fermentation before using]
Yeast which has instant yeast or rapid ris yeast written on the packet is recommeded. - When using yeast from sachets, seal the saccher again immediately after use, and keep it in the fridge. (Use After the manufacturer's recommended time)
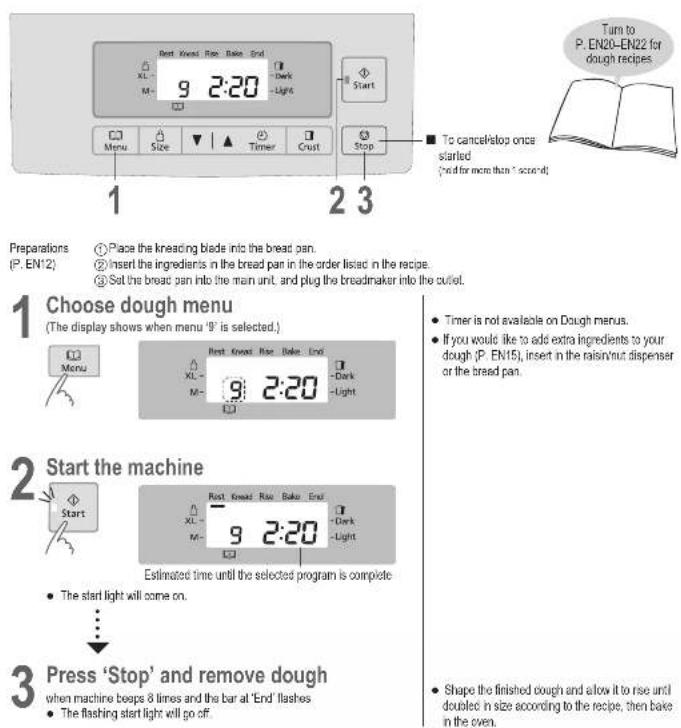
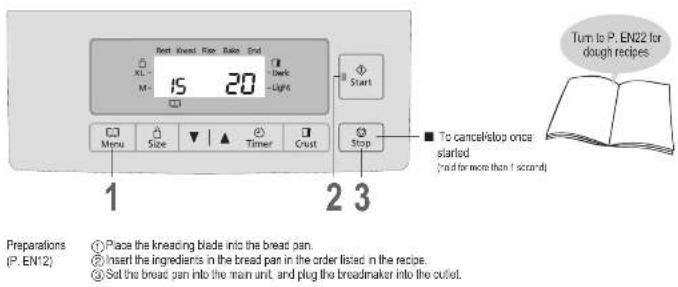
Baking bread
Insert the ingredients in the bread pan Set the program and start Remove the bread
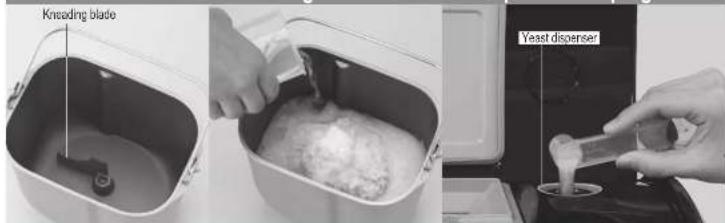

1 Remove the bread pan and set the kneading blade
① Twist the bread pan countier-clockwise.
② Remove the bread pan
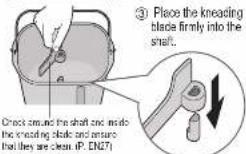
- The blade fits closely into place, but it must touch the bottom of the bread pan.
2 Place the measured ingredients in the bread pan
① Place the dry ingredients except dry yeast (flour, sugar, salt, etc.) ② This result can be summarized as
- FIOI must be Noegy on scales.
② Pour in the water and any other liquids.
3 Wipes off any moisture and flour from the outside of the bread
Place the bread pan inside the breadmaker by turning it slightly.
clockwise, I find the needle down. Close the lid.
- Don't open the lid until bread is complete (aflects broad quality);
3 Insert the dry yeast in the yeast dispenser
If the yeast dispenser is wet, absorb wellness with tissue etc.
[Do not rub the yeast dispenser, otherwise the yeast will not drop into the bread pan due to static.]
4 Plug the breadmaker into a 120 V outlet
CAUTION:
To prevent electric shock, be sure your hands are dry.

5 Choose a bake menu. (The display shows when menu "1" is


See P. EN7 for availability of size and crust.
To set the timer
e.g. It is 8:00 PM now, and you want the bread to be ready at 6:30 the next morning.
Set the timer to 9:30 (9 hours 30 minutes from now).

- Pressing the button once will advance the timer by 10 minutes up to 13 hours (hold to advance more quickly):
6 Press 'Start' button


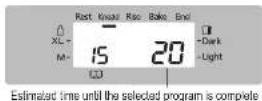
Estimatd time until the selecet program is complete
- When 'Start' is first pressed, menu 1 will start.
7 Turn off the power when the bread is ready (machine keeps 6 times and the bar End flashes.)

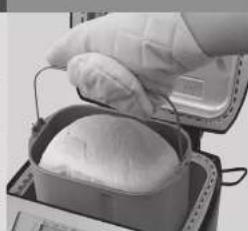
8 Remove the bread immediately
allow to cool, for example, on a wire rack
9 Unplug (holding the plug) after use
If you do not pass "stop and remove in tread from the unit to cool it, then the car will proceed to keep warm to reduce condensation of steam within the tire.
This will accelerate the crowning of the crust, therefore, upon completion of baking, switch off the unit and remove the icehead immediately from the unit to cool it.
- if you leave the bread to cool down in the bread pan, it will cause condensation. Therefore, cool on a wine rack to ensure better quality loaf.
Making Dough
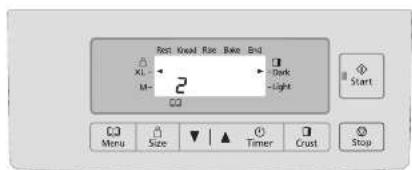
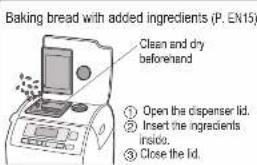
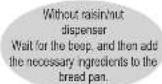
When adding extra ingredients
Adding extra ingredients to bread or dough
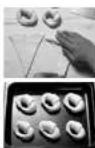
By selecting a menu with Raisin (2, 4, 6, 10 or 12), you can mix your favourite ingredients into the dough to make all kinds of flavoured breads.
Follow the recipe for the quantities for each ingredient.
Dry ingredients,
insoluble ingredients
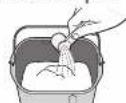
Insert the extra ingredients in the raisinvit dispenser and set the machine.


Correct Incorrect
Do not overill the raisin/rut dispenser.

Cut up roughly into approx. 5 mm (inches) cubes.
Sugar-coated ingredients may stick to the raisin/nu despper and not fall into the bread pan.
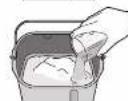
Moist/viscous ingredients, soluble ingredients*
Insert these ingredients together with the others into the bread can.

Fresh fruits, fruits picked in alcohol

Only use quantities as in the recipe, as the water content of the ingredients will affect your bread.
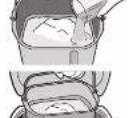
Cheese, chocolate

These ingredients cannot be inserted in the raisinmul dispenser as they will stick to the dispenser and not fall into the bread pan.
- Chcp chocolate finally.
Cut the cheese into 1 cm (ind) cubes.
Making Pasta
1 Select menu '15' (The display shows when menu '15' is


2 Start the machine

The start light will come on.
Press 'Stop' and remove dough in machine beeps 8 lines
4 Wrap the dough in the plastic wrap and rest the dough
Rest the dough for 1 hour in the refrigerator.
- Timer is not available on menu 15.
Baking Cake
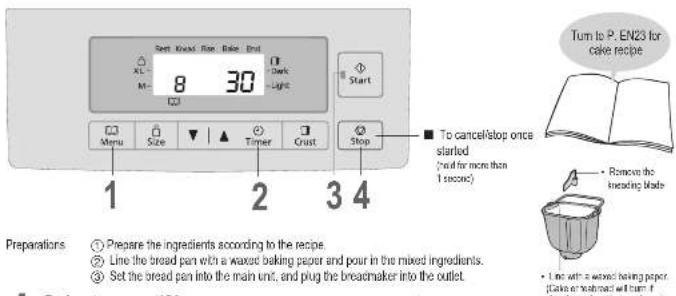

2 Set the baking time
3 Start the machine
The start light will come on.
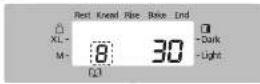
4 Press 'Stop' when the machine beeps and the bar at 'End' flashes, check that baking is complete, and remove the bread pan
The flashing start light will go off.
If baking is not complete Repeat steps 1-3 (Additional cooking time can be made up to twice. Each time should be within 50 minutes. The timer will start again from 1 minute when the unit is hot. Increase the time by pressing the timer button as required.)
Be careful! it's hot!
- You cannot use the timer function for menu 8. (This key only sets the duration of the baking time.)
To check whether baking is complete, insert a skewer into the center of the cake or tea bread - it is ready if there is no mixture stuck to the skewer when you remove it.
Recipes
- For menu 3 or 4: Add extra tsp of dry yeast and only XL size add extra 20~mL (9 oz.) of water or other liquid on top of that.
C=cup(s),lsp=laespon(s),lbp=labespon(s)
Measure the ingredients accurately.
Accurate measurement is essential in achieving good baking results. Weighing the ingredients would be more accurate than measuring them in cups. This is why in this book's recipes, many ingredients are given in weight as well as in cupspoon measurements.
The only ingredients that may be appropriate in measuring by volume, that is, by cups and spoons, are liquids and very small quantities of dry ingredients, such as the yeast and spices. These are difficult to weigh by a kitchen scale. Even in such instances, measure the amount accurately by scooping the ingredients in the measuring cup or the spoon of the desired size until the measure is more than full. Level the top with the straight edge of a metal spatula to remove the excess. Do not tap the bottom of the cup or spoon on the table to hold another scoop.
Correct way to use a measuring cup. (Use store-sought measuring cup for flour.)

Bread
[1 Basic] [2 Basic Rasin nut] [3 Basic Rapid] [4 Basic Rapid Rasin nut]
Basic White Bread select menu 1
| XL | M | |
| Sparefoot 400g 212.6L | 54°C 400 | 37.4 |
| Salt 2 tbsp | 24 tbsp | |
| Drymick 3 tbsp 2 tbsp | ||
| Butter 3 tbsp 2 tbsp | 22 tbsp | |
| Sugar 2 tbsp 1 | ||
| Water | 400 mL 137.5 mL 11% C | 270 mL 85% oz, 71% C |
| Dry weight | 14.9 kg | 14.8 kg |
[meas]mea-monts not as proe- as wight mearu-monts.
Basic White Rapid Bread
| M1 | M2 | |
| Bread flour 80g 21oz (4) | M1(Cy 40) | M1-Cy 25(Cy 3) |
| Salt 2 tbsp | 25 Cbo | |
| Dry milk 3 tbsp 2 tbsp | ||
| Butter 3 tbsp 2 tbsp | ||
| Sugar 2 tbsp 1 | 25 Cbo | |
| Wister | 400 mL 133 oz, 71% C | 270 mL 51% oz, 71% C |
| Dry yeast 1 | / Top 1 | 35 Bo |
meaernrnnnne nneae aee
Basic Raisin Bread
sliced melo 2, 4 or 5
| XL | M | |||
| Bread flour 869 g 21 oz. (4 Salt: 2 tsp.) | 50 C/40 | 54 % | 56 % (30 C) | |
| 2% tsp. | ||||
| Dry milk 3 tbsp 2 tsp. | ||||
| Butter 3 tbsp 2 tsp. | ||||
| Sugar 2 tbsp 1 | 3% tsp. | |||
| Wheat | 16 tsp 1 tsp | |||
| 400 mL | 193 mL | 75% mL | 250 mL | |
| Dry yeast [mM] 2 | 10 tsp | 16 % | ||
| Dry yeast [mM] 1 | 7.5 tsp 1 | 24 % | ||
| Kosaiin | 120 g/4.2 oz. | 85 g/3.6 oz. | ||
[measereents not as prese as weighmearessments.
- If you find that the menus can not meet required in this digest, do burn a burn-in burn on the menus. Do not use the menus without a baked, and 5-7 teaspoons of water to make the digestion safer for the next time.
Carrot Spice Bread
select menu'1 or 3
| XL | M | |
| Blood flow 600g/27 oz, CH | 52.1C/100ml | 14.1C/100ml, 22% Cr |
| Salt 2 cup, 1 | ||
| Dry milk 3 drops 2 tbsp | ||
| Butter 3 drops 2 tbsp | ||
| Cream, cream | 85 g (140g) | 2 tbsp |
| Aljusice | 4 drop 2 tbsp | |
| Potato | 2 tbsp | |
| Water | 350 mL (170g, 11% C) | 260 mL (184g, 7% C) |
| Dry years. [menu 1] | 14 bp | |
| Dry years. [menu 3] | 16 bp |
j measurements not as prese as weight measurements.
Cranberry Bread
select menu '1' or '3
| XI | XII | |
| Breadth (mm) | 52.4700 | 51.14. 56.23.47. |
| Salt 2 eqn. | 19.8bp | |
| Dry milk 3 tbsp. 2 tbsp. | ||
| After 3 tbsp 2 tbsp. | ||
| Sugar 2 tbsp. | ||
| Concentrion juice | 100 mL/4% az. 5°C | 128 mL/4% az. 5°C |
| Water | 220 mL/7% az. 5°C | 150 mL/7% az. 5°C |
| Dry years: [mm] | % bp | % bp |
| Dry years: [mm] | % bp | % bp |
(1) measurements not as prese as weight measurements.
Spicy Cheese
select menu '1' or '3'
| XL | M | |
| Brand Kool 60g Q12 en. (4 Saln 2 cap) | 35 Cr 40% | 14% Sin. (25% Cr) |
| Dry milk 3 tbsp 2 tsp | 1/4 cup | |
| Sugary 2 tsp 1 | 1/4 cup | |
| Dry malad. | 2 tsp 1 tsp | 1/4 cup |
| Black yogurt | 1/4 cup | 1/4 cup |
| Baklue 3 tbsp 2 tsp | ||
| Pomegranate chocs, dropped | 60 g (2% C) | 80 g (2% C) |
| Vitamin c in cat | 2 tbsp 1 tsp | |
| Water | 400 mL (102 oz, 1% C) | 270 mL (96 oz, 7% C) |
| Dry yeast (muesli) | 1/4 tsp | 1/4 tsp |
| Dry yeast (muesli) | 1/4 tsp | 1/4 tsp |
(1)measurement as as pmo as wgrl maaesments
For addition of ingredients with, follow programming instructions on P. EN15.
Bread
Fruit Nut Bran Bread
select menu 2 or 4
| XL | M | |
| Bread flour 60g/12 oz. /4 Salt 2 cup | 5% (C) 400 | 1% (V) 2% (C) 1% (P) |
| Dry milk 3 tbsp 2 tbsp. | ||
| Butter 3 tbsp 2 tbsp | ||
| Sugar 2 tbsp 1 | 1/4 tsp | |
| Bran flakes | 20 g (% C) | 10 g (% C) |
| Sliced onions | 30 g (% C) | 20 g (% C) |
| Water | 400 mL/13.5 oz, 71% C | 220 mL, 91% oz, 71% C |
| Dry yeast [menu 2] | 3/4 tsp | 5/4 tsp |
| Dry yeast [menu 4] | 7/8 tsp | 1/4 tsp |
| "Yield" from herbs | 100 g/12 seeds | 40 g/2 seeds |
measreerns no as proe as wgrl meaere.
Milk Bread
select menu'1 or 3
| XL | M | |
| Bread flour 620 g 1/2 oz. 1/4 cup 2 tsp. | 5% Cr 400 | 1% cr 25% Cr |
| Dry milk 3 tbsp 2 tsp. | 1/4 tsp | |
| Butter 3 tbsp 2 tsp | ||
| Sugar 2 tsp | 1/4 tsp | |
| Milk | 400 - mL 130 oz 11% C | 270 ml 91% oz 75% C |
| Dry yeast (Tritium 1) | 5% tsp | 5% tsp |
| Dry yeast (Tritium 2) | 7/8 tsp | 1/4 tsp |
measereerns asprese as gmea
Pepperoni & Cheese Bread
select menu'1 or 3
| XL | M | ||
| Bread flour 80g 21 oz. (4) | (3/4) CP | 6g 1/4 oz. (2/4) CP | (5/6) CP |
| Salt 2 sp. 1 | (5/6) BP | ||
| Dry milk 3 bs 2 flax | |||
| Sugar 2 tbsp | (7/8) BP | ||
| Papaveron, freshly chopped | 110 g 9/4 oz. | 85 g 5/4 oz. | |
| Ferrous cheddar, chopped | 63 g (1/4) | 20 g (1/4) | |
| Parmesan cheese, grated | 18 g (1/4) | 8 g (1/4) | |
| Stale pestar | 3 tbsp | 2 tbsp | |
| Onion powder | 10 tbsp | 20 tbsp | |
| Oregano | 16 tbsp | 20 tbsp | |
| Olive oil | 1 tbsp 1 tbsp | 2 tbsp | |
| Winter | 490 mL 1/4 KS or 1/4 W/C | 270 mL 65/KW or 7/8 G | |
| Dry yeast (nutri f) | 36 tbsp | 20 tbsp | |
| Dry yeast (nutri d) | 36 tbsp | 20 tbsp | |
measereis no as prete as wegrim meaernenie.
Zucchini
select menu'2 or 4
| XL | M | |||
| Bread flour 600 g/12 oz. (4) | % Cr. 400 | % Cr. 250 Ch | ||
| Salt 2 sp. 1 | 1% sp. | |||
| Dry milk 3 tbsp. 2 tbsp. | ||||
| Sugar 2 tbsp. | 1% Esp. | |||
| Green pepper 2 tbsp. 1 tbsp. | ||||
| Cloves powder | 1 tsp. | 1% Esp. | ||
| Butter 2 | % tsp. | 1% Esp. | ||
| Zucchini, chopped | 65 g/12 oz. | 40 g/12 oz. | ||
| Water | 380 mL/12 oz. 1% Cr. | 280 mL/12 oz. 1% Cr. | ||
| Dry yeast (mixture 2) | % tsp. | 1% tsp. | ||
| Dry yeast (mixture 4) | % tsp. | 1% tsp. | ||
| "Water" finely chopped | 30 g/12 oz. | 29 g/12 oz. | ||
i:measereernsnotaspreseaswgrlmesameles.
30% Whole Wheat Bread
select menu
| XL | M | |
| Whole wheat flour | 190 g/100 g (35g) | 125 g/400 g (29.5g) |
| Bread flour 400 g (15) | Nar. (300g) | 280 g/700 g (20.4g) |
| Salt 2 cup | 35 kg | |
| Dry milk 3 drops 2 drops | ||
| Pasta 2 | 36 kg | 36 kg |
| Measles 2 drop 1 | 36 kg | |
| Water | 340 mL (27% w/v, 75% C) | 280 mL (26% w/v, 75% C) |
| Dry years 1 | 36 kg 1 kg |
meaereerre eae aee as wee
30% Whole Wheat Honey Walnut Bread
select menu 2
| XL | M | |
| Wishes best four | 180 g/95oz (34% CI) | 125g/95oz (34% CI) |
| Red meat 450g/15 | 95 oz (35% CI) | 250g/705oz (25% CI) |
| Salt 2 tsp.1 | 16 tsp. | |
| Dry milk 3 tsp 2 days | ||
| Butter 2 | 16 tsp | 16 tsp |
| Honey | 2 tsp | 16 tsp |
| Water | 380 mL/725oz (16% CI) | 290 mL/725oz (16% CI) |
| Dry cream 1 | 16 tsp 1 tsp | |
| "Natural, finely chopped" | 390 g/1725 | 26 g/6.0 oz |
meaereerne eae aee
30% Whole Wheat Raisin & Apricot Bread
select menu 2
| XI | M | |
| Whole wheat flour | 100 g/100g (35.6%) | 125 g/100g (37.4%) |
| Bread flour 450 g/18 | Kg. oz. (39.4%) | 285 g/100g (24.2%) |
| Salt 2 oz. | 36 kg | |
| Dry milk 3 drops 2 days | 36 kg | |
| Water | 36 kg | |
| Mangoes 2 drops 1 | 36 kg | |
| Water | 360 mL/100g (36.6%) | 250 mL/100g (24.2%) |
| Dry yeast 1 | 1/4 cup 1 oz | |
| Rapesein | 60 g/12.2 oz | 40 g/15.5 oz |
| Uncooked potato (potato) | 40 g/12.2 oz | 40 g/15.5 oz |
measurments as as pse as wgt mssurments
- If you find that the marks do not get cleaned into, the dough is small enough on the surface of the bread. The bread is too thick to be used as a 2-layered slice of water to make the dough softer than rice.
[5 French]
French Bread
| Eveil kuf 420 g/14 | % oz (3C) |
| Salt 1 | 5/8 oz |
| Butter 1/2 drop | |
| Water | 310 mL/706 oz /4.5 C |
| Dry yeast | % oz |
measerees aspreee as weigmeasures.
For addition of ingredients with, follow programming instructions on P. EN15.
Recipes
C=cup(s;isp=leaspcom(s);isp= tablesponn(s)
Dough
[9 Basic]
| Bread flour 4/8 cup (1/2 cup) | (NC) |
| Sugar 50 g Salt 1 | % C % bp |
| Dry milk 3 tbsp. | |
| Butter or margarine spread | % or 1/2% C |
| Water 2/3 mL N | % or 1/2% C |
| Dry yeast 1 | % bp |
| Egg, leekon for brushing on top | % bp |
| Papaya seeds for potting on top (optional) | % bp |
| Sesame seeds for sprouting on top (optional) | % bp |
| Variation: Whole Wheat Dicer Rolls Reelback 1 can be mixed with white wheat flour. | |
Dinner Roll (Yield 18)
select menu
[meas.remeisns no as prece as wghl meaents
1
2
3
A
5
6
7
T
8
9
Croissant (Yield 18)
select menu 9
| Head Start 450g (16oz.) [3] | (N) |
| Sugar 2 tbsp | |
| Dry milk 3 tbsp | |
| Salt 1 | 1/2 cup |
| Water 240 mL (8oz.) [10] | |
| Dry yogurt 2 tbsp | |
| Butter or margarine 2 tbsp | |
| Fats or margarine, chilled for cooking in the dough bag, paste or brushing on top |
meaereerreee eee
1
Make the dough according to instructions on P. EN14.
2
Place the dough in a greased bowl. Cover it with a plastic wrap. Rest the dough in the refrigerator for 30 minutes.
3
Roll 7.62 of chitosan buffer between two slices of waste paper at a 2~V = 18~cm (10× 7 inches) rectangle. Place back in the reperficer Celli at least 1 hour.
4
Roll cut the dough on a lightly floured surface into a 30 cm (12 inches) square.
5
Place the rolled out butter over hazethirds of the dough. Place the third withoutbutter over the center third.
6
Fold the remaining zucchini on top. Seal edges. Rest the dough in the refrigerator for 20-30 minutes.
7
Place the dough at right angles to the previous position in step 5. Roll out in 30~cm (12 inches) square, Foc into thinds. Cover them with a plastic wrap and place it into refrigerator for 20 - 30 minutes.
8
Fold and roll twice. Wear and clip after each rolling. After the final folding, clip several hours or overnight.
9
Roll cut the dough and divide into 9 squares into two triangles.
1
Roll up each triangle randomly, starting from the edge opposite the point. Count errors.
1
Place seam down on a greased.
Picking pan, place water tap. Proof: 32^80^ for 30-50 minutes or until
really coolbed.
1
Breaten them with a sweetest egg. Bake in a 170°C 350°C oven for 10-15 minutes until baby golden brown.

e. Res the doun

0
[11 French]
Baguette (French sticks) (Yield 2)
select menu'11
| Bread flour 40g/16 Sugar 1 tbsp Salt 1 Dry milk 1 tbsp Butter 1 tbsp Water 250 mL 18 Dry years: 1 Fizzy seeds for making on top of dishes) | % oz (150 g) 1/2 cup |
[measereinrsn as prose as wgrimmertre]
1
Make the dough according to instructions on P. EN14
2
Divide the dough into 2 equal portions. Roll each portion into a ball.
3
Place the dough in a greased bowl. Cover it with a plastic wrap. Rest for about 20 minutes. (Place in the refrigerator during the summer time.)
4
Rcch bell inb a recargla, using a rolling pr.
5
Starting at one short edge, roll the dough up tightly into a thin log, pinching the eggs to seal. "Paper and rounder ends."
6
Place on a greased baking pen. Spray water on top. Record at 32^ - 90^ for 60 minutes or until nearly doubled.
7
Buses with water: With a small nozzle, make 3 or 4 diagonal cuts about 6mm (1 cm) deep across top of the iigs.
8
Sprids with pupsoy seeds if desired
9
Bae in a 190C375F over for 25-38 minutes or until golden brown.
If your oven allows for steaming, bake with steam for the first 10 minutes.
[13 Pizza]
Pizza
select menu 13
Ingredients: Makes 6 small or 2 large
| Food Item | 4/6kg (100 cc, 29% Ca) |
| Milk powder | 1 cup |
| Sugar | 1/2 cup |
| Salt | 1 cup |
| Butter | 1 cup |
| Water | 342 mL (71% Ca, 7% C) |
| Dry years | 1 cup |
120
1
Make the dough according to instructions on P. EN14.
2
Kread dough on a lightly flourless surface until it becomes elastic and springs back when touched.
3
Divide into 6 balls or 2 large balls, and place in warm area for 10 minutes.
4
Shapa each ball into a flat circle. Place the circles on a beaming pot and pick with a fork.
5
Let reel for 15 minutes at room temperature.
6
Brenn each circle with 2 scoops to some paste. Spiniddle with Mezzarella cheese. Top with your favorite topping, such as salad onion, papparon, popcorn ham, olives.
7
Bake in a prehebed 170C340F oven for 15-20 minutes
Recipes
C=cup(s;isp=leaspcom(s);isp= tablesponn(s)
Dough
[13 Pizza]
Focaccia
select menu "3 large"
components: Make 1 large
| Bread flour 475g/18 Milk powder 2 tbsp Sugar 2 tbsp Salt 2 tbsp Olive oil 2 tbsp Water 330mL/111oz.71 Dry yeast 2 tbsp |
| Topping Olive oil 4 tbsp Fried potato 2 tbsp Dried eggplant 2 tbsp Dried spinach 2 tbsp 1 cup hard-boil,extra for flavoring Option:Chives (corning) 30g/1 oz Dry and chop before needing in the master mix dispenser |
(1):measUREMENTs not as preacse as weight measurements.
1
2
3
4
5
6
[15 Pasta]
Basic Egg Pasta
| Breadth (cm) | 450 g/100 gram (36.5) |
| Eggs | 3 |
| Water combined with the eggs | 120 mL 98% w/v (1%) |
| Salt | 1% as |
| Other | 2 kg |
Use heat lamp when in room temperature space than 27^ / 10 'tight ages and water and salt well below.
1
2 Wrap the dough in a plastic wrap and rest for 1 hour in the refrigerator.
3
4
5
6
Spinach Pasta
| Brand Name | 400g/100g (96℃) |
| Eggs | 2 |
| Water combined with the egg | 124 mL (75°C, 90°C) |
| Salt | 1% as |
| 1/3Spinach paste | 3 tbsp. |
| Other | 1 tbsp. |
"lu" - liquid water when room temperature ≤ greater than 20°C/7Pa.
Tomato Pasta
select menu'15
| Food Item | Amount (100g or 25.5g) |
| Eggs | 3 |
| Water combined with the egg | total 210 mL (76 oz, 56.5g) |
| Salt | 1% cup |
| Tomato puree | 3 tbsp. |
| Cheese | 1 tbsp. |
miggs and water and salt well before hand
Cake
This program can be used for baking cakes and tea breads. It is not suitable for all types of cake, such as light sponge cakes, Christmas pudding, or those that require baking in a hot oven.
Make sure that the kneading blade is removed from the bread pan and the bottom and sides of the bread pan are lined with a waxed baking paper before the cake baking is added.
Ensure that the cake mixture is kept inside the wavedbacon paper.
The maximum asking time is 1 hour and 30 minutes
[8 Bake only]
Banana Cake
select menu B
| Salt eating flour | 230 g 2 oz. (15% |
| Baking soda | in bp |
| Salt | in bp |
| Butter 85 g 2 oz. | |
| Caster sugar | 56 g 2 oz. |
| Bananas with skin, peel & mashed | 500 g 1 lb. 2 oz. |
| Mucor seed egg, hummus | 1 |
| Optional gluten, instant jam | |
i:measereents no as prese as weighmeaementes.
Fruit Cake
select menu 8
| Mixed mixed fruit | $40 c/g oz. |
| Cropped dates | 5g,2 g oz |
| Cropped seeds | 5g,2 g oz |
| Cropped cherries | 110 g oz. |
| Water 300 mL (100 cc.) | 94 C |
| Batteries: 8 g oz | |
| Bakery and eggs, hobslo | 3 |
| Flax flour | 255 g oz. (1/4 L) |
| Baking soda | 1 kg |
meaernrre rreee as wee
1
Sioe four, sat bicarborale of soda tegather into a bow
2
Rub the butter into the flour until it resembles fine bread crumbs.
3
Slir in the sugar, bananas and the beaten egg. mix well.
4
Remove the kneosing blade from the bread pan and line the
5
Insert the mixture into the bread part, being careful to ensure that
6
Select menu 8 and anter 45 minuAs on the inner
7
After baking, test with a skewer to see if the cake is cocked. If
。
the cake requires extra time, select menu B again, and order a new cake. The first time the cake is made, you just slightly stay. This will keep you through during the stand period.
8
Take the bread pan out of the breadmaker using oven gloves.
9
and leave to stand for 5-10 minutes before removing from the breadbox and adding the flour.
9
Gaza if desired. Sohen the jam spread over the top of the warm
9
1
Insert the fruit, cakes, walnuts, cherries, water and butter together and heat until the fat has melted and the liquid is hot. This can be done on the hon or in the microwave oven (high power for 4-5 minutes).
Alof to cod slightly. Her and eggs, flour and the baking soda. Mia wtel
3 Remove the kneading base from the bread pan and line the bottom and sides with the waxed baking paper.
4 Insert the mixture into the bread pan, being careful to ensure that the mixture is inside the waxed baking paper.
5
Select menu 8 and enter 55 minutes on the timer.
6
After baking, test with a skewer to see if the cake is cooked. If the cake requires extra time, select menu B again and enter a further 3-5 minutes on the timer. It is still slightly story, this will cook through during the sland period.
7 Take the broad pan out of the breadbread using every cloves and leave to stand for 5-10 minutes before removing from the breadpan and allowing to cool.
Baking Gluten Free Bread/Making Gluten Free Dough
Preparations ①Have all ingredients at room temperature.
(P. EN12) (2)Be sure to whisk milk, eggs, melted butter, and vinegar together until very smooth before adding to breadmaker
Place the kneading blade into the bread pan.
4Insert the ingredients in the bread pan in the following.
the liquid ingredients flour
6) Inser the dry yeast in the yeast dispenser.
⑥ Sat the bread pan into the man unit and plug the breadmaker into the cutlet.
1 Select Gluten Free menu (The display shows when menu 'T' is selected

2 Start the machine

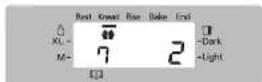
After 2 minutes

3 Open the lid, and scrape off the flour within 5 minutes when
the beep sound
Press 'Start' again


Estimated time until the selected program is complete
Press 'Stop' and remove bread
p 25 when machine beeps 8 times and the bar at End' flashes
-
Timer is not available on menu 7.
-
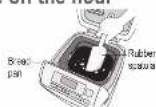
Use the rubber spatula to avoid damaging the bread pen. Do not use the metal spatula.
After 5 minutes have passed in step 3, the heels sound and Kneel starts automatically.
Gluten Free Recipes
As with all gluten-free cooking, cleaning and hygiene precautions must be taken when using this breadmaker.
To avoid cross contamination (gluten accidentally gelling into food during processing, cooking or serving) please take particular care when
washing the bread pan and the sheilding diabe, etc: If the breadmaker has been, or is also used, for food which contains gluten, please take all precautions to avoid any cross contamination.
Bread
[7 Gluten Free]
Gluten Free Bread Recipes
select menu T
| Vitamin K12 (63 °C/105 °F, 360 ml, 112 g, 7) | % C |
| Malted butter 95 g/22 g, | % C |
| Eggs | 2 Whole eggs (Malt and egg white in mixture: 1:100 g/kg, 4 oz.) |
| Glutenogen 1 cup | |
| Hippocratic mix (flax 454 g/16 oz, 1/3) | % C) |
| Dry yeast, Entericin tablet (5 g) | 38 oz.) |
| Milk 400 mL/5 | %w/v, P/C |
| Malted butter g/62 oz./7 | N.C. |
| Egg | 1 Whole egg (all extra eggs, white to soft) N.V. 160 g, 450 ml |
| Glutenogen II lip | |
| Homemade version Bread Mix 451 g/18 oz./(3) | V/C) |
| Dry years: Enzyme series (Tg) | Stc.) |
i mee rene nre e prn e aegme reene
Gluten Free Bread Arranged Recipe
select menu 7
meaereerre eaeee as wee
| Milk 510ml,95 | Hcr.174 Cr |
| Egg 2 wmeat egg 700g/s | Hcr.02 |
| Other vegetables 12 mL/1 cup | Pcrz. |
| Vegetables of 32 g/L | S#p#.174Cr |
| Honey 56g/dice p/c | Pcrz. |
| Brownie cake 18g/g | Vcr.174Cr |
| Porridge, shallots 300 g/10 | Scr.22Cr |
| Kashmiri gum 95 g/2 | Nap#.95Cr |
| Salé 5 g/l | Scr.95Cr |
| Dry years #2 | Nap#.95Cr |
Gluten Free Recipes
Dough
[14 Gluten-Free Pizza] Gluten Free Pizza Recipes
select menu14
| Water 450ml,150g,71 | 150°C |
| White riceflour milk 150g/5 | 95°C, [19°C] |
| Soy flour mixed milk 150g 5 | 95°C, [19°C] |
| Tea powder mixed milk 150g 6 | 95°C, [19°C] |
| Quick gum 1 cap | |
| Vegetable oil 3 | 15 kg# |
| Salt 1 cap | |
| Dry yeast 1 cap |
Sarrngd Rgnge 1
| Winter 458 m.17° es.27°C White snow flound 300 kg/16 h Piano flour (red mil.) 71 g 2 Vegetable oil 1 Sal. 1 tsp Dry yeast 1 tsp |
SArranged Rrcipe 2> fr4 s#
| Water 350 mL,1/2 | %az. 1/2 C |
| Withstanding free redmelt 475 g/16 | %az. 2/3 Cu |
| Volume of 1 | A 2 bp |
| Salt Temp | |
| Dry years 1 bp |
1 measurement not as prede as weight measurement
Preparations
① Mix all flour in a bowl.
② Place the breeding place in to the breed pen.
③ Insert the ingredients in the spread as in the following.
the liquid ingredients → four
Inset the dry yeast in the yeast dispenser.
Set the bread pan into the main unit, and plug the breadmaker into the outlet.
1 Select menu 14.
1
2
3 Press out dough using soon or spiral to two 2cm (7.9 inch) circles for thin and细心 base on a pressed bearing tray.
4 Add sauce, cheese and your favorite topping then bake in a preheated oven at 220C45F6Gas Mark 7 for 15-20 minutes depending on an amount of toppings.
To freeze pizza boxes files = method to step 5 and delete all frozen toppings for 5 mins. Allow to cool, freeze. To remove frozen pizzas immediately and baking (you must), and bake as above step 4.
[16 Gluten-Free Pasta]
Gluten Free Pasta Recipes
select menu '16'
| Water 200 mL/7 g. l | % C |
| Mixed eggs | 2 whole eggs |
| White flour (red mil. 220 g) /7 | % cc. [11°C] |
| Franklin flour (red mil. 50 g) /2 | % cc. [11°C] |
| Tarpes flour (red mil. 100 g) /3 | % cc. [11°C] |
| Glue gum 10 g | % cc. |
| Vegetable of 2 tbsp | |
| Salt 1 tsp |
i mee mne n no as pdeas weitme rems
Preparations
① Mix three-four and quar gum in a bowl.
③ Flase the kneading place in to the bread pan
(3)Ink the ingredients in the spread can in the falcrings.
the liquid ingredients - flow
Set the bread pan into the main unit, and plug the breadmaker into the cuake.
1
Select menu'16
2
Make the gluten free pasta according to instruction on P EN24 Step 2-5
3
Wrap: the dough in a plastic wrap and rest for 1 hour in the refrigerator.
4
Lightly featured on the surface of dough, desire crisps such as grooch or ravioli.
5
Boil them in boiling hot water for 2-3 minutes until it is completely soaked through.
6
Draen them and tess the pasta with your favorite sauce.
Care & cleaning
CAUTION:
Unplug your breadmaker and allow it to cool down before cleaning.
To avoid damaging your breadmaker.
Do not use abrasives, such as cleansers
scouring pads etc.
Do not wash any part of your
brecnaker in the dis
Do not use benzine, thinnars, or alcohol.
After rinsing the washable parts, wipe with cloth.
Always keep the breadmaker parts clean and dry.
Raisin/nut dispenser
Remove and wash with water
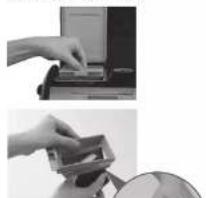
Wash after each
use to remove
any residue.
Dispenser lid
Remove and wash with water
- Open the dispenser lid to approximately 75 degrees to line up connections on both side and pull it towards you to remove.
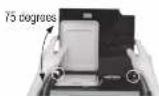
- Be careful not to damage the seal. Damage could lead to leakage of water.
steain, condensation, or deformation
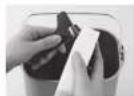
Yeast dispenser
Wipe with a camp cloth and dry naturally. If wipe with a dry cloth, dry yeasts will no longer into the bread pan due to static
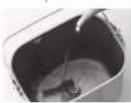
Bread pan &
kneadingblade
Remove any leftover dough and wash with water.
- If it is difficult to remove the smearing blade, soak in warm water for 5-10 minutes. Do not submerge the bread pan in water.
Measuring spoon & cup
Wash with water
- No dishwasher safe

:
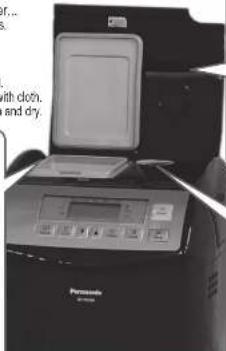
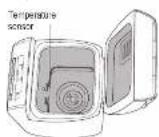
Body, lid and steam vent
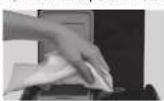
Wipe with a damp cloth.
- Wipe gently to avoid damaging the temperature sensor.
The use of the mode of the machine may change with use.
To protect the non-stick finish
Bread pan and kneading blade are coated with a non-stick finish to avoid stains and to make it easier when removing bread.
To avoid damaging it, please follow the instructions below.
- Do not use hard utensils such as a knife or a fork when removing bread from the bread pan. When you have had time taking out the bread from the bread pan, see P.EN50.
- Ensure that the kneading blade is not embedded in the bread loaf before slicing it. If it is embedded, wait for the loaf to cool and remove it. (Do not use hard or sharp utensils such as a knife or a fork.) Be careful not to set burns as the kneading blade may still be hot.
- Use the soft sponge when cleaning the bread pan and the kneading blade. Do not use anything abrasive such as cleansers or scouting pads.
Hard, coarse or large ingredients such as flours with whole or ground grains, sugar, or the addition of nuts and seeds may damage the non-stock finish of the bread pan. If using large chunks of ingredients, break into small pieces. Please make sure to follow the recipe quantities stated.
Troubleshooting
Please check the following before contacting us for repair
Problem Cause an
breed does not rise
The top of my bread is uneven.
My bread is full of air holes.
My bread seems to have collapsed after rising.
- The quality of the gluten in your flour is poor, or you have not used bread flour and all-purpose flour. (Gluten quality can vary depending on temperature, humidity, how the flour is stored, and the season of harvest)
Try another type, brand or another batch of flour.
The dough has become too firm because you haven't used enough liquid.
Bread flour and all-purpose flour with higher protein content absorbs more water than others so try adding an extra 10 - 20~mL of water.
You are not using the right type of yeast.
Use a dry yeast from a seashit, which has instant yeast or rapid rise yeast written on it. This type does not require pre-fermentation.
- You are not using enough yeast or your yeast is old.
Use the measuring spoon provided. Check the yeast's expiry date. (Keep in fridge)
The yeast has touched the liquid before kneading.
Check that you have put in the ingredients in the correct order according to the instructions, adding the xaler and liquids last. (P. EN12)
You have used too much salt, or not enough sugar.
Check the recipe and measure out the correct amounts using the measuring spoon provided. Check that salt and sugar are not included in other ingredients.
You have used too much yeast.
Check the recipe and measure out the correct amount using the measuring spoon provided.
You have used too much liquid.
Some types of flour absorb more water than others, so try using 10-20 mL less water.
The quality of your flour isn't very good.
To using a different brand of four
You have used too much liquid.
Try using 10-20 mL less water.
Problem Cause an
My bread has risen too much.
Why is my bread pale and sticky?
There is excess flour around the bottom and sides of my bread.
Why has my bread not mixed properly?
My bread has not been baked.
Daugh leaks out of the bottom of the bread pan.
The sicca of my breast have collapsed and the bottom is damp.
ton
You have used too much yeast water.
Check the recipe and measure out the correct amount using the measuring spoon (yeast) cup (waxil) provacid.
Check that excess water amount is not included in other ingredients.
You have not used enough flour.
Carefully weigh the flour using scales.
You are not using enough yeast or your yeast is old
Use the measuring spoon provided. Check the yeast's expiry date. (Keep in fridge)
There has been a power failure, or the machine has been stopped during shashinkings.
→ The machine has been replaced by another machine.
You will need to remove the bread from the bread pan and start again with new needles.
You have used too much flour, or you are not using enough liquid.
Check the racle and measure out the correct amount using scales for the flour or the measuring cup provided for liquids.
You haven't put the kneading blade in the bread pan.
Make sure the blade is in the bread pan before you put in the ingredients.
There has been a power failure, or the machine has been stopped during breadmaking.
The machine switches off if it is stopped for more than 10 minutes. You might be able to start the loaf again, though this might give poor results if kneading had already begun.
The Daugh maru was selected.
The 'Dough' menu does not include a baking process.
There has been a power failure, or the machine has been stopped during breadmaking.
→ The machine switches off if it is stopped for more than 10 minutes. You can try baking the cough in your oven if it has risen and proved.
- There is not enough water and the motor protection device has activated
This only happens when the machine is overloaded and excessive force is applied to the motor. The motor will be turned off and the machine will be turned on. To check the recipe and measure out the correct amount using the measuring out provided.
- You have forgotten to attach the kneading blade.
Make sure you attach the blade first IP EN12
The kneading mounting shaft in the head pan is stiff and does not rotate
If the kneading mounting shaft does not rotate when the blade is attached, you will need to replace the kneading mounting shaft unit. (Please see 'Contact Information' P. EN31.)
- A small amount of dough will escape through the ventilation holes (so that it does not stop the rotating parts from rotating). This is not a fault, but check occasionally that the kneading mounting shaft rotate properly.
If the kneading mounting shaft does not rotate when the blade is attachable, you need to replace the kneading mounting shaft with a piece see Contact information P:EN31
You have left the bread in the bread pan for too long after baking.
Remove the bread promptly after baking.
There has been a power failure, or the machine has been stopped during breadmasking. The machine switches off if it is stopped for more than 10 minutes. You may try baking the cough in your oven.
Kneading mounting shell
如图10-2
in total
Kneading nongina shil
unit
B

Troubleshooting
Please check the following before contacting us for repair.
| Problem Cause and | tion |
| The kneading blade rattles. | This is because the blade fits loosely on the shaft. (This is not a fault) |
| I can smell burning while the bread is baking. | Ingredients may have spilled on the heating element. → Sometimes a little flour, raisins or other ingredients may be flicked out of the bread pan during mixing. Simply wipe the element gently after baking once the breadmaker has cooled down. → Remove the bread pan from the breadmaker to insert ingredients. |
| Smoke is coming out of the steam vent. | |
| The kneading blade stays in the bread when I remove it from the bread pan. | The dough is a little stiff. → Allow the bread to cool completely before removing the blade carefully. Some types of flour absorb more water than others, so try adding an extra 10–20 mL of water next time. → Crust has built up underneath the blade. → Wash the blade and its spindles after each use. |
| The crust creases and goes soft after cooling. | The steam remaining in the bread after cooking can pass into the crust and soften it slightly. → To reduce the amount of steam, try using 10–20 mL less water or half the amount of sugar. |
| How can I keep my crust crispy? | To make your bread crisper, you could use the menu 5, 6 or the 'Dark' crust color option, or even bake it in the oven at 200°C (392°F) gas mark 6 for an extra 5–10 minutes. |
| My bread is sticky and slices unevenly. | It was hot when you sliced it. → Allow your bread to cool on rack before slicing to release the steam. |
| U50 appears on the display. | The unit is hot (above 40°C/105°F). This may occur with repeated use. → Allow the unit to cool down to below 40°C/105°F before using it again (U50 will disappear). |
| f appears on the display. | There has been a power failure for approx. 10 minutes (the plug has been accidentally pulled out, or the braker has been activated), or there is another problem with the power supply. → The operation will not be affected if the problem with the power supply is only momentary. The breadmaker will operate again if its power is restored within 10 minutes, but the end result may be affected. |
| (f)(menu section) appears on the display. | There has been a power failure for a certain amount of time (differs depending on the circumstances - e.g. mains power failure, unplugging, malfunctioning fuse or breaker). → Remove the dough and start again using new ingredients. |
| When program is completed, the raisin/put dispenser is opened. | The dispenser will open automatically for all programs. This is not malfunction. → When ingredients such as raisins and nuts are inserted in the dispenser on the bake only program, ingredients will be dropped on to the cake only half size of it. |
| H01/H02 appears on the display. | The display indicates a problem with the breadmaker. → Please see 'Contact Information' P. EN31. |
| The bread does not come out. | If the bread cannot be easily removed from the bread pan, leave the bread pan for 5–10 minutes to cool, making sure that it is not left unattended where somebody or something may get burnt. After that, shake the bread pan several times using oven gloves. (Hold the handle down so that it does not get in the way of bread.) |
| Dry yeast does not drop into the bread pan. | The timing of yeast dispenser activation is different depending on the menu program and room temperature. → Yeast dispenser is well, or there may be a static build up. → Wipe with a damp cloth and dry naturally. → Dry yeast is damped. → Use new dry yeast. |
| Problem Cause and | tion |
| Extra ingredients does not fall into the bread pan from the raisin/ nutrient dispenser. | ● Is the surface of the extra ingredients higher than the edge of the raisin/ nutrient dispenser? → Put the extra ingredients so that its surface is lower than the edge of the raisin/ nutrient dispenser. (P, EN15) The capacity of the raisin/ nutrient dispenser is 150 g, however depending on the state and the type of ingredients, they may overflow. |
Contact Information
For product information and operation assistance:
In USA contact:
Customer Care Center: 1-800-211-PANA(7262)
Dreedy Online: shop.panasonic.com
In CANADA contact:
Directly Onine: www.panasonic.ca
Additional bread pans and kneading blades can be bought via the following:
In USA contact:
Directly Onine: shop.panasonic.com
In CANADA contact:
Directly Onine: www.panasonic.ca
For defective product exchange within the warranty period, please contact the original dealer or our Customer Care Carrier.
Specifications
| Power supply 120 V 60 Hz | |
| Power consumed 550 W | |
| Capacity | {All-purpose flour} max. 620 g (21 % oz.) min. 420 g (14 % oz) |
| (Dry yeast) max. 5.6 g (x oz.) min. 2.1 g (y oz.) | |
| Capacity of raisin/fruit dispense | max. 150 g (5.3 oz.) raisins |
| Timer | Digital timer (up to 13 hours) |
| Dimensions (H×W×D) | approx. 37.0×28.2×32.5 cm (14.6×11.1×12.8 inches) |
| Weight | approx. 6.8 kg (15.3 lb.) |
| Accessories | Measuring cup. Measuring spoon and Menu label |
Table des matieres
Avant utilisation
He porme me mceror in aore, in
Cutho#
Mareques
C. b - AB
Marque 5
1. 实验原理
Etiquette du menu

FR6 FR7
Panneau de commande
Ct t t
Verilog 2020 of the IEEE C.64 pure scalar array is shown in Table 1.
5.3.2. We discover that any sequence of matrices is non-empty (see above). A prime matrix record exists as a submatrix of M whose entries set are all positive, i.e., if M has 2 nonzero elements it suffices to construct a matrix plus matrices in the problem's basis.
[5 Pain français]
Pain francs
Seeripnpaas meu
| Fonne a c 48g/dl4 | %wt (3) |
| Selt 1 | Vc: c, àh |
| Bonne l'airborne | %wt (3), 7 |
| Ex. 2, 100 g | %wt (3), 7 |
| Leisure daytime | %wt (3) |
mssnnnns nnnnne eae
(1)meures mns preces cuarepees
Croissants (18 portions)
Seionnez le menu
| Fune a pao 456.00000003 Succe 2,0 s tobe La tene cie nable Set 1 Leu 200.00000001 Leu 200.00000002 Bonne cu margane 2,0 in bele Eonne cu margane, illeuee pour pi ciere la plece 196,702 Dont parre pour d'etre |
meure moe eae eae
1
Prepaez a pale en suban le retnctions de la P FRT2
2
Meléz la alsoa cun o b lajeado. Reccuá la dura fitlbrile. Lecóse ocrear o pate al refigirarse mandar.
3
Replace the dimer ions on the salts. Seal two bonds. Lissage reconstitute a cell to an equilibrium pendant 20-30 minutes.
7
Baguettes (pain français) (2 portions)
Selections meru 11
| Forma apanam 40mg/te | %az [3] |
| Sucra 1, c. sibne | %az, a. tne |
| Sxt 1 | %az, a. tne |
| Lal reo 1, c. abate | %az, a. tne |
| Evee | %az, a. tne |
| Exz 260 mL/L | %az, a. tne |
| Levitra sedra 1 | %az, a. tne |
| Oraliz me pasado por responsolet (la niflare option) | %az, a. tne |
mssn mnnn nnnnne
1
Prepae a pala an suvant les instruction de la P FR12
2
Disposi on a rare plaque of bicuspid prolapse, vasodilation in "suc" surface surface lacerated at 32^ 90% persisting 60 minutes after the operation.
7
Endusaoeau.Aecuocoulouienagouie,effectueo3 ou 4Incidoregiondovoron8mm(spuace)opoldeour au ceseusdechaquebecquille.
8
Sauocuae da grines da panel au goit.
9
measures more precssee pse
1
[16 Pates sans gluten]
Recettes de pates sans gluten
Selection of the menu 152
Sponge de la revueille GIAI
| Eco 280 mL/7 oz | 3+1 |
| This means | 2 whole eggs |
| Fano de en bane pinto ml/280 g | 5 oz (Ht) |
| Tocque de potas de serre en bane ml/80 g | 2 oz (Ht) |
| Fattie de pep oce (puno ml/100 g) | 3 oz (Ht) |
| Compania de pest. por. | 2 oz |
| Huile vagina 2 c. antrare | |
| Sol 1, 2 e 3 |
mme808mo1nnc6e85curnpeee
Preparalils
Limited Warranty (ONLY FOR U.S.A.)
Panasonic Products Limited Warranty
Limited Warranty Coverage (For USA Only)
If your product does not work properly because of a defect in materials or workmanship. Panasonic Consumer Electronics Company (referred to as "the warrior") will, for the length of the period indicated on the chart below, make a purchase order with a value equal to the total amount of money you have paid. To replace either (a) repair your product with new or refurbished parts, (b) replace it with a new or a refurbished equivalent value product, or (c) refund your purchase price. The decision to repair, replace or refund will be made by the warranty.
| Product or Part Name Label Parts | |
| Small Appliances 1st 1st. | |
| Emergency Light 600 Days IC Days | |
| Large 30-45 Square Feet Counters (SRS-42 Services) | 6 Months 6 Months |
During the "labor" warranty period there will be no charge for labor. During the "Parts" warranty period, there will be no charge for parts.
This warranty only applies to products purchased and serviced in the United States. The use of this warranty is only to the original purchaser of a new product which was not sold "as is".
Mail-In Service—Online or Telephone Repair Request
Online Repair Request
To submit a new repair request, and for quick repair status visit our Web Site at www.panasonic.com/support
When shipping the unit, carefully pack and send it in the original (or subsoxil) carton. Include a toilet detailing his complaint along with the bill of sales and provide a daytime phone number where you can be reached. A valid registered receipt is required under the Limited Warranty.
When shopping, choose items that are best fit to your needs. For example, a watch and watch radio is a good choice.
IF REPAIR IS NEEDED DURING THE WARRANTY PERIOD. THE PURCHASER WILL BE REQUIRED TO FURNISH A SALES RECEIPTS/PROOF OF PURCHASE INDICATING DATE OF PURCHASE, AMOUNT PAID AND PLACE OF PURCHASE, CUSTOMER WILL BE CHARGED FOR THE REPAIR OF ANY UNIT RECEIVED WITHOUT SUCH PROOF OF PURCHASE.
Limited Warranty Limits And Exclusions
This warranty ONLY COVERS MATTERED failures due to defects in materials or workmanship, and DOES NOT COVER glass, plastic parts, temperature probes (if included) and normal wear and fear or cosmetic damage. The warranty ALSO DOES NOT COVER damages which occurred in shipment, or failures which are caused by products not supplied by the warranty, or failures which result from accidents, misuse, abuse, neglect, bug infestation, mishanding, misapplication, alteration, faulty installation, setup adjustments, made/ajustment of consumer controls, improper maintenance, power line usage, lightning damage, modification, or commercial use (such as in a hotel, office, restaurant, or other business), rental use of the product, service or anyone other than a factory service center or other authorized servicer, or damage that is attributable to acts of God.
THERE ARE NO EXPRESS WARRANTY EXCEPTION AS LISTED UNDER
THE WARRANTYOR IS NOT LIABLE FOR INCIDENTAL OR
CONSEQUENTIAL DAMAGES RESULTING FROM THE USE OF THIS PRODUCT,OR ARISING OUT OF ANY BREACH OF THIS WARRANTY. As examples, this excludes damages for lost time, travel to and from the service, loss of or damage to media or images, data or other memory or recorded content. The items listed are not exclusive, but for illustration only.) ALL EXPRESS AND IMPLIED WARRANTYINGS, INCLUDING THE WARRANTY OF MERCHANTIBILITY, ARE LIMITED TO THE PERIOD OF THE LIMITED WARRANTY. Some states do not allow the exclusion or limitation of incidental or consequential damages, or limitations on how long an implied warranty lasts, so the exclusions may not apply to you.
This community gives you specific legal rights and you may also have other rights which vary from state to state. If a problem with this product develops during or after the warranty period, you may contact your dealer or Service Center. If the problem is not handled to your satisfaction, then write to:
Consumer Affairs Department
Panasonic Corporation of North America
551 In dependence PwY
Observations (1-2013)
PARTS AND SERVICE, WHICH ARE NOT COVERED BY THIS LIMITED WARRANTY, ARE YOUR RESPONSIBILITY.
Shop Accessories!
for all your Panasonic gear
www.panasonic.com/accessories
Get everything you need to get the most out of your Panasonic products
Accessories & Parts for your Camera, Phone, AV products, TV, Computers & Networking, Personal Care, Home Appliances, Headphones, Batteries, Backup Chargers & more...
Customer Services Directory
For Product Information, Operating Assistance, Parts, Owner's Manuals, Dealer and Service info go to www.parsonic.com/support
For the hearing or speech impaired TTY:1-877-833-8855
As of Feb 2015
Panasonic Canada Inc.
5770 Amblr Drive, Mississauga, Ontario L4W 2T3
PANASONIC PRODUCT -LIMITED WARRANTY
EXCHANGE PROGRAM
Panasonic Canada Inc. warrants this product to be free from defects in material and workmanship under normal use and for a period as stated below from the date of original purchase agrees to, all its option either (a) repair your product with new or refurbished parts. (b) replace it with a new or a refurbish equivalent value product, or (c) refund your purchase price. The decision to repair, replace or refund will be made by Panasonic Canada Inc.
Electric Rice Cooker One (1) year
Electric Thermo Pot One (1) year
Automatic Bread Maker One (1) year
Multi Cooker
Toaster Oven
Breakfast series (Coffee maker, Toaster, Kettle)
Hand Blender
One (1) year
One (1) year
One (1) year
One (1) year
This warranty is given only to the original purchaser, or the person for whom it was purchased as a gift, of a Panasonic brand product mentioned above sold by an authorized Panasonic celiac in Canada and purchased and used in Canada, which product was not sold as a gift, and which product was delivered to you in new condition in the original packaging.
IN ORDER TO BE ELIGIBLE TO RECEIVE WARRANTY SERVICE HEREUNDER. A PURCHASE RECEIPT OR OTHER PROOF OF DATE OF ORIGINAL PURCHASE, SHOWING AMOUNT PAID AND PLACE OF PURCHASE IS REQUIRED
LIMITATIONS AND EXCLUSIONS
This warranty ONLY COVERS FERS UREES due to defects in materials or workmanship, and DOES NOT COVER normal wear and tear or cosmetic damage. The warranty ALSO DOES NOT COVER damages which occurred in shipment, or failures which are caused by products not supplied by Panasonic Canada Inc. or failures which result from accidents, misuse, abuse, neglected, mishandling, misapplication, alteration, faulty installation, set-up adjustments, misadjustment of consumer controls, improper maintenance, power line surges, lighting damage, modification, introduction of sand, humidity or liquids, commercial use such as hotel, office, restaurant, or other business or rental use of the product, or service by anyone other than a Authorized Servicer, or damage that is attributable to acts of God.
THIS EXPRESS, LIMITED WARRANTY IS IN LEU OF ALL OTHER WARRANTY. EXPRESS OR IMplied, INCLUDING ANY IMPLIED WARRANTYES OF MERCHANTIBILITY AND FITNESS FOR A PARTICULAR PURPOSE: IN NO EVENT WILL PANASONIC CANADA INC. BE LIABLE FOR ANY SPECIAL, INDIRECT OR CONSEQUENTIAL DAMAGES RESULTING FROM THE USE OF THIS PRODUCT OR ASRISING OUT OF ANY BREACH OF ANY EXPRESS OR IMplied WARRANTY. (As examples, this warranty excludes damages for last time, travel to and from the Authorized Servicer, loss of or damage to media or images, data or other memory or recorded content. This list of items is not exhaustive, but for illustration only.)
In certain instances, some jurisdictions do not allow the exclusion or limitation of incidental or consequential damages, or the exclusion of implied warranties, so the above limitations and exclusions may not be applicable. This warranty gives you specific legal rights and you may have other rights which vary depending on your province or territory.
CONTACT INFORMATION
For product information and operation assistance, please visit our Support page:
www.panasonic.ca/english/support
For defective product exchange within the warranty period, please contact the original dealer.
Panasonic Canada Inc. 5770, Amber Drive, Mississauga (Ontario) L4W 2T3