DAP290BAW - Air purifier DANBY - Free user manual and instructions
Find the device manual for free DAP290BAW DANBY in PDF.

| Brand | Danby |
| Model | DAP290BAW |
| Product Type | Air Purifier |
| Filters | 2 genuine HEPA filters (model DAP290-F) + 2 pre-filters |
| Sensors | PM2.5 particle sensor and VOC sensor |
| Operating Modes | Auto, Sleep, Turbo |
| Fan Speed | Low, Medium, High (manually adjustable) |
| Child Lock | Yes (activation by holding buttons) |
| Lighting | 3 levels: normal, dim, off |
| Display | Screen with air quality indicators and filter life |
| Power Supply | 120 V, 60 Hz |
| Power Consumption | Not specified |
| Filter Maintenance | Clean the pre-filter; replace HEPA filters after 720 hours of continuous use |
| Replacement Parts | HEPA filter model DAP290-F |
| Safety | Polarized plug, overheat protection, do not use outdoors |
| Warranty | 24 months functional parts, 30 days plastic parts |
| Intended Use | Residential and indoor only |
Frequently Asked Questions - DAP290BAW DANBY
User questions about DAP290BAW DANBY
0 question about this device. Answer the ones you know or ask your own.
Ask a new question about this device
Download the instructions for your Air purifier in PDF format for free! Find your manual DAP290BAW - DANBY and take your electronic device back in hand. On this page are published all the documents necessary for the use of your device. DAP290BAW by DANBY.
USER MANUAL DAP290BAW DANBY
Danby Products Limited, Guelph, Ontario, Canada N1H 6Z9
Danby Products Inc. Findlay, Ohio, U.S.A. 45840
www.danby.com

Printed in China | Imprimé en Chine | Impreso en China
2025.03.06
Welcome to the Danby family.
We are proud of our quality products and we believe in dependable service. Read this owner's manual before plugging in your new appliance as it contains important operation information to ensure the reliability and longevity of your appliance. You are entitled to the warranty coverage as described in the owner's manual.
- Please write down your appliance information below. You must keep the original proof of purchase receipt to validate and receive warranty services.
- Register your product online and fill out a survey, at www.danby.com/support/product-registration to receive a FREE 2 MONTH WARRANTY EXTENSION.
Model Number:
Serial Number:
Date of Purchase:
Need Help?
- Read your Owner's Manual for installation, troubleshooting, and maintenance.
- Visit www.Danby.com to access self-service tools, FAQs and more by searching for your model number using the search bar at the top of the page.
- For consumer service, please fill out the web form at www.danby.com/support. Your submission will go directly to an expert on your appliance. Our average response times are between 20 minutes and 2 hours, during business hours.
- Or call 1-800-263-2629 - hold times can exceed one hour in peak periods.
SAFETY REQUIREMENTS
This appliance is not intended for use by persons (including children) whose physical, sensory or mental capabilities may be different or reduced, or who lack experience or knowledge, unless such persons receive supervision or training to operate the appliance by a person responsible for their safety.
Children should be supervised to ensure that they do not play with the appliance.
Do not store or use combustible materials such as gasoline or other flammable vapors or liquids in the vicinity of this or any other appliance.
Do not insert fingers or other objects into grilles or openings in the appliance.
Do not cover or block the intake and exhaust openings.
Do not operate the appliance without the filter installed.
Do not operate the appliance near heat sources.
This appliance is intended for indoor, residential applications only. Do not use this appliance outdoors. Do not use this appliance for commercial or industrial applications.
Warning - To reduce the risk of fire or electric shock, do not use this fan with any solid-state speed control device.
SAFETY REQUIREMENTS
Do not connect the appliance to extension cords, adapters or together with another appliance in the same wall outlet.
Do not splice the power cord. If the power supply cord is damaged, it must be replaced by the manufacturer, its service agent or similar qualified person in order to avoid hazard.
To reduce the risk of electric shock, this appliance has a polarized plug (one blade is wider than the other). This plug will fit in a polarized outlet only one way. If the plug does not fit fully in the outlet, reverse the plug. If it still does not fit, contact a licensed electrician to install the proper outlet. Do not alter the plug in any way.
To avoid risk of electric shock, do not operate this appliance in an area that is likely to accumulate standing water. If this condition develops, disconnect the power supply before stepping into the water.
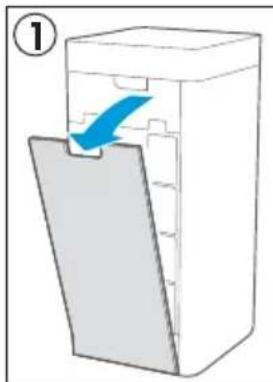
INSTALLATION INSTRUCTIONS
FILTER INSTALLATION
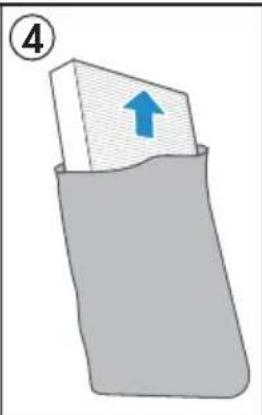
- When unpacking the unit and before first-time use, please ensure that the plastic film on the filter is removed.
- Ensure that the filter is properly installed before using the appliance.
- Unplug the air purifier when installing the filter.
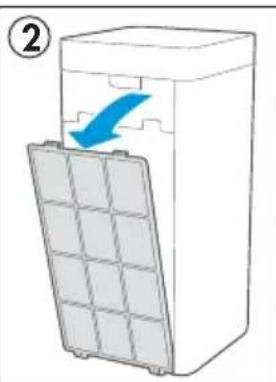
Installation Steps:
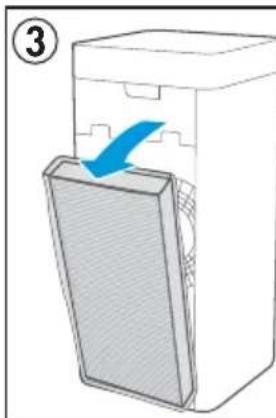
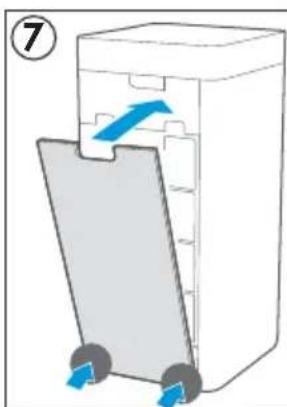
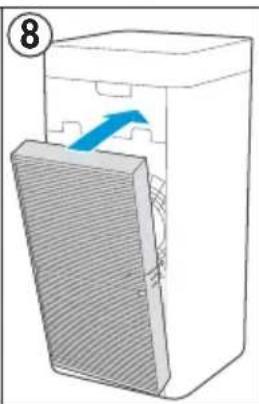
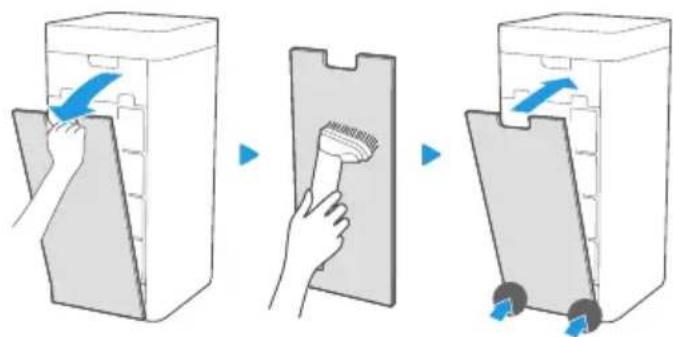
- Remove the air inlet grille.
- Remove the pre-filter by pressing the U-shaped buckle and pulling outward.
- Remove the true HEPA filter.
- Remove the packaging from the filter.
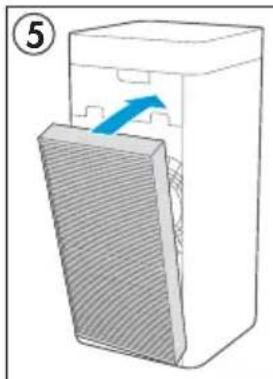
- Install the filter - ensure the arrow at the top of the filter is facing inwards
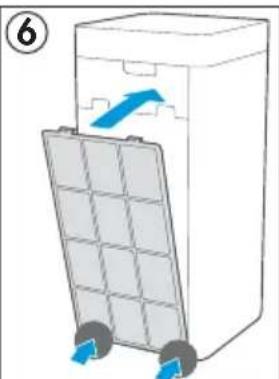
- Replace the pre-filter by aligning the bottom and pressing the top inward until it clicks.
- Replace the air inlet grille by aligning the bottom and pressing the top inward until it clicks.
- Repeat this process on both sides of the air purifier for both true HEPA filters.
NOTE: It is recommended that you change the HEPA filter after 720 hours of continuous usage
OPERATING INSTRUCTIONS
FEATURES
- PM2.5 sensor
- VOC sensor
- Air outlet grille
- Operation panel
- Display screen
- Handle
- True HEPA filter
- Pre-filter
- Air inlet grille
Note: Filters are replicated on both sides of the air purifier. They are installed the same way on both sides.

ON FIRST USE
When the air purifier is plugged in for the first time it will go through a start up sequence that will take approximately 1 - 2 minutes. During this time the display panel and indicator lights will flash as the appliance activates.
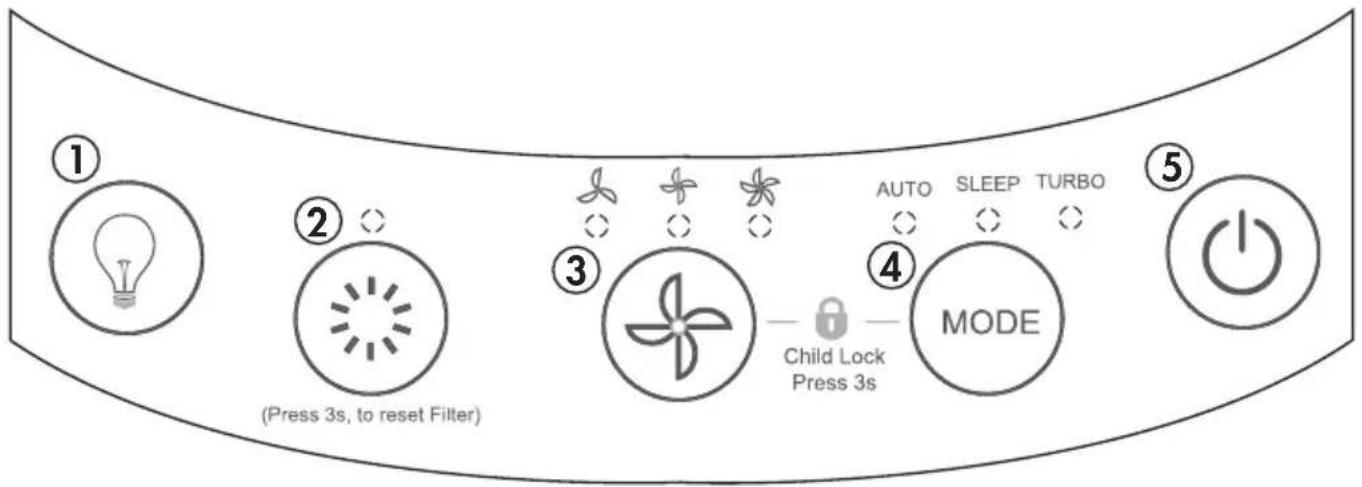
LIGHT SETTING
The control panel has three brightness settings, normal, dim and off. Press the light button repeatedly to cycle through the options. If it looks like the air purifier is turned off but the fan is still running very quietly, check the light setting. You may have them set to off, which can make the unit look like it is turned off.
OPERATING INSTRUCTIONS
OPERATING MODES
This air purifier has three modes: auto, sleep and turbo. The mode indicator light will show which mode is currently active. Pressing the mode button will cycle through the options: auto, sleep and turbo.
AUTO
The air purifier will default to running in auto mode. In auto mode, the air purifier will run the fan at very low speed so that it is able to take readings from the air while remaining extremely quiet.
SLEEP
Press the mode button to activate sleep mode. This mode will turn off the lights and indicators on the control panel except for the sleep light and will run the fan at very low speed to ensure the air purifier is as quiet as possible during sleeping hours.
TURBO
Press the mode button to activate turbo mode. This mode will run the fan at very high speed to purify a large amount of air in a short period of time.
FAN
The fan can be manually set to low, medium or high. Press the fan button to set the desired fan speed. The fan indicator light will show the current speed setting.
CHILD LOCK
Press and hold the fan speed button and the mode button at the same time for 3 seconds to engage the child lock. The unit will chime and a lock icon will illuminate on the control panel next to the prefilter check light. The buttons on the control panel will not function when the child lock is engaged. If any buttons are pressed, the lock icon will flash. Press and hold the fan button and the mode button at the same time for 3 seconds to disengage the child lock.
OPERATING INSTRUCTIONS
CONTROL PANEL
- Light button: Press to set the desired light brightness.
-
PM2.5 button:
-
Press once to display PM2.5 level.
-
Press twice to display VOC level.
-
Fan button: Press to set the fan speed.
- Mode button: Press to set the desired mode: auto, sleep or turbo.
- Power button: Press to turn the air purifier on or off.
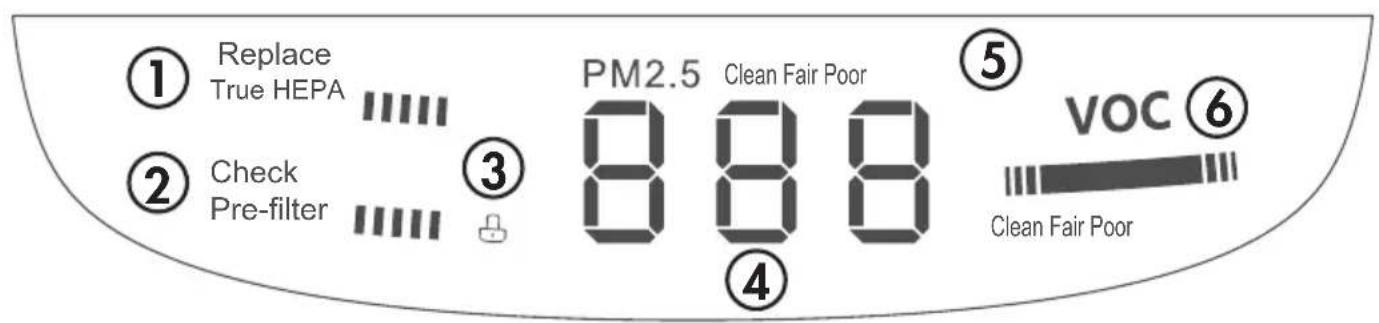
DISPLAY PANEL
- True HEPA filter life progress bar
- Pre-filter life progress bar
- Child lock indicator
- PM2.5 number display
- PM2.5 level display
- VOC level display
OPERATING INSTRUCTIONS
PARTICULATE MATTER 2.5 (PM2.5)
- Refers to airborne particles with a diameter smaller than 2.5 micrometers
These particles can reduce visibility and cause air to appear hazy - This includes dust, smoke from cooking grease, soot, and pollutants emitted by vehicles and industries
There are two ways that the PM2.5 will be displayed:
Manually
Press the PM2.5 button on the control panel once, and the current PM2.5 level will flash on the display panel
- The PM2.5 number displayed in is units of g / m^3 , which means 'micrograms per cubic meter'
- A reading of 1 g / m^3 means that one cubic meter of air contains 1 microgram of pollutant
Automatically
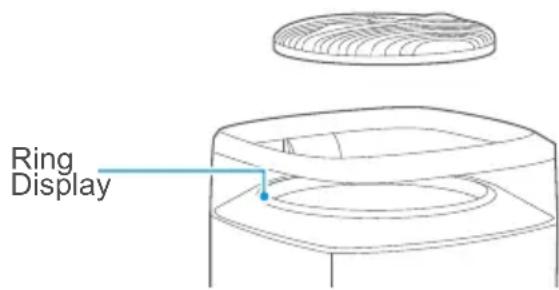
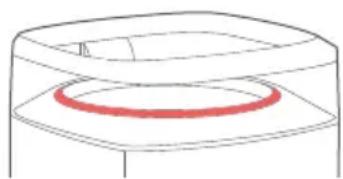
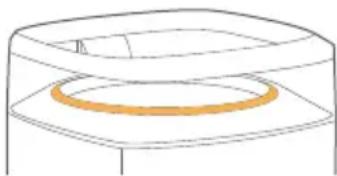
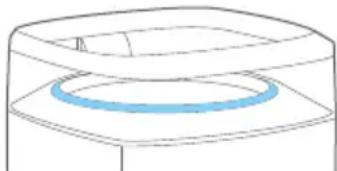
The air purifier will continually monitor the air particles in the air, and the color of the ring display will reflect the air quality. The display panel on the PM2.5 level display.
| Ring Color | Air Quality | Range |
| Red Poor | 140 or higher | |
| Orange | Fair 65 | 140 |
| Blue Clean | 65 or lower |
NOTE: The ranges provided are approximate, ambient conditions may vary
OPERATING INSTRUCTIONS
VOLATILE ORGANIC COMPOUNDS (VOCs)
- Refers to a large group of chemicals found in many consumer products such as paint, varnishes, cooking oils, air fresheners, etc.
- These can be released into the air and can pose health risks.
There are two ways that the VOCs will be displayed:
Manually
Press the PM2.5 button on the control panel twice, and the current VOC level will flash.
Automatically
The air purifier will continually monitor for VOCs in the air, and the color of the VOC display bar will reflect the current air quality based on the current level of VOCs.
| Bar Color Air Quality | |
| Red Poor | |
| Orange Fair | |
| Blue Clean | |

CARE & MAINTENANCE
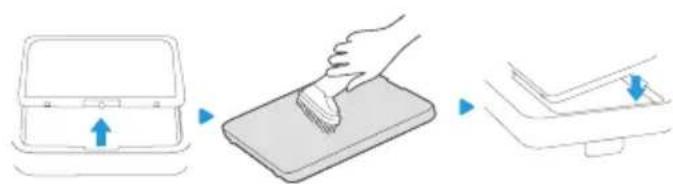
AIR INLET GRILLE
Ensure the air purifier is unplugged during any cleaning or maintenance.
The air inlet grille can be cleaned with a vacuum cleaner and wiped with a cloth.
AIR OUTLET GRILLE
The air outlet grille can be cleaned with a vacuum cleaner and wiped with a cloth.
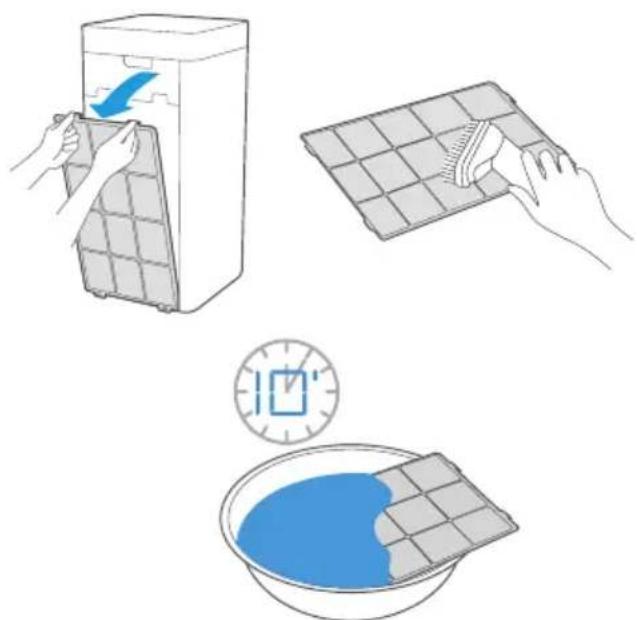
PRE-FILTER
Ensure the air purifier is unplugged during any cleaning or maintenance.
When the pre-filter progress bar turns red, the pre-filter should be cleaned.
Remove the filter from the air purifier and clean it with a vacuum cleaner or a damp cloth. If the filter is very dirty, it can be soaked in warm water and a mild detergent for ten minutes.
Ensure the pre-filter is completely dry before replacing it in the air purifier. Once replaced, press and hold the PM2.5 detection button for 3 seconds to reset the pre-filter progress bar.
CARE & MAINTENANCE
CLEANING
- Unplug the appliance before cleaning or servicing.
- Clean the cabinet with a lukewarm damp cloth and neutral detergent. Dry the cabinet with a lint-free dry cloth.
- Do not use gasoline, paint thinner or other chemicals to clean the appliance.
- Do not wash the appliance directly under a tap or using a hose. It may cause electrical damage.
TRUE HEPA FILTER
True HEPA filter model number: DAP290-F
Two are included with the air purifier. When the True HEPA filter progress bar turns red, the filters should be replaced. Once replaced, press and hold the PM2.5 detection button for 3 seconds to reset the filter progress bar.
Replacement filters can be purchased through one of the following methods:
- Visit www.danbyapplianceparts.com
- Visit www.danbyapplianceparts.ca
- Call consumer care at 1-800-263-2629.
NOTE: Replacement filters are not covered under warranty and must be purchased separately.
TROUBLESHOOTING
Appliance will not operate
- Plug is not fully inserted into the wall outlet
- Blown fuse or circuit breaker
- The filter may not be correctly installed
Insufficient air purification
Air filter is dirty or needs to be replaced
- Restricted air flow
- Appliance size is too small for application
- Ensure that all packaging has been removed from the filter
Appliance will not resume functioning after cleaning the filter
- Press and hold the PM2.5 button for 3 seconds to reset the filter
Odors
- Replace the air filter
ERROR CODES
E1 - filter installation error; check that all air filters are correctly installed
E0 - hardware fault
Eu - sensor fault
E3 - fan speed fault
If the codes E0, Eu or E3 appear on the display, unplug the air purifier and allow it to sit undisturbed for 5 minutes. If the error code persists when the air purifier is plugged in, please contact a local service depot.
DISPOSAL
This appliance should not be treated as regular household waste. Check for local regulatory compliance regarding the approved and safe disposal of this appliance.
Danby
Limited "Carry-In" Warranty
This quality product is warranted to be free from manufacturer's defects in material and workmanship, provided that the unit is used under the normal operating conditions intended by the manufacturer. This warranty is available only to the person to whom the unit was originally sold by Danby Products Limited (Canada) or Danby Products Inc. (U.S.A.) (hereafter "Danby") or by an authorized distributor of Danby, and is non-transferable.
Terms of Warranty
Plastic parts are warranted for thirty (30) days from the date of purchase, with no extensions provided.
First 24 months
During the first twenty four (24) months, any functional parts of this product found to be defective, will be repaired or replaced, at warrantor's option, at no charge to the original purchaser.
To obtain service
Contact the dealer where the unit was purchased, or contact the nearest authorized Danby service depot, where service must be performed by a qualified service technician. If service is performed on the unit by anyone other than an authorized service depot, all obligations of Danby under this warranty shall be void.
It is the responsibility of the purchaser to transport the appliance to the nearest authorized service depot. Transportation charges to and from the service location are not protected by this warranty and are the responsibility of the purchaser
Nothing within this warranty shall imply that Danby will be responsible or liable for any spoilage or damage to food or other contents of this appliance, whether due to any defect of the appliance, or its use, whether proper or improper.
Exclusions
Save as herein provided, by Danby, there are no other warranties, conditions, representations or guarantees, express or implied, made or intended by Danby or its authorized distributors and all other warranties, conditions, representations or guarantees, including any warranties, conditions, representations or guarantees under any Sale of Goods Act or like legislation or statute is hereby expressly excluded. Save as herein provided, Danby shall not be responsible for any damages to persons or property, including the unit itself, howsoever caused or any consequential damages arising from the malfunction of the unit and by the purchase of the unit, the purchaser does hereby agree to indemnify and hold harmless Danby from any claim for damages to persons or property caused by the unit.
General Provisions
No warranty or insurance herein contained or set out shall apply when damage or repair is caused by any of the following:
-
Power failure.
-
Damage in transit or when moving the appliance.
-
Improper power supply such as low voltage, defective house wiring or inadequate fuses.
-
Accident, alteration, abuse or misuse of the appliance such as inadequate air circulation in the room or abnormal operating conditions (ie. extremely high or low room temperature).
-
Use for commercial or industrial purposes (ie. If the appliance is not installed in a domestic residence).
-
Fire, water damage, theft, war, riot, hostility, acts of God such as hurricanes, floods etc.
-
Service calls resulting in customer education.
-
Improper Installation (ie. Building-in of a free standing appliance or using an appliance outdoors that is not approved for outdoor application, including but not limited to: garages, patios, porches or anywhere that is not properly insulated or climate controlled).
Proof of purchase date will be required for warranty claims; retain bills of sale. In the event that warranty service is required, present the proof of purchase to our authorized service depot.