
AF 5076MS - Digital photo frame AGFA - Free user manual and instructions
Find the device manual for free AF 5076MS AGFA in PDF.
| Product Type | Digital Photo Frame |
| Brand | AgfaPhoto |
| Model | AF 5076MS |
| Dimensions (W × H × D) | 216.5 × 150 × 27 mm |
| Weight | 0.5 kg |
| Power Supply | Input 100–240 V ~ 50/60 Hz, Output 12 V == / 1 A (power adapter included) |
| Display | 7 inches, LCD-TFT, 16:9 format, 480 × 234 pixels resolution |
| Internal Memory | 128 MB (NAND Flash) |
| Card Reader | SD / MMC / MS / XD |
| Connectivity | USB port (USB Host) for USB flash drive or computer |
| Compatible Photo Formats | JPEG |
| Compatible Music Formats | MP3 |
| Compatible Video Formats | Motion-JPEG |
| Speaker | 1 × 1 W |
| Main Functions | Automatic slideshow, background music, photo rotation, display format adjustment (4:3/16:9), alarm, time and date display, on/off timer, transition effect, file copy/delete |
| Remote Control | Included with battery (CR2025), range up to 2 meters, angle 30° |
| Removable Frame | Spare frame included, magnetic attachment |
| Care and Cleaning | Clean screen with a soft, dry cloth; do not use liquid or abrasive products |
| Safety | Do not expose to moisture, heat or direct sunlight; do not open the device; avoid contact with liquids; use only the supplied power adapter |
| Spare Parts and Repairability | Spare frame provided; remote control battery (CR2025); power adapter and USB cable included; repair exclusively by an authorized specialist |
| General Information | Operating temperature: 0–45°C; relative humidity 20–80%; warranty and service via the retailer or Sagem Communications |
Frequently Asked Questions - AF 5076MS AGFA
User questions about AF 5076MS AGFA
0 question about this device. Answer the ones you know or ask your own.
Ask a new question about this device
Download the instructions for your Digital photo frame in PDF format for free! Find your manual AF 5076MS - AGFA and take your electronic device back in hand. On this page are published all the documents necessary for the use of your device. AF 5076MS by AGFA.
USER MANUAL AF 5076MS AGFA
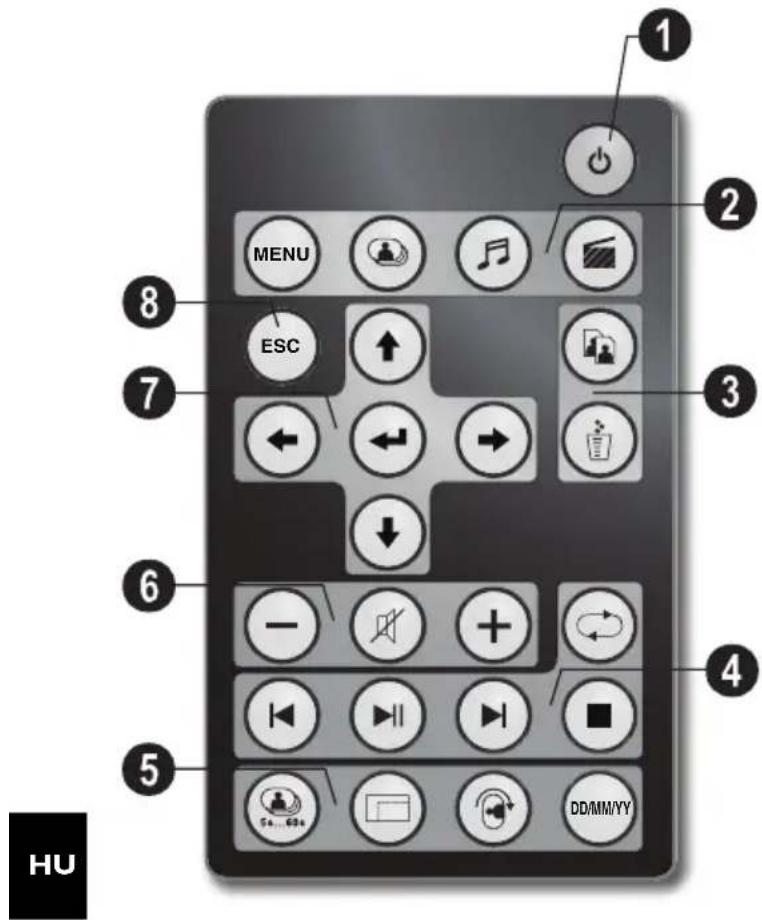
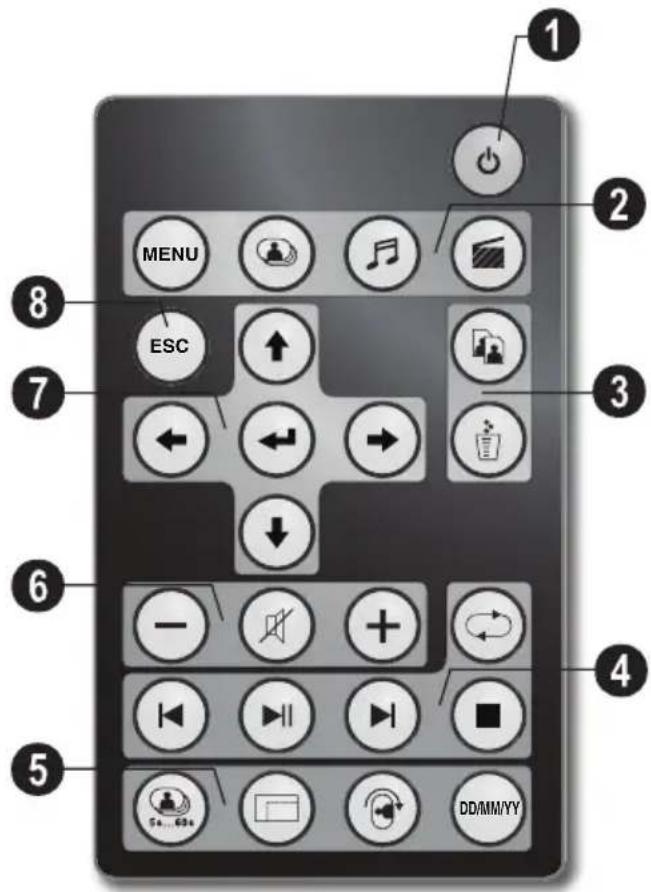
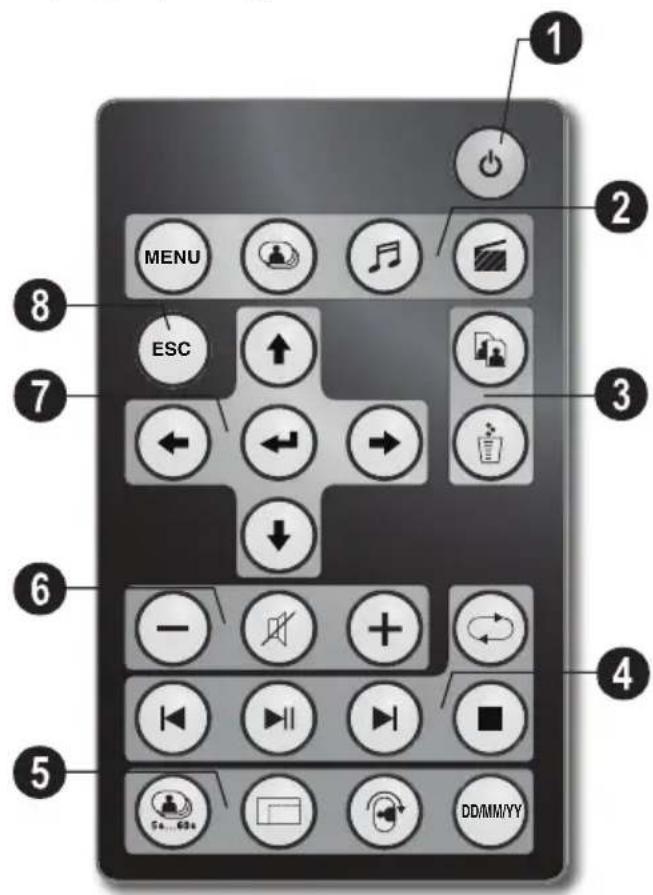
Fernbedienung

① Ein-/Ausschalten

natural_image
Illustration of a tablet device with a scroll wheel and a circular button, showing no text or symbols.natural_image
Diagram showing a device with an attached cable and a power outlet, no text or symbols presentnatural_image
Gray rectangular object with a plus sign and circular symbol at the bottom (no text or labels)natural_image
Grid of nine black-and-white photos arranged in a 3x3 grid, with no visible text or symbols.natural_image
Illustration of a CD or DVD disc with an arrow pointing to its side, showing no text or symbols.natural_image
Illustration of two overlapping rectangular frames with a curved arrow indicating rotation (no text or symbols)Hinweise
Copyright © 2008 Sagem Communications
Très cher client,
Supports mémoire photo
Télécommande


natural_image
Illustration of a tablet device with a scroll wheel and a black arrow indicating rotation (no text or symbols)natural_image
Diagram showing a computer monitor with an attached cable and a power outlet connected to a device (no text or symbols visible)Connectez au PC
natural_image
Diagram showing a computer monitor connected to a server rack via cable, with an icon of a USB cable inserted (no text or symbols present)natural_image
Gray rectangular object with a plus sign and a small circular symbol at the bottom (no text or symbols present)natural_image
Grid of nine black-and-white photos arranged in a 3x3 grid, with no visible text or symbols.natural_image
Diagram showing a card slot with a circular arrow and a black arrowhead, no text or symbols present.natural_image
Illustration of two overlapping rectangular frames with a curved arrow indicating rotation (no text or symbols)Informations
Copyright © 2008 Sagem Communications
Dear Customer,
Thank you for purchasing our photo frame. Get ready to experience photography like never before! The photo frame allows you to view photos, audio and video files—all without a computer.
High definition LCD screen
Your digital photo frame includes 128MB of built-in memory, a memory card slot and a USB port. Files on the built-in memory can be deleted and files on memory card and USB-disc can be copied.
The included remote control makes it simple to select photo-, music- and movies files, change settings and more.
Supports browse mode (thumbnails of nine images per page at a time). Your digital photo frame supports photo rotate and stretch function.
An automatic, continuous slide show with background music lets you enjoy all of your photos with ease.
Additional functions like time and date display, alarm clock and an automatic on and off switch are also available.
We hope you enjoy your machine and its many functions!
About this User Manual
With the installation guide on the following pages, you can start using your machine quickly and easily. Detailed descriptions can be found in the following sections of this user manual.
Read the entire user manual carefully. Follow all safety instructions in order to ensure proper operation of your machine. The manufacturer accepts no liability if these instructions are not followed.
Symbols Used

Warns about dangers for people, damage to the device or other objects as well as possible loss of data. Injuries or damage can result from improper handling.

This symbol designates tips that will help you to use your machine more effectively and easily.
1 Safety Instructions and Recommendations
Do not make any changes or settings that are not described in this user manual.
Setting Up the Device
The device is exclusively for indoor use only. The device should rest securely on a stabile, flat surface. Position all cables in such a way that no one will stumble on them, thus avoiding possible injuries to persons or damage to the device itself.
Always handle the unit with care. Avoid touching the LCD screen. Never place heavy or sharp objects on the LCD panel, frame or power cord.
Protect the device against direct sunlight, heat, large temperature fluctuations and moisture. Do not place the device in the vicinity of heaters or air conditioners. Observe the information on temperature and humidity in the technical data.
The device should not be switched on immediately after being moved from a cold to a warm room or vice versa or into a cold room which has been heated up quickly. In such cases, wait at least three hours until the device has adapted to the changed conditions (temperature, humidity...).
In the event that the device becomes too hot, or if you see smoke coming from the device, you must immediately pull the power cable out of the power socket. Have your device examined by trained professionals at a technical service location. To prevent the spread of fire, open flames should be kept away from the device.
Do not plug in the device in moist rooms. Never touch the mains cable or the mains connection with wet hands.
Do not allow liquids to enter into the device. Disconnect the device from the power socket if liquids or foreign objects have entered the device and have your device examined by trained professionals at a technical service location.
Do not allow children to handle the device without supervision. The packing materials should be kept out of the hands of children.
Power Supply
Never touch the power cable if the insulation is damaged.
Before cleaning the surface of your device, disconnect it from the power network. Never use liquid, gaseous or easily flammable cleansers (sprays, abrasives, polishes, alcohol).
Only clean the display with a dry, soft cloth. If the display breaks, a mildly corrosive liquid may escape. Avoid all contact with your skin and eyes.
Repairs
Do not make any repairs to the device yourself. Improper maintenance can result in injuries or damage to the device. Only have your device repaired by an authorised service centre.
Do not remove the type label from your device; this would void the warranty.
Photo Memory Media
Only use storage media that are compatible with the device. In order to prevent damage to the card or the unit, please turn off the power before removing or inserting the card.
Never pull out the memory card while the device is accessing it. This could cause data to be damaged or lost.
Batteries
CAUTION! RISK OF EXPLOSION IF BATTERY IS REPLACED BY ONE OF AN INCORRECT TYPE.
If the device is not used for a long time, take out the batteries. So you can prevent leakage and possible damage to the device.
The batteries used should be disposed of according to the recycling regulations of your country.
2 Overview
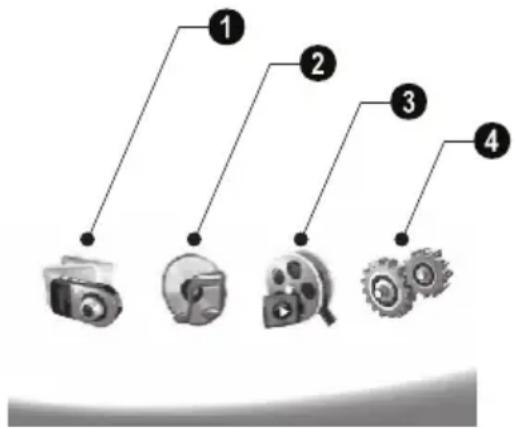
Overview of the Menu Functions
There are four items on the main menu.
① Photo Menu
② Music Menu
③ Video Menu
4 Settings
flowchart
graph TD
    A["1"] --> B["Camera Icon"]
    C["2"] --> D["Circle Icon"]
    E["3"] --> F["Wheel Icon"]
    G["4"] --> H["Gear Icon"]
Navigating in the Menu
1 Press Ⓞ on the remote control.
2 Select the desired menu using ⏻/→.
3 Confirm with .

You can also call up the menus using the corresponding keys on the back of the device.
Call up menus directly
Press 📄 on the remote control to calling the photo menu.
Press Ⓜ on the remote control to calling the music menu.
Press ☐ on the remote control to calling the video menu.
Symbols on the LCD Display
Using the keys on the back of the device, you can call up the corresponding function which is shown on the display.

If there is no operation within five seconds after pressing the button on the rear, the on-screen con will disappear.
Photo- / Music- / Movie- Mode
3—Return to the previous menu level
—Move up
∇—Move down
◀—Move left
▶—Move right
Delete the files from the internal memory
Copy files to the internal memory
√—Confirms selection
Slide Show Mode
3—Return to the previous menu level
▶—To the next photo file
To the previous photo file
▶III—Starts or pauses the playback.
✿—Adjustment menu for Brightness (✿), contrast (¶) and color saturation (☐). Press the corresponding button on the rear of the frame to enter the adjustment menu. Repeatedly pressing the corresponding button to adjust the brightness, contrast and saturation.
Optional menu to rotating the image (☑), to changing the aspect ratio (☐) and adjusting the slide show speed (☑). Press the corresponding button on the rear of the photo frame to enter the options menu. Repeatedly pressing the corresponding button to get different effects.
—Background music setting menu
Music-/Movie-Playback Mode
3—Return to the previous menu level
To the next music or movie file
To the previous music or movie file
▶ III—Starts or pauses the playback.
+/-—Adjust the volume
i—Shows current music or video title
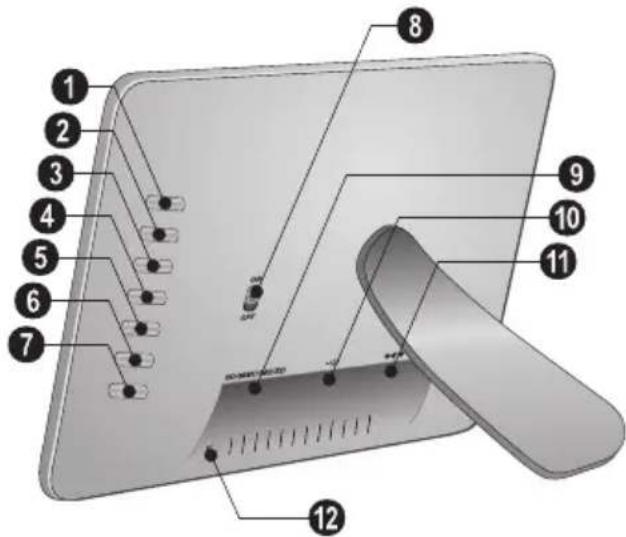
Device Overview
Using the keys on the back of the device, you can call up the corresponding function which is shown on the display.
① 3—Calling the menu functions / Return to the previous menu level
② △—Calling the menu functions / Navigating in the Menu / Skips to the next image, music or movie / Increase the brightness
③ ▼—Calling the menu functions / Navigating in the Menu / Skips to the previous image, music or movie / Decrease the brightness
4 ▶—Calling the menu functions / Navigating in the Menu / Start or pauses the playback / Increase the contrast / To adjust the slide show delay
5—Calling the menu functions / Navigating in the Menu / Enters the adjustment menu for brightness, contrast and colour saturation / Decrease the contrast / Increase the brightness.
6 📋/ 🔊—Calling the menu functions / Copy or delete the file / Enters options menu / Decrease the volume
7 — Confirms the selection / Start slide show
⑧ ON/OFF – On/Off switch
⑨ SD/MMC/MS/XD—Slot for Memory card
10 -socket—USB port for PC
⑪ ⊖ ⊕ ⊕—socket—Mains cable socket
12 button for changing the frame
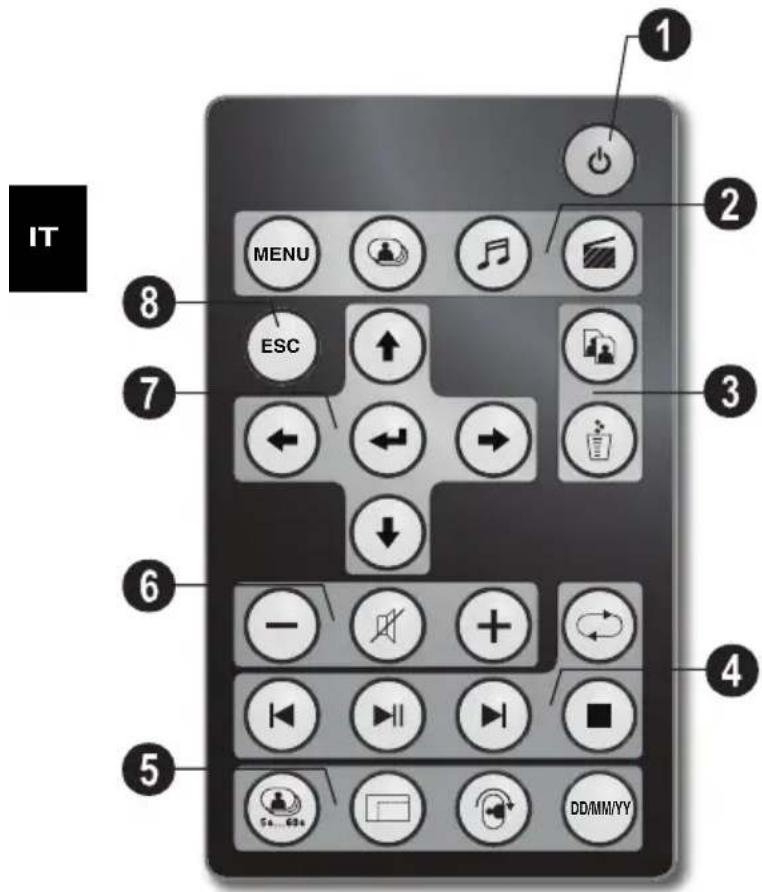
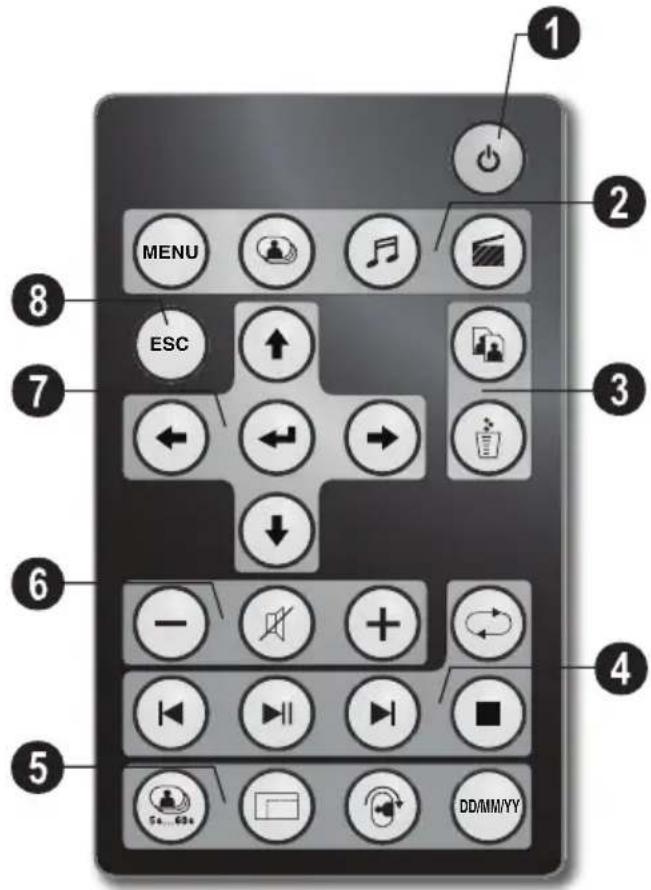
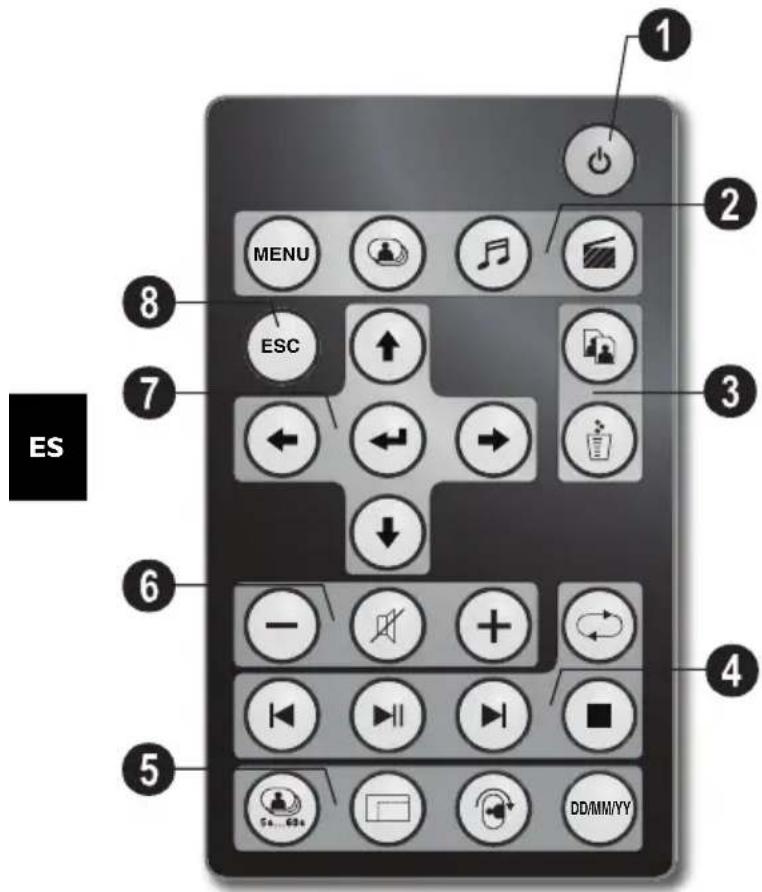
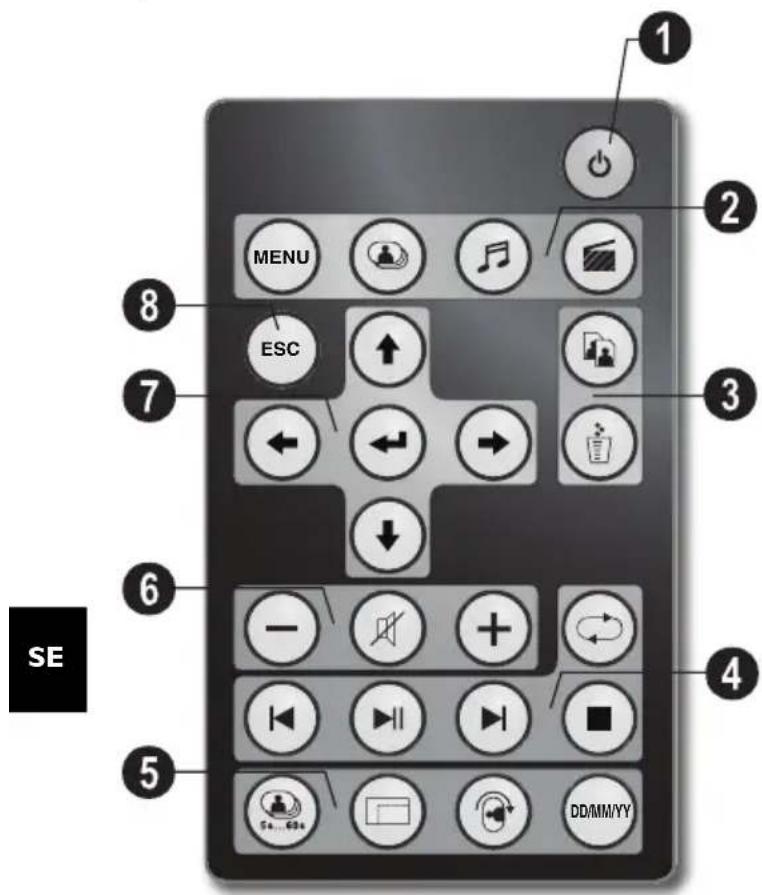
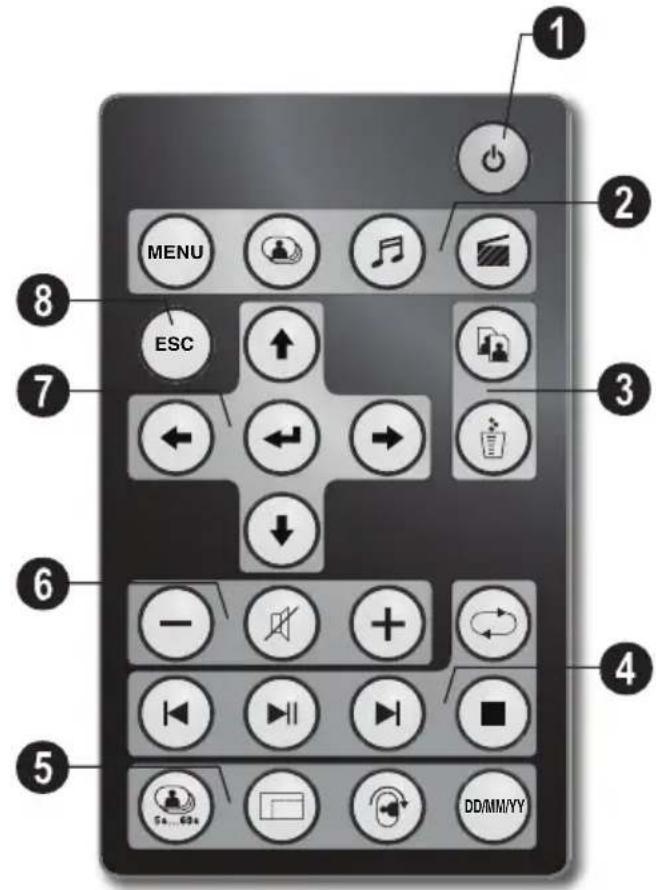
Remote Control
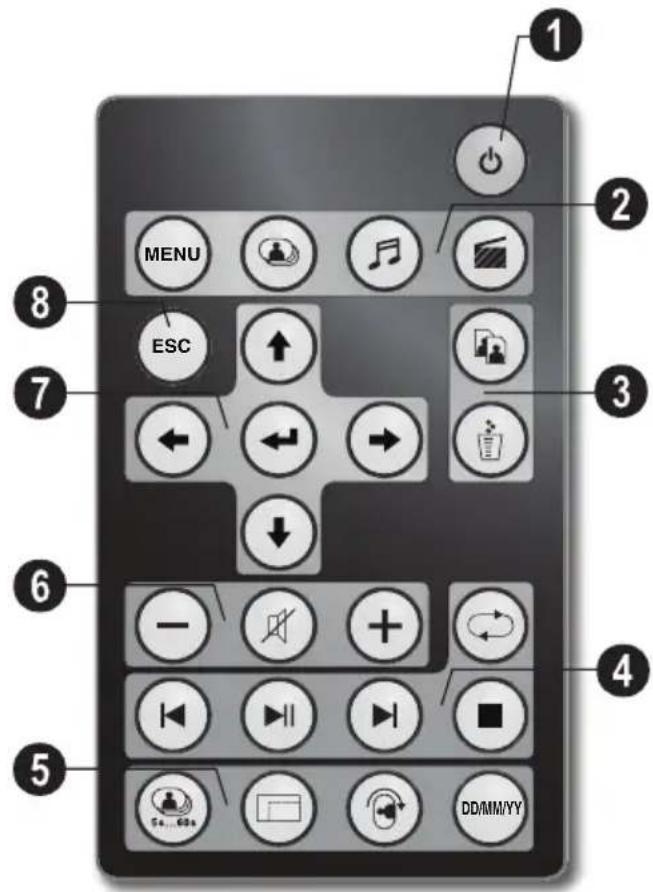
① Switching On and Off
- On/Off / Standby mode
② Calling the menu functions
MENU—Calling the menu functions
- Calling the photo menu
●—Calling the music menu
- Calling the video menu
③ Copy / Delete Files
- In the photo, music, video menu: copy files
- In the photo, music, video menu: delete files
④ playback functions
While enjoy a single image, a music, a movie: To the previous image, music or movie file
▶—Starts or pauses the playback.
While enjoy a single image, a music, a movie: To the next image, music or movie file
-Stop playback / Return to the previous menu level
- Repeat playback of image, music, video file
⑤ Additional Functions
Press repeatedly: display of the various slide show speeds
☐—Switches aspect ratio (4:3 or 16:9)
Ⓐ—To rotate the orientation of an image while enjoy a single photo or slide show with one image.
(DWW)—During playback, press to display or hide the time information that you set on the setting menu.
⑥ Adjusting Volume Level
-/+ —Adjust the volume
Mute mode
⑦/⑧ Direction Buttons
↑/↓/←/→—Navigating in the Menu / Select options
←—Calling the menu functions / confirming input
ESC—Return to the previous menu level
3 Initial Operation
EN
Packing Contents
① Digital photo frame with bracket
② Interchangeable frames
③ A remote control (with battery)
④ Power supply
⑤ USB cable
User Guide (not depicted)
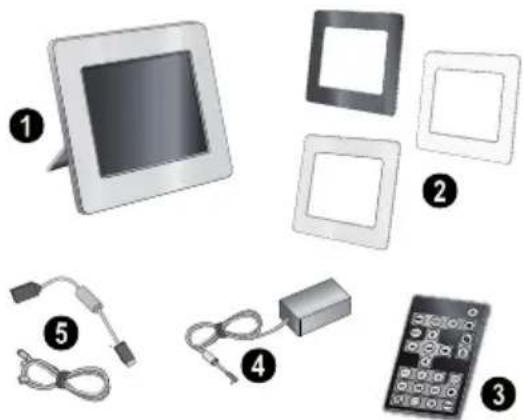

If one of the parts is missing or damaged, please contact your retailer or our customer service.
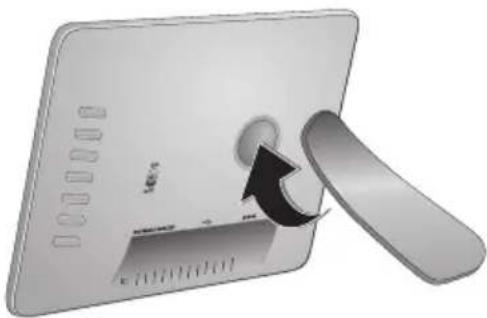
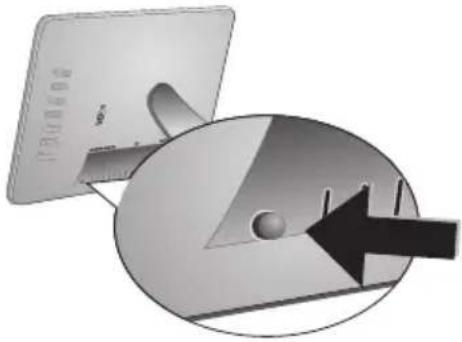
Mount the Bracket
Assemble the Photo Frame bracket on the back to prop the player up.
natural_image
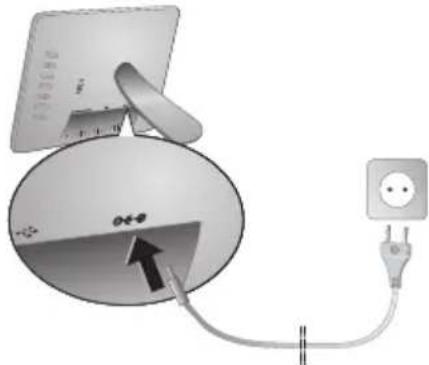
Illustration of a tablet device with a scroll wheel and a black arrow indicating rotation (no text or symbols)Connecting the Mains Cable

Check whether the mains voltage of your device (indicated on the type label) matches the mains voltage available at the setup location.
1 Insert the mains cable into the connection located on the rear side of the device. Connect the mains cable to the electrical socket. Do not switch on the device!
natural_image
Diagram showing a computer monitor connected to a power outlet via cable, with an arrow pointing to the device (no text or symbols present)Connecting to a PC
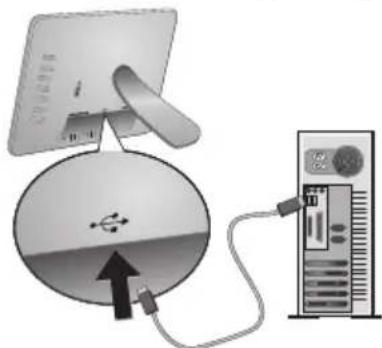
Using the USB cable, you can connect your photo frame to a computer to transfer files between the internal memory and computer.

If you connected the photo frame to a computer, the inserted memory card can not be recognized.
1 Switch the device off using the on/off switch on the rear.
2 With the photo frame turned off, connect the small end of the cable to the frame and the large end to your computer.
natural_image
Diagram showing a computer monitor connected to a server tower via cable, with a USB cable inserted into the device (no text or symbols present)3 Switch the device on using the on/off switch on the rear. Allow the computer a few moments to recognize the new hardware. Compatible photo, music and video files can be copied using Explorer onto the internal memory
Inserting a Memory Card
1 Switch the device off using the on/off switch on the rear.
2 Insert a memory card into the appropriate card slot at the rear of the device. Your photo frame supports the following memory cards: SD/MMC/MS/XD.
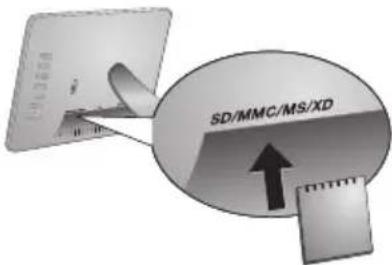
Only use storage media that are compatible with the device. In order to prevent damage to the card or the unit, please turn off the power before removing or inserting the card.
Never pull out the memory card while the device is accessing it. This could cause data to be damaged or lost.
3 Switch the device on using the on/off switch on the rear. The player will start slide show after the start screen be displayed. Press Ⓗ on the remote control to stop the slide show.
Installing or Changing the Batteries of the Remote Control
CAUTION! RISK OF EXPLOSION IF BATTERY IS REPLACED BY AN INCORRECT TYPE.
1 Take the battery compartment from the remote control by opening the locking mechanism (①) and pulling out the battery compartment (②).
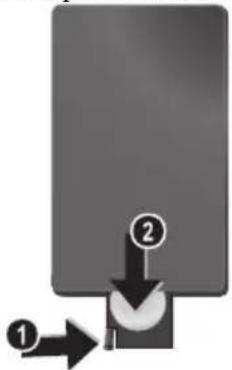
2 Insert the new batteries into the battery compartment with the positive and negative poles as shown on the back of the remote control. Make sure the polarities(+ and -) are aligned correctly.
natural_image
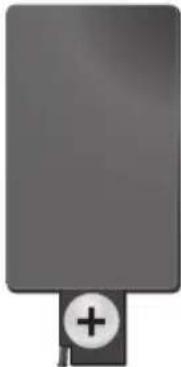
Pure electrical circuit lines without any symbols3 Push the battery compartment back into the remote control until the locking mechanism engages.
natural_image
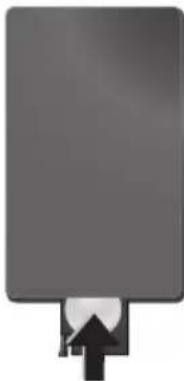
Simple gray rectangular shape with a small upward arrow at the bottom (no text or symbols)Normally the batteries will last for around one year. If the remote control does not work, please replace the batteries. If the player is not used for a long time, take out the batteries. So you can prevent leakage and possible damage to the remote control.
The batteries used should be disposed of according to the recycling regulations of your country.
Using the Remote Control
Point the remote control to the remote sensor on the front panel of the device. Its working limits is within an angle of 30 degrees and a distance of 2 meter. When using the remote control, no obstacle should be placed between the remote control and remote sensor.

4 Playback
Photo Playback
1 Select the photo menu in the main menu and confirm using ⏻. A screen with memory type icons will appear.

You can call the photo menu also using Ⓞ on the remote control.
2 Follow the steps on the Internal Memory and Memory Card Slot section to select the memory type and press
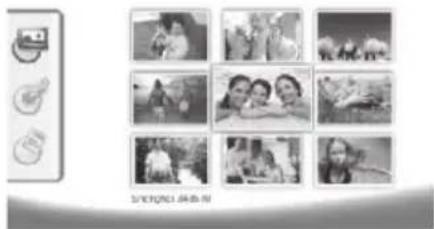
3 Then the frame will display nine thumbnail images per page as below.
natural_image
Grid of nine black-and-white photos arranged in a 3x3 grid, with no visible text or symbols.4 Select the image you want to view using ⏻/⇨ or ⬇/⇨ on the remote control.
5 Press ⬇ to start the slide show.

During playback call up the menu using MENU. During a slide show, you can press ↻ to view a single image. Press ↻/→ to skip top the previous or next image.
Rotate Photos
When a single image is displayed, you can rotate the image using Ⓤ button on the remote and finally return to original image. Every time you press this button, the image rotates 90 degrees clockwise.
Switches the Aspect Ratio
The digital photo frame has a wide screen with 16:9 aspect ratio. However most of the consumer camera's take photo in 4:3 aspect ratio. You can alternate aspect ratios between 16:9 and 4:3 by repeatedly pressing ☐ on the remote control. If you change the display aspect ratio to 4:3, the images will appear in the middle of the screen with black bars on both sides.
Set up Slide Show
Adjust the slide show speed
The slide show speed can be changed using Ⓗ on the remote control. Repeatedly pressing this button will get different time delay such as 5s, 10s, 30s and 60s.
Setting the Background Music of the Slide Show

As background music, you can only use files that are stored together with the photos in the internal memory on the memory card or the USB connection.
1 Press on the 🔔 symbol on the back of the device during a slideshow. The settings menu for the background music appears.
2 Press ▷ to start the background music.

Using ⏻/∫=, set the volume. You can skip to the previous or next song by using the ◀ or ▶ button on the remote control.
Music Playback
1 Select the music menu in the main menu and confirm using ⬇. A screen with memory type icons will appear.

You can call the music menu also using ⏻ on the remote control.
2 Follow the steps on the Internal Memory and Memory Card Slot section to select the memory type and press ⏻.
3 Select the file you want to play back using / or / on the remote control.
4 Press ⬇ to start playback. To stop press ■ or Ⓔ on the remote control.

During playback, you can skip to the previous or next song by using ⏻/↔ oder ⏻/↔ on the remote control.
During playback, press the ▶ on the remote control to pause and to resume playback.
Using Ⓤ to select if the actual song is repeated, all songs are repeated or to switch off the repeat function.
Adjusting Volume Level
During playback you can adjust the volume using ⏻/⊕ on the remote control. Press Ⓜ or repeatedly ⏻ to switch off the volume (mute function).
Movie Playback
1 Select the movie menu in the main menu and confirm using ⬆. A screen with memory type icons will appear.

You can call the movie menu also using Ⓞ on the remote control.
2 Follow the steps on the Internal Memory and Memory Card Slot section to select the memory type and press 🔒.
3 Select the file you want to play back using ⏻/⇨ or ⏻/⇨ on the remote control.
4 Press ⬇ to start playback. To stop press ■ or ESC on the remote control.

During playback, you can skip to the previous or next song by using ⏻/↔ oder ▶/↔ on the remote control.
During playback, press the ⬆ on the remote control to pause and to resume playback.
Using Ⓤ to select if the actual song is repeated, all songs are repeated or to switch off the repeat function.
Adjusting Volume Level
During playback you can adjust the volume using -/+ on the remote control. Press or repeatedly - to switch off the volume (mute function).
5 Settings
EN
Modifying the Settings
1 Select the settings menu in the main menu and confirm using ⏻.
2 Use ⬆/↓ to select the setting you would like to allocate.
3 Confirm with .
You can allocate the following settings:
28 (Clock)—Setting the time and date. Press ☐ to display the time on the screen.
(Brightness, Contrast, Colour saturation)—This setting allows you to adjust the brightness, contrast, color saturation of the LCD screen.
(Transition Effects)—Allows you to choose different styles of slide show effects.
(Alarm & Power off)
Alarm: The alarm can be set to ring at a specific time each day. The hours and minutes are set in the same manner as used in setting the clock.
Power Off: Allows the frame to automatically power off at a particular time of the day. The Power icon must be set to √.
(Auto Start)—Allows you to set different auto start playback item among Main Menu, Slide show with one image, Slide Show with four images and Play video). The photo frame will play the corresponding content after the start-up screen logo be displayed.
(Default)—Select ☑ to restore the settings to the factory default.
4 Select the desired setting using ⬆/↓.
5 Confirm with .

Press Ⓗ or ⏻ to close the menu and return to the starting mode.
Copy / Delete Files
Images, music and video files in the internal memory can be deleted. Images, music and video files on the memory card or USB disk can be copied.
Copy Files
1 Highlight the file you want to copy.
2 Press 📄 on the remote control.
3 Highlight ☑ icon and press ⏻ to start copying.
4 The screen will display the processing bar. After finish copying, you can find the image in the internal memory.
Highlight ☒ icon and press ⬇ to exit the current operation menu.
Delete Files
1 Highlight the file you want to delete.
2 Press 📋 on the remote control.
3 Highlight ☑ icon and press ← to delete the file.
Highlight ✗ icon and press ← to exit the current operation menu.
Setting Music and time for the Alarm Function
Ensure that a memory card is inserted in the device or an USB connections to a computer exists.
1 Press Ⓜ on the remote control.
2 Using ⬆/↓ select the USB connection or a memory card as the source.
3 Confirm with .
4 Using / or / select the file that you would like to set as music for the alarm function.
5 Press 📄 on the remote control.
6 Select the symbol for the alarm function (☑) using ⬇/↔.
7 Confirm with ⏻. The music will be copied to the internal memory and be set the as the alarm music.
8 Press Ⓜ on the remote control to highlight the setting symbol (☐).
9 Confirm with .
10 Using ⬆/↓ select 📋.
11 Follow the steps on the Setting the Alarm Time. The Alarm Mode must be set to MP3.
6 Service
Changing the frame
You can change the frame of the device using the picture frames supplied. The frames are held with magnets.
1 Press on the change frames button on the back of the device. Remove the frame.
natural_image
Diagram showing a computer monitor and a circular device with an arrow, no visible text or symbols2 Place the picture frame onto the device until it engages on the magnets.

natural_image
Illustration of two overlapping rectangular frames with a curved arrow indicating rotation (no text or symbols)Information
| Problems Solutions | |
| Photo Frame does not power on. Check that you connect the | AC adapter to the photo frame properly. |
| Cannot save files Make sure that enough internal memory | is available. Re-start the picture frame and delete some files in order to free up memory space. |
| No sound Make sure the file format is supported, the computer and the frame are correct connected or the memory card is not damaged. | |
| Memory card can not be recognized | If you connected the photo frame to a computer, the inserted memory card can not be recognized. |
7 Appendix
EN
Technical Data
Model..... AF 5076MS
Dimensions (L × H × W) .....216,5 × 150 × 27 mm
Weight 0,5 kg
Mains Connection.....Input: 100–240V \~ / 50–60Hz .....Output: 12V== / 1A
Audio Output.... 1 × 1 W
Recommended Ambient....0–45°C
Relative humidity ....20–80%
Display
Screen size 7"
Aspect ratio....16:9
Resolution 480×234 Pixel
Memory
Internal memory...... 128 MB-NAND-Memory
Connections
USB port.... USB-Host
Compatible Memory Cards...... SD · MMC · MS · XD
Supported formats
Photo formats......JPEG
Music formats....MP3
Video formats....Motion-JPEG
All data are provided for reference purposes only.
AgfaPhoto reserves the right to make any changes without prior notice.
AgfaPhoto Holding GmbH: AGFAPHOTO is used under license of Agfa-Gevaert NV & Co.KG. Agfa-Gevaert NV & Co.KG does not manufacture these products or provide any product warranty or support.
Contact: www.agfaphoto.com
For service, support and warranty information, contact the distributor or manufacturer:sold and distributed by Sagem Communications.
Contact: www.sagem-communications.com
The CE marking certifies that the product meets the main requirements of the European Parliament and Council directive 1999/5/CE on telecommunications terminal equipment, regarding safety and health of users and regarding electromagnetic interference.
The declaration of compliance can be consulted on the site www.agfaphoto.com
Preservation of the environment as part of a sustainable development logic is an essential concern of AgfaPhoto. The desire of AgfaPhoto is to operate systems observing the environment and consequently it has decided to integrate environmental performances in the life cycle of this products, from manufacturing to commissioning use and elimination.

Packaging: The presence of the logo (green dot) means that a contribution is paid to an approved national organisation to improve package recovery and recycling infrastructures to facilitate. Please respect the sorting rules set up locally for this kind of waste.
Batteries: If your product contains batteries, they must be disposed of at appropriate collection points.

Product: The crossed-out waste bin stuck on the product means that the product belongs to the family of electrical and electronic equipment. In this respect, the European regulations ask you to dispose of it selectively;
- At sales points in the event of the purchase of similar equipment.
- At the collection points made available to you locally(drop-off centre, selective collection, etc.).
In this way you can participate in the re-use and upgrading of Electrical and Electronic Equipment Waste, which can have an effect on the environment and human health.
This user manual was printed on recycled paper bleached without chlorine. This satisfies the highest standards for low environmental impact. The cardboard packaging used and the packaging inserts of paper and cardboard can be disposed of as waste paper. The plastic foil may be submitted for recycling or disposed of with waste not intended for recycling, depending on the requirements in your country.
Trademarks: The references mentioned in this manual are trademarks of the respective companies. The lack of the symbols ^® and ^™ does not justify the assumption that these dedicated terms are free trademarks. Other product names used herein are for identification purposes only and may be trademarks of their respective owners. AgfaPhoto disclaims any and all rights in those marks.
Neither AgfaPhoto nor its affiliates shall be liable to the purchaser of this product or third parties for damages, losses, costs, or expenses incurred by the purchaser or third parties as a result of accident, misuse, or abuse of this product or unauthorized modifications, repairs, or alterations to this product, or failure to strictly comply with AgfaPhoto operating and maintenance instructions.
AgfaPhoto shall not be liable for any damages or problems arising from the use of any options or any consumable materials other than those designated as original AgfaPhoto products or AgfaPhoto approved products.
AgfaPhoto shall not be held liable for any damage resulting from electromagnetic interference that occurs from the use of any interface cables other than those designated as AgfaPhoto products.
All rights reserved. No part of this publication may be reproduced, stored in a retrieval system or transmitted in any form or by any means, electronic, mechanical, photocopying, recording, or otherwise, without the prior written permission of AgfaPhoto. The information contained herein is designed only for use with this product. AgfaPhoto is not responsible, if this information is applied to other devices. This user manual is a document that does not represent a contract.
Errors, printing errors and changes are reserved.
Copyright © 2008 Sagem Communications
Stimato cliente,
Telecomando
③ Copia/cancella i file

natural_image
Illustration of a device with a knob and handle, showing a circular button on the screen (no text or symbols)natural_image
Diagram showing a computer monitor connected to a power outlet via cable, with an arrow pointing to the screen (no text or symbols present)
Collegamento al PC
natural_image
Diagram showing a computer monitor connected to a server tower via cable, with an arrow pointing to the monitor (no text or symbols present)natural_image
Gray rectangular object with a plus sign and circular base (no text or symbols)natural_image
Pure electrical circuit lines without any symbolsnatural_image
Grid of nine black-and-white photos arranged in a 3x3 grid, with no visible text or symbols.natural_image
Diagram showing a computer monitor with an open screen and a circular arrow pointing to a button (no text or symbols present)natural_image
Illustration of two overlapping rectangular frames with a curved arrow indicating rotation (no text or symbols)Attenzione!
Sagem Communications.
Contatti:www.sagem-communications.com
Copyright © 2008 Sagem Communications
Geachte klant,
Afstandsbediening
① In-/uitschakelen
natural_image
Illustration of a device with a circular button and a curved arrow, no visible text or symbolsNetkabel aansluiten
natural_image
Diagram showing a device with an antenna connected to a power outlet, no text or symbols presentnatural_image
Diagram showing a computer monitor connected to a server tower via cable, with a USB cable inserted into the screen (no text or symbols present)natural_image
Gray rectangular object with a plus sign and a small circular symbol at the bottom (no text or symbols present)natural_image
Pure electrical circuit lines without any symbolsnatural_image
Grid of nine black-and-white photos arranged in a 3x3 grid, with no visible text or symbols.natural_image
Diagram showing a computer monitor with an open screen and a circular arrow pointing to a button (no text or symbols present)natural_image
Illustration of two overlapping rectangular frames with a curved arrow indicating rotation (no text or symbols)NL
Tips
Copyright © 2008 Sagem Communications
Estimado cliente:
flowchart
graph TD
    A["1"] --> B["2"]
    B --> C["3"]
    C --> D["4"]
Navegar por el menú
Control remoto
① Conectar / desconectar
© – Encender-Apagar / Modo de espera

natural_image
Illustration of a remote control panel with a circular dial and scroll wheel (no text or symbols)natural_image
Diagram showing a computer monitor connected to a power outlet via cable, with an arrow pointing to the screen (no text or symbols present)natural_image
Pure electrical circuit lines without any symbolsnatural_image
Pure electrical circuit lines without any symbolsnatural_image
Grid of nine black-and-white photos arranged in 3 rows, each with a small icon on the left (no text or symbols visible)natural_image
Diagram showing a computer monitor with an open screen and a circular arrow pointing to a button (no text or symbols present)natural_image
Illustration of two overlapping rectangular frames with a curved arrow indicating rotation (no text or symbols)Indica
Copyright © 2008 Sagem Communications
Estimado cliente,
flowchart
graph TD
    A["1"] --> B["2"]
    B --> C["3"]
    C --> D["4"]
Navegar no menu

Comando à distância

natural_image
Illustration of a tablet device with a scroll wheel and a black arrow indicating rotation (no text or symbols)Ligar o cabo de rede

natural_image
Diagram showing a computer monitor mounted on a spherical device with an attached power outlet, connected by cables (no text or symbols present)Conectar ao PC
natural_image
Diagram showing a computer monitor connected to a server tower via cable, with a USB cable inserted into the device (no text or symbols present)natural_image
Pure electrical circuit lines without any symbolsnatural_image
Pure electrical circuit lines without any symbolsnatural_image
Grid of nine black-and-white photos arranged in a 3x3 grid, with no visible text or symbols.natural_image
Diagram showing a computer monitor and a circular device with an arrow, no visible text or symbolsnatural_image
Illustration of two overlapping rectangular frames with a curved arrow indicating rotation (no text or symbols)Indicações
Sagem Communications.
Contacto: www.sagem-communications.com
Copyright © 2008 Sagem Communications
Bästa/bäste kund,
Fjärrkontroll

natural_image
Illustration of a tablet device with a scroll wheel and a black arrow indicating rotation (no text or symbols)natural_image
Diagram showing a computer monitor connected to a power outlet via cable, with an arrow pointing to the screen (no text or symbols present)Anslut till PC:n
natural_image
Pure electrical circuit lines without any symbols3 Skjut in batterifacket i fjärrkontrollen tills låset hakar in.
natural_image
Simple gray rectangular shape with a small upward arrow at the bottom (no text or symbols)
natural_image
Grid of nine black-and-white photos arranged in a 3x3 grid, with no visible text or symbols.natural_image
Diagram showing a computer monitor with an arrow pointing to a circular device (no text or symbols present)natural_image
Illustration of two overlapping rectangular frames with a curved arrow indicating rotation (no text or symbols)Anvisningar
Copyright © 2008 Sagem Communications
Vážený zákazníku,
Dálkový přístup


natural_image
3D rendering of a tablet device with a scroll wheel and circular button, showing no text or symbols on the device itself.natural_image
Diagram showing a computer monitor connected to an electrical outlet via cable, with no visible text or symbols.natural_image
Gray rectangular object with a plus sign and a circular symbol on top (no text or labels)natural_image
Pure electrical circuit lines without any symbolsnatural_image
Grid of nine black-and-white photos arranged in a 3x3 grid, with no visible text or symbols.natural_image
Diagram showing a computer monitor and a circular device with an arrow, no visible text or symbolsnatural_image
Illustration of two overlapping rectangular frames with a curved arrow indicating rotation (no text or symbols)Informace
Copyright © 2008 Sagem Communications
Tisztelt vásárló!
Távvezérlés

natural_image
Illustration of a tablet device with a scroll wheel and a black arrow indicating rotation (no text or symbols)natural_image
Diagram showing a device with a cable inserted into a spherical component, connected to an electrical outlet (no text or symbols present)natural_image
Diagram showing a computer monitor connected to a server tower via cable, with a USB cable inserted into the device (no text or symbols present)natural_image
Pure electrical circuit lines without any symbolsnatural_image
Pure electrical circuit lines without any symbolsnatural_image
Grid of nine black-and-white photos arranged in a 3x3 grid, with no visible text or symbols.natural_image
Diagram showing a computer monitor and a circular device with an arrow, no visible text or symbolsnatural_image
Illustration of two overlapping rectangular frames with a curved arrow indicating rotation (no text or symbols)Információ
Zdalne sterowanie

natural_image
Illustration of various electronic components including a square, square, capacitor, and remote control unit (no text or symbols)natural_image
Illustration of a tablet device with a scroll wheel and a black arrow indicating rotation (no text or symbols)natural_image
Diagram showing a device with an attached cable and power outlet, no text or symbols presentnatural_image
Diagram showing a computer monitor connected to a server tower via cable, with an icon indicating data transfer (no text or symbols present)natural_image
Gray rectangular object with a plus sign and circular symbol at the bottom (no text or labels)natural_image
Pure graphical icon of a rectangular object with an upward arrow at the bottom (no text or symbols)natural_image
Grid of black-and-white photo collage images arranged in 3x3 grid, no visible text or symbolsnatural_image
Illustration of a CD or DVD disc with an arrow indicating direction (no text or symbols present)natural_image
Illustration of two overlapping rectangular frames with a curved arrow indicating rotation (no text or symbols)Informacje
Copyright © 2008 Sagem Communications

Stimate client,
flowchart
graph TD
    A["1"] --> B["2"]
    B --> C["3"]
    C --> D["4"]
Navigare în meniu
Telecomanda

natural_image
Illustration of a tablet device with a scroll wheel and a curved arrow indicating rotation (no text or symbols)natural_image
Diagram showing a computer monitor connected to a power outlet via cable, with an arrow pointing to the screen (no text or symbols present)Conectarea la un calculator
natural_image
Diagram showing a computer monitor connected to a server tower via cable, with an arrow pointing to the monitor (no text or symbols present)natural_image
Pure electrical circuit lines without any symbolsnatural_image
Pure electrical circuit lines without any symbolsnatural_image
Grid of nine black-and-white photos arranged in a 3x3 grid, with no visible text or symbols.natural_image
Diagram showing a CD or DVD disc with an arrow pointing to a circular object, no text or symbols present.natural_image
Illustration of two overlapping rectangular frames with a curved arrow indicating rotation (no text or symbols)Indicații:
Copyright © 2008 Sagem Communications
Stimate client,
flowchart
graph TD
    A["1"] --> B["2"]
    B --> C["3"]
    C --> D["4"]
Navigare în meniu
Telecomanda


natural_image
Illustration of a tablet device with a scroll wheel and a black arrow indicating rotation (no text or symbols)natural_image
Diagram showing a computer monitor connected to a power outlet via cable, with an arrow pointing to the screen (no text or symbols present)Conectarea la un calculator
natural_image
Diagram showing a computer monitor connected to a server tower via cable, with an arrow pointing to the monitor (no text or symbols present)natural_image
Gray rectangular object with a plus sign and circular base (no text or symbols)natural_image
Pure electrical circuit lines without any symbolsnatural_image
Grid of nine black-and-white photos arranged in a 3x3 grid, with no visible text or symbols.natural_image
Diagram showing a CD or DVD disc with an arrow pointing to a circular object, no text or symbols present.natural_image
Illustration of two overlapping rectangular frames with a curved arrow indicating rotation (no text or symbols)Indicații:
Copyright © 2008 Sagem Communications
Sayın müşterimiz,
Uzaktan kumanda

① Açma/Kapama

natural_image
Illustration of a tablet device with a scroll wheel and a curved arrow indicating rotation (no text or symbols)natural_image
Diagram showing a device with an attached cable and a power outlet, no visible text or symbolsnatural_image
Gray rectangular object with a small circular plus sign at the bottom (no text or symbols)natural_image
Pure electrical circuit lines without any symbolsnatural_image
Grid of nine black-and-white photos arranged in a 3x3 grid, each with unique facial features and no visible text or symbols.natural_image
Diagram showing a computer monitor and a circular device with an arrow, no visible text or symbolsnatural_image
Illustration of two overlapping rectangular frames with a curved arrow indicating rotation (no text or symbols)Uyarýlar
Copyright © 2008 Sagem Communications
Αγαπητέ πελάτη,
flowchart
graph TD
    A["1"] --> B["2"]
    B --> C["3"]
    C --> D["4"]
Πλοήγηση στο μενού
Τηλεχειριστήριο
① Άναμμα/ Σβήσιμο
natural_image
Illustration of various electronic components including a square frame, square cutouts, connected cables, and a remote control (no text or symbols present)natural_image
Illustration of a tablet device with a scroll wheel and a black arrow indicating rotation (no text or symbols)natural_image
Diagram showing a computer monitor connected to an electrical outlet with a cable, no text or symbols presentnatural_image
Pure electrical circuit lines without any symbolsnatural_image
Simple gray rectangular sign with a small upward arrow at the bottom (no text or symbols)natural_image
Grid of nine black-and-white photos arranged in a 3x3 grid, with no visible text or symbols.natural_image
Diagram showing a CD or DVD disc with an arrow pointing to a circular object, no text or symbols present.natural_image
Illustration of two overlapping rectangular frames with a curved arrow indicating rotation or change (no text or symbols)Οδηγίες
Copyright © 2008 Sagem Communications
natural_image
Illustration of various electronic components including a square display, square frames, connected cables, a battery, and a remote control unit (no text or symbols present)
natural_image
Illustration of a tablet device with a scroll wheel and a black arrow indicating rotation (no text or symbols)Подключите к ПК
natural_image
Diagram showing a computer monitor connected to a server tower via cable, with a USB cable inserted into the screen (no text or symbols present)natural_image
Gray rectangular object with a plus sign and a small circular symbol on the side (no text or symbols present)natural_image
Pure graphical icon of a gray rectangular block with an upward arrow at the bottom (no text or symbols)natural_image
Grid of nine black-and-white photos arranged in 3x3 grid, each with a small icon on the left (no text or symbols visible)natural_image
Diagram showing a computer monitor with an open screen and a magnified view of a device with an arrow pointing to a sphere (no text or symbols present)natural_image
Illustration of two overlapping rectangular frames with a curved arrow indicating rotation (no text or symbols)Рекомендации
Copyright © 2008 Sagem Communications
RU