
PX5 - Projector 3M - Free user manual and instructions
Find the device manual for free PX5 3M in PDF.
Frequently Asked Questions - PX5 3M
User questions about PX5 3M
0 question about this device. Answer the ones you know or ask your own.
Ask a new question about this device
Download the instructions for your Projector in PDF format for free! Find your manual PX5 - 3M and take your electronic device back in hand. On this page are published all the documents necessary for the use of your device. PX5 by 3M.
USER MANUAL PX5 3M
USER'S MANUAL (Simplified Edition)
Introduction
Congratulations on your purchase of the 3M^TM Digital Projector.
Please read the USER'S MANUAL (Simplified Edition) and the USER'S MANUAL (CD-ROM Edition) carefully and use the projector properly. After reading, please store in a safe place.
IMPORTANT
Digital Light Processing, DLP™, Digital Micromirror Device and DMD are all trademarks of Texas Instruments.
Other names of companies and products mentioned are trademarks and registered trade-marks of the respective companies. ^TM ,®and ^ marks are not used in this document.
DECLARATION OF CONFORMITY
This device complies with Part 15 of the FCC Rules. Operation is subject to the following two conditions. (1) This device may not cause harmful interference, and (2) this device must accept any interference received, including interference that may cause undesired operation.
U.S. Responsible Party:
Address:
3M Austin Center
Building A145-5N-01 6801 River Place Blvd.
Austin, TX 78726-9000
Tel. No.:
800-328-1371
Type of Product:
Projector
Equipment Classification:
Class B Peripheral
Models:
PX5
We hereby declare that the equipment specified above conforms to the technical standards as specified in the FCC Rules.

RF Interference
WARNING
This equipment has been tested and found to comply with the limits for a Class B digital device, pursuant to Part 15 of the FCC Rules. These limits are designed to provide reasonable protection against harmful interference in a residential installation. This equipment generates, uses and can radiate radio frequency energy and, if not installed and used in accordance with the instructions, may cause harmful interference to radio communications. However, there is no guarantee that interference will not occur in a particular installation. If this equipment does cause harmful interference to radio or television reception, which can be determined by turning the equipment off and on, the user is encouraged to try to correct the interference by one or more of the following measures:
- Reorientate or relocate the receiving antenna.
- Increase the separation between the equipment and receiver.
- Connect the equipment into an outlet on a circuit different from that to which the receiver is connected.
- Consult the dealer or an experienced radio/TV technician for help.
DOC compliance Notice
This Class B digital apparatus meets all requirements of the Canadian Interference-Causing Equipment Regulations.

CAUTION
TO PREVENT SHOCK, DO NOT OPEN THE CABINET. NO USER-SERVICEABLE PARTS INSIDE. REFER SERVICING TO QUALIFIED 3M^TM SERVICE PERSONNEL.
This symbol warns the user that uninsulated voltage within the unit may have sufficient magnitude to cause electric shock. Therefore, it is dangerous to make any kind of contact with any part inside of this unit.
This symbol alerts the user that important literature concerning the operation and maintenance of this unit has been included. Therefore, it should be read carefully in order to avoid any problems.
The above cautions are given on the bottom of the product.
Hg: Lamp in This Product Contains Mercury. Dispose of Lamp According to Local, State or Federal Law.
WARNING
TO PREVENT FIRE OR SHOCK, DO NOT EXPOSE THIS UNIT TO RAIN OR MOISTURE. DO NOT USE THIS UNIT'S GROUNDED PLUG WITH AN EXTENSION CORD OR IN AN OUTLET UNLESS ALL THREE PRONGS CAN BE FULLY INSERTED. DO NOT OPEN THE CABINET. THERE ARE HIGH-VOLTAGE COMPONENTS INSIDE. ALL SERVICING MUST BE DONE BY QUALIFIED 3M SERVICE PERSONNEL.
Important Safeguards
These safety instructions are to ensure the long life of the unit and to prevent fire and shock. Please read them carefully and heed all warnings.
Installation
- For best results, use the unit in a darkened room.
- Place the unit on a flat, level surface in a dry area away from dust and moisture.
- Do not place the unit in direct sunlight, near heaters or heat radiating appliances.
- Exposure to direct sunlight, smoke or steam can harm internal components.
- Handle the unit carefully. Dropping or jarring can damage internal components.
- Do not place heavy objects on top of the unit.
Power Supply
- The unit is designed to operate on a power supply of 100-240 V 50/60 Hz AC. Ensure that your power supply fits these requirements before attempting to use the unit.
- Handle the power cable carefully and avoid excessive bending. A damaged cord can cause electric shock or fire.
- Disconnect the power cable (main's lead) from the power outlet after using the unit. Before disconnecting the power cable, make sure that the STANDBY indicator lights in amber (not blinking or in green).
Cleaning
- Disconnect the power cable (main's lead) from the unit.
- Clean the cabinet of the unit periodically with a damp cloth. If heavily soiled, use a mild detergent. Never use strong detergents or solvents such as alcohol or thinner.
- Use a blower or lens paper to clean the lens, and be careful not to scratch or mar the lens.
- Clean the ventilation slots and speaker grills on the unit periodically using a vacuum cleaner. If accumulated dust blocks the ventilation slots, the unit will overheat, which may cause the unit to malfunction.
Use a soft brush attachment when using the vacuum cleaner. Do not use a hard attachment, such as a crevice tool, to prevent the damage to the unit.
Lamp Replacement
- Be sure to replace the lamp when the Status indicator comes on. If you continue to use the lamp after 2000 hours of usage, the lamp will turn off.
Fire and Shock Precautions
- Ensure that there is sufficient ventilation and that vents are unobstructed to prevent the buildup of heat inside the unit. Allow at least 10cm (3 inches) of space between the unit and walls.
- Prevent foreign objects such as paper clips and bits of paper from falling into the unit. Do not attempt to retrieve any objects that fell into the unit. Do not insert any metal objects such as a wire or screwdriver into the unit. If something should fall into the unit, immediately disconnect the power cable from the unit and have the object removed by a qualified 3MTM service person.
- Do not place any liquids on top of the unit.
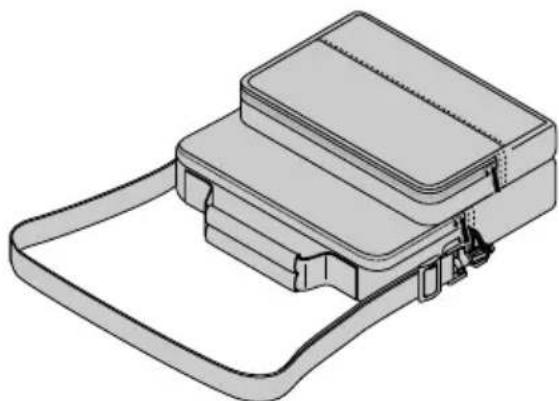
Carrying around
When carrying the unit around, please use the storage case that comes with it and, to protect the lens from scratches, always shut the Iris Lens Cover. Also, do not subject the unit to strong mechanical shock.
CAUTION - HOT!
The area around the exhaust vents is hot during and immediately after image projection.
To avoid burns, keep your hands away from this area.
Wait until the exhaust vents area cools off before touching it.
Do not look into the lens while the unit is on. Serious damage to your eyes could result.
Checking the Supplied Accessories
Remove the main unit and the accessories from the box and check that the following items are included.
-
Wireless remote control unit (includes one button battery) [1]
-
Carrying case [1]
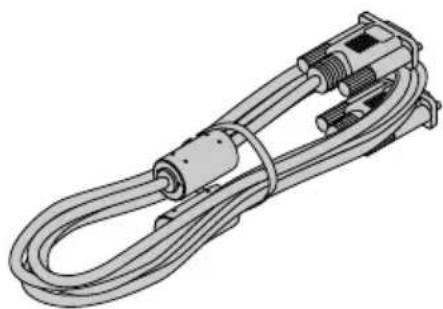
- RGB signal cable (Mini D-sub 15-pin, 2m / 6.6 feet) [1]
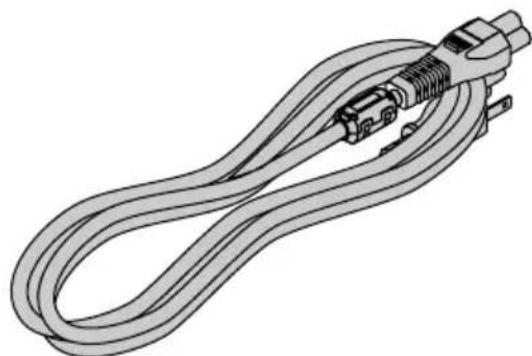
Power cable (1.8 m / 5.9 feet) [1]
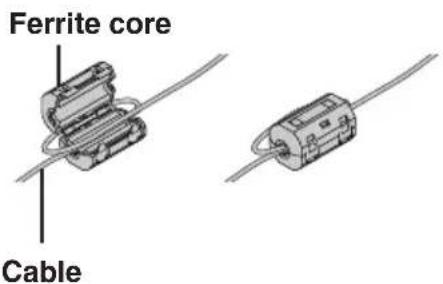
Ferrite cores [2]
These ferrite cores are attached to video cables and audio cables.

Mounting the Ferrite Core
Open the ferrite core, loop the cable through it, then close.
- User's Manual (CD-ROM Edition) [1]
- User's Manual (Simplified Edition) [1]
Security Sheet [1]
Security Label [1]
Product Safety Guide [1]

Using the User's Manual (CD-ROM Edition)
The User's Manual (CD-ROM Edition) is a version of the User's Manual that has been prepared in the Portable Document Format (PDF).
Adobe Reader 6.0.1 (English Version) Installation
For Windows
- Load the CD-ROM into the CD-ROM drive.
- Open CD-ROM "Start".
- Open the "Adobe Reader" folder within the CD-ROM.
- Open the "English" folder.
- Run "AdbeRdr60_enu.exe".
For Macintosh
- Load the CD-ROM into the CD-ROM drive.
- Open CD-ROM "Start".
- Open the "Adobe Reader" folder within the CD-ROM.
- Open the "English" folder.
- Run "AdbeRdr60_enu.dmg".
Follow the procedure that is displayed on the screen and start the installation.
- Depending on the personal computer that you are using, the "thumbnail" images might not be displayed.
Opening the User's Manual
- Load the CD-ROM into the CD-ROM drive.
- Open CD-ROM "Start".
- Double click on "INDEX.pdf" within the CD-ROM. This will launch Adobe Reader and a language selection list for the User's Manual will be displayed.
-
Move the mouse pointer to the desired language and click. The User's Manual will open. Please see the Help menu for details about Adobe Reader.
-
Adobe Reader is a trademark of Adobe Systems Incorporated.
Windows is a registered trademark of the Microsoft Corporation in the USA and other countries.
Macintosh is a registered trademark of Apple Computer Inc.
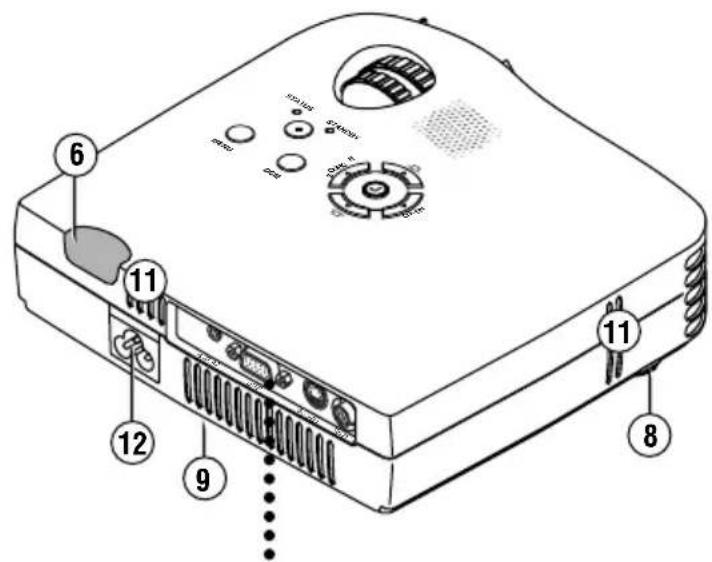
Names of the Main Unit Parts
See the User's Manual (CD-ROM Edition) for information about operation.
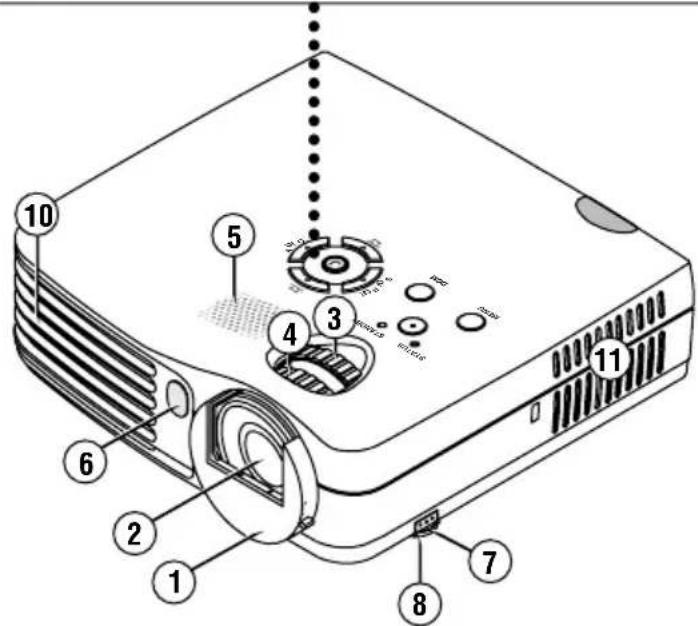
- Lens cover
- Lens
- Zoom ring
- Focus ring
- Speaker
- Remote control sensor
- Adjuster button
- Front adjusters
- Rear adjusters
- Exhaust vents
- Ventilation slots
- AC IN connector
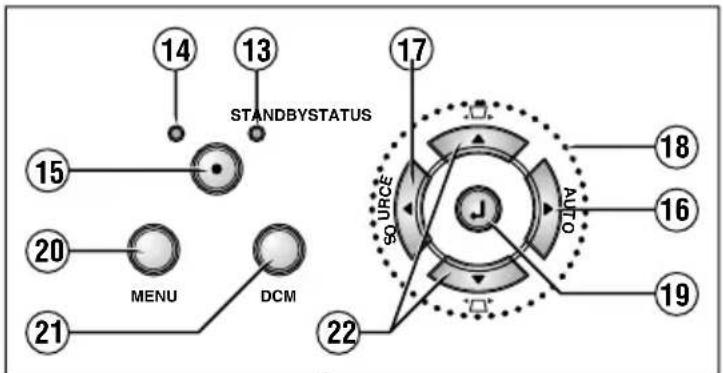
- STANDBY indicator
- STATUS indicator
- STANDBY button
- AUTO button
- SOURCE button
- SELECT (▲▼▲▶) buttons
- ENTER button
- MENU button
- DCM button
- Keystone Manual Adjustment button
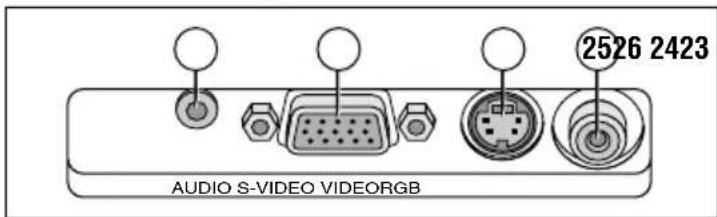
- AUDIO connector
- S-VIDEO connector
- VIDEO connector
- RGB connector
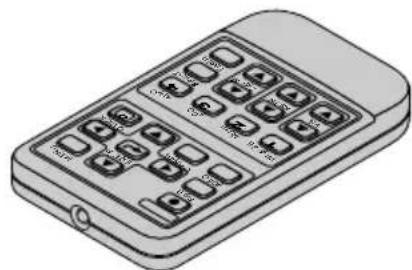
Names of the Remote Control Parts
See the User's Manual (CD-ROM Edition) for information about operation.
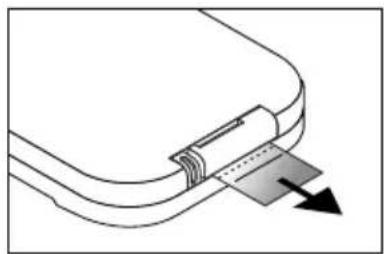
Before use, pull out and remove the transportation insulation sheet which is inserted in the battery compartment.
The remote control should be pointed toward the remote control sensor of the projector and operated.
- Infrared transmitter
- STANDBY button
- Input selection buttons
- CANCEL button
- FREEZE button
- MUTE button
- VOL. button
- KSTN button
-
SELECT (▲▼▲) buttons
-
MENU button
- ENTER button
- QUICK button
- ECO button
- AUTO button
- Number buttons
- ASPECT button
- TIMER button
- ZOOM button
CAUTION
- Danger of explosion if battery is incorrectly replaced.
Replace only with the same or equivalent type (CR2025) recommended by the manufacturer. Dispos of used batteries according to your local regulations.
DISPOSE OF USED BATTERIES ACCORDING TO THE INSTRUCTIONS.
Precautions
Handling of the Remote Control
- Do not expose the remote control to water or other liquids. Should the remote control become wet, wipe it dry immediately.
- Please keep button batteries out of the reach of children. If a battery is swallowed, promptly obtain the medical care of a doctor.
- Some operations (such as menu operations) are available only through the use of the remote control and attention should be given to its careful handling.
Connections with the Personal Computer
Please check the following before making connections with the personal computer.
- A suitable resolution for this projector is 1024 × 768 dots (XGA). The maximum displayable resolution is 1280 × 1024 dots (S-XGA).
Refer to "Table of Supported Frequency" in the User's Manual (CD-ROM Edition).
- The setting method of the personal computer will differ depending on the personal computer that you are using. For information, read the instruction manual for your personal computer, read the on-line help, or contact the manufacturer of your personal computer.
RGB signal cable (Supplied item)
Connections with the Video Equipment

Operating
1 Set up the screen and the projector
See the User's Manual (CD-ROM Edition) "Projection Distance Table" for the distance between the screen and the projector.
2 Connect the personal computer or video equipment to the projector
3 Connect the AC IN connector of the projector and the power outlet using the supplied power cable.
The STANDBY indicator lights amber and the standby mode is set.
4 ①Turn the lens cover clockwise.
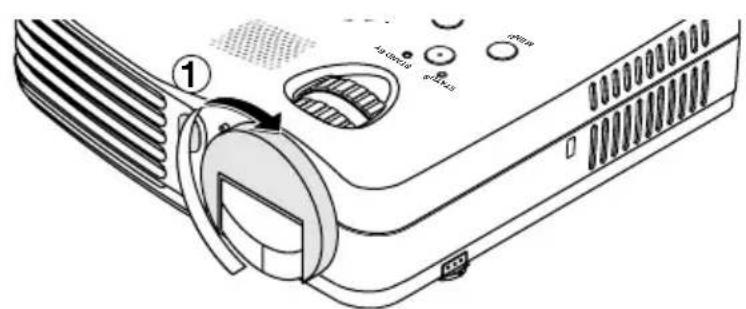
② When the lens cover stops with a click, the projector is ready for projection.
5 Switch on the projector power
Press the STANDBY button on the remote control or the projector.

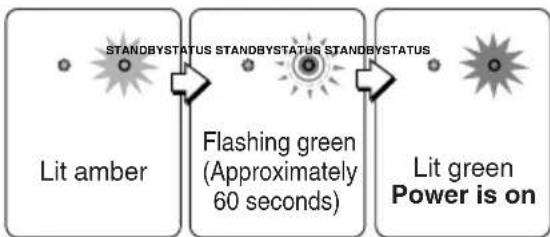
The first time the power is switched on after purchase, [Menu Language Select] will be displayed. See Page E-13
- The STANDBY indicator starts flashing green, then stops flashing, remaining lit, after about 60 seconds. If the STATUS indicator lights up green at the same time, the lamp mode is set to the Ecomode.
If the "Password" input window is displayed:
The correct password must be input or the projector cannot be used. For instructions on inputting the password, refer to the operating instructions (on the CD-ROM). For instructions on turning off the power, see page E-14.
The projector is now capable of regular projection.

Note:
- The image can be muted quickly by closing the lens cover while the image is being projected.
6 Switch on the power of the connected equipment
7 Select the input
Main unit operation: Press the SOURCE button.
Remote control operation: Press the desired button from among the input selection buttons.
Precautions
- When the power plug will be unplugged from the power outlet, please place the projector near the power outlet so that it may be reached easily.
- Press the STANDBY button after the STANDBY indicator is lit in amber.
When [Menu Language Select] is Displayed Upon Switching On the Power
The first time the power is switched on after purchase, [Menu Language Select] will be displayed. Follow the procedure described below and select the display language of the projector.
If the image is blurred, turn the focus ring counterclockwise or clockwise to focus it.
(1) Press the SELECT ( ) buttons of the Remote control and align the deep blue cursor with [English].
(2) Press the ENTER button to set.
This will set language and [Menu Language Select] will close.
This completes the selection of the display language.
Caution:
[Menu Language Select] will not appear the next time the power is switched on.
| Menu Language Select | |
| Please select a menu language. | English |
| Wählen Sieitte die Menu Sprache aus, | Deutsch |
| S'il vous plaithoir la langue de menu, | François |
| Per favore di scegliere la lingua di menu, | Italiano |
| Escola por favor el idioma de menu, | Espanol |
| Valj menyn spreken. | Svenska |
| Île nuèr éperre se l'ælil si olo | 韓国어 |
| 请选择项目单语言 | 中文 |
| ×二十一言語を選択に下さ。 | 日本語 |
| Select "▲" "▼" & "ENTER" | |
No projection when connected to a notebook computer
Should a sign not be output from the notebook computer, please try the operation described below.
| Manufacturer Model Key | |
| DELL All computers Fn + F8 | |
| EPSON All computers Fn + F8 | |
| FUJITSU All computers Fn + F10 | |
| iiyama All computers Fn + F3 | |
| IBM All computers Fn + F7 | |
| NEC All computers Fn + F3 | |
| Panasonic All computers Fn + F3 | |
| SHARP All computers Fn + F5 | |
| SONY All computers Fn + F7 | |
| SOTEC | All computers Fn + F3-F5 |
| TOSHIBA | All computers Fn + F5 |
| Victor | All computers Fn + F10 |
Note: Table information is current to December 2003.
Please see Page E-15 of the User's Manual (CD-ROM Edition) for details.
1 Switch off the power of the connected equipment
2 Switch off the power of the projector
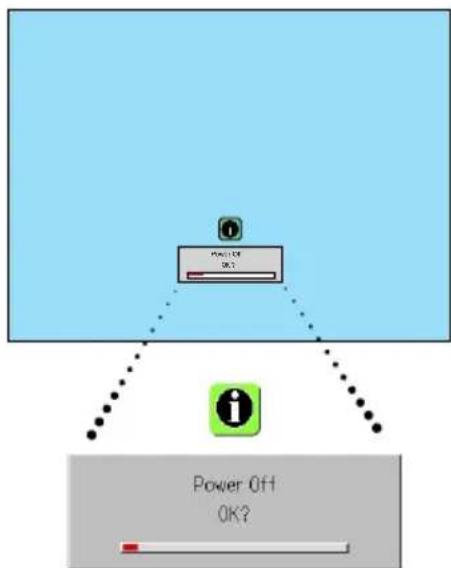
Press the STANDBY button on the remote control or the projector.

The [Power Off] display appears.
When the level gauge reaches maximum, the projection screen will go off (in about 5 seconds) and the projector will enter the power-off operation.
Note:
- The operation can be cancelled by pressing a button other than the STANDBY button.
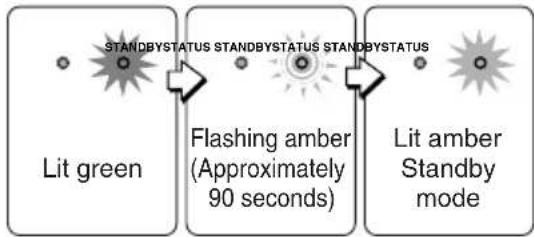
One more press of the STANDBY button will switch off the power.
The STANDBY indicator changes to flashing amber and lights a steady amber after about 90 seconds (when the unit enters the standby mode).
3 Unplug the power cable
Check that the STANDBY indicator is lit in amber and then unplug the power cable.
The STANDBY indicator will go off when the power cable is unplugged.
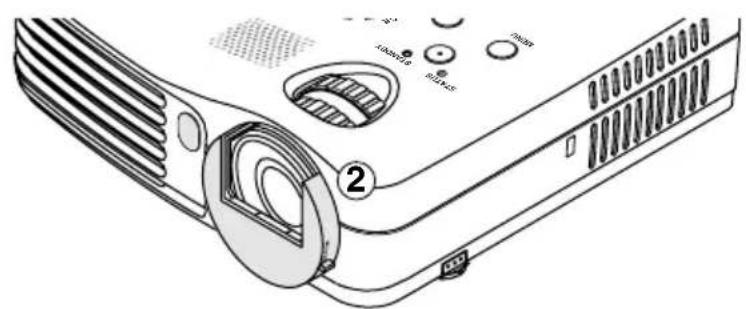
4 ①Turn the lens cover counterclockwise until it stops.
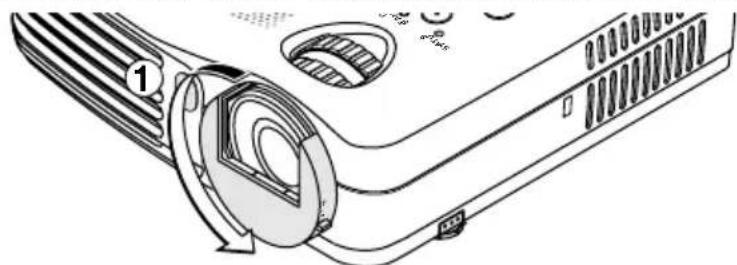
(2) The lens cover will stop with a click.

Unplug & Go function
When the power cord is unplugged directly after the power is turned off, the internal power supply is used to keep the cooling fan turning and cool the lamp, so the projector can be moved immediately.
- It may be more difficult to turn the lamp back on if it has been cooled with the power cord unplugged.
- Do not place the projector in a bag, etc., while the cooling fan is turning.
When an indicator is lit or flashing
The indicators on the projector's control panel light or flash to notify of problems, as described below.
STATUS Indicators
STANDBY Indicators
| Indicator status | What you should do | |
| STATUS Lit red | STANDBY When the Power is on (Lit green) Standby (Lit amber) | It is time to replace the lamp. Replace with a new lamp cartridge. |
| STATUS Lit red | STANDBY Flashing amber for 60 seconds, then lit amber | The lamp has reached the end of its service life. The power will no longer turn on. The projector can be used for 100 hours after the lamp has reached the end of its service life. Replace with a new lamp cartridge. |
| STATUS Flashing red (lit for 1 seconds/ off for 1 seconds) | STANDBY Lit red | The lamp cover is open. The lamp cover is not properly mounted. Mount it properly. |
| STATUS Flashing red (lit for 0.5 seconds/ off for 0.5 seconds) | STANDBY Lit red | The temperature is abnormally high. • The temperature protector has been activated. If the room temperature is high, move the projector to a cool place. If the projector's internal temperature is high, check the cooling fan's ventilation slots and clean them if they are clogged. • When the temperature protector is activated, the power turns off and in some cases will not turn back on immediately. In this case wait about 90 seconds, then try again. |
| STATUS Flashing red (lit for 0.5 seconds/ off for 0.5 seconds) | STANDBY Lit amber | The fan has stopped. Unplug the power cable and contact a store that sells the PX5 for repairs. |
| STATUS Flashing red (lit for 1 seconds/ off for 1 seconds) | STANDBY When the lamp has burned out during use: Flashing amber for 90 seconds, then lit amber. When the lamp does not come on from the start: Lit amber | The lamp will not light. Wait at least 90 seconds, then turn the power back on. If the problem persists, unplug the power cable and contact a store that sells the PX5 for repairs. |
Should an indicator be in a condition other than normal or flash at a rate other than the aforementioned, disconnect the power cable and contact your store of purchase.
Note
Should the projector not project properly, see the Troubleshooting section of the User's Manual (CD-ROM Edition).
Replacing the Lamp Cartridge
- The lamp that is used as a light source in the projector has a limited service life. The rated service life of the lamp is about 2000 hours (when used in normal mode only). This could be shortened depending on conditions of use and other factors.
Note that lamp life will be extended when the projector is often used in Eco mode. (The rated service life of the lamp means the average value of lamp life for lamps that have been manufactured over a long period, and it is derived from test conditions at this company.)
- When the life of the lamp is exceeded, the STATUS indicator lights a steady red and the message [Replace the Lamp Cartridge] is displayed on the screen. When this occurs, it is time to replace the lamp cartridge. Please make the replacement following the procedure below.
- If the projector is used another 100 hours after the lamp's service life is reached, the power is set to the standby mode and no longer turns on.
- Contact a store that sells the PX5 for a replacement lamp. Indicate you need a LKPX5 replacement lamp for the PX5.

CAUTION
- Replacement of the lamp cartridge is performed after switching off the power, waiting for the cooling fan to stop, disconnecting the power plug from the power outlet, and then leaving the projector for about 60 minutes before replacement is started. Replacement of the lamp cartridge during operation or immediately after operation stops will cause burns because of the high temperature.
- Do not remove any screws other than those specified.
- Do not touch the lamp with bare hands. Doing so could shorten the life of the lamp.
- If lamp has reached the end of its usable life, the lamp bulb may shatter. When this happens, an explosive sound can be heard and pieces of glass may be scattered in the lamp cartridge. Do not touch them as the pieces of glass may cause injury. If this happens, contact your dealer or the store the projector was purchased.
Preparations:
Turning the projector upside-down on top of a soft cloth, etc., so that it does not get scratched makes it easier to replace the lamp cartridge. Turn the projector right-side up after replacing the lamp cartridge.
1 Unplug the power cable.
2 Turn the projector upside-down.
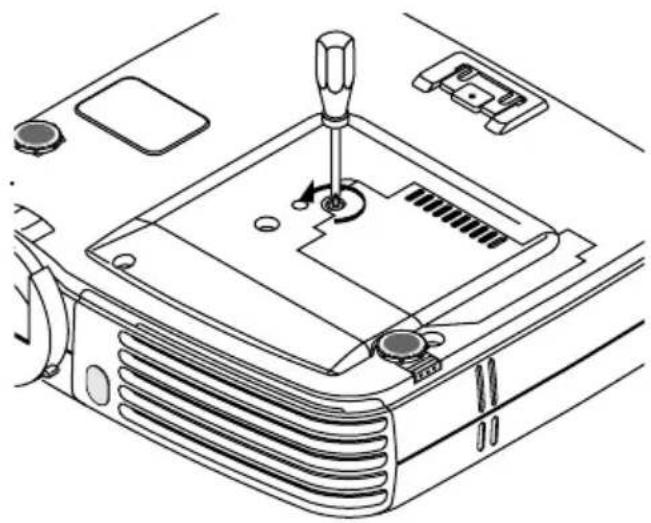
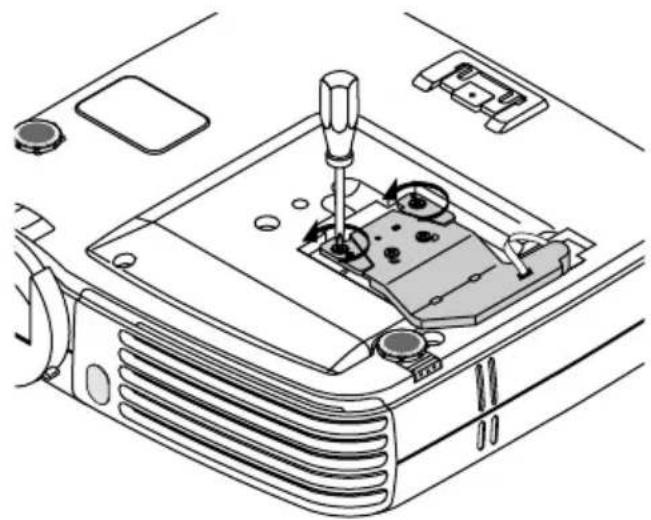
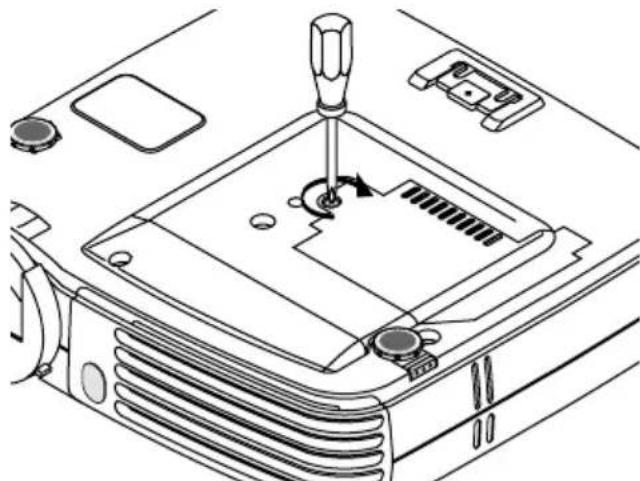
3 Remove the lamp cover.
(1) Turn the lamp cover's set screw counterclockwise and loosen until the screw turns freely. (The screw does not come off.)
(2) Open the lamp cover a little, then pull it in the direction of the arrow and remove it.
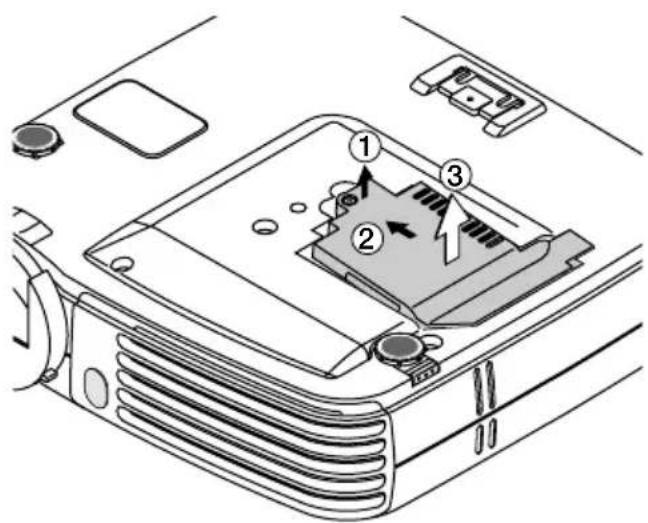
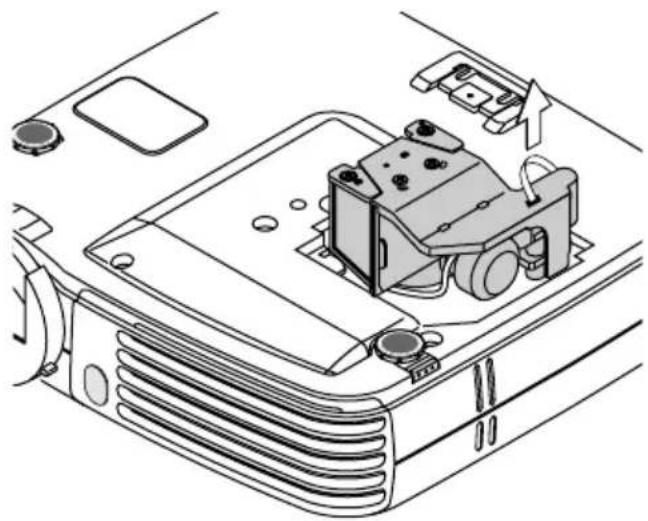
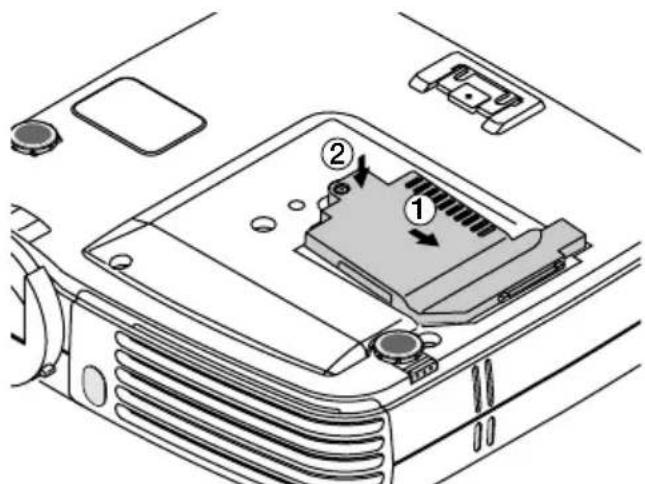
4 Remove the lamp cartridge.
(1) Fully loosen the lamp cartridge's two screws. (The screws do not come off.)
(2) Grasp the lamp cartridge's handle and pull upward to remove the lamp cartridge.
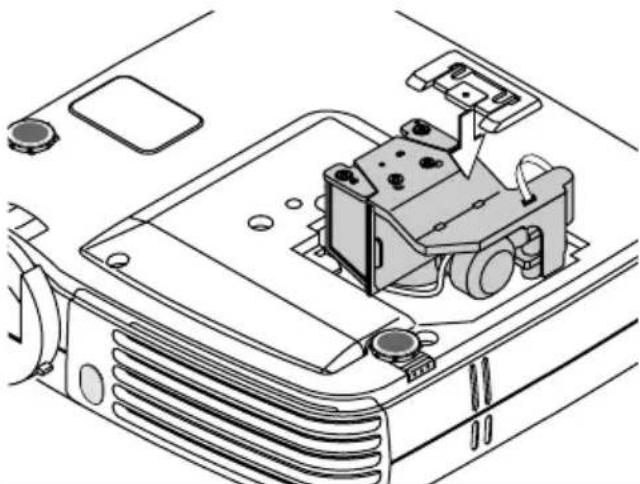
5 Mount the new lamp cartridge.
(1) Push the lamp cartridge in slowly. (Line it up with the screw holes in the projector.)
(2) Turn the lamp cartridge's two screws clockwise to tighten them.
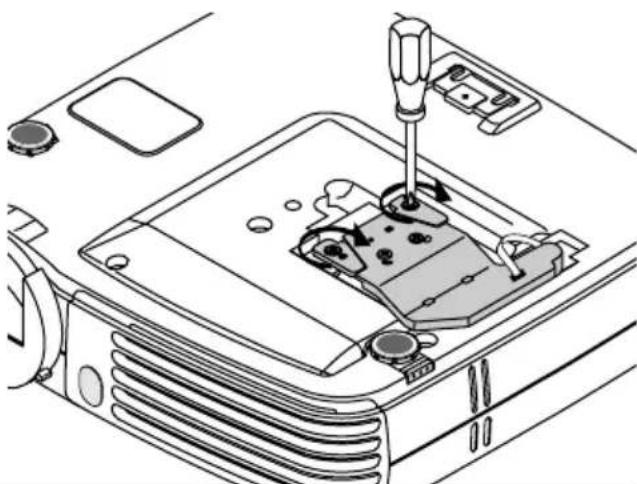
6 Mount the lamp cover.
(1) Set the tip of the lamp cover in place, then close the lamp cover.
(2) Turn the lamp cover's screw clockwise to tighten it.
7 Reset the lamp Timer.
Connect the power cable, switch on the power, and then reset.
Select [Info.] [Lamp Timer Reset] on the menu and press the ENTER button. There is a change to the initialization verification display. Press the ENTER button again.
NOTE:
After reaching the lamp service life, if the lamp is used for more than another 100 hours, it will not be possible to switch on the power. Should this happen, while the projector is in the standby mode, simultaneously holding down the projector's SOURCE button and AUTO button for more than 5 seconds will clear the lamp timer. Checking that the STATUS indicator is out will show that the lamp timer has been cleared.
Contact a store that sells the PX5 for a replacement lamp. Indicate you need a LKPX5 replacement lamp for the PX5.
Model PX5
Optical
Method of projection: DLPT^TM (single chip DMD)
DMD 0.7 inches 1024 × 768 dots
Lamp 130 W high pressure mercury lamp
Projection lens : Manual zoom ( × 1.2 ),
Manual focus F = 2.6 - 2.9 f = 27.5 - 33.0mm
Image size Minimum 26 inch
(at projection distance of 1.20m / 3.9 feet telephoto)
Maximum 300 inch
(at projection distance of 11.81m / 38.76 feet wide)
Light Output Standard mode: 1300 lm
Contrast Ratio 2000:1 (Full on/off)
Electrical
Inputs Video (NTSC3.58/NTSC4.43/PAL/PAL-N/PAL-M/PAL60/SECAM/
YCbCr(NTSC, PAL)/YPbPr(480p, 576p, 1080i, 720p)): (automatic
or manual switching)
RGB (Horizontal :15 to 80 kHz, Vertical 50 to 85 Hz)
Color Reproduction Full color (16,770,000 colors)
Resolution VGA (640× 480) expansion/true,
S-VGA (800× 600) expansion/true,
XGA (1024× 768) true,
S-XGA (1280× 1024) compression
Input Current 1.9 A
Power Requirement
100 - 240 V AC, 50/60 Hz
Power Consumption
190 watts (170 watts in eco mode)
Mechanical
Dimensions Excluding Stand
(when stored, not including projecting parts)
7.3 in.(W) × 1.8 in.(H) × 6.9 in.(D)
(when stored, not including projecting parts)
Weight
Approximately 1.3kg / 2.9 lbs
Operational Temperatures
Data projector: 5^ to 35^ (41^ to 95^) 30 to 85% humidity
- Specifications and design are subject to change without notice.
3M
(range, pieces de projection non comprises)
| Fabbricante Modello Tasto | |
| DELL Tutti i computer Fn + F8 | |
| EPSON Tutti i computer Fn + F8 | |
| FUJITSU Tutti i computer Fn + F10 | |
| iiyama Tutti i computer Fn + F3 | |
| IBM Tutti i computer Fn + F7 | |
| NEC Tutti i computer Fn + F3 | |
| Panasonic Tutti i computer Fn + F3 | |
| SHARP Tutti i computer Fn + F5 | |
| SONY Tutti i computer Fn + F7 | |
| SOTEC | Tutti i computer Fn + F3-F5 |
| TOSHIBA | Tutti i computer Fn + F5 |
| Victor | Tutti i computer Fn + F10 |
Ingressi Video (NTSC3,58/NTSC4,43/PAL/PAL-N/PAL-M/PAL60/SECAM/
YCbCr(NTSC, PAL)/YPbPr(480p, 576p, 1080i, 720p)):
RGB (Horizontal: 15 a 80 kHz, Vertical 50 a 85 Hz)
Reproduccion de-colored Color total (16.770.000 coloces)
Resolucion VGA (640× 480) expandido/verdadero,
S-VGA (800× 600) expandido/verdadero,
XGA (1024× 768) verdadero,
S-XGA (1280×1024) compresión