
AX100G - Hi-fi system KORG - Free user manual and instructions
Find the device manual for free AX100G KORG in PDF.
| Product type | Guitar effects processor (multi-effects) |
| Brand | Korg |
| Model | AX100G |
| Dimensions (W x D x H) | 329.6 x 181.5 x 57.5 mm |
| Weight | 1.05 kg |
| Power supply | 4 AA alkaline batteries (LR6) or DC9V AC adapter (sold separately) |
| Number of effects | 63 types |
| Simultaneous effects | Up to 7 |
| Programs | 80 (40 preset, 40 user) |
| Guitar input | 6.35 mm mono jack (battery power switch) |
| Auxiliary input (AUX IN) | 3.5 mm stereo mini jack |
| Line/headphone output (OUTPUT) | 6.35 mm stereo jack |
| Display | Backlit LCD + 2-digit numeric display |
| Built-in tuner | Chromatic, range A0 to C7, calibration A = 438–445 Hz |
| Rhythm patterns | 50 types, tempo 40–208 bpm |
| Expression pedal | Yes, real-time control of 23 effects |
| Phrase Trainer function | Record up to 8 seconds, slow playback without pitch change |
| Sample & Play function | Yes, with loop and reverse playback |
| Accessories included | User manual |
| Maintenance | Clean with a soft dry cloth. Do not use solvents. |
| Safety | Avoid exposure to sunlight, heat, moisture, dust, vibrations, and magnetic fields. |
| CE compliance | EMC directive (89/336/EEC) and low voltage directive (73/23/EEC) |
Frequently Asked Questions - AX100G KORG
User questions about AX100G KORG
0 question about this device. Answer the ones you know or ask your own.
Ask a new question about this device
Download the instructions for your Hi-fi system in PDF format for free! Find your manual AX100G - KORG and take your electronic device back in hand. On this page are published all the documents necessary for the use of your device. AX100G by KORG.
USER MANUAL AX100G KORG
MODELING SIGNAL PROCESSOR
AX100G
REMS
OWNER'S MANUAL P.2
NOTICE D'EMPLOI p.18
Using the unit in the following locations can result in a malfunction.
• In direct sunlight
- Locations of extreme temperature or humidity
• Excessively dusty or dirty locations
- Locations of excessive vibration
- Close to magnetic fields
Power supply ⊕-⊖
Please connect the designated AC adaptor to an AC outlet of the correct voltage. Do not connect it to an AC outlet of voltage other than that for which your unit is intended.
Interference with other electrical devices
This product contains a microcomputer. Radios and televisions placed nearby may experience reception interference. Operate this unit at a suitable distance from radios and televisions.
Handling
To avoid breakage, do not apply excessive force to the switches or controls.
Care
If the exterior becomes dirty, wipe it with a clean, dry cloth. Do not use liquid cleaners such as benzene or thinner, or cleaning compounds or flammable polishes.
Keep this manual
After reading this manual, please keep it for later reference.
Keeping foreign matter out of your equipment
Never set any container with liquid in it near this equipment. If liquid gets into the equipment, it could cause a breakdown, fire, or electrical shock.
Be careful not to let metal objects get into the equipment. If something does slip into the equipment, unplug the AC adaptor from the wall outlet. Then contact your nearest Korg dealer or the store where the equipment was purchased.
THE FCC REGULATION WARNING (for U.S.A.)
This equipment has been tested and found to comply with the limits for a Class B digital device, pursuant to Part 15 of the FCC Rules. These limits are designed to provide reasonable protection against harmful interference in a residential installation. This equipment generates, uses, and can radiate radio frequency energy and, if not installed and used in accordance with the instructions, may cause harmful interference to radio communications. However, there is no guarantee that interference will not occur in a particular installation. If this equipment does cause harmful interference to radio or television reception, which can be determined by turning the equipment off and on, the user is encouraged to try to correct the interference by one or more of the following measures:
- Reorient or relocate the receiving antenna.
- Increase the separation between the equipment and receiver.
- Connect the equipment into an outlet on a circuit different from that to which the receiver is connected.
- Consult the dealer or an experienced radio/TV technician for help.
Unauthorized changes or modification to this system can void the user's authority to operate this equipment.
CE mark for European Harmonized Standards
CE mark which is attached to our company's products of AC mains operated apparatus until December 31, 1996 means it conforms to EMC Directive (89/336/EEC) and CE mark Directive (93/68/EEC). And, CE mark which is attached after January 1, 1997 means it conforms to EMC Directive (89/336/EEC), CE mark Directive (93/68/EEC) and Low Voltage Directive (73/23/EEC).
Also, CE mark which is attached to our company's products of Battery operated apparatus means it conforms to EMC Directive (89/336/EEC) and CE mark Directive (93/68/EEC).
Printing conventions in this manual

marks a point of caution.
LCD screens printed in this manual are only for purposes of illustration, and may not match the actual display on your AX100G.
Content
1. Introduction---- 3
Main features----3
Front and rear panel 4
Front panel 4
Rear panel 4
The modes of the AX100G ----5
Installing the batteries 5
2. Playing the AX100G----5
Example connections ----5
Turn on the power 5
Program mode 6
Input level switch setting 6
Adjusting the volume (master volume) ---- 6
Selecting a program 6
Checking the effects used by a program ---- 6
Bypass, Mute 6
Auto tuner 6
Rhythm 7
AUX IN 7
Expression pedal 7
Effect Select mode 7
Entering Effect Select mode---- 7
Exiting Effect Select mode 7
Editing the effects 9
Drive Amp effect Quick Edit function 9
Editing the Drive Amp effect (example)---- 9
Editing other effects 10
Modifying the program name----10
Writing programs 10
4. Appendices 11
Adjusting the expression pedal (Calibration) - 11
Restoring the user programs to the factory settings (Reload) ---- 11
Troubleshooting 11
Main specifications 12
Effect parameters 12
DRIVE-AMP (Drive Amp effects) ----12
MOD (Modulation effects) 13
PEDAL (Pedal effect)----14
AMB (Ambience effect) 15
CABI (Cabinet effect) 16
NR LEV
(Noise Reduction, Program Level) ----16
Rhythm Pattern List---- 16
Preset Program Parameter List ---- 17
1. Introduction
Thank you for purchasing the ToneWorks AX100G Modeling Signal Processor.
In order to enjoy your AX100G to the fullest, please read this manual carefully, and use the unit correctly. Please keep this manual for future reference.
Main features
- Korg's Streaming technology provides detailed and powerful modeling sounds.
- 63 modeling effect variations are built-in, and up to 7 effects and rhythm sounds sources can be used simultaneously.
- Forty preset programs (4 x 10 banks) and forty rewritable user programs (4 x 10 banks) are built-in.
- In Effect Select mode you can use a foot switch to change the drive amp channel or turn the Modulation effect or Ambience effect on/off.
• V virtual Feedbacker lets you sustain a note on your guitar and generate feedback with vibrato - You can use the expression pedal to control 23 types of Pedal effect in realtime.
- When using the delay effect, you can automatically set the delay time by pressing the TAP switch to the rhythm of the song you are playing.
- The Phrase Trainer function lets you record up to 8 seconds of sound from an audio device, and play it back at a slower speed without changing the pitch.
- The Sample & Play function lets you record a phrase for a maximum of 6 seconds, and use the expression pedal for phrase play back.
• 7 point LED pedal indicator - 50 different rhythm patterns and a metronome are built-in for convenient practicing.
• Built in tuner mute function for on stage silent tuning. - An AUX IN jack is provided allowing for connection to an external audio source (CD player, cassette tape deck, etc) for play along purposes.
- Use the auto chromatic tuner to tune your instrument when the AX100G is bypassed or muted.
• The LCD (multi-display) features an intuitive visual interface. - The LCD is backlit for easy visibility even in dark locations.
What is EMS
REMS (Resonant structure and Electronic circuit Modeling System) is KORG's proprietary sound modeling technology which precisely reproduces the complex character and nature of both acoustic and electric instruments as well as electronic circuits in real world environments. REMS emulates a wide variety of sound generation characteristics including instrument bodies, speakers & cabinets, acoustic fields, microphones, vacuum tubes, transistors, etc.
1. Introduction
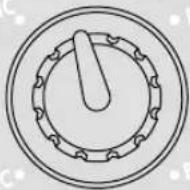
Front and rear panel
Front panel
text_image
TONeworkS TONeworkS TONeworkS TONeworkS TONeworkS TONeworkS TONeworkS TONeworkS TONeworkS TONeworkS TONeworkS TONeworkS TONeworkS TONeworkS TONeworkS TONeworkS TONeworkS TONeworkS TONeworkS TONeworkS TONeworkS TONeworkS TONeworkS TONeworkS TONeworkS TONeworkS① Type knob
This knob selects the type of Drive Amp effect that will be used.
② Value knobs
For each effect, these knobs adjust the values of the parameters assigned to the knobs. From the left, these are referred to as value knobs 1—5.
When you are not editing an effect, parameters of the drive amp effect used by the selected program are assigned to these knobs. (Refer to p.9 "Drive Amp effect Quick Edit function.")
③ Select switches
Each time you press the DRIVE·AMP switch, the drive amp channels A and B will alternate, and will be in Edit mode. At this time, the LED beside the switch will change between blinking green (channel A) and blinking red (channel B).
Each time you press the MOD, PEDAL, AMB, or CABI switch, the corresponding effect will be in edit mode (on) or off. The LED beside the corresponding switch will also change between blinking (lit) and dark.
Each time you press the NR LEV switch, you will alternate between editing and on. The LED beside the switch will change between blinking and dark.
Each time you press the RHYTHM or PHRASE TRAINER switch, the corresponding function will be switched on/off. The LED beside the corresponding switch will light or go dark.
④ Pedal indicator
This shows the state of the pedal effect (the depth to which it is pressed). When the tuner is operating, this shows the amount of pitch deviation. In Phrase Trainer mode, this shows the recording/playback time.
⑤ PROG/FX SELECT switch
Each time you press this switch, you will alternate between Program mode and Effect Select mode.
⑥ Multi-display
This displays information such as program names, parameter names and values, and editing icons.
⑦ Number LED
This displays the program bank and program number. While the Tuner is operating, it displays the note name.
⑧ WRITE, EXIT, TAP switches
The WRITE switch is used to write an edited program. By pressing the EXIT switch, you can return to Program mode at any time.
When using a delay effect, you can press the TAP switch at the tempo of the song to set the delay time automatically.
⑨ DOWN, UP switches
These switches are used to select programs, bypass or mute, or to switch the drive amp channel.
⑩ Expression pedal
This controls the effect that is selected as the Pedal effect. After advancing the pedal all the way, you can press the pedal more firmly to switch the Pedal effect on/off.
Rear panel

text_image
①②③④⑤⑥⑦ ⑧① INPUT jack
If you are using batteries, this jack acts as a power switch. When a cable is connected, the power will be turned on.
Before turning the power on or off, be sure to turn down the volume of any equipment that is connected.
② Input level switch
Set this switch according to the output of your instrument.
③ AUX IN jack (stereo mini)
Connect the output (AUX OUT: analog) of your audio device to this jack.
④ DC9V
The separately sold AC adapter (DC9V connected here. When this is connected, the power will be turned on automatically.
⑤ Cable hook
If the separately sold AC adapter is connected, hook the cable of the AC adapter around this hook as shown below. When removing the cable from the hook, do not apply tension.
⑥ MASTER VOL. (Master volume)
This adjusts the volume of the OUTPUT jack.
⑦ OUTPUT jack
This also functions as the headphone jack.
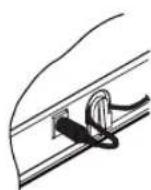
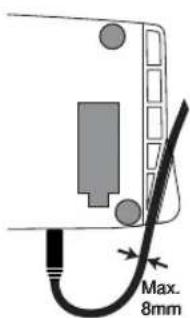
⑧ Cable guide
This prevents the cable that connects the guitar to the AX100G from interfering with the operation of the pedal. Pass the cable through the guide as shown in the diagram below.
When using the cable guide, please use a cable whose diameter is 8 mm or less.
text_image
Max. 8mmThe modes of the AX100G
The AX100G is divided into three modes: Program mode, Effect Select mode, and Phrase Trainer mode.
Program mode
In this mode you can select programs and use the AX100G for normal performance.
Use the foot switches (UP, DOWN) to select programs.
Immediately after the power is turned on, the AX100G will always be in this mode. With the factory settings, the User programs contain the same programs as the Preset programs.
Effect Select mode
In this mode you can use the foot switches UP or DOWN to switch the drive amp channel ^*1 , Modulation effect or Ambience effect on/off.
Programs cannot be selected in this mode. Use Program mode to select programs.
*1 The AX100G provides two (A and B) Drive (distortion) Amp Effects so that you can switch between settings such as backing and solo without having to change programs.
Phrase Trainer mode
This mode allows you to record a phrase from a CD or MD connected to the AUX IN jack, and play it back as a repeated loop that you can practice along with.
Since you can slow down the playback speed without affecting the pitch, this is a convenient way to learn or practice difficult phrases.

When you enter Phrase Trainer mode, the Modulation, Pedal, and Ambience effects will be turned off automatically.
In Program mode and Effect Select mode, you can use the various knobs to edit the effect, adjust noise reduction, adjust the program level, and change the program name.
Installing the batteries
- Lightly press on arrow A of the battery case, and slide the lid upward in the direction of the arrow to open the case.
- Insert four AA alkaline batteries (sold separately) as shown in the diagram. Be careful to observe the correct polarity (+ and -) of the batteries.
- Close the lid of the battery case.

text_image
Diagram showing a battery cell with labeled components A and B, including polarity indicators and directional arrows.
If you will not be using the unit for an extended period of time, remove the batteries to prevent them from leaking.

When the multi-display blinks "BATTERY," it is time to replace the batteries. Please install new batteries as soon as possible.
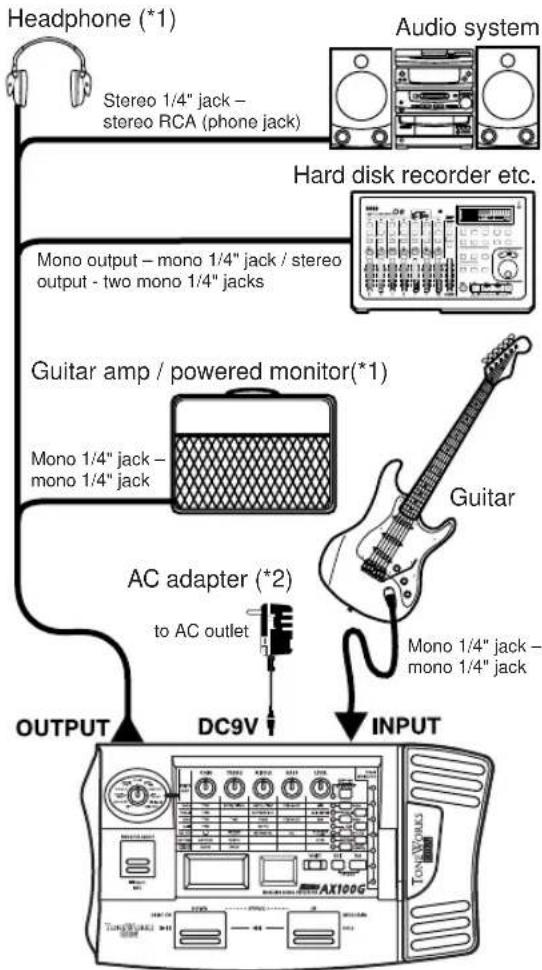
2. Playing the AX100G Example connections

The power must be off when making connections. Otherwise, damage to your speaker system, or other malfunctions may occur. Connecting cables are sold separately.
flowchart
graph TD
    A["Headphone (*1)"] --> B["Stereo 1/4" jack – stereo RCA (phone jack)"]
    B --> C["Audio system"]
    C --> D["Hard disk recorder etc."]
    D --> E["Mono output – mono 1/4" jack / stereo output - two mono 1/4" jacks"]
    E --> F["Guitar amp / powered monitor(*1)"]
    F --> G["AC adapter (*2)"]
    G --> H["to AC outlet"]
    H --> I["Output"]
    I --> J["DC9V"]
    J --> K["INPUT"]
    K --> L["Guitar"]
    L --> M["Mono 1/4" jack – mono 1/4" jack"]
    M --> N["TON WOODS"]
*1: The OUTPUT jack is a stereo output. If you use a mono cable to connect the AX100G to a guitar amp, only the L (left) side signal will be output to the amp.
*2: If you use batteries, the AC adapter is not necessary. If you use an AC adapter, be sure to use only the specified model (DC 9V ⊕-⊖).
Turn on the power
The AX100G does not have a power switch.
The power will be turned on when one of the following occurs.
If you are using batteries, the power will be turned on when you connect a mono cable to the INPUT jack. To maximize the battery life, disconnect the cable from the INPUT jack when you are not using the AX100G.

If you connect a stereo cable, the power will not be turned on.
If you are using the AC adapter (sold separately), the power will be turned on when you connect the AC adapter to a DC 9V.
Before you turn off the power of the AX100G, turn off the power of the other connected equipment.
Program mode
When you turn on the power, the AX100G will always enter Program mode, and will be set to the program setting that were last selected when the power was turned off.
Input level switch setting
Set this switch according to the output of your instrument.
H: Suitable for a pickup with a high output level, such as a humbucking pickup
L : Suitable for a pickup with a low output level, such as a single coil pickup
Adjusting the volume (master volume)
To adjust the volume, rotate the MASTER VOL. (master volume) located on the rear panel.
Selecting a program
Press the UP or DOWN switches to increment or decrement the programs in steps of one. When you do so, the multi-display will show the name of each program.
Programs are organized into groups of four, and these groups are called "banks." The current bank is shown by the 10's digit of the number LED.
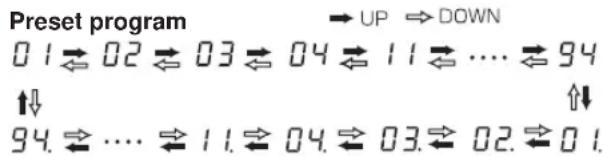
The AX100G contains a total of 80 programs (sounds): 40 (4 x 10 banks) of preset programs that cannot be overwritten, and 40 (4 x 10 banks) of user programs that you are able to modify (edit). When a user program is selected, the decimal point (dot) in the lower right of the number LED will light.


Selecting a bank
Although you can use the UP or DOWN switches to select programs across banks, you can also switch programs by bank.
- Press and hold the PROG/FX SELECT switch for approximately one second until the number LED begins to blink.
- Press either the UP or DOWN switch to increment or decrement the bank.
- Press the PROG/FX SELECT switch once again to finalize the bank and make the number LED stop blinking.
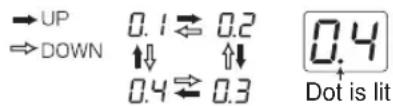
Bank Hold (10's HOLD)
By simultaneously pressing the TAP switch and EXIT switch, you can prevent programs of other banks from being selected. At this time, the decimal point (dot) at the lower right of the 10's place in the number LED will light.
Press the UP or DOWN switches to select programs within the current bank.
When you once again press the TAP switch and EXIT switch simultaneously, the Bank Hold (10'S HOLD) function will be cancelled.
text_image
→UP 0.1 ⇌ 0.2 ↔DOWN ↑↓ ↑↓ 0.4 ⇌ 0.3 Dot is litChecking the effects used by a program
Some programs do not use all of the effects. When you select a program, the LED beside each effect select switch will light to indicate the effects that are being used. An effect that is turned off can be edited (turned on) by pressing its select switch, and when you press another select switch or the EXIT switch, the LED will change from blinking to lit.
Bypass, Mute
By pressing the UP and DOWN switches simultaneously, you can Bypass the AX100G so that no effects will be applied. (The multi-display will indicate "BYPASS" for two second.)
Alternatively, by pressing the UP and DOWN switches simultaneously and holding them for approximately one second, you can Mute the AX100G completely so that no sound will be output. (The multi-display will indicate "MUTE" for two second.) To defeat Bypass or Mute, press the UP or DOWN switch.
Auto tuner
When the AX100G is in bypass or mute condition, the tuner will operate automatically. If you mute the AX100G you will be able to tune your instrument without producing sound. This is used for on stage tuning.
- Tunc your guitar so that the desired note name appears in the number LED. The decimal point “.” at the lower right of the number LED will light to indicate a sharp #.
Example display
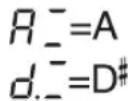
- The seven-point pedal indicator will show the difference between the pitch you play and the note name. Tune your instrument so that only the center LED is lit.
Tuning discrepancy shown by the pedal indicator and the multi-display
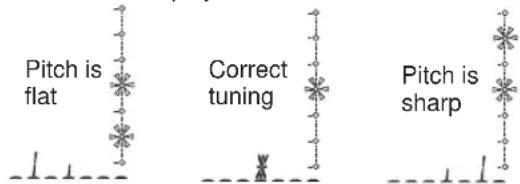
text_image
Pitch is flat Correct tuning Pitch is sharpChanging the calibration setting
As necessary, you can adjust the calibration (the frequency of the standard A pitch) in the range of 438—445 Hz. (440 Hz is “standard”)
When the tuner is operating, you can rotate value knob 1 to adjust the calibration. The calibration setting is shown in the multi-display.
When the power is turned off, the calibration setting you modify will be lost, and will automatically return to 440 Hz the next time the power is turned on.
Rhythm
Press the RHYTHM switch (the LED will light) and the rhythm will begin playing. Use value knob 1 to select the rhythm pattern (50 types), use value knob 2 to adjust the tempo (range: 40—208), and use value knob 3 to adjust the rhythm level (range: 0—30). To stop the rhythm, press the RHYTHM switch while the rhythm is playing.

The rhythm will stop when you enter Bypass, Mute, or Edit modes.
AUX IN
Sound from an audio device (e.g. CD or MD) connected to the AUX IN jack can be mixed with the effect sound for listening, which is a convenient way to practice along with a song.

The AUX input and the effect output will automatically be mixed and output from the OUT PUT jack except when you are in Phrase Trainer mode.
Use the controls on your audio device to adjust the AUX IN volume.
Expression pedal
You can use the expression pedal to control 23 types of Pedal effect in realtime.
If a program uses a Pedal effect, the pedal indicator LED's will light to indicate the Min-Max value of the effect when you press up and down on the pedal. Operation for the SAMPLE1—LOOP2 pedal effects is different from the other effects (see p.14).
Using the expression pedal as you play
- In Program mode, select a program that uses the expression pedal.
- Make sure that the pedal indicator is lit. If it is not lit, advance the expression pedal once as far as it will go, making the top pedal indicator light (the pedal will be on)
- Operate the expression pedal while playing your guitar. As you raise and lower the pedal, the output sound will change correspondingly.

If VOLUME is selected in the Pedal effect, it will not be possible to turn the expression pedal on/off. The pedal indicator will remain lit.

The on/off status of the expression pedal is not memorized by each program.

Do not apply excessive force to the expression pedal. Before operating the expression pedal, verify the amount of force that is required to make the pedal indicator light and to apply the effect.
Effect Select mode
In this mode, you can press the DOWN switch to switch the drive channel while you perform. You can press the UP switch to turn the Modulation and Ambience effects on/off.
As in Program mode, you can edit the settings, use the metronome, and write a program.

In this mode it is not possible to switch programs or to select bypass or mute.
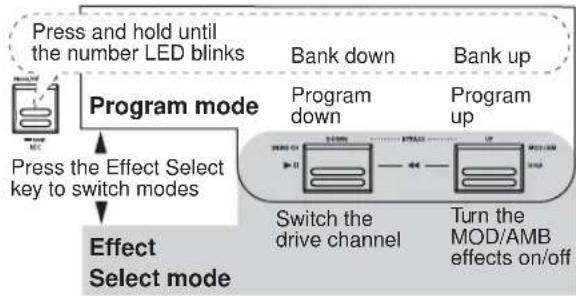
flowchart
graph TD
    A["Press and hold until the number LED blinks"] --> B["Program mode"]
    B --> C["Press the Effect Select key to switch modes"]
    C --> D["Effect Select mode"]
    D --> E["Switch the drive channel"]
    E --> F["Turn the MOD/AMB effects on/off"]
    style A fill:#f9f,stroke:#333
    style B fill:#ccf,stroke:#333
    style C fill:#cfc,stroke:#333
    style D fill:#fcc,stroke:#333
    style E fill:#cff,stroke:#333
    style F fill:#ffc,stroke:#333
Entering Effect Select mode
In Program mode, press the PROG/FX SELECT switch to enter Effect Select mode. The multi-display will indicate "FX SEL," and the number LED will indicate "≡ ≡"
Switching the drive amp channel
Since each program contains two separate Drive Amp effect settings, you can switch between backing and solo sounds without changing programs.
Each time you press the DOWN switch, the Drive Amp effect settings will switch between channels A and B. When channel A is selected the LED beside the DRIVE-AMP switch will light green, and when channel B is selected the LED will light red.
Turning the Modulation and Ambience effects on/off (INDIVIDUAL)
Each time you press the UP switch, the Modulation effect or Ambience effect will be turned on/off.
The effects that are turned on/off when you press the UP switch can be specified beforehand in the settings of the program, as follows.
Procedure
- Press the NR LEV switch.
- Rotate value knob 3 to change the indication in the multi-display to the desired setting.
MOD: Only the Modulation effect will be turned on/off
AMB: Only the Ambience effect will be turned on/off
M+A: Both the modulation and ambience effects will be turned on/off

For some effects, it is not possible for the Modulation and Pedal effects or the Pedal and Ambience effects to be used simultaneously. For such combinations, attempting to turn on both effects will cause the previously-on effect to be turned off automatically.
Exiting Effect Select mode
To return to Program mode, press either the PROG/FX SELECT switch or the EXIT switch.
2. Playing the AX100G
Phrase Trainer mode
In this mode, you can record a phrase from an audio device (CD or MD) connected to the AUX IN jack, and play it back repeatedly as a loop. Then you can practice a phrase on your guitar while playing to the repeating phrase.
Since you can slow down the playback speed without affecting the pitch, this is a convenient way to learn or practice phrases from recordings that are difficult to play.
In Phrase Trainer mode, the expression pedal will automatically function as the volume control of your guitar.

When you enter this mode, the Modulation, Pedal, and Ambience effects will automatically be turned off. (When you exit Phrase Trainer mode, the previous settings will be restored.)
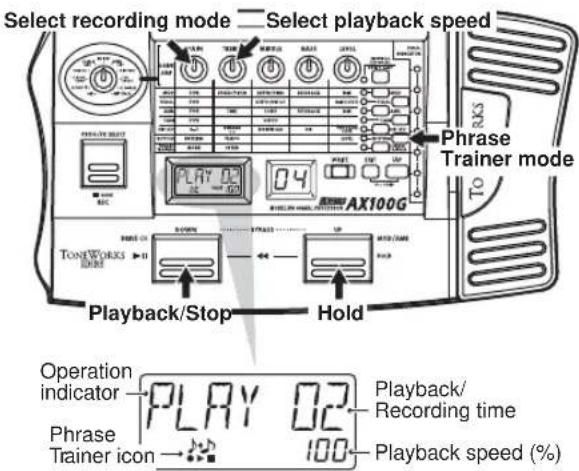
text_image
Select recording mode Select playback speed Phrase Trainer mode TONWORKS 04 PLAY 02 04 PLAY/Stop Hold Operation indicator Phase Trainer icon PLAY 02 Playback/Recording time 100 Playback speed (%)Press the PHRASE TRAINER switch located at the right of the panel. (The corresponding LED will light.)
The Phrase Trainer icon will blink in the multi-display, and the selected recording mode will be displayed.

You cannot edit the sound of the guitar in Phrase Trainer mode. You must select the desired sound before entering this mode.
2. Select the recording mode
Rotate value knob 1 to select the recording mode.
AUX IN: Record up to 8 seconds of the AUX sound GTR IN: Record up to 8 seconds of the guitar sound
3. Begin recording
Start the connected device, and at the moment that you wish to begin recording, press the PROG/FX SELECT switch (REC) to begin recording. The multi-display will indicate "REC" and the number of seconds of recording, and the pedal indicator will show the recording time.

Once you record a phrase, it is not possible to change the recording mode. If you wish to change the recording mode, you must return to Program mode, and once again enter Phrase Trainer mode.
4. Stop recording
At the point that you want to stop recording, press the PROG/FX SELECT switch (REC). Recording will end when the maximum recording time (8 seconds) has elapsed. The multi-display will indicate "PLAY," and loop (repeated) playback will begin automatically.

Depending on the volume of the connected audio device, the sound may be distorted. If this occurs, adjust the volume on the audio device.
To re-do the recording
Press the DOWN switch (▶/11) to stop playback. Then continue with step "3. Begin recording" and step "4. Stop recording."
To erase the recorded phrase
Press the EXIT switch to delete the phrase. You can now record a new phrase to overwrite the previously-recorded phrase.
5. Stop/Playback
When you press the DOWN switch (▶/■), playback will stop. Press the DOWN switch (▶/■) again, and play-back will resume from where you stopped.
- While the sound is being held, you can press the UP and DOWN switches simultaneously, to return to the beginning of the recorded phrase.
- During playback, you can press the UP and DOWN switches simultaneously to rewind.
- During playback, you can press the UP switch (HOLD) to hold the sound at that moment. Press the switch once again to defeat this.
Changing the playback speed
You can slow down the playback speed without changing the pitch of the recorded phrase.
Rotate value knob 2 to slow down the playback in 5% steps: 100%, 95%, 90%, 85%, ... 25%.
Exiting Phrase Trainer mode
To return to Program mode, you can press the PHRASE TRAINER switch or EXIT switch.

When you exit Phrase Trainer mode or turn off the power, the recorded phrase will be erased.
3. Editing
In Program mode and Effect Select mode, you can edit each effect, adjust the noise reduction and program level, and modify the program name.
During editing, the edit icons in the multi-display and the LEDs beside the select switches for each effect will blink.

If you wish to save the effects you edited, you must use the "Program Write" operation. If you turn off the power or switch to another effect without performing "Program Write," the previous settings will reappear.
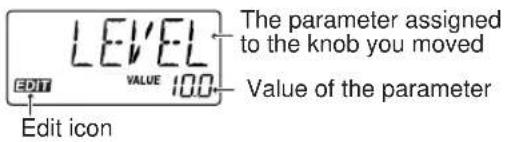
text_image
LEVEL EDIT VALUE 100 Edit icon The parameter assigned to the knob you moved Value of the parameterEditing the effects
The drive amp effect can be edited immediately by turning the value knobs or type knob; you do not have to press the DRIVE·AMP switch. (Refer to the section below, "Drive Amp effect Quick Edit function.")
Toedit other effects, press the corresponding select switch to put that effect in Edit mode (the LED will blink).
Drive Amp effect Quick Edit function
You can edit the Drive Amp effect (unless the effect is turned off) by using the Type knob to re-select the effect, or by rotating the five value knobs to modify the parameter values. When you do so, the multi-display will show the effect name or parameter name assigned to the corresponding knob, and its current value.
Even when another effect such as Modulation or Pedal is in edit mode, you can still turn the type knob to edit the drive amp effect.

Editing is not possible if other functions are assigned to the value knobs, nor in Bypass, Mute, or Phrase Trainer modes.
Drive amp channel
For each program, the Drive Amp effect has settings for two channels, A and B.
Press the DRIVE-AMP switch located at the right of the panel to select the channel you will edit. Each time you press the switch, the LED will change between green (channel A) and red (channel B).
Editing the Drive Amp effect (example)
As an example, here's how to set channel B of the Drive Amp effect to TUBE OD.
-
Press the DRIVE·AMP switch several times to select channel B (red LED).
-
If the multi-display reads "TUBE OD," no change is necessary. Otherwise, rotate the Type knob to select TUBE OD. If the Type knob is already located at the TUBE OD position, turn it first to another effect type, and then turn it back to TUBE OD.
-
The multi-display will indicate "TUBE OD" as the effect name. If you selected the effect that had been programmed, the Original icon in the multi-display will light.
-
The five value knobs will be assigned to GAIN, TREBLE, MIDDLE, BASS, and LEVEL respectively, and will adjust the value of the corresponding parameter. (See p.12, "Effect parameters.")
-
As you rotate the knobs, the sound will change and the multi-display will show the parameter name assigned to that knob and the current value. If you rotate the knob to adjust the value to the value it had before you began editing the original parameter value icon in the multi-display will light.
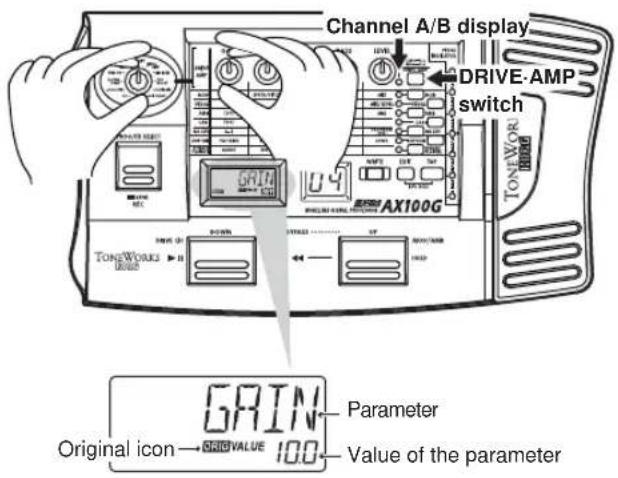
text_image
Channel A/B display DRIVE-AMP switch TONEWORKS AX100G GRIN Original icon → ORI VALUE 100 Parameter Value of the parameterIf you do not wish to use the Drive Amp effect, use the Type knob to select OFF so that the Drive Amp effect will be bypassed, and the multi-display will indicate "DRV OFF." In this case, the LED beside the DRIVE-AMP switch will go dark.
3. Editing
Editing other effects
Press the select switch for the desired effect to be edited.
MOD: Edits the Modulation effect (e.g., chorus)
PEDAL: Edits the Pedal effect (e.g., wah)
AMB: Edits the Ambience effect (e.g., delay)
CABI: Edits the Cabinet effect which models the cabinet resonances of a guitar amp
NR LEV: Edits the noise reduction and program level (volume)

For some effects, the Modulation and Pedal effects, or the Pedal and Ambience effects cannot be used simultaneously. In the case of such a combination of effects, attempting to turn on both simultaneously will automatically turn off the previously-on effect.
As an example, here's how to select CHORUS as the Modulation effect.
- Press the MOD switch. The LED beside it will blink, indicating that the Modulation effect is selected. Even if the Modulation effect has been turned off within the program, it will be turned on at this point.
- Rotate value knob 1 (TYPE) to select CHORUS. The type name will appear in the multi-display. If you select the effect that had originally been selected, the Original icon will appear in the multi-display.
- Value knobs 2, 3, 4 and 5 will adjust the chorus speed (SPEED), chorus depth (DEPTH), chorus feedback amount (FEEDBACK), and the mix balance between the chorus sound and the direct sound (MIX). If the adjusted value matches the unedited value (the original parameter value) as you rotate a knob, the Original icon will appear in the multi-display.
The value knobs that can be used and the parameters that are assigned will depend on the type of each effect. (See p.12 "Effect parameters.")
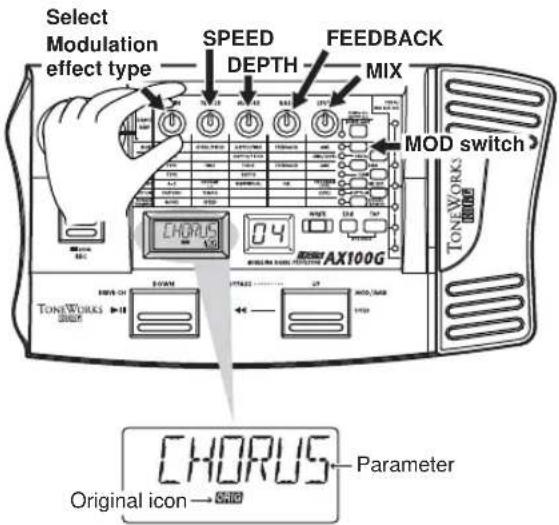
text_image
Select Modulation effect type SPEED DEPTH FEEDBACK MIX MOD switch TONEWORKS 04 AX100G CHORUS TONEWORKS SWIFT 0.000 0.000 0.000 0.000 0.000 0.000 0.000 0.000 0.000 0.000 0.000 0.000 0.000 0.000 0.000 0.000 0.000 0.0 CHORUS Parameter Original icon →Using the TAP switch to edit the delay time
When using the Ambience or Pedal DELAY effect, press the TAP switch two times at the tempo of the song you are playing. The AX100G will detect the interval, and set the delay time automatically.
You can set the delay time in the same way even while you are not playing.
Modifying the program name
Press the NR LEV switch so that the LED beside the switch is blink. Use value knob 2 to select the character that you wish to change (the character will blink), and use value knob 1 to change the character. The available characters are shown below.
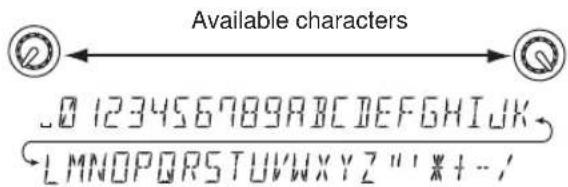
text_image
Available characters 0 123456789A B C D E F G H I J K LMNOPORSTU V W X Y Z " " * + - /
If you wish to save the modified program name, you must perform the "Writing programs" operation. If you turn off the power or select a different program without writing the program, the program name you edited will revert to its previous setting.
Writing programs
Here's how to write an edited program.
- Press the WRITE switch, and the Multi-display will indicate "*WRITE*." The number LED will blink.
- Use the UP and DOWN switches to select the destination for your program.
- Press the WRITE switch once again, and the display will read "COMPLT" to indicate that the program has been written. You will then return to Program mode.
If you decide not to write, press the EXIT switch to cancel the Write operation.

If you write an edited program to a different program number, the program that was overwritten will be lost.

It is not possible to write to a preset program.
4. Appendices
Adjusting the expression pedal
(Calibration)
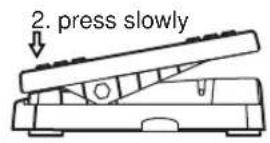
If you find the expression pedal difficult to use, perform this procedure so that the pedal will function optimally. For example if the effect does not reach maximum when the pedal is advanced all the way, or does not reach minimum when the pedal is returned all the way, use the following procedure to make the appropriate adjustments.

When making adjustments, use your hand to move the pedal. Accurate calibration may not be possible if you use your foot to operate the pedal.
-
Turn on the power while simultaneously holding down the EXIT switch and the PEDAL switch. The Multi-display will show "PEDAL" for approximately one second, and will then indicate "MIN."
-
Slowly return the pedal to the full back position. When it stops, release your hand and press the WRITE switch. The Multi-display will change from "MIN" to "MAX."

If you decide to halt the adjustment procedure, press the EXIT switch. The power-on display will appear, and you will enter Program mode.
- Slowly advance the pedal. When it stops, release your hand and press the WRITE switch.
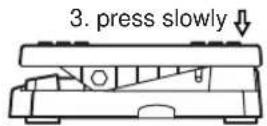
The Multi-display will indicate "COMPLT" for approximately one second. Then the power-on display will appear, and you will enter Program mode.
After the adjustment procedure has been completed, verify the operation of the pedal.
Select an effect that will make it easy to verify the adjustment. For example, set the Pedal effect to the VOLUME effect, set the value to 0, and check the MIN level when the pedal is returned all the way.

If you make a mistake during the calibration procedure, the Multi-display will indicate "ERROR," and you will return to the screen before the adjustment (the "MIN" display). If the "ERROR" display appears for repeated attempts, a malfunction may have occurred. In this case, please contact your dealer.
Restoring the user programs to the factory settings (Reload)
- Turn on the power while simultaneously holding down the EXIT switch and the PROG/FX SELECT switch. The Multi-display will indicate "RELOAD?"
- Press the WRITE switch. The Multi-display will change to "RELOAD," and the reload operation will begin. When the reload operation is completed, the display will indicate "COMPLT" for approximately one second. Then the power-on display will appear, and you will enter Program mode.

Never turn off the power during the reload operation.

When you perform the reload operation, all user programs will be rewritten. Rhythm settings will also be initialized.
Troubleshooting
If you suspect a malfunction, please check the following points first. If this does not resolve the problem, contact a nearby Korg dealer.
1. Power does not turn on
*Are batteries installed? Alternatively, is the AC adapter connected to an AC outlet? (p.5)
*Is a mono cable connected to the INPUT jack? (0.5p.5)
2. No sound
*Are your guitar, amp, and headphones connected to the correct jack? (p.5)
*Is your amp turned on, and is it set accordingly?
*Is one of your connection cables broken?
* Has the MASTER VOL (master volume) of the AX100G been turned down? (p.6)
* Is the program level of the AX100G set to "0" or to a low value? (p.9, 16)
* Is the Level of the Drive Amp effects set to "0" or to a low value?
*Is the volume of your guitar turned down?
*Is the AX100G muted?
※ If VOLUME is selected for the PEDAL effect, has the pedal been returned to the full back position?
3. Effects are not applied
* Is the AX100G bypassed? (p.6)
* Are the effects used by the program turned on? (p.6)
4. Rhythm does not function
* Are you in Program mode or in Effect Select mode? The rhythm will not function in Phrase Trainer mode.
* Is the rhythm output level set to "0"? (p.7)
5. Pedal does not function
*Have you selected a program that uses an effect in the PEDAL effect mode? (p.6)
* Is the pedal indicator lit? (p.4, 7)
* Try calibrating the expression pedal. (1-4p.11)
6. Cannot write
(the Multi-display indicates "ERROR")
* Did you turn the power off while the preset programs were being loaded?
Reload the preset programs. (p.11)
Main specifications
Number of effects:
63 types
(maximum number of effects that can be used simultaneously: 7)
☐Number of programs:
80 (40 preset, 40 user)
□Inputs:
Guitar input (mono)
Line/Headphone dual-purpose output
(stereo phone jack)
□Tuner section
Detection range: 27.5 Hz — 2,093 Hz (A0—C7)
Calibration: A=438—445 Hz
□Rhythm section
Pattern: 50 types
Tempo: bpm=40—208
Power supply:
four AA size (LR6) alkaline batteries
(battery life is 12 hours of continuous use)
or separately sold AC adapter (DC9V ⊕-⊖)
Dimensions:
329.6(W) × 181.5 (D) × 57.5 (H) mm
Weight:
1.05kg (not including batteries)
□Included items:
Owner's manual
* Specifications and appearance are subject to change with out notice for improvement.
Effect parameters
DRIVE-AMP (Drive Amp effects)
| TYPE GAIN TRE | Knob 1 KREBLE MIDDLE BASS | Knob 2 Knob 3 Knob 4 LEVEL | Knob 5 | ||
| OFF — — | — | — | — | ||
| ACOUSTIC 0...10.0 | 0...10.0 | 0...10.0 | 0...10.0 | 0...10.0 | |
| CLASSIC COMP | 0...10.0 | 0...10.0 | 0...10.0 | 0...10.0 | 0...10.0 |
| TUBE OD 0...10.0 | 0...10.0 | 0...10.0 | 0...10.0 | 0...10.0 | |
| CLASSIC DIST 0...10.0 | 0...10.0 | 0...10.0 | 0...10.0 | 0...10.0 | 0...10.0 |
| FAT DIST 0...10.0 | 0...10.0 | 0...10.0 | 0...10.0 | 0...10.0 | |
| METAL DIST | 0...10.0 | 0...10.0 | 0...10.0 | 0...10.0 | 0...10.0 |
| BIG FUZZ | 0...10.0 | 0...10.0 | 0...10.0 | 0...10.0 | 0...10.0 |
| TOP BOOST | 0...10.0 | 0...10.0 | 0...10.0 | 0...10.0 | 0...10.0 |
| US HI-GAIN | 0...10.0 | 0...10.0 | 0...10.0 | 0...10.0 | 0...10.0 |
| BRIT STACK | 0...10.0 | 0...10.0 | 0...10.0 | 0...10.0 | 0...10.0 |
These Drive Amp models combine sound processing effects such as compressor, overdrive, or distortion with a three-band equalizer to adjust the tone. The following parameters are assigned to each knob.
Type knob Select the type of drive or amp
Knob 1 GAIN Adjusts the amount of distortion.
Knob 2 TREBLE Adjusts the treble (high-frequency range).
Knob 3 MIDDLE Adjusts the mid (mid-frequency range).
Knob 4 BASS Adjusts the bass (low-frequency range).
Knob 5 LEVEL Adjusts the output level.
If the sound distorts, slightly decrease the LEVEL, TREBLE, MIDDLE, and BASS.
OFF (off) "DRV OFF"
Turn off the Drive Amp effect.
ACOUSTIC (Acoustic) "ACOUSTC"
This effect model transforms the sound of an electric guitar into the sound of an acoustic guitar. A more realistic acoustic guitar simulation will be obtained if you use the pickup closest to the neck. A compressor with adjustable sensitivity (GAIN) is built-in.
CLASSIC COMP (Classic compressor) "CL COMP"
A compressor is an effect that boosts low-level sounds and turns down louder levels in order to compress differences in volume and make the sound more consistent. This model will make your picking more even, and will produce smooth sustain.
TUBE OD (Tube overdrive) "TUBE OD"
It simulates the overdriven sound of a popular tube overdrive pedal from the 70's that responds well to the nuances of your picking.
CLASSIC DIST (Classic distortion) "CL DIST"
This model simulates a popular distortion pedal from the 70's.
FAT DIST (fat sounding distortion) "FAT DST"
This model simulates a popular fat sounding distortion pedal from the 80's.
METAL DIST (metallic distortion) "METAL"
This model simulates the metallic distortion of the 90's.
BIG FUZZ (Big fuzz) "BIGFUZZ"
This model simulates a popular vintage fuzz unit.
TOP BOOST (Top boost) "T-BOOST"
This model simulates the sound of an AC30 overdriven by a popular 80's OD pedal.
US HI-GAIN (U.S. High Gain)
"US HI-G"
This model simulates the distortion typical of a high-gain amp made in the USA.
BRIT STACK (British amp stack) "
BRITSTK"
This model simulates the distortion typical of a British amp stack.
MOD (Modulation effects)
| Knob 1 Knob 2 Knob 3 Knob 4 Knob 5TYPE SPEED/PITCH DEPTH/FINE | FEEDBACK | MIX | ||
| CHORUS 0.1 | ...10 [Hz] 0...10.0 0...10 | 0.0 0...10.0 | ||
| FLANGER 0.1 | ...10 [Hz] 0...10.0 -15 | ...15 0...10.0 | ||
| PHASER 0.1 | ...10 [Hz] 0...10.0 0...10 | 0 | ||
| TREMOLO | 1...10 [Hz] | 0...10.0 | ||
| PAN | 1...10 [Hz] | 0...10.0 | ||
| WAH UP | 0...10.0 | |||
| WAH DWN | 0...10.0 | |||
| PITCH | -24...24 [x100CENT] | -50...50 [CENT] | 0...10.0 | |
| MAJ3UP | C...B | 0...10.0 | ||
| MAJ3DWN | C...B | 0...10.0 | ||
| MIN3UP | C...B | 0...10.0 | ||
| MIN3DWN | C...B | 0...10.0 | ||
| 4TH | C...B | 0...10.0 | ||
| 5TH | C...B | 0...10.0 | ||
| MAJ6TH | C...B | 0...10.0 | ||
| SLOWATK | 0...10.0 | 0...10.0 | ||
Chorus and flanger are effects that delay the sound slightly to modulate the pitch, and combine the modulated sound with the original to produce a sensation of modulated spaciousness. The following parameters are assigned to each knob.
Knob 1 TYPE Select the effect type
Knob 2 SPEED/PITCH Adjusts the speed/
Adjusts the pitch
Knob 3 DEPTH/FINE Adjusts the depth/
Adjusts the fine pitch
Knob 4 FEEDBACK Adjust the strength of the tonal character.
Knob 5 MIX Adjust the mix balance between the effect sound and the original sound
CHORUS (Chorus)
This chorus effect creates a sense of modulation, spaciousness, and vibrato by slightly delaying the sound, modulating its pitch, and combining it with the original sound. This is most effective when used in stereo.
FLANGER (Flanger)
This is a vintage flanger that produces modulation and a sense of pitch movement.
PHASER (Phaser)
This effect cyclically modifies the phase shift of the sound, and mixes the phase-shifted sound with the original sound to produce modulation.
TREMOLO (Tremolo)
This effect adds depth to the sound by modulating the volume.
PAN (Panpot)
This effect cyclically changes the pan of sound, when stereo play-back is used.
WAH UP (Auto-wah filter up)
This is an auto-wah filter that automatically opens or closes according to how hard you pick the strings.
WAH DWN (Auto-wah filter down)
Auto wah in opposite direction from WAH UP
PITCH (Pitch)
This is a pitch shifter that can change the pitch in a +/-2 octave range.
Intelligent Pitch Shifter
MAJ3UP (3rd up in a major key)
MAJ3DWN (3rd down in a major key)
MIN3UP (3rd up in a minor key)
MIN3DWN (3rd down in a minor key)
4TH (4th up in a major key)
5TH (5th up in a major key)
MAJ6TH (6th up in a major key)
The Intelligent Pitch Shifter creates musically useful harmonies by varying the amount of pitch shift according to the note you play and the key in which you are playing. For example if you select a pitch shift of a 3rd upward in a major key (MAJ3UP), the amount of pitch shift will vary automatically between three semitones (a minor third) and four semitones (a major third).
- When MAJ3UP is used with a key setting of C

The pitch created by the intelligent pitch shifter is shown in parentheses ( ).
If your instrument is not tuned correctly, the results may not be as you expect. In this case, re-tune your instrument.
The intelligent pitch shifter will function when you play individual notes. It cannot produce the effect for chords.
This effect cannot be used simultaneously with a Pedal effect (except for VOLUME) or with the ROOM1—ARENA Ambience effects. If you use the Intelligent Pitch Shifter in a program in which the Pedal effect or a ROOM1—ARENA Ambience effect is turned on, the pedal or ROOM1—ARENA Ambience effect will be turned off automatically.
SLOWATK (Slow Attack)
This effect gradually raises the volume each time you pick your guitar. Value knob 2 controls the speed of the attack, and value knob 3 controls the threshold level. As you raise the threshold level, you will need to pick more harder to produce the slow attack effect.
PEDAL (Pedal effect)
| Knob 1 Knob 2TYPE DEPTH/PITCH | Knob 3 Knob 4 | Knob 5 PedalMIX/LEVEL | |||
| VOLUME — | 0 | ...10.0 Volume | |||
| CHO1 0...10.0 — | Depth | ||||
| CHO2 0...10.0 — Speed | |||||
| VIBRATE 0...10.0 — Speed | |||||
| FLANGER 0...10.0 — Modulation | |||||
| PHASER 0...10.0 — Speed | |||||
| TREMOLO 0...10.0 — Speed | |||||
| PAN | 0...10.0 — Speed | ||||
| WAH | — | — | Peak Fre. | ||
| FILTER | 0...10.0 — Peak Fre | ||||
| RING | 0...10.0 — Pitch | ||||
| PITCH | -24...24 [CENT] | 0...10.0 Pitch | |||
| F BACK1 | 0...10.0 — Level+Reverb | ||||
| F BACK2 | 0...10.0 — Level+Reverb | ||||
| DELAY 10[ | mq...2[SEC] | 0...10.0 Effect level | |||
| ECHO | 10[mq...2[SEC] | 0...10.0 Delay time | |||
| ROOM | — | 0...10.0 | Reverb level | ||
| GARAGE | — | 0...10.0 | Reverb level | ||
| HALL | — | 0...10.0 | Reverb level | ||
| SAMPLE1 | S/L | — Playback | |||
| SAMPLE2 | S/L | — Play reverse | |||
| LOOP1 | S/L | — Volume | |||
| LOOP2 | S/L | — Loop time | |||
These effect models let you use the expression pedal to control the effect in realtime. The following parameters are assigned to each knob.
Knob 1 TYPE
Select the effect type
Knob 3 DEPTH/PITCH
Adjusts the depth/Adjusts the pitch
Knob 5 MIX/LEVEL
Adjusts the mix balance between the effect sound and original sound/Adjusts the level
CHO1—PITCH cannot be used simultaneously with the Modulation effect. If you use this effect in a program where the Modulation effect is turned on, the Modulation effect will automatically be turned off.
F BACK 1 and 2 cannot be used simultaneously with the ROOM1—ARENA Ambience effects. If you use these effects in a program where ROOM1—ARENA are turned on, the ROOM1—ARENA effect will be turned off automatically.
DELAY—HALL cannot be used simultaneously with the Ambience effect. If you use this effect in a program where the Ambience effect is turned on, the Ambience effect will automatically be turned off.
SAMPLE1—LOOP2 cannot be used simultaneously with a Modulation effect or Ambience effect. If you use the SAMPLE1—LOOP2 effects in a program where a Modulation effect or Ambience effect are turned on, that effect will be turned off automatically.
VOLUME (Volume)
This is a volume pedal. Value knob 5 sets the minimum level.
CHO1 (Chorus1)
This is a chorus effect in which the pedal controls the depth of the pitch modulation.
CHO2 (Chorus2)
This is a chorus effect in which the pedal controls the speed of the pitch modulation.
VIBRATO (Vibrato)
This is a vibrato effect in which the pedal controls the speed of the pitch modulation.
FLANGER (Flanger)
This is a flanger in which the pedal controls the bandwidth (modulation) of the effect.
PHASER (Phaser)
This is a phaser in which the pedal controls the speed of the phase modulation.
TREMOLO (Tremolo)
This is a tremolo effect in which the pedal controls the speed of the volume change.
PAN (Panpot)
This is a pan effect in which the pedal controls the speed at which the position of the sound will change when stereo playback is used.
WAH (Wah)
This is a wah in which the pedal controls the peak frequency.
FILTER (Resonance Filter)
This is a resonance filter in which the pedal controls the peak frequency of the filter.
RING (Ring Modulator)
This effect creates a bell-like sound in which the pedal controls the pitch. To obtain the cleanest effect, use the pickup closes to the neck, turn down the tone of your guitar, and play near the 12th fret.
PITCH (pitch shifter)
The pedal will control the amount of pitch shift. When value knob 5 is at "0" only the original sound will be heard. At "5" the original sound and effect sound will be mixed equally, and at "10" only the effect sound will be heard.
Feed Back
In this effect, the pedal controls the vibrato that is applied to the feedback sound.
While sustaining a note on your guitar, advance the pedal to produce a feedback sound. The feedback sound will disappear when you return the pedal. Value knob 3 adjusts the speed of the vibrato.
There will be no feedback effect if OFF, ACOUSTIC, or CLASSIC COMP is selected for the Drive Amp effect.
F BACK1 (Feed Back1)
A feedback sound will be generated to the pitch of your playing.
F BACK2 (Feed Back2)
A feedback sound will be generated one octave above your playing.
DELAY (Delay)
In this effect, you can use the pedal to control the input level of the delay.
By pressing the TAP switch two times, you can set the TIME of knob 2 to the corresponding tempo.
ECHO (Echo)
This is a echo in which the pedal controls the delay time. As on a tape echo unit, changing the delay time will also change the pitch. Value knob 3 adjusts the maximum delay time.
ROOM (Room Reverb)
This simulates the reverberation of a small room the size of a studio. The pedal will control the reverb level.
GARAGE (Garage Reverb)
This simulates the reverberation of a mid-size room such as a garage. The pedal will control the reverb level.
HALL (Hall Reverb)
This simulates the reverberation of a mid-size to large hall. The pedal will control the reverb level.
Sample and play
The SAMPLE1 to LOOP2 effects allow you to record a phrase up to 6 seconds, and then use the pedal to play it back.

The recorded phrase will be erased when you change the effect type or program, when you use the Phrase Trainer, or when you turn the power off.

The recorded phrase will be erased when you change the effect type or program, when you use the Phrase Trainer, or when you turn the power off.
SAMPLE1 (Sample1)
The recorded phrase will playback when you press the pedal.
SAMPLE2 (Sample2)
The recorded phrase will playback when you press the pedal, and will playback in reverse when you return the pedal.
Procedure for Sample 1 and 2
-
Select SAMPLE 1 or SAMPLE 2 for the Pedal effect, or choose a program that uses these effects.
-
Use value knob 3 to select the recording time (S is three seconds of high-quality recording, L is six seconds of extended recording).
-
Advance the expression pedal all the way until the pedal indicator blinks, to enter record-ready mode.
-
Begin playing a phrase. Recording will begin automatically when you start playing your guitar, and the pedal indicator will change from blinking to lit.
-
Recording will end when the recording time has elapsed. It is not possible to stop recording before this time. If you wish to re-do the recording, repeat the procedure from "3. Advance the expression pedal...."
-
Operate the expression pedal.
LOOP1 (Loop1)
As soon as you record a phrase, it will be played back as a loop (repeatedly). When you return the pedal (to minimum volume), the phrase will return to the beginning. When you advance the pedal, loop (repeated) playback will occur again. Use the pedal to adjust the playback volume.
LOOP2 (Loop2)
The pedal will control the length of the loop. The loop will become shorter as you return the pedal, and at the minimum length the loop will not playback at all.
Procedure for Loop 1 and 2
-
Select LOOP 1 or LOOP 2 for the Pedal effect, or choose a program that uses these effects.
-
Use value knob 3 to select the maximum recording time. (S is 3 seconds of high quality, L is 6 seconds of extended recording.)
-
Advance the expression pedal all the way until the pedal indicator blinks, to enter record-ready mode.
-
Begin playing a phrase. Recording will begin automatically when you start playing your guitar, and the pedal indicator will change from blinking to lit.
-
Recording will end when you record up to the maximum time, or when you once again advance the pedal all the way. When recording ends, the pedal indicator will go dark, and the recorded sound will be played back as a loop. If you wish to redo the recording, repeat from step "3. Advance the expression pedal ..."
-
Operate the expression pedal.
AMB (Ambience effect)
| Knob 1 Knob 2 Knob 3 Knob 4 Knob 5TYPE TIME TONE FEEDBACK MIX | ||||
| DELAY 10 [ms]...2 [SEC] 0...10.0 | 0...10.0 | 0...10.0 | ||
| ROOM1 | — | — | — | 0...10.0 |
| ROOM2 | — | — | — | 0...10.0 |
| GARAGE1 | — | — | — | 0...10.0 |
| GARAGE2 | — | — | — | 0...10.0 |
| HALL | — | — | — | 0...10.0 |
| ARENA | — | — | — | 0...10.0 |
These are reverberation-type effect models such as delay, reverb, and echo. The following parameters are assigned to each knob.
| Knob 1 | TYPE | Selects the effect type |
| Knob 2 | TIME | Adjusts the delay time |
| Knob 3 | TONE | Adjusts the tonal quality |
| Knob 4 | FEEDBACK | Adjusts the delay repeats |
| Knob 5 | MIX | Adjusts the mix amount |
DELAY (Delay)
This adds spaciousness to the sound by using a stereo delay with a time difference between left and right.
By pressing the TAP switch two times, you can set the TIME of knob 2 to the corresponding tempo.
ROOM1 (Room 1)
Deep room type reverb
ROOM2 (Room 2)
Bright room type reverb
GARAGE1 (Garage 1)
Garage-type reverb1
GARAGE2 (Garage 2)
Garage-type reverb2
HALL (Hall)
Hall type reverb
ARENA (Arena)
Arena-type reverb
CABI (Cabinet effect)
| Knob 1 Knob 2 Knob 3 K TYPE DEPTH | Knob 4 Knob 5 | ||
| 1×8 0...10.0 | |||
| 1×10 0...10.0 | |||
| 1×12 0...10.0 | |||
| 2×12 0...10.0 | |||
| 4×10 0...10.0 | |||
| 4×12 0...10.0 |
The cabinet resonator simulates the acoustical characteristics of a guitar amplifier cabinet. Although these models are especially effective when you are plugged in to a mixer etc. via a direct line connection, they are also effective when you are using a guitar amp. The following parameters are assigned to each knob.
Knob 1 TYPE Select the cabinet type
Knob 3 DEPTH Adjusts depth
1×8
Simulation of a cabinet with a single 8-inch speaker
1×10
Simulation of a cabinet with a single 10-inch speaker
1×12
Simulation of a cabinet with a single 12-inch speaker
2×12
Simulation of a cabinet with two 12-inch speakers
4×10
Simulation of a cabinet with four 10-inch speakers
4×12
Simulation of a cabinet with four 12-inch speakers
NR LEV
(Noise Reduction, Program Level)
Adjust the depth of noise reduction and the level for each program.

Use value knobs 1 and 2 to modify the program name (see p.10), and use value knob 3 to turn the modulation and/or ambience effects on/off (see p.7).
NR (Noise Reduction) "NR"
This is adjusted by value knob 4. Depending on the guitar that you use, excessively high noise reduction settings may cause the sound to be interrupted. Set this accordingly.
PROGRAM LEVEL "PROGLEV"
This is adjusted by value knob 5. The volume of each program will change depending on your guitar. Adjust the program level as accordingly.
Rhythm Pattern List
| No. | Name | No. | Name |
| 1 | 8BEAT1 | 26 | DISCO |
| 2 | 8BEAT2 | 27 | EURO |
| 3 | 8BEAT3 | 28 | FUNK |
| 4 | 8BEAT4 | 29 | JAZZ1 |
| 5 | 8BEAT5 | 30 | JAZZ2 |
| 6 | 8BEAT6 | 31 | MOTOWN |
| 7 | 8SHFL | 32 | REGGAE 1 |
| 8 | 16BEAT1 | 33 | REGGAE 2 |
| 9 | 16BEAT2 | 34 | SURF |
| 10 | 16BEAT3 | 35 | COUNTRY |
| 11 | 16BEAT4 | 36 | BOSSA |
| 12 | 16BEAT5 | 37 | SAMBA |
| 13 | 16SHFL1 | 38 | PRACT0 |
| 14 | 16SHFL2 | 39 | PRACT1 |
| 15 | 16SHFL3 | 40 | PRACT2 |
| 16 | 16SHFL4 | 41 | PRACT3 |
| 17 | 3/4 | 42 | PRACT4 |
| 18 | 6/4 | 43 | PRACT5 |
| 19 | 6/8 | 44 | PRACT6 |
| 20 | BALAD | 45 | PRACT7 |
| 21 | BLUES | 46 | PRACT8 |
| 22 | ROCK | 47 | PRACT9 |
| 23 | THRASH | 48 | METRO1 |
| 24 | DANCE1 | 49 | METRO2 |
| 25 | DANCE2 | 50 | METRO3 |
Preset Program Parameter List
When an effect that was off is turned on, the effect model printed in a slanted typeface will be selected.
With the factory settings, the user programs have the same contents as the preset programs.
BANK # PROGRAM DRIVE-AMP A DRIVE-AMP B MOD PEDAL AMB CABI
| 0 | 1 | S | T | A | TIC US HI-G METAL | PHASE | VOLUME | ROOM2 | 4X12 |
| 2 | FILTER | ACOUSTIC | FAT DST | CHORUS | VOLUME | GARAGE2 | 4X12 | ||
| 3 | KIDROCK | US HI-G BRITSTK | FLANGER | VOLUME | GARAGE2 | 4X10 | |||
| 4 | FREAK | TUBE OD | T-BOOST | CHORUS | VOLUME | DELAY | 1X8 | ||
| 1 | 1 | RAGE | BRITSTK | BRITSTK | FLANGER | PITCH | ROOM2 | 4X12 | |
| 2 | TRASH | US HI-G ACOUSTIC | CHORUS | VOLUME | ARENA | 2X12 | |||
| 3 | NIN | CL DIST | METAL | PHASER | VOLUME | DELAY | 1X8 | ||
| 4 | HOSTILE | METAL | METAL | FLANGER | WAH HALL | 4X12 | |||
| 2 | 1 | PRIEST BRITSTK | BRITSTK | CHORUS | VOLUME | ROOM1 | 4X12 | ||
| 2 | 2112 | CL COMP | CL DIST | PHASER | VOLUME | HALL | 2X12 | ||
| 3 | R R | CL DIST | CL DIST | PITCH | GARAGE | GARAGE1 | 4X12 | ||
| 4 | SATCH | BRITSTK | BRITSTK | CHORUS | WAH DELAY | 4X10 | |||
| 3 | 1 | J | P | TUBE OD | BRITSTK | CHORUS | ECHO | GARAGE1 | 4X12 |
| 2 | CARLOS | US HI-G | US HI-G | WAH UP | VOLUME | DELAY | 2X12 | ||
| 3 | DA'FUZZ | BIGFUZZ | BIGFUZZ | PHASER | FILTER | DELAY | 1X8 | ||
| 4 | RINGMAN | FAT DST | T-BOOST | CHORUS | RING | HALL | 4X12 | ||
| 4 | 1 | JAZZ | OFF | BRITSTK | CHORUS | VOLUME | DELAY | 2X12 | |
| 2 | FUNKY | CL COMP | FAT DST | WAH UP | VOLUME | HALL | 4X12 | ||
| 3 | SURF | CL COMP T-BOOST | CHORUS | TREMOLO | GARAGE1 | 1X8 | |||
| 4 | FUSION | TUBE OD | BRITSTK | CHORUS | VOLUME | GARAGE2 | 2X12 | ||
| 5 | 1 | ROCK | FAT DST | BRITSTK | PHASER | VOLUME | ARENA | 4X10 | |
| 2 | BLUES | TUBE OD | TUBE OD | CHORUS | VOLUME | ROOM1 | 2X12 | ||
| 3 | VINTAGE | T-BOOST | TUBE OD | TREMOLO | VOLUME | GARAGE2 | 4X12 | ||
| 4 | F BACK | FAT DST | FAT DST | CHORUS | F BACK2 DELAY | 4X12 | |||
| 6 | 1 | A MINOR | CL COMP | US HI-G | MIN3UP | VOLUME | DELAY | 4X12 | |
| 2 | A MAJOR | BRITSTK | BRITSTK | MAJ3DWN | VOLUME | DELAY | 4X12 | ||
| 3 | LOOP | CL COMP US HI-G | CHORUS | LOOP1 | DELAY | 2X12 | |||
| 4 | SAMPLE | US HI-G METAL | CHORUS | SAMPLE2 | DELAY | 4X12 | |||
| 7 | 1 | CHORUS | OFF | CL COMP | CHORUS | CHO2 | HALL | 4X10 | |
| 2 | FLANGER | CL COMP | FAT DST | FLANGER | VOLUME | DELAY | 4X12 | ||
| 3 | PHASER | OFF | BRITSTK | PHASER | PHASER | DELAY | 4X10 | ||
| 4 | VIBRATO | TUBE OD | CL DIST | TREMOLO | VIBRATO | GARAGE1 | 1X12 | ||
| 8 | 1 | ECHO | ACOUSTIC | TUBE OD | CHORUS | ECHO | ROOM1 | 2X12 | |
| 2 | BENDER US HI-G ACOUSTIC | CHORUS | PITCH | DELAY | 4X10 | ||||
| 3 | SLOWATK | FAT DST | CL COMP | SLOWATK | VOLUME | ARENA | 2X12 | ||
| 4 | VIOLIN | T-BOOST | CL COMP | SLOWATK | DELAY | GARAGE1 | 4X10 | ||
| 9 | 1 | ACOU LN | ACOUSTIC | ACOUSTIC | CHORUS | VOLUME | ROOM1 | 1X10 | |
| 2 | COMP LN | CL COMP | CL COMP | FLANGER | VOLUME | ROOM1 | 2X12 | ||
| 3 | OVDR LN | T-BOOST | T-BOOST | FLANGER | VOLUME | ROOM2 | 4X10 | ||
| 4 | DIST LN | BRITSTK | US HI-G | CHORUS | F BACK2 | DELAY | 4X12 | ||
Précautions
Emplacement
Mode Effect Select 23
Activer le mode Effect Select----23
Quitter le mode Effect Select----23
text_image
Diagram showing battery charging mechanism with labeled components A and B, including a battery block and charge distribution.
If you will not be using the unit for an extended period of time, remove the batteries to prevent them from leaking.

Verrouillage de banque (10's HOLD)
OFF (coupé) "DRV OFF"
Désactive l'effet Drive Amp.
PITCH (Pitch Shifter)
Pitch Shifter intelligent
PITCH (Pitch Shifter)
GARAGE (Reverb Garage)
AMB (effet Ambience)
| Bouton 1 Bouton 2 Bouton 3 Bouton 4 Bouton 5TYPE TIME TONE FEEDBACK MIX | ||||
| DELAY 10 [ms]...2 [SEC] 0...10.0 | 0...10.0 | 0...10.0 | 10.0 | |
| ROOM1 | — | — | — | 0...10.0 |
| ROOM2 | — | — | — | 0...10.0 |
| GARAGE1 | — | — | — | 0...10.0 |
| GARAGE2 | — | — | — | 0...10.0 |
| HALL | — | — | — | 0...10.0 |
| ARENA | — | — | — | 0...10.0 |
Bouton 1 TYPE Select the effect type
ROOM1 (Reverb Room 1)
ROOM2 (Reverb Room 2)
GARAGE1 (Reverb Garage 1)
GARAGE2 (Reverb Garage 2)
Bouton 1 TYPE Select the cabinet type
The modes of the AX100G 37
text_image
TONeworkS HORE 10 2 3 4 5 6 7 8 9 TONEWORKS HORE TONeworkS HORE TONEWORKS HORE TONeworkS HORE TONeworkS HORE TONeworkS HORE TONeworkS HORE TONeworkS HORE TONeworkS HORE TONeworkS HORE TONeworkS HORE TONeworkS HORE TONeworkS HORE TONeworkS HORE TONeworkS HORE TONeworkS HORE TONeworkS HORE TONeworkS HORE TONeworkS HORE TONeworkS HORE①Type-Regler
The modes of the AX100G
text_image
Diagram showing a battery terminal with labeled components A and B, alongside its internal charge distribution diagram.
80 (40 x Preset, 40 x User)
□Eingänge:
PITCH (Pitch Shifter)
RING (Ringmodulator)
PITCH (Pitch Shifter)
ROOM1 (Zimmerhall 1)
Tiefer Room Reverb
ROOM2 (Zimmerhall 2)
Heller Room Reverb
GARAGE1 (Garagenhall 1)
garagenartiger Hall 1
GARAGE2 (Garagenhall 2)
garagenartiger Hall 2
HALL (Saalhall)
Hall Reverb
ARENA (Stadionhall)
NR (Noise Reduction)
„NR“
text_image
Diagram showing a battery cell with labeled components A and B, including polarity indicators and directional arrows.
| TYPE GAIN | ツマミ1REBLE | ツマミ22MIDDLE | ツマミ3BASS | ツマミ4LEVEL | ツマミ5 |
| OFF - - | - | - | - | ||
| ACOUSTIC 0~1 | 0.0 0~1 | 0.0 0~1 | 0.0 0~1 | 0.0 0~1 | 0.0 |
| CLASSIC COMP | 0~10.0 | 0~10.0 | 0~10.0 | 0~10.0 | 0~10.0 |
| TUBE OD 0~1 | 0.0 0~1 | 0.0 0~1 | 0.0 0~1 | 0.0 0~1 | 0.0 |
| CLASSIC DIST | 0~10.0 | 0~10.0 | 0~10.0 | 0~10.0 | 0~10.0 |
| FAT DIST | 0~10.0 | 0~10.0 | 0~10.0 | 0~10.0 | 0~10.0 |
| METAL DIST | 0~10.0 | 0~10.0 | 0~10.0 | 0~10.0 | 0~10.0 |
| BIG FUZZ | 0~10.0 | 0~10.0 | 0~10.0 | 0~10.0 | 0~10.0 |
| TOP BOOST | 0~10.0 | 0~10.0 | 0~10.0 | 0~10.0 | 0~10.0 |
| US HI-GAIN | 0~10.0 | 0~10.0 | 0~10.0 | 0~10.0 | 0~10.0 |
| BRIT STACK | 0~10.0 | 0~10.0 | 0~10.0 | 0~10.0 | 0~10.0 |
This warranty is valid only in Japan.
This product has been manufactured according to strict specifications and voltage requirements that are applicable in the country in which it is intended that this product should be used. If you have purchased this product via the internet, through mail order, and/or via a telephone sale, you must verify that this product is intended to be used in the country in which you reside.
WARNING: Use of this product in any country other than that for which it is intended could be dangerous and could invalidate the manufacturer's or distributor's warranty.
Please also retain your receipt as proof of purchase otherwise your product may be disqualified from the manufacturer's or distributor's warranty.