
25200 - Chopper KORONA - Free user manual and instructions
Find the device manual for free 25200 KORONA in PDF.
| Product Type | Electric Meat Grinder |
| Brand | KORONA |
| Model | 25200 |
| Power Supply | 220 - 240 V ~ 50/60 Hz |
| CO-Time (continuous time) | 7 minutes |
| Recommended Cooling Time | 30 minutes |
| Main Uses | Grinding fresh meat, preparing sausages, kibbeh, cookies |
| Included Accessories | Meat tray, pusher, rotating blade, grinding plates (medium and coarse), kibbeh attachment, sausage funnel, cookie press, fixing ring |
| Blade | Stainless steel, very sharp |
| Care and Cleaning | Removable parts washable in warm soapy water, do not immerse motor block, do not wash in dishwasher, oil blades and plates after drying |
| Safety | On/off/reverse switch, body lock, use of pusher, sharp blade |
| Warranty | 2 years |
| After-sales Service | KORONA Service, Am Steinbach 9, 59872 Meschede-Enste, Germany Tél. 02933 90284-80 Email service@korona-electric.de |
| Intended Use | Private domestic use, small quantities |
| Prohibited Foods | Bones, frozen foods, nuts, hard tendons |
Frequently Asked Questions - 25200 KORONA
User questions about 25200 KORONA
0 question about this device. Answer the ones you know or ask your own.
Ask a new question about this device
Download the instructions for your Chopper in PDF format for free! Find your manual 25200 - KORONA and take your electronic device back in hand. On this page are published all the documents necessary for the use of your device. 25200 by KORONA.
USER MANUAL 25200 KORONA
KORONA electric GmbH, Sundern/Germany
www.korona-electric.de
Before use, please read these instructions carefully and keep them in a safe place for future reference. When passing on the appliance to a third party, make sure to include these instructions for use.
This appliance is intended and suitable for processing small amounts of foods. All other use or modification of the appliance is not intended by the manufacturer and might entail a risk of damage or injury.
This appliance is only intended for private household use and not for commercial use!
Safety:
This symbol identifies hazards which may cause injuries!
This symbol identifies electric shock hazards!
! General Safety Instructions
- Manufacturer takes no responsibility for any damage caused by incorrect use.
Incorrect or improper use can damage the appliance and cause injuries to the user. - Before connecting this appliance to the mains, make sure your local voltage matches the technical data of the appliance. Otherwise the appliance may overheat and get damaged.

Caution! Danger of electric shock!
- Never put the appliance, cord or plug into water or any other liquid.
- Do not use the appliance near a sink or wash basin.
- Do not use the appliance with wet hands.
- Do not use the appliance outdoors.
An electric appliance is not a toy!
- Never leave the appliance unattended during use.
- This appliance is not intended for use by persons (including children) with reduced physical, sensory or mental capabilities, or lack of experience and knowledge, unless they have been given supervision or instruction concerning use of the appliance by a person responsible for their safety.
- Children should be supervised to ensure that they do not play with the appliance.
- Always unplug your appliance when it is not in use, and before cleaning.
Always pull the plug - not the cord. - Keep the appliance and the cord well away from any hot surfaces to avoid any damage to the appliance.
- Make sure the cord may not inadvertently be pulled or cause anyone to trip when in use. Do not allow the cord to hang over sharp edges.
- Do not bend the cord or wind it round the appliance.
Do not use the appliance,
if the cord is damaged.
in case of malfunction.
- if the appliance was dropped or is damaged otherwise. Have it checked and, if necessary, repaired by a qualified person/Customer Service. Never attempt to make any modifications to or repair the appliance yourself.
- Only use accessories evaluated for use with this appliance.
- Never attempt to drive any objects into the appliance.
- Never attempt to open the housing yourself!
Special Safety Instructions

Warning! To avoid the possibility of injury/damage to the appliance, electric shock and risk of burns.
- Only use the appliance for its intended purpose (mincing fresh meat, making sausages with natural or artificial sausages skin) and as described in this manual.
- Always unplug the appliance when assembling/ disassembling and/or attaching/removing accessories.
- This appliance is not suitable for processing frozen foods or other hard food items (e.g. nuts, bones).
- Never touch the rotating parts/blades/discs with your hands and/or other objects when using the appliance. This could lead to serious injuries and/or damage to the appliance.
- Careful, when cleaning the blade, it is very sharp.
- If the appliance should experience any problems during operation, switch off the appliance, disconnect it from the mains and remove the blockage.
- Never let the appliance run empty.
- Reassemble the appliance after each use and cleaning, to avoid injuries.
- Keep the appliance out of the reach of children.
CO-Time: 7 minutes
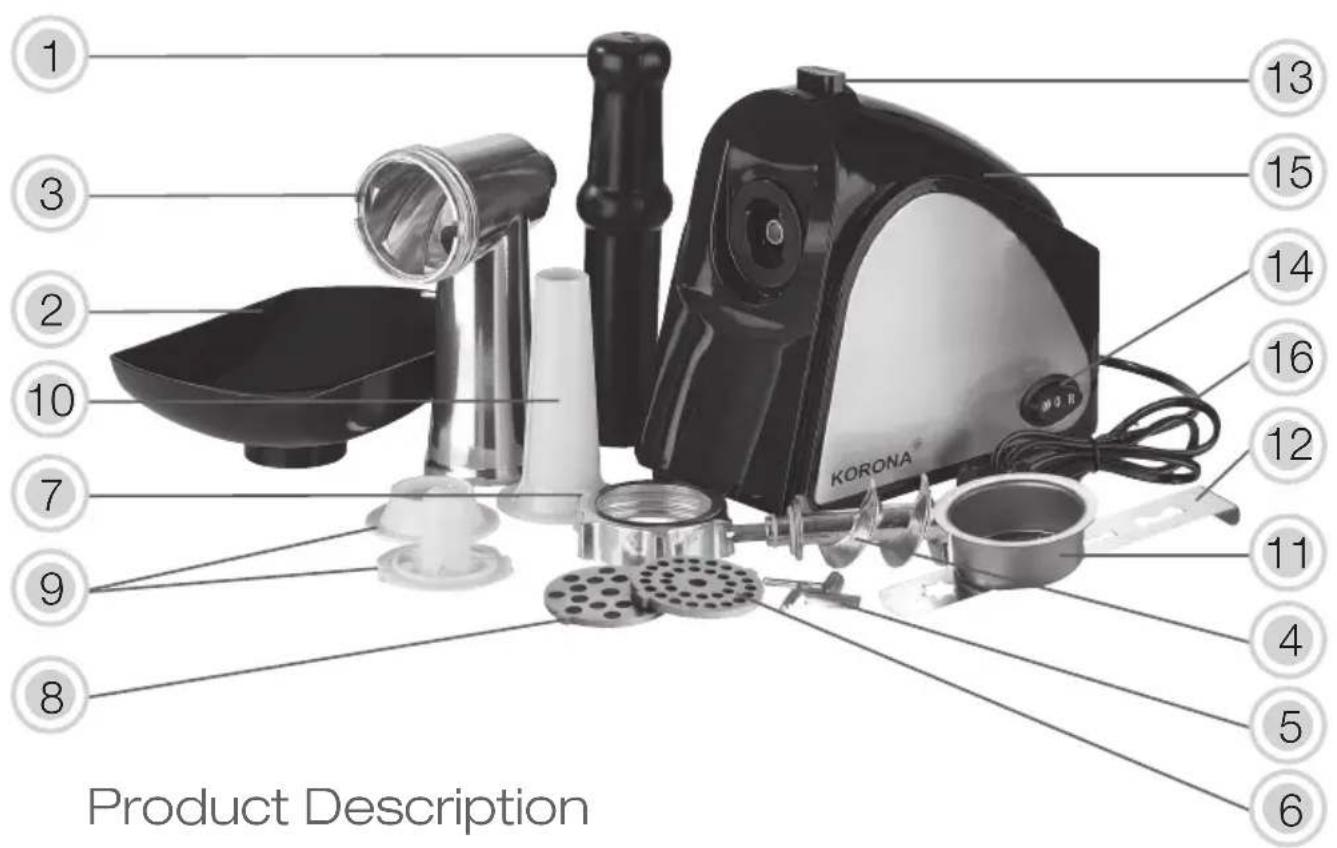
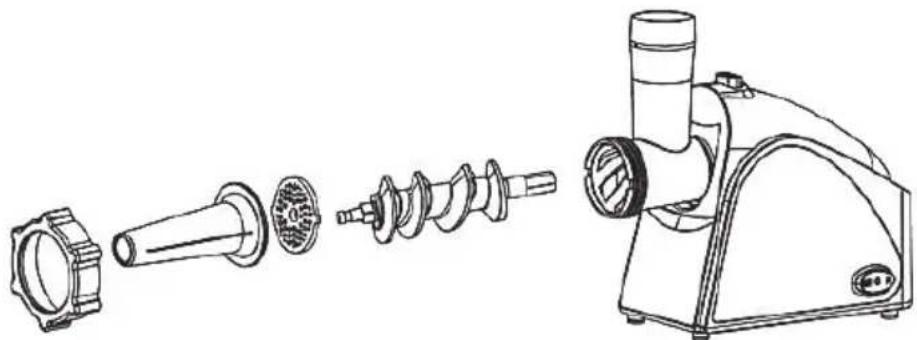
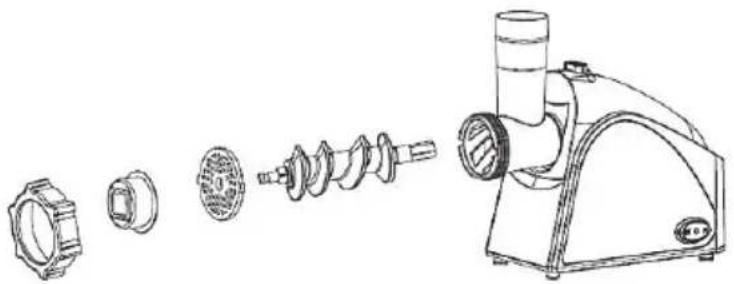
- Stodger
- Feeding Tray
- Meat Grinding Casing
- Transport Screw
- Cross Blade
- Cutting Disc (medium)
- Ring Clamp
- Cutting Disc (coarse)
- Kebbe attachment (Kebbe former and Kebbe cone)
- Sausage filling funnel
- Cookies attachment ring
- Cookie press
- Release button
- On / O (off) / R (reverse) switch
- Motor block
- Power cord and plug (not shown in line drawing)
Before First Use
- Remove all packaging material.
- Disassemble and clean all the detachable parts/accessories as specified under "Cleaning and Care".
Assembly
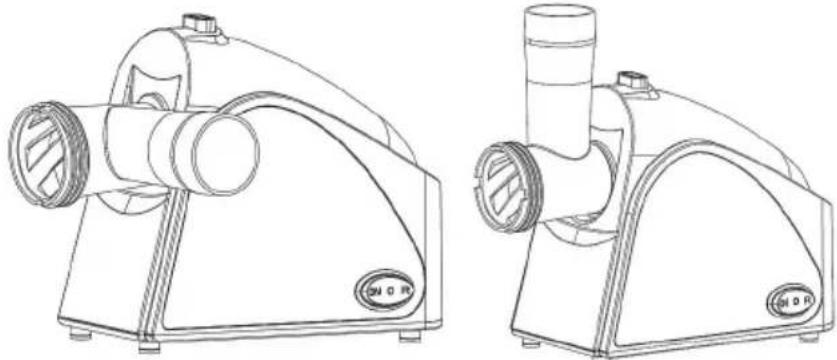
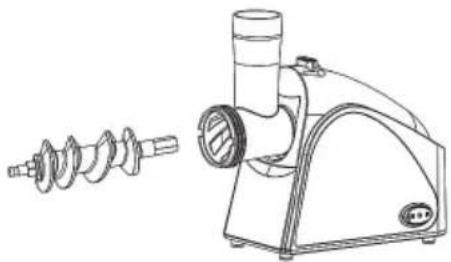
- Press and hold the release button (13).
- Insert the meat grinder casing (3) in horizontal into the inlet of the motor block (15) and rotat anticlockwise direction, make sure it is properly locked in.
- The stuffing funnel should face upward.
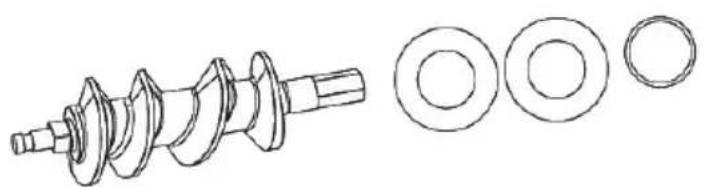
- Insert the transport screw (4) into the meat grinder casing (3). Turn it slightly to make sure that it is properly fixed.
Note: The shaft is assembled with washer and sealing ring to avoid meat squeeze backward to the motor block. Make sure parts are in place.
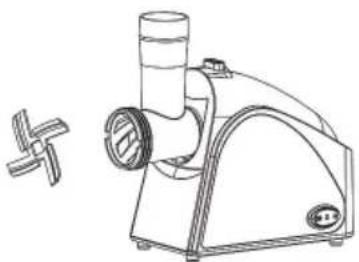
- Place the cross blade (5) with its sharp side facing the cutting disc (6 / 8).
Warning: The cross blade is very sharp - risk of injury!
Attention: The device can get damaged if the cross blade is wrongly inserted in the opposite direction!
③
4
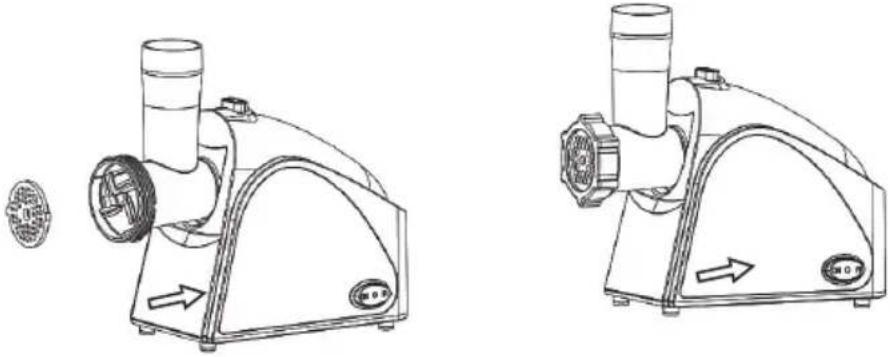
- Choose the appropriate cutting disc(6/8).
- Insert both the edges of the chosen cutting disc into the slots in the meat grinder casing.
- Screw on the ring clamp (7) tightly.
5
- Now you can place the feeding tray (2) on top stuffing funnel
How to prepare the meat
- Cut the meat into strips or cubes no larger than 2 ~cm (cut them smaller if necessary).
- Make sure that the meat is free of bone, tough tendons, excessive fat, etc. before grinding
- Raw meat of fish should be thoroughly chilled (not frozen) before grinding to reduce the loss of juices.

Caution: Freshly ground meat should be refrigerated
and cooked within 24 hours as it is prone to easily decay.
Pay attention to maintain good hygiene when processing meat.

Note: When processing meat for kebbe or sausages, access the meat twice beforehand, using it as stuffing.
When preparing your stuffing you can add some chopped onions or herbs according to your taste or recipe.
Operation
Once the appropriate attachments have been fixed:
- Place the appliance on an even, firm and heat resistant surface and make sure that the air vents at the bottom and back remain unblocked.
- Make sure that the appliance is on 0-positon (off) (14) and plug it in into a properly installed wall socket.
- Place a bowl/container underneath the appliance to collect the processed foods.
- Carefully insert the meat / cookie dough into the feeding tray (2).
- Switch on (14) the appliance and push down the meat / cookie dough with the stodger (1) supplied into feeding tube.

Warning: Always use the supplied stodger – never use objects or your hand or fingers – to push down the foods, could cause serious injuries and damage the appliance.
If the motor slows down, this may be due to jammed food switch off the appliance, unplug it and clean the internal parts.
Preferably, the appliance should be operated at a room temperature of (23 - 25^) .

Warning: DO NOT operate the appliance longer than
7 minutes (CO-time) at a time, to avoid overheating of the appliance. We recommend a cooling down period of approx. 30 minutes each time.
Using the Reverse Switch
If the smooth running of the appliance is hampered by stuck or excessive food, switch to R (anti-clock-wise operation)
(14). Press and hold the Reverse button (14)
appliance will run in reverse direction. This should enable you to dislodge the food, which got stuck.
If this should not be successful, clean the machine as described under Cleaning and Care.
Making Kebbe
Use your favourite Kebbe recipe by mincing the meat either twice or three times.
Once the meat grinder has been assembled as described under "Assembly"
- Open the ring clamp.
- Replace the cross blade (5) and cutting disc (6/8) with the Kebbe attachment (9).
- Screw on the ring clamp (7) again tightly and start making your Kebbe (see operation). Deep fry or fry and enjoy.

Making Sausages
Assemble the meat grinder as explained under "Assembly".
- Open the ring clamp (7).
- Remove the cross blade (5).
-
Attach the cutting disc (6/8), the sausage filling funnel and screw on the ring clamp again tightly.
-
Attach and completely pull the casing over the sausage filling funnel (10). Place a knot at the end of the casing. Make sure that the casing used is cleaned.
- Slowly feed the meat through the appliance into the casing. Fill the casings until they are firm, but don't overstuff them.
Casings
You can make sausages with or without casings. But, if you wish to use a casing you have the following two options:
Natural casings (ask your local butcher):
- To properly clean and to remove excess salt, soak casing in cold water for 30 minutes.
- Rinse several times by running cold water through entire length of casing.
Synthetic Casings:
Soak casings in water for 5 minutes to make them more pliable and easier to work with.
Making cookies
Before starting your cookie recipe, make sure that the appliance and all attachments have been cleaned properly.
-
Once the meat grinder has been assembled as described under "Assembly".
-
Open the ring clamp (7).
- Remove the cross blade (5).
- Attach the cutting disc (6/8), the cookies attachment ring (11) and screw on the ring clamp (7) tightly.
- Insert the cookie press (12) into the cookies attachment ring (11) and choose the form you wish to use. Make sure that the handle points outward.
- Insert the cookie dough into the feeding tray (2).
- Switch on the appliance. (14) and push down cool dough with the stodger (1) supplied into the feeding tube.
- Cut the cookie dough shapes into the desired size and bake them on a bake tray according to your recipe.
Attention: When exchanging accessories, always make sure to disconnect the appliance from the mains.
Disassembly
Always make sure to disconnect the appliance from the mains before disassembling it.
- Press onto the release button (13) to remove the mea grinder casing (3) from the motor block (15).
- Open the ring clamp (7) and remove the respective accessories carefully, in order to avoid any injuries.
cleaning and care
Due to hygienic reasons clean your meat grinder after each use, and remove any food residues. Not doing so could possibly result in a hazardous situation.

Before cleaning, always switch off the appliance and disconnect it from the mains. Let it completely cool down.
Never immerse the appliance in water. Danger! Electric Shock!
- Do not allow stains to dry. Clean the appliance as soon as possible after use with a damp cloth and do not use any aggressive cleaning agents or sharp objects.
- Remove all potential food leftovers from the funnel with a soft spatula or bottle brush.
- All parts except the motor block (16) can be in hot soapy water, using care when handing the sharp blades.
- Excess food leftovers can be removed from the cutting disc (6 / 8), cookies attachment (11/12), Kebbe attachment (9) and sausage filling funnel (10) by using a dish brush or tube brush.
- Afterwards rinse these parts with clean hot water and then dry them.
- The parts are not dishwasher safe.
- After all parts are cleaned and dried, coat the blade and discs with cooking oil to keep them lubricated and rust free.
- Before reassembling the appliance make sure that a parts are clean and dry.

The blade is extremely sharp. Therefore, reassemble
the unit after use. Risk of injury!
After use, store the appliance in a clean and dry place and keep it out of the reach of children.
disposal Instructions

Waste electrical devices marked with this sign must not be disposed of with your household waste, but are to be collected separately. Therefore, please return this device at the end of its life cycle to special
collection points for disposal or your local dealer.
Your Meat Grinding 25200 is packed in a retail box.
Such boxes are recyclable waste, i.e. they are reusable or recyclable.
Technical data:
Voltage: 220 - 240 V ~ 50 / 60 Hz
Rated Power: 400 W
CO Time: 7 Minutes
Protection Class: II
Subject to change without notice!

Guarantee:
This product is guaranteed against defects in materials and workmanship for a period of 2 years.
This guarantee is not valid:
- if the appliance has not been used in accordance to the instructions
for damages due to wear and tear (batteries, etc.) - for damages known by customer at time of purchase
for damages caused by owner
This guarantee does not affect your statutory right, nor any legal right you may have as a costumer under applicable national legislation governing the purchase of goods.
In order to assert his/her right in a guarantee case during the guaranteed period, the customer must provide evidence of the date of purchase (receipt).
The guarantee is to be asserted against
KORONA electric GmbH, Sundern/Germany.
Service Address:
KORONA Service, Am Steinbach 9, 59872 Meschede, Germany
Telephone Hotline: 02933 90284-80
Mail: service@korona-electric.de
web: www.korona-electric.de
within 2 years after the date of purchase. In case of guarantee the customer is given the right to get the appliance repaired at our own or at an authorized shop. Further rights (due to guarantee case) are not given to the customer.
Beoogd gebruik

- Caution! Danger of electric shock!
- An electric appliance is not a toy!
- Do not use the appliance,
- Special Safety Instructions
- Warning! To avoid the possibility of injury/damage to the appliance, electric shock and risk of burns.
- Before First Use
- Assembly
- How to prepare the meat
- Note: When processing meat for kebbe or sausages, access the meat twice beforehand, using it as stuffing.
- Operation
- Warning: DO NOT operate the appliance longer than
- Using the Reverse Switch
- Making Kebbe
- Use your favourite Kebbe recipe by mincing the meat either twice or three times.
- Making Sausages
- Casings
- Natural casings (ask your local butcher):
- Synthetic Casings:
- Making cookies
- Disassembly
- cleaning and care
- disposal Instructions
- Guarantee:
- Beoogd gebruik
Brand : KORONA
Model : 25200
Category : Chopper