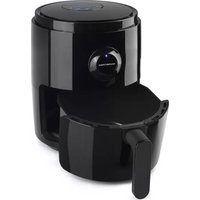
XL 1500W - Deep fryer Gourmetmaxx - Free user manual and instructions
Find the device manual for free XL 1500W Gourmetmaxx in PDF.
| Product type | Hot air fryer |
| Brand | Gourmetmaxx |
| Model | XL 1500W |
| Model number | TXG-DS14C |
| Article numbers | 01057 (white), 07026 (black) |
| Power | 1500 W |
| Supply voltage | 220-240 V ~ 50 Hz |
| Temperature range | 80°C - 200°C |
| Timer | 0 to 60 minutes |
| Basket capacity | Up to 2/3 of its capacity (not specified in liters or kg) |
| Functions | Hot air frying, grilling, defrosting, reheating |
| Safety | Automatic shutdown in case of overheating, shut-off when drawer is removed, timer with audible signal |
| Maintenance | Clean basket and drawer with warm soapy water, damp cloth for the interior |
| Included accessories | Basket, drawer with handle |
| Protection class | I |
| Customer service | DS Produkte GmbH (Germany) |
| Use | Household use only |
Frequently Asked Questions - XL 1500W Gourmetmaxx
User questions about XL 1500W Gourmetmaxx
0 question about this device. Answer the ones you know or ask your own.
Ask a new question about this device
Download the instructions for your Deep fryer in PDF format for free! Find your manual XL 1500W - Gourmetmaxx and take your electronic device back in hand. On this page are published all the documents necessary for the use of your device. XL 1500W by Gourmetmaxx.
USER MANUAL XL 1500W Gourmetmaxx
www.service-shopping.de
Safety Instructions 22
Items Supplied and Device Overview 25
Before Initial Use 25
For Your Safety 26
Please note 26
Use 27
Recipe ideas 29
Cleaning and Storage 34
Troubleshooting 35
Technical data 36
Disposal 36
Explanation of Symbols


Safety instructions: Read these carefully and comply with them in order to prevent personal injury and damage to property.
Caution of hot surfaces!
Suitable for food use.
Supplementary information
Read operating instructions before use!
Dear customer,
We are delighted that you have chosen our hot air frying machine.
Before using the device for the first time, please carefully read through the instructions and store them for future reference. These instructions are to accompany the device when passed on to others.
The manufacturer and importer assume no liability in the event the data in these instructions have not been observed!
Please note: The illustrations used in this instruction manual may vary slightly from the real device.
If you have questions about the device or spare parts / accessories, contact customer service via our website:
www.service-shopping.de
Intended Use
- The device is designed for grilling, defrosting and heating up food.
- The device is not a conventional fryer in which food is deep-fried using oil. The device works with hot air! Do not fill the drawer containing the basket insert with fairly large amounts of cooking oil or deep-frying fat!
The device is not suitable for preparing liquid dishes such as soups, sauces or stews! - The device is for personal use only and is not intended for commercial applications.
- Use the device only as described in the instructions. Any other use is deemed to be improper. Incorrect operation and incorrect handling may cause faults with the device and cause injury to the user.
- The following are excluded from the warranty: all defects caused by improper handling, damage or unauthorised attempts at repair. This also applies to normal wear and tear.
Safety Instructions
This device may be used by children aged 8 and over and by people with reduced physical, sensory or mental abilities or a lack of experience and / or knowledge if they are supervised or have received instruction on how to use the device safely and have understood the dangers resulting from this.
Children may not play with the device.
- Cleaning and user maintenance may not be performed by children, unless they are older than 8 years of age and are supervised.
Children younger than 8 years of age and animals must be kept away from the device and the connecting cable. - Only use and store the device out of the reach of children. The mains cord may also not be accessible for children. They could pull the device down with it.
-
CAUTION: Hot surfaces! The device will become very hot during use. Make absolutely sure that you do not come into contact with any heated parts during and after use of the device. Only touch the handles and the control dials while the device is in use or immediately after it has been switched off. Only transport or store away the device after it has cooled down completely. Use suitable oven gloves when handling the device.
-
The device is not designed to be operated with an external timer or a separate remote control system.
The device should always be unplugged from the power supply if it is not supervised and before assembly, disassembly or cleaning. - For your own safety, always check the device for damages prior to using it. Only use the device if the device, mains cord and the plug do not exhibit any damages!
If the device, the connecting cable or the plug of the device is damaged, it must be replaced by the manufacturer or customer service department or a similarly qualified person (e. g. specialist workshop) in order to avoid any hazards.
■ ATTENTION: Note cleaning instructions in "Cleaning and Storage" chapter!

Risks of injury
- Risk of injury and suffocation! Keep the device and packaging material away from children and animals.
Danger of scalding from hot steam! Keep your hands and head away from the ventilation slots. Hot steam emerges from the ventilation slots!
Danger of scalding from heat, hot steam or condensation! We recommend using oven cloths or kitchen gloves if you want to remove food. - Make sure that the connected mains cord does not present a trip hazard. The mains cord must not hang down from the surface on which the device is placed in order to prevent the device from being pulled down.
The device must not be moved during operation.

Risk of electric shock
- Only connect the device to a properly installed socket with protective earth contacts. The socket must also be easily accessible after connecting so that the mains connection can be quickly disconnected. The mains voltage must correspond to the technical data of the device. Only use proper extension cords, whose technical data correspond to those of the device.
- Never immerse the device, the mains cord and the plug in water or other liquids and make sure that there is no risk of them falling in water or getting wet.
If the device falls in water, immediately disconnect the power supply. Do not attempt to pull the device out of the water when it is connected to the mains supply! - Never touch the device, the mains cord and the plug with wet hands when these components are connected to the mains supply.
- Position the mains cord in such a way that it does not become squashed or bent and does not come into contact with hot surfaces.
-
Do not connect the device along with other consumers (with a high wattage) to a multiple socket in order to prevent overloading and a possible short circuit (fire).
-
Turn the device off and pull the plug out of the socket if a fault occurs during operation or before a storm.
Always pull on the plug itself and never on the mains cord! - Never pull on the mains cord to move the device.
Only use the device in enclosed areas.

Risk of Fire
- Do not use the device in rooms containing easily flammable dust or toxic and explosive vapours.
- Do not operate the device in very moist environment or in the vicinity of flammable material.
- Do not cover the device during operation in order to prevent it from catching fire.
In the event of a fire: Do not put the fire out using water! Smother the flames with a fireproof blanket or a suitable fire extinguisher. - Do not place any combustible materials (e.g. cardboard, plastic, paper or candles) on or in the device.
Avoiding damage to materials, property and the device
Always set up the device with a clear space on all sides (at least 20~cm ) and clear space above it (at least 30~cm ) on a dry, flat, solid and heat-resistant surface.
- Maintain adequate distance to heat sources such as stoves or ovens to prevent damage to the devices.
- Do not expose the device to extreme temperatures, strong temperature fluctuations, direct sunlight or moisture.
- Do not drop the device or allow it to be knocked violently.
Use only the accessory parts supplied by the manufacturer.
Insert the drawer into the device only with the basket insert placed in it!
- Make sure that the drawer containing the basket insert is correctly inserted into the device before you switch on the device.
- Do not pull the drawer out of the device during operation. Always switch off the device before you remove the drawer from the device.
- Do not overfi ll the basket insert so that the food does not touch the heating element inside the device during use. Fill the basket insert no more than 2/3 full!
- Keep the device in a dry place at temperatures of between 0 and 40^ .
Hygienic notes
The device may contain production residues. In order to avoid health hazards, clean the inside of the housing and all accessories before initial use (see the "Before Initial Use" and "Cleaning and Storage" chapters) and heat the device up for approximately 15 minutes without any food in it.
Clean the device after every use and keep it clean to prevent the formation of germs.
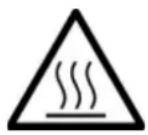
Items Supplied and Device Overview
1 Temperature control (80^ - 200^)
2 Temperature control lamp
3 Operating lamp
4 Timer (0 - 60 minutes)
5 Device housing
6Drawer
- Basket handle
8 Basket insert
Not shown:
- Ventilation slots on back of device
Before Initial Use

ATTENTION!
Danger of suffocation! Keep children and animals away from the packaging material.
Danger of burns! The device gets very hot during and after operation! When setting up the device, ensure that you select a location with enough clearance all around the device (at least 20 cm to the sides, 30 cm above it).
-
Unpack the device and check the items supplied to ensure they are complete (see the "Items Supplied and Device Overview" chapter) and for possible transport damage. If you find transport damage, do not use the device (■), but contact the customer service department immediately.
-
The device may contain production residues. To avoid harmful effects to your health, clean the inside of the housing and the accessories thoroughly before using them for the first time (see the "Cleaning and Storage" chapter).
- Place the device on a dry and heat-resistant fl at surface at a safe distance from fl ammable objects. Make sure that the device is not accessible to children.
- Insert the mains plug into a properly installed 220 - 240 volt plug socket.
- You should use the device for the first time without any food in it, as it may produce a small amount of smoke or odours due to coating residues. Allow the device to heat up on the highest temperature setting for approx. 15 minutes without any food in it (see the "Use" chapter). During this time, make sure the room is well ventilated, e.g. with wide-open windows!
For Your Safety
- The device is equipped with a safety mechanism which switches off the device automatically if it overheats during operation. If the device switches off automatically during operation, move the timer to the 0 position and remove the mains plug from the plug socket. Allow the device to cool down completely before you connect and use the device again.
- The device is equipped with an internal timer. Once the timer time which is set has elapsed, a beep sounds and the supply of heat is automatically switched off. To switch the device on again, the timer needs to be reset.
- The device switches off automatically when the drawer containing the basket insert is pulled out of the device. But for your own safety, always switch the device off first by moving the timer to the 0 position before you remove the drawer from the device.
Please note
- This device works with hot air. In general, you can prepare all dishes that can also be prepared in a conventional fan oven. It is suitable, among other things, for hot-air grilling of chips and potato wedges made from fresh potatoes, for cooking frozen chips and other frozen convenience products, and for cooking all kinds of chopped up food (both fresh vegetables and fresh meat and fresh fi sh).
- Generally it is not necessary to preheat the device. However, to be better able to determine when the food is cooked and when preparing food which has to be ready "on the dot", preheating is recommended. To preheat the device, use the temperature control to set the cooking temperature you want and use the timer to set a time of more than 3 minutes. When the temperature control lamp goes out (after around 3 minutes), the device has reached the set temperature. You can now cook your food.
- You generally do not require any oil to cook food. You can add oil to your food to enhance the taste by spraying your food with a little oil from the oil atomiser. In addition, you can also prepare marinated food or food in breadcrumbs.
- Cooking times are dependent on the size and quantity of the food and on the cooking temperature. However, in general the cooking times are shorter than in a conventional oven. Start with shorter cooking times and then adjust the cooking times to reflect your own personal taste.
- For the preparation of frozen products, please follow the time and temperature specifications of the manufacturer. To get a crispy result, never add fat when preparing mass-produced frozen products as they have generally already been pre
fried. The preparation time may be reduced slightly. You should check whether your food is already cooked before the stated cooking time has expired.
-
For preparing homemade chips made from fresh potatoes, you should pay heed to a few tips:
-
Use waxy potatoes. Young potatoes contain more water and therefore take longer to cook and it is possible that they may not go as crispy.
- Wash the chopped-up potatoes with cold, clear water to remove any excess starch in the potatoes. IMPORTANT: Then thoroughly dry the potatoes. The less moisture is present, the crispier the chips will become.
- The thinner the potatoes are chopped up, the crispier they will become.
- If necessary, spray the uncooked potatoes with a little oil from the oil atomiser as this will make them go crispier.
-
Preboiled potatoes will cook more evenly! Cut the potatoes into small sticks and preboil them for around 5 minutes. This will prevent your chips from being crispy on the outside but not fully cooked on the inside.
-
With some food (e.g. chips, potato wedges etc.) it is advisable to mix the food around from time to time to obtain an even cooking result. To do this, remove the drawer from the device, the basket from the drawer and shake the food about slightly to mix it all up. Then reinsert the drawer and continue the cooking process.
Use

ATTENTION!
The device is not a conventional fryer in which food is deep-fried using oil. The device works with hot air! Do not fi ll the drawer containing the basket insert with fairly large amounts of cooking oil or deep-frying fat!
Danger of scalding! Hot steam may escape when the drawer is removed from the device. Keep your head and hands away from the danger zone above the drawer!
Danger of scalding! Hot air emerges from the ventilation slots. Be careful when operating the control panel or when removing the basket insert.
■ Risk of burns! The drawer, the basket insert and the cooked food are hot after the cooking process! Use oven gloves when removing the drawer containing the basket insert or removing the basket insert from the drawer!
The drawer and the basket insert are hot after being removed from the device! Only ever put them down on a heat-resistant surface!
The device switches off automatically when the drawer containing the basket insert is pulled out of the device. When the drawer is pushed back into the device, the device automatically switches back on. Always switch off the device when you are not using it by moving the timer to the 0 position to prevent it being switched on accidentally!
Make sure that the drawer has been inserted correctly. The device cannot be switched on if the drawer is not inserted.
Only use the drawer with the basket insert placed in it.
■ Provide adequate ventilation while the device is in operation.
- Do not overfill the basket insert so that the hot air can circulate optimally inside the device. Fill the basket insert no more than 2/3 full.
Do not place food in the basket insert wrapped in cling film or plastic bags.
- Make sure that the food that you would like to prepare does not come into contact with the heating elements of the device.

This device works with hot air. It is not a conventional fryer in which food is deep-fried using lots of oil! In general, you can prepare all dishes that can also be prepared in a conventional fan oven. For good results, also read through the "Please note" chapter.
- Place the device on a dry and heat-resistant fl at surface at a safe distance from fl ammable objects.
- Insert the mains plug into a properly installed 220 - 240 volt plug socket.
- Insert the basket insert into the drawer. It must engage audibly.
- Place the food which you wish to prepare into the basket insert.
- Insert the drawer containing the basket insert into the device.
- Use the temperature control to set a cooking temperature between 80^ and 200^ .
- Use the timer to set a cooking time to start the cooking process. Set the timer to a time from 1 - 30 minutes. After the timer has been activated, the operating lamp lights up to indicate that the device has been switched on. The temperature control lamp also lights up as soon as the device starts heating up.
Please note: The temperature control lamp goes out and lights up at regular intervals. This is not a malfunction. To maintain a constant temperature, the device heats up or the device stops the heating process at regular intervals. When the temperature control lamp is lit up, the device is in a heating phase; if the temperature control lamp goes out, the supply of heat is interrupted for a brief period.
- When the set timer time has elapsed, a beep is heard and the supply of heat is automatically stopped. You can also move the timer to the 0 position manually to stop the cooking process at any time in order, for example, to mix food around or check whether the food is already fully cooked.

-
Pull the drawer containing the basket insert out of the device by holding the handle and place the drawer down on a heat-resistant, non-slip surface. Remove the basket insert from the drawer by pushing the guard forward and pressing the release button on the handle (see picture). Pull the basket insert up out of the drawer. Risk of burns! The basket insert, the drawer and the cooked food are hot! Use oven gloves when you handle the basket insert or the drawer.
-
Remove the food.
- Allow the device to cool down and pull the mains plug out of the plug socket.
- Clean the device after each use (see the "Cleaning and Storage" chapter). Do not allow any food residues to dry on the device.
Recipe ideas
Notes on cooking times and cooking temperatures
Please note that all cooking temperatures and cooking times are approximate values. As ingredients may differ in terms of their origin, size, shape and brand, we are unable to guarantee an optimal setting for your ingredients. The actual cooking times may therefore vary depending on portion size and the selected cooking temperature. Before serving, please make sure that your food is well done!
Homemade French fries
Ingredients:
4 large potatoes (waxy)
1-2 TBSP cooking oil
Salt to taste
Preparation:
- Peel the potatoes and cut them into sticks of equal size.
- Wash and then dry the potatoes thoroughly.
- Add 1 - 2 TBSP of oil to the potatoes and mix.

You do not have to add oil. However, adding oil to the French fries will make them crispier and tastier.
- Insert the basket insert in the tray.
- Add the potato sticks to the basket insert and place the tray with the basket insert in the device.
- Set the cooking temperature to 180^ .
- Set the timer to 10 minutes.
- Take the tray out after the set time has expired. Mix the French fries by shaking the basket insert gently.
- Place the tray with the basket insert back in the device.
- Set the timer to 15 minutes.
- Your French fries are done when they are golden brown. If necessary, reduce the temperature if you think the French fries have gotten too dark. If your French fries are not done after 25 minutes, increase the cooking time and cooking temperature as needed.

Tips:
- For best results, you should mix the fries more often.
- If you precook the potatoes (already cut) for five minutes before hot air grilling, the cooking time is reduced and the potatoes cook more evenly! This will prevent your French fries from being crispy on the outside but not cooked to completion on the inside!
-
Mix the oil before adding your favourite spices and herbs. This way, you can also make delicious curry or pepper fries for example. Let your imagination run wild.
-
Depending on how thick you cut the potatoes, you can vary between potato wedges and thick or thin fries. The thicker you cut the potatoes, the longer the cooking time.
- If you would like to prepare frozen French fries, you do not have to add oil as most frozen foods are par-fried. When preparing frozen French fries or other frozen foods, be sure to observe the information from the manufacturer on the packaging.
- Depending on the variety, climate and cultivation conditions, potatoes may have a different shape, size, taste and quality. Each variety has its own special characteristics. That's why your cooking results may vary depending on the origin and season.
- Waxy potatoes are generally recommended for making French fries. Young potatoes often have a high water content that makes it difficult to make crispy French fries.
Coconut shrimps
Ingredients:
12 shrimps (peeled and gutted)
For the breadcrumb coating:
approximately 12 cup of flour
approximately 12 cup of coconut flakes
approximately 12 cup of breadcrumbs
1-2 egg whites
Preparation:
- Add the coconut flakes and the breadcrumbs, 1 part to 1, to a small bowl and mix the ingredients.
- Add the fl our to a separate bowl.
- Separate the yolk from the egg white and add the egg white to another small bowl.
- Insert the basket insert in the tray.
- First roll the shrimps in the flour, then dip them in the egg white and finish by rolling them in the coconut breadcrumb coating.
- Place the shrimps in the basket insert and put the tray with the basket insert in the device.
- Set the cooking temperature to 190^ .
- Set the timer to 10 minutes.
- Your shrimps are ready to serve once they are golden brown.
- If your shrimps are not finished when the set time has elapsed, extend the cooking time.
Breaded chicken wings and drumsticks Ingredients:
2 chicken drumsticks or chicken wings approximately 12 cup of breadcrumbs
1 egg white
2 TBSP paprika powder
1 garlic clove
1 TBSP sea salt
1 TBSP rosemary
Preparation:
- Peel the garlic and press it through the garlic press.
- Mix the garlic, paprika powder, salt, rosemary and breadcrumbs.
- Separate the egg white and add it to a separate bowl.
- Insert the basket insert in the tray.
- Dip the drumsticks or the chicken wings in the egg white and then roll them in the breadcrumb coating.
- Place the drumsticks or wings in the basket insert.
- Place the tray with the basket insert in the device.
- Set the cooking temperature to 200^ .
- Set the timer to 25 minutes.
- After 25 minutes have passed, remove the tray and turn over all chicken drumsticks and wings.
- Place the tray back in the device and set the timer to another 15 minutes.

The cooking time may vary depending on the size of the drumsticks and wings. If applicable, adjust the cooking temperature and cooking time.
Breaded chicken breast strips Ingredients:
2 chicken breast fi Ilets
1-2 egg whites
approximately 12 cup of flour
approximately 12 cup of breadcrumbs
1/2 TBSP salt
1/2 TBSP pepper
Preparation:
- Place the egg white, fl our and breadcrumbs in three separate small bowls.
- Cut each of the chicken breast fi Ilets into strips of equal size.
- Spice the flllet strips with salt and pepper.
- Insert the basket insert in the tray.
- Roll the chicken breast fi llet strips in fl our, then dip them in the egg white and then bread the chicken breast strips with breadcrumbs.
-
Place the chicken breast fi llet strips in the basket insert.
-
Place the tray with the basket insert in the device.
- Set the cooking temperature to 200^ .
- Set the timer to 10 minutes.
- Check whether your chicken breast strips have been cooked to completion; if necessary, cook them longer.
Chicken wings
Ingredients:
12 chicken wings
For the sauce:
approximately 6 TBSP cooking oil
2 TBSP tomato ketchup
2 TBSP vinegar (e.g. white wine or apple vinegar)
1 TBSP chili spice (e.g. Tabasco)
Preparation:
- Mix the ingredients for the sauce in a bowl.
- Insert the basket insert in the tray.
- Place the chicken wings (not marinated) in the basket insert.
- Place the tray with the basket insert in the device.
- Set the cooking temperature to 200^ .
- Set the timer to 45 minutes.
- Interrupt the cooking process approximately every 15 minutes to remove the tray and mix the chicken wings by gently shaking the basket insert.
- After the 45 minutes have past, remove the chicken wings and place them in the sauce.
- Place the chicken wings that have soaked in the sauce in the basket insert, set the cooking temperature to 200^ and set the timer to another 5 minutes.
- If necessary, extend the cooking time. The chicken wings should be crispy.

If you are short on time:
You don't have time to buy a lot of groceries or you don't have the ingredients for the sauce on hand? You can also place the chicken wings in another sauce like barbecue or garlic sauce or, for an Asian touch, a sweet chili sauce or hot chili sauce!
Codfish fillet with a herb garlic crust
Ingredients:
approximately 100 gr. codfish fillet
1-2 egg whites
1 garlic clove
approximately 1 TBSP chopped basil
approximately 1 TBSP paprika powder
Sea salt, pepper to taste
approximately 12 cup breadcrumbs for breading
Preparation:
- Peel the garlic and press it through the garlic press.
- Mix the garlic, other spices and breadcrumbs in a bowl.
- Separate the egg white and add it to a separate bowl.
- Dip the codfi sh fi llet in the egg white and then bread it with the garlic-herb breadcrumb coating.
- Insert the basket insert in the tray.
- Place the codfish fillet in the basket insert.
- Place the tray with the basket insert in the device.
- Set the cooking temperature to approximately 200^ .
- Set the timer to approximately 10 minutes.
- After 10 minutes have passed, remove the tray and turn over the codfi sh fi llet.
- Place the tray back in the device and set the timer to another 5 - 8 minutes.
- Increase the cooking time if the codfi sh fi llet is not cooked to completion.
Zucchini sticks
Ingredients:
1 zucchini
2 eggs
1 / 2 cup flour
1 / 2 cup breadcrumbs
Preparation:
- Cut the zucchini into small sticks.
- Whisk the eggs.
- Place the eggs, fl our and breadcrumbs in separate small bowls.
- Coat the zucchini sticks in the flour, then dip them in the egg and bread them with the breadcrumbs.
- Insert the basket insert in the tray.
- Place the zucchini sticks in the basket insert.
- Place the tray with the basket insert in the device.
- Set the cooking temperature to 200^ .
- Set the timer to approximately 12 - 17 minutes.
- If necessary, extend or shorten the cooking time depending on whether you like your vegetables crisp or soft.

The cooking time may vary depending on the size of the zucchini sticks. If applicable, adjust the cooking temperature and cooking time.
Apple turnovers
Ingredients:
1-2 apples
1 roll of flaky pastry from the chilled section
50 g brown sugar
2 TBSP fl our
1-2 TBSP lemon juice
Cinnamon to taste
Preparation:
- Peel the apples, remove the core and cut them into small pieces.
- Mix the apple pieces, fl our, sugar and lemon juice and add cinnamon to taste.
- Roll out the flaky pastry and divide into squares with approx. 10 cm sides.
- Spread a tablespoon of the flling on the middle of each of the dough squares.
- Coat the edge of the dough with a small amount of water and fold over into triangles. Firmly push down on the dough edge.
- Insert the basket insert in the tray.
- Place two apple turnovers in the basket insert.
- Place the tray with the basket insert in the device.
- Set the cooking temperature to approximately 170 - 190^
- Set the timer to approximately 13 - 15 minutes.
- The apple turnover should be golden brown. Increase the cooking time by 5 - 10 minutes if you think the apple turnover is not brown enough.
- Repeat steps 7 and 11 for the other apple turnovers.
Cleaning and Storage

ATTENTION!
Danger of burns from hot device parts! Allow the device to cool down before cleaning it.
Danger of electric shock! Remove the mains plug from the plug socket before doing any cleaning. Never immerse the device, the mains cable or plug in water. Never place the device in the dishwasher.
Do not spray cleaning agents directly onto the device.
- Do not use any caustic or abrasive cleaning agents for cleaning. These can damage the surface. Do not use any metal objects.
- Remove the drawer containing the basket insert from the device.
- Press the release button on the handle and pull the basket insert by the handle up out of the drawer.
-
Clean the drawer and the basket insert with warm water and mild detergent. In the case of stubborn dirt, we recommend soaking the drawer and the basket insert in warm water and detergent beforehand.
-
Clean the housing, the inside of the drawer compartment and the heating elements if necessary with a damp cloth and mild detergent.
- Store the device in a clean, dry place after cleaning, that is out of the sun and out of the reach of children and animals.
Troubleshooting
If the device is not working properly, please check whether you are able to rectify the problem yourself first.

Do not attempt to repair a defective device yourself!
| Problem Possible cause / solution | |
| The device does not work. | ·Is the mains plug correctly inserted in the plug socket? ·Is the plug socket defective? Try another plug socket. ·Check the fuse of your mains connection. ·Have you set a cooking temperature? ·Have you used the timer to set a cooking time? The device only switches on once a time has been set! Note: If you wish to set a cooking time of under three minutes, you must fi rst turn the timer to beyond the 3-minute mark and then set it back. ·Has the drawer been inserted correctly? The device only works if the drawer has been inserted correctly. ·The device is equipped with a safety mechanism which switches off the device automatically if it overheats. If the device switches off automatically during operation, move the timer to the 0 position and remove the mains plug from the plug socket. |
| The device switches itself off automatically during operation. | ·The device is equipped with a safety mechanism which switches off the device automatically if it overheats. If the device switches off automatically during operation, move the timer to the 0 position and remove the mains plug from the plug socket. |
| The drawer containing the basket insert cannot be inserted. | ·Has the basket insert been overfi lled? Fill the basket insert no more than 2/3 full with food. |
| You have prepared frozen chips. The result is not crispy. | ·Have you used oil? For the preparation of frozen products, there is generally no need to add any fat as most frozen products are already prefried! |
| You have made chips from fresh potatoes. The result is not crispy. | ·Use waxy potatoes. Young potatoes contain more water and therefore take longer to cook and it is possible that they may not go as crispy. ·The basket insert is too full, place fewer potatoes into the device. ·The chips are cut too thick, cut them into thinner pieces. ·If necessary, spray the uncooked potatoes with a little oil from the oil atomiser as this will make them go crispier. |
Problem Possible cause / solution
The food has not been evenly cooked or is not fully cooked.
- The food was not cut up into pieces of equal size. Make sure that all of the pieces of food which you cut up small are of roughly the same size.
- The basket insert is overfilled. Reduce the quantity of food.
- With some food (e.g. chips, potato wedges etc.) it is advisable to mix the food around from time to time to obtain an even cooking result. To do this, remove the drawer from the device. Remove the basket from the drawer and shake the food about slightly to mix it all up. Then reinsert the drawer with the basket and continue the cooking process.
- The temperature chosen is too low, turn it up to a higher setting.
- The preparation time is too short, adjust the cooking time.
- If you are preparing chips from fresh potatoes, you obtain a more even cooking result if you preboil the potatoes for around 5 minutes before cooking.
Technical data
Model: TXG-DS14C
Article numbers: 01057 (white) 07026 (black)
Voltage supply: 220 - 240V 50Hz
Power: 1500 W
Temperature range: 80 - 200^
Timer: Up to 60 min.
Protection class: I


Customer service/ importer:
DS Produkte GmbH
Am Heisterbusch 1
19258 Gallin
Germany
Tel.: +49 38851 314650
(Calls to German landlines are subject to charges. The cost varies depending on the service provider.)
Disposal

The packaging material is recyclable. Please dispose of it in an environmentally friendly manner and take it to a recycling centre.

Dispose of the device in an environmentally friendly manner. It should not be disposed of in the normal domestic waste. Dispose of it at a recycling centre for used electrical and electronic devices. You can obtain more information from your local authorities.
Contenu
Attention aux surfaces chaudes!
Chere cliente, cher client,
www.service-shopping.de
www.service-shopping.de