Z01 - Ski bindings Hagan - Free user manual and instructions
Find the device manual for free Z01 Hagan in PDF.
| Product type | Touring and alpine ski binding |
| Brand | Hagan |
| Model | Z01 |
| Available sizes | S (sole ~255-310 mm), M (285-340 mm), L (315-370 mm) |
| Estimated weight (per binding) | Approximately 500-600 g |
| Power supply | None (mechanical) |
| Adjustable release value | Range according to DIN/ISO (max. 10), adjustment beyond at skier's own risk |
| Standards | DIN ISO 13992 (touring), DIN ISO 9462 (alpine), TÜV certified |
| Brake width | Pre-assembled for skis up to 80 mm; options 90, 100, 115 mm |
| Compatible boots | Soles ISO 5355 (piste) and ISO 9523 (adult touring), except Dynafit and Scarpa F1 |
| Main functions | Release value adjustment (lateral and forward), climbing aid (2 positions), ski brake, ice claws, safety strap |
| Maintenance and cleaning | Clean with fresh water; use only Hagan-approved lubricants; store dry and frost-free |
| Recommended inspection | Before each season by a specialist dealer, visual inspection and functional test according to ISO 11088 |
| Spare parts and repairability | Brakes of different widths, ice claws, safety strap; replacement screws available |
| General information | Made in Germany; instructions and manual available at www.hagan-ski.com |
Frequently Asked Questions - Z01 Hagan
User questions about Z01 Hagan
0 question about this device. Answer the ones you know or ask your own.
Ask a new question about this device
Download the instructions for your Ski bindings in PDF format for free! Find your manual Z01 - Hagan and take your electronic device back in hand. On this page are published all the documents necessary for the use of your device. Z01 by Hagan.
USER MANUAL Z01 Hagan
natural_image
Illustration of two Hagan skis in action poses, no text or symbols presentTechnical and Installation Instructions for Retailers
natural_image
Line drawing of a shoe being adjusted on a rail, showing foot positioning and adjustment points (no text or symbols)natural_image
Mechanical assembly diagram showing a lever mechanism with numbered component (10), no visible text or symbols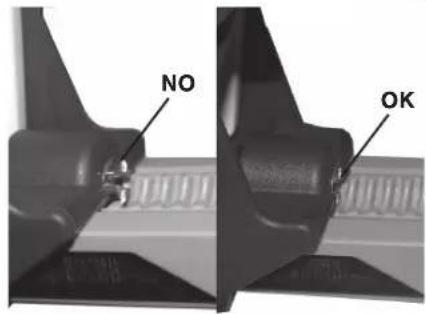
text_image
NO OKtext_image
Labeled diagram of a ski gear assembly showing numbered parts including 1, 18, and 17.
natural_image
Mechanical assembly diagram showing a lever mechanism with labeled component (22), no readable text or symbols present.natural_image
Mechanical assembly diagram showing a component with numbered annotation (30), no readable text or symbols present.natural_image
Mechanical assembly diagram showing a lever mechanism and a numbered component (3), no readable text or symbols present.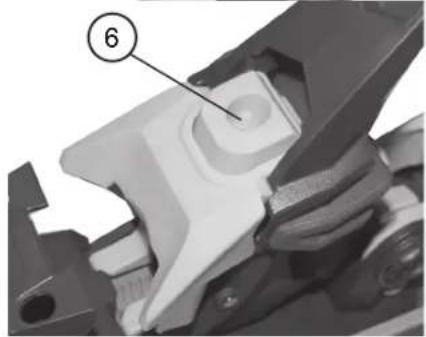
natural_image
Mechanical component with numbered annotation (6) showing a highlighted section, no readable text or symbols present.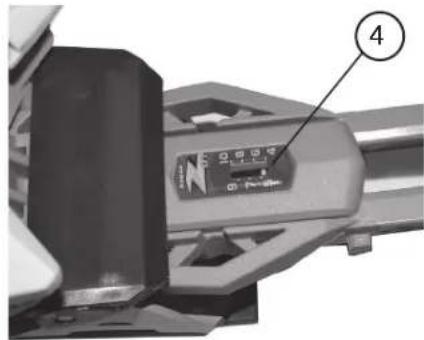
text_image
Technical diagram of a mechanical component with labeled parts and numbered annotation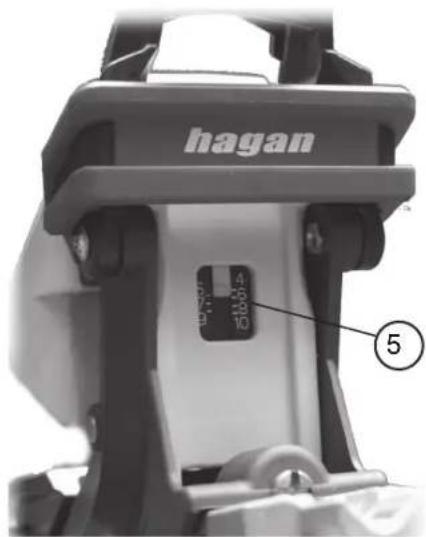
text_image
hagan 4 28 28 10 ⑤Retail assembly instruction for touring binding „hagan Z“
- For a perfect performance of the binding, everything like mounting, adjusting and maintenance has to be carried out by a special retailer according to the manufacturers guidelines.
- You can only use the original ski stopper. If using a ski leash, it has be to be according to DIN-ISO Standard 11087
- Any modification of the binding, any improper use or use with non suiting accessories, raises the risk of an unintended release and therefore is not permitted.
- The hagan Z binding has to be mounted right on the ski and without any other external parts, in order to not influence especially the proper function of the ski stoppers.
- Not standardized, worn or damaged boots are due to negatively influence the release function
- An adjusting range of more than Z is not standardized. The setting in this range is at one's peril. The hagan Z is TÜV-approved and complies with DIN ISO 13992 (Tour) and DIN ISO 9462 (Alpine)
- The hagan Z01 suits the following standardized soles: Ski boots for on Piste skiing accord - ing to DIN ISO 5355, touring boots for adults according to DIN ISO 9523
- Some Dynafit boots and the Scarpa F1 are not compatible
- Leather boots and boots with a flexible sole are not supposed to be used. We generally recommend to check both the boots fit into the binding before mounting and whether the binding can be adjusted to the specific type of boot.
General guidelines for a standard-ized equipment
As a specialized retailer you are obliged to gage, if necessary newly arrange or change all units of equipment and match them with the specific skier according to DIN/ISO 11088, before you mount or adjust the functional unit ski/binding/boot. All parts of equipment have to comply with current DIN/ISO standards.
Guidelines for binding inspection:
- Before mounting or adjusting of a hagan binding a visual inspection, especially of used bindings, is required.
- Check whether die release setting of the binding is adjusted to the specific skier
- Damages of the surface: check the surfaces which are in contact with the ski boot for wear and obvious damages. Repair or exchange the worn or damaged part.
text_image
hagan 1 2 18 2 14 4 19 15 22 3 13 16 23 24 5 11 12 7 6 8 9 10 21 20- Ski brake: check if its broken or bent, check the function
- Scales: check for readability and adjustability
- All binding surfaces have to be clean. Check for contamination and corrosion. If the ski brake is contaminated, clean it with a dry or wet rag. Do not use solvents for the binding clean up, no silicone and no other lubricants than the ones approved by hagan. Repair broken or damaged parts.
Guidelines for ski inspection:
- Most skis do have a reinforced area in the skis centre for the purpose of mounting the binding. Since ski material, construction and dimensions can vary, it is important to follow the guidelines of the particular ski manufacturer. Also mind the manufacturers suggestions concerning drill diameter, gluing materials or thread cutting.
Guidelines for the use of ski boots
- hagan ski touring bindings do have release mechanisms that are related to the particular boot sole. For a secure fixation of the boot into the binding a few minimum requirements according to ISO 5355 and 9523, concerning the geometry, have to be fulfilled.
- Only boots complying with this standard are to be used. Not suited are the soles of kids boots DIN ISO 5355 Type C.
- Caution: boots that show a great wear have to check about the secure functioning with the binding or whether they can be fixed into the binding properly and safely.
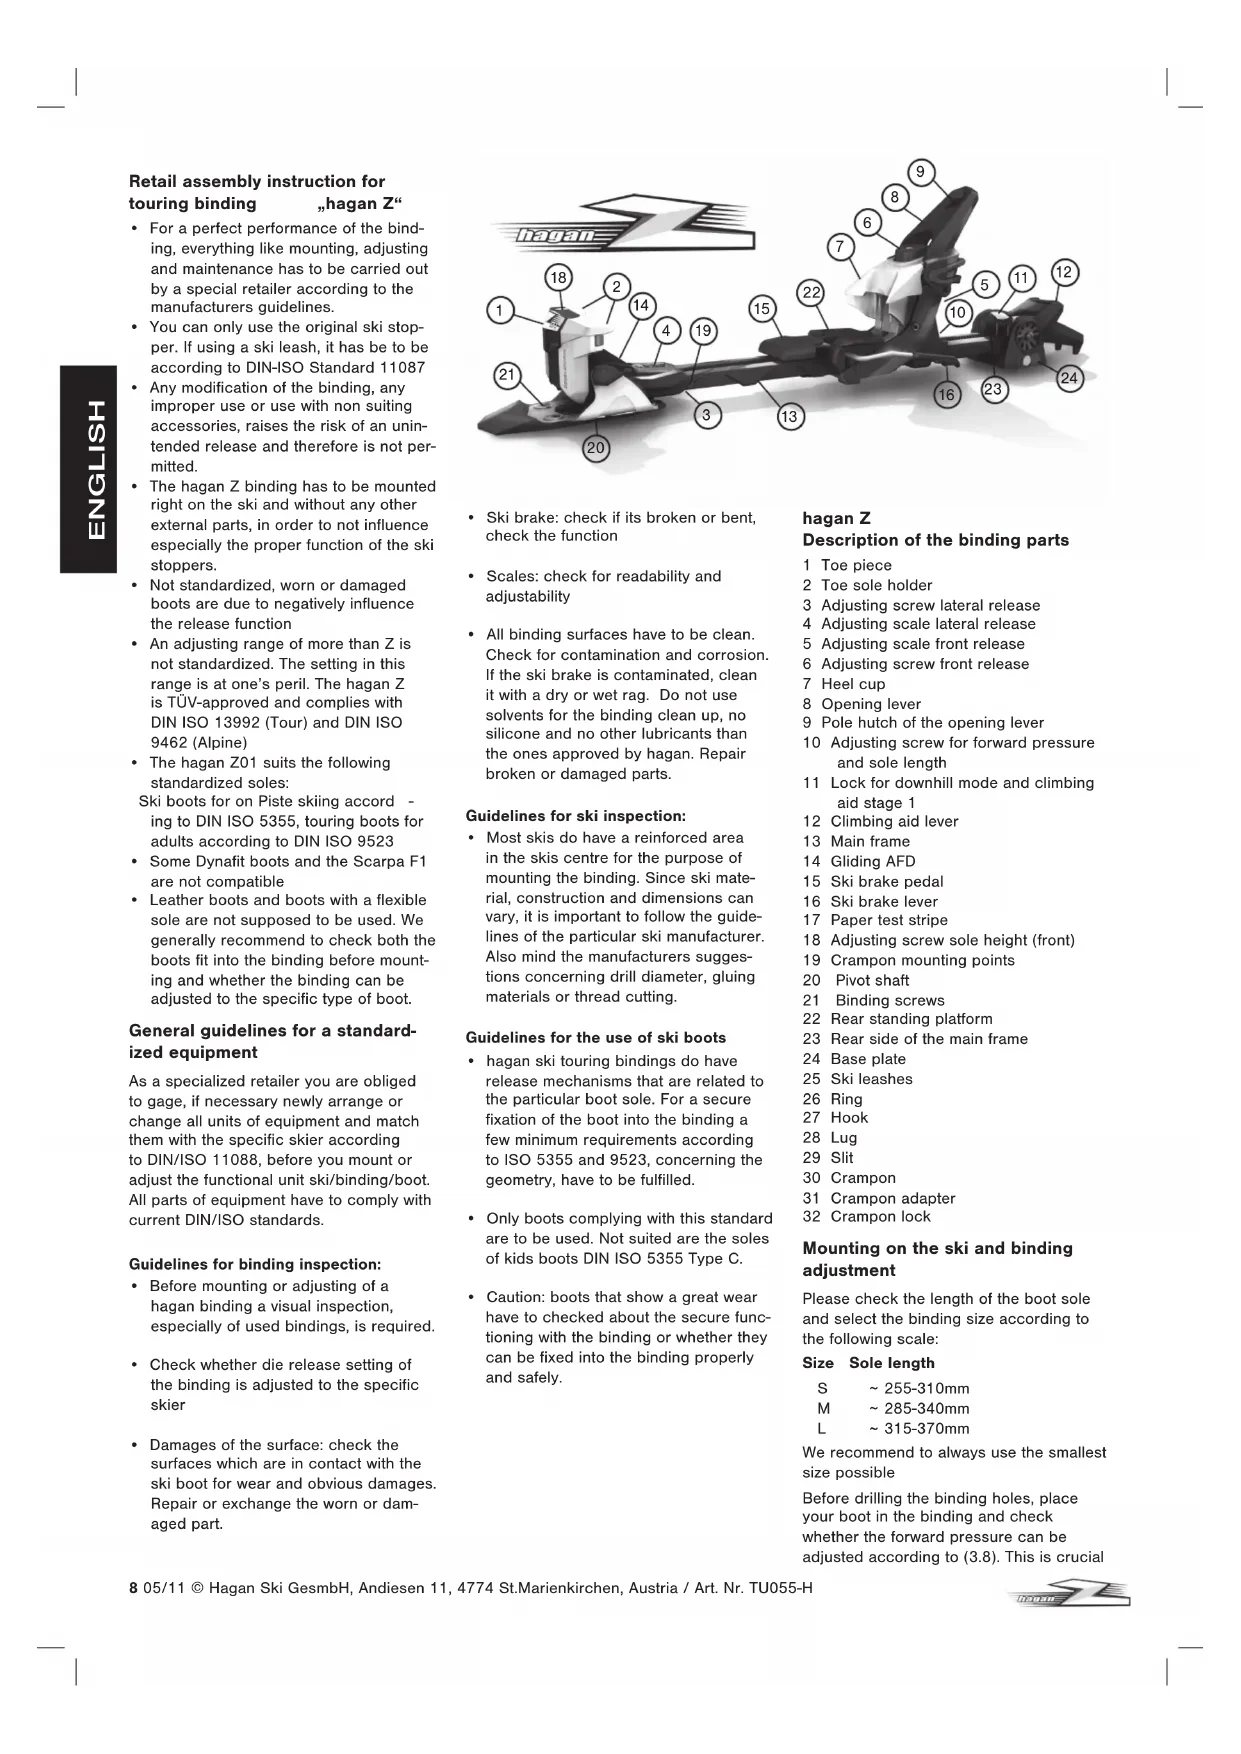
hagan Z Description of the binding parts
1 Toe piece
2 Toe sole holder
3 Adjusting screw lateral release
4 Adjusting scale lateral release
5 Adjusting scale front release
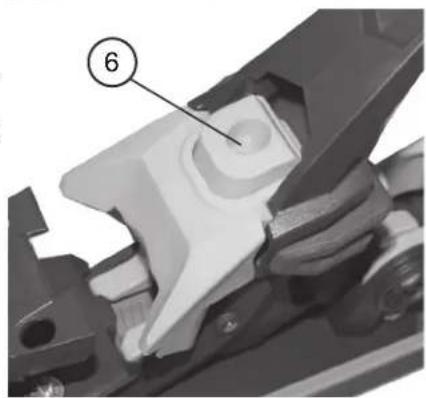
6 Adjusting screw front release
7 Heel cup
8 Opening lever
9 Pole hutch of the opening lever
10 Adjusting screw for forward pressure and sole length
11 Lock for downhill mode and climbing aid stage 1
12 Climbing aid lever
13 Main frame
14 Gliding AFD
15 Ski brake pedal
16 Ski brake lever
17 Paper test stripe
18 Adjusting screw sole height (front)
19 Crampon mounting points
20 Pivot shaft
21 Binding screws
22 Rear standing platform
23 Rear side of the main frame
24 Base plate
25 Ski leashes
26 Ring
27 Hook
28 Lug
29 Slit
30 Crampon
31 Crampon adapter
32 Crampon lock
Mounting on the ski and binding adjustment
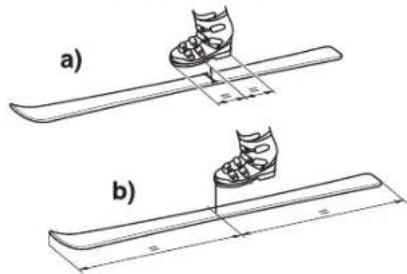
Please check the length of the boot sole and select the binding size according to the following scale:
Size Sole length
S \~ 255-310mm
M \~ 285-340mm
L \~ 315-370mm
We recommend to always use the smallest size possible
Before drilling the binding holes, place your boot in the binding and check whether the forward pressure can be adjusted according to (3.8). This is crucial
with boots that have sizes (300-305mm and 335-340mm) which are close to the particular adjusting ranges of the different binding sizes (S/M/L).
Mounting preparations
Always follow the ski manufacturers recommendations. Basically there are two different ways (ill. B) To place the binding on the ski:
a) Skis with a mounting point: most manufacturers indicate the mounting position of the binding either on the skis surface or on its sidewall, whereas the midsole mark of the boot has to be aligned with this mounting point.
b) Skis without a mounting point: toe of the boot = center of the ski
text_image
a) b)1. Defining the mounting point
Skis without a midsole mark:
Bisect the length of the ski and mark it measured from the tail of the ski. Align the mounting jig with its marking, align the toe of the boot and clamp the jig.
A ski with an assembly marking (for the middle of your boot):
Measure the length of your boot sole. Match up the corresponding point on the scale of the mounting jig with the assembly marking for the middle of your boot, and clamp.
2. Drilling the screw holes

natural_image
Line drawing of a shoe being measured on a horizontal bar, showing foot positioning and measurement markings (no text or symbols)Caution:
- Do not bend the ski while drilling
- Make sure to use only the intended guide sleeves or marks referring to the particular binding length:
Please note:
drill these holes for Z-01 only

| Guide sleeve color of the jig | |
| S | silver |
| M | black |
| L | gold |
Choose the step drill according to the manufacturers specification or the following criteria:
- Adult ski (wood core with integrated metal layer) 4.1 x 9mm
Adult ski (foam core) 3.5 x 9mm - Drill through the guide sleeves of the jig and make sure the jig is fitted tightly on the ski.
References for the fixing screws
The fixing screws for ski bindings are conform to applicable DIN/ISO standards. For skis the standard claims for a specific binding mounting range on the ski and defined tear strength of the screws. A few ski models require longer fixing screws since the binding mounting plate is too deep inside the core for regular screw lengths. Make sure to pay attention to the manufacturers instructions.
- Only use genuine ski binding drills and pay attention to the manufacturers instructions. Do not use dulled drills.
- Drill with constant pressure and keep the drill aligned and do not cant it within the jig.
- The drilling hole has to be deep enough to give each hole a countersink. Remove the jig after drilling.
- Turn the ski upside down and knock all chippings out of the holes with your hand.
- If the ski has an integrated metal layer you have to cut threads before mounting.
- Fill the drilling holes with special binding glue after drilling (not for skis with a foam core!).
• Make sure that the screws are screwed in absolutely vertical.
- Drill one of the three middle holes on the jig for the additional Z-01 heel-spoiler screw only. Do not use for Z-02!
- Fixing the binding to the ski: all screws have to be tightened and may not be over twisted. If using an cordless screw-driver the torque has to be adjusted as low as possible, in order to avoid an over twisting of the screw. In any case the final tightening of the screw should be carried out by hand.
- If needed or recommended by the manufacturer, glue can be used as a lubricant for the binding screws.
3. Mounting of the hagan Z Important:
3.1 Place the base plate (24) of the climbing aid (12) on the three drilling holes at the rear end and screw it in.
3.2 Switch the climbing aid lever (12) up into stage 1
3.3 Place the rest of the binding unit on the ski and align it with the base plate of the climbing aid (24).
3.4 Tighten the two front screws of the pivot shaft (20)
3.5 Tighten the two rear screws of the pivot shaft (20)
3.6 Check whether the rear side of the binding frame (23) is precisely aligned with the base plate (24) of the climbing aid (12). (If needed: loosen the two front screws and align again). Tighten all screws.
3.7. Check whether the locking device (11) properly locks the rear end of the binding frame (23).
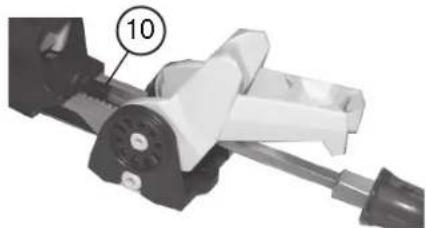
3.8 Adjusting the sole length and the forward pressure: Place the boot in the binding and adjust the heel cup with the length adjustment screw until the screw head aligns with the housing of the rear piece.
natural_image
Mechanical assembly diagram showing a lever mechanism with a numbered component (10), no visible text or symbols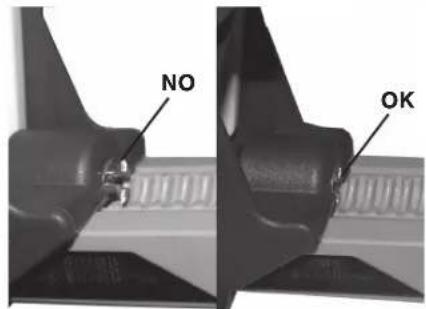
text_image
NO OK3.9 Half open the opening lever for two-three times and make sure the boot is properly centered. If needed, repeat step 3.8.
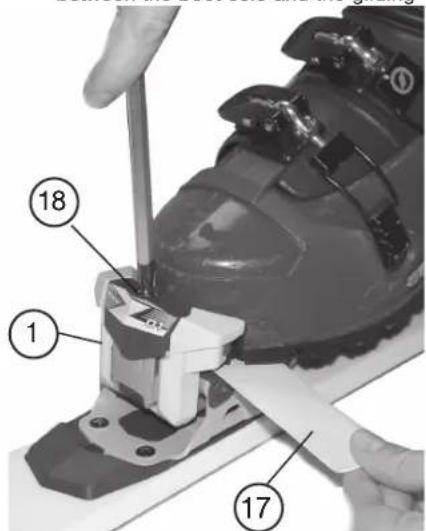
3.10 Height adjustment front piece: Pull the toe of the boot upward in the front. Adjust the toe sole holder (1) by turning the sole height adjusting screw (18) until there remains a gap between the boot sole and the gliding
text_image
Labeled diagram of a ski gear assembly showing numbered parts including 1, 18, and 17.AFD (14) of 0.5mm (it has to be possible to pull a 0.5mm paper test stripe through this gap between the sole and gliding AFD).
Caution: The toe sole holder screw may only be operated with a hand screw-driver! If the sole is too thick a not standardized, it cannot be fitted in as described. In this case you have to grind the sole down as far as the above mentioned paper stripe test can be realized.
3.11 Height adjustment of the heel cup The heel cup (7) adjusts to the height of the boot heel by itself!
3.12 Check whether the boot is held in the binding without any clearance. Therefore you have to turn the boot upward and sideways by hand.
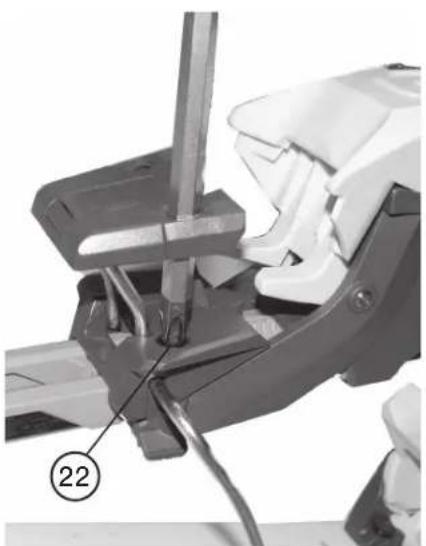
3.13 Ski brake: The hagan ski brake is supplied with a ski brake for a maximum waist width of 80mm ex works! Additional options are ski brakes with a waist width of 90, 100 and 115mm.
Mounting and exchange of this optional brake widths: Loosen the screws (22), exchange the whole brake against the optional, new one and then tighten the screws again by hand!
Check: The brake levers have to move freely along the sidewalls of the ski. If they touch the sidewalls slightly, you can carefully bend the levers apart until they have the desired width.
natural_image
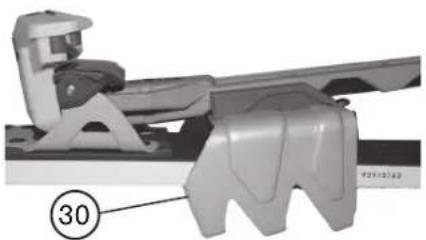
Mechanical assembly diagram showing a clamping mechanism with labeled component (22), no readable text or symbols present.3.14 Crampons: Pivot the crampon (30) onto the binding frame from the bottom up and
natural_image
Mechanical assembly diagram showing a bracket with a numbered component (30), no visible text or symbolsslide it forward until the cutouts within the crampon adapter (31) connect with the crampon mounting points (19) of the binding frame (13). Now push the crampon-locking lever (33) upward until it locks. Dismount in the reverse order.
3.15 General operation of the binding: See user manual client
4. Release value selection and adjustment
Only use the DIN/ISO recommended release values! Only use the chart attached below or the official standard-adjustment charts to calculate the right release value for the specific skier.
• Each modification or personal adjustment can be hazardous!
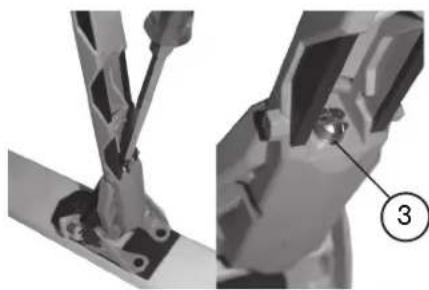
- The adjustment is carried out via the adjustment screws (3+6)
- The adjustment value is visible on the Z-value adjusting scale (4+5). Always set front and toe piece on the same values.
• We strongly recommend to double check the release value on a specific binding test device (compare ISO 11110)
- The release value have to be evaluated for each skier by a specialized retailer, in order to find the right adjustment according to DIN/ISO 11088
- All specifications and the adjusted Z-value have to be entered in a certificate and be handed out to the client along with the owner's manual.
natural_image
Close-up of mechanical components with a numbered annotation (3) showing a detail on a component (no readable text or symbols)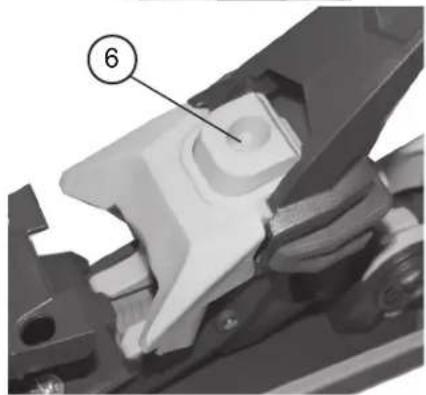
natural_image
Mechanical component with numbered annotation (6) showing a mechanical assembly (no readable text or symbols)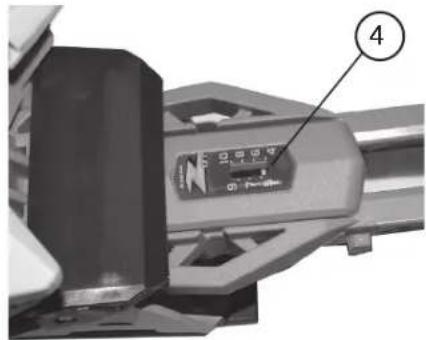
text_image
Close-up of a mechanical component with labeled parts and a numbered annotation pointing to part 4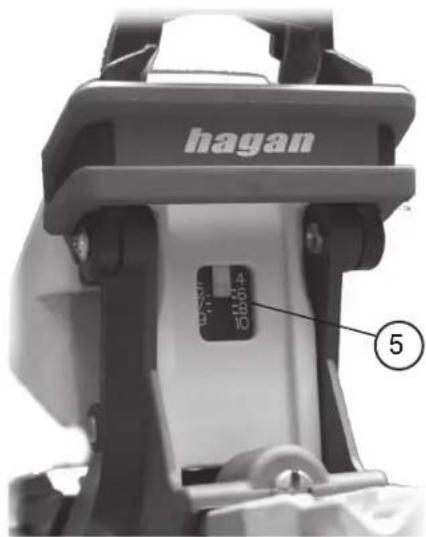
text_image
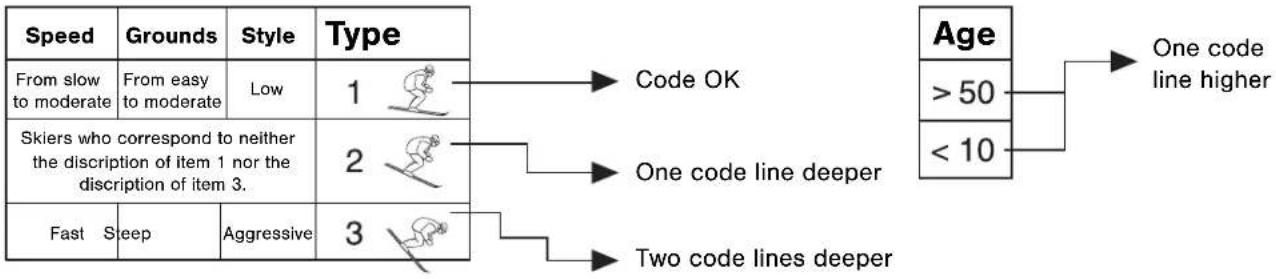
hagan 4 28 10 ⑤4.1 Categorization of the skier according to the weight method
Required information of the skier:
- Weight
- Height
- Age
- Sole length
- Skier type
This classification for a skier's type has to be evaluated in a conversation between retailer and skier in order to find out the parameters for the setting of the binding. The parameters are the following:
Skier type 1:
• Skis without taking risks
- Prefers moderate speed
- Prefers easy, moderate terrain
- Has a basic skiing knowledge and little shape
- For good skiers with a moderate and mellow style, preferring to on the safe side
• Uses a lower Z-setting. The risk of unintended releases is higher, but the binding releases in any case, even in a slight fall.
Skier type 2:
- Has a basic skiing knowledge and good shape
- Skis at varying speeds
- Skis every terrain, even difficult slopes
- Applies to every skier who is not categorized in any of the other types
Skier type 3:
• High speeds, difficult slopes
• Skis aggressively and fast
- Prefers steep terrain
- Uses a Z-setting, which is above normal level. As a consequence the risk of both, unintended releases and releases in crashes, is less.
4.2 Adjustment of the release values
- Find the skiers code according to chart 1. Find out the skiers weight in column 1, the skiers height in column 2. If these are not found in the same line, use the code of the line above.
- This code refers to skier type 1.
- For a skier type 2, go one line down
- For a skier type 3, go two lines down
- For a skier being older than 50 years, again go one line up
• After defining the skiers code, go find the column in chart 2 which refers to the sole length (in mm) - The interface between the column for the sole length and the line for the skier's code specifies the adjustment value.
- Adjust front- and toe piece accordingly
- Caution, if the interface of the right line and the column is a blank box, take the value of the next box in the same line.
- If the binding has proofed unintended releases the retailer is allowed to adjust at the behest of the skier:
- First raise the front release value at the heel piece. Then, but only in case of still occurring unintended releases, raise the value for torsional releases at the toe piece. These settings have to be carried out progressively by raising the value in half steps.
4.3 Measuring of the release torque with a testing device
If mounting, adjustment and functional test were carried out properly, the binding has to be double-checked with a calibrated, according to DIN/ISO 11110, measuring device for ski bindings.
Important! Mind the specifications of the measuring device manufacturer.
This examination should assess and confirm with a print out, that the adjusted nominal values for the release (indicated in Nm) are within the predefined tolerances.
Release value tolerance
According to DIN/ISO 11088 a release value tolerance of +/- 15% is permitted, corresponding with a chart value between one line above and one line below the nominal release value (My, Mz in the columns of the adjusting chart). If the measured value is lying within these tolerances, the system can be cleared.
Important!
After a correct adjustment of the binding
it is necessary to hand out both the functional unit and an inspection document (printed or handwritten) to the client.
4.4 Fault diagnostic process
Carry out the following test after a correct adjustment of the side release and the heel piece: Check whether ski binding, ski and ski boot are conforming to criteria of visual examination. Important: All used binding have to be cleaned before examination. Do not grease sole holder or glide AFC!
Side release function test:
Review of lateral resilience and reset (symmetry):
Clamp the ski tightly and hit the front part of the ski boot sideways with the palm of your hand. Die toe cap of the boot should deflect around 10mm and has to be back in its initial center position as quick as frictionless.
If the system has a default:
A Slow and not exact reset to the center:
- Check whether the ski boot conforms to DIN/ISO standards or is extensively worn. If needed, replace it.
- Check the height adjustment of the toe sole holder and correct if necessary.
- Toe cap of the boot is not precisely centered in the toe sole holder: check the forward pressure and correct if necessary
B Non-symmetric release:
- It can occur that the release does not work symmetrically. If the release values to the right or to the left happen to be out of the tolerances, this can be due to an adjustment failure or due to a non-fitting boot. Check the following:
- Ski boot:
Does it conform to DIN/ISO standards?
- No excessive wear, damage of the rims and the sole
- No differing radii at the hold points
- Height adjustment of the toe piece: Adjustment according to 3.10
• Forward pressure: Adjustment according to 3.8
C Screws at the front piece or the lock mechanism/climbing aid are loose:
- Check whether screws are missing, over wound or loose. If necessary repair or replace or maybe glue it in.
If everything is ok, repeat the release check. If it still does not function properly, we recommend consulting the manufacturer.
Care and maintenance
The warranted guarantee by hagan presumes that the owner's manual as well as the warning notices have been followed and taken care of. Make sure to get the binding checked according to its function and correct adjustment regularly or at least before starting a new ski season. Always store your skis with the binding locked in a dry and cool, but frost-protected place. If the binding is heavily contaminated, only refine it with water.
Caution: Only use hagan approved lubricants. Otherwise friction values could alter, leading to unintended releases.
In case of questions or dubiety we are glad to help anyway.
Tested and approved according to the DIN/ISO 13992 (Tour) and DIN/ISO 9462 (Alpine) by TÜV-Süd-Product Service GmbH, Munich.
Made in Germany
All operating and mounting instructions are available as a PDF database at www.hagan-ski.com
Hagan Ski GesmbH, Andiesen11,
4774 St.Marienkirchen, Austria, +43 7711 33133-0
Calibration chart of the weight-procedures according to DIN/ISO 11088
1. By consideration of the skier types
2. By consideration of the ages
text_image
Speed Grounds Style Type From slow to moderate From easy to moderate Low 1 Skiers who correspond to neither the discription of item 1 nor the discription of item 3. Fast Sleep Aggressive 3 Code OK One code line deeper Two code lines deeper Age >50 <10 One code line higher| Parameter of the skier | Original setting parameter depending on the boot sole length | Release value of the measurement testing device | ||||||||
| kg (Pounds) | cm (Ft. In.) | Code | ≤250mm | 251-270 mm | 271-290 mm | 291-310 mm | 311-330 mm | ≥331 mm | Rotation M_z in daNm | Forward inclination M_y in daNm |
| Limiting value | Limiting value | |||||||||
| Release set value | Release set value | |||||||||
| Release set value tolerance | Release set value tolerance | |||||||||
| 10 - 13 kg22 - 29 lbs. | A | 0,75 | 0,75 | (5) 8 | (18) 29 | |||||
| 14 - 17 kg30 - 38 lbs. | B | 1,00 | 1,00 | 0,75 | 11 | 40 | ||||
| 18 - 21 kg39 - 47 lbs. | C | 1,50 | 1,25 | 1,00 | 14 | 52 | ||||
| 22 - 25 kg48 - 56 lbs. | D | 1,75 | 1,50 | 1,50 | 1,25 | 17 | 64 | |||
| 26 - 30 kg57 - 66 lbs. | E | 2,25 | 2,00 | 1,75 | 1,50 | 1,50 | 20 | 75 | ||
| 31 - 35 kg67 - 78 lbs. | F | 2,75 | 2,50 | 2,25 | 2,00 | 1,75 | 1,75 | 23 | 87 | |
| 36 - 41 kg79 - 91 lbs. | G | 3,50 | 3,00 | 2,75 | 2,50 | 2,50 | 2,00 | 27 | 102 | |
| 42 - 48 kg92 - 107 lbs. | ≤148 cm≤4'10" | H | 3,50 | 3,00 | 3,00 | 2,75 | 2,50 | 31 | 120 | |
| 49 - 57 kg108 - 125 lbs. | 149 - 157 cm4'11" - 5'1" | I | 4,50 | 4,00 | 3,50 | 3,50 | 3,00 | 37 | 141 | |
| 58 - 66 kg126 - 147 lbs. | 158 - 166 cm5'2" - 5'5" | J | 5,50 | 5,00 | 4,50 | 4,00 | 3,50 | 43 | 165 | |
| 67 - 78 kg148 - 174 lbs | 167 - 178 cm5'6" - 5'10" | K | 6,50 | 6,00 | 5,50 | 5,00 | 4,50 | 50 | 194 | |
| 79 - 94 kg175 - 209 lbs. | 179 - 194 cm5'11" - 6'4" | L | 7,50 | 7,00 | 6,50 | 6,00 | 5,50 | 58 | 229 | |
| 95 + kg210 + lbs. | ≥195 cm≥6'5" | M | 8,50 | 8,00 | 7,00 | 6,50 | 67 | 271 | ||
| N | 10,00 | 9,50 | 8,50 | 8,00 | 78 | 320 | ||||
| O | 11,5 | 11,00 | 10,00 | 9,50 | 91 | 380 | ||||
| P | 105 | 452 | ||||||||
| (118) | (540) | |||||||||
natural_image
Line drawing of a shoe being adjusted on a metal track, showing foot positioning and adjustment points (no text or symbols)natural_image
Mechanical assembly diagram showing a lever mechanism with a numbered component (10), no visible text or symbols
text_image
NO OKtext_image
Labeled diagram of a ski gear assembly showing numbered parts including 1, 18, and 17.natural_image
Mechanical assembly diagram showing a lever mechanism with labeled component (22), no readable text or symbols present.
natural_image
Mechanical assembly diagram showing a component with numbered annotation (30), no readable text or symbols present.natural_image
Close-up of mechanical components with a numbered annotation (3) showing a detail on a bracket (no readable text or symbols)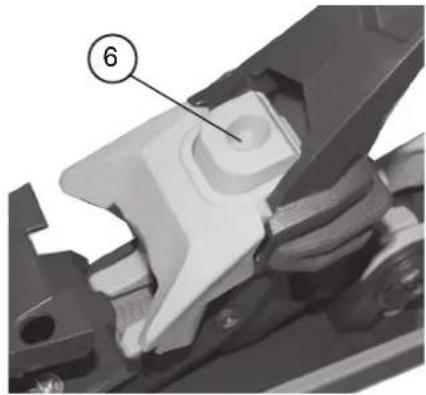
natural_image
Close-up of mechanical components with a numbered label (6) pointing to a specific part, no readable text or symbols present.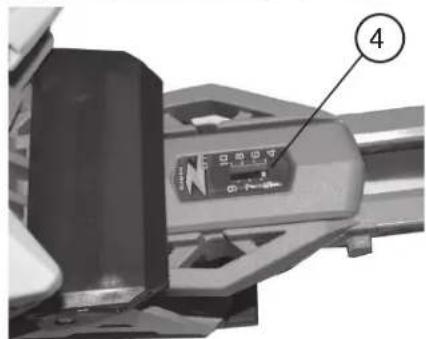
text_image
Technical diagram of a mechanical component with labeled parts and numbered annotation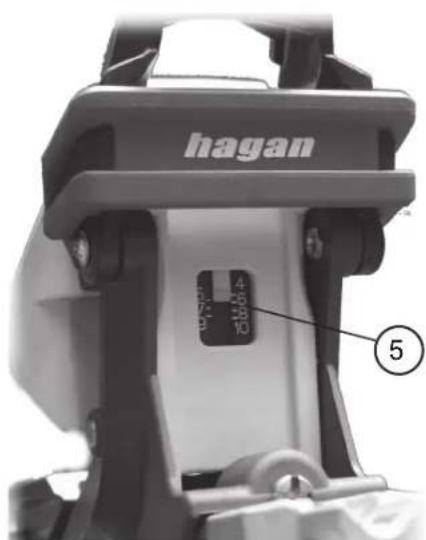
text_image
hagan 4 5 6 7 8 9 10 ⑤natural_image
Line drawing of a shoe being adjusted on a rail track, showing foot positioning and adjustment points (no text or symbols)text_image
Diagram showing a mechanical or electrical component with labeled parts and a lightning bolt symbol below.natural_image
Mechanical assembly diagram showing a lever mechanism with a numbered component (10), no visible text or symbols
text_image
NO OKtext_image
Labeled diagram of a ski gear assembly showing numbered parts: 1, 18, and 17.natural_image
Close-up of a mechanical device with a lever and clamping mechanism (no visible text or symbols)natural_image
Mechanical assembly diagram showing a component with numbered annotation (30), no readable text or symbols present.natural_image
Mechanical component diagram showing a clamping mechanism with labeled part (6), no readable text or symbols present.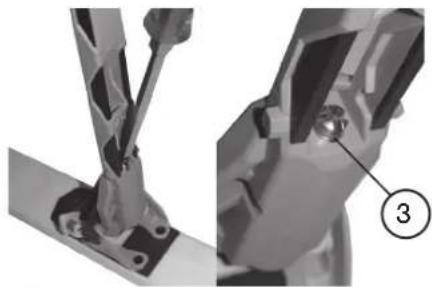
natural_image
Close-up of mechanical components with a numbered annotation (3) showing a detail on a joint (no readable text or symbols)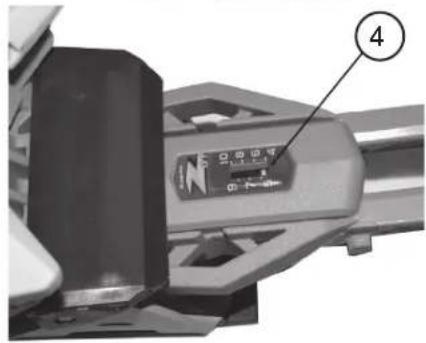
text_image
Technical diagram of a mechanical component with labeled parts and numbered annotation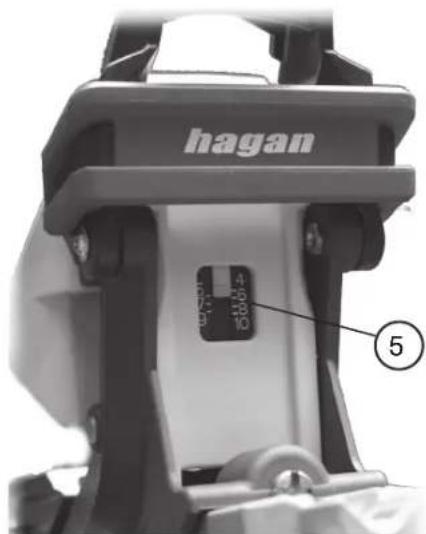
text_image
hagan 4 10 18 ⑤natural_image
Line drawing of a shoe being adjusted on a horizontal bar, showing foot positioning and adjustment points (no text or symbols)natural_image
Mechanical assembly diagram showing a lever mechanism with numbered component (10), no visible text or symbols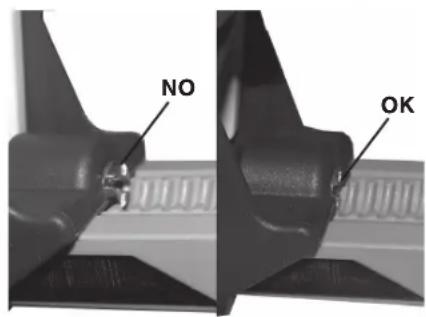
text_image
NO OKtext_image
Labeled diagram of a ski gear assembly showing numbered parts: 1, 18, and 17.natural_image
Mechanical assembly diagram showing a clamping mechanism with labeled component (22), no readable text or symbols present.
natural_image
Mechanical assembly diagram showing a component with numbered annotation (30), no readable text or symbols present.natural_image
Close-up of mechanical components with a numbered annotation (3) pointing to a detail on a surface (no readable text or symbols)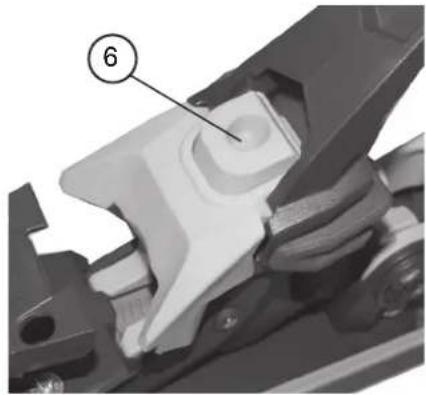
natural_image
Mechanical assembly diagram showing a component with numbered callout (6), no readable text or symbols present.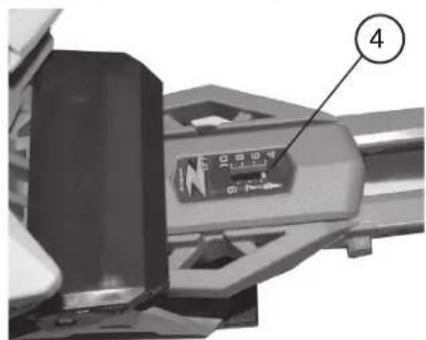
text_image
Technical diagram of a mechanical component with labeled parts and a numbered annotation pointing to part 4.
text_image
hagan 4 26 18 10 5natural_image
Line drawing of a shoe being adjusted on a metal track with adjustment knobs (no text or symbols)2. ボルト穴をあける
注意
natural_image
Mechanical assembly diagram showing a lever mechanism with a numbered component (10), no visible text or symbols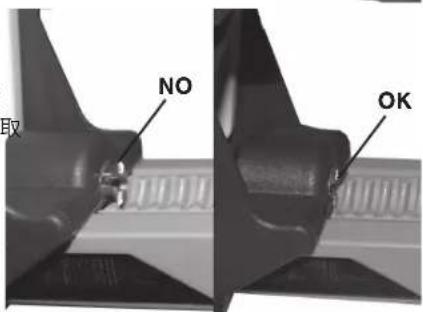
text_image
NO OKtext_image
Labeled diagram of a ski gear being adjusted with numbered parts, showing tool and component details.natural_image
Mechanical assembly diagram showing a lever mechanism with labeled component (22), no readable text or symbols present.natural_image
Close-up of mechanical components with a numbered annotation (3) indicating a specific part, no visible text or symbols beyond the number.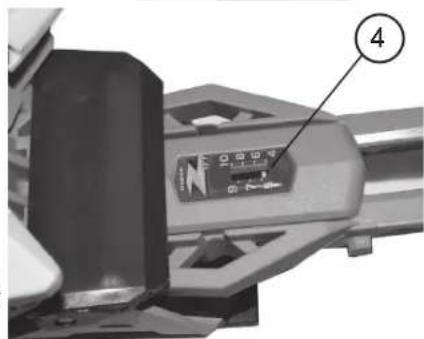
text_image
Technical diagram of a mechanical component with labeled parts and a numbered annotation pointing to part 4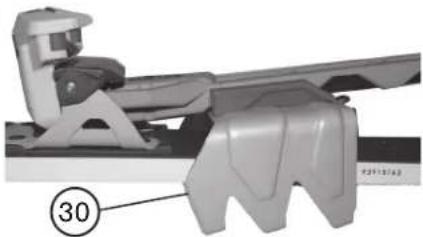
natural_image
Mechanical assembly diagram showing a component with numbered annotation (30), no readable text or symbols present.