
VT1510E - Car video screen CLARION - Free user manual and instructions
Find the device manual for free VT1510E CLARION in PDF.
| Product Type | Car Video Screen (Overhead Monitor with DVD Player) |
| Brand | Clarion |
| Model | VT1510E |
| Screen Size | 15 inches (38.1 cm) diagonal |
| Screen Resolution | 1280 x 800 pixels |
| Aspect Ratio | 16:9 (widescreen), adjustable |
| Screen Type | Active Matrix TFT LCD, Foldable |
| Video Systems | NTSC, PAL, Auto |
| Opening Angle | Up to 150 degrees (manual vertical adjustment) |
| Power Supply | 12 V DC (10-16 V), negative ground |
| Power Consumption | Less than 20.7 W (normal operation) |
| Weight | 7.6 lb (3.45 kg) |
| Operating Temperature | -5 °C to 55 °C |
| Supported Disc Types | DVD, DVD±R/RW, CD-DA, CD-RW, MP3, SVCD, DivX |
| Additional Audio/Video Formats | MP3, WMA (320 kbps not supported), DivX |
| Connectivity | 1 USB 2.0 port, 1 SD/MMC card reader, 2 A/V inputs (3.5 mm), 1 A/V output (RCA) |
| Main Features | DVD player, IR remote control, wireless IR headphones (2 included), LED dome light, parental control |
| OSD Languages | French, English, Spanish |
| Maintenance and Cleaning | Soft dry cloth; do not use solvents or abrasive products |
| Safety | Do not open the casing, contact a professional for repairs; disconnect the battery before installation |
| Box Contents | Monitor, remote control (battery included), 2 IR headphones (AAA batteries included), cables, wire harness, mounting plate, gasket, screws, manual |
Frequently Asked Questions - VT1510E CLARION
User questions about VT1510E CLARION
0 question about this device. Answer the ones you know or ask your own.
Ask a new question about this device
Download the instructions for your Car video screen in PDF format for free! Find your manual VT1510E - CLARION and take your electronic device back in hand. On this page are published all the documents necessary for the use of your device. VT1510E by CLARION.
USER MANUAL VT1510E CLARION
Owner's manual & Installation manual
10" /15.4" OVERHEAD MONITOR SYSTEM WITH
DVD PLAYER & USB2.0 /SD/MMC PORTS
MONITEUR SUSPENDU DE 10" /15.4" AVEC
LECTEUR DE DVD ET PORTS USB2.0 /SD/MMC
10" /15.4" -DECKENMONITORSYSTEM MIT
DVD-PLAYER & USB2.0-/SD-/MMC-PORTS
SISTEMA MONITOR RIBALTABILE DA 10" /15.4" CON
LETTORE DVD E PORTE USB2.0 /SD/MMC
MONITOR DE TECHO DE 10"/15" CON
REPRODUCTOR DE DVD Y PUERTOS USB2.0/SD/MMC
10" /15.4" NOTOJIOUHbI MOHITOP C DVD PJIEEPOM I
IIOPTAMN USB2.0 /SD/MMC
Thank you for purchasing this Clarion product.
- Please read this owner's manual in its entirety before operating this equipment.
After reading this manual, keep it handy, such as in your glove compartment. - Save your sales receipt. The warranty at the end of this manual and your sales receipt are essential for warranty service.
Contents
1 FEATURES 3
OVERHEAD MONITOR & IMAGE FEATURES 3
DVDVIDEO FEATURES 4
2. PRECAUTIONS 5
OPERATING 5
GENERAL 5
MAINTENANCE 5
INSTALLATION 6
3.CONTROLS. 7
MONITORCLOSED 7
MOTOR OPEN 8
SIDE PROFILE VIEW 9
REMOTE CONTROL 10
4. OPERATIONS 12
OPENING THE MONITOR 12
CLOSING THE MONITOR. 12
HANDLING DISCS 13
TURING THE PLAYER ON 13
TURING THE PLAYER OFF 13
CHANGING THE IMAGE ASPECT RATIO 13
PLAYING A DISC (DVD OR CD) 13
USING HEADPHONES 14
PLAYING DVDs 16
PLAYING AUDIO CDs 18
PLAYING MP3s 18
USING THE USB STORAGE AND SD/MMC CARD 19
CARE AND MAINTENANCE 20
CHANGE THE BATTERY IN THE REMOTE CONTROL 20
5. INSTALLATION AND WIRING 22
WHAT IS INCLUDED IN THE BOX 22
BEFORE YOU BEGIN 22
MOUNTING AND WIRING PRECAUTIONS 23
INSTALLATION PROCEDURE 23
WIRING DIAGRAM 26
6. SETTING PREFERENCES 27
ACCESSING THE ON-SCREEN DISPLAY MENUS 27
GENERAL SETUP PAGE 27
SPEAKER SETUP PAGE 27
PREFERENCE PAGE 27
7.TROUBLESHOOTING 29
8. SPECIFICATIONS 31
9. GLOSSARY 32
1. FEATURES
Warning!
The Clarion VT1010E / VT1510E overhead monitor players are designed strictly for rear-seat entertainment. Viewing the monitor while operating a motor vehicle can result in serious injury and/or property damage.
Clarion is not responsible for any injury and/or property damage as a result of the improper use or viewing of the monitor.
The Clarion VT1010E/VT1510E overhead monitor players are engineered with advanced technological designs and components to combine flexibility with reliability, and expandability for the best picture quality and ease-of-use.
Flexibility
Designed primarily for rear seat entertainment, the audio from a VT1010E/VT1510E can be enjoyed privately through wireless headphones and/or incorporated into any head unit.
Reliability
High-grade electronic components and heightened electronic connections provide years of service in extremely harsh, mobile environments.
Expandability
The player's built-in audio/video (A/V) connectors allow you to add multiple A/V sources.
OVERHEAD MONITOR & IMAGE FEATURES
- Flip-down thin film transistor (TFT) active matrix display with screen width that depends on the model:
VT1010E: 10.2"
VT1510E: 15.4"
High Resolution LCD with 16:9 aspect ratio:
VT1010E: 800 x 480 pixels
VT1510E: 1280 x 800 pixels - NTSC, AUTO and PAL support
- Wide viewing angle
- Manual display angle adjustment: vertically adjustable up and down with a maximum angle of 150 degrees
Adjustable color, contrast brightness, and hue (PAL) or tint (NTSC) - On-screen display (OSD) of configuration options
- USB2.0 (full speed) Support
Memory Card Reader for SD/MMC formats - Roof Mounted Application
Automotive Start-up Protection
2 Audio/Video Inputs
1 Audio/Video Output
Built-in White LED Dome Light
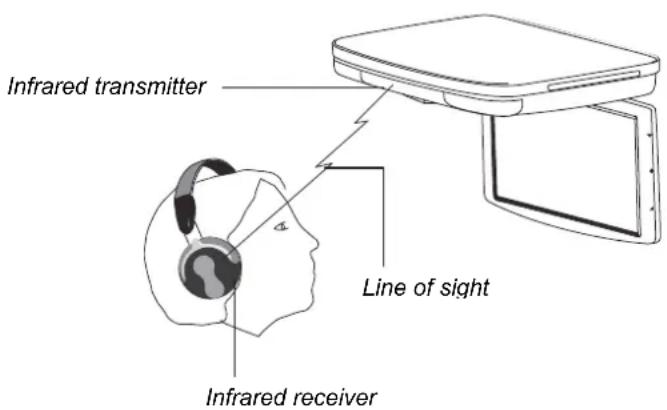
Built-in IR Transmitter for IR Wireless Headphones
1. FEATURES
- Wireless IR Remote Control
- Slot-in DVD Player with Multi-format Support
- Capability to read: DVD /DVD±R /DVD±RW /CD-DA /CD-RW/MP3 /WMA /VCD /SVCD/DivX
Note:
Multi-session CDs and 320kbps WMA files cannot be played on this player.
- 3.5 mm Audio/Video Input
DVDVIDEO FEATURES
DVD drive that supports the following formats:

DVDs (12cm)

Video CDs (12cm)

Audio CDs (12cm)

MP3 CDs (12cm)

DivX CDs / DVDs
- Playback of CDs with two recorded sessions (one audio and one data).
- Multi-sound (②D): DVD audio that supports up to eight languages per film.
- Multi-angle function (B): for DVDs that provide multiple views of the same scene.
- Subtitles ( ): support up to 32 languages.
The playback of MP3 music files stored on a CD-R/CD-RW disc. - Region number assigned based on the sales area; region number is indicated on the box as follows:


DivX Certifcb play DivX® video, including premium content.
ABOUT DIVX VIDEO: DivX® is a digital video format created by DivX, Inc. This is an official DivX Certified device that plays DivX video. Visit divx.com for more information and software tools to convert your files into DivX video.
ABOUT DIVX VIDEO-ON-DEMAND: This DivX Certified device must be registered in order to play purchased DivX Video-on-Demand (VOD) movies. To obtain your registration code, locate the DivX VOD section in your device setup menu. Go to vod.divx.com for more information on how to complete your registration.
DivX, DivX Certified and associated logos are trademarks of DivX, Inc. and are used under license.
2. PRECAUTIONS
Failure to observe these precautions may damage your car, the monitor, or the video source, and may void the warranty.
For questions or problems not covered in this manual, contact your local Clarion Dealer.
OPERATING
- Do not operate this product in ways other than those described in this manual.
- Failure to follow instructions may void the warranty.
- Do not use the unit with the ignition off. This could drain the car's battery.
If the internal temperature of the vehicle is extremely high (over 50 degrees Celsius), let the unit cool down a bit before you use it. - If the temperature in the car is very low (below -5 degrees Celsius), starting the unit right after you start the car with its heater running may cause moisture to form in the unit. Do not power on the unit for an hour. Failure to do so may cause an electrical short. Allow about one hour for the condensation to dissipate before using the unit.
- In extremely cold temperatures the picture may appear dark and move slowly. The display returns to normal when the temperature rises.
- When operating the unit, ensure you are seated with your seat belt fastened, or parked in a safe location. Otherwise, you may be injured if the driver brakes suddenly. In an accident, injuries may be more severe if your seat belt is not fastened.
- Before leaving the vehicle, eject the disc and store it separately away from direct sunlight. Heat and humidity can damage discs causing them not to play.
GENERAL
- Do not leave the monitor open when the unit is not in use. Direct sunlight can cause the monitor to malfunction.
- Do not hang onto or hang items from the overhead monitor.
- Do not pour liquid into the unit or insert foreign objects into the DVD drive slot. Water, humidity and foreign objects may damage internal circuitry.
- If the unit becomes wet, turn off all power and consult your authorized Clarion Dealer for service. Do not operate the unit until it has been inspected and repaired.
- Do not drop the unit or hit the LCD panel. You may cause permanent damage.
- If the LCD breaks, avoid touching the glass and fluid. If you do touch the fluid, clean it off your body and/or clothes with plenty of water, then get medical attention.
MAINTENANCE
- Do not clean the surface of the LCD with chemical solvents or corrosive detergents. Permanent damage to the screen may result. Avoid using abrasive cleaners. Use a soft, damp cloth to clean.
- Do not disassemble or modify this unit. You may damage the monitor, void the warranty, and suffer electric shock. Modification of this unit will void safety certifications.
INSTALLATION
Installation of mobile audio and video components requires experience with a variety of mechanical and electrical procedures. Although this manual provides general installation and operation instructions, it does not depict the exact installation methods for your particular vehicle.
If you do not have the required knowledge, experience, and/or tools to successfully complete the installation, consult an authorized Clarion Dealer about professional installation options.
3. CONTROLS
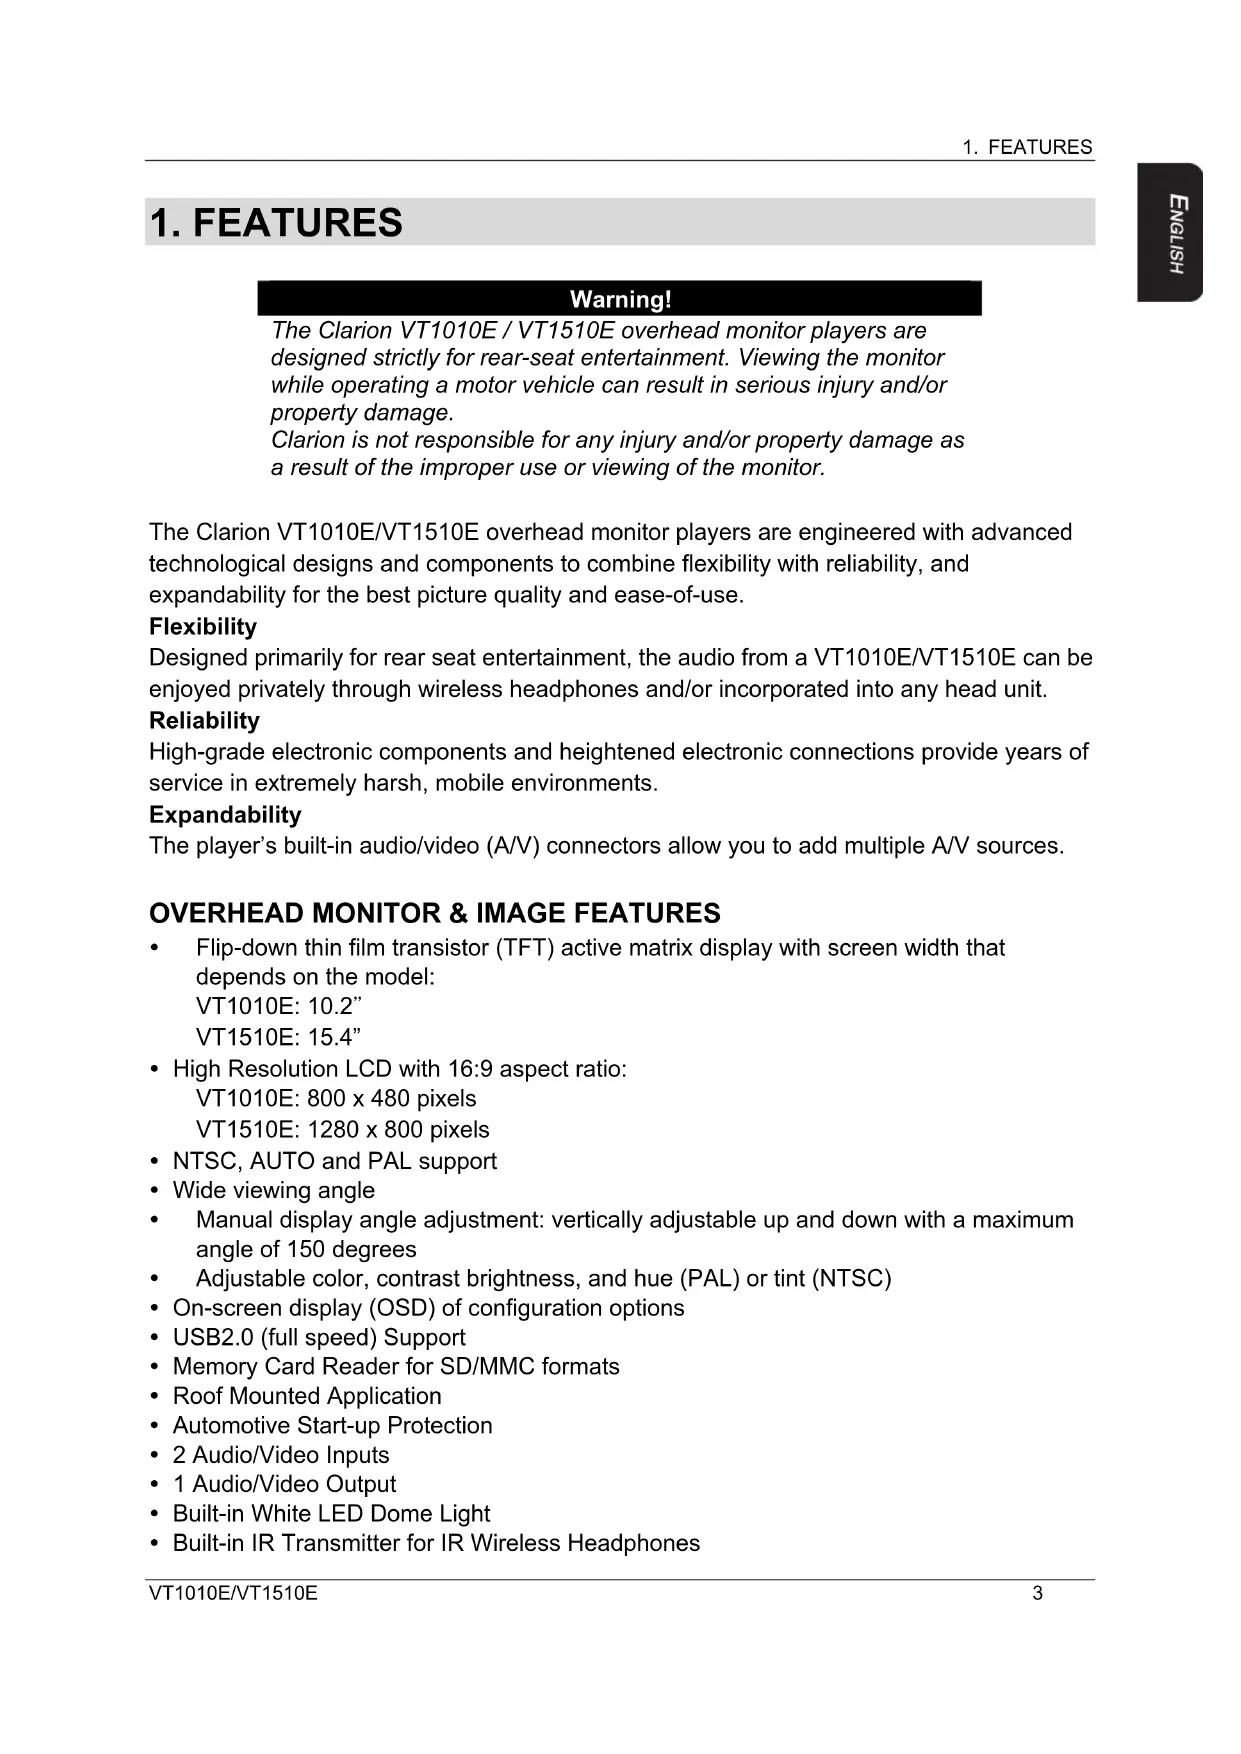
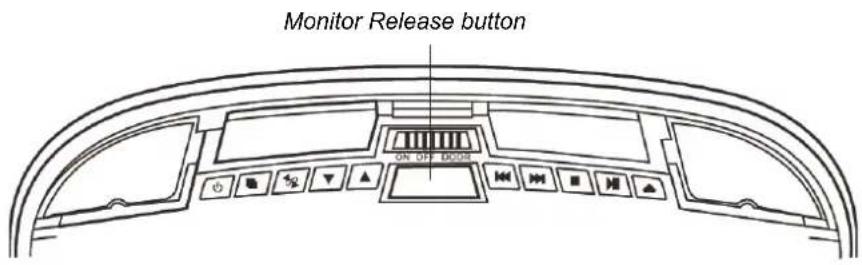
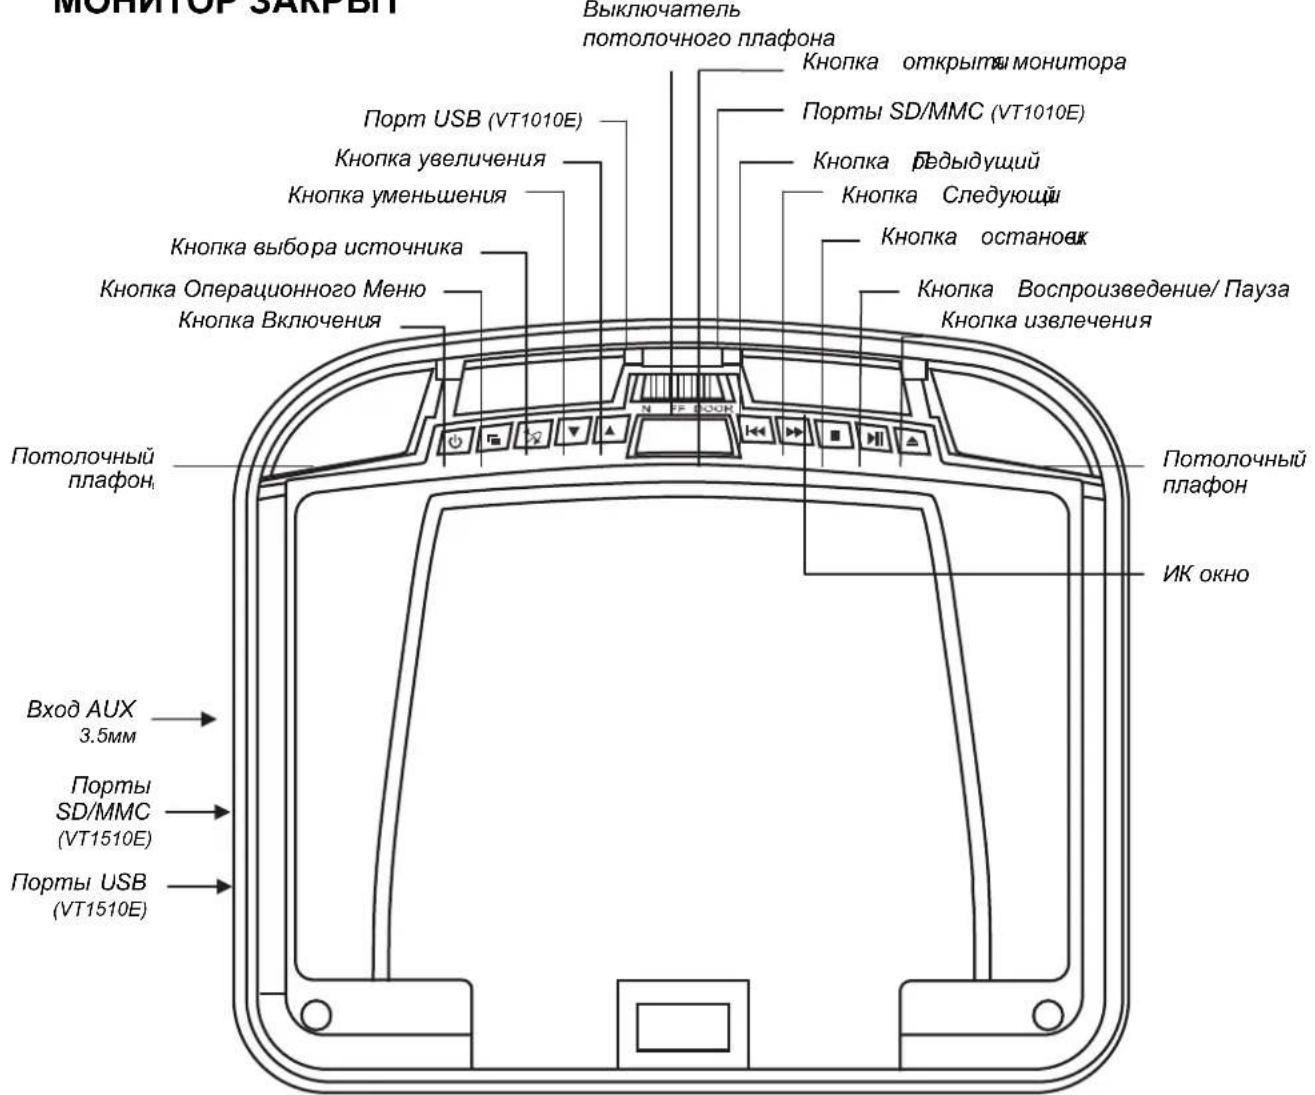
MONITORCLOSED
Looking up directly below at the player with the LCD panel closed.
Buttons functions (monitor is closed)
Power button Press to turn On or Off the player.
- Menu button Open the operational menu. Press again to select each menu item sequentially.

Source button Selects the video input source: DVD-IN, AV IN1 or AV IN2, DVD/USB
NOTE: To switch to the USB mode, switch to DVD mode, then insert the USB into the port. Press and hold this button for 2 seconds to switch to USB mode while in the DVD mode.
Decrease button Decrease volume during playback.
In the MENU mode, press to select menu item down.
Increase button Increase volume during playback.
3. CONTROLS
In the MENU mode, press to select menu item up.
Previous button Skips to the previous chapter on a DVD or track on a CD.
During playback, press and hold to fast reverse playback
Next button Skips to the previous chapter on a DVD or track on a CD.
During playback, press and hold to fast forward playback
- Stop button Press once to stop playback. To resume where the player left off, press the play/pause button.
Press this button twice to stop playing fully. To start playing at the beginning of the disc, press the play/pause button.
Play/Pause Plays or pauses the disc. button
Eject button Ejects the disc. Monitor
Release button Release the LCD panel from the storage area.
Dome light switch Configures the dome light: ON, OFF or door activated. To manually turn the light on or off, move this switch to the ON or OFF positions. In the car door activated position, the dome light turns on and off when you open and close the car door.
NOTE:
The dome light switch works only when the green dome light wire is connected to the door sensor and the polarity switch is set correctly.
See the vehicle's wiring manual for connection details.
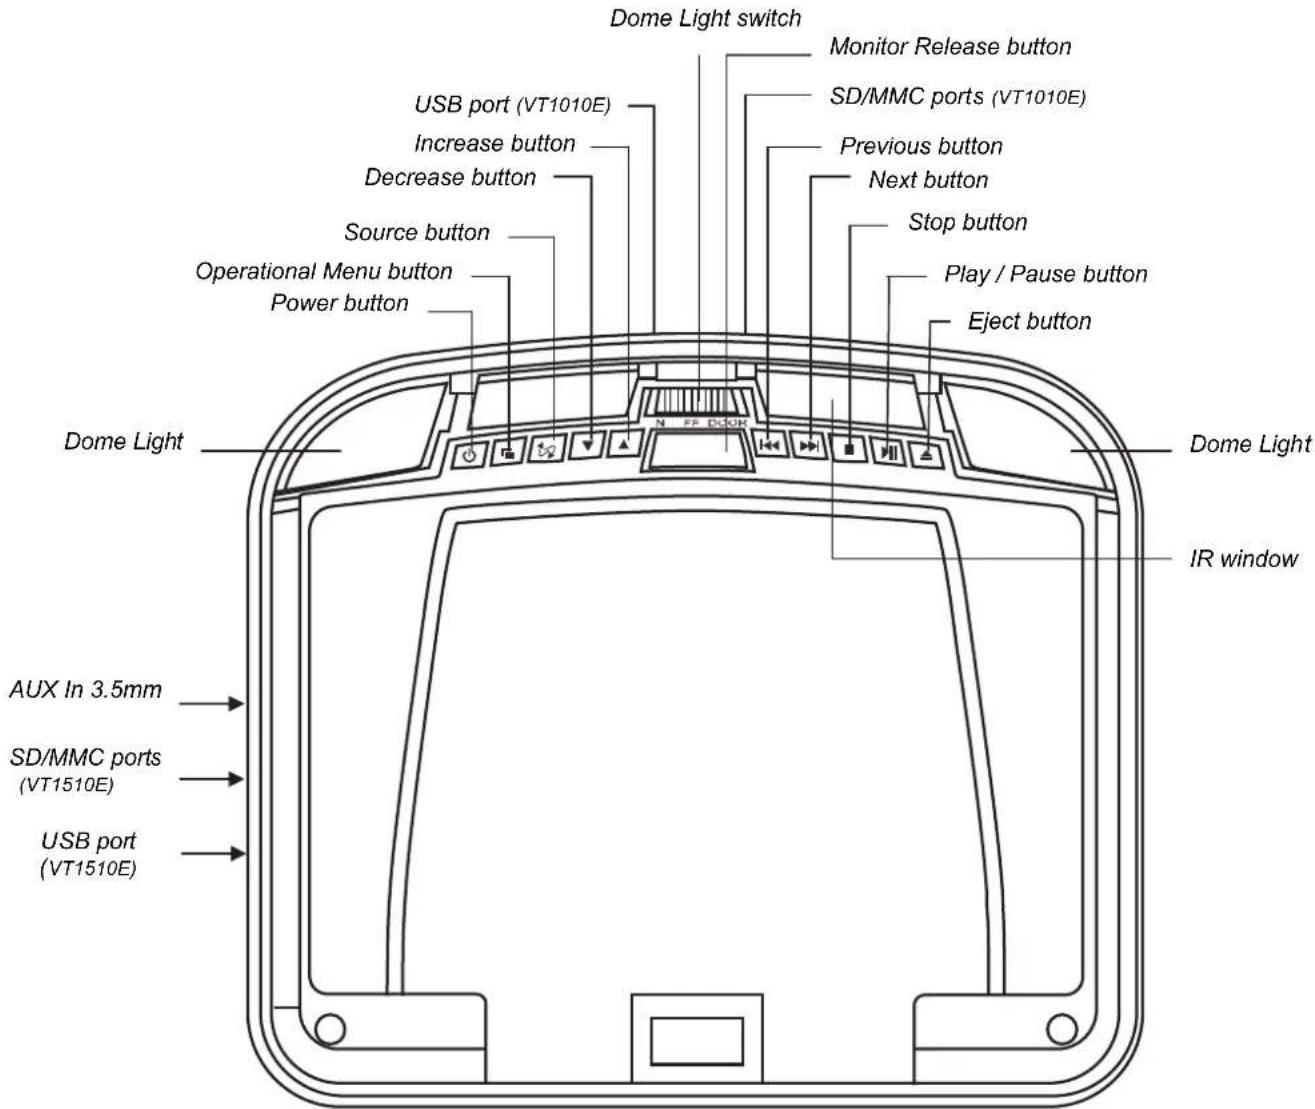
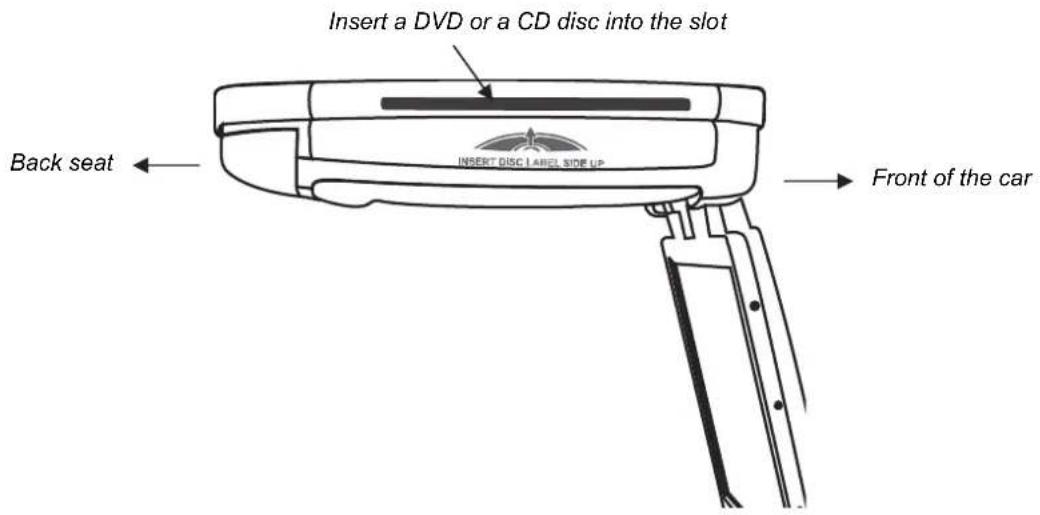
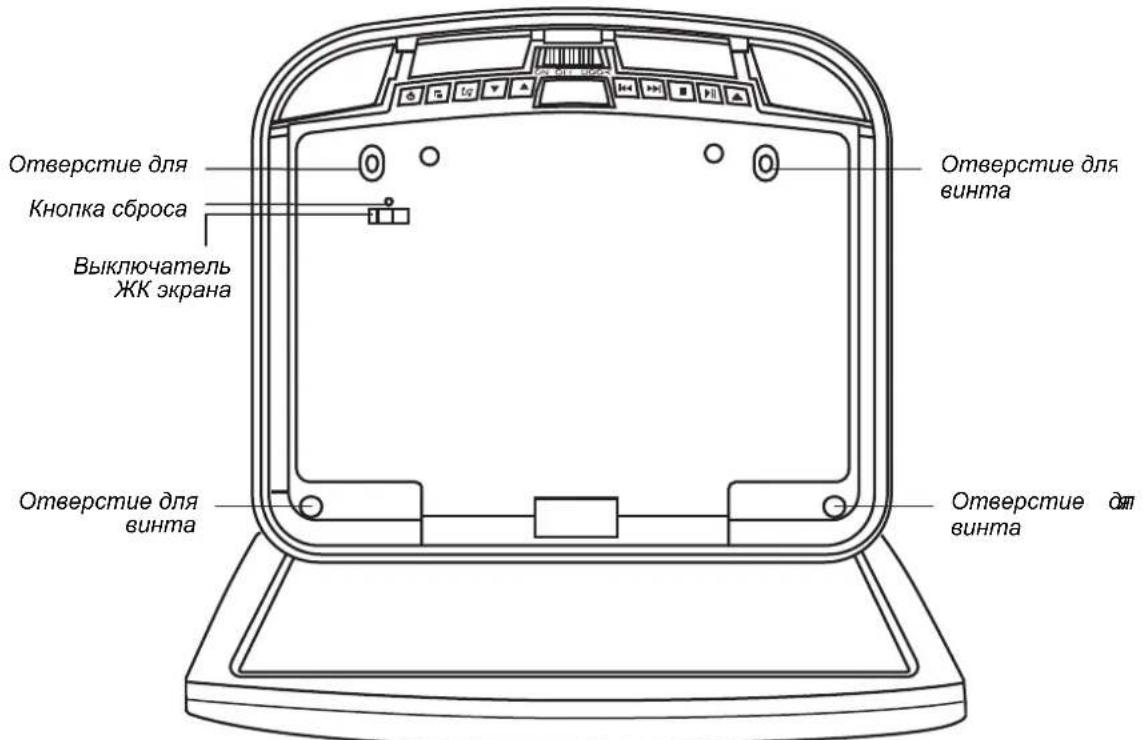
MONITOR OPEN
Looking up directly below at the player with the LCD panel open.
Buttons functions (monitor is open)
LCD Off switch Turns Off the LCD screen
Reset button Press with a pencil or other narrow-tipped tool to return all setup options to their factory defaults.
Screw hole Used to attach the player to the mounting plate.
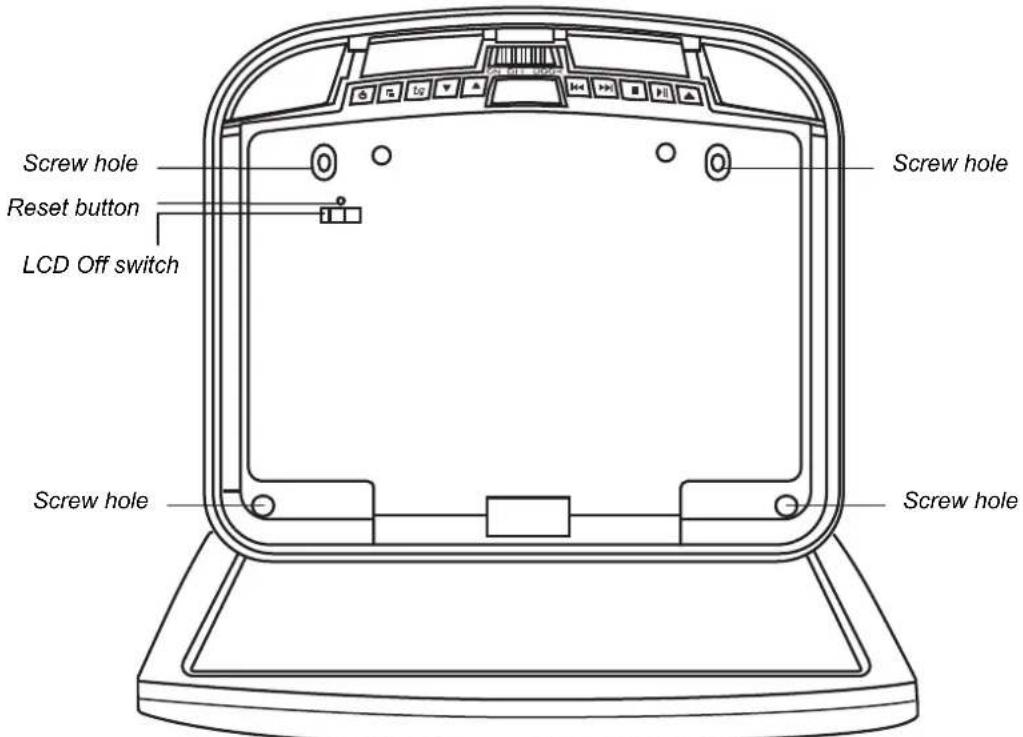
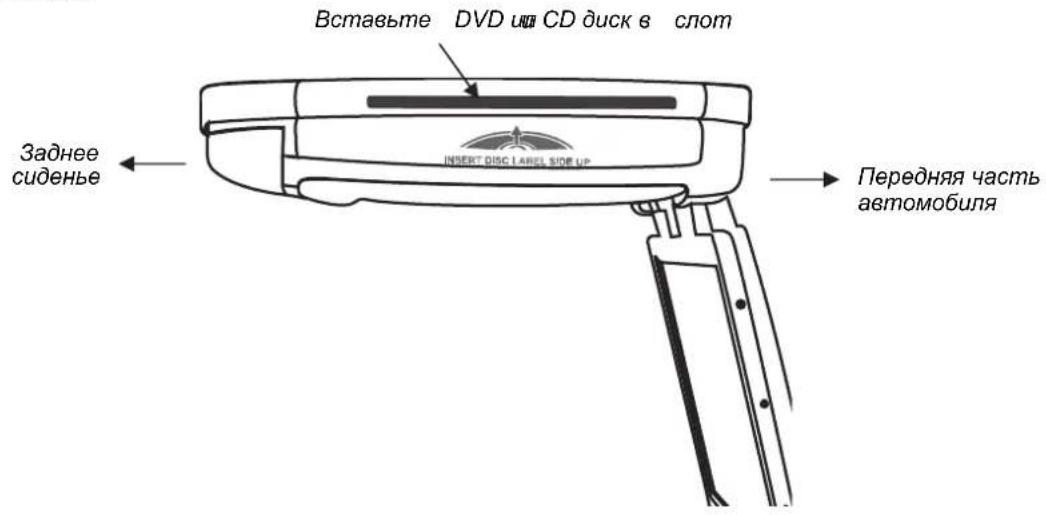
SIDE PROFILE VIEW
REMOTE CONTROL
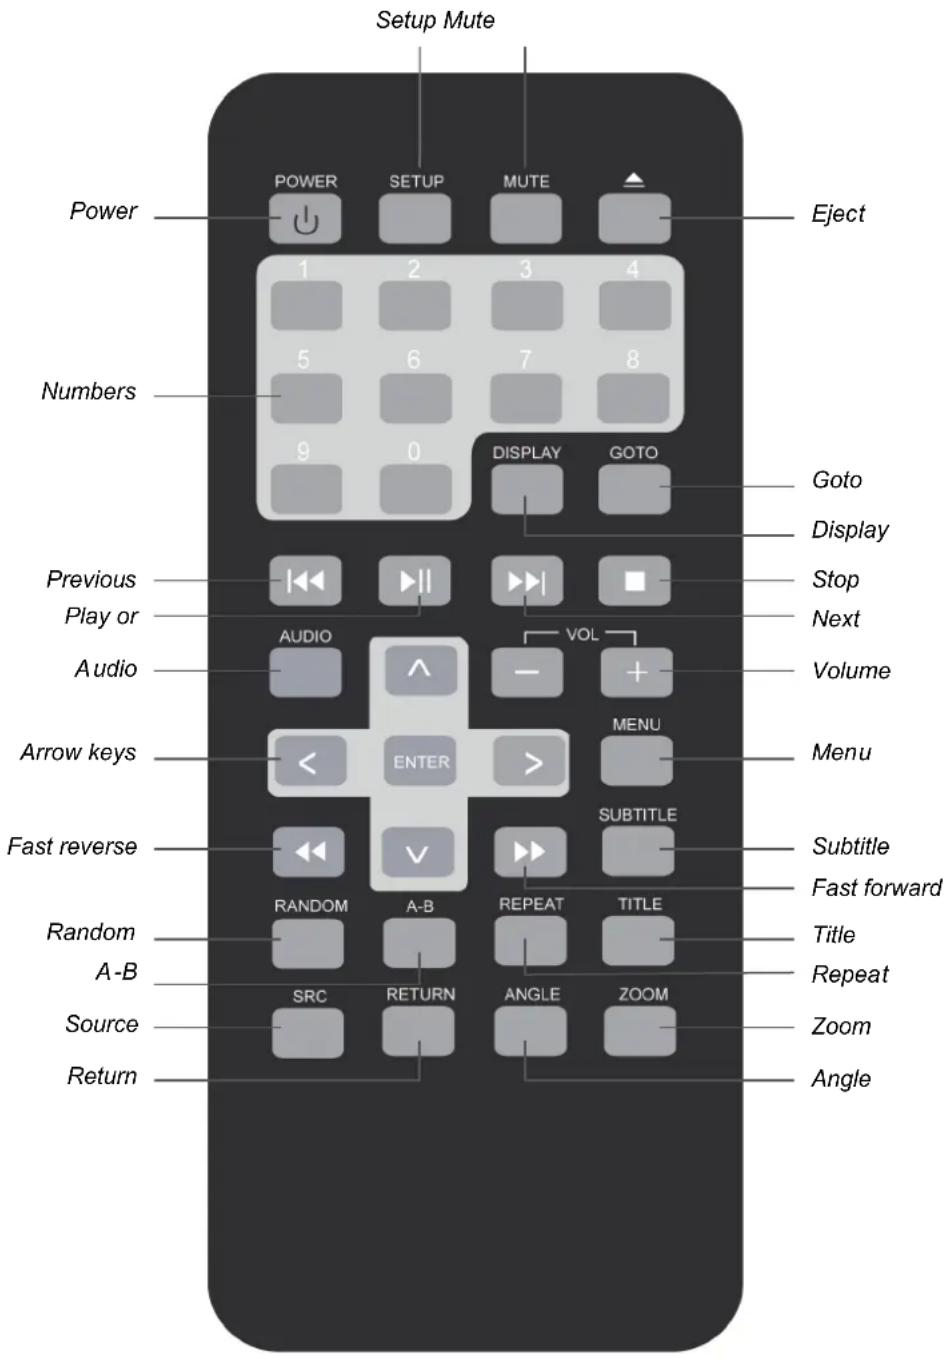
Remote control buttons functions
Power button Turns the player on and off.
Setup Access the setup menu. Use to modify player options.
Mute Disables and enables sound.
Eject Ejects the current disc from the slot.
Numbers Used to directly enter track numbers and to configure some options.
Previous Returns to previous chapter on a DVD or previous track on a CD.
Play or Pause Starts or pauses playback of a DVD or a CD.
Audio For a DVD: Change the language during playback
For a VCD/CD: Change audio channel (left, right, stereo) during playback.
Arrow keys Selects options on DVD menu and values on Display menu.
ENTER Accepts settings selected using the arrow keys.
Rewind Fast reverses playback at 2x, 4x, 8x, 16x and 32x speeds.
Random Plays back chapters or tracks in random order.
A-B Repeats playback from previously identified points A to B.
Source Selects the video input source: DVD-IN, AV IN1 and AV IN2 or DVD-IN, and USB.
Return Returns to DVD main menu.
Angle Changes a scene angle when playing back a DVD that includes
multiple scene angles.
Zoom Zooms in when viewing a movie or photographs. As you press
ZOOM, the player alternates between the available zoom
settings.
Repeat Alternates among repeat options.
Title Displays the DVD title menu.
Fast Forward Speeds playback forward at 2x, 4x, 8x, 16x and 32x speeds.
Subtitle Turns pre-recorded subtitles on and off.
Menu Displays the DVD's main menu. Press and hold to view the
display menu.
Volume Decreases and increases the volume.
Next Jumps to next chapter on a DVD or to next track on a CD.
Stop Stops playback. Then press the play/pause or ENTER button to resume playing back at last position. Press the stop button twice
to fully stop playback, then press the play or ENTER button to start playing back at the beginning of the DVD.
Display Displays playback information; title, chapter, track and time.
Goto Starts playback at the selected chapter, track or time.
4. OPERATIONS
The monitor and DVD player provide the video; headphones provide the audio. The unit receives power from the power circuit of the car's dome light, which is replaced by the unit.
OPENING THE MONITOR
- Press the monitor release button to lower the overhead monitor screen.
Looking up at the monitor from directly below.
- Gently swing the LCD down and adjust the angle for viewing.
The monitor turns on automatically when you fully open it (assuming the ignition switch is on or in the ACC position).
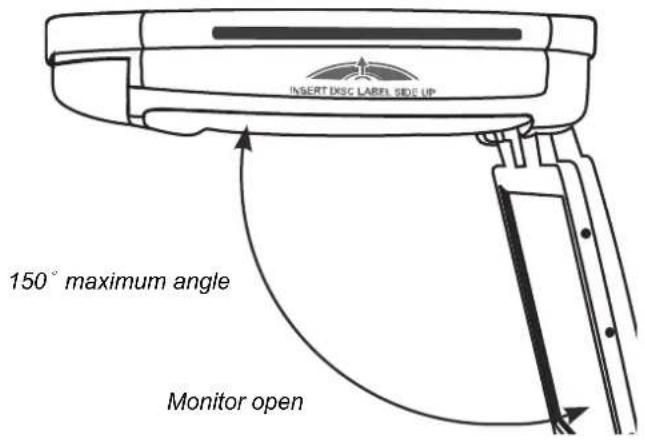
CAUTION!
The LCD opens to a maximum angle of 150 degrees. Do not attempt to open it further.
CLOSING THE MONITOR
Gently push the back side of the display panel until it clicks into the overhead housing. The monitor turns off automatically when you return it to the closed position.
Note:
When closing the display panel, do not let cords or other items get caught between the display and the overhead housing. Doing so can seriously damage the screen.
For safety, close the LCD panel when you are not using it.
HANDLING DISCS
To keep a disc clean, do not touch the play side (non-label side).
- Do not attach sticky notes to or put tape on a disc.
- Keep discs away from direct sunlight and heat.
- Store discs in a protective disc case.
- To clean the disc, wipe the disc outwards from the center with a clean cloth.


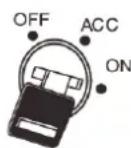
- Turn the ignition to either ACC or ON.
- Press the power button ( ) on the player or on the remote. If no disc is in the drive, it displays: "NO DISC."
- To change input sources, press SRC and alternate among
A/V input sources: DVD, AV IN1 (3.5mm input terminal) and AV IN2 (second audio-video source).
Additional AV sources are optional must be connected.
Note:
You cannot insert a DVD into the slot if you've selected an alternate audio-video source (AV IN1 or AV IN2).
To turn the power off, press the power button (
If a CD or DVD is playing when you turn the power off and back on again, the player continues playback from where you stopped.
Note:
Once the player is turned off, you cannot eject the DVD or CD in the player.
CHANGING THE IMAGE ASPECT RATIO
A common display setting to change is screen mode, which controls the aspect ratio used to display images.
PLAYING A DISC (DVD OR CD)
- Put the headphones on your head and turn the headphone power on.
- Assuming the power is on, insert a DVD into the player. The player displays "Loading."
- Aim the remote control directly at the IR receiver on the player and press the play/pause button (▶) or press ENTER (on the remote).
Using the remote control
- Use the remote control only inside the vehicle.
- Use the remote control no further than five feet (three meters) from the sensor.
- Direct sunlight (or a very bright light) reduces sensitivity to remote signals. Do not use the player in direct sunlight.
- Any object that comes between the infrared sensor and the remote control may disrupt reception.
Controlling playback
To pause and resume, press the play/pause button ( ).
- To stop playback, press the stop button ( ).
If you press the stop button (■) and then press the play/pause button (HI) again, playback begins from the beginning of the last chapter played, not the last exact location when you interrupted playback.
To play back the previous track or chapter, press the previous button (K).
To play back the next track or chapter, press the next button (▶I).
To remove the CD or DVD, press the eject button (▲).
- To mute the sound, press the MUTE button on the remote. Press this button again to enable sound again.
USING HEADPHONES
To hear the audio requires headphones.
Do not leave the headphones in a place that is subject to direct sunlight or extreme temperatures.
An IR receiver in the headphones that is exposed to direct sunlight for an extended period of time may cause poor sound quality. Let the headphones cool off before you use them.
WARNING!
Do not use the headphones while driving.
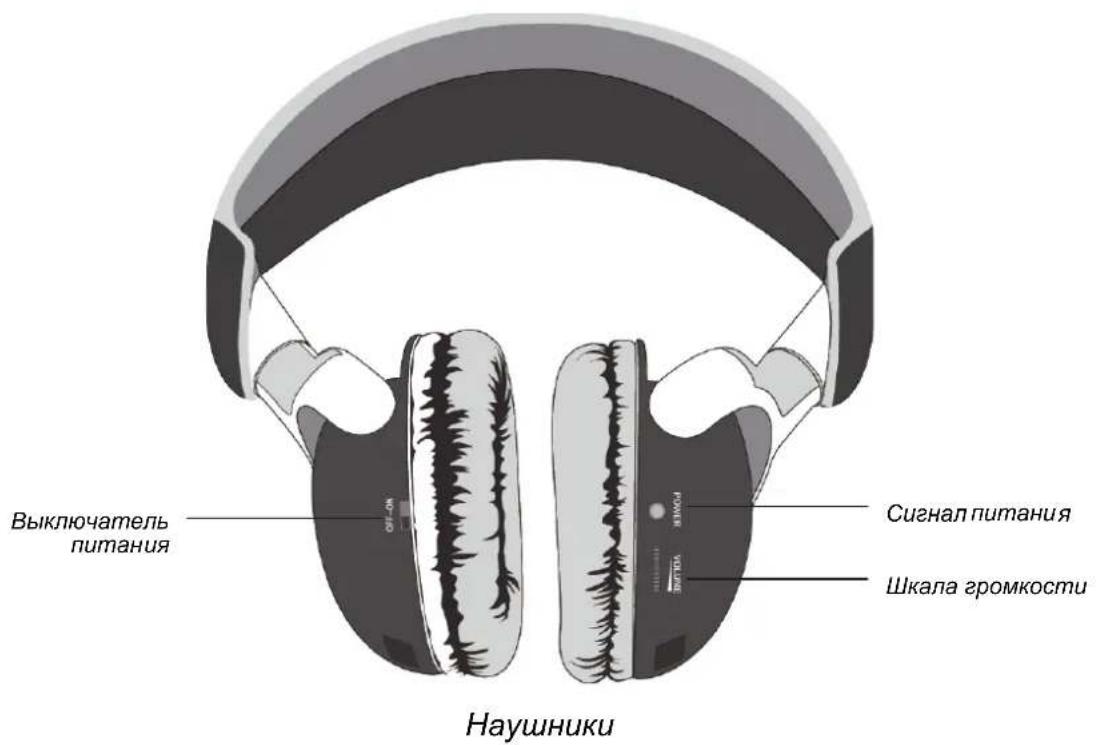
Headphone components
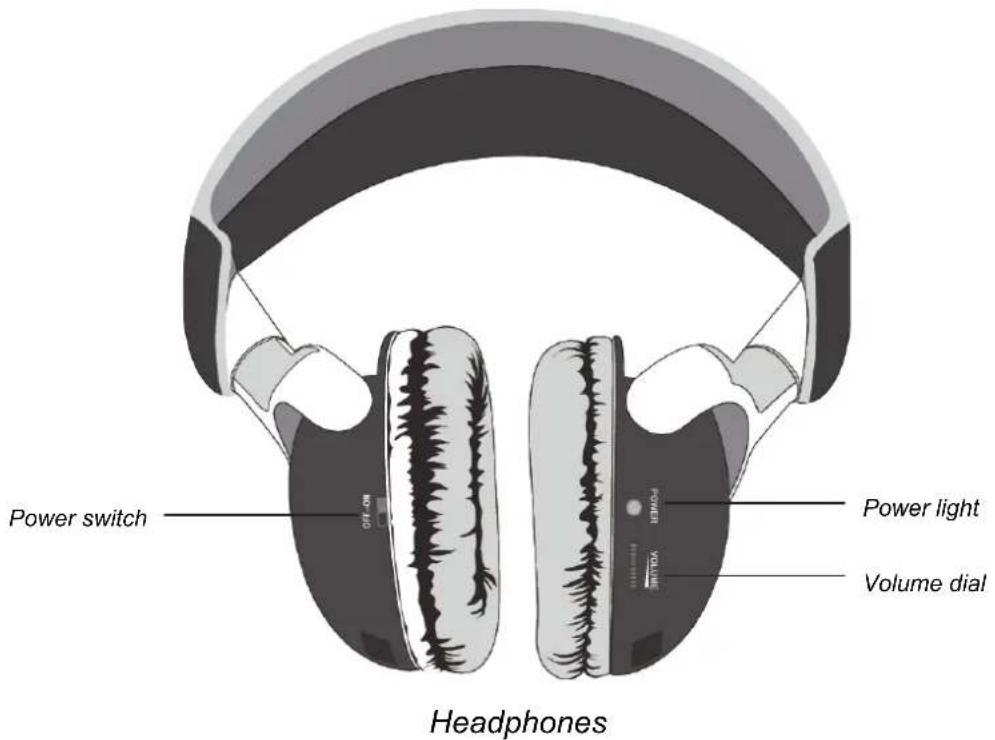
Installing batteries in the headphones
If this is the first time you're using the system, install batteries in the headphones. Change the batteries when you begin to hear distorted audio that cuts in and out.
- Rotate the left earpiece so the battery cover is accessible.
- Slide the battery cover down.
- If replacing the batteries, remove the discharged batteries.
- Insert the new AAA batteries according to the polarity marked inside the battery compartment.
- Slide the battery cover back into place.
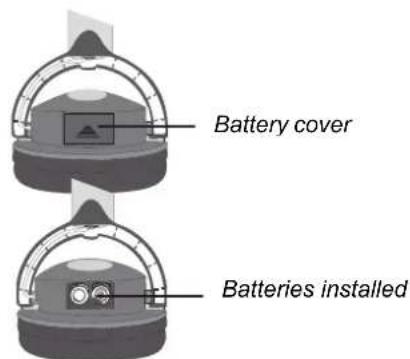
Close-up with batteries installed
Setting the volume
The volume control is on the headphones. Turn the volume dial up or down.
Note:
Some noise may be audible depending on the type of encoder software used while recording. This noise is not caused by the VT1010E/VT1510E
Direct sunlight and temperature extremes
Do not leave the headphones in direct sunlight or extreme temperatures.
PLAYING DVDs
Accessing the root menu
A DVD is divided into titles and chapters. The root menu shows the contents of the disc. Some DVDs only allow you to select disc playback options from the DVD root menu. To access the root menu of the DVD, press the RETURN or TITLE button during playback.
Status information
To view status information about the current viewing session, press the DISPLAY button continuously to cycle through the displayed information.
Changing languages
Note:
All audible languages must be pre-recorded on the DVD. Some DVDs only allow language access through the DVD menu.
- To change the audible language, press the AUDIO button on the remote. The player displays the current language number and name, and the total number of languages available.
- To cycle through all available languages, continue pressing the AUDIO button. The audio information disappears automatically if you wait three seconds.
Using subtitles
Language subtitles are normally off.
Note:
Subtitles must be on the DVD. Some DVDs only allow subtitle access through the DVD menu.
- To turn subtitles on, press the SUBTITLE button. The player displays the current language number and name, and the total number of languages for which subtitles are available.
- If the DVD provides subtitles in multiple languages, continue pressing the SUBTITLE button to change the subtitle language.
To turn subtitles off, press the SUBTITLE button until the screen displays "subtitle off". - The display of the subtitle options disappears automatically if you wait for three seconds.
Repeating DVD chapters and titles
To repeat a chapter or title during playback, continue pressing REPEAT to alternate among options.
Chapter - repeats the current chapter.
- Title - repeats the current title.
- All - repeats all chapters and titles.
- Off - resumes normal playback.
Repeating favorite sections
To repeat a favorite section you must first mark where it begins and ends.
- Play back the DVD.
- To identify the beginning of your favorite section (point A), press the A-B button when the section starts playing back.
- To identify the end of your favorite section (point B), press the A-B button again when play back reaches the end of the section.
To repeat this section, press the A-B button on the remote. To cancel the repeat playback and resume normal playback, press the A-B button again.
Changing viewing angle
Note:
Multiple angles must be pre-recorded on the DVD. Look for the multiple angles icon on the jacket of the DVD.
- To cycle through the available viewing angles, press the ANGLE button on the remote while playing back the DVD.
The player displays the current angle number and the total number of angles available.
To change the angle, press the ANGLE button again.
To return to normal viewing, press the ANGLE button again.
Zooming in and out
- To zoom in (enlarge) the image when watching a DVD, press ZOOM during playback. As you press ZOOM on the remote, the player alternates among the available zoom settings (2x, 3x, 4x, 1/2, 1/3, 1/4).
- To zoom in when viewing photographs (JPEG/JPG images) stored on a disc, press ZOOM on the remote, the player alternates among zoom settings (ZOOM 100%, ZOOM 125%, ZOOM 150%, ZOOM 200%, ZOOM 75%, ZOOM 50%).
Adjusting picture quality
- Press the MENU button on the main unit to display the operational adjustment menu (OSD).
-
Press or button to alternate among the available options.
-
Contrast - Adjusts the differences between the light and dark areas of the image.
- Brightness - Makes the whole image lighter or darker.
Color - Adjusts color based on the color spectrum. - Tint - Adjusts the intensity of the color when in NTSC mode (to play back DVDs recorded in the United States).
- Wide Screen - Selects the aspect ratio of the image wide and normal.
- Reset - Returns all menu values to their default settings.
PLAYING AUDIO CDs
Displaying CD information
To display the playing time and current track, press DISPLAY on the remote during CD playback.
Continue pressing DISPLAY on the remote to view the disc type, current time, current track number, and total number of tracks.
Repeating CD tracks
To repeat a track or the entire CD, press REPEAT on the remote during playback.
To cycle through the available options, continue pressing REPEAT.
- REPEAT ONE - Repeats the current track.
- REPEAT ALL - Repeats the current CD.
- REPEAT FOLDER - Repeats all tracks in the current folder
- Off - Resumes normal playback.
Repeating favorite sections
To repeat a favorite section you must first mark where it begins and ends.
- Play back the CD.
- To identify the beginning of your favorite section (point A), press the A-B button on the remote when the section starts playing back.
- To identify the end of your favorite section (point B), press the A-B button again when play back reaches the end of the section.
To repeat this section, press the A-B button on the remote.
To cancel the repeat playback and resume normal playback, press the A-B button again.
PLAYING MP3s
MP3, a format for storing digital audio, compresses each audio track with little loss of audio quality.
The result takes up much less disc space than the track would without MP3 compression.
MP3 icons

This icon in front of an item identifies a folder.

This icon in front of an item identifies the item as an MP3 file.
Procedure
- Insert a CD that contains MP3 files into the player. The player displays the MP3 menu.
- To select the folders and tracks to play, press the ENTER button on the remote. The player displays the folder structure.
- To choose a folder from the list, press the up and down arrow keys on the remote.
-
Press the ENTER button on the remote. The player displays the contents of the selected folder.
-
To select the MP3 file, press the up and down buttons on the remote.
- To play the file, press the ENTER button on the remote.
MP3 controls
To play back to the next MP3 file, press the next button (▶).
To play back the previous MP3 file, press the previous button (K).
Repeating MP3s
To repeat a single MP3 file, press the REPEAT button on the remote. To cycle through all the following settings, continue to press REPEAT.
- Repeat - repeats the current folder.
- Repeat all - Repeats the current CD.
- Repeat off - turns off repeat and resumes normal playback.
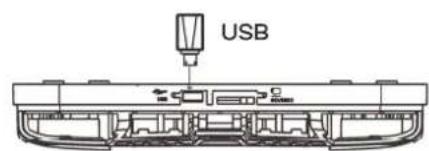
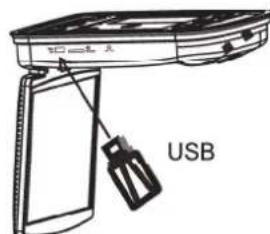
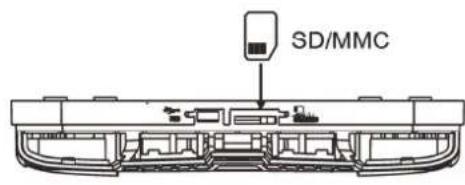
USING THE USB STORAGE AND SD/MMC CARD
FOR VT1010E ONLY
- Follow arrow 1 to open the rubber cover when you want to use the USB storage device or the memory card.
- Follow arrow 2 to put the rubber cover back when you are done using the USB storage device or memory card.

Procedure
- Insert the USB storage into the USB socket of the main unit.
- With the unit set in a DVD mode, press SRC button on the remote control for more than 2 seconds to change the mode from DVD to USB. The main unit will now automatically read the contents of USB storage.
VT1010E
VT1510E
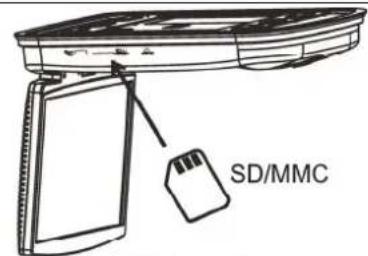
Using memory card
- Insert the memory card into the memory socket of the main unit.
- When the unit is in DVD mode, pressing SRC on the remote control for more than two seconds will change the mode from DVD or USB to memory card, then the main unit will read the contents of memory card automatically.
VT1010E
VT1510E
CARE AND MAINTENANCE
Cleaning the monitor
Use a clean, soft, dry cloth to gently wipe dust and dirt from the screen.
- Do not use benzene, thinner, car cleaner, or other cleaners. These substances may damage the monitor system or cause the paint to peel.
The surface of the LCD can be easily scratched. Do not rub it with anything abrasive.
Servicing the monitor
In the event that trouble arises, never open the monitor case, disassemble the player or attempt to repair it yourself. The internal parts are not serviceable by the user. Opening any components will void the warranty. All warranty service should be performed by an authorized Clarion service center.
CAUTION!
Changes or modifications to this product not approved by the manufacturer will void the warranty and will violate E mark certification
Cleaning the remote control
Use only a clean, soft, damp cloth to clean the remote control. Do not use lighter fluid, methyl alcohol or other solvents.
Cleaning discs
Before playing a disc, wipe it outwards from the center with a clean, soft cloth.
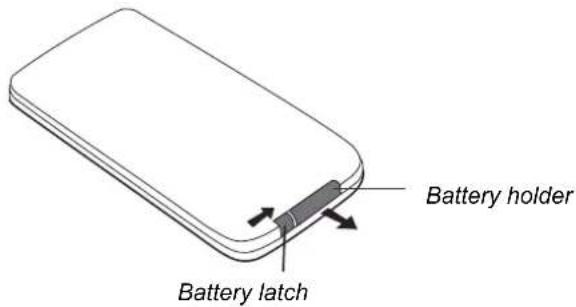
CHANGE THE BATTERY IN THE REMOTE CONTROL
The battery has to be changed when the buttons on the remote stop working or when you have to move close to the player for the remote to work.
Precautions
- Dispose of used batteries properly.
- Do not dispose of used batteries throwing them into fire. If you do so, they may explode.
- Do not short the positive (+) and negative (-) terminals.
- Keep the battery and its holder away from young children. They may choke on the battery while attempting to swallow or chew on it.
Procedure
Note:
The battery type must be CR2025. Do not replace with any other battery type.
- Turn the remote up-side-down.
- Simultaneously slide the battery latch in the direction of the arrow and pull the battery holder out of the slot.
- Remove the old battery.
- Place the new lithium battery in the slot with the plus (+) side up.
- Push the battery holder back into the slot until it locks in place.

Battery with the plus side up
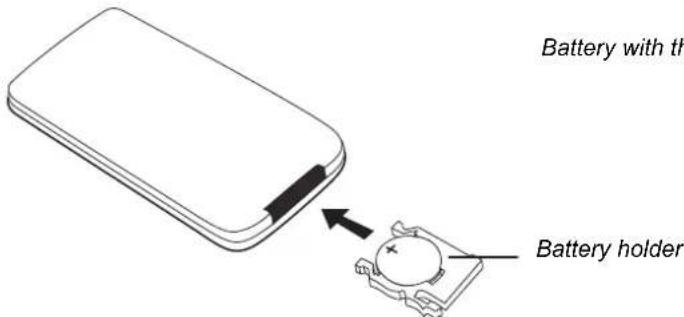
Inserting the holder with the battery into the remote control
5. INSTALLATION AND WIRING
Do not attempt to install or service your player yourself. Installation and servicing require experience in electronic equipment and automotive accessories. If you do not have the knowledge or experience this installation may be dangerous and could expose you to the risk of electric shock or other hazards.
Read these instructions and precautions carefully. Improper installation can damage the monitor and the vehicle.
WHAT IS INCLUDED IN THE BOX
In addition to this manual, the box contains:
1 - Player
1 - IR remote control with battery
1 - Audio/video RCA cable with 3.5mm connector
1 - Power harness
1 - RCA output cable
- 1 - RCA input cable
- 6 - ST4.2 x 16, 4 - CM4 x10 screws (VT1010E)
- 10 - ST4.2 x 16, 8 - CM4 x 8 screws (VT1510E)
1 - Metal mounting plate
1 - Rubber gasket
- 2 - Headphones and 4 AAA batteries
Note:
Use only the contents of this package to install and use the system. Using accessories not provided with this player may damage the player.
BEFORE YOU BEGIN
- Verify that the vehicle electrical components function, including: power windows, power door locks, air conditioning, lights, etc.
- Identify the polarity of the dome light circuit and set the switch on the bottom of the overhead monitor housing.
- Test fit the location of the overhead monitor system to ensure it will not interfere with the operation of the vehicle.
- If applicable, verify that the monitor, when mounted, will not interfere with the operation of the sun roof.
- Carefully mark the location with masking tape.
- Lower the vehicle's headliner down to see if a roof support beam is available to screw the mounting bracket. If a support beam is not available, use a 3/4-inch piece of plywood cut to the appropriate size. Attach the plywood to the roof of the vehicle using silicone. Allow for adequate drying time.
- Determine the location of any additional audio/video sources.
- Disconnect the negative battery terminal before making any wiring connections.
CAUTION!
Do not open the case. There are no serviceable parts inside. If you drop anything into the unit during installation, consult with your Clarion Dealer or an authorized Clarion service center.
MOUNTING AND WIRING PRECAUTIONS
The VT1010E/VT1510E should be mounted in the ceiling of the vehicle. The front panel controls should be easily accessible from the rear seat. In addition:
This unit is exclusively for vehicles with a negative ground, 12V power supply.
This unit may be in installed with additional mobile audio components, such as a digital camera.
- Always use great care when attaching anything to a vehicle. Check clearances on both sides of the planned installation before drilling any holes or installing any screws.
- A good chassis ground connection is critical to minimize resistance and avoid noise problems.
Use the shortest wire possible and securely connect it to the car chassis.
- When routing RCA cables, keep them away from the power cables and output speaker wires, engine, exhaust system, etc. Heat may damage wires.
- If the fuse should blow, make sure that all connections are correct, the cables have not caused a short circuit, and no wires are damaged. Then replace the fuse with a new fuse of the same amperage value as the original fuse. When replacing a fuse, never let the battery side touch any metal part or any other wire.
- Never let disconnected cables or terminals touch metal on the car or any other conducting material.
- To prevent short circuits, do not remove the caps from unused terminals or from the ends of unconnected cables.
- Insulate unconnected wires with vinyl tape or other similar material.
WARNING!
To prevent short circuits during installation, disconnect the vehicle's negative (-) battery lead before making any power connections.
INSTALLATION PROCEDURE
The VT1010E/VT1510E replaces the car's dome light. This section provides basic tips and techniques to aid the installation. These are not vehicle specific, but should be used as guidelines for performing the installation.
Set the polarity switch
- Determine the polarity of the power system in the car. This information should be on a vehicle specific diagram.
- Locate the polarity switch on the back of the player (the side that will be attached to the ceiling).
- If the vehicle's power supply requires negative polarity, slide this switch to the negative (-) position. Otherwise, slide this switch to the positive (+) position.
CAUTION!
Make sure the switch is fully to one side or the other. Do not attempt to configure this switch once the player is in position.
- Cut a one-inch hole in the headliner along the backside of the ceiling bracket for the cables to pass through.
Install the ceiling bracket and cables
- Disconnect and remove the original dome light.
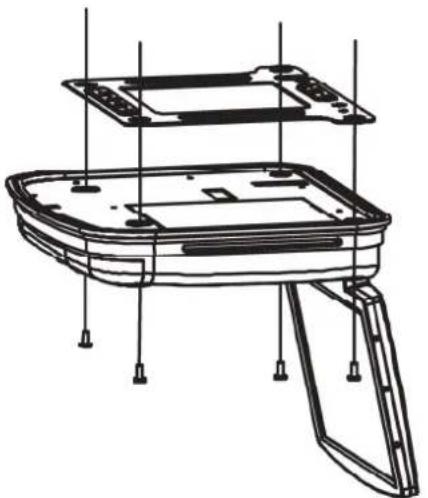
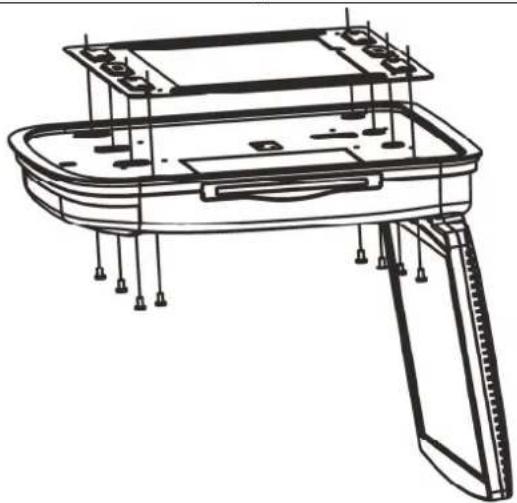
- Screw the metal mounting plate to the beam or plywood using the six ST4.2 x 16 screws for VT1010E and ten (same size) screws for VT1510E.
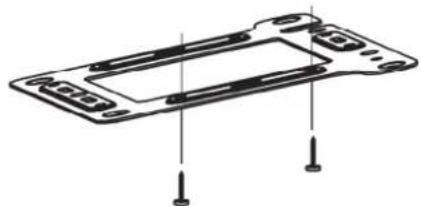
Metal mounting plate showing screw position(VT1010E)
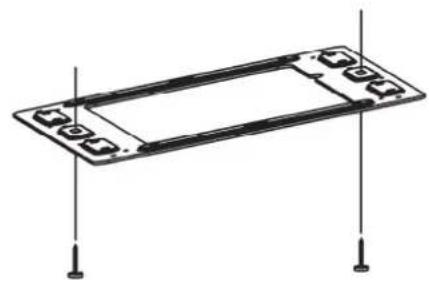
Metal mounting plate showing screw position(VT1510E)
Note:
Do not obscure the original dome light opening.
Connect cables
- Pull out the original dome light's power wire and signal/power cable through the original dome light opening.
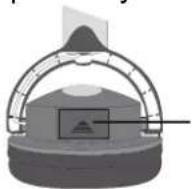
- Place the rubber gasket on the player.
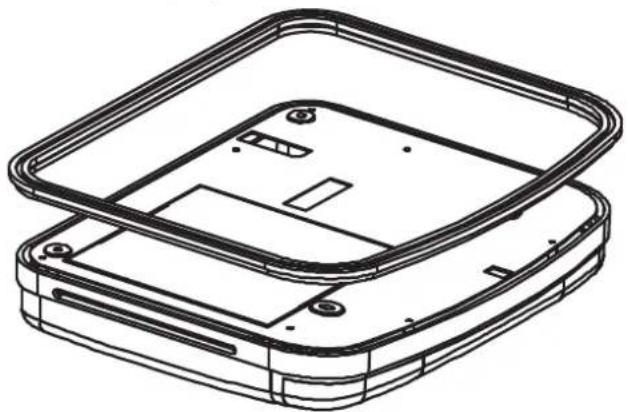
Placing the rubber gasket on a player
- Route the cables through the hole to the location of any audio/video sources.
- Identify the dome light wires in the vehicle and connect them to the corresponding
dome light wire on the overhead monitor system.
- Plug in any audio/video source cables.
- Plug in the power harness into the overhead monitor system in the following order: ground wire, battery wire, ACC wire and door wire.
Note:
The red lead must be connected to the ACC or IGN wire to the ignition switch. If you do not connect this wire properly, the battery will drain / discharge prematurely.
Install the monitor
- Carefully hold the overhead monitor up to the metal mounting plate.
- Screw in the four CM4 x 8 screws for VT1010E or eight screws (same size) for VT1510E making sure the wires are not in the way.
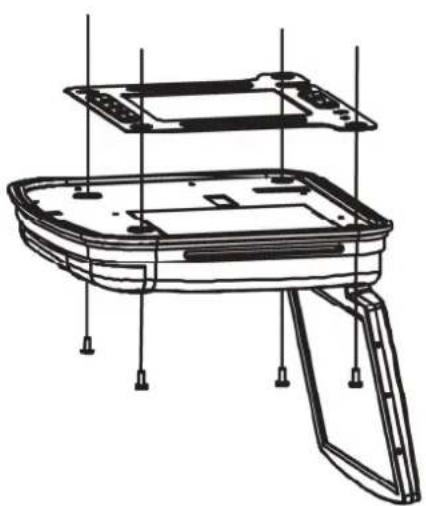
Mounting the player (VT1010E)
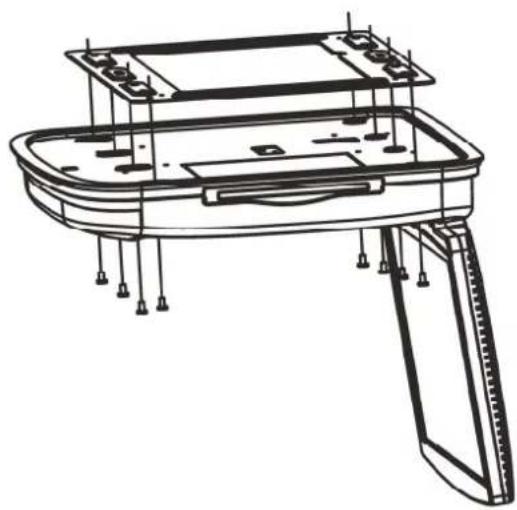
Mounting the player(VT1510E)
- Reconnect the battery.
- Check the car's brake lights, blinkers, wiper, etc. to ensure they are working properly.
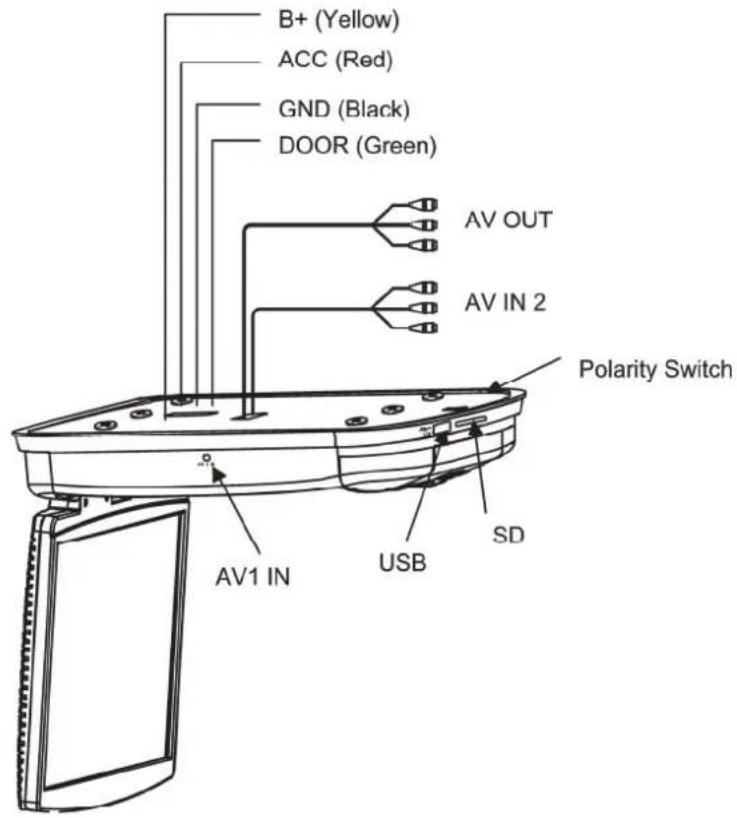
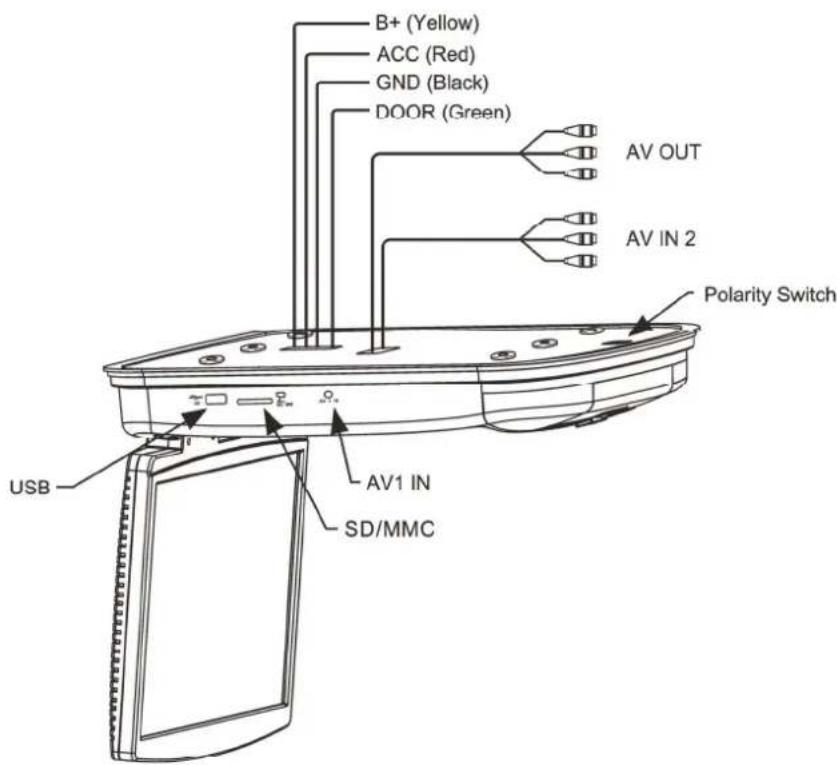
WIRING DIAGRAM
VT1010E Cable connections
VT1510E Cable connections
6. SETTING PREFERENCES
ACCESSING THE ON-SCREEN DISPLAY MENUS
- Press SETUP on the remote to access the OSD menus.
- Press up arrow and down arrow on the remote to select among menu items.
- Press left arrow and right arrow button on remote to alternate set items.
- Press up arrow and down arrow button to select the option you wish to change.
- Press ENTER to confirm your selection.
- Press SETUP to exit the OSD menus.
GENERAL SETUP PAGE
This page controls standard DVD options.
ANGLE MARK Turns the multiple-angle feature on or off. The multiple-angle must be pre-record on the DVD disc. To determine if the DVD supports multiple angles, look for the multiple-angle symbol on the disc jacket. ON enables the ANGLE button to select a different angle for the current scene. OFF disables the ANGLE button.
OSD LANG Selects the language for the on-screen display menus: ENGLISH, FRENCH, SPANISH
CAPTIONS Turns the caption on or off. ON enables captions. OFF disables captions.
SCREEN Turns the screen saving feature on or off.
SAVER ON enables the screen saver function.
OFF disables the screen saver function.
SPEAKER SETUP PAGE
This page controls the speaker options.
DOWNMIX Applies to Dolby digital sound. You cannot change this option, which is permanently set to output stereo signals, that is the player outputs audio to both the left and right channels of the output RCA jacks.
PREFERENCE PAGE
This page controls system overall preferences.
TV TYPE Selects the TV system. Changing this option also changes the RCA AV output. Select from NTSC or PAL
AUDIO Selects the audible language for the DVD audio track. ENGLISH, FRENCH, SPANISH
SUBTITLE Selects the language for subtitles. ENGLISH, FRENCH, SPANISH
DISC MENU Select the language to display the contents of the current disc. ENGLISH, FRENCH, SPANISH
PARENTAL Restrictions movie viewing to appropriate ages.
1 Kid Safe Material is safe for children.
2 G Material a safe for general audiences.
3 PG Parental guidance suggested.
4 PG-13 Some material unsuitable for children under 13.
5 PG-R Some material unsuitable for children under 17.
6 R Some material unsuitable for under 17.
7 NC-17 Not recommended viewing for children under 17.
8 Adult Only for adults due to the graphic content.
This is the default setting.
Note:
After setting parental control, the player prompts you for the system password.
Password To change the original password.
Note:
Before changing the parental control set please input the password, the default password is 3308. It will no longer work once you change the password.
DEFAULT Resets all values to the factory defaults.
DivX Registration code: 557QBJDXCU
DivX URL: www.divx.com/vod or vod.divx.com
7. TROUBLESHOOTING
If operations freeze, the screen goes blank, or the player otherwise does not function properly, try turning it off and back on again. If it still does not respond, press the reset button on the front panel.
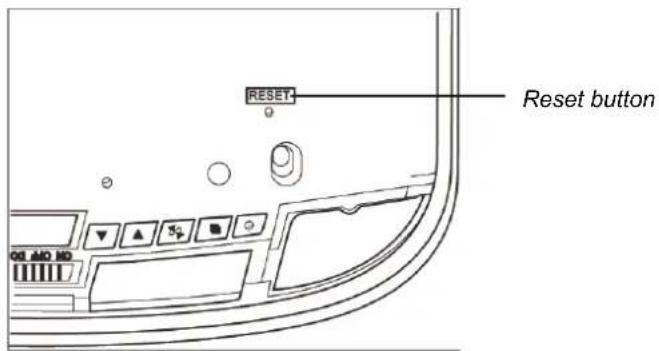
Player with the monitor open
PLAYER DOES NOT TURN ON
The car's ignition may be off. Turn on the ignition to the ACC (Accessory) position.
- The player may not be on. Turn the player's power on.
- There may be condensation in the player. Wait for about one hour or until the condensation evaporates.
- A fuse may be blown. Check the fuses at the end of the monitor installation cables and on the vehicle.
- The player may be disconnected. Check all connections. See the installation instructions.
- The remote control battery may require changing.
- Dirt may be covering the remote's infrared lens. Clean the lens with a soft damp cloth.
The disc may be inserted incorrectly. Reinsert the disc with the label side up (facing the ceiling of the car).
- The disc format may not be supported.
The disc may be dirty or scratched. Clean or replace the disc.
THE PLAYER SUDDENLY STOPS WORKING
There is an error in the player. Turn the player off and on again. If it still doesn't respond, press the RESET button.
- The remote control battery needs replacing.
- The IR window on the player or remote control is dirty. Clean the IR windows with a soft damp cloth.
The connections are loose. Check and tighten all connections.
THE PICTURE OCCASIONALLY SKIPS
- The disc is dirty or scratched. Clean or replace the disc.
THE PICTURE IS BLURRED
- You may be passing near a high voltage wire, transformer, aircraft or other source of electrical interference. The picture will improve when you move away from the source interference.
THE PICTURE IS VERY DARK
- The temperature in the car is very low. At low temperatures LCD screen display dark pictures.
The picture will improve as the temperature rises.
- The brightness is set too high. Adjust it lower. Press the MENU button on the remote or on the player.
- The headphones are not turned on.
- The battery in the headphones is low. Replace the battery.
- An object is blocking the transmission of the infrared signal from the player to the headphones or the headphones are beyond the reach of the IR signal. The IR receiver on the headphones must be in direct line of sight of the IR transmitter on the player.
8. SPECIFICATIONS
| VT1010E | ||
| Power supply (car battery) 12V DC | (10V-16V) | |
| Test voltage 14V, negative ground | ||
| Operating current <20.7W | ||
| Current consumption <82.8mW | ||
| Max current consumption <27.6W | ||
| Mechanism Manual open and close | ||
| Video system Auto, NTSC and PAL | ||
| Screen | 10.2" diagonal | 15.4" diagonal |
| Resolution (pixels) 800 x 480 1280 x 800 | ||
| Display angle | Vertical adjustable up and down; maximum angle 150° | |
| Viewing angle (up/down/left/right) | 45/65/65/65 | 10/30/40/40 |
| Weight 4.959 lbs (2.25kg) 7.6 lbs (3.45kg) | ||
| Video signal 1Vp-p, 75-Ohm load | ||
| Operating temperature | 23 ~ 131°F (-5 ~ 55°C) | |
| Storage temperature | -4 ~ 158°F (-20 ~ 70°C) | |
| Dome light | 2W | |
Note:
For the sake of technical improvements, this technical data and the design of the equipment may change without prior notice.
9.GLOSSARY
Active matrix: A flat panel display technology that produces a brighter and sharper display and a broader viewing angle than passive matrix panels. Each pixel has its own thin film transistor (TFT) and is sometimes called a "TFT screen."
Aspect ratio: The comparison of the width to the height of an object.
Audio/video (A/V) source: Any additional audio and/or video device that has a composite RCA output, such as a game player, VCR, digital camera, etc.
CD: Compact Disc.
CD-R/RW: CD Read/Read and Write.
Display angle: The extent to which the LCD screen can be opened (150 degrees).
Dolby Digital: The marketing name for the audio compression technologies developed by Dolby Laboratories.
DVD: Digital Video Disc or Digital Versatile Disc.
DVD-R: DVD Read only.
DVD-RW: DVD Read and Write.
JPEG/JPG: Joint Pictures Expert Group, the committee that developed the standards for compressing graphics, especially photographs.
IR: Infrared.
NTSC: National TV Standards Committee, the group that developed the television standards used in the United States.
LCD: Liquid Crystal Display, the technology used for laptop and other small computer monitors.
MP3: MPEG Audio Layer-3, a standard for sound compression without sacrificing quality.
OSD: on-screen display.
PAL: The primarily European standard for displaying analog television signals.
Pixel: Short for picture element, the smallest point on a graphic image or monitor.
TFT (Thin film transistor): The display technology in which thin films are deposited during the manufacturing process to create metallic contacts.
SRC: Source.
VCD: Video CD, the standard for storing video on a CD.
Viewing angle: Pre-recorded alternative angles for individual scenes.
WVGA: Wide Angle Video Array, the number of pixels in each direction that can be displayed on a monitor.
- The brightness is set too high. Adjust it lower. Press the MENU button on the remote or on the player.
- MEPbI PPEIOCTOPOXHOCTN 185
ФУHKЛИОПОВАНЕ 185
OBUNIEIPOLOXKENIA 185
TEXHINCHECKOE OBCJYKIBAHNE 186
YCTAHOBKA 187
- 3JIEMENTbI UYPABJIENHIA 188
MOHHTOP 3AKPbIT 188
MOHITOPOTKPBIT 190
BIVD C6OKU 190
ДИСТАЦИОНHоЕУПРавлЕнe 191
- 3KcPJIyATAUЯ 194
OTKpbITNE MOHHTOPA 194
3AKPbITNE MOHHTOPA 194
PABOTACINCKAMN 195
BKNIOUeHnE PJIeEPA. 195
BbIKJIIOUeHHe IJIeEPA 195
I3MEHEHNE OTHOLEHNI KAPPA KBICOTE 195
ПОИГРБАНЕ ДИСКА (DVD ИЛN CD) 196
INCIOJIb3OBAHNE HAYUHNIKOB 196
ПОИГРБАНЕ DVD-ДИСКOB 198
ПОИГРБАНЕ АДЮ ДИСКOB 200
ПОНГРБАНЕ МРЗДИСКOB 201
IcnoJIb3OBAHE USB IAMrTn I KAPT SD/MMC 202
YXODI OBCJYKIBAHNE 202
3AMEHA BATAPEI B INCTAHUOHHOM YNPABJIEN 203
- YCTAHOBKA I NPOBEDEHNE 3JEKTPONPOBOKN 205
HTOBKIIIOUeHO B YNAKOBky 205
ПЕД HACHAJOM 205
MOHTAXI MEPBIPNEIOCTOPOXHOCTINPIIPOBEENHNIJIEKTPONPOBOOKN 206
IOPRAOK YCTAHOBKN 207
MOHTAXHAR CXEMA 210
- IPEIIOUHTAEMbIE HACTPOIKN 211
IOCTYIKKPAHHOMMEHIO 211
OBUINE HACTPOIKI 211
HACTPOIKN DUNHAMKKA 211
PPEINOHTEN 212
- BbIaJIeHHe HEnCnPABHOCTeI 214
- TEXHnueCKNE XAPAKTEPNCIKN 216
- TLOCCAPNI 217
1. NAPAMETPbl
IpeDocTepeXeHne!
Pomonoynble nneepb c mohumopamu Clarion VT1010E/VT1510E pa3pa6omahb cmpo2o dny ucnno30aHna Ha 3adHe m cudeHbe.
Ppocmnp MOumopa 60 epeM 3Kcnnyamau u aMOMoBUN moXem npueecmu K cepb3HbIM mpaam u/uNHaHeceHuo yuepe6a umyuuecmey.
Kompana Clarion He Hecem ombeemcbehnocmu 3a Iohympaemy u/Unu HaheceHue yuepebua umyuacemby pezylbmameHe npabunbHO20 UcnoB3O8AHU uNnpocmopma MOumopa.
IToJIoUHbIe nIeepblc MOHITopamn Clarion VT1010E/VT1510E pa3pa6oTaHbIB COBpeMeHHOM TexHOJOrnueckOM dI3aIHe n C COBpeMeHHbIMN KOMNoHEtAmn, YTO6bl OBeDInHTb npucnooc6JIeMoCTb c HaJeXHoCTbIO, N BO3MOxHOCTbIO paCUnpeHnA JIPOJyHnRA JyUWeRo KaYeCTBa KapTINHKn I IpOCTOTbl B INCNOJB3OBaHN.
Ppncno6jraemoctb
B OCHOBHOM, yCTpOiCtBO pa3pa6oTaHO IJRA IcNoJIb3OBAHnI Ha 3aIHeM cIeHbe, ayIIO B MoJeI NVT1010E/VT1510E MOxHNO IInuHO IpocIyUWBaTb chepe3 becIpoBoDhbIe HayuHnKn n/nnu chepe3 cTepeocNCTemY.
HaedxHoctb
BbICOKoKaueCTBeHHbIe 3JIeKtpoHHbIe KOMNoHeHbI uYcJIeHHbIe 3JIeKtpoHHbIe coeINHeHnI npocnykAT DoJrVe rOdbI B 3KCTpeMaJIbHO JckTKnX, MObInbHbIX cpeaX.
Bo3MOxHocTb paCUnpeHnA
BcTpoeHHbIe pa3bEml aydno/BnJeO (A/V) n03BOJrHOT Bam do6aBnTb MHOKeCTBO NCTOuHNKOB A/V
IAPAMETPbMOHHTOPA N OTOBPAXAEMOTO CnHaja
3aueKnBaOuHcKaK-ekpaH cakTBHO MaTpncE NO TexHOJIN TOHKoJIeHOHybIX TpaH3NCTOpOB (TFT) c uipnHO, 3aBNCsJe OT MOnJI:
VT1010E: 10.2"
VT1510E: 15.4"
KK 3kpah BbICOKo ra3peuHn c opMaTOM KaIpa 16:9
VT1010E:800x480 nikkseien
VT1510E: 1280 x 800 nikksej
- Пдержka Форматов NTSC, AUTO n PAL
- Μιρόκην yγολ σθερα
PyuHoe peryInpOBaHne yrJa HAKIoHa 3KpaHa: BepTnKaJIbHa YCTaHOBka BBepx IN BHN3 C MaKcIMaJIbHo BO3MOXHbIM yrIOM B 150 rpaIycob
- PerynipoBaanHe zBeTa, KOHTpacta, npKocTn n ZBeTa (PAL) nn ZBeTOBOrTOHa (NTSC)
- Инданаши Конфурипунов орций на захане (OSD)
- PoiDaeppKa USB2.0 (noHocKOpocTha)
- UcTpoIcTBo IJIa YTeHnI KApT IamrTn IJIa fOpMaTOB SD/MMC
- IcnoIb3ObaHne npu yCTaHOBKe Ha noToJIOK
3aunTaOTcMOBOJbHOrO BKJIuOHeHnA
2aydno/Bndeo BxoJa
1aynio/Bndeo BbIXoI
BcTpoHHbI NOTOJIOUHbI PnAfoH C6eJIbIM CBeTOJIOJOM
BcTpoHHbIK nepeDaTuNK dIa NK 6ecnpoBOdHbIX HayuHnKOB
BecnpoBoDnoeIKdntaHNoHHoeynpabIeHne
BctabHoi DVD nleepc MhoroopMaTHOH noIepKko
Bo3MOxHocTb TteHHaOpMaTOB: DVD /DVD±R /DVD±RW /CD-DA /CD-RW/MP3/WMA/VCD/SVCD/DivX
PpumeyaHue:
Ha daHOM pIeep He npouepbiaomc Mylbmuceccuohbie KOMnakm-ducku u faunb WMA 320 Kbum/c.
ayDIO/BnIeO BxO3.5MM
IAPAMETPbI DVDVIDEO
DvDD,noepKnBaUcni cndyUoune fopMaTbI:

DVD nucn (12 cm)

Bndeo kOmnaKT-dnckn VCD (12 cm)

Aydno KOMnKaT-ДиСКИ (12 cm)

KomnaKT-dnckn MP3 (12 cm)

DivX CDs / DVDs
Bocnpo3BeHeNE KOMnAKT-DnCKOB C DByM aHcHHbIMN CeCCnMn (OHa ayNo n OHa c DaHHbIMN)
- MylbTn3Byk (2): DVD aydno, noDJIepKINBaIOUe ee Do BOCbMn Ra3bIKOB 3a OdH cnIbM.
Mhoropakpcna yHKnra (B): nra DVD nckOB, npedocTabnoa BO3MOXHOCTb HeCKoJIbKnx npocmotpoB oHOn cHebl.
Cy6TnpyI [3]: noDepKka do 32 r3bIKOB.
Bocnpo3BeHHe My3bikalhbx faiIOB MP3 c CD-R/CD-RW kOIMnKr-DnCKOB. Homep pernoHa yCTaHOBJIeH, OCHOBbIbAraCb Ha pernoHe npOaXn; Homep pernoHa 6o3NaeH Ha Kopo6Ke cJeDyUOuM o6pa3OM:


DivX CertifednBocnpon3BeDeneHr DivX BnDeo, BKJIouaI npemmyM-KOHTeHT.
HEMOTO O DIVXVIDEO:DivX - 3TO uHpOBoB BnDeo oOpMaT, co3aHHbIKOMpaHnei DivX, Inc. 3To oHuaJIbHO cepTuHpUPOBaHHe yCTpoIcTBO DivX
1. NAPAMETPbI
Certified [dЯ npoɪrpbɪBaHnɪy DivX Bɪdeə. [dЯ noŋyuēHnɪ 6oJIe e nɒdpoBHO nHΦopMaци, a TAKKe npoɪpɑmMHorO oBeCneueHnɪ dIy KOHbεrTaци BaɪeRo BɪdeO B φopMaT DivX, nocetιte caɪT divx.com.
HEMHORO O DIVX VIDEO-ON-DEMAND: 3To cepTnФицрованhoe DivX Certified yctpoIcTBo Heo6xOДIMo 3apeRicTpnpoBaTb ДЯ BOCPpOIN3BEdENr npNo6peTeHHbIX ΦnIbMoB DivX Video-on-Demand (VOD).ДЯ noLyuEHNr peRicTpaCOnHOro KoJa, NaIdnte pa3deN DivX VOD B MeHIO nactpoiKn BaWeero ycTpoIcTBA.ДЯ noLyuEHNr DeTaIbHO INΦopMaunO 3aBepSeHNn peRicTpaCUn, nocTe nte vod.divx.com.
DivX, DivX Certified, a TakaKe BCE doUeHne IIOROTnblЯBnIOTcT OTOBbIMN MapkAmu DivX, Inc.,nx nCNoJIb3OBAHne NODJIeKNT NIIeH3nPOBaHnIO.
2. MEPbI INPEДОCTOPOXHOCTN
OTka3 OT co6JIIODeHnAaHHbIX Mep npeIOcTOPOXHOcTeM MoKeT pINBeCTN K NOBpeKdEHNIO BaWeO aBTOMo6nIa, MOHTopa NII NCTOCHNka BIndeO IN MoKeT aHHyIpOBaTB rapaHTNU.
ПО BCEM BONPOCAM, He OROBOPEHHbIM B DaHHOM pyKOBOdCTBe, obpaaItec b K BaUeMy MeCTHOMy DnJIepy KomnaHn Clarion.
ФУнКЦИОНЮВАнUE
He 3KcnpnyatnpyTe daHHoe n3dJIne INHbIMN cnoCobAMn, Yem Te, KOTOpBie ONIcaHbI B daHHOM pyKOBOIDCTBe.
- Otka3 OT co6JIIODeHnI HNCTpyKcIIM MOKeT aHHyIInpOBAt b rapaHTnIO.
He nCnoJIb3yIte yCTpoIcTBO C BblKJIIOUeHHbIM 3aXnIraHneM. 3TO MOxET pa3pIITb aKKymJrTOP aBTOMo6nIg.
- Ecnn BnytpenHnra TemnepaTpa TpaHcnpTHoro cpeCTBa OyeHb Bblcokar (60nee 50 rpaDycob no LcIbCnIO) - OxlaNTe HEMHOr yctpoNCTBO nepeN CNOJb3OBAHNem.
- EcINB aBTOMo6nIe OueHb Hn3KaJ (HNKe -5 rpaDycOB LcJIbCn), BKIOUChHe yCTpoiCTBa NocIe TORO KaK Bbl 3aBeJIb aBTOMo6nJIb IN BKLIOUHIn OTOINTeHBi npIbOp, MoKet Bbl3BaTb φOpMnPoBAHne BlaRn B yCTpoiCTBe. B TeueHne Yaca He BKNIOUaIte yCTpoiCTBO. OTka3 BblONHЯTb DaHHble Mepbl MOxET Bbl3BaTb yIap 3JIeKTPnueckm TokOM. Ipeed nCNOJb3OBAHnem yCTpoiCTBa n03BOJbTe KOHdEHCATy nCnapITbcra
- Пи очень НИЗКИХ ИЗOBрахе"Hne может ьITь ТЕмныIM И "ПОДТOPмЖИВаТь". Диспел ВОЗВрацаETСВ В HOPмальhoe COCTОHne рNi ПОДБЕМ TeMпераТурbl.
- Пи ИспОЛьЗOBAHи yCtpoIcTBA, y6eДntecb, YTO BAw peMeHb 6e3ONaCHocTn
-пстETHyT nIи HaxOДNTcB B NOLOKeHn 6e3ONaCHocTn.В npOTINBHom cIyae Bbl
- можete yIu6NtbcR, ecn BODITeNB BHe3aHNO 3aTOPMO3rT. Пи HeCuaCTHom cIyae
-Травмы мOrYt 6bITb 6OJIecePbE3HbIMn, ecn BAw peMeHb 6e3ONaCHocTn He
-пстETHyT.
- Ipeed Tem, KaK NOKHyTb TpaHCnOpTHoe CpeDCTBO, BbIHbTe DnCK N XpaHnTe erO OTdEJIbHO BdJIHOT COJIHeuHOro CBeta. NObBIeHHaR TeMnepaTypa N BJIaXHoCTb MOrYT NOBpeDHTb DNCKN, CTAB pINuHOn OTCyTCTBn IN X pONIRpbIbAHnI.
OBUHE NOLOXKEN
He octabnIte MOHITOp OTKpbITbIM, KOrda yCTpoiCTBO He nCNoJIb3yeTc. IprMoN CoJIHeuHbI CBET MoKeT Bbl3BaTb HEnpaBnIbHyO pa6Otu MOHITopa.
He BewaIte H He CHMaITe HnKaKne IpeDMeTbIC NOTOnOuHOro MOHITopa.
He BnBaIte JxNIOCTb BycTpoiCTBO n He BCTaBnIe IOCTOpOHnE IpeMeTbIB Cnot DnCKOBoDa DVD.BoDa, BnaXHOCTb NIOCTOpOHnE IpeMeTbIMOryT NOBpeHtB BHyTpEHnE CXembl.
Ecni yctpoiCTBO cTahOBHTcB BJaXHbIM - OTKJIouHTe BcE NITaHne i NOCOBetyTEcb C aBTOpN3nPOBaHHbIM dIInepom KomnaHm Clarion hacet o6cnykBaHn. He 3KcNllyaTnpyIte yctpoiCTBO, noka OHO He 6ydet npoBepeHo n OTPMOHTnpoBaHO.
He poHraIte yCTpOcTBo n He yApAaTe naHeJIb XXK aKpaHa - Bbl MoXeTe Bbl3BaTb DOJIOBpeMeHHbIe NOBpeJdEHHa.
- Ecnn JKK kpan pa36nncs - n36eaiTe npNKoCHOBENK CTeKny JxNkocTn. Ecnn Bbl
2. MEPbI IPEDOCTOPOXHOCTN
PnKocHyncB K XnDkoCTN - CMOIe e c TeJa N/Inn C OJekdbI 6OJIbIM KOINueCTBOM BODbl, 3aTeM O6paTntEcB 3a MeiunHCKoN NOMOu.
TEXHnueCKOE OBCJyKINBAHNE
He ouuau Te noBepxHocTb KK 3KpaHa xIMnueckmnpactBopnteJMaN nn pa3beaIOUmm CpeDCTBaMn. B pe3yIbTaTe moKeT npOn3oITn DOJIROBpeMeHHoe NOBpeXdEHNe MOHtOpa. N36eraIte nCNoB3OBAHnA abpa3HBhIX MOUux CpeDCTB. IJa YnCTKn INcNoB3yIte MmKyIO, BnaXHyTO TkaHb.
He demoHTnpuIte n He moHnOuIpUyTe daHHOe yCTpoINCTBO. Bb MoKeTe NOBpeINtB MOHITOp, aHHyIpOBaTb rapaHTNIO IN oCtpaDaTb OT 3JIeKtPOwoka. MoHnΦnKauzna DaHHoro yCTpoINCTBa aHHyIpuyET cepTnΦnKaTbI 6e3OnaCHOCTn.
YCTAHOBKA
YCTaHOBka Mo6nIbHbIX ayDIO N BnDeO KOMNoHErOB Tpe6yET ONbITa IN PRAd a
MexaHnuecknx I TexHnuecknx npoceDyp. HecMOTpHa To, YTO daHoe pyKOBoIDCTBO
PpeOCTaBnEeT nHcTpkyCmN IO o6uEYCTaHOBKe I EKcPnyaTaCmN, OHO He ONcBIAe
ToUHbIe MeToDbI yCTaHOBKn DnA BaUero KOHKpeTHOrO aBTOMo6nJIa.
EcnBbI He o6naeTe Tpe6yembIMn 3HaHnMaMn, ONbITOM N/INN HCTpyMeHTaMn DJIy ycneHNo yCTaHOBKn - npOKoHCyNbTnpuYteCb C aBTOpn3nPoBaHHbIM DInepom KOMNaHnClarion no NOBody npocceccnoHaJIbHOy yCTaHOBKn.
3. ΘΙΕΜΕΝΤbI UYPABJIΕΗΝ
MOHNTOP 3AKPbIT
Bud ha nneep npraMo cHu3y c 3aKpbimou naHelenbIO KK 3kpaHa.
Функцин КНОК (MOHHTOP B 3aKpbITOM NOLOXeHHN)

Khonka BknioueHna

KhoIka MeHIO

KhoNka BbIbopa NCTOUYHnKa
HaxmTe nBkIoueHn nn BbIKIOeHn nIeepa.
OTkpbyBaet onepaunOHoe MeHIO. ChOba haxMnte JIy IocneIOBATEbHoro BbIbopa KaKdOro NyHKTa MeHIO.
BbIbupaet nCTOuHnK BXoHOro BnDeocnHaJa: DVD-IN, AV IN1 nII AV IN2, DVD/USB.
PIMMEAHNE:ДЯпсклочень ржUM USBпсклочТecьВ ржUM DVD,a 3aTeM BCTaBbTe USBВ npT.ДЯпсклоченьВ ржUM USB,haxOJaCBВ pexKMeDVD,нaxMITEиудрхиBaIte 3Ty KHONKy TBeueHne2cekynd

Khonka yMeHbWeHn
UMeHbShaetpOMKocTbBOBpeMBOcnpOn3BeDeHnA.B
| KhoIGNka уveileчения | peşсime MENU нахмite дя вьбора похнero рункta meию. |
| Увелочьает гомковсть BO время похлеведения. В peşсime MENU нахмite дя вьбора ворхero рункta meию. | |
| КhoIGNka преыдуши | пөрөдүлүдүшөмүхөтү Ha DVD-dиске ил төрөдүлүдүшөдүхөдүлүдүдүхөдүхөдүхөдүхөдүхөдүхөдүхөдүхөдүхөдүхөдүхөдүхөдүхөдүхөдүхөдүхөдүхөдүхөдүхөдүхөдүхөдүхөдүхөдүхөдүхөдүх线索. |
| КhoIGNka Следуши | пөрөдүлүдүшөмүхөтү Ha DVD-dиске ил төрөдүлүдүшөдүхөдүхөдүх线索. |
| КhoIGNka octahobkn | Длг оctановки ворхиме один раз.НөхмITE кногу ворхиме ворхиме/пay3a дяВозбновлени C места, на КOTOPOM OCTAHOBINCS рпeeр.Длг полно octановки пeeра двaxды нахмite 3ту кногу. HαхмITE кногу ворхиме/пay3a дяначала ворхиме/пevelа диска. |
| КhoIGNka octahobkn | Борсponиэвдит пли CTABIT диснHa пay3y. |
| KhoIGNka n3вileчения | ИзBLEкайет дисk. |
| KhoIGNka otkpbltna moHITOPa | ИзBLEкайет паллжжжжжжжжжжжжжжжжжжжжжжжжжжжжжжжжжжжжжжжжжжжжжжжжжжжжжжжжжжжжжжжжжжжжжжжжжжжжжжжжжжжжжжжжжжжжжжжжжжжж化. |
| Выклочаел notolochoro палфona | Конфигурирует полочьий палфон: BKПЮЧЕH, Выклочeuен Yлл akтувируется дерам. Для руного Выклочeuен Yлл выклочeuен CBeta -пeрдвиньтеш Выклочаел B пооженя ON/BKПЮЧЕH, пли OFF/BыклочeuEN. В пооженя.akтувцидberам ABTomobиля - notolochуньий палфон BKПЮЧЕТСЯ и Выклочаetся рпи OTkpbltni и 3akpbttin дepeи abTomobиля. |
ПРИМЕЧАНЕ:
BbIKIOUaTeJIb NOTOLOHOro PnlaΦoHa pa6Otae TToIbKO B TOM cIyue, KOrda 3eJIeHbI NpOBOD NOTOLOHOro PnlaΦoHa coeINHeC DaTChKOM DBepN, INpeKeKNHOaTeJIb NOJRAPHOCr IpaBnIbHO yCTaHOBNeH. Dnra CoeINHeHn IAeTanei CMOTPnTE CnpaBOuHKn IO 3JeKTPocXeMaM TpaHCnOpTHORO cpeDcTba.
MOHNTOP OTKPbIT
Bud ha nneep npraMo chu3y c omKpbimou naHeIbIO KK 3kpHa.
Функцн КнОК (MOHHTOP B OTKpbITOM NOLOXeHN)
BbiklnoyataeIb
BknioaetKK3kpan
KKKekpaha
KhoNka c6poca
Для ВОЗВраТа BCex HAcTpoEК Ha 3aBOДСКи, NO yMOЛчанIO NaXMITE KapaHДaшOM ИПДугIM INHCTpyMeHTOM C y3KIM HAKOHeuHnKOM.
OTBepTne In
IcnoB3yeTcA DnI npKpeHnna nHeepa K yCTaHOBOHOn nnactnHe.
BnD CbOKy
BbIKJIIOUcHHe NJIeEPA
Haxmte KhoNky BkIIOueHnry/BbIKIOueHnry () dny BbIKIOueHnry nneepa.
Ecn npnnpbIbaetc CD nnn DVD-dnck Bo BpeM BbIKnueHn nTaHn ero NOBTOPO BRIOUeHn, nneep 6ydt npdoJXaTb BocnpOn3BeDeHne C TORO MeCTa, rde OH OCTaHOBUNC.
PpumeyaHue:
Ecnu nneep biknoueh, bHe cmoxeme u3neyb DVD unu CD duck u3 nneepa.
N3MEHEHNE OTHOUIEHNI KADPA KBbICOTE
UTo6bI n3MeHnTb oBsqHe hAcTpOKn 3KpaHa, nCNoIb3yIe peXIM 3KpaHa, KOToPbI KOnTpOJIpyE T OTHoUSeHne 7uRpNbI KaIpa K BbICOTe Ha OTo6paXaEMOM CnHane DIncPiJe.
He octabnIte Hayunu B MeCTax nonaHna npMOro cOnHeuHoro CBeta nIN BO3dEiCTBnA BbICOKnx TemnepaTyp.
IK npHmHK HayuHKOB, y3BMBK K npoJXHTbHOMy BO3DeIcTBIO npMORO COJIHeHOrO CBeta, MoKET NocJyKtB npuHnOH nIoxoro KaecTba 3Byka. Nepei NCNoJIb3OBaHHem DaIte HayuHKam OCTbITb.
IPEIOCTEPEXEHNE!
He uonb3yime HayuHuku 60 epeMa 60kdeHu.
KomnoheHmbi Haywhukoe
YcmaHOeKa 6amapeu E HayuHuku
EcnBbI NcNoB3yete CnCTemy BnepBbIe - yctaHOBnTe 6aTapeN B HayuHnKn. EcnBbICblIHTe NCKaxKHeHHbI 3ByK, KOTOpbI npepbIbAeTcra - 3aMeHnTe 6aTapeN.
- NObepHInTe JEBbI HayuHnK, YTo6bl NoJyUHTb DoCTyn K BaTapeHOMy OTceKy.
- CdBnHbTe Bn3 KpbIuKy 6aTapeHoro OTceKa.
- Пи заме He 6aTape BbInbTe pa3pJxHeHHie.
- BCTaBbTe HOBbie 6aTapeu Tuna AAA, co6IIOda noJrphOcTB, 6o3HaueHHyIO BHyTpNi 6aTapeHoro OTceKa.
- 3aBnHbTe Ha3a KpbIuKy 6aTapeHoro otceka.
Kpbilika omceka
bamaepuhozo
YcmaHOBneHHbIe 6amapeu
KpynHbI nlaH c ycmaHOBJIeHNbIMu bamaepaMu
Hacmpouka apomkocmu
PeryjIaTOp rPOMKoCTn HaxOJntcH Na HayuHnKax. NObepHInTe uKaany rPOMKOCTn BBepx IIN BHN3.
PpumeyaHue:
Mozym cnblwambc HekomopbIe wMbI, 3aBucuue om npo2paMMbI KodupoBaHua, uCnoJb308aWeue c npu 3anucu. 3mu wMbI He 6bl38aHbI MoedJIbIO VT1010E/VT1510E
Ppmaou coJneuHbU ceem u kpaHue cmeneHu memnepamyp
He octabTnIe HayuHnKn Ha npMOM COJIHeuHOM CBety nJIn npN 3KCTpeMaJIbHbIX TemnepaTypax.
ПОНТPBIBAHNE DVD-ДИСКOB
Ocmyn K 2naHOMy MeHIO
DVD-DINCK pa3deJHn Ha H3BaHnI n CIOXeTbI. IaBHOe MeHIO NOKa3bIBaET COePxIMoe DnCKa.
HeKOTopbIe DVD-DnCKN I03BOJIAOT Bbl6npaTb ONcH NBOCPpon3BeDeHnR N3 rnaBHOro MeHIO DVD-DnCKa.ДЯdoCTyna K rnaBHomy MeHIO DVD-DnCKa - HaxmTe KhoNky BO3BPAT/RETURN nnn KhoNkY HA3BAHNE/TITLE Bo BpeM RAocpon3BeDeHnR.
HΦopMauaOcocmHaHuu
IcnoJb3oBaHue cy6mumpoe
Cy6TnTpbl 0bUHNO OTKJIOueHbI
PpumeyaHue:
Cy6mumpbdoJIOCHbI 6bIm b3anucahbHa DVD-ducke. Hekomopbie DVD-ducku omKpbBaIOM docmyn K cy6mumpam uepe3 MeHIO DVD-ducka.
- Дя вклюецни сбтntpoB haxmnte KhoNKу Cy5TNTPbI/SUBTITLE. Пиep оображaelTekuyш Homep И ha3BaHneЯ3bika n obuee KoJInueCTBOЯ3bIKOB,Дя KOToPbIXdoCTynHbIc6TNTpbl.
- Ecnn DVD-Dnck npedocabnaet cy6tntpbl dny HeckoJbKnx Ra3bIKOB - nny N3MeHnna Ra3bika cy6tntpoB npodonkaite haxmabTkONky Cy6TNTPbl/ SUBTITLE.
-
Дя Вьклоченяcy6tntpoB haxmmaTe KhoNKy Cy6TNTPbI/SUBTITLE noka Ha ekpaHe He OTO6pa3ntcHaDnncb "cy6tntpblOTKIOUeHbI/subtitle off".
-
OTo6paXeHne onuN cy6TnTpoB aBTOMaTHueCKn IcYe3HeT, ecN Bbl NDoXdTe Tprn CeKyHDbI.
Iopmop cokemoe u Ha3aHuHa DVD-duke
Для NOВtopa сожеТа ИИн Ha3BaHЯ BO BpeMЯ BOCIpOu3BeDEHЯ npoJoxKaITe HaKIMaTb KhoNky IOBTOP/REPEAT ДпчepedOBaHЯ onци.
CioXeT/Chapter - noBToPraTeKyuIuI CIOXeT.
Ha3BaHne/Title- NOBTopraTe TekuIee Ha3BaHne.
Bce/All - noBToPraTe BCE cHKeTbI n Ha3BaHn.
- OTKIIOUeHO/Off - BO3O6HOBJAEr HopMaJIbHoe BOCnpoN3BeJeHHe.
Iopmop IIO6umbix ompbieKoe
Дя NOВTOPа Лобимоу OТьвka, ChaЧаа Bы ДОЛжны OTMeTиТь, Ге OH NaUnHaETсЯ 3akAHnBaETcra.
- Hauhnte Bocnpon3BeJeHne DVD-dncka.
- Дя обозанения нада вазero Лобимою OTPыВka (Toчka A) нажмITE Конky A-B KOrda OTpbIbOK HaHET BOCIpOu3BOdntbcr.
- Дя обозанения Конца Baшero Лобимою OTPыВka (TOUka B), сюва нахмITE коньу A-B korда ВоспponЗбени DoCTURHT KOHца OTPыВka.
Дя NOBTOpeHnA 3TORO OTPbIBKa HaxMnte KhoNky A-B Ha nyIbTe Y.ДЯ OTMeHbI NOBToPa BocnpOn3BeHnA IN BO3o6HOBJIeHnA HopMaJIbHOrO BocnpOn3BeJeHnA CHOBA HaxMnte KhoNky A-B.
I P E D U N P E X K D E H N E!
I3meHnua uUu moUdukauuu daHnoo mobapa, He pa3peWHe HbIe npou3Bodumenem, aHHyIpyom zapaHmuu u hapwaiom cepmuDkauuo 3HaKa E
Ynctka npIbTa dNCTaHcNoHHOrO ynpabJIeHnA
ДячNTипьтадистанционногуypаВлелЯсToькQuHCTyO,MЯгkyO, BnaJxHyTOKaHb. He nCnoIb3yIte 3axnIraTeIbHbIe xNdkOcTn,MeTN cNInrT n Dpyrne pactBopnteJIi
OuInCTka DnCKOB
Ipeed Bocnpoun3BedeHnem DnCKA BbITpnte eO n3 ueHTpa K kpaHO uCToM MrgKo TprKnO.
3AMEHA BATAPEB DINCTAHUHHOM YIPABJIENH
BaTapeH Heo6xOIMO 3aMeHrTb, KOrda KhoNkHa npIbTe Dy nepeCTaOT pa6oTaB nnn KOrda Bam HyXHo npiDbnRaTbcra 6nIXe K nneepy dJra TORO, UTObl npIbT Dy pa6oTaN.
Mepbl npedocmopoxhocmu
- IinkBnDnpyuIte nCnoJb3ObaHhbIe 6aTapeN doJXhIM o6pa3OM.
He NIKBnDnpyTe nCNoIb3OBAHHbIe 6aTapeN, 6pocNB IN B OROHb. B npOTnBHom cnUyae, OHN MOrY T B3OpBaTbcra.
He 3ambkaTe NOJIOKNTeBHyO (+) nOTpuCaTeBHyO (-) KIeMMbl.
XpaHnTe 6aTapeB ynaKOBKe BdaIbO nO t deTei. OHI MOryt 3aOxHytbc8 6aTapee npu nonbITke eE nporNToTb IIN pa3KeBaTb.
4.3KCNJYATAU
Popdoek deucmeua
PpumeyaHue:
MOnTax nIeepa (VT1010E)
MOnTax nIeepa (VT1510E)
- Choba nokJIOHHTe aKKyMyJrTOP.
- ПоверпстОн-сИгнавы ABTomOБиЯ, уka3aTeПи NOBOPOTOB, DBOPHи И Др.ДлТOrO,чTOбbl ybeNTbcr,чTO OHH pa6ToAOT NaIpeJaxm O6pa3OM
MOHTAXHAR CXEMA
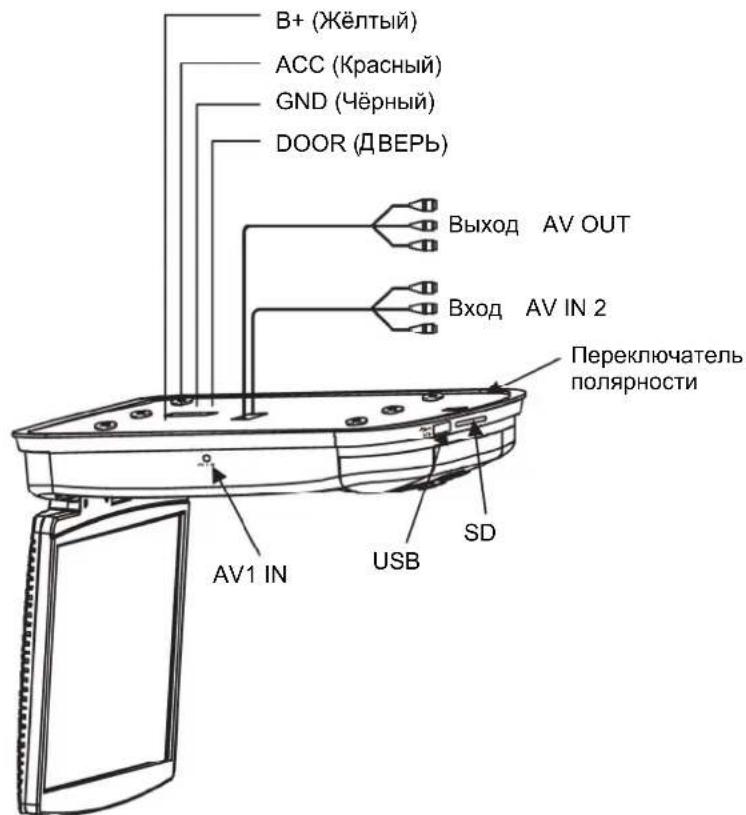
VT1010E CoeHHeNHa Ka6JeI
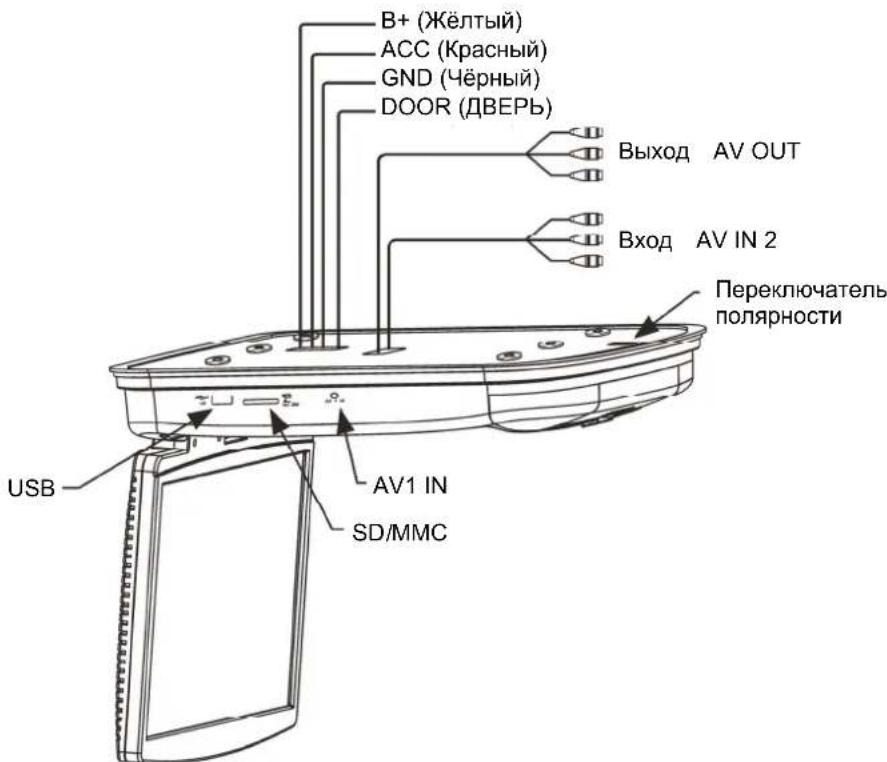
VT1510E CoeHeneHa Ka6eNe
6. ПЕДПОЧИТАБLE HACTPOДКN
ДОCTУП KЭКPAHHOMY MEHIO
BkIIOUaET N BbIKIOUaET TITpbI. IOn3nua
BKJIHOUHEO/ON aKTnBnpyeT TnTpbl. Po3nua BbIKJIHOUHEO/OFF DeaKTnBnpyeT TnTpbl.
Bknioaetnn BbIKIOaET yHKcHIO 3KpaHHo
3ACTABKA/SCREEN
3acTabKn. N03nue BKNIOUOHEHO/ON aKTNBnpyeT yHKnIO 3KpaHNO 3acTabKn.
SAVER
Позиця ВыКЛIOUEHO/OFF Функцию эКраHHоу 3аCTaBKN.
HACTPOIKN DINHAMNKA
3Ta cTpaHnua ynpabIaTe TOnCnIaMn DInHaMnKa.
DOWNMIX
Приименяет 3Byk Dolby digital. Бы He можete ИзMeHNTb 3Ty ONцИю, КOTOPа NOCTОнно HabTpoeHa Ha BbIBOd CTpeOcNrHaNbI, KOTOpbie Ппeep BbIBOДТ Ha Левий И праВьй kaHaNbI pa3bEМOB RCA.
PPEIIOUTEHIN
JaHHa cTpaHnca ynpabJareT obzmm npednoptyenm cnCTembl.
JIEEP HE BKNIOHYAETC
3aXnraHne aBtOMo6nIa MoXeT 6bITb BbIKIOueHo. BKnIOuHTe 3aXnraHne B noJoxeHne ACC (YcTpoiCTBa).
-Плесь можетьн He BкючeH.Вкючite nntaHne Плеса.
Ha nIeepe moKet 6bITb KOHdeHcT. IIOJoxdnte B TeueHne Yaca, Noka KOHdeHcAT He nCnapNTcA.
- PpeOxpaHnteMgYT 6bITb cropeBwIMn. IpoBepTe ppeOxpaHnteN Ha KOHax MOHTaXbIX KaBeJeM OMHToPA N B TpaHCNOPTHom CpeCTBE.
- Pnep MoKet 6bITb OTKJIIOueH. PpOBepbTe BCE coeINHeHnA. CmOTpnte HNCTpyKcnn NO VCTaHOBKe.
Bo3MOxHO,6aTapenBpyIbTeDHyHxJaOTcB 3aMeHe.
JIINH3bIK-NopTa nyIbTa DY MOryT 6bITb 3aRpy3HeHbI. IpoTpTe JINH3bIMrKoBnBnaXHOJ TkaHbIO.
JIEEP BKJIOUeyH, HO JNCK HE IPOUNPbIBAETC
- INCK MOKET 6bITb HENpABUNbHO BCTaBHe. BCTaBTe INCK CHOBa HAKJeIKoB BBepx (INUEBOI CTOPOHIO K NOTONKY ABTOMO6nJI).
- OFOMAT DINGKA MOKET HE NOIDJEDPXNBaTbca.
- DnCK MoKET 6bItb Ipr3HbIM NIN NOUAPAanAHbIM. IpOTpNTe DnCK NIN 3aMeHnte eRO.
JIEEP BHE3ANHO INPEKPATN PABOTATb
B nIeep oun6ka. BbIKHouHte n cHOba BKHouHte pHeep. EcIn OH BcE eue He OTBeHaET - HaxMITE KONKv CBPOC/ RESET.
JIEEP PABOTAET HEYCTOHNBO
BaTapeN NylbTa DY Heo6xOJMo 3aMeHHTb.
3arpy3HeO OKoUko NK npTa Ha nnepe nHn Ha nyIbTe Dv. Ipotpnte Okoukn IK NOPTOB MRAKO BnaXHO TKAHbIO.
Ocna6IeHbI coeHNHeHn. IpoBepbTe n 3akpeNITe coeHNHeHn.
N3OBPAXKEHNE NEPNODNUECKN CKAET
DVD-R:ToIbKO cHTbIBaEMbl DVD-Dnck
DVD-RW: CunTBiBaembI n nepe3anncbIaembI DVD-dnck.
JPEG/JPG: Joint Pictures Expert Group - komuTeT, pa3pa6oTabuN cTaHapTbI Cxatnra rpaФнк, ocobEnho foToRpaФn.
IK/IR: INHpaKpacHbI.
NTSC: Komitet HaunohbIX TB CtaHapToB/National TV Standards - rpynnna, pa3pa6oTaba TeneBn3NoHHbIe cTaHapTbI, INcNoJb3YeMbIe B CUSA.
KK DnCnnei/LCD: KnDkoKpncTaJIInuYeckn Diucnnei -TexHOnOrna, NcNoJb3yEmaI HooTy6yKOB n dpyrnx MOHTOpOB dIra MaIeHbKnx KOMNbIOTePOB.
MP3: MPEG Audio Layer-3 - ctaHapT cKaTnA 3Byka 6e3 noTepr KaueCTBa 3Byka.
OSD:Диспей с оTo6paЖeHem ДОЛНHTeJbHо INHΦopMaци.
PAL: B OCHOBHOM, eBponeiCKn cTaNdapr dIpy OTobpaXeHnaAHaIOROBbIX TeNEBn3NOHHbIX CnHaNOB.
ПикSEL:КорOTКИ сИгнел AnemeHTa n3O6paJKeHЯ,camaMaJIeHbKaT OUka rpaФИчecKOrO n3O6paJKeHЯ UNI MOHITopa.
TFT (ToHKoONJIeHouHbI TpaH3nCTOp): TexHOJOrnI N3rOToBJIeHnI MOHITOpOB, B KOTOpOI DJIa CO3dAHnI MaTaJIInueCKNX KOHTaKTOB BO BpeM IpoUceCa IpOn3BOIDCTBa HAnOCaTc PJIeHKn.
SRC:Источник.
VCD:Bndeo KOMNaKT-DnCK,CTaHdapT DnIe CoXpaHeHn BnDeo Ha KOMNaKT-DnCKe.
Pakypc npocmoTaViewing angle: 3aHcaHHbIe 3apaHee aJIbTepeHaTINBbIe paKypcbI dIy OTdJIbHbIX CueH.
All Rights Reserved. Copyright © 2013: Clarion Co., Ltd.
- Contents
- FEATURES 3
- PRECAUTIONS 5
- 3.CONTROLS. 7
- OPERATIONS 12
- INSTALLATION AND WIRING 22
- SETTING PREFERENCES 27
- 7.TROUBLESHOOTING 29
- SPECIFICATIONS 31
- GLOSSARY 32
- FEATURES
- Warning!
- Flexibility
- Reliability
- Expandability
- OVERHEAD MONITOR & IMAGE FEATURES
- Note:
- DVDVIDEO FEATURES
- PRECAUTIONS
- OPERATING
- GENERAL
- MAINTENANCE
- INSTALLATION
- CONTROLS
- MONITORCLOSED
- Buttons functions (monitor is closed)
- MONITOR OPEN
- Buttons functions (monitor is open)
- SIDE PROFILE VIEW
- REMOTE CONTROL
- Remote control buttons functions
- OPERATIONS
- OPENING THE MONITOR
- CAUTION!
- CLOSING THE MONITOR
- HANDLING DISCS
- CHANGING THE IMAGE ASPECT RATIO
- PLAYING A DISC (DVD OR CD)
- Using the remote control
- Controlling playback
- USING HEADPHONES
- Headphone components
- Installing batteries in the headphones
- Setting the volume
- Direct sunlight and temperature extremes
- PLAYING DVDs
- Accessing the root menu
- Status information
- Changing languages
- Using subtitles
- Repeating DVD chapters and titles
- Repeating favorite sections
- Changing viewing angle
- Zooming in and out
- Adjusting picture quality
- PLAYING AUDIO CDs
- Displaying CD information
- Repeating CD tracks
- PLAYING MP3s
- MP3 icons
- Procedure
- MP3 controls
- Repeating MP3s
- USING THE USB STORAGE AND SD/MMC CARD
- FOR VT1010E ONLY
- Using memory card
- CARE AND MAINTENANCE
- Cleaning the monitor
- Servicing the monitor
- Cleaning the remote control
- Cleaning discs
- CHANGE THE BATTERY IN THE REMOTE CONTROL
- Precautions
- INSTALLATION AND WIRING
- WHAT IS INCLUDED IN THE BOX
- BEFORE YOU BEGIN
- MOUNTING AND WIRING PRECAUTIONS
- INSTALLATION PROCEDURE
- Set the polarity switch
- Install the ceiling bracket and cables
- Connect cables
- Install the monitor
- WIRING DIAGRAM
- SETTING PREFERENCES
- ACCESSING THE ON-SCREEN DISPLAY MENUS
- GENERAL SETUP PAGE
- SPEAKER SETUP PAGE
- PREFERENCE PAGE
- TROUBLESHOOTING
- PLAYER DOES NOT TURN ON
- THE PLAYER SUDDENLY STOPS WORKING
- THE PICTURE OCCASIONALLY SKIPS
- THE PICTURE IS BLURRED
- THE PICTURE IS VERY DARK
- SPECIFICATIONS
- 9.GLOSSARY
- NAPAMETPbl
- IpeDocTepeXeHne!
- Ppncno6jraemoctb
- HaedxHoctb
- Bo3MOxHocTb paCUnpeHnA
- IAPAMETPbMOHHTOPA N OTOBPAXAEMOTO CnHaja
- PpumeyaHue:
- IAPAMETPbI DVDVIDEO
- NAPAMETPbI
- MEPbI INPEДОCTOPOXHOCTN
- ФУнКЦИОНЮВАнUE
- OBUHE NOLOXKEN
- MEPbI IPEDOCTOPOXHOCTN
- TEXHnueCKOE OBCJyKINBAHNE
- YCTAHOBKA
- ΘΙΕΜΕΝΤbI UYPABJIΕΗΝ
- Функцин КНОК (MOHHTOP B 3aKpbITOM NOLOXeHHN)
- ПРИМЕЧАНЕ:
- MOHNTOP OTKPbIT
- Функцн КнОК (MOHHTOP B OTKpbITOM NOLOXeHN)
- BnD CbOKy
- BbIKJIIOUcHHe NJIeEPA
- N3MEHEHNE OTHOUIEHNI KADPA KBbICOTE
- IPEIOCTEPEXEHNE!
- KomnoheHmbi Haywhukoe
- YcmaHOeKa 6amapeu E HayuHuku
- Hacmpouka apomkocmu
- ПОНТPBIBAHNE DVD-ДИСКOB
- Ocmyn K 2naHOMy MeHIO
- HΦopMauaOcocmHaHuu
- IcnoJb3oBaHue cy6mumpoe
- Iopmop cokemoe u Ha3aHuHa DVD-duke
- Iopmop IIO6umbix ompbieKoe
- I P E D U N P E X K D E H N E!
- Ynctka npIbTa dNCTaHcNoHHOrO ynpabJIeHnA
- OuInCTka DnCKOB
- 3AMEHA BATAPEB DINCTAHUHHOM YIPABJIENH
- Mepbl npedocmopoxhocmu
- 4.3KCNJYATAU
- Popdoek deucmeua
- MOHTAXHAR CXEMA
- ПЕДПОЧИТАБLE HACTPOДКN
- ДОCTУП KЭКPAHHOMY MEHIO
- HACTPOIKN DINHAMNKA
- PPEIIOUTEHIN
- JIEEP HE BKNIOHYAETC
- JIEEP BKJIOUeyH, HO JNCK HE IPOUNPbIBAETC
- JIEEP BHE3ANHO INPEKPATN PABOTATb
- JIEEP PABOTAET HEYCTOHNBO
- N3OBPAXKEHNE NEPNODNUECKN CKAET
Brand : CLARION
Model : VT1510E
Category : Car video screen