
CFVDM312U - DVD player PANASONIC - Free user manual and instructions
Find the device manual for free CFVDM312U PANASONIC in PDF.
Frequently Asked Questions - CFVDM312U PANASONIC
User questions about CFVDM312U PANASONIC
0 question about this device. Answer the ones you know or ask your own.
Ask a new question about this device
Download the instructions for your DVD player in PDF format for free! Find your manual CFVDM312U - PANASONIC and take your electronic device back in hand. On this page are published all the documents necessary for the use of your device. CFVDM312U by PANASONIC.
USER MANUAL CFVDM312U PANASONIC
THIS PRODUCT UTILIZES A LASER.
USE OF CONTROLS, ADJUSTMENTS OR PERFORMANCE OF PROCEDURES OTHER THAN THOSE SPECIFIED HEREIN MAY RESULT IN HAZARDOUS RADIATION EXPOSURE.
DO NOT OPEN COVERS AND DO NOT REPAIR YOURSELF.
REFER SERVICING TO QUALIFIED PERSONNEL.
12-E-1
WARNING!
DIESES PROUKT ERZEUGT LASERSTAHLUNG.
Federal Communications Commission Radio Frequency Interference Statement
Note: This equipment has been tested and found to comply with the limits for a Class B digital device, pursuant to Part 15 of the FCC Rules. These limits are designed to provide reasonable protection against harmful interference in a residential installation. This equipment generates, uses and can radiate radio frequency energy and, if not installed and used in accordance with the instructions, may cause harmful interference to radio communications. However, there is no guarantee that interference will not occur in a particular installation. If this equipment does cause harmful interference to radio or television reception, which can be determined by turning the equipment off and on, the user is encouraged to try to correct the interference by one or more of the following measures:
- Reorient or relocate the receiving antenna.
- Increase the separation between the equipment and receiver.
- Connect the equipment into an outlet on a circuit different from that to which the receiver is connected.
- Consult the Panasonic Service Center or an experienced radio/TV technician for help.
Warning
To assure continued compliance, use only shielded interface cables when connecting to a computer or peripheral. Also, any changes or modifi cations not expressly approved by the party responsible for compliance could void the user's authority to operate this equipment.
This device complies with Part 15 of the FCC Rules.
Operation is subject to the following two conditions:
(1) This device may not cause harmful interference, and
(2) This device must accept any interference received, including interference that may cause undesired operation.
This device is Class B verified to comply with Part 15 of FCC Rules when used with Panasonic Notebook Computer.
Responsible Party: Panasonic Corporation of North America
One Panasonic Way
Secaucus, NJ 07094
Tel No:1-800-LAPTOP5 (1-800-527-8675)
6-M-1
For Canada
Canadian ICES-003
This Class B digital apparatus complies with Canadian ICES-003.
Declaration of Conformity (DoC)
"Hereby, Panasonic declares that this DVD Multi Drive Pack is in compliance with the essential requirements and other relevant provisions of EU Council Directives."
Authorised Representative:
Panasonic Testing Centre
Panasonic Marketing Europe GmbH
Winsberging 15, 22525 Hamburg, Germany
Introduction
Thank you for purchasing this Panasonic product ^*1 .
This drive connects to the computer through the multimedia pocket.
Please read these instructions carefully before using this product, and save this manual for future use.
*1 For information about the computer(s) for which the DVD MULTI Drive Pack can be used, refer to the catalogs, etc.
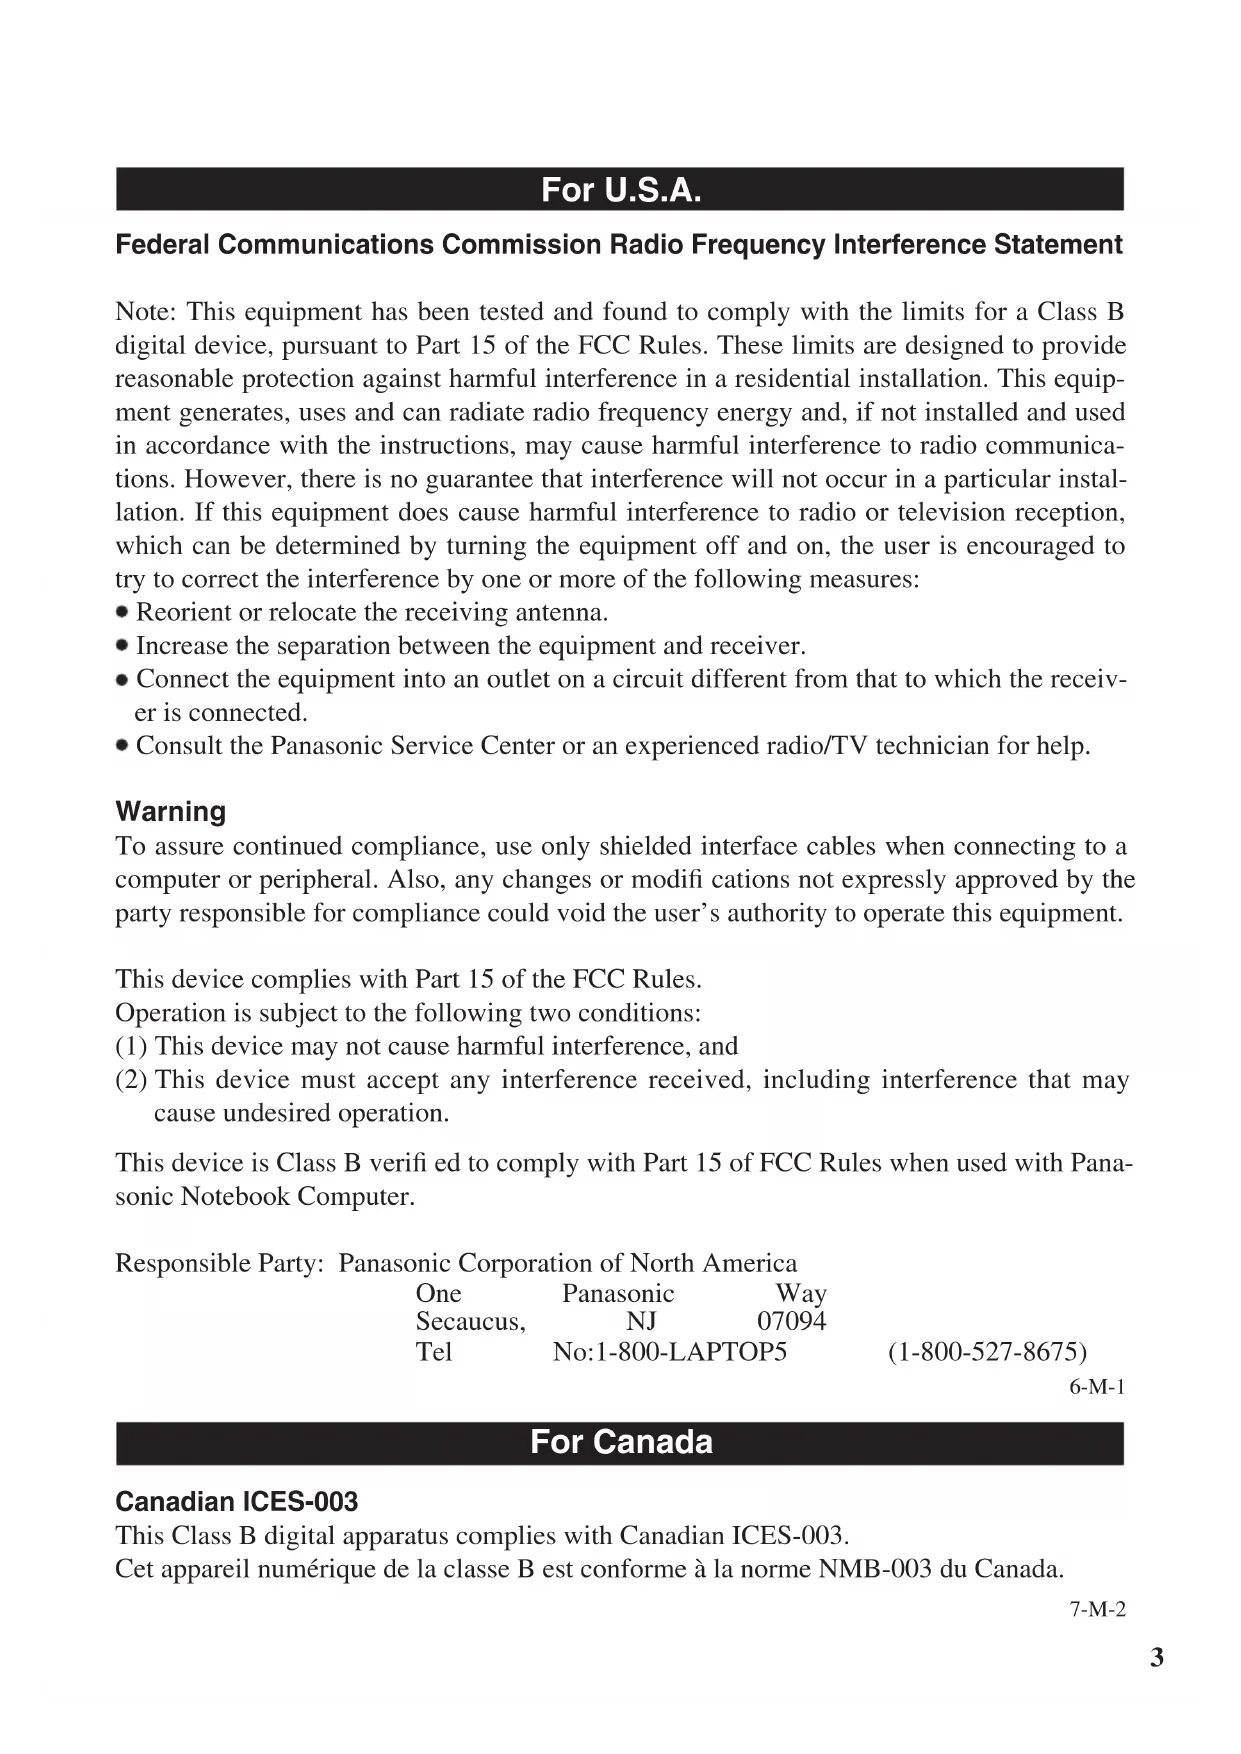
DVD MULTI Drive Pack
Operating Instructions (This book) 1
DVD Drive Utility Disc*2 1
^*2 This contains the programs used to install "Roxio CreatorTM LJB (hereafter, Roxio Creator LJB)", "WinDVDTM (OEM Version) (hereafter, WinDVD)", and "DVD-RAM Software (only for Windows XP)".
NOTE
The DVD MULTI Drive Pack may also be referred to as the drive.
- This manual explains the procedure for default settings. The procedure may differ according to the settings.
Windows 7 indicates Genuine Windows® 7 Professional Operating System.
- Windows XP indicates Genuine Microsoft® Windows® XP Professional Operating System.
- Page in these Operating Instructions or in the Reference Manual.
Refers to the on-screen manuals.
Microsoft® and Windows® are registered trademarks of Microsoft Corporation in the United States and/or other countries.
Sonic, Roxio and Roxio Creator are trademarks or registered trademarks of Sonic Solutions in the United States and/or other countries.
InterVideo, WinDVD, and the InterVideo logo, Ulead and the Corel logo are trademarks or registered trademarks of Corel Corporation and/or its subsidiaries in Canada, the United States and/or other countries.
Do Not Look Into the Drive
Looking directly at the internal laser light source may result in damage to eyesight.
Do Not Use Discs That Are Cracked or Deformed
Because the discs rotate at high speeds, damaged discs may break apart causing injury.
- Discs that are not round and discs that have been repaired using adhesives are similarly dangerous, and so should not be used.
Drive Handling Care
- Do not expose the drive to excessive smoke that may leave a residue, e.g., oil smoke, or tobacco smoke. Doing so can shorten the life of the drive lens.
- We recommend cleaning the drive lens with an air puffer used for camera lenses. (Do not use any spray-type of lens cleaning products.)
When opening/closing the tray
- When the computer is on, use the eject button (page 8) or eject through Windows.
- When inserting or removing a disc, be careful not to touch the lens and other parts of the laser pickup.
- Do not leave the tray open and do not touch the lens and other parts of the laser pickup. The laser pickup and disc can become dusty in some conditions. It may cause malfunction in reading or writing.
- Do not apply excessive force to the tray in the open position.
- Never insert a foreign object such as a paper clip into the drive. Doing so may cause malfunction.
- Do not place items other than discs on the tray.
While the drive is being accessed
- Do not open the tray or move the computer while the drive is being accessed. Doing so could cause the disc to shift position and this may damage the disc, or cause the drive to malfunction. In addition, after running an application involving access to a disc, close the application before opening the tray or removing the disc.
Disc Handling Care
- Before using a disc, carefully read the operating/handling instructions and package of the disc.
- If the discs are not handled appropriately, they may become dirty or scratched. Furthermore the writing speed may get slower and the data may not be correctly written on or read from the disc. Other damage may cause a drive failure.
Note the following precautions. - Do not touch the disc surface (the side with no printing).
- Keep the disc surface clean and free from dirt, dust, fingerprints and scratches.
- Do not write on the surface of the disc with a ballpoint pen or other writing instrument.
- Do not attach stickers to discs.
- Do not drop, bend, or place heavy objects on top of discs.
- Do not place or store discs in locations exposed to heat, direct sunlight, humidity or dust.
- If a disc is brought from a cold to a warm location, condensation may form on the disc. For read-only discs, wipe off the condensation using a soft, dry, lint-free cloth before using the disc. For recordable/rewritable discs, wait until the condensation dries.
- When not using discs, keep them in their protective cases or cartridges.
To clean discs
Wipe discs with a dry, soft cloth from the center toward the edge.
If discs get very dirty, wipe with a
moist, soft cloth from the center toward the edge, then wipe again with a dry cloth to take up remaining moisture.
Use the recordable/rewritable disc cleaner to clean these discs.
Do not use a cloth, CD cleaners or any other such cleaners under any circumstances.

How to hold a disc


Inserting/Removing the Drive
For details on how to insert and remove the drive, refer to "Multimedia Pocket" in the Reference Manual included with your computer.
Setting a Disc
1 Turn on the computer.
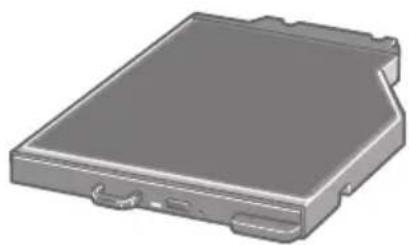
2 Slide the latch (A) and open the cover.
3 Press the eject button (B) and slowly pull out the tray.
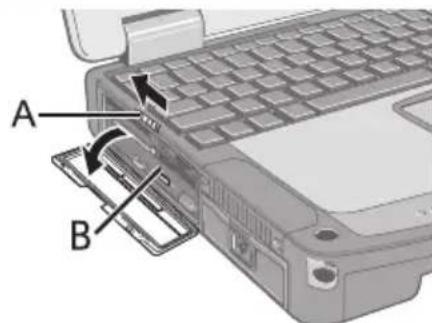
4 Insert/Remove the disc.
TO insert
Set the disc with the label side up and press the center of the disc until it clicks in place.
TO remove
Press on the center spindle (C) and carefully lift up the edge of the disc.
5 Close the tray and the cover.
Do not press the eject button.
NOTE
- To remove a disc when the computer is powered off, insert a pointed object (e.g., the bent-out tip of a paper clip) into the emergency hole (D). Pushing it to the end allows the tray to come out.
-
If the vibration of the drive is excessive, check the disc.
For AutoPlay CD/DVD: -
If an AutoPlay CD/DVD does not start after the computer resumes from sleep (Windows 7), standby (Windows XP) or hibernation, remove the disc from the drive and then reinsert it after waiting 15 seconds.
- An AutoPlay CD/DVD may start during file access depending on the status of the disc.
When playing back video from a disc, playback may not be smooth in some conditions.
Power-saving Mode
If the drive is not accessed for 30 seconds, the drive motor will automatically be shut down to reduce the power consumption. When the drive is accessed again, the drive motor is turned on. In this case, reading of the disc data will take approximately 30 seconds.
Information
To play DVD-Video or MPEG2 files, install the DVD playback software using "DVD Drive Utility Disc" (included).
For information on how to install the software, refer to page 19.
Region Code Setting
DVD-Videos are allocated to region codes according to where they are sold. To play a DVD-Video, the player's software and the drive must have the corresponding region code. e.g.,
For U.S.A. and Canada: "1"
For Europe: "2"
- The region code of the drive is not set at purchase. The operation depends on the DVD-Video that is first played.
DVD-Video with a specific region code:
The drive will automatically be set at the same region code as the DVD-Video.
DVD-Video with multiple region codes:
[Confirm Region] appears. Select the region code and click [OK]. Play now begins.
CAUTION
- You can change the region code setting up to five times including the initial setting. Be extremely careful because you cannot change the region code anymore after the fi fth change, even if you reinstalled the operating system.
- Any problem resulting from illegal changing or altering of the region code is the user's responsibility.
NOTE
- [Confirm Region] appears when the DVD-Video has only one region code and the drive is set for another region code.
([Confirm Region] may not appear with some DVD-Video discs. To check the current region code and the number of remaining times of changing the code, right-click on the [WinDVD] screen and click [Setup] - [Region].)
Writing to Discs
Windows 7
Windows 7 includes the standard function that enables you to write or rewrite data to a disc.
Windows 7
You can copy a CD/DVD or create a music CD, data CD/DVD, etc. by installing "Roxio Creator LJB" using the included "DVD Drive Utility Disc". (3 page 17)
Windows XP
Writing software is required to write data to a disc other than DVD-RAM.
Install "DVD-RAM Software" and "Roxio Creator LJB" using "DVD Drive Utility Disc"(included). (page 17)
- Be sure to use discs conforming to the proper write speeds. (page 24)
- If the write operation is to involve a long period of time, be sure to connect the AC adaptor of the computer. If the battery power runs low and the power of the computer is cut, the write operation may end in failure.
- You can read from/write to the following discs.
| CD-R | CD-RW | ||
| COMPACT DISC Recordable | COMPACT DISC ReWritable | COMPACT DISC High Speed ReWritable | COMPACT DISC Un Speed ReWritable |
| DVD-RAM*1 | DVD-R | DVD-R DL | DVD-RW*2 |
| DVD R AM | DVD R | DVD R DL | DVD RW |
| +R | +R DL | +RW | |
| RW DVD+R | RW DVD+R DL | RW DVD+ReWritable | RW DVD+ReWritable |
- You can read from the following discs.
| CD-ROM | CD DIGITAL AUDIO | CD TEXT | CD-EXTRA |
| COMPACT DISC DIGITAL AUDIO | COMPACT DISC DIGITAL AUDIO TEXT | COMPACT DISC DIGITAL AUDIO | COMPACT DISC DIGITAL AUDIO CD EXTRA |
| Video CD | Photo CD | DVD-ROM | DVD-Video |
| COMPACT DISC VIDEO CD | DVD ROM | DVD VIDEO |
^1 DVD-RAM: Only non-cartridge type or removable cartridge type can be used.
2 Does not support DVD-RW Ver.1.0.
Recommended discs for writing
The quality of written data depends on the disc.
- HITACHI MAXELL, Ltd.
Victor Company of Japan, Limited
Panasonic Corporation
HITACHI MAXELL, Ltd.
< + >
DVD discs you can use for writing
1X-SPEED (4.7 GB)
12X-SPEED (4.7 GB)
1 4X-SPEED (4.7 GB)
18X-SPEED (4.7 GB)
1 16X-SPEED (4.7 GB)
2-4X-SPEED (8.5 GB)
28X-SPEED (8.5 GB)
1X-SPEED (4.7 GB/9.4 GB)
1 2X-SPEED (4.7 GB/9.4 GB)
2-4X-SPEED (4.7 GB/9.4 GB)
2-6X-SPEED (4.7 GB/9.4 GB)
2X-SPEED (4.7 GB/9.4 GB)
2-3X-SPEED (4.7 GB/9.4 GB)
2-5X-SPEED (4.7 GB/9.4 GB)
< + >
12.4X-SPEED (4.7 GB)
1 4X-SPEED (4.7 GB)
18X-SPEED (4.7 GB)
1 16X-SPEED (4.7 GB)
< + R DL>
2.4X-SPEED (8.5 GB)
2.4-8X-SPEED (8.5 GB)
< + RW>
12.4X-SPEED (4.7 GB)
14X-SPEED (4.7 GB)
Using the Software
If necessary, install the software application contained in the "DVD Drive Utility Disc" (supplied): "DVD-RAM Software", "Roxio Creator LJB" and "WinDVD" Only for Windows XP
Before Installing the Software
- Insert the drive into the multimedia pocket. (Reference Manual "Multimedia Pocket")
CAUTION
- Do not install the software using a drive other than this drive. Be sure to insert this drive into your computer, and then insert the disc for installation.
- Close all other software application before running the Setup program for the software applications.
- Log on to Windows as an administrator.
NOTE
To play a DVD-Video, use "WinDVD". (page 19)
Windows XP
DVD-RAM Software
Use this software to write data to DVD-RAM through Explorer.
After installing "DVD-RAM Software", you can use a DVD-RAM disc.
For further information, refer to the online manual of "DVD-RAM Software" (below).
Installing DVD-RAM Software
1 Log on to Windows as an administrator.
2 Set "DVD Drive Utility Disc" in the drive.
[Utility Setup tool] screen will appear (allow some time for disc recognition).
When the setup program will not run automatically, input [x:\setuputil.exe]2 in [start] - [Run] and click [OK].
^2 "x" is the drive letter. You can change the letter to suit your preference.
3 Click [DVD-RAM Software Setup].
4 Click [Driver and Formatter Setup].
5 At the welcome screen, click [Next].
6 The License Agreement screen appears. Carefully read the agreement, then click [Yes].
7 At [Choose Destination Location] screen, do not change the setting, and click [Next].
8 At [Select Program Folder] screen, do not change the setting, and click [Next].
9 At [Start Copying Files] screen, click [Next].
10 After installation, add a check mark for [Yes, I want to restart my computer now], then click [Finish].
The computer will restart automatically.
To access the Online Manual
Click [start] - [All Programs] - [DVD-RAM] - [DVD-RAM Driver] - [Using DVD-RAM disc].
Using DVD-RAM Disc
To write a file to a DVD-RAM disc, logical formatting is required.
It is possible to write a file to a logically formatted DVD-RAM disc in the same way as writing to a floppy disk or hard disk.
For further information, refer to the online manual of "DVD-RAM Software" (page 14).
NOTE
- If you write using "Roxio Creator LJB", because the format is different, it will no longer be possible to write using applications other than "Roxio Creator LJB".
- Logical formatting type
There are two types of formatting for DVD-RAM discs: UDF (Universal Disk Format) and FAT32.
We recommend that you choose the formatting type depending on the application.
- Logical formatting
Formatting software and drivers required to conduct each type of formatting have been installed in this computer.
CAUTION
- When formatting is executed, recorded data is erased and can no longer be read. Back up data as required.
- Before starting up formatting software, close all application software that uses DVD-RAM discs.
1 Log on to Windows as an administrator.
2 Set the DVD-RAM disc to be formatted in the drive.
3 Click [start] - [All Programs] - [DVD-RAM] - [DVD-RAM Driver] - [DVDForm].
4 Click in [Format Type] to select the format, and click [Start].
- [Volume label]
Input the volume label.
- [Execute physical format]
Inspect all sectors on the disc, and execute replacement processing of bad sectors.
Normally, it is not necessary to select this.)
NOTE
- DVDForm can be used only when logging on with administrator authority.
Roxio Creator LJB
"Roxio Creator LJB" is CD/DVD writing software application developed by Sonic Solutions. Here, explanations are given on general information about "Roxio Creator LJB," the installation procedure, and how to access the online manual. For further information, refer to the online manual of "Roxio Creator LJB" (page 18).
General Information
- What you can do with this software application
- Creation of music CDs and data CD/DVD
- Creation of back-up CD/DVD
- Restoring the backup data divided into the multiple discs
NOTE
- For details on the functions of the software application and media, refer to the online manual of the application as well.
About Copies
When writing to discs, make sure that you are not infringing any copyrights.
It is illegal to copy audio CDs for non-personal use.
When backing up software, make sure that you are not infringing any software copyrights for that product.
Installing Roxio Creator LJB
To install the software application, follow the procedure below.
CAUTION
- 1 GB of free space on the hard disk is needed to install all the components of "Roxio Creator LJB."
- Close all other software application before running the Setup program for "Roxio Creator LJB."
- Log on to Windows as an administrator.
NOTE
- Depending on the computer, preparatory steps may be necessary before installation. Before installing the application, be sure to read the Operating Instructions or Reference Manual of the computer.
1 Log on to Windows as an administrator.
2 Set "DVD Drive Utility Disc" in the drive.
3 Windows 7
At the [AutoPlay] message, click [Run SETUPUTIL.EXE]. [Utility Setup tool] screen will appear (allow some time for disc recognition). When the setup program will not run automatically, click Start) and input [x:\setuputil.exe] *3 in [Search programs and fi les], and press Enter.
Windows XP
[Utility Setup tool] screen will appear (allow some time for disc recognition).
When the setup program will not run automatically, input [x:\setuputil.exe]*3 in [start] - [Run] and click [OK].
^*3 "x" is the drive letter. You can change the letter to suit your preference.
4 Click [Roxio Creator Setup].
5 Select your language at [Setup], then click [OK].
Follow the on-screen instructions.
- During the installation, you will be required to agree the License Agreement. After reading the agreement, click [I accept the terms in the license agreement], then click [Next].
6 Click [Finish].
7 A message appears advising that the computer must be restarted. Click [Yes].
Windows 7
Use the Packet Write function which Windows 7 includes so that you can write to a CD-R, CD-RW, DVD-R, DVD-RW, +R, or +RW in the same way as in the floppy disk operation.
Running Roxio Creator JLB
Windows 7
Click (Start) - [All Programs] - [Roxio] - [Roxio Creator LJB].
Windows XP
Click [start] - [All Programs] - [Roxio] - [Roxio Creator LJB].
How to access the Online Manual
After running Roxio Creator LJB, you can access the online manual.
Click [Help] from the menu, and then click [Help].
Cautions on Use
- When using "Roxio Creator LJB," set the display resolution to 1024 × 768 or more.
WindowsXP
After erasing the data in the disc following the order of [Disc and Device Utility] - [Erase/ Format...] - [Quick Erase/Format] - [Start], remove the disc once before reuse.
Information
- If "Roxio Creator LJB" does not operate properly, we recommend carefully reading the online help file first for problems with the operating environment or operations.
Then install the latest Windows Service Pack.
If you still cannot troubleshoot the problem, contact Panasonic Technical Support.
- For further information, refer to the following URL.
http://www.roxio.com/enu
WinDVD
WinDVD is a software application for DVD playback.
Install "WinDVD" using "DVD Drive Utility Disc" (below).
Installing WinDVD
1 Log on to Windows as an administrator.
2 Set "DVD Drive Utility Disc" in the drive.
3 Windows7
At the [AutoPlay] message, click [Run SETUPUTIL.EXE]. [Utility Setup tool] screen will appear (allow some time for disc recognition).
When the setup program will not run automatically, click (Start) and input [x:\setuputil.exe]*4 in [Search programs and files], and press Enter.
Windows XP
[Utility Setup tool] screen will appear (allow some time for disc recognition).
When the setup program will not run automatically, input [x:\setuputil.exe]*4 in [start] - [Run] and click [OK].
^*4 "x" is the drive letter. You can change the letter to suit your preference.
4 Click [WinDVD Setup].
5 Click [Next] at the welcome message.
6 After reading the "License Agreement" ^+5 , click [Yes] if you agree to the terms.
*5 Refer to the "LIMITED USE LICENSE AGREEMENT" on the Operating Instructions of the computer.
7 Follow the on-screen instructions and install "WinDVD".
8 Click [Finish].
9 Click [Exit] on [Utility Setup tool] screen, and remove "DVD-Drive Utility Disc".
Running WinDVD
NOTE
Windows 7
-
When a disc has so many folders, "WinDVD" may not operate correctly. Remove the disc as follows.
-
Click Start) - [Computer], right-click [DVD RW Drive (x:)] and select [Eject] from the menu.
You can run "WinDVD" using either of the following procedures.
Windows 7
Double-click

the desktop.
Click (Start)
- [All Programs] - [InterVideo WinDVD] - [InterVideo WinDVD for
WindowsXP
Double-click

the desktop.
- Click [start] - [All Programs] - [InterVideo WinDVD] - [InterVideo WinDVD for Panasonic].
To access the Online Manual
- Right-click on the [WinDVD] screen and click [Help...].
- Click "?" of the [WinDVD] screen.
NOTE
DVD-Audio cannot be played back using "WinDVD".
- Do not start "WinDVD" while the drive indicator is blinking immediately after the computer is turned on.
- While "WinDVD" is running, do not:
- Enter sleep (Windows 7), standby (Windows XP) or hibernate.
- Switch the display by pressing + ^*6 or + 3 .
During video playback, do not:
- Eject the disc.
- Use other applications or the Command Prompt.
- Change the settings of the screen properties.
*6 Windows 7 only
NOTE
-
If you maximize the video display window, you can return to the original window size by double-clicking over the images.
-
When the number of display colors is increased, a message appears and the DVD cannot be played:
-
Reduce the number of display colors.
WindowsXP
Right-click on the desktop, click [Properties] - [Settings] - [Advanced Settings] - [Troubleshooting] and maximize the value of [Hardware acceleration].
- Immediately after resuming from a pause, frame dropping may occur depending on the operating environment or DVD-Video (images or sounds are disrupted).
- In the Extended Desktop or simultaneous (internal/external) display mode, there are times when images or video are not displayed correctly.
- During a prolonged period of rapid advance, the pause mode may be established at some point. If this happens, exit "WinDVD", and restart.
- Do not install another player software together with "WinDVD".
Doing so may interfere with smooth playback. Some DVD-Video discs contain the player software and start installing. In this case, cancel the installation as soon as possible. If you accidentally installed another player software and find a problem in playback, try either of the following procedures.
Windows 7
- Uninstall the player software by clicking (Start) - [Control Panel] - [Uninstall a program].
(Make sure the name of the uninstalled player software with the operating instructions of the player software.)
Windows XP
- Uninstall the player software by clicking [start] - [Control Panel] - [Add or Remove Programs].
(Make sure the name of the uninstalled player software with the operating instructions of the player software.)
- Set "WinDVD" as the playback software if you can select the option in the player software settings.
DVD Discs Created Using a DVD Recorder
The following restrictions apply:
- Depending on the condition (record quality, cracks, dirt, modification, copy protection, type of drive/disc maker used when creating the disc, etc.) of a disc, it may not be possible to be read or play it correctly.
- In order to play discs other than DVD-RAM, they must be finalized (a process that enables it to play on other DVD players, etc.). For information on the finalizing method used by your DVD recorder, refer to its operating instructions.
- Media in which digital broadcasts have been recorded using copyright management technologies such as CPRM (Content Protection for Recordable Media) cannot be played back.
SUPPORT INFORMATION
If "WinDVD" does not operate properly, we recommend carefully reading the online help file first for problems with the operating environment or operations.
If you still cannot troubleshoot the problem, enter the required information in the inquiry form on the Corel Corporation homepage (http://www.corel.com/), and submit the form.
Troubleshooting
| The computer does not recog- nize the drive | ● Is the drive properly mounted in the multimedia pocket? ● Restart the computer. |
| The drive indicator ◆does not light | ● Is the disc loaded on the tray correctly? ( page 8) |
| Cannot play disc or read data from it | ● Is the disc bent, scratched, or dirty? ● An error may occur if, after the tray has been closed or operation has been resumed from the sleep (Windows 7 ), standby ( Windows XP )/ hibernate modes, the drive is accessed before the drive indicator ◆does off. Also, an error may occur if the drive is accessed by the application software automatically. In a case like this, remove the disc, re- insert it, and try again. |
| “Roxio Creator LJB” does not work properly | ● Is writing software other than “Roxio Creator LJB” installed? Uninstall the writing software other than “Roxio Creator LJB.” (Windows XP) ● Be sure to disable writing to CDs. Right-click [(x:)]*1 in [start] - [My Computer], click [Properties] - [Recording], then remove the check mark for [Enable CD recording on this drive]. (Remove the check mark for [Enable CD recording on this drive] every time a new user is added.) *1 “x” is the drive letter. You can change the letter to suit your preference. |
| Cannot eject disc | ● Turn on the computer. To remove a disc when the computer is powered off, insert a pin of 1.3 mm {0.05"} in di- meter into the emergency hole (A). (When the diameter of the pin is smaller than this, insert the pin slightly downward.) Pushing it completely to the end will free the tray so that it can be pulled out. (The position of the emergency hole differs depending on the drive.) ● If a disc with fi ngerprints or other dirt is used, you may not be able to remove it. Use a clean disc. ( page 7) |
| The disc tray does not close | ● Do not touch the eject button when closing the tray. |
| Other disc operation problems Use | ● another drive or media. |
Specifications
| Item Description | |||
| Operating voltage range DC 5 V ± 0.25 V | |||
| Drive Data Transfer Rate*1 | Reading*2 | DVD-ROM: 8X (Max.), CD-ROM: 24X (Max.) | |
| Writing*3 | CD-R: 24X (Max.), CD-RW: 4XHigh-Speed CD-RW: 10XUltra-Speed CD-RW: 24X (Max.)DVD-R: 8X (Max.), DVD-R DL: 6X (Max.)DVD-RW: 6X (Max.), DVD-RAM: 5X (Max.)+R: 8X (Max.), +R DL: 6X (Max.)+RW: 4X (Max.), High Speed +RW: 8X (Max.) | ||
| Supported Discs/ Format*4 | Reading DV | D-ROM (4.7 GB, 8.5 GB, 9.4 GB, 17 GB), DVD-Video, DVD-R (1.4 GB, 3.95 GB, 4.7 GB), DVD-R DL (8.5 GB), DVD-RW*5 (1.4 GB, 2.8 GB, 4.7 GB, 9.4 GB), DVD-RAM*6 (1.4 GB, 2.8 GB, 4.7 GB, 9.4 GB), +R (4.7 GB), +R DL (8.5 GB), +RW (4.7 GB), High Speed +RW (4.7 GB), CD-Audio, CD-ROM, CD-R, Photo CD, Video CD, CD-RW, High-Speed CD-RW, Ultra-Speed CD-RW, CD TEXT, CD-EXTRA | |
| Writing DV | D-R (1.4 GB, 4.7 GB for General), DVD-R DL (8.5 GB), DVD-RW*5 (1.4 GB, 2.8 GB, 4.7 GB, 9.4 GB), DVD-RAM*6 (1.4 GB, 2.8 GB, 4.7 GB, 9.4 GB), +R (4.7 GB), +R DL (8.5 GB), +RW (4.7 GB), High Speed +RW (4,7 GB), CD-R, CD-RW, High-Speed CD-RW, Ultra-Speed CD-RW | ||
| Buffer overrun error prevention function | Supported | ||
| Cache memory | 2 MB*7 | ||
| Interface Serial ATA | |||
| Dimensions (width × depth × height) | 132 mm × 149 mm × 14 mm {5.2" × 5.9" × 0.6"} | ||
| Weight Approx. 220 g {0.49 lb.} | |||
| Operating temperature/Humidity range | 5 °C to 35 °C {41 °F to 95 °F}/30 % RH to 80 % RH (no condensation) | ||
^1 The data transfer rate of DVD per 1X speed is 1,350~KB / s . The data transfer rate of CD per 1X speed is 150~KB / s .
2 If an unbalanced disc (e.g., a disc with which the balance has been displaced from the center) is inserted, the speed may become slower if there are large vibrations while the disc is rotating.
3 Depending on the disc, the writing speed may become slower.
4 1GB = 1,000,000,000 bytes. Your operating system or some application software will report as fewer GB.
*5 Does not support DVD-RW Ver.1.0.
^6 DVD-RAM: Only non-cartridge type or removable cartridge type can be used.
1MB = 1,048,576 bytes.
Modelle für Europa

Panasonic Testing Centre
Panasonic Marketing Europe GmbH
Panasonic Testing Centre
Panasonic Marketing Europe GmbH
Winsberging 15, 22525 Hamburg, Allemagne
| CD-R | CD-RW | ||
| COMPACT DISC Recordable | COMPACT DISC ReWritable | COMPACT DISC ReWritable | COMPACT DISC ReWritable |
| DVD-RAM*1 | DVD-R | DVD-R DL | DVD-RW*2 |
| R AM | R | R DL | RW |
| +R | +R DL | +RW | |
| RW DVD+R | RW DVD+R DL | RW DVD+ReWritable | RW DVD+ReWritable |
Victor Company of Japan, Limited
Panasonic Corporation
HITACHI MAXELL, Ltd.
< + R>
| CD-R | CD-RW | ||
| COMPACT DISC Recordable | COMPACT DISC ReWritable | COMPACT DISC ReWritable | COMPACT DISC ReWritable |
| DVD-RAM*1 | DVD-R | DVD-R DL | DVD-RW*2 |
| R AM | R | R DL | RW |
| +R | +R DL | +RW | |
| RW DVD+R | RW DVD+R DL | RW DVD+ReWritable | RW High Speed DVD+ReWritable |
Panasonic Solutions Company
3 Panasonic Way, Panzip 2F-5,
Secaucus, NJ 07094
Panasonic Canada Inc.
5770 Ambler Drive Mississauga,
Ontario L4W 2T3
Importer's name & address pursuant to the EU GPSD (General Product Safety
Directive) 2001/95/EC Art.5
Panasonic Computer Products Europe, Panasonic Marketing
Europe GmbH
Hagenauer Straße 43
65203 Wiesbaden
Germany
Web Site: http://panasonic.net/
© Panasonic Corporation 2010