
SC-XH155 - DVD player PANASONIC - Free user manual and instructions
Find the device manual for free SC-XH155 PANASONIC in PDF.


| Product Type | DVD Home Theater System (5.1-channel) |
| Model Number | SC-XH155 |
| Main Unit Dimensions (W x H x D) | 430 mm x 38 mm x 279 mm |
| Main Unit Weight | 2.6 kg |
| Power Supply | AC 220–240 V, 50 Hz |
| Power Consumption | 75 W (approx. 0.8 W in standby) |
| Disc Types Played | DVD-Video, DVD-R/RW, DVD-R DL, +R/+RW, +R DL, CD, CD-R/RW, Video CD, SVCD, MP3, JPEG, DivX |
| Total RMS Output Power (Dolby Digital) | 1000 W (Front: 160 W x 2, Center: 160 W, Surround: 160 W x 2, Subwoofer: 200 W) |
| Speaker System | Front (SB-HF167), Center (SB-HC270), Surround (SB-HS270), Subwoofer (SB-HW370) |
| FM Tuner Presets | 30 stations |
| USB Playback | MP3, JPEG, DivX (FAT12/16/32, up to 500 mA) |
| Video Outputs | HDMI (with ARC), SCART (Composite/S-Video/RGB), Composite via SCART |
| Audio Inputs | Optical digital (1), AUX (analog), SCART |
| Surround Sound Modes | Dolby Pro Logic II Movie/Music, Super Surround, Advanced Surround, Multi-Channel, Stereo |
| Special Features | VIERA Link (HDAVI Control), Whisper-mode Surround, Sleep Timer, Equaliser, Dynamic Range Compression |
| Remote Control Range | Approx. 7 m, within 20° up/down, 30° left/right |
| Safety Class | Class 1M Laser Product (FDA 21 CFR / IEC) |
| Auto Power Down | After 30 minutes of inactivity |
| Maintenance | Clean with soft dry cloth; do not use alcohol, thinner, or lens cleaners |
| Repair Policy | No user-serviceable parts; refer to qualified service personnel |
Frequently Asked Questions - SC-XH155 PANASONIC
User questions about SC-XH155 PANASONIC
0 question about this device. Answer the ones you know or ask your own.
Ask a new question about this device
Download the instructions for your DVD player in PDF format for free! Find your manual SC-XH155 - PANASONIC and take your electronic device back in hand. On this page are published all the documents necessary for the use of your device. SC-XH155 by PANASONIC.
USER MANUAL SC-XH155 PANASONIC
natural_image
Two identical gray cylindrical pillars with fluted bases, no text or symbols visible.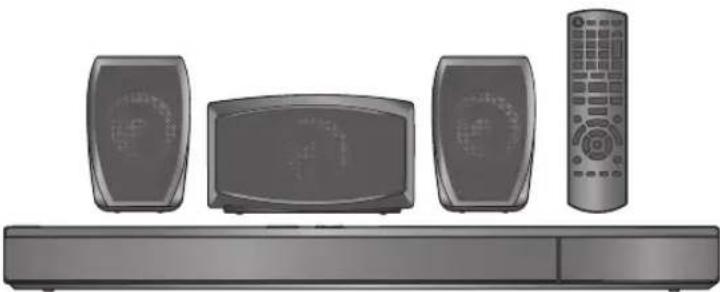
natural_image
Illustration of a set TV setup including a streaming unit, two speakers, a monitor, and a remote control (no text or symbols visible)
natural_image
Exterior view of a modern office building (no signage)Dear customer
Thank you for purchasing this product. For optimum performance and safety, please read these instructions carefully.
Before connecting, operating or adjusting this product, please read the instructions completely.
Please keep this manual for future reference.
The illustrations shown may differ from your unit.
Vážený zákazníku
Operations in these instructions are described mainly with the remote control, but you can perform the operations on the main unit if the controls are the same.
Please check and identify the supplied accessories.
| CAUTION | - LASER RADIATION WHEN OPEN,DO NOT STARE INTO BEAM. | FDA 21 DPR / Class II |
| CAUTION | - CLASS IM VIBLE AND INVIBLE LASER RADIATION WHEN OPEN,DO NOT VIEW DIRECTLY WITH OPICIAL INSTRUMENTS. | EDG085-I + AAI Class 1M |
| VARNING | - KLAS IM SYNLED OCH SYNDLE LASERSTRÄBLING NAR DENNA DEL AR ÖPTNADO,BETRAKTA EL STRÄLEN EIREKT QONOM OPTIBAT INSTRUMENTS. | |
| FORSIGTIG | - SYNLED OUSYNLED LASERSTRÄBLING KLAS IM, NAR LAGET ERÅBEUT, LINGÅ AT BELIDE PA ME ÖPTIKIN INSTRUMENTS. | |
| VARO! | - AVATTASSIA OLET ALTINA LUCHAN I MKNYAVA LA NAYKMATONTA, LASERSTAEKTE, ALKÁRATO OPTIBELLA LAITTEELLA SUDRAAN SÄTESESEN. | |
| VORSICHT | - EDTHAPE UND UNSICHTBARE LASERSTRÄBLING KLASSE, IM, WEIN ABDECKUNG GEOFRIT, IND IT EIREKT MT OPTICHEN INSTRUMENTS BERTACHEN. | |
| ATTENTION | - RAYMONNEMENT LASER VIRLE ET INVIBLE, CLASSE IM, EN CAS D'OUVERTURE,NE PAS REGARDER DIRECTMENT A LIABE INSTRUMENTS D'OPTIQUE. | |
| 注意 | - ここを聞くと可視及び不可視レーザ光が出ます。ピームを見たり、触れたりしないでください。 | |
| 注意 | - 打刺時有可见及不可見歴光細節。避免光束限制。GAT341 - 0001099 過 | RQLX90075 |
(Inside of product)
(Uvnitř přehrávače)
(Wewnątrz
urządzenia)
(A készülék
belsejében)


[NO TEXT]
The circled numbers indicated in the operating instructions (e.g. Press [⏻]①) correspond to the circled numbers in the above.
① Turn the main unit on/off ( 9)
② Select channels and title numbers etc. / Enter numbers ( 10, 12)
③ Cancel ( 13)
④ Source select
[DVD]: Select disc as the source ( 12)
[RADIO]: Select FM tuner ( 9)
[EXT-IN]: Select external audio as the source (⇒ 10)
AV → AUX → ARC → D-IN → USB
↑
⑤ Basic operations for play ( 12)
⑥ Display RDS text data / Show on-screen menu ( 10, 14)
⑦ Show a disc top menu ( 13)
⑧ Select or confirm menu items / Frame-by-frame (⇒ 12)
⑨ Select the play mode / Set the repeat mode => 13, 14)
⑩ Select sound mode / Select speaker channel (⇒ 12)
⑪ Select surround sound effects ( 11)
or Set the Sleep timer
Press and hold [-SLEEP].
While the time is shown on the main unit's display, press
[-SLEEP] repeatedly.
Each time you press the button:
SLEEP 30 → SLEEP 60 → SLEEP 90 → SLEEP120
OFF (Cancel)
- To confirm the remaining time, press and hold the button again.
⑫ TV operations
Aim the remote control at the Panasonic TV and press the button.
[TV, ⏻]: Turn the TV on/off
[INPUT, AV]: Change the TV's video input mode
[+, VOL, -]: Adjust the TV volume
This may not work properly with some models.
⑬ Adjust the volume of the main unit
⑭ Mute the sound
- "MUTE" flashes on the main unit's display while the function is on.
- To cancel, press the button again or adjust the volume.
- Muting is cancelled when you switch the unit to standby.
⑮ Select radio stations manually (⇒ 10)
⑯ Select preset radio stations ( 10)
⑰ Exit the display
⑱ Show START menu ( 10)
⑲ Show a disc menu ( 13)
⑳ Return to previous screen (⇒ 13)
② Switch information on the main unit's display ( 13)
② Turn Whisper-mode Surround on/off ( 12)
Avoiding interference with other Panasonic equipment
Other Panasonic audio/video equipment may start functioning when you operate the unit using the supplied remote control. You can operate this unit in another mode by setting the remote control operating mode to "REMOTE 2".
The main unit and remote control must be set to the same mode. 1 Press [EXT-IN]④ to select "AUX".
2 Press and hold [▶]⑧ on the main unit and [2] on the remote control until the main unit's display shows "REMOTE 2".
3 Press and hold [OK]® and [2] on the remote control for at least 2 seconds.
To change the mode back to "REMOTE 1", repeat the steps above by replacing [2] with [1].
Main unit
① Standby/on switch (⏻/I)
Press to switch the unit from on to standby mode or vice versa. In standby mode, the unit is still consuming a small amount of power.
② Open/Close the disc tray ( 12)
③ Adjust the volume of the main unit
4 Power indicator
The indicator lights when this unit is turned on.
⑤ Disc tray
6 Stop
⑦ Connect USB device ( 16)
8 Start play
9 Remote control signal sensor
10 Display (FL display)
POWER-SAVING FEATURES
The main unit is designed to conserve its power consumption and save energy.
■ Auto power-down function
The main unit will automatically switch to standby mode after 30 minutes of inactivity.
e.g.
-There is no audio signal from an external device.
—Media playback is stopped/paused.
–The disc menu is displayed and play is not selected. (This function may not work depending on the application type of discs.)
TABLE OF CONTENTS
Getting Started
Accessories 2
Control reference guide....4
POWER-SAVING FEATURES....4
Quick Start Guide
step 1 Preparing the speakers ..... 6
step 2 Positioning .... 7
step 3 Connections 7
Speaker connections....7
Radio antenna connections....7
Audio and video connections .....8
step 4 AC mains lead connection....9
step 5 Preparing the remote control ..... 9
step 6 Easy setup....9
Listening to the radio....9
Presetting stations automatically 9
Listening/confirming the preset channels ..... 10
RDS broadcasting....10
Using the START menu .....10
Selecting the source using the remote control ..... 10
Listening to the TV or other device's audio from this unit's speakers....11
Enjoying sound effects from all speakers
Enjoying surround sound effects....11
Selecting sound mode.....12
Whisper-mode Surround....12
Adjusting the speaker level during playback .....12
Adjusting the speaker balance during playback ...12
Playing Discs
Basic play....12
Playing from the selected item....13
Other modes of play 13
Program and Random play 13
Repeat play 14
Using on-screen menus 14
Other Operations
Linked operations with the TV
(VIERA Link "HDAVI Control™") 15
Setting the audio link 15
Easy control only with VIERA remote control ..... 16
Playing from an USB device....16
Reference
Changing the player settings 16
DivX information....18
Displaying DivX subtitles text 18
Media that can be played....19
Maintenance....19
Speaker installation option....20
Troubleshooting guide 21
Licenses 22
Specifications 23
Safety precautions 24
CAUTION!
THIS PRODUCT UTILIZES A LASER.
USE OF CONTROLS OR ADJUSTMENTS OR PERFORMANCE OF PROCEDURES OTHER THAN THOSE SPECIFIED HEREIN MAY RESULT IN HAZARDOUS RADIATION EXPOSURE. DO NOT OPEN COVERS AND DO NOT REPAIR YOURSELF. REFER SERVICING TO QUALIFIED PERSONNEL.
WARNING:
TO REDUCE THE RISK OF FIRE, ELECTRIC SHOCK OR PRODUCT DAMAGE,
- DO NOT EXPOSE THIS APPARATUS TO RAIN, MOISTURE, DRIPPING OR SPLASHING AND THAT NO OBJECTS FILLED WITH LIQUIDS, SUCH AS VASES, SHALL BE PLACED ON THE APPARATUS.
- USE ONLY THE RECOMMENDED ACCESSORIES.
- DO NOT REMOVE THE COVER (OR BACK); THERE ARE NO USER SERVICEABLE PARTS INSIDE. REFER SERVICING TO QUALIFIED SERVICE PERSONNEL.
THIS UNIT IS INTENDED FOR USE IN MODERATE CLIMATES.
CAUTION!
- DO NOT INSTALL OR PLACE THIS UNIT IN A BOOKCASE, BUILT-IN CABINET OR IN ANOTHER CONFINED SPACE. ENSURE THE UNIT IS WELL VENTILATED. TO PREVENT RISK OF ELECTRIC SHOCK OR FIRE HAZARD DUE TO OVERHEATING, ENSURE THAT CURTAINS AND ANY OTHER MATERIALS DO NOT OBSTRUCT THE VENTILATION VENTS.
- DO NOT OBSTRUCT THE UNIT'S VENTILATION OPENINGS WITH NEWSPAPERS, TABLECLOTHS, CURTAINS, AND SIMILAR ITEMS.
- DO NOT PLACE SOURCES OF NAKED FLAMES, SUCH AS LIGHTED CANDLES, ON THE UNIT.
- DISPOSE OF BATTERIES IN AN ENVIRONMENTALLY FRIENDLY MANNER.
This product may receive radio interference caused by mobile telephones during use. If such interference is apparent, please increase separation between the product and the mobile telephone.
The socket outlet shall be installed near the equipment and easily accessible.
The mains plug of the power supply cord shall remain readily operable.
To completely disconnect this apparatus from the AC Mains, disconnect the power supply cord plug from AC receptacle.
step 1 Preparing the speakers
Front speakers
Preparation
• To prevent damage or scratches, lay down a soft cloth to assemble speakers.
- For assembly, use a Phillips-head screwdriver (not supplied).
Make sure you have all the indicated components before starting assembly, setup, and connection.
- Keep the screws out of reach of children to prevent swallowing.
- For optional wall mount, refer to page 20.
- Keep the screws out of reach of children to prevent swallowing. - For optional wall mount, refer to page 20.

2 Front speakers
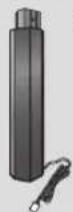
2 Stands (with cable)
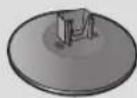
2 Bases
8 Screws

1

2


natural_image
3D diagram of a vertical cylindrical object with labeled parts (1 and 2), no text or symbols present.Speaker assembly option
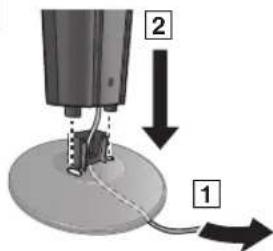
Thread the speaker cable through the base.

Attach the speaker.


natural_image
3D rendered black cylindrical object with a flared base (no text or symbols)Preventing the speakers from falling
- You will need to obtain the appropriate screw eyes to match the walls or pillars to which they are going to be fastened.
- Consult a qualified housing contractor concerning the appropriate procedure when attaching to a concrete wall or a surface that may not have strong enough support. Improper attachment may result in damage to the wall or speakers.
- Use a string of less than 2.0 mm, which is capable of supporting over 10 kg.
String (not supplied)
Thread from the wall to the speaker and tie tightly.

Caution
- Do not stand on the base. Be cautious when children are near.
- When carrying the speaker, hold the stand and base parts.
- Do not stand on the base. Be cautious when children are near. - When carrying the speaker, hold the stand and base parts.
step 2 Positioning
How you set up your speakers can affect the bass and the sound field. Note the following points:
- Place speakers on flat secure bases.
- Keep your speakers at least 10 mm away from the system for proper ventilation.
- Placing speakers too close to floors, walls, and corners can result in excessive bass. Cover walls and windows with thick curtains.
Setup example ("Surround layout (Recommended)": Standard surround placement)
Place the front, center, and surround speakers at approximately the same distance from the seating position. The angles in the diagram are approximate.
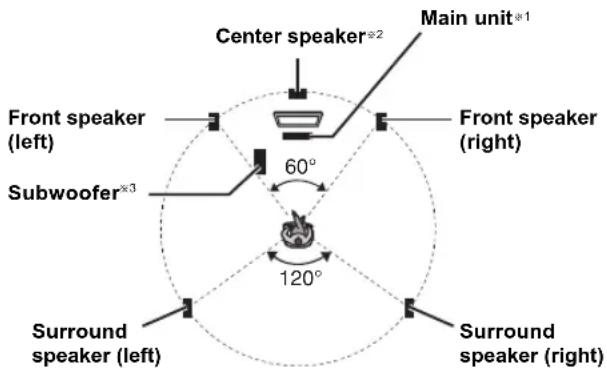
※1 Position with at least 5 cm of space on all sides for proper ventilation.
※2 Put on a rack or shelf. Vibration caused by the speaker can disrupt the picture if it is placed directly on the TV.
※3 Place to the right or left of the TV, on the floor or a sturdy shelf so that it will not cause vibration. Leave about 30 cm from the TV.
Depending on the room layout, you may like to use all the speakers at the front ("Front layout (Alternative)") ( 9, Easy setup).
Notes on speaker use
- Use only supplied speakers
Using other speakers can damage the unit, and sound quality will be negatively affected.
- You can damage your speakers and shorten their useful life if you play sound at high levels over extended periods.
- Reduce the volume in the following cases to avoid damage:
– When playing distorted sound.
- When the speakers are reverberating due to a record player, noise from FM broadcasts, or continuous signals from an oscillator, test disc, or electronic instrument.
– When adjusting the sound quality. - When turning the unit on or off.
If irregular colouring occurs on your TV
The center speaker is designed to be used close to a TV, but the picture may be affected on some TVs and setup combinations.
f this occurs, turn the TV off for about 30 minutes.
The demagnetising function of the TV should correct the problem. If it persists, move the speakers further away from the TV.
Caution
- The main unit and supplied speakers are to be used only as indicated in this setup. Failure to do so may lead to damage to the amplifier and/or the speakers, and may result in the risk of fire. Consult a qualified service person if damage has occurred or if you experience a sudden change in performance.
- Do not attempt to attach these speakers to walls using methods other than those described in this manual.
step 3 Connections
Turn off all equipment before connection and read the appropriate operating instructions.
Do not connect the AC mains lead until all other connections are completed.
1 Speaker connections
Pay attention to the type of speaker and the connector colour when you place the speakers.
Main unit (rear)
Connect to the terminals of the same colour.
Use of the speaker cable stickers is convenient when making cable connections.
Speakers (rear)
Insert the wire fully, taking care not to insert beyond the wire insulation.
+: White
-: Blue line
- Be careful not to cross (short circuit) or reverse the polarity of the speaker wires as doing so may damage the speakers.
2 Radio antenna connections
Using an indoor antenna

Using an outdoor antenna
Use outdoor antenna if radio reception is poor.
- Disconnect the antenna when the unit is not in use.
- Do not use the outdoor antenna during an electrical storm.

3
Audio and video connections
- To listen to the TV audio on the sound system, connect the optical digital audio cable, SCART cable, HDMI *1 cable or audio cable. Refer to the operating instructions of the respective devices for the settings necessary to output the audio.
※1 Only when connecting to an ARC compatible TV. Refer to "Connection with an ARC compatible TV" for details. (⇒ below)
Recommended connection to a TV
This connection provides the best picture and audio quality.
VIERA Link "HDAVI Control"
If your Panasonic TV is VIERA Link compatible, you can operate your TV synchronising with home theater operations or vice versa ( 15, Linked operations with the TV).
1
- Please use High Speed HDMI Cables that have the HDMI logo (as shown on the cover).
• Non-HDMI-compliant cables cannot be utilised. - It is recommended that you use Panasonic's HDMI cable. Recommended part number: RP-CDHS15 (1.5 m), RP-CDHS30 (3.0 m), RP-CDHS50 (5.0 m), etc.
- For TV with more than one HDMI terminal, refer to the operating instructions for the TV to determine which terminal to connect to.
- Do not make the video connections through the VCR. Due to copy guard protection, the picture may not be displayed properly.
- After connecting with the optical digital audio cable or HDMI cable, make settings to suit the type of audio from your digital equipment ( 11). (Only Dolby Digital and PCM can be played with this connection.)
■ Connection with an ARC compatible TV
What is ARC?
ARC is an abbreviation of Audio Return Channel, also known as HDMI ARC. It refers to one of the HDMI functions. If the TV is ARC compatible, audio from the TV can be sent to this unit via the HDMI cable without the need to make an extra audio connection.
• Refer to the operating instructions of the TV for details.

■ Connection without an ARC compatible TV
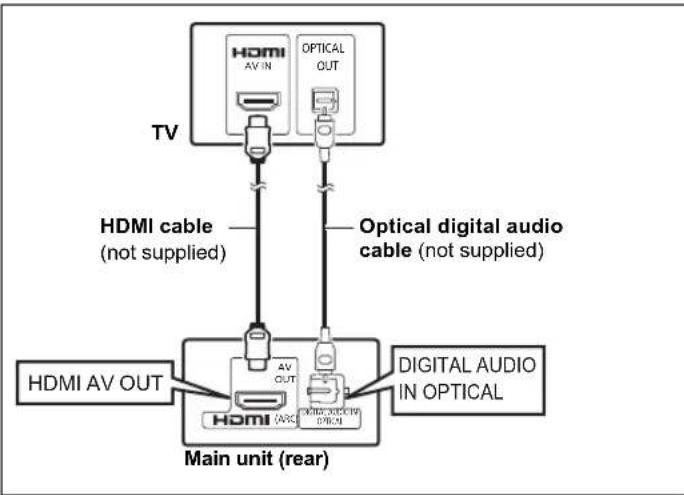
flowchart
graph TD
    TV["TV"] -->|HDMI cable (not supplied)| A["Main unit (rear)"]
    TV -->|Optical digital audio cable (not supplied)| B["Main unit (rear)"]
    A --> C["HDMI AV OUT"]
    A --> D["DIGITAL AUDIO IN OPTICAL"]
    B --> E["HDMI AV OUT"]
    B --> F["OPTICAL OUT"]
AUX
Use this connection when the TV does not have an OPTICAL OUT terminal or when the DIGITAL AUDIO IN OPTICAL terminal on this unit is being used by the STB.
Connect the audio cable (not supplied) from the AUX terminal on the main unit to the AUDIO OUT terminal on your TV.
Alternative connection to a TV

flowchart
graph TD
    A["Main unit (rear)"] --> B["SCART cable*2 (not supplied)"]
    B --> C["TV"]
    D["AV"] --> E["Main unit (rear)"]
    E --> F["SCART cable*2 (not supplied)"]
    F --> G["TV"]
    H["AV"] --> I["Main unit (rear)"]
    I --> J["SCART cable*2 (not supplied)"]
    J --> K["TV"]
To improve picture quality, you can change the video signal output from the SCART (AV) terminal to suit the type of TV you are using.
- Select "S-Video", "RGB 1" or "RGB 2" from "Video Out-SCART" in Video menu (⇒ 17).
- When both the HDMI cable and SCART cable are connected, there will be no RGB output from the SCART (AV) terminal.
Set Top Box (cable/satellite/Blu-ray Disc player, etc) connection
Use this connection when you want to output the original surround audio from your STB, etc. to this unit.
Connect the optical digital audio cable (not supplied) from the DIGITAL AUDIO IN OPTICAL terminal on the main unit to the OPTICAL OUT terminal on your STB.
- If the DIGITAL AUDIO IN OPTICAL terminal is already in use for the TV audio, reconnect the TV audio to the AUX terminal using an audio cable.
The image contains no text.
If you have various sound sources (such as Blu-ray Disc player, DVD recorder, VCR, etc.), connect them to the available inputs on the TV and the TV output should then be connected to the SCART (AV), AUX, HDMI AV OUT 1 or DIGITAL AUDIO IN OPTICAL terminal of the main unit.
step 4 AC mains lead connection
To household mains socket

flowchart
graph LR
    A["AC mains lead (supplied)"] --> B["Main unit (rear)"]
    B --> C["AC IN~"]
    C --> D["Output"]
Conserving power
The main unit consumes a small amount of power, even when it is in standby mode (approx. 0.8 W). To save power when the unit is not to be used for a long time, unplug it from the household mains socket.
You will need to reset some memory items when plugging back the main unit.

The supplied AC mains lead is for use with the main unit only.
Do not use it with other equipment. Also, do not use cords for other equipment with the main unit.
step 5 Preparing the remote control
Batteries
2 Insert so the poles (+ and -) match those in the remote control.
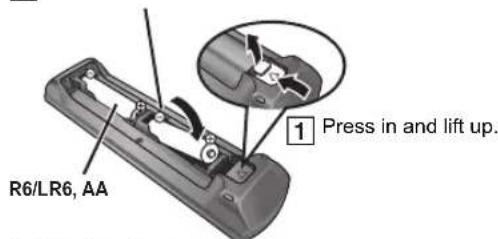
3 Replace the cover.
CAUTION
Danger of explosion if battery is incorrectly replaced. Replace only with the same or equivalent type recommended by the manufacturer. Dispose of used batteries according to the manufacturer's instructions.
- Use alkaline or manganese batteries.
- Do not heat or expose to flame.
- Do not leave the battery(ies) in an automobile exposed to direct sunlight for a long period of time with doors and windows closed.
Do not:
- mix old and new batteries.
- use different types of batteries at the same time.
●take apart or short circuit. - attempt to recharge alkaline or manganese batteries.
- use batteries if the covering has been peeled off.
Mishandling of batteries can cause electrolyte leakage which can severely damage the remote control.
Remove the batteries if the remote control is not going to be used for a long period of time. Store in a cool, dark place.
Use
Aim at the remote control signal sensor ( 4), avoiding obstacles.
Distance: Within approx. 7 m
Angle: Within approx. 20irc up and down, approx. 30irc to the left and right
step 6 Easy setup
The Easy setup screen assists you in making necessary settings.
Preparation
Turn on your TV and select the appropriate video input mode (e.g. VIDEO 1, AV 1, HDMI, etc.) to suit the connection to this unit.
- To change your TV's video input mode, refer to its operating instructions.
- This remote control can perform some basic TV operations (⇒ 4).
1 Press [⏻]① to turn on the unit.
- The Easy setup screen appears automatically.
2 Press [▲, ▼]⑧ to select "Yes" and press [OK]⑧.
3 Follow the messages and make the settings with [▲, ▼, ◀, ▶]⑧ and [OK]⑧.
•Language
Select the language used on menu screen.
• TV aspect
Select the aspect to suit your TV.
- Speaker layout
Select "Surround layout (Recommended)" mode or "Front layout (Alternative)" mode according to your speaker layout ( 7, Positioning).
- Speaker check
Listen to speaker output to confirm speaker connections.
- Speaker output
Make surround sound setting for speaker output.
• TV audio
Select the audio input connection from your TV.
For AUX connection ( 8): Select "AUX".
For HDMI connection ( 8): Select "ARC"
For DIGITAL AUDIO IN OPTICAL connection ( 8): Select "DIGITAL IN".
For SCART (AV) connection ( 8): Select "AV".
This will be the TV audio setting for VIERA Link "HDAVI Control". (⇒ 15)
4 Press [OK]⑧ to finish the "Easy setup".
[1]
- You can perform this setup anytime by selecting "Easy setup" in the Setup menu. (→ 18)
- If this unit is connected to a "HDAVI Control 3 or later" compatible TV via HDMI cable, the menu language and TV aspect information will be retrieved via VIERA Link.
- If this unit is connected to a "HDAVI Control 2" compatible TV via HDMI cable, the menu language information will be retrieved via VIERA Link.
Listening to the radio
Presetting stations automatically
Up to 30 stations can be set.
1 Press [RADIO]④ to select "FM".
2 Press [MENU]⑲.
Each time you press the button:
LOWEST (factory preset):
To begin auto preset with the lowest frequency.
CURRENT:
To begin auto preset with the current frequency. *
※ To change the frequency, refer to "Manual tuning" (⇒ 10).
3 Press and hold [OK]⑧.
Release the button when "FM AUTO" is displayed.
The tuner starts to preset all the stations it can receive into the channels in ascending order.
- "SET OK" is displayed when the stations are set, and the radio tunes to the last preset station.
- "ERROR" is displayed when auto presetting is unsuccessful. Preset the stations manually (⇒ 10).
Listening/confirming the preset channels
1 Press [RADIO]④ to select "FM".
2 Press the numbered buttons to select a channel.
●To select a 2-digit number
e.g. 12: [≥10]② → [1] → [2]
Alternatively, press [v, ∧]⑯.
- The FM setting is also shown on the TV display.
If noise is excessive
Press and hold [PLAY MODE]⑨ to display "MONO".
To cancel the mode, press and hold the button again until "AUTO ST" is displayed.
- The mode is also cancelled when you change the frequency.
Manual tuning
1 Press [RADIO]④ to select "FM".
2 Press [SEARCH◀◀, SEARCH▶▶]⑮ to select the frequency.
- To start auto tuning, press and hold [SEARCH◀◀, SEARCH▶▶]⑮ until the frequency starts scrolling. Tuning stops when a station is found.
Presetting stations manually
Up to 30 stations can be set.
1 While listening to the radio broadcast
Press [OK]⑧.
2 While the frequency is flashing on the display
Press the numbered buttons to select a channel.
• To select a 2-digit number
e.g. 12: [≥10]② ⇒ [1] ⇒ [2]
Alternatively, press [, ] ⑯, and then press [OK]⑧.
A station previously stored is overwritten when another station is stored in the same channel preset.
RDS broadcasting
The unit can display the text data transmitted by the radio data system (RDS) available in some areas.
While listening to the radio broadcast
Press [FUNCTIONS]⑥ to display the text data.
Each time you press the button:
PS: Program service
PTY: Program type
FREQ: Frequency display
| PTY displays | |||
| NEWS VAR | ED FINANCE CO | UNTRY | |
| AFFAIRS POP | M CHILDREN | NATIONAL | |
| INFO | ROCK M | SOCIAL A OLDIES | |
| SPORT | M.O.R. M* | RELIGION | FOLK M |
| EDUCATE | LIGHT M | PHONE IN | DOCUMENT |
| DRAMA | CLASSICS | TRAVEL | TEST |
| CULTURE OT | HER M LE | SURE ALARM | |
| SCIENCE | WEATHER | JAZZ | |
※“M.O.R. M”=Middle of the road music
1
RDS displays may not be available if reception is poor.
Using the START menu
You can select sound effects, desired source, change the settings, access playback/menus, etc., by using the START menu.
1 Press [START] ⑱ to show the START menu.
- When using VIERA Link "HDAVI Control", the TV also turns on when the START menu is displayed.
e.g.

2 Press [▲, ▼]⑧ to select an item and press [OK]⑧.
- To exit, press [START]⑱.
3 Press [▲, ▼, ◀, ▶]⑧ to make the setting and press [OK]⑧.
When "Input Selection" is selected
You can select a desired source from the menu.
- DVD/CD (⇒ 12), FM RADIO (⇒ 9), AV*1 (⇒ below), AUX (⇒ below), ARC*1 (⇒ below), DIGITAL IN.2 (⇒ below)USB (⇒ 16)
※1 “(TV)” will appear beside “AV”, “AUX”, “ARC” or “DIGITAL IN”, indicating the TV audio setting for VIERA Link “HDAVI Control” (⇒ 15).
※2 “(STB)” will appear beside “DIGITAL IN”, indicating the STB audio setting for VIERA Link “HDAVI Control” ( 15).
When "Setup" is selected
You can change the settings for this unit. ( 16)
When "Sound" is selected
You can select sound quality settings ( 12, EQ (Equaliser)).
Other selectable items
The items that are displayed will vary depending on the media and source.
When a disc is loaded or an USB device is connected, you can also access playback or menus from the START menu.
e.g. DVD-V
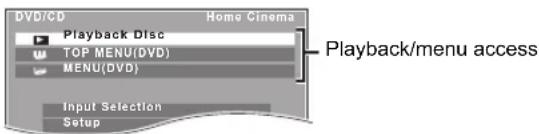
When the on-screen control panel appears
e.g. DVD-V (when "Playback Disc" is selected from the START menu)

You can operate the playback with the indicated controls.
Selecting the source using the remote control
| Press | To select |
| [DVD]4 | DVD/CD |
| [RADIO]4 | FM (⇒ 9) |
| [EXT-IN]4 | Each time you press the button:AV: For audio input through the SCART (AV) terminal.AUX: For audio input through the AUX terminal.ARC: For audio input through the HDMI AV OUT terminal.D-IN: For audio input through the DIGITAL AUDIO IN OPTICAL terminal. (⇒ 11)USB: (⇒ 16) |

Confirm the audio connection to the SCART (AV), AUX, HDMI AV OUT or DIGITAL AUDIO IN OPTICAL terminal on the main unit when you select the corresponding sources ( 8). Reduce the volume on the TV to its minimum, and then adjust the volume of the main unit.
Listening to the TV or other device's audio from this unit's speakers
Preparation
- Make sure that there is an audio connection between this unit and the TV or other device. (⇒ 8)
●Turn on the TV or/and other device.
Press [EXT-IN]④ to choose the source that is used to connect this unit to the TV or other device.
- To change the surround sound effects and sound mode, refer to "Enjoying sound effects from all speakers" (⇒ right).
- If your Panasonic TV is VIERA Link compatible, refer to "Linked operations with the TV" (⇒ 15) for other related functions.
Making settings for digital audio input
Select to suit the type of audio from the DIGITAL AUDIO IN OPTICAL and HDMI AV OUT terminal on the main unit.
●Underlined items are the factory presets.
| Available settings | |
| Mode Setting | |
| DUAL: (Only works with Dolby Dual Mono)– MAIN+SAP(stereo audio)– MAIN– SAP“SAP” = Secondary Audio Program• Set PCM FIX mode to “OFF” to listen to the “MAIN” or “SAP” audio. | |
| DRC:(Dynamic Range Compression) | – ONAdjust for clarity even when the volume is low by compressing the range of the lowest sound level and the highest sound level. Convenient for late night viewing. (Only works with Dolby Digital)– OFFThe full dynamic range of the signal is reproduced. |
| PCM FIX: – ON | Select when receiving only PCM signals.– OFFSelect when receiving Dolby Digital and PCM signals.• When receiving true 5.1-channel surround sound, select “OFF”. |
| STB*: (CABLE/SAT AUDIO) | – SETSelect when setting the main unit to switch to “D-IN” when the input channel of an HDMI connected device (STB, etc.) is selected on the TV (⇒ 15, Setting the audio link with the STB).– OFFSelect to cancel this setting. |
1 Press [EXT-IN]④ several times to select "D-IN" or "ARC".
2 Press [PLAY MODE]⑨ and then [▲, ▼]⑧ to select the mode.
3 While the selected mode is displayed, press [◀, ▶]⑧ to select the desired setting.
※ Only when "D-IN" is selected.
Be sure to select the device's (STB, etc.) input channel on the TV when making the setting.
The device must be connected to the Panasonic TV via an HDMI cable and to this unit with an optical digital audio cable.
- If the device's (STB, etc.) input channel on the TV is changed or if you want to change the device allocated for the linked operations, select the "STB" mode to "OFF" in step 3 above and then select "SET" again.
- This function will not operate if "DIGITAL IN" is selected in "TV Audio" ( 17).
Enjoying sound effects from all speakers
- The following sound effects may not be available or may have no effect with some sources.
- You may experience a reduction in sound quality when these sound effects are used with some sources. If this occurs, turn the sound effects off.
[NO TEXT]
When changing the surround sound effect, Whisper-mode Surround or the sound modes, the setting is displayed on the TV screen if "DVD/CD" or "USB" is the selected source during video playback.
Enjoying surround sound effects
Press [SURROUND]⑪.
Each time you press the button:
For "Surround layout (Recommended)" * mode STANDARD:
Sound is output as it was recorded/encoded. Speaker output varies depending on the source.
MULTI-CH:
You can enjoy sound from the front speakers, as well as the surround speakers even when playing a 2-channel sound.
MANUAL: ( below)
While “MANUAL” is displayed, press [◀, ▶]⑧ to select other surround modes.
Each time you press [◀, ▶]⑧:
DOLBY PLII MOVIE
Suitable for movies, or videos recorded in Dolby Surround. (except DivX)
DOLBY PLII MUSIC
Adds 5.1-channel effects to stereo sources. (except DivX)
S.SRD (Super Surround)
You can enjoy sound from all speakers with stereo sources.
STEREO
Sound will only be output to the front speakers and the subwoofer from any source.
Recommended modes to enjoy TV audio or stereo sources from all speakers:
- DOLBY PLII MOVIE - DOLBY PLII MUSIC - S.SRD
For "Front layout (Alternative)" * mode STANDARD:
Stereo source is output as 2.1-channel audio.
When playing surround sources, you can enjoy 5.1-channel surround-like effect even with all the speakers at the front.
STEREO:
You can play any source in stereo. Surround sound effect is unavailable.
A.SRD (Advanced Surround):
You can enjoy surround effect with any audio source.
When the signal is Dolby Digital, "/DOLBY DIGITAL" will also be displayed.
※ Selected mode in "Speaker layout" (⇒ 9, Easy setup).
Selecting sound mode
1 Press [SOUND]⑩ to select a sound mode.
Each time you press the button:
EQ: Equaliser
SUBW LVL: Subwoofer Level
C.FOCUS: Center Focus (Only when "Surround layout (Recommended)" mode is selected in "Speaker layout" ( 9, Easy setup).)
2 While the selected mode is displayed, press [◀, ▶]⑧ to make the settings.
Refer to the following for setting details of each sound effect.
EQ (Equaliser)
You can select sound quality settings. Each time you press [◀, ▶]⑧:
FLAT: Cancel (no effect is added).
HEAVY: Adds punch to rock.
CLEAR: Clarifies higher sounds.
SOFT: For background music.
SUBW LVL (Subwoofer level)
You can adjust the amount of bass. The unit automatically selects the most suitable setting according to the type of playback source.
LEVEL 1 ↔ LEVEL 2 ↔ LEVEL 3 ↔ LEVEL 4
- The setting you make is retained and recalled every time you play the same type of source.
C.FOCUS (Center Focus)
(Effective when playing audio containing the center channel sound or when DOLBY PLII ( 11) is selected.)
You can make the sound of the center speaker seem like it is coming from within the TV.
ON ←→ OFF
Whisper-mode Surround
You can enhance the audio effect for low volume 5.1-channel sound. (Convenient for late night viewing.)
Press [W.SRD] 22 .
Each time you press the button: ON ←→ OFF
Adjusting the speaker level during playback
Only when "Surround layout (Recommended)" mode is selected in "Speaker layout" ( 9, Easy setup)
(Effective when playing 5.1-channel sound or when DOLBY PLII/“S.SRD” ( 11) is selected.)
1 Press and hold [-CH SELECT] ⑩ to select the speaker. While the speaker channel is displayed, press [-CH SELECT] ⑩ .
e.g. L→C→R→RS→LS→SW
- You can adjust SW (Subwoofer) only if the disc includes a subwoofer channel.
- When "S" appears, only the surround speaker channel can be adjusted. Both surround speaker levels will be adjusted at the same time.
2 While "C", "RS", "LS", "SW" or "S" is selected Press [▲]⑧ (increase) or [▼]⑧ (decrease) to adjust the speaker level for each speaker.
C, RS, LS, SW, S: -6 dB to +6 dB (L, R: Only the balance is adjustable.) ( below)
Adjusting the speaker balance during playback
For "Surround layout (Recommended)" * mode:
Front speaker balance
For "Front layout (Alternative) * mode:
Front and surround speaker balance
1 Press and hold [-CH SELECT]⑩ to select "L" or "R".
2 While "L" or "R" is selected Press [◀, ▶]⑧ to adjust the speaker balance.
※ Selected mode in "Speaker layout" (⇒ 9, Easy setup).
Basic play
Preparation
To display the picture, turn on your TV and change its video input mode (e.g. VIDEO 1, AV 1, HDMI, etc.) to suit the connection to this unit.
1 Press [⏻]① to turn on the unit.
2 Press [DVD]④ to select "DVD/CD".
3 Press [▲ OPEN/CLOSE]② to open the disc tray.
4 Load the disc.
- Load double-sided discs so the label for the side you want to play is facing up.
Label facing up
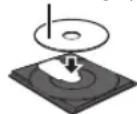
5 Press [▶ PLAY]⑤ to start play.
- Press [+, VOL, -] ⑬ to adjust the volume.
![PANASONIC SC-XH155 - Press [▶ PLAY]⑤ to start play. - 1](/content/2026/05/1006516/images/20115c39637f51cb497c7b968aeb0b9b3d99c3dcdb53665860da40bc26a521ac.jpg)
- When you press [▲ OPEN/CLOSE]② to close the disc tray, this unit automatically starts playing the disc in the tray.
MP3 JPEG DivX
– Only the contents in the current group will be played.
- If there are MP3, JPEG and DivX contents in the current group, only one content type will be played. (Priority: MP3 → JPEG → DivX) You can select an item of your desired content type to start play. (⇒ 13, Using navigation menu)
• DISCS CONTINUE TO ROTATE WHILE MENUS ARE DISPLAYED.
Press [■ STOP]⑤ when you finish to preserve the unit's motor and your TV screen.
- Total title number may not be displayed properly on +R/+RW.
Basic controls
One touch play (remote control only): [▶ PLAY]⑤ (during standby mode)
The main unit automatically turns on and starts playing the disc in the tray.
Stop: [■ STOP]⑤
The position is memorised while "RESUME" is on the main unit's display. DVD-V VCD CD MP3 DivX This unit can memorise the resume position for the last 5 discs.
- Press [▶ PLAY]⑤ to resume
- Press [■ STOP]⑤ again to clear the position.
Pause: [II PAUSE]⑤
- Press [▶ PLAY]⑤ to restart play.
Skip: [SKIP ◀◀, SKIP ▶▶]⑤
Search: [SEARCH◀◀, SEARCH▶▶]⑤ (during play)
Slow-motion: [SEARCH◀◀, SEARCH▶▶]⑤ (during pause)
• Search: Up to 4 steps
Slow-motion: Up to 3 steps
- Press [▶ PLAY]⑤ to start normal play.
• VCD DivX Slow-motion: Forward direction only.
Frame-by-frame (during pause)
DVD-V : [◀, ▶]⑧
DVD-V VCD DivX : [■■ PAUSE]⑤ (forward direction only)
On-screen item select: [▲, ▼, ◀, ▶, OK]⑧
[▲, ▼, ◀, ▶]⑧: Select
[OK]⑧: Confirm
Enter number: Numbered buttons
DVD-V VCD CD
e.g. To select 12: [≥10]② ⇒ [1] ⇒ [2]
DVD-V Show a disc top menu: [TOP MENU]⑦
DVD-V Show a disc menu: [MENU]⑲
Return to previous screen: [RETURN] 20
VCD (with playback control)
Show a disc menu: [RETURN]⑳
Turn PBC function on/off: [MENU]⑲
Main unit display: [FL DISPLAY]②1
DVD-V MP3 DivX
Time display ↔ Information display
JPEG
SLIDE↔Contents number
Playing from the selected item
Using navigation menu
CD MP3 JPEG DivX
You can select to play from your desired item while the navigation menu screen is displayed.
e.g. Data disc
Group (Folder):

Content (File/Track):

: MP3/CD-DA

: JPEG

DivX®

Press [▲, ▼]⑧ to select an item and press [OK]⑧.
- Press [◀, ▶]⑧ to skip page by page.
Play starts from the selected content.
MP3 JPEG DivX
- To return to the previous folder, press [RETURN] 20 . You can also do this by selecting "the menu.
●Maximum: 16 characters for file/folder name. - Only the contents in the current group will be played.
- If there are MP3, JPEG and DivX contents in the current group, play will be based on the selected content type.
Selecting the picture in Thumbnail menu
JPEG
1 While the picture is displayed, press [TOP MENU]⑦ to show the thumbnail menu.
e.g.

2 Press [▲, ▼, ◀, ▶]⑧ to select a picture and press [OK]⑧.
- Press [SKIP ◀◀◀, SKIP ▶▶▶]⑤ to skip page by page.
■ Rotating a picture
While a picture is displayed, press [▲, ▼, ◀, ▶]⑧ to rotate the picture.
Other modes of play
Program and Random play
CD MP3 JPEG DivX
Preparation
While stopped, press [PLAY MODE]⑨ to select the play mode.
Each time you press the button:
CD | MP3 | Music Program menu
JPEG Picture Program menu
DivX Video Program menu
RND (Random) menu
Exit program and random menus
Program play (up to 30 items)
1 Press [▲, ▼]⑧ to select an item and press [OK]⑧.
e.g. MP3
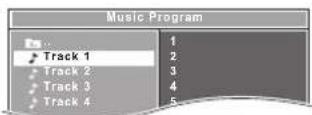
- When a content is selected, it will be programmed.
- Repeat this step to program other items.
- |MP3| |JPEG| |DivX| To return to the previous folder, press [RETURN]20. You can also do this by selecting "the menu.
2 Press [▶ PLAY]⑤ to start play.
To clear the selected program
1 Press [▶]⑧ and then press [▲, ▼]⑧ to select the program.
2 Press [CANCEL]③.
To clear the whole program
Press [▶]⑧ several times to select "Clear All", and then press [OK]⑧.
The whole program is also cleared when the disc tray is opened, the unit is turned off or another source is selected.
Random play
CD All tracks will be played in random order.
MP3 | JPEG | DivX | The MP3/JPEG/DivX contents of the selected group will be played in random order.
1 MP3 JPEG DivX
Press [▲, ▼]⑧ to select the desired group and press [OK]⑧.
e.g. MP3
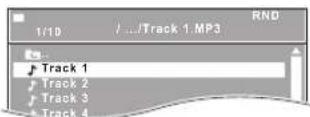
- To return to the previous folder, press [RETURN]②0. You can also do this by selecting "in the menu.
2 MP3 JPEG DivX
Press [▲, ▼]⑧ to select the desired content ® and press [OK]⑧.
※ If there are MP3, JPEG and DivX contents, random play will be based on the selected content type.
3 Press [▶ PLAY]⑤ to start play.
Repeat play
This works only when the elapsed play time can be displayed. It also works with all JPEG content.
During play, press and hold [-REPEAT]⑨, to show the repeat mode.
While the repeat mode is displayed, press [-REPEAT]⑨ to select the item to be repeated.
e.g. DVD-V
![PANASONIC SC-XH155 - During play, press and hold [-REPEAT]⑨, to show the repeat mode. - 1](/content/2026/05/1006516/images/be72f2dd248ab04b8308483b349daad3565e48a779bf79927c373893458da3cd.jpg)
To cancel, select "Off".
Items shown differ depending on the type of disc and playback mode.
1
Random mode will be cleared when you change the repeat mode.
Using on-screen menus
1 Press [FUNCTIONS]⑥ to show the on-screen menu.
Each time you press the button:
Menu 1 (Disc)
Menu 2 (Video)
Menu 3 (Audio)
Exit
e.g. DVD-V Menu 1 (Disc)
Current item
![PANASONIC SC-XH155 - Press [FUNCTIONS]⑥ to show the on-screen menu. - 1](/content/2026/05/1006516/images/1da4bb664c6032a2e44f12615e4320339f1b1d225ee77aff99adc3d882c9b886.jpg)
2 Press [▲, ▼, ◀, ▶]⑧ to select the item and press [OK]⑧.
e.g. DVD-V Menu 1 (Disc)
Current setting
![PANASONIC SC-XH155 - Press [▲, ▼, ◀, ▶]⑧ to select the item and press [OK]⑧. - 1](/content/2026/05/1006516/images/a61eb871f83fb60e5696450f4b1fde4cc5b984cd21193da2d04d7a3aa0acdb8b.jpg)
3 Press [▲, ▼]⑧ to make the settings and press [OK]⑧.
[NO TEXT]
This does not work during HD JPEG playback ( 17, HD JPEG Mode JPEG)
Items shown will vary depending on the type of disc.
Menu 1 (Disc)
Track Search, Title Search, Content Search, Chapter Search
To start from a specific item
e.g. DVD-V: T2 C5
DVD-V DivX (with multiple soundtracks)
To select audio soundtrack
VCD
To select "L", "R", "L+R" or "L R"
Actual operations depend on the disc. Read the disc's instructions for details.
Signal type/data
LPCM/DTS */MP3/MPEG: Signal type
※ During playback of DTS source, there will be no sound from the speakers.
- DivX It may take some time for play to start if you change the audio on a DivX video disc.

Play Speed
DVD-V
To change play speed
- from "×0.6" to "×1.4" (in 0.1-unit steps)
- Press [▶ PLAY]⑤ to return to normal play.
• After you change the speed
– Dolby Pro Logic II has no effect.
– Audio output switches to 2-channel stereo.
– Sampling frequency of 96 kHz is converted to 48 kHz.
- This function may not work depending on the disc's recording.

Repeat Mode
(⇒ left, Repeat play)
A-B Repeat (To repeat a specified section)
Except JPEG DivX
Press [OK]⑧ at the starting and ending points.
- Select "Off" to cancel.

Subtitle
DVD-V (with multiple subtitles)
To select subtitle language
- On +R/+RW, a subtitle number may be shown for subtitles that are not displayed.
DivX ( 18, Displaying DivX subtitles text)

Angle
DVD-V (with multiple angles)
To select a video angle
Menu 2 (Video)

Transfer Mode
To select the method of conversion for video output to suit the type of material
Auto, Video
- When the content is distorted, select "Video".
- This may have no effect with some sources.
- The setting will return to "Auto" when the disc tray is opened, the unit is turned off or another source is selected.

Zoom
To select zoom
Normal, 1, 2, 3
Menu 3 (Audio)

Dialogue Enhancer
To make the dialogue in movies easier to hear
DVD-V DivX (Dolby Digital, 3-channel or higher, with the dialogue recorded in the center channel)
Off, On
Linked operations with the TV
(VIERA Link "HDAVI Control™")
What is VIERA Link "HDAVI Control"?
VIERA Link "HDAVI Control" is a convenient function that offers linked operations of this unit, and a Panasonic TV (VIERA) under "HDAVI Control". You can use this function by connecting the equipment with the HDMI cable. See the operating instructions for connected equipment for operational details.
Preparation
- Confirm that the HDMI connection has been made ( 8).
1 Set "VIERA Link" to "On" ( 17).
(The default setting is "On".)
2 Set the "HDAVI Control" operations on the connected equipment (e.g., TV).
3 Turn on all "HDAVI Control" compatible equipment and select this unit's input channel on the connected TV so that the "HDAVI Control" function will work properly.
Whenever the connection or settings are changed, repeat this procedure and reconfirm the points in "Setting the audio link"
(⇒ below).
Setting the audio link
■ Setting the audio link with the TV
Select "AV", "AUX", "ARC" or "DIGITAL IN" for TV audio link. Refer to TV audio setting in Easy setup ( 9) or "TV Audio" in HDMI menu ( 17). Confirm the TV audio connection to the SCART (AV) terminal (for "AV"), AUX terminal (for "AUX"), HDMI AV OUT terminal (for "ARC" *1) or DIGITAL AUDIO IN OPTICAL terminal (for "DIGITAL IN") on the main unit ( 8).
■ Setting the audio link with the STB
Select "D-IN" for STB audio link.
Refer to STB setting in "Making settings for digital audio input" ( 11). Confirm the STB audio connection to the DIGITAL AUDIO IN OPTICAL terminal (for "D-IN") on the main unit ( 8).
[NO TEXT]
- VIERA Link "HDAVI Control", based on the control functions provided by HDMI which is an industry standard known as HDMI CEC (Consumer Electronics Control), is a unique function that we have developed and added. As such, its operation with other manufacturers' equipment that supports HDMI CEC cannot be guaranteed.
- This unit supports "HDAVI Control 5" function. "HDAVI Control 5" is the newest standard (current as of December, 2010) for Panasonic's HDAVI Control compatible equipment. This standard is compatible with Panasonic's conventional HDAVI equipment.
- Please refer to individual manuals for other manufacturers' equipment supporting VIERA Link function.
Auto lip-sync
(For "HDAVI Control 3 or later")
This function automatically provides synchronised audio and video output. (This works only when the source is "DVD/CD", "USB", "AV" 2 , "AUX" 2 , "ARC" 1, 2 or "D-IN" 2, 3 .)
- When using "DVD/CD" or "USB" as the source, set "Time Delay" in Video menu to "0ms/Auto" (⇒ 17).
One touch play
You can turn the main unit and the TV on, and start playing a disc with a single press of a button.
(Remote control only)
During standby mode, press [▶ PLAY]⑤ to start disc playback.
This unit's speakers will be automatically activated ( right).
The image contains a graphical icon of an open book, which is not text. According to the guidelines, non-text figures/diagrams are to be ignored. Therefore, no OCR output is generated.
Playback may not be immediately displayed on the TV. If you miss the beginning portion of playback, press [SKIP ◀◀]⑤ or [SEARCH ◀◀]⑤ to go back to where playback started.
Auto input switching
(Power on link)
When the following operations are performed, the TV will automatically switch the input channel and display the corresponding action. Additionally when the TV is off, the TV will automatically turn on:
- When play starts on the unit
- When an action that uses the display screen is performed (e.g., START menu)
- When you switch the TV input to TV tuner mode or the STB input channel, this unit will automatically switch to "AV" 2 , "AUX" 2 , "ARC" 1,2 or "D-IN" 2,3 .
-
When this unit is in "DVD/CD" mode, the TV will automatically switch its input mode for this unit.
●The TV will automatically switch to TV tuner mode when: -
you press [EXIT]⑰. *4. 5
- you press [RETURN]⑳ to exit the START menu. *4, 5
- you select "AV"*2, "AUX"*2, "ARC"*1, 2 or "DIGITAL IN"*2 from the START menu.
- playback stops (DVD-V VCD) or when this unit turns off. 5
Power off link
All connected equipment compatible with "HDAVI Control", including this unit, automatically turn off when you switch the TV off.
To continue audio playback even when the TV is turned off, select "Video" ( 17, "Power Off Link" in HDMI menu).
[NO TEXT]
When you press [⏻]①, only this unit turns off. Other connected equipment compatible with VIERA Link "HDAVI Control" stays on.
For details, refer also to the operating instructions for your TV.
Speaker selection
You can select whether audio will output from this unit's speakers or the TV speakers by using the TV menu settings. For details, refer to the operating instructions for your TV.
Home Cinema
This unit's speakers are active.
- When you turn on this unit, this unit's speakers will be automatically activated.
- When this unit is in standby mode, changing the TV speakers to this unit's speakers in the TV menu will automatically turn this unit on and select "AV" 2 , "AUX" 2 , "ARC" 1,2 or "D-IN" 2,3 as the source.
●The TV speakers are automatically muted. - You can control the volume setting using the volume or mute button on the TV's remote control. (The volume level is displayed on the main unit's display.)
- To cancel muting, you can also use this unit's remote control ( 4).
- If you turn off this unit, TV speakers will be automatically activated.
TV
TV speakers are active.
●The volume of this unit is set to "0".
- This function works only when "DVD/CD", "USB", "AV" *2, "AUX" *2, "ARC" *1.2 or "D-IN" *2.3 is selected as the source on this unit.
●Audio output is 2-channel audio.
[0]
When switching between this unit speakers and TV speakers, the TV screen may go blank for several seconds.
| ※1 | The selection works only when using an ARC compatible TV. |
| ※2 | “AV”, “AUX”, “ARC” or “D-IN” (DIGITAL IN) works depending on the TV audio setting (⇒ left, Setting the audio link with the TV). |
| ※3 | “D-IN” (DIGITAL IN) works depending on the STB audio setting (⇒ left, Setting the audio link with the STB). |
※4 This does not work during playback or resume mode when "DVD/CD" or "USB" is selected as the source.
※5 Only after the TV automatically switched to the HDMI input mode for this unit.
Easy control only with VIERA remote control
(For "HDAVI Control 2 or later")
You can control the playback menus of this unit with the TV's remote control. When operating the TV's remote control, refer to the below illustration for operation buttons.
1 Select this unit's operation menu by using the TV menu settings.
(For details, refer to the operating instructions for your TV.)
The START menu will be shown.
e.g. DVD-V
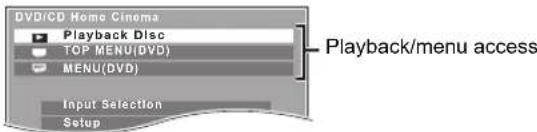
- The START menu can also be shown by using a button on the TV's remote control (e.g. [OPTION]).
- When "DVD/CD" or "USB" is selected as the source, the TV's remote control works only during stop mode.
2 Select the desired item on the START menu ( 10).
When the on-screen control panel appears
e.g. DVD-V (when "Playback Disc" is selected from the START menu.)

flowchart
graph TD
    A["II"] --> B["Center"]
    C["III"] --> B
    D["IV"] --> B
    B --> E["Arrow to Center"]
    style B fill:#f9f,stroke:#333
You can operate the playback with the indicated controls.
- The on-screen control panel can also be shown by using a button on the TV's remote control (e.g. [OPTION]).
- This works only during "DVD/CD" or "USB" playback and resume modes.
[NO TEXT]
- Depending on the menu, some button operations cannot be performed from the TV's remote control.
- You cannot input numbers with the numbered buttons on the TV's remote control ([0] to [9]). Use this unit's remote control to select the play list etc.
Playing from an USB device
You can connect and play tracks or files from USB mass storage class devices ( 19).
Devices which are defined as USB mass storage class:
- USB devices that support bulk only transfer.
Preparation
- Before connecting any USB mass storage device to the unit, ensure that the data stored therein has been backed up.
- It is not recommended to use a USB extension cable. The USB device connected using the cable will not be recognised by this unit.
1 Connect the USB device (not supplied) to the USB port (●7).
2 When you press [EXT-IN]④ to select "USB", this unit automatically starts playing the contents in the USB device.
- To playback a selected item, press [■ STOP]⑤ and refer to "Playing from the selected item" (⇒ 13).
- For other operating functions, they are similar to those described in "Playing Discs" (⇒ 12 to 14).
11
- Maximum: 189 folders (excluding Root folder), 1900 files, 16 characters for file/folder name.
- Only one memory card will be selected when connecting a multiport USB card reader. Typically the first memory card inserted.
Changing the player settings
1 Press [DVD]④ to select "DVD/CD".
2 Press [START] 18 to show the START menu.
3 Press [▲, ▼]⑧ to select "Setup" and press [OK]⑧.

4 Press [▲, ▼]⑧ to select menu and press [OK]⑧.
5 Press [▲, ▼]⑧ to select the item and press [OK]⑧.
6 Press [▲, ▼]⑧ to make the settings and press [OK]⑧.
- To return to the previous screen, press [RETURN]⑳.
- To exit the screen, press [START]⑱.
●The settings remain intact even if you switch the unit to standby.
● Underlined items are the factory settings in the following menus.
Language menu
Display
Choose the language for the on-screen messages.
| ●English | ●Français | ●Español | ●Deutsch |
| ●Русский | ●Magyar | ●Polski | ●Česky |
Audio※
Choose the audio language.
| ●English | ●French | ●Spanish | ●German |
| ●Russian | ●Hungarian | ●Polish | ●Czech |
Subtitle\*
Choose the subtitle language.
| ●Auto | ●English | ●French | ●Spanish |
| ●German | ●Russian | ●Hungarian | ●Polish |
| ●Czech | ●Off |
DVD Menu\*
Choose the language for disc menus.
| ●English | ●French | ●Spanish | ●German |
| ●Russian | ●Hungarian | ●Polish | ●Czech |
※ Some discs start in a certain language despite any changes you make here.
When the selected language is not available on the disc, the default language is played. There are discs where you can only switch the language from the menu screen ( 13).
Subtitle Text DivX
Select a suitable item according to the language used for DivX subtitles text ( 18).
| ●Latin1 | ● Latin2 | ● Cyrillic | ● Turkish |
Video menu
TV Aspect
Choose the setting to suit your TV.
•16:9: Widescreen TV (16:9)
●4:3 Pan&Scan: Regular aspect TV (4:3)
The sides of the widescreen picture are cut off so it fills the screen (unless prohibited by the disc).
●4:3 Letterbox: Regular aspect TV (4:3)
Widescreen picture is shown in the letterbox style.
Time Delay
When connected with a Plasma display, adjust if you notice the audio is out of sync with the video.
- 0ms/Auto
- 20ms
• 40ms
- 60ms
- 80ms - 100ms
When using VIERA Link "HDAVI Control" with "HDAVI Control 3 or later" compatible TV ( 15), select "0ms/Auto".
Audio and video will automatically be set in sync.
TV System
Choose the appropriate output source when connecting to a TV ( 19, Video systems).
- NTSC: When connected to an NTSC TV.
●PAL: When connected to a PAL TV.
●Auto: Selects the original output source when playing PAL or NTSC discs.
Video Resolution
This works only when the HDMI connection is being used.
Select suitable picture quality with your TV.
(Video recordings will be converted to, and output as, high-definition video.)
•Auto
●480i/576i ●
480p/576p ●
720p
●1080i ●1080p
Ensure that your TV can support the resolution that you choose.
If a message screen appears, confirm your selection by pressing
[◀, ▶]⑧ to select "Yes" and press [OK]⑧. If the picture is distorted, wait for 15 seconds or press [◀, ▶]⑧ to select "No". To accept the setting, select "Yes" again.
HD JPEG Mode JPEG
(This works only when using HDMI connection with "Video Resolution" ( above) set to "Auto", "720p", "1080i" or "1080p".)
- On: HD JPEG playback is available. (JPEG images will be displayed in original resolution.)
• Off
During HD JPEG playback, there will be no on-screen menus ( 14) and on-screen displays.
Video Out-SCART
Choose the video signal format to be output from the SCART (AV) terminal.
•Video
• S-Video
- RGB 1: (Only when connected to a RGB compatible TV) If you always would like to view the picture from the unit in RGB signal, select this mode. The TV screen will automatically switch to display the picture from the unit when the unit is turned on.
- RGB 2: (Only when connected to a RGB compatible TV)
When in TV tuner mode, if the selector is set to "DVD/CD", the TV screen will automatically switch to display the picture from the unit only during disc playback (|DVD-V||VCD|) or when viewing on-screen menu of DVD/CD.
The TV picture will be displayed when the selector is set to "AV". With other selectors, the picture from this unit will be displayed.
Audio menu
Select to suit the type of equipment you connected to the HDMI AV OUT terminal.
Select "Bitstream" when the equipment can decode the bitstream (digital form of 5.1-channel data). Otherwise, select "PCM".
(If the bitstream is output to the equipment without a decoder, high levels of noise can be output and may damage your speakers and hearing.)
Digital Output
- Bitstream
•PCM
When audio output is from HDMI AV OUT terminal, and the connected equipment does not support the item selected, the actual output will depend on the performance of this connected equipment.
Dynamic Range
- On: Adjusts for clarity even when the volume is low. Convenient for late night viewing. (Only works with Dolby Digital)
• Off
Speaker Settings
Select the delay time of the speakers.
(Effective only when "Surround layout (Recommended)" mode is selected in "Speaker layout" ( 9, Easy setup).)
(Center and surround speakers only)
For optimum listening with 5.1-channel sound, all the speakers, except for the subwoofer, should be the same distance from the seating position.
If you have to place the center or surround speakers closer to the seating position, adjust the delay time to make up for the difference.

flowchart
graph TD
    A["L"] --> B["C"]
    B --> C["R"]
    C --> D["SW"]
    D --> E["a"]
    E --> F["c"]
    F --> G["b"]
    G --> H["RS"]
    H --> I["RS"]
    I --> J["LS"]
    J --> K["LS"]

Actual speaker position

Ideal speaker position

① © : Primary listening distance
Approximate room dimensions
Circle of constant primary listening distance
If either distance (a) or (b) is less than (c) , find the difference in the table and change to the recommended setting.
| a Center speaker | b Surround speaker | ||
| Difference (Approx.) | Setting | Difference (Approx.) | Setting |
| 30 cm | 1ms | 150 cm | 5ms |
| 60 cm | 2ms | 300 cm | 10ms |
| 90 cm | 3ms | 450 cm | 15ms |
| 120 cm | 4ms | ||
| 150 cm | 5ms | ||
●C Delay (Center Delay):
0ms, 1ms, 2ms, 3ms, 4ms, 5ms Select the delay time for your center speaker.
- LS/RS Delay (Left Surround/Right Surround Delay): 0ms, 5ms, 10ms, 15ms
Select the delay time for your surround speakers.
- Test Tone:
Use the test tone to listen to the speaker output to confirm speaker connections.
Test tone will be output to each channel in the following order.
Left, Center, Right, Surround Right, Surround Left, Subwoofer
To stop the test tone, press [RETURN] 20 .
HDMI menu
VIERA Link
- On: The VIERA Link "HDAVI Control" function is available (⇒ 15).
- Off
Audio Out
- On: When audio output is from the HDMI AV OUT terminal. (Depending on the capabilities of the connected equipment, audio output may differ from the audio settings of the main unit.)
- Off: When audio output is not from the HDMI AV OUT terminal. (The audio is output using the settings of the main unit.)
Power Off Link
Select the desired power off link setting of this unit for VIERA Link operation ( 15). (This works depending on the settings of the connected VIERA Link "HDAVI Control" compatible equipment.)
- Video/Audio: When the TV is turned off, this unit will turn off automatically.
●Video: When the TV is turned off, this unit will turn off except during the following conditions:
– audio playback (CD MP3)
- radio mode
- "AV", "AUX", "ARC" or "D-IN" mode (non-selected TV audio setting for VIERA Link)
TV Audio
Select the TV audio input to work with the VIERA Link operations ( 15).
•AUX
•ARC
• DIGITAL IN
•AV
Others menu
DivX Registration DivX
Display the unit's registration code.
You need this registration code to purchase and play DivX Video-on-
Demand (VOD) content ( right).
DivX Deregistration DivX
Display the unit's deregistration code.
You need this deregistration code to cancel this unit's registration
(⇒ right).
This setting is only selectable after playing DivX VOD content for the first
time
Slide Show Time
Set the speed of the slideshow.
• 3 Seconds
- 5 Seconds
- 10 Seconds
• 15 Seconds
Easy setup
You can execute basic settings to optimise your home theater system.
(→ 9)
FL Dimmer
Change the brightness of the unit's display.
- Bright
- Dim: The display is dimmed.
- Auto: The display is dimmed, but brightens when you perform some operations.
Screen Saver
This is to prevent burn marks on the TV screen.
- Off
- Wait 5 min if there is no operation for 5 minutes, the screen saver will be shown. The TV screen will resume when you perform some operations. (This does not work during playback.)
Ratings
Set a rating level to limit DVD-Video play.
Setting ratings (When level 8 is selected)
• 1 to 7
- 8 No Limit
When you select your ratings level, a password screen is shown.
The default password is "8888".
Enter the 4-digit password with the numbered buttons, and press [OK]⑧.
You can change the default password ( below)
Do not forget your password.
A message screen will be shown if a DVD-Video disc exceeding the rating level is inserted in the unit.
Follow the on-screen instructions.
Set Password
Change the password for "Ratings".
When you change the password for the first time:
The default password is "8888".
Follow the on-screen instructions.
This returns all values in the Setup menu to the default settings except the password and ratings level.
Press [◀, ▶]⑧ to select "Yes" and press [OK]⑧.
Turn the unit off and on again.
DivX information
ABOUT DIVX VIDEO:
DivX® is a digital video format created by DivX, Inc. This is an official DivX Certified® device that plays DivX video. Visit divx.com for more
information and software tools to convert your files into DivX video.
ABOUT DIVX VIDEO-ON-DEMAND:
This DivX Certified ® device must be registered in order to play purchased DivX Video-on-Demand (VOD) movies.
To obtain your registration code, locate the DivX VOD section in your device setup menu.
Go to vod.divx.com for more information on how to complete your registration.
Display the unit's registration code
(⇒ left, "DivX Registration" in Others menu)

- After playing DivX VOD content for first time, "DivX Registration" is not selectable until this unit is deregistered.
- If you purchase DivX VOD content using a registration code different from this unit's code, you will not be able to play this content.
Cancel the unit's registration
Select "DivX Deregistration" ( left) and follow the on-screen instructions. Use the deregistration code to cancel the registration in
http://vod.divx.com.
Regarding DivX content that can only be played a set number of times
Some DivX VOD contents can only be played a set number of times.
When you play this content, the number of times already played and initially playable number of times is displayed.
- The remaining number of plays decreases each time a programme is played.
Resume function ( 12, [■ STOP]⑤) does not work.
Displaying DivX subtitles text
You can display subtitles text on a DivX video disc with this unit.
This function has no relation to the subtitles specified in the DivX standard specifications and has no clear standard.
Set "Subtitle" in Menu 1 (Disc) ( 14).
DivX video files that do not display "On" do not contain subtitles text.
Subtitles text cannot be displayed.
Types of subtitles text file that can be displayed
Subtitles text that satisfy the following conditions can be displayed on this unit.
- File format: MicroDVD, SubRip, or TMPlayer
- File extension: ".SRT", ".srt", ".SUB", ".sub", ".TXT", or ".txt"
- File name: No more than 16 characters excluding the file extension
- The DivX video file and subtitles text file are inside the same folder, and the file names are the same except for the file extensions.
- If there are more than one subtitles text files inside the same folder, they are displayed in the following order of priority: ".srt", ".sub", ".txt".
[NO TEXT]
- Depending on the methods used to create the file or the state of the recording, only parts of the subtitles may be displayed, or the subtitles may not be displayed at all.
- The subtitles text cannot be displayed during menu display or when operations such as search are being performed.
- If the subtitles text are not displayed correctly, try changing the subtitle text settings ( 16).
Media that can be played
Commercial discs
| Type of media/Logo | Remarks Indicated as | |
DVD-Video High quality movie and music discs  VIDEO VIDEO | DVD-V | |
Video CD Music discs with video Including SVCD (Conforming to IEC62107)  | VCD | |
CD Music discs  | ||
Recorded discs and USB devices
| Type of media/Logo | Formats Indicated as | |
DVD-R/RW R4.7 R4.7 | ●DVD-Video Format●MP3 format●JPEG format●DivX® format | DVD-VMP3JPEGDivX |
DVD-R DL R DL R DL | ●DVD-Video Format●DivX® format | DVD-VDivX |
| +R/+RW/+R DL | ●+VR (+R/+ RW Video Recording) Format | DVD-V |
| CD-R/RW ● | CD-DA format●MP3 format●JPEG format●DivX® format | CDMP3JPEGDivX |
| USB device | ●MP3 format●JPEG format●DivX® format | MP3JPEGDivX |
- Before playback, finalise the disc on the device it was recorded on.
- It may not be possible to play all the above-mentioned medias in some cases due to the type of media, the condition of the recording, the recording method, or how the files were created ( right, About MP3/ JPEG/DivX files).
- During playback of DTS source, there will be no sound from the speakers.
Note about using a DualDisc
The digital audio content side of a DualDisc does not meet the technical specifications of the Compact Disc Digital Audio (CD-DA) format so playback may not be possible.
Discs that cannot be played
Blu-ray Discs, HD DVD, AVCHD discs, DVD-RW version 1.0, DVD-Audio, DVD-ROM, DVD-VR, CD-ROM, CDV, CD-G, SACD, DTS Music Discs, WMA discs and Photo CD, DVD-RAM, and "Chaoji VCD" available on the market including CVD, DVCD and SVCD that do not conform to IEC62107.
Video systems
This unit can play PAL and NTSC, but the "TV System" ( 17) of this unit must match the system of your TV.

Depending on the PAL video on the disc, the image may not be displayed correctly on an NTSC TV.
Disc handling precautions
- Do not attach labels or stickers to discs. This may cause disc warping, rendering it unusable.
- Do not write on the label side with a ball-point pen or other writing instrument.
- Do not use record cleaning sprays, benzine, thinner, liquids which prevent static electricity, or any other solvent.
- Do not use scratch-proof protectors or covers.
- Do not use the following discs:
– Discs with exposed adhesive from removed stickers or labels (rented discs, etc.).
– Discs that are badly warped or cracked.
– Irregularly shaped discs, such as heart shapes.
About MP3/JPEG/DivX files
MP3 (Extension: “.MP3”, “.mp3”)
- Sampling frequency and compression rate:
- 8 kHz, 11.02 kHz, 12 kHz, 16 kHz, 22.05 kHz, 24 kHz (8 kbps to 160 kbps), 32 kHz, 44.1 kHz and 48 kHz (32 kbps to 320 kbps)
• ID3 tags: version 1, 2
JPEG (Extension: “.JPG”, “.jpg”, “.JPEG”, “.jpeg”)
- JPEG files taken on a digital camera that conform to DCF Standard (Design rule for Camera File system) Version 1.0 are displayed.
- Files that have been altered, edited or saved with computer picture editing software may not be displayed.
- This unit cannot display moving pictures, MOTION JPEG and other such formats, still pictures other than JPEG (e.g. TIFF), or play pictures with attached audio.
DivX (Extension: “.DIVX”, “.divx”, “.AVI”, “.avi”)
- DivX files greater than 2 GB or have no index may not be played properly on this unit.
-
This unit supports all resolutions up to maximum of 720 × 480 (NTSC)/ 720 × 576 (PAL).
-
There may be differences in the display order on the menu screen and computer screen.
- This unit cannot play files recorded using packet write.
DVD-R/RW
- Discs must conform to UDF bridge (UDF 1.02/ISO9660).
- This unit does not support multi-session. Only the default session is played.
CD-R/RW
- Discs must conform to ISO9660 level 1 or 2 (except for extended formats).
- This unit supports multi-session but if there are many sessions it takes more time for play to start. Keep the number of sessions to a minimum to avoid this.
USB device
●This unit does not guarantee connection with all USB devices.
●This unit does not support USB device charging.
●FAT12, FAT16 and FAT32 file systems are supported.
●This unit supports USB 2.0 Full Speed.
Maintenance
Clean this unit with a soft, dry cloth
- Never use alcohol, paint thinner or benzine to clean this unit.
- Before using chemically treated cloth, carefully read the instructions that came with the cloth.
Do not use commercially available lens cleaners as they may cause malfunction. Cleaning of the lens is generally not necessary although this depends on the operating environment.
Before moving the unit, ensure the disc tray is empty. Failure to do so will risk severely damaging the disc and the unit.
Speaker installation option
Attaching to a wall
You can attach all of the speakers (except subwoofer) to a wall.
- The wall or pillar on which the speakers are to be attached should be capable of supporting 10 kg per screw. Consult a qualified building contractor when attaching the speakers to a wall. Improper attachment may result in damage to the wall and speakers.
1 Drive a screw (not supplied) into the wall.
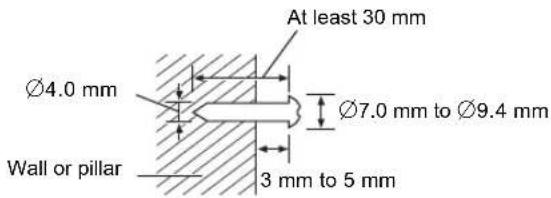
2 Fit the speaker securely onto the screw(s) with the hole(s).
| e.g., Surround speaker | |
| DO NOT DO | |
 | [07YD] |
| In this position, the speaker will likely fall if moved to the left or right. | Move the speaker so that the screw is in this position. |
Tips
Use the measurements indicated below to identify the screwing positions on the wall.
- Leave at least 20 mm of space above the speaker and 10 mm on each side to allow enough space for fitting the speaker.
Surround speaker Center speaker


Front speaker
Attach to a wall without the base and the stand

■ To prevent speakers from falling
Front speaker, Surround speaker, Center speaker
e.g. Front speaker
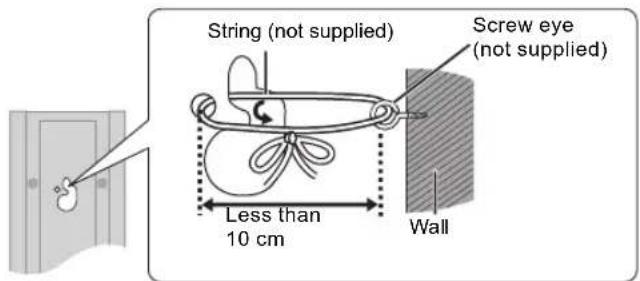
Reattaching the speaker cable

Troubleshooting guide
Before requesting service, make the following checks. If you are in doubt about some of the check points, or if the solutions indicated in the following guide do not solve the problem, consult your dealer for instructions.
Power
No power.
Insert the AC mains lead securely. ( 9)
The unit is automatically switched to standby mode.
- The Sleep timer was working and had reached the set time limit. ( 4)
- The main unit will automatically switch to standby mode after 30 minutes of inactivity. (⇒ 4)
Power of this unit is turned off when the input for the TV is changed.
This is normal when using VIERA Link "HDAVI Control 4 or later". For details please read the operating instructions for the TV.
Unit displays
The display is dark.
Select "Bright" in "FL Dimmer" in the Others menu. ( 18)
"NO PLAY"
- You inserted a disc the unit cannot play; insert one it can. (→ 19)
- You inserted a blank disc.
- You inserted a disc that has not been finalised.
"NO DISC"
- You have not inserted a disc; insert one.
- You have not inserted the disc correctly; insert it correctly. (⇒ 12)
"OVER CURRENT ERROR"
The USB device is drawing too much power. Switch to "DVD/CD" mode, remove the USB and turn the unit off.
"F61"
Check and correct the speaker cable connections. If this does not fix the problem, consult the dealer. ( 7)
"F76"
There is a power supply problem. Consult the dealer.
"DVD U11"
Disc may be dirty. Wipe it clean.
"ERROR"
Incorrect operation performed. Read the instructions and try again.
“DVD H□□”
“DVD F□□□”
□ stands for a number.
- Trouble may have occurred. The numbers following "H" and "F" depend on the status of the unit. Turn the unit off and then back on.
Alternatively, turn the unit off, disconnect the AC mains lead, and then reconnect it. - If the service numbers fail to clear, note the service number and contact a qualified service person.
“U70□”
☐ stands for a number. (The actual number following "U70" will depend on the state of the main unit.)
The HDMI connection acts unusually.
- The connected equipment is not HDMI-compatible.
- Please use High Speed HDMI Cables that have the HDMI logo (as shown on the cover).
– The HDMI cable is too long.
– The HDMI cable is damaged.
"REMOTE 1" or "REMOTE 2"
Match the modes on the main unit and remote control. Depending on the number being displayed ("1" or "2"), press and hold [OK]⑧ and the corresponding numbered button ([1] or [2]) for at least 2 seconds. (⇒ 4)
General operation
No response when any buttons are pressed.
- This unit cannot play discs other than the ones listed in these operating instructions. (⇒ 19)
- The unit may not be operating properly due to lightning, static electricity or some other external factor. Turn the unit off and then back on. Alternatively, turn the unit off, disconnect the AC mains lead, and then reconnect it.
- Condensation has formed. Wait 1 to 2 hours for it to evaporate.
No response when remote control buttons are pressed.
- Check that the batteries are installed correctly. (⇒ 9)
- The batteries are depleted. Replace them with new ones. ( 9)
- Aim the remote control at the remote control signal sensor and operate. (⇔ 4)
Other products respond to the remote control.
Change the remote control operating mode. ( 4)
Cannot display the START menu.
Remove the disc and then press [START] 18 again.
No picture or sound.
- Check the video or speaker connection. (→ 7, 8)
- Check the power or input setting of the connected equipment and the main unit.
- Check that the disc has something recorded on it.
- During HD JPEG playback, there will be no video output from the VIDEO OUT terminal.
No on-screen menus/displays.
JPEG This is normal during HD JPEG playback.
You have forgotten your ratings password.
Reset all the settings to Factory Preset. While stopped and "DVD/CD" is the source, press and hold [■]⑥ on the main unit and [≥10]② on the remote control until "RESET" appears on the main unit's display. Turn the unit off and on again. All settings will return to the default values.
Some characters are not displayed correctly.
Characters other than English alphabet and Arabic numerals may not be displayed correctly.
The VIERA Link "HDAVI Control" function does not respond.
Depending on the condition of this unit or the connected equipment, it may be necessary to repeat the same operation so that the function can work correctly. ( 15)
The setting you made in "TV Aspect" ( 16, Video menu) or "Display" ( 16, Language menu) does not work.
The settings for "TV Aspect" 1 and "Display" 2 will automatically follow the information from the TV. ( 9, Easy setup)
※1 When using VIERA Link "HDAVI Control" with "HDAVI Control 3 or later" compatible TV
※2 When using VIERA Link "HDAVI Control" with "HDAVI Control 2 or later" compatible TV
Disc operation
It takes time before play starts.
- Play may take time to begin when an MP3 track has still picture data. Even after the track starts, the correct play time will not be displayed. This is normal. MP3
●This is normal on DivX video. DivX
A menu screen appears during skip or search. VCD
This is normal for Video CDs.
Playback control menu does not appear.
VCD with playback control
Press [MENU] 19 to change to PBC on and then press [RETURN] 20 during playback.
Play does not start.
- If playing DivX VOD content, refer to the homepage where you purchased the DivX VOD content. (Example: http://vod.divx.com) DivX
- If a disc contains CD-DA and other formats, proper playback may not be possible.
No subtitles.
- Display the subtitles. ("Subtitle" in Menu 1) (⇒ 14)
- Subtitles may not be displayed depending on the disc. DivX
Point B is automatically set.
The end of an item becomes point B when it is reached.
The Setup menu cannot be accessed.
Select "DVD/CD" or "USB" as the source.
Sound
Sound is distorted.
When using the HDMI output, audio may not output from other terminals.
Effects do not work.
Some audio effects do not work or have less effect with some discs.
Humming is heard during play.
An AC mains lead or fluorescent light is near the main unit. Keep other appliances and cables away from the main unit.
No sound.
- There may be a slight pause in sound when you change the play speed.
- If the input source is bitstream, set the sound setting to PCM on the external equipment.
- Audio may not be output due to how the files were created. DivX
- During playback of DTS source, there will be no sound from the speakers. Select a different audio source (e.g. Dolby Digital). (⇒ 14)
No sound from the TV.
- If the TV is not ARC compatible and only the HDMI connection is used, an extra audio connection is necessary. (⇒ 8)
- Confirm the audio connection. Press [EXT-IN]④ to select the corresponding source. (⇒ 8, 10)
- When using the HDMI connection, ensure that "Audio Out" in the HDMI menu is set to "On". (⇒ 17)
No sound from the surround speakers.
- When using the "Surround layout (Recommended)" mode, press [SURROUND]⑪ to select "MULTI-CH". (⇒ 11)
- When using the "Front layout (Alternative)" mode, press [SURROUND]⑪ to select "A.SRD". (⇒ 11)
Picture
The picture on the TV is not displayed correctly or disappears.
- The unit and TV are using different video systems. Use a multi-system or PAL TV.
- The system used on the disc does not match your TV.
- Change the "TV System" settings to match your TV. (⇒ 17) (Depending on the PAL video on the disc, the image may not be displayed correctly on an NTSC TV.)
- Ensure that the unit is connected directly to the TV, and is not connected through a VCR. ( 8)
- Mobile telephone chargers can cause some disturbance.
- If you are using an indoor TV antenna, change to an outdoor antenna.
- The TV antenna wire is too close to the unit. Move it away from the unit.
- Reduce the number of connected HDMI devices.
- When using the HDMI AV OUT terminal, ensure that an incompatible video output with the connected TV is not selected. Set the "Video Resolution" in Video menu to "480p/576p". (⇒ 17)
- Video images converted to 1920 × 1080 resolution may look different from the true native 1080p full-HD sources. This is not a malfunction of the main unit.
- When the HDMI cable is connected, there will be no RGB output from the SCART (AV) terminal. If the SCART (AV) terminal is to be used, remove the HDMI cable and turn this unit on/off again.
Picture size does not fit the screen.
- Change "TV Aspect" in the Video menu. (⇒ 16)
- Use the TV to change the aspect.
- Change the zoom setting. ("Zoom" in Menu 2) (⇒ 14)
- JPEG This is normal during HD JPEG playback. Set "HD JPEG Mode" to "Off" if you want to perform zoom function. (→ 17)
Menu is not displayed correctly.
Restore the zoom ratio to "Normal". ("Zoom" in Menu 2) (→ 14)
Display is distorted.
JPEG This is normal when the display switches to/from HD JPEG playback.
After choosing “Home Cinema” in “Speaker selection” with the TV’s remote control, the TV’s input selection also changes.
Disconnect the HDMI cable from the TV and reconnect it to a different HDMI terminal.
USB
The USB drive or its contents cannot be read.
- The USB drive format or its contents is/are not compatible with the system. (→ 16)
- The USB host function of this product may not work with some USB devices.
- USB devices with storage capacity of more than 32 GB may not work in some instances.
Slow operation of the USB device.
Large file size or high memory USB device takes longer time to read and display on the TV.
HDMI progressive video
There is ghosting when HDMI progressive output is on.
This problem is caused by the editing method or material used on DVD-Video, but should be corrected if you use interlaced output. When using the HDMI AV OUT terminal, set "Video Resolution" in Video menu to "480i/576i". Or, disable the HDMI connection and use the other video connection. ( 8, 17)
Radio
Distorted sound or noise is heard.
- Adjust the position of the FM antenna.
- Use an outdoor antenna. (⇒ 7)
A beat sound is heard.
Turn the TV off or move it away from the unit.
TV displays
“”
The operation is prohibited by the unit or disc.
"Incorrect Disc Region"
Only DVD-Video discs that include or have the same region number as the one on the rear panel of this unit can be played. (⇒ Cover page)
Licenses
Manufactured under license from Dolby Laboratories. Dolby, Pro Logic, and the double-D symbol are trademarks of Dolby Laboratories.
This item incorporates copy protection technology that is protected by U.S. patents and other intellectual property rights of Rovi Corporation. Reverse engineering and disassembly are prohibited.
HDMI, the HDMI Logo, and High-Definition Multimedia Interface are trademarks or registered trademarks of HDMI Licensing LLC in the United States and other countries.
HDAVI Control™ is a trademark of Panasonic Corporation.
"DVD Logo" is a trademark of DVD Format/Logo Licensing Corporation.
DivX ® , DivX Certified ® and associated logos are trademarks of DivX, Inc. and are used under license.
MPEG Layer-3 audio coding technology licensed from Fraunhofer IIS and Thomson.
Specifications
AMPLIFIER SECTION
RMS Output Power: Dolby Digital Mode
| Front Ch | 160 W per channel (3 Ω), 1 kHz, 10 % THD |
| Surround Ch | 160 W per channel (3 Ω), 1 kHz, 10 % THD |
| Center Ch | 160 W per channel (3 Ω), 1 kHz, 10 % THD |
| Subwoofer Ch | 200 W per channel (3 Ω), 100 Hz, 10 % THD |
Total RMS Dolby Digital mode power 1000 W
FM TUNER, TERMINALS SECTION
Preset Memory FM 30 stations
Frequency Modulation (FM)
| Frequency range 87.50 MHz to 108.00 MHz (50-kHz step) |
| Antenna terminals 75 Ω (unbalanced) |
Digital audio input
| Optical digital input | Optical terminal |
| Sampling frequency | 32 kHz, 44.1 kHz, 48 kHz |
USB Port
| USB standard | USB 2.0 Full Speed |
| Media file format support | MP3 (*.mp3) |
| JPEG (*.jpg, *.jpeg) | |
| DivX (*.divx, *.avi) | |
| USB device file system | FAT12, FAT16, FAT32 |
| USB Port power | Max. 500 mA |
| Bit rate | Up to 4 Mbps (DivX) |
DISC SECTION
Discs played (8 cm or 12 cm)
(1) DVD (DVD-Video, DivX※4.5)
(2) DVD-R (DVD-Video, MP3 ≈2,4, JPEG※3,4, DivX ≈4,5)
(3) DVD-R DL (DVD-Video, DivX 4,5 )
(4) DVD-RW (DVD-Video, MP3※2,4, JPEG※3,4, DivX※4,5)
(5) +R/+RW (Video)
(6) +R DL (Video)
(7) CD, CD-R/RW (CD-DA, Video CD, SVCD *1, MP3*2,4, JPEG *3,4, DivX*4,5)
※1 Conforming to IEC62107
※2 MPEG-1 Layer 3, MPEG-2 Layer 3, MPEG-2.5 Layer 3
※3 Exif Ver 2.0 JPEG Baseline files
Picture resolution:
16:9 min. size 4×4, max. size (720×8)×(405×8);
4:3 min. size 4×4, max. size (720×8)×(540×8)
※4 The total combined maximum number of recognizable audio, picture and video contents and groups: 1900 audio, picture and video contents and 189 groups. (Excluding Root folder)
※5 Plays DivX® video.
Pick up
| Wavelength (DVD/CD) | 655/790 nm |
| Laser power | CLASS 1M |
Audio output (Disc)
| Number of channels | 5.1 ch (FL, FR, C, SL, SR, SW) |
VIDEO SECTION
| Video system | PAL, NTSC |
| Composite video output | |
| Output level | 1 Vp-p (75 Ω) |
| Terminal | SCART jack (1 system) |
| S-video output | |
| Y output level | 1 Vp-p (75 Ω) |
| C output level | PAL; 0.3 Vp-p (75 Ω)NTSC; 0.286 Vp-p (75 Ω) |
| Terminal | SCART jack (1 system) |
| RGB video output | |
| R output level | 0.7 Vp-p (75 Ω) |
| G output level | 0.7 Vp-p (75 Ω) |
| B output level | 0.7 Vp-p (75 Ω) |
| Terminal | SCART jack (1 system) |
| HDMI AV output | |
| Terminal | 19-pin type A connector |
| HDAVI Control | This unit supports “HDAVI Control 5” function. |
SPEAKER SECTION
| Front speakers SB-HF167 | |
| Type | 1 way, 1 speaker system (Bass reflex) |
| Speaker unit(s) | Impedance 3 Ω |
| Full range | 6.5 cm Cone type |
| Output sound pressure | 78 dB/W (1 m) |
| Frequency range | 75 Hz to 25 kHz (-16 dB)90 Hz to 22 kHz (-10 dB) |
| Dimensions (W×H×D) | 100.5 mm×522.5 mm×78.8 mm |
| Mass | 0.9 kg |
| Full assembly with stand base | |
| Dimensions (W×H×D) max | 291.2 mm×1185 mm×291.2 mm |
| Mass | 2.35 kg |
| Dimensions (W×H×D) min | 291.2 mm×542.3 mm×291.2 mm |
| Mass | 1.6 kg |
| Surround speakers SB-HS270 | |
| Type | 1 way, 1 speaker system (Bass reflex) |
| Speaker unit(s) | Impedance 3 Ω |
| Full range | 6.5 cm Cone type |
| Output sound pressure | 78 dB/W (1 m) |
| Frequency range | 105 Hz to 25 kHz (-16 dB)130 Hz to 22 kHz (-10 dB) |
| Dimensions (W×H×D) | 80 mm×117 mm×70.5 mm |
| Mass | 0.35 kg |
| Center speaker SB-HC270 | |
| Type | 1 way, 1 speaker system (Bass reflex) |
| Speaker unit(s) | Impedance 3 Ω |
| Full range | 6.5 cm Cone type |
| Output sound pressure | 79 dB/W (1 m) |
| Frequency range | 90 Hz to 25 kHz (-16 dB)115 Hz to 22 kHz (-10 dB) |
| Dimensions (W×H×D) | 145 mm×81 mm×70.5 mm |
| Mass | 0.52 kg |
| Subwoofer SB-HW370 | |
| Type | 1 way, 1 speaker system (Bass reflex) |
| Speaker unit(s) | Impedance 3 Ω |
| Woofer | 16 cm Cone type |
| Output sound pressure | 78 dB/W (1 m) |
| Frequency range | 30 Hz to 220 Hz (-16 dB)35 Hz to 180 Hz (-10 dB) |
| Dimensions (W×H×D) | 180 mm×408 mm×300 mm |
| Mass | 4.3 kg |
GENERAL
| Power supply | AC 220 V to 240 V, 50 Hz |
| Power consumption | Main unit 75 W |
| Dimensions (W×H×D) | 430 mm×38 mm×279 mm |
| Mass | Main unit 2.6 kg |
| Operating temperature range | 0 °C to +40 °C |
| Operating humidity range | 35 % to 80 % RH (no condensation) |
Power consumption in standby mode
approx. 0.8 W
The image contains no text.
1 Specifications are subject to change without notice. Mass and dimensions are approximate.
2 Total harmonic distortion is measured by a digital spectrum analyzer.
Safety precautions
Placement
Set the unit up on an even surface away from direct sunlight, high temperatures, high humidity, and excessive vibration. These conditions can damage the cabinet and other components, thereby shortening the unit's service life.
Do not place heavy items on the unit.
Voltage
Do not use high voltage power sources. This can overload the unit and cause a fire.
Do not use a DC power source. Check the source carefully when setting the unit up on a ship or other places where DC is used.
AC mains lead protection
Ensure the AC mains lead is connected correctly and not damaged. Poor connection and lead damage can cause fire or electric shock. Do not pull, bend, or place heavy items on the lead.
Grasp the plug firmly when unplugging the lead. Pulling the AC mains lead can cause electric shock.
Do not handle the plug with wet hands. This can cause electric shock.
Foreign matter
Do not let metal objects fall inside the unit. This can cause electric shock or malfunction.
Do not let liquids get into the unit. This can cause electric shock or malfunction. If this occurs, immediately disconnect the unit from the power supply and contact your dealer.
Do not spray insecticides onto or into the unit. They contain flammable gases which can ignite if sprayed into the unit.
Service
Do not attempt to repair this unit by yourself. If sound is interrupted, indicators fail to light, smoke appears, or any other problem that is not covered in these instructions occurs, disconnect the AC mains lead and contact your dealer or an authorized service center. Electric shock or damage to the unit can occur if the unit is repaired, disassembled or reconstructed by unqualified persons.
Extend operating life by disconnecting the unit from the power source if it is not to be used for a long time.
Information for Users on Collection and Disposal of Old Equipment and used Batteries


These symbols on the products, packaging, and/or accompanying documents mean that used electrical and electronic products and batteries should not be mixed with general household waste.
For proper treatment, recovery and recycling of old products and used batteries, please take them to applicable collection points, in accordance with your national legislation and the Directives 2002/96/EC and 2006/66/EC. By disposing of these products and batteries correctly, you will help to save valuable resources and prevent any potential negative effects on human health and the environment which could otherwise arise from inappropriate waste handling.
For more information about collection and recycling of old products and batteries, please contact your local municipality, your waste disposal service or the point of sale where you purchased the items.
Penalties may be applicable for incorrect disposal of this waste, in accordance with national legislation.

For business users in the European Union If you wish to discard electrical and electronic equipment, please contact your dealer or supplier for further information.
[Information on Disposal in other Countries outside the European Union]
These symbols are only valid in the European Union. If you wish to discard these items, please contact your local authorities or dealer and ask for the correct method of disposal.
![PANASONIC SC-XH155 - [Information on Disposal in other Countries outside the European Union] - 1](/content/2026/05/1006516/images/cd3391a4ff11ecaa7cc8f739345a99fead9c802fa1d903fb9cc41a59672d285c.jpg)
Cd
Note for the battery symbol (bottom two symbol examples):
This symbol might be used in combination with a chemical symbol. In this case it complies with the requirement set by the Directive for the chemical involved.

natural_image
3D rendered black cylindrical object with a flared base, no text or symbols visibleS.SRD (Super Surround)
A.SRD (Advanced Surround):
C, RS, LS, SW, S: -6 dB do +6 dB
• 480i/576i • 480p/576p • 720p
• 1080i • 1080p
E 16,7 mm
F 63,7 mm
G 23 mm
H 96 mm
26 mm
Čelní reproduktor
J 64,5 mm
348,5 mm
109,5 mm
M 50,3 mm
N 50,3 mm
"REMOTE 1" nebo "REMOTE 2"
DivX ® , DivX Certified ® and associated logos are trademarks of DivX, Inc. and are used under license.
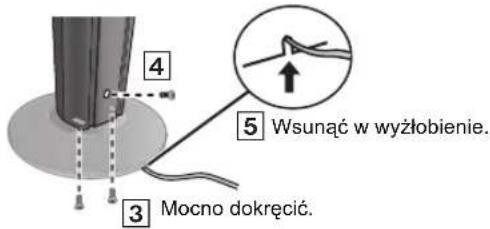
natural_image
3D model of a vertical cylindrical object with labeled parts (1 and 2), no text or symbols present.natural_image
3D rendered image of a vertical cylindrical object with a flared base (no text or symbols)3 Założ pokrywę.
UWAGA
The image contains a graphical icon of an open book. There is no text, mathematical formulas, tables, or figures present in the image.
S.SRD (Super Surround)
A.SRD (Advanced Surround):
C, RS, LS, SW, S: -6 dB do +6 dB
np. Aby wybrać 12: [≥10]② → [1] → [2]
Aby wybrać "L", "P", "L+P" lub "L P"
(VIERA Link "HDAVI ControlTM")
• Auto • 480i/576i • 480p/576p • 720p
• 1080i • 1080p
0ms, 1ms, 2ms, 3ms, 4ms, 5ms
E 16,7 mm
F 63,7 mm
G 23 mm
H 96 mm
26 mm
Głośniki przednie
"REMOTE 1" lub "REMOTE 2"
DivX ® , DivX Certified ® and associated logos are trademarks of DivX, Inc. and are used under license.
System wideo PAL, NTSC

natural_image
Mechanical assembly diagram showing a base mount with clamping mechanism and cable (no text or symbols)natural_image
3D rendered image of a black cylindrical object with a flared base (no text or symbols)The image contains no text.
• 480i/576i • 480p/576p • 720p
• 1080i • 1080p
The image is too blurry to recognize any text content.
E 16,7 mm
F 63,7 mm
G 23 mm
H 96 mm
1 26 mm
Első hangsugárzók
64,5 mm
K 348,5 mm
109,5 mm
M 50,3 mm
N 50,3 mm
Pursuant to at the directive 2004/108/EC, article 9(2)
Panasonic Testing Centre
Panasonic Marketing Europe GmbH
Winsbergring 15, 22525 Hamburg, Germany
Panasonic Corporation
Web Site: http://panasonic.net


- Dear customer
- Vážený zákazníku
- Avoiding interference with other Panasonic equipment
- Main unit
- POWER-SAVING FEATURES
- The main unit is designed to conserve its power consumption and save energy.
- ■ Auto power-down function
- TABLE OF CONTENTS
- Getting Started
- Quick Start Guide
- Enjoying sound effects from all speakers
- Playing Discs
- Other Operations
- Reference
- CAUTION!
- WARNING:
- step 1 Preparing the speakers
- Front speakers
- Preparation
- Speaker assembly option
- Preventing the speakers from falling
- Caution
- step 2 Positioning
- Notes on speaker use
- - Use only supplied speakers
- If irregular colouring occurs on your TV
- step 3 Connections
- Speaker connections
- Main unit (rear)
- Speakers (rear)
- Radio antenna connections
- Using an outdoor antenna
- 3
- Audio and video connections
- Recommended connection to a TV
- VIERA Link "HDAVI Control"
- 1
- ■ Connection with an ARC compatible TV
- What is ARC?
- ■ Connection without an ARC compatible TV
- AUX
- Set Top Box (cable/satellite/Blu-ray Disc player, etc) connection
- The image contains no text.
- step 4 AC mains lead connection
- Conserving power
- step 5 Preparing the remote control
- Batteries
- Do not:
- Use
- step 6 Easy setup
- The Easy setup screen assists you in making necessary settings.
- [1]
- Listening to the radio
- Presetting stations automatically
- Listening/confirming the preset channels
- If noise is excessive
- Manual tuning
- Presetting stations manually
- RDS broadcasting
- Using the START menu
- Listening to the TV or other device's audio from this unit's speakers
- Press [EXT-IN]④ to choose the source that is used to connect this unit to the TV or other device.
- Making settings for digital audio input
- Enjoying surround sound effects
- Press [SURROUND]⑪.
- Selecting sound mode
- Press [SOUND]⑩ to select a sound mode.
- While the selected mode is displayed, press [◀, ▶]⑧ to make the settings.
- EQ (Equaliser)
- SUBW LVL (Subwoofer level)
- C.FOCUS (Center Focus)
- Whisper-mode Surround
- Press [W.SRD] 22 .
- Adjusting the speaker level during playback
- Press and hold [-CH SELECT] ⑩ to select the speaker. While the speaker channel is displayed, press [-CH SELECT] ⑩ .
- While "C", "RS", "LS", "SW" or "S" is selected Press [▲]⑧ (increase) or [▼]⑧ (decrease) to adjust the speaker level for each speaker.
- Adjusting the speaker balance during playback
- Press and hold [-CH SELECT]⑩ to select "L" or "R".
- While "L" or "R" is selected Press [◀, ▶]⑧ to adjust the speaker balance.
- Basic play
- Press [⏻]① to turn on the unit.
- Press [DVD]④ to select "DVD/CD".
- Press [▲ OPEN/CLOSE]② to open the disc tray.
- Load the disc.
- Press [▶ PLAY]⑤ to start play.
- Basic controls
- Stop: [■ STOP]⑤
- Pause: [II PAUSE]⑤
- Playing from the selected item
- Other modes of play
- Random play
- Repeat play
- During play, press and hold [-REPEAT]⑨, to show the repeat mode.
- Using on-screen menus
- Press [FUNCTIONS]⑥ to show the on-screen menu.
- Press [▲, ▼, ◀, ▶]⑧ to select the item and press [OK]⑧.
- Press [▲, ▼]⑧ to make the settings and press [OK]⑧.
- Menu 1 (Disc)
- Track Search, Title Search, Content Search, Chapter Search
- Signal type/data
- Play Speed
- DVD-V
- To change play speed
- Repeat Mode
- (⇒ left, Repeat play)
- Subtitle
- DVD-V (with multiple subtitles)
- To select subtitle language
- Angle
- Menu 2 (Video)
- Transfer Mode
- To select the method of conversion for video output to suit the type of material
- Auto, Video
- Zoom
- Menu 3 (Audio)
- Dialogue Enhancer
- Linked operations with the TV
- (VIERA Link "HDAVI Control™")
- What is VIERA Link "HDAVI Control"?
- Whenever the connection or settings are changed, repeat this procedure and reconfirm the points in "Setting the audio link"
- Setting the audio link
- ■ Setting the audio link with the TV
- ■ Setting the audio link with the STB
- [NO TEXT]
- Auto lip-sync
- (For "HDAVI Control 3 or later")
- One touch play
- During standby mode, press [▶ PLAY]⑤ to start disc playback.
- The image contains a graphical icon of an open book, which is not text. According to the guidelines, non-text figures/diagrams are to be ignored. Therefore, no OCR output is generated.
- Auto input switching
- (Power on link)
- Power off link
- Speaker selection
- Home Cinema
- TV
- [0]
- Easy control only with VIERA remote control
- (For "HDAVI Control 2 or later")
- Playing from an USB device
- 11
- Changing the player settings
- Language menu
- Display
- Audio※
- Subtitle\*
- DVD Menu\*
- Subtitle Text DivX
- Video menu
- TV Aspect
- Time Delay
- TV System
- Video Resolution
- HD JPEG Mode JPEG
- Video Out-SCART
- Audio menu
- Digital Output
- Dynamic Range
- Speaker Settings
- HDMI menu
- VIERA Link
- Audio Out
- TV Audio
- Others menu
- DivX Registration DivX
- DivX Deregistration DivX
- Slide Show Time
- Easy setup
- FL Dimmer
- Screen Saver
- Ratings
- Do not forget your password.
- Set Password
- DivX information
- ABOUT DIVX VIDEO:
- ABOUT DIVX VIDEO-ON-DEMAND:
- Display the unit's registration code
- Cancel the unit's registration
- Regarding DivX content that can only be played a set number of times
- Displaying DivX subtitles text
- Types of subtitles text file that can be displayed
- Media that can be played
- Note about using a DualDisc
- Discs that cannot be played
- Video systems
- Disc handling precautions
- About MP3/JPEG/DivX files
- MP3 (Extension: “.MP3”, “.mp3”)
- JPEG (Extension: “.JPG”, “.jpg”, “.JPEG”, “.jpeg”)
- DivX (Extension: “.DIVX”, “.divx”, “.AVI”, “.avi”)
- DVD-R/RW
- CD-R/RW
- USB device
- Maintenance
- Clean this unit with a soft, dry cloth
- Speaker installation option
- Attaching to a wall
- Tips
- ■ To prevent speakers from falling
- Troubleshooting guide
- Power
- No power.
- The unit is automatically switched to standby mode.
- Power of this unit is turned off when the input for the TV is changed.
- Unit displays
- The display is dark.
- "NO PLAY"
- "NO DISC"
- "OVER CURRENT ERROR"
- "F61"
- "F76"
- "DVD U11"
- "ERROR"
- “DVD H□□”
- “DVD F□□□”
- “U70□”
- "REMOTE 1" or "REMOTE 2"
- General operation
- No response when any buttons are pressed.
- No response when remote control buttons are pressed.
- Other products respond to the remote control.
- Cannot display the START menu.
- No picture or sound.
- No on-screen menus/displays.
- You have forgotten your ratings password.
- Some characters are not displayed correctly.
- The VIERA Link "HDAVI Control" function does not respond.
- The setting you made in "TV Aspect" ( 16, Video menu) or "Display" ( 16, Language menu) does not work.
- Disc operation
- It takes time before play starts.
- A menu screen appears during skip or search. VCD
- Playback control menu does not appear.
- Play does not start.
- No subtitles.
- Point B is automatically set.
- The Setup menu cannot be accessed.
- Sound
- Sound is distorted.
- Effects do not work.
- Humming is heard during play.
- No sound.
- No sound from the TV.
- No sound from the surround speakers.
- Picture
- The picture on the TV is not displayed correctly or disappears.
- Picture size does not fit the screen.
- Menu is not displayed correctly.
- Display is distorted.
- After choosing “Home Cinema” in “Speaker selection” with the TV’s remote control, the TV’s input selection also changes.
- USB
- The USB drive or its contents cannot be read.
- Slow operation of the USB device.
- HDMI progressive video
- There is ghosting when HDMI progressive output is on.
- Radio
- Distorted sound or noise is heard.
- A beat sound is heard.
- TV displays
- "Incorrect Disc Region"
- Licenses
- Specifications
- AMPLIFIER SECTION
- FM TUNER, TERMINALS SECTION
- Preset Memory FM 30 stations
- DISC SECTION
- Discs played (8 cm or 12 cm)
- Safety precautions
- Placement
- Voltage
- AC mains lead protection
- Foreign matter
- Service
- Information for Users on Collection and Disposal of Old Equipment and used Batteries
- [Information on Disposal in other Countries outside the European Union]
- Note for the battery symbol (bottom two symbol examples):
- A.SRD (Advanced Surround):
- "REMOTE 1" nebo "REMOTE 2"
- UWAGA
- The image contains a graphical icon of an open book. There is no text, mathematical formulas, tables, or figures present in the image.
- (VIERA Link "HDAVI ControlTM")
- "REMOTE 1" lub "REMOTE 2"
Brand : PANASONIC
Model : SC-XH155
Category : DVD player