
MDSNT1 - Dictaphone SONY - Free user manual and instructions
Find the device manual for free MDSNT1 SONY in PDF.
Frequently Asked Questions - MDSNT1 SONY
User questions about MDSNT1 SONY
0 question about this device. Answer the ones you know or ask your own.
Ask a new question about this device
Download the instructions for your Dictaphone in PDF format for free! Find your manual MDSNT1 - SONY and take your electronic device back in hand. On this page are published all the documents necessary for the use of your device. MDSNT1 by SONY.
USER MANUAL MDSNT1 SONY
Operating Instructions ____ GB
Mode d'emploi FR
The model and serial numbers are located on the bottom of the unit. Record the serial number in the space provided below. Refer to them whenever you call upon your Sony dealer regarding this product.
Model No. MDS-NT1
Serial No. ____


MDLP
MDS-NT1
WARNING
To prevent fire or shock hazard, do not expose the unit to rain or moisture.
This appliance is classified as a CLASS 1 LASER product.
This label is located on the bottom exterior.
To prevent fire, do not cover the ventilation of the apparatus with newspapers, table-cloths, curtains, etc. And don't place lighted candles on the apparatus.
To prevent fire or shock hazard, do not place objects filled with liquids, such as vases, on the apparatus.
CAUTION: INVISIBLE LASER RADIATION WHEN OPEN AND INTERLOCKS DEFEATED. AVOID EXPOSURE TO BEAM.
IN NO EVENT SHALL SELLER BE LIABLE FOR ANY DIRECT, INCIDENTAL OR CONSEQUENTIAL DAMAGES OF ANY NATURE, OR LOSSES OR EXPENSES RESULTING FROM ANY DEFECTIVE PRODUCT OR THE USE OF ANY PRODUCT.
Don't throw away the battery with general house waste, dispose of it correctly as chemical waste.
For the customers in the U.S.A.
This symbol is intended to alert the user to the presence of uninsulated “dangerous voltage” within the product’s enclosure that may be of sufficient magnitude to constitute a risk of electric shock to persons.

This symbol is intended to alert the user to the presence of important operating and maintenance (servicing) instructions in the literature accompanying the appliance.
If you have any questions about this product, you may call: Sony customer Information Center 1-800-488-7669 The Number below is for the FCC related matters only.
Regulatory Information
Declaration of Conformity
Trade name: SONY
Model No.: MDS-NT1
Responsible Party: Sony Electronics Inc.
Address: 680 Kinderkamack Road,
Oradell, NJ.07649 USA
Telephone No.: 201-930-6972
This device complies with Part 15 of the FCC Rules. Operation is subject to the following two conditions: (1) This device may not cause harmful interference, and (2) this device must accept any interference received, including interference that may cause undesired operation.
WARNING
This equipment has been tested and found to comply with the limits for a Class B digital device, pursuant to Part 15 of the FCC Rules. These limits are designed to provide reasonable protection against harmful interference in a residential installation. This equipment generates, uses, and can radiate radio frequency energy and, if not installed and used in accordance with the instructions, may cause harmful interference to radio communications. However, there is no guarantee that interference will not occur in a particular installation. If this equipment does cause harmful interference to radio or television reception, which can be determined by turning the equipment off and on, the user is encouraged to try to correct the interference by one or more of the following measures:
- Reorient or relocate the receiving antenna.
- Increase the separation between the equipment and receiver.
- Connect the equipment into an outlet on a circuit different from that to which the receiver is connected.
- Consult the dealer or an experienced radio/TV technician for help.
CAUTION
You are cautioned that any changes or modification not expressly approved in this manual could void your authority to operate this equipment.
The shielded interface cable recommended in this manual must be used with this equipment in order to comply with the limits for a digital device pursuant to Subpart B of Part 15 of FCC Rules.
For the customers in Canada
CAUTION
TO PREVENT ELECTRIC SHOCK, DO NOT USE THIS POLARIZED AC PLUG WITH AN EXTENSION CORD, RECEPTACLE OR OTHER OUTLET UNLESS THE BLADES CAN BE FULLY INSERTED TO PREVENT BLADE EXPOSURE.
CAUTION
This Class B digital apparatus complies with Canadian ICES-003.
Welcome!
Thank you for purchasing the Sony MiniDisc Deck. Before operating the deck, please read this manual thoroughly and retain it for future reference.
For information on user support, visit the following web site.
Net MD User support: http://www.sony.co.jp/en/Products/homeaudio/
If you install another application software that supports the Net MD after installing the supplied OpenMG Jukebox, the links to the above web site may be changed. In this case, enter the above address manually in the address field of your browser.
About This Manual
- This manual explains the location, function and connection of parts on the MDS-NT1 and provides notes on the operation of the MDS-NT1.
- The MDS-NT1 is operated through connection by USB cable to a computer installed with the OpenMG Jukebox software. For details on the installation and operation of OpenMG Jukebox, refer to the instruction manual or the online help for OpenMG Jukebox.
- The OS messages described in this manual might be slightly different from the actual massage that appears on your computer.
Unpacking
Check that you have the following items:
- AC power adaptor (1)
- USB cable (1)
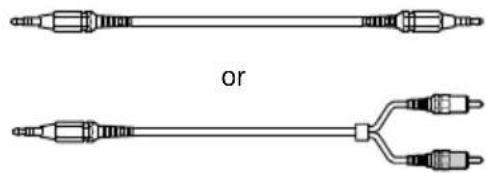
- Audio connecting cord (stereo mini-plug · 1 ↔ stereo mini-plug · 1) (1)
- OpenMG Jukebox CD-ROM (1)
-
Operating instructions for OpenMG Jukebox (1)
-
If a problem should occur on this MD deck as a result of defective manufacturing, SONY shall replace unit. However, SONY shall bear no other responsibility.
- In no event shall SONY be liable for any financial loss or loss of profits, including claims made by third parties, arising out of the use of the MD deck.
Table of Contents
Location and Function of Parts
Front Panel Parts Description ....4
Rear Panel Parts Description ....5
Hooking Up 6
Additional Information
Notes on Recording ....7
Precautions 8
Handling MDs 9
System Limitations ......9
Troubleshooting......10
Specifications ...... 11
Self-Diagnosis Function ......12
Location and Function of Parts
Front Panel Parts Description
This chapter tells you about the location and function of the various buttons, controls on the MD deck.
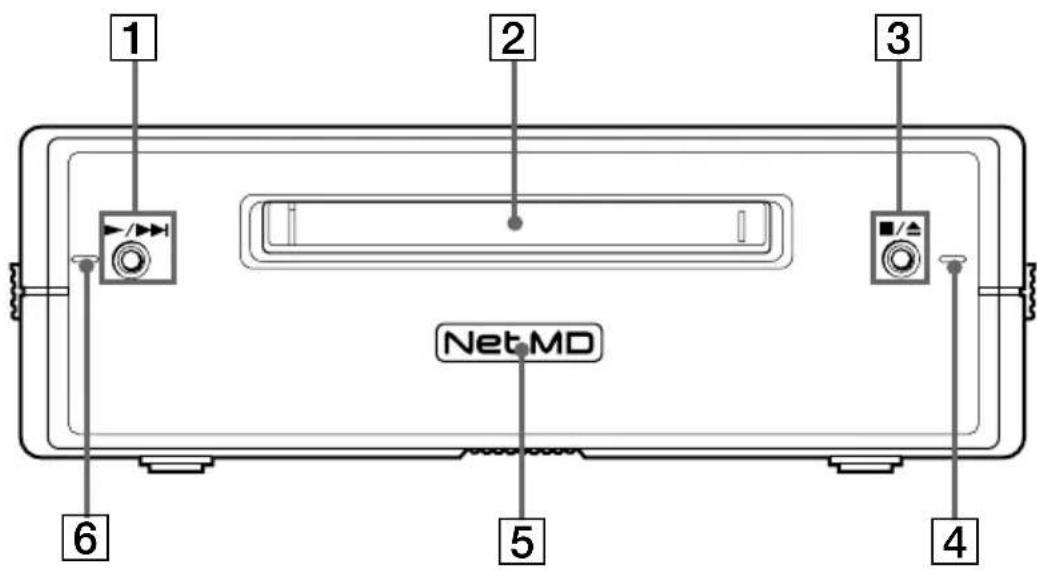
1 ▶/▶▶I button
Press while the unit is stopped to start playback. Press while the unit is playing to locate the beginning of the next track.
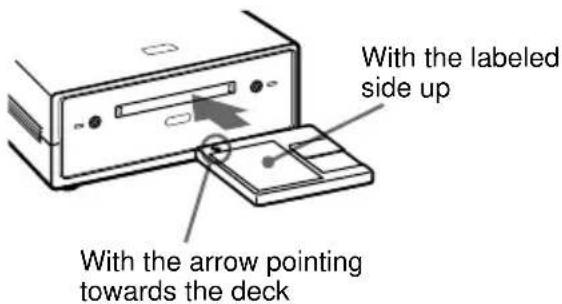
2 MD insertion slot
Insert the MD as illustrated below.
3 ■/▲ button
Press while the unit is playing to stop playback. Press while the unit is stopped to eject the MD.
4 Recording indicator
Lights up in the following cases: While an audio file is being transferred from the connected computer to the MD deck (check-out). While an audio file is being transferred from the MD deck to the connected computer (check-in). When TOC information (such as track information) has not been recorded to the MD. Flashes when overwriting of the MD's TOC by the MD deck is started by pressing ■/▲.
5 Net MD lamp
Indicates the USB connection status between the unit and the computer.
Lights dimly when the unit is connected only to a wall outlet with the supplied AC adaptor.
Lights brightly when the unit is connected to a computer with its operating system running.
6 Playback indicator
Lights during playback. Flashes while the MD's TOC is being loaded by the MD deck.
Notes
- Except for operation of the ■/▲ button for ejecting the MD, all other operations on the MD deck are disabled while the Net MD is connected through the supplied USB cable to a computer with its operating system running.
Under these conditions, the Net MD lamp flashes (the other indicators remain off) whenever you attempt to do an operation that is disabled.
- The flashing of the Net MD lamp and flashing or lighting up of the other indicators are indications that the MD deck's self-diagnosis function is active. For details, see page 12.
Rear Panel Parts Description
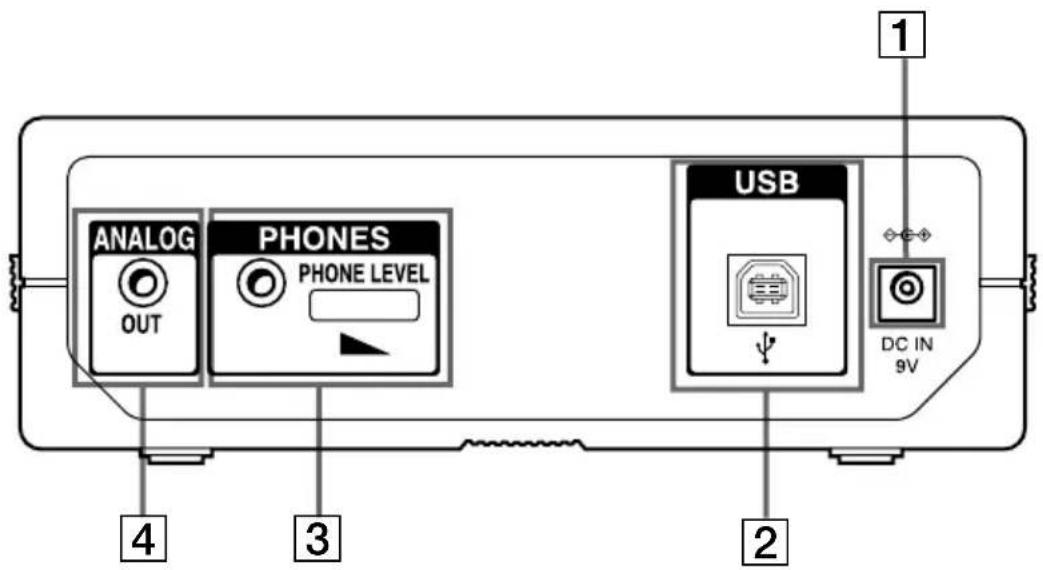
1 DC IN 9V jack
Connect this jack to a wall outlet via the supplied AC power adaptor to power the MD deck.
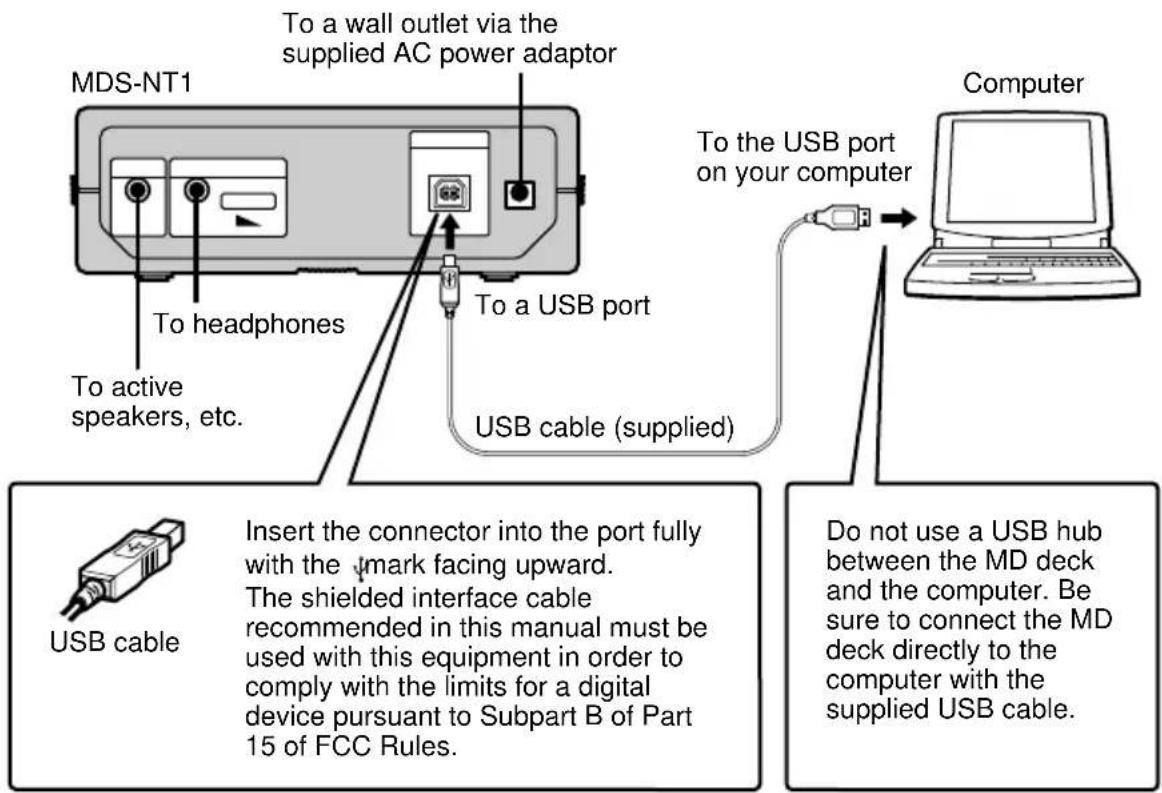
2USB port
Connect this port to a USB port on your computer with the supplied USB cable.
3 Headphones jack and PHONE LEVEL control
Connect a headphones plug to this jack. Turn the PHONE LEVEL control to adjust the volume of the connected headphones.
4 ANALOG OUT jack
Connect active speakers, etc. to this jack with the supplied audio connecting cord (stereo mini-plug · 1 ↔ stereo mini-plug · 1) or optional audio connecting cord (stereo mini-plug · 1 ↔ phono plug · 2).
natural_image
Two types of electrical connectors shown: a straight line with resistors and a multi-pin terminal (no text or symbols)Notes
• Full performance of the MD deck is not guaranteed when it is connected to the computer through a USB hub or USB extension cord. Be sure to connect the MD deck directly to the computer with the supplied USB cable.
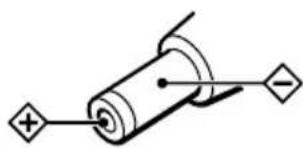
- Do not connect the supplied AC power adaptor to a switched AC outlet (e.g., on an amplifier).
- Use only the supplied AC power adaptor. Do not use any other AC power adaptor.
Polarity of the plug
natural_image
Pure electrical circuit lines without any symbolsThe shielded interface cable recommended in this manual must be used with this equipment in order to comply with the limits for a digital device pursuant to Subpart B of Part 15 of FCC Rules.
- Before outputting sound through the headphones, it is recommended that you turn the volume down completely, and then gradually turn up the volume to the desired level while listening to the sound.
Hooking Up
Notes
- Make sure each plug is straight when you insert it. Inserting it at an angle may damage the connector parts.
- Be sure to install the OpenMG Jukebox software to your computer before you connect the MD deck and your computer. Otherwise, the computer may select an inappropriate driver for the MD deck when you connect them, and the MD deck may not work correctly.
The [Add New hardware wizard] may appear when you connect the MD deck to the computer. If this happens, click [Cancel.]
- Sound output is not supported when you connect the MD deck to the computer by the supplied USB cable alone. Sound from the MD deck requires the connection of headphones or active speakers, etc. to the MD deck (see page 5).
- To output sound from the MD deck to the speakers of the connected computer, use the supplied audio connecting cord (a stereo mini-plug is provided on both ends) or a resistance-free, equivalent commercially available product to connect the LINE OUT jack on the MD deck with the audio input jack on the computer.
- Do not disconnect the USB cable while operating the MD deck from the connected computer. Be sure to stop the recording or playback operation before disconnecting the USB cable.
Additional Information
Notes on Recording
About indications which light up or flash after recording
When the recording indicator lights up in the display
Recording has finished but the TOC (Table of Contents) on the MD has not been updated to reflect the recording results. The recording will be lost if you disconnect the AC power adaptor while the indicator is on. The TOC will be updated only when you eject the MD from the MD deck.
When the recording indicator flashes in the display
The deck is updating the TOC. Do not disconnect the AC power adaptor or move the deck while the indicator flashes. The recording may not be completed properly.
Guide to the Serial Copy Management System
Digital audio components, such as CDs, MDs, and DATs make it easy to produce high-quality copies of music by processing music as a digital signal.
To protect copyrighted music sources, this deck uses the Serial Copy Management System which allows you to make only a single copy of a digitally recorded source through digital-to-digital connections.
You can make only a first-generation copy through a digital-to-digital connection.
Examples are given as follows:
- You can make a copy of a commercially available digital sound program (for example, a CD or MD), but you can't make a second copy from the first-generation copy.
- You can make a copy of a digital signal from a digitally recorded analog sound program (for example, an analog record or a music cassette tape) or from a digital satellite broadcast program, but you can't make a second copy from the first-generation copy.
Note
The restrictions of the Serial Copy Management System don't apply when you make a recording through the analog-to-analog connections.
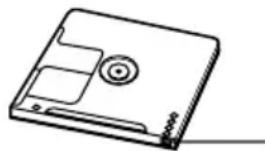
To prevent accidental erasure of the recorded material
To make it impossible to record on an MD, slide the record-protect tab in the direction of the arrow (see illustration below) to open the slot. To enable recording, close the slot.
Bottom side of the MD
natural_image
Line drawing of a floppy disk (no text or symbols)Record-protect tab
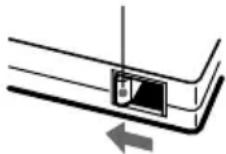
Slide in the direction of arrow
Precautions
The nameplate is located on the bottom exterior.
On safety
- Should any solid object or liquid fall into the cabinet, unplug the deck and have it checked by qualified personnel before operating it any further.
- Caution–The use of optical instruments with this product will increase eye hazard.
On power sources
- Before operating the deck, check that the operating voltage of the deck is identical with your local power supply. The operating voltage is indicated on the nameplate on the AC power adaptor.
- The unit is not disconnected from the AC power source (mains) as long as it is connected to the wall outlet, even if the unit itself has been turned off.
- If you are not going to use the deck for a long time, be sure to disconnect the AC power adaptor from the wall outlet. To disconnect the AC power adaptor, grasp the plug itself; never pull the cord.
- AC power adaptor must be changed only at the qualified service shop.
On condensation in the deck
If the deck is brought directly from a cold to a warm location, or is placed in a very damp room, moisture may condense on the lenses inside the deck. Should this occur, the deck may not operate properly. In this case, remove the MD and leave the deck turned on for several hours until the moisture evaporates.
On the MiniDisc cartridge
- Do not open the shutter to expose the MD.
- Do not place the cartridge where it will be subject to extremes of sunlight, temperature, moisture or dust.
On cleaning
Clean the cabinet, panel and controls with a soft cloth slightly moistened with a mild detergent solution. Do not use any type of abrasive pad, scouring powder or solvent such as alcohol or benzine.
If you have any questions or problems concerning your deck, please consult your nearest Sony dealer.
Handling MDs
The MD is enclosed in a cartridge to protect the disc from debris or fingerprints and to make it easy to handle.
However, the presence of debris or a warped cartridge may inhibit the disc from operating properly. To assure that you can always listen to the highest quality music, follow the precautions below:
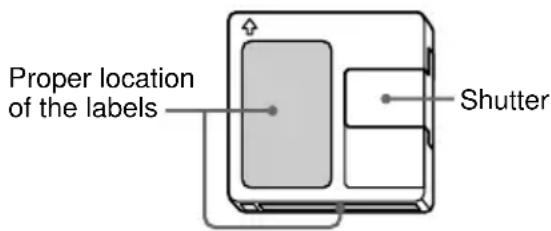
- Do not touch the internal disc directly. Forcing the shutter open may damage the internal disc.
- Be sure to stick the labels supplied with the MD to the appropriate positions. The shape of the labels may vary depending on the MD brand.
Where to keep the MDs
Do not place the cartridge where it may be exposed to direct sunlight or extremely high heat and humidity.
Regular maintenance
Wipe dust and debris from the surface of the cartridge with a dry cloth.
System Limitations
The recording system in your deck is radically different from those used in cassette and DAT decks and is characterized by the limitations described below. Note, however, that these limitations are due to the inherent nature of the MD recording system itself and not to mechanical causes.
The remaining recordable time becomes "0" even before the MD has reached the maximum recording time
When 255 tracks have been recorded on the MD, the remaining recordable time becomes “0” regardless of the total recorded time. More than 255 tracks can’t be recorded on the MD. To continue recording, erase unnecessary tracks or use another recordable MD.
The remaining recording time does not increase even after erasing numerous short tracks
Tracks under 12 seconds* in length are not counted and so erasing them may not lead to an increase in the recording time.
* When recording in stereo mode. (Approx. 24 seconds in mono or LP2 mode, and approx. 48 seconds in LP4 mode.)
continued
System Limitations (continued)
The total recorded time and the remaining recordable time on the MD may not total the maximum recording time
Recording is done in minimum units of 2 seconds* each, no matter how short the material. The contents recorded may thus be shorter than the maximum recording capacity. Disc space may also be further reduced by scratches.
* When recording in stereo mode. (Approx. 4 seconds in mono or LP2 mode, and approx. 8 seconds in LP4 mode.)
Tracks created through editing may exhibit sound dropout as you're searching for a point while monitoring the sound.
Some tracks can't be combined with others
Tracks may not be combined if they have been edited.
The playback indicator flashes for a long time
If the inserted recordable MD is brand new, the playback indicator flashes longer than for MDs that have already been used.
Troubleshooting
If you experience any of the following difficulties while using the deck, use this troubleshooting guide to help you remedy the problem. Should any problem persist, consult your nearest Sony dealer.
The deck does not operate or operates poorly.
- The MD may be dirty or damaged. Replace the MD.
- When the MD deck is connected to a computer and the operating system is running, you can only use the / button (for ejecting the MD while the deck is stopped).
The deck does not play.
- Moisture has formed inside the deck. Take the MD out and leave the deck in a warm place for several hours until the moisture evaporates.
- The deck may not be connected to the amplifier correctly. Check the connection.
- The MD is inserted in the wrong direction. Slide the MD into the disc slot with the label side up and the arrow pointing towards the slot.
- The MD may not be recorded. Replace the disc with one that has been recorded.
The sound has a lot of static.
- Strong magnetism from a television or a similar device is interfering with operations. Move the deck away from the source of strong magnetism.
The deck does not record.
- The MD is record-protected. Slide the record-protect tab and close the slot.
- The deck is not connected properly to the computer. Check the connection.
- A premastered MD is inserted. Replace it with a recordable MD.
- There is not enough time left on the MD. Replace it with another recordable MD with fewer recorded tracks, or erase unnecessary tracks.
- There has been a power failure or the AC power adaptor has been disconnected during recording. Data recorded to that point may be lost. Repeat the recording procedure.
The Net MD lamp flashes.
- If the other indicators are lighted up or flashing, the MD deck's self-diagnosis function is active. See the table on page 12.
- When the other indicators are off, you have pressed the inoperative ▶/▶▶ button while OpenMG Jukebox is active. Only the ■/▲ button for ejecting the MD can be operated at this time.
Note
If the deck does not operate properly even after you've attempted the prescribed remedies, eject the MD, then reinsert the AC power adaptor into the AC power outlet.
Specifications
System MiniDisc digital audio system
Disc MiniDisc
Laser Semiconductor laser (λ = 780 nm)
Emission duration: continuous
Revolutions (CLV) 800 rpm to 1800 rpm
Error correction Advanced Cross Interleave Reed
Solomon Code (ACIRC)
Sampling frequency 44.1 kHz
Coding Adaptive Transform Acoustic
Coding (ATRAC)/ATRAC 3
Modulation system EFM (Eight-to-Fourteen
Modulation)
Number of channels 2 stereo channels
Frequency response 5 to 20,000 Hz ±0.8 dB
Signal-to-noise ratio Over 96 dB during playback
Wow and flutter Below measurable limit
Outputs
LINE (ANALOG) OUT Jack type: stereo-mini
Rated output: 1 Vrms (at
50 kilohms)
Load impedance: Over 10 kilohms
PHONES Jack type: stereo-mini
Rated output: 5 mW
Load impedance: 32 ohms
General
USB port series B, self powerd, full speed
| Where purchased | Power requirements* |
| USA and Canada | 120 V AC, 60 Hz |
| Europe and Other countries | 220 – 230 V AC, 50/60 Hz |
*Using an AC power adaptor (supplied)
Power consumption 6 W
Dimensions (approx.)
152 · 52 · 249 mm (w/h/d) incl.
projecting parts and controls
Mass (approx.) 1.0 kg
Supplied accessories
See page 3.
US and foreign patents licensed from Dolby Laboratories Licensing Corporation.
Design and specifications are subject to change without notice.
Self-Diagnosis Function
The deck's self-diagnosis function automatically checks the condition of the MD deck when an error occurs, then indicates the nature of the error through the two indicators. If the indicators light up or flash, find them in the following table and perform the indicated countermeasure. Should the problem persist, consult your nearest Sony dealer.
| Playback Indicator (green) | Recording Indicator (red) | Cause/Remedy |
| Flashes The recording was not made properly. (C13/Rec Error)→ Set the deck in a stable surface, and repeat the recording procedure. | ||
| Flashes The inserted MD is dirty (with smudges, fingerprints, etc.), scratched, or substandard in quality. (C13/Rec Error)→ Replace the disc and repeat the recording procedure. | ||
| Flashes The deck could not read the TOC on the MD properly. (C13/Read Error)→ Take out the MD and insert it again. | ||
| Lights up The deck could not read the TOC on the MD properly. (C14/Toc Error)→ Insert another disc.→ If possible, erase all the tracks on the MD. | ||
| Lights up Lights up There is an error in the internal data that the deck needs in order to operate. (E0001/MEMORY NG)→ Consult your nearest Sony dealer. | ||
| Flashes Flashes There is a problem with the optical pickup. (E0101/LASER NG)→ Consult your nearest Sony dealer. | ||
| Both indicators flash alternately An MD loading problem has occurred. (E0201/LOADING NG)→ Consult your nearest Sony dealer. | ||
AVERTISSEMENT
natural_image
Two types of electrical connectors with labeled 'OU' (no text or symbols on the diagrams themselves)Remarques
natural_image
Pure electrical circuit lines without any symbolsCLASS 1 LASER PRODUCT
LUOKAN 1 LASERLAITE
KLASS 1 LASERAPPARAT
natural_image
Two types of electrical connectors with labeled ends, no text or symbols presentNotas
natural_image
Pure electrical circuit lines without any symbolsnatural_image
Line drawing of a compact floppy disk (no text or symbols)CLASS 1 LASER PRODUCT
LUOKAN 1 LASERLAITE
KLASS 1 LASERAPPARAT
natural_image
Pure electrical circuit lines without any symbolsnatural_image
Line drawing of a floppy disk (no text or symbols)錄音保護小翼
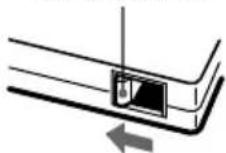
沿箭頭方向滑動
使用前須注意
名稱標籤位於機器底部外面。