
Black Beat - Exercise bike MPF - Free user manual and instructions
Find the device manual for free Black Beat MPF in PDF.

Frequently Asked Questions - Black Beat MPF
User questions about Black Beat MPF
0 question about this device. Answer the ones you know or ask your own.
Ask a new question about this device
Download the instructions for your Exercise bike in PDF format for free! Find your manual Black Beat - MPF and take your electronic device back in hand. On this page are published all the documents necessary for the use of your device. Black Beat by MPF.
USER MANUAL Black Beat MPF
Warranty 59
General safety directions 60
Parts list 62
General reference drawing 63
Assembly 64
Exercise monitor 66
General fitnesstips 69
Garantie
Postadres: H its International B.V.
Postbus 465
7400 AL Deventer
Copyright (c) 1997 American Heart Association
Warming-up - Cooling down
Copyright (c) 1997 American Heart Association
Copyright (c) 1997 American Heart Association
Exercices abdo-fessiers
Copyright (c) 1997 American Heart Association
Warming-up - Cooling down
H'its International, importer of MPF, guarantees that each piece of equipment has been manufactured from proper and reliable materials. All MPF equipment carries a 2-year warranty, provided it is used in the correct way and for the proper purposes and assembled as described in this manual. The warranty will be cancelled if the equipment has been assembled incorrectly, is damaged due to improper transport or used in professional applications. This 2-year warranty covers all components, including frame, electronics, cables, foam, wheels and pedals. However, components subject to wear are excluded.
The warranty period commences upon delivery. Keep your purchasing document (such as invoice or receipt) in a safe place throughout the warranty period as proof of the warranty commencement date. If you make a claim under the warranty terms, you will be requested to submit a proof of purchase to the service department.
Of course, this department will also be of service after the warranty period has expired.
Any defects noticed at delivery shall be reported to us without delay. Damages, including any transport damages, are only taken into consideration if reported within one week upon delivery.
If a piece of equipment is offered to us for repair without any proof of purchase being available, repair will only be made against payment, unless you are able to otherwise provide a proof of purchase of the equipment under our conditions including the date of delivery.
Postal address: H'its International B.V.
Postbus 465
NL-7400 AL Deventer
E-mail: info@hits-international.nl (preferred), stating
Name and address
Telephone number
Type of equipment
Description of defect
Service phone: +31 0900-2354487
Our service department can be reached by telephone Mondays to Fridays, between 9.00-
12.00 hrs and 13.30-16.30 hrs.
This equipment has been manufactured in accordance with the applicable EN norms.
The figures are given by way of illustration. Subject to changes.
Not to be used for rehabilitation purposes.
General safety instructions
In the design and the production of this fitness equipment, much attention has been paid to safety. Nevertheless, you need at all times to remain conscious of certain safety measures. Make certain that you have carefully read through the whole user manual prior to your use of the equipment. Keep in mind the following points:
- This equipment has not been designed to be used as a toy and must only be used for the purposes described in this manual. Read the instructions below carefully before using this equipment.
- Keep children and animals away from the equipment. Children's enthusiasm may well lead to incorrect use of the equipment. If children are allowed to use the equipment, they should only do so under supervision and after receiving instructions regarding its proper use. Under no circumstances should the equipment be used as a toy.
- Always consult with your physician prior to making use of this equipment or any other fitness equipment.
- Always wear safe and comfortable clothing when you are using fitness equipment. Preferably, wear sports shoes or aerobic footwear.
- In the event you should feel faint or suffer other discomforts, stop using the equipment. You also need to stop when you experience pain in or pressure on your joints.
- Make certain that no more than one user is occupying the equipment at one time. Place the equipment on a level surface; the space required is approximately 2 × 1 metres.
- Make certain that the equipment has been correctly assembled prior to its use. Ensure that all screws, nuts and bolts have been fitted correctly and tightened properly. Use only the parts that are recommended by the importer and that have been delivered with the equipment.
- Do not use the equipment if it is damaged or has broken down.
- Pay attention to how your body reacts after using the equipment. Dizziness is a sign that you worked out too intensely. If you feel dizzy, stretch out on the floor and do not try to get back on your feet until the dizziness has disappeared.
- Always use the equipment on a level and clean surface. Never use the equipment outdoors or in water.
- Avoid that your arms and legs come too close to the moving parts. Do not stuff articles inside the existing openings in the equipment.
- Use this equipment only for the purposes as described in this user manual. Do not use parts that were not recommended by the manufacturer.
- Ascertain that there are no sharp and pointed objects in the immediate vicinity of the equipment.
- We advise physically challenged individuals to use this fitness equipment only under the supervision of qualified instructors.
- The equipment must have come to a complete standstill before stepping down.
Warning
Consult with your physician prior to starting your exercises. A frequent and intensive training programme should first be approved by your family physician. This is especially important for individuals above 35 years of age or for those with physical problems. Carefully read through the entire user manual before you start exercising. We are in no wise responsible for personal injury or physical strains and discomforts that are caused by the use of this equipment and cannot be held liable in case of their occurrence. Carefully save these instructions. Incorrect or extreme use may lead to personal injury.
Note: the maximum permissible weight on this equipment is 115kg
Assembly
This user manual has been put together in order to simplify the assembly of the equipment and at the same time to explain its correct use. Please make certain to carefully read through this manual. In order to familiarise yourself with the parts of the equipment, we recommend that you carefully study the general reference drawing prior to starting the assembly and the use of the equipment.
Place all parts needed for the assembly on the floor in an orderly manner and remove all packing material. Check the list of parts to verify what items are present. For the actual assembly we make referral to the following pages.
Thank you for your purchase
We thank you for your purchase of this MPF fitness equipment. This equipment will help you in improving your general conditioning and in developing your muscles in the correct way. In addition, you can now enjoy all of these benefits inside your own home.
Maintenance and use
Consult your physician before starting the exercises. A frequent and strenuous workout program must be approved by your physician first.
- The equipment requires a regular check-up to prevent physical injury. This means that bolts and nuts should be frequently checked for their proper tightening and that the equipment in general should be checked for cracks and sharp edges etc.
- Defective components must be replaced immediately. If this is not feasible, the equipment must be put out of order until the required repairs have been made.
- NB! Do not smoke or use fire near the equipment, as some of the plastic components are flammable.
- Do not use the equipment in front of a burning stove and/or fire place.
- Persons suffering from a plastics allergy should consult their physician before using the equipment.
- Do not touch any cylinders on the equipment as they become extremely hot during use.
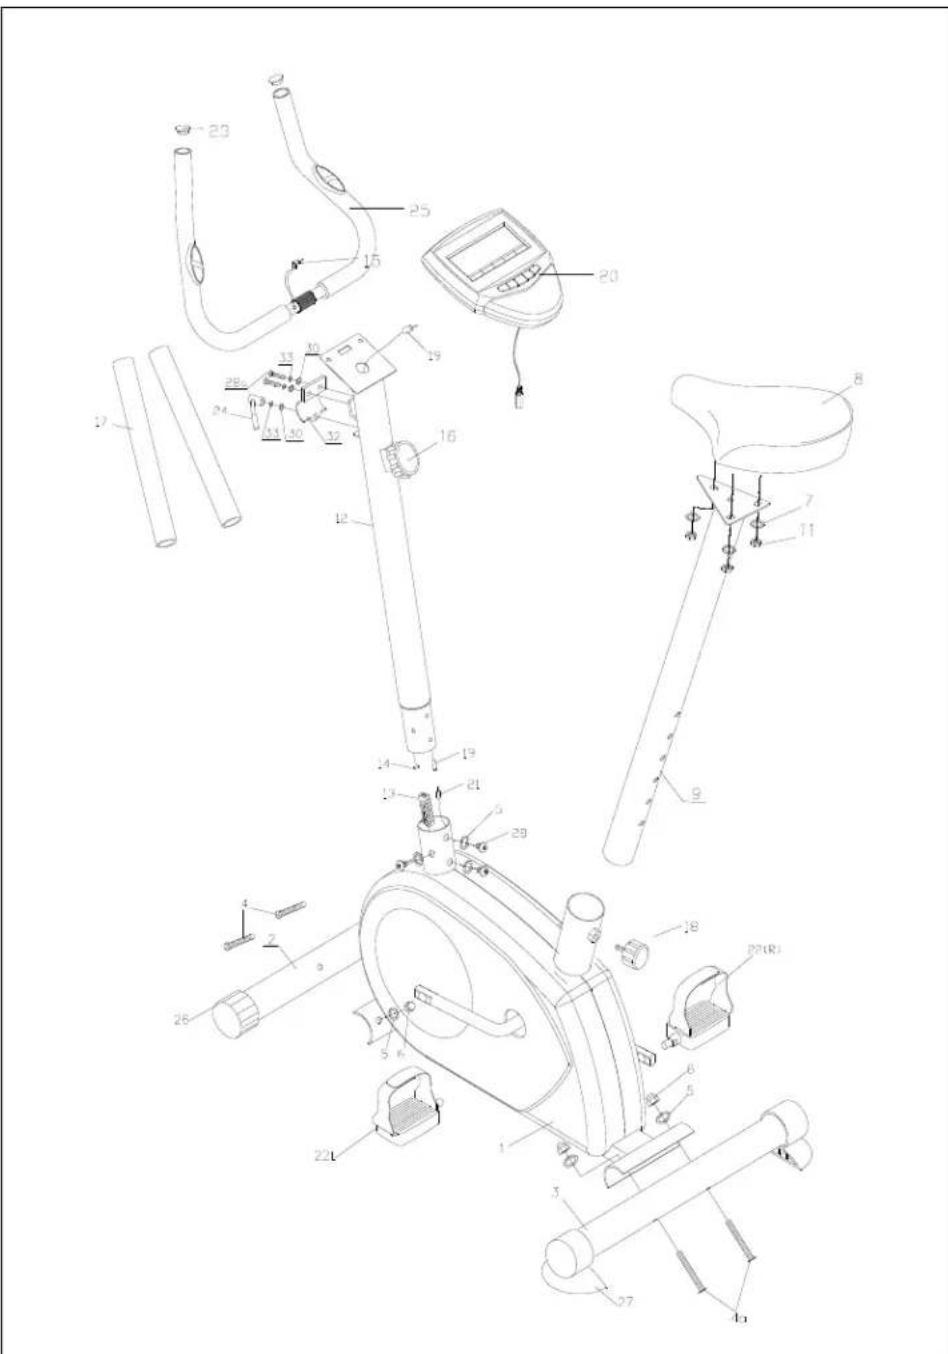
Parts list
| No. | Description | Qty |
| 1. | Main frame | 1 |
| 2. | Front stabilizer bar | 1 |
| 3. | Rear stabilizer bar | 1 |
| 4. | Screw m8* 16 | 4 |
| 5. | Washer Φ 8 | 8 |
| 6. | Blind nut m8 | 4 |
| 7. | Washer 8 3Φ | |
| 8. | Saddle | 1 |
| 9. | Saddle pillar | 1 |
| 11. | Nut m8 | 3 |
| 12. | Handlebar | 1 |
| 13. | Lower resistance cable | 1 |
| 14. | Upper resistance cable | 1 |
| 15. | Wire for heart rate measurement | 1 |
| 16. | Resistance knob | 1 |
| 17. | Foam grip | 2 |
| 18. | Adjusting knob | 1 |
| 19. | Upper computer cable | 1 |
| 20. | Computer | 1 |
| 21. | Lower computer cable | 1 |
| 22. | Pedal (r&l) | 1 |
| 23. | End cap | 2 |
| 24. | L-clip | 1 |
| 25. | Handlebar post | 1 |
| 26. | Front stabilizer cap | 2 |
| 27. | Rear stabilizer cap | 2 |
| 28. | Screw m8* 12 | 4 |
| 28A | Screw m8* 20 | 2 |
| 30. | Washer Φ8 3 | |
| 32. | Handlebar post mounting bracket | 1 |
| 33. | Spring washer | 3 |
General reference drawing
Assembly
Step 1
Remove all packaging materials and arrange all parts neatly on the floor.
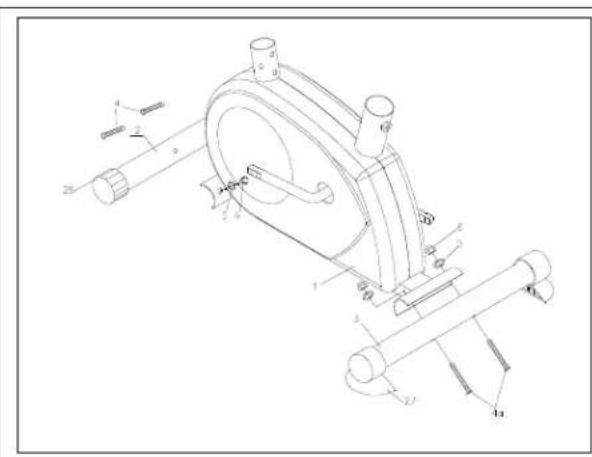
Step 2
Remove nuts (6) and washers (5) from front stabilizer bar (2) and rear stabilizer bar (3). Attach front stabilizer bar (2) and rear stabilizer bar (3) to the main frame (1). Place nuts and washers again and secure the screws with the supplied wrench.
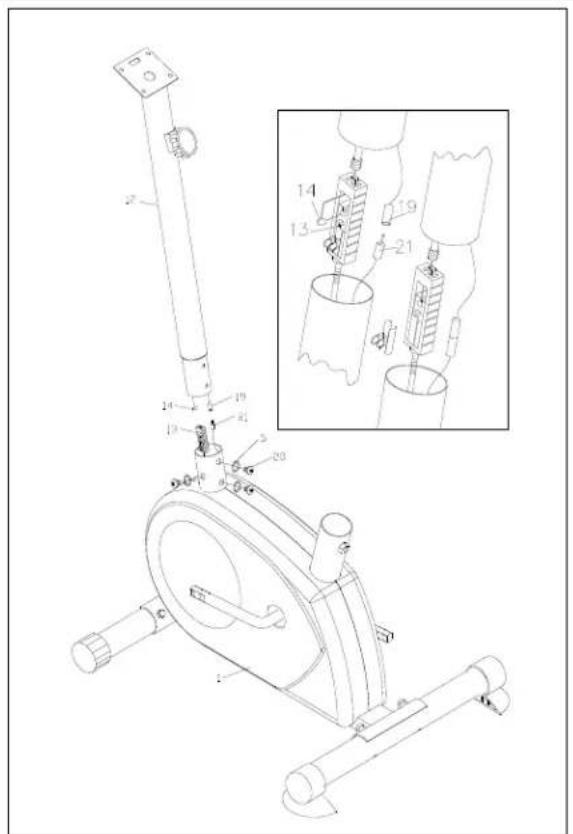
Step 3
Remove nuts and washers from handlebar (12). Connect the upper resistance cable (13) to the lower resistance cable (14). Remove the metal clip. Connect the upper computer cable (19) to the lower computer cable (21).
Step 4
Slide the handlebar (12) onto the main frame (1) and secure the assembly with the two screws and washers.
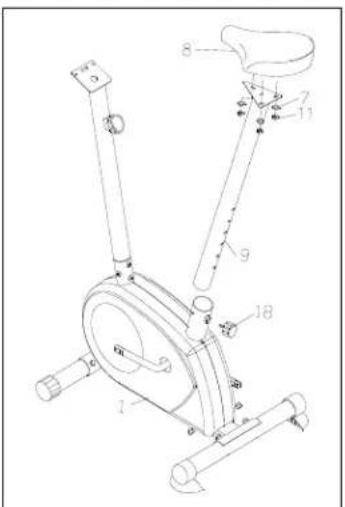

Step 5
Loosen adjusting knob (18). Slide the saddle pillar (9) onto the main frame (1). Align the holes in the saddle pillar with the holes in the main frame (1). Secure firmly with adjusting knob (18).
Step 6
Remove three nuts (11) and washers (7) from the saddle (8). Slide the saddle onto the saddle pillar and secure with three nuts and washers.

Step 7
Attach the handlebar post (25) with the mounting bracket (32) and secure it with the screws (28A), washers (33) and L-clip. Slide the foam grips (17) onto the handlebar post (25) Moisten the inside with water and soap, if necessary.
Step 8
Slide pedal (22L), marked with an L, onto the left-hand pedal spindle. Slide pedal (22R) onto the right-hand spindle (seen from the position of the user). Secure the pedals with the supplied wrench.
Step 9
Attach the computer to the handlebar post. Connect the computer cable (19) to the computer.
Step 10
Connect the heart rate measurement wire (15) to the computer. The heart rate measurement helps you during your workout and displays the heart rate differences.
Step 11
Check whether all screws and nuts are firmly secured. The home trainer is now ready for use.
Exercise monitor Functions
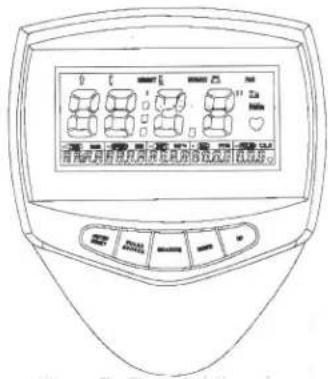
Enter/Reset:
- Select a function by pressing Sex-Length-Weight-Age-Time-Distance-Calories-Pulse
Press this button to set the correct function.
Press this button to confirm your selection. - Keep this button depressed for two seconds to reset all values.
Pulse recovery
Press this button to display your heartbeat.
Up: 1. Increase the value of the following functions:
Sex - Length - Weight - Age - Time - Distance - Calories - Pulse
- Select a function on the main screen during your workout.
Scan - Time - Speed - Distance - Calories - Pulse
Down: 1. Decrease the value of the following functions:
Sex - Length - Weight - Age - Time - Distance - Calories - Pulse
- Select a function on the main screen during your workout.
Scan - Pulse - Calories - Distance - Speed - Time
Inserting batteries
- Place 2 AA or UM-3 batteries in the battery compartment below the computer.
- Check for correct polarity (+/-) and ensure batteries are in proper contact with springs
- If the display is illegible, remove batteries and wait 15 seconds before inserting them again.
- Removing the batteries will reset all values.
- Please deposit old batteries in a relevant recycling bin.
Functions & Operation
Auto On/Off
The computer starts automatically as soon as you start your workout on the fitness equipment. When your workout is interrupted for more than four minutes, the computer will automatically be switched off.
Scan
Press the Up or Down button until the display light flashes. The following Scan functions are displayed: Time - Speed - Distance - Calories - Pulse. Each function is displayed for five seconds.
Time
Press the Up or Down button until the relevant display light illuminates. The Time function is displayed. If you want to change the value, press Enter/Reset until Time is displayed and press Up or Down to select the desired value.
Count Up
If the time has not been preset, the display will automatically count up the seconds (00:00-99:59).
Count down
If the time has been preset to 1:00-99:00, the computer will automatically count down from the value set. When the target value is reached, the display will give a signal.
Speed
Use the Up or Down buttons or Speed in the display. The display shows the current speed. The speed is given in 0.00-99.9 km/hr or mile/hr).
Distance
Press the Up or Down button until the DIST. light illuminates. The display shows the workout distance. Press Enter/Reset until Dist. if you want to enter the distance manually. Use the Up or Down buttons to set the distance.
Count up:
If the distance has not been preset, the display will automatically count up the kilometres or miles (0.1-999.0 km or miles).
Count down:
If the distance has been preset to 1.0-999.0 km or miles, the computer will automatically count down from the value set. When the target value is reached, the display will give a signal.
Calories
Press the Up or Down button until the Cal. light illuminates. The display shows the calories burned. If you want to set the value, press Enter/Reset until Cal is displayed and press Up or Down to select the desired value.
Count up:
If the calories have not been preset, the display will automatically count up the calories (1.0 - 999.0 calories)
Count down:
If the calories have been preset to 1.0 - 999.0 calories, the computer will automatically count down from the value set. When the target value is reached, the display will give a signal.
Pulse
Press the Up or Down button until the Pulse light illuminates. Your heart rate is displayed in heartbeats per minute. If you want to set the value, press Enter/Reset until T.H.R. is selected and press Up or Down to set the desired value.
Pulse limit:
If the maximum pulse limit has been preset to a value between 60 and 220, the computer will register your heart rate. When the target value is reached, the display will give a signal.
When measuring pulse with an ear lobe sensor, make sure you rub your ear lobe to improve circulation. Attach the sensor wire to your collar with the clip. This prevents the sensor from moving during the workout.
You can also measure the pulse by touching the two handle bar sensors.
NB: If the computer does not register your heartbeat within 16 seconds, "P" will be displayed. This saves energy. Press UP or Down to restart the Pulse function.
Heart rate recovery
This function checks your heart rate after you finished the workout (F1.0 - F6.0). The values are displayed from F1.0 (excellent) through F6.0 (poor). The function will measure your heart rate recovery after finishing your workout. If you exercise regularly you should notice an improvement.
For accurate measurement, you must press the Recovery key immediately upon completion of the workout. Make sure the heart rate detector is properly attached. It takes one minute to find your heart rate. It will be displayed immediately. Press the Recovery key again to leave this mode.
Body Fat Measurement
Keep Enter/Reset depressed for six seconds. The Body Fat Measurement function is now selected. Enter your details (using the Up and Down buttons) before pressing the Measure button for body fat measurement. The flashing symbol indicates where you are. Use Enter to confirm your details.
Press Measurement en place both hands on the hand pulse sensors. Your body fat percentage is displayed. Your details are deleted when switching off or resetting the computer
Example
Sex: male or female
Length: 175 cm
Weight: 70 kg
Age: 30 years
A. Body typesy Fat R:
There are nine different body types according to body fat percentage. Type 1: Ultra sportsman, Type 2: Ideal sportsman, Type 3: Ultra slim, Type 4: Sportsman, Type 5: Ideal health, Type 6: Slim, Type 7: Too fat, Type 8: Fat, Type 9: Ultra overweight.
B. BMR: Basal Metabolism Ratio. The computer calculates your BMR on the basis of sex, length, weight and age. The value will be displayed (1~9999Kcal).
C. BMI: Body Mass Index. The computer calculates your BMI on the basis of length and weight. The value will be displayed (1.0~99.9Kcal).
D. Fat % (Bod ratio). The computer calculates your Body Fat Ratio on the basis of sex, length, weight and age. The value will be displayed (5 - 50%)
General fitness tips
Consult your physian
Before you start using this fitness equipment, it is recommended that you first get a physical examination by your family physician or by a specialist. Before starting regular exercises on this equipment, you must first get your doctor's approval. When you feel discomfort during your training on the equipment, you need to immediately consult your family physician. Intelligent use, meaning responsible use of this equipment is crucial. Make sure that no children are near you when you are using this equipment. Moreover, make sure to store the equipment in a safe place away from children.
Wear comfortable clothing
Always wear comfortable clothing when you are using the equipment, including gym shoes. Do not wear loose clothing that can tear during use.
Inspect your equipment
Prior to using your equipment, make sure that all nuts and bolts are properly tightened. Regular maintenance is very important to keep the equipment in good condition.
Set your own pace
The intensity level of your workout on this equipment depends on your own condition. If you have not been in training for some years or if you are overweight, it is recommended that you start slowly with only a few minutes per week.
At first you will be able to do the exercises for only a few minutes but this will improve within 6 to 8 weeks. Do not let yourself get discouraged if this takes a few weeks more. It is important for you to set your own pace. In the end you will be able to keep on exercising for more than 30 minutes. The better your condition, the more difficult it will become to stay at this level. But be aware of the following:
- Consult with your physician before you start your training programme. Let him/her advise you about the training programme as well as about your diet.
- Start your training at an easy pace and do not aim too high at first. Aside from this exercise with the equipment, also engage in extra activities, for instance, jogging, swimming, dancing, and biking. Regularly check your heart rate. If you do not have a counter, ask your family physician how you can best check your heart rate. Determine your desired heart rate. Take into consideration your age and condition.
- Make sure that you drink enough when training on this equipment. You need to keep drinking to prevent dehydration. The liquids you take in must be at room temperature. Limit your intake of cold drinks.
Check your heart rate
To be able to check your heart rate, you first need to know how to measure it. The easiest way is to press your fingertips against the artery in your neck, between the muscles and the air passages. Count the number of pulses for 10 seconds and multiply by 6. This will give you your heart rate per minute.
EXERCISE WITHIN YOUR OWN CAPABILITIES
What level of heart rate do you have to maintain during your exercises? Ask your physician to give you guidelines that are relevant for you.
| Age | Heartbeat level 50-75% (beats per minute) | Maximum heart rate 100% |
| 20 | 100-150 | 200 |
| 25 | 98-146 | 195 |
| 30 | 95-142 | 190 |
| 35 | 93-138 | 185 |
| 40 | 90-135 | 180 |
| 45 | 88-131 | 175 |
| 50 | 85-127 | 170 |
| 55 | 83-123 | 165 |
| 60 | 80-120 | 160 |
| 65 | 78-116 | 155 |
| 70 | 75-113 | 150 |
Copyright (c) 1997 American Heart Association
Warming-up - Cooling down
A successful exercise starts with a warm-up and is completed with a cool-down. Run through all of the exercises two or three times a week and take a day off in between the exercise days. After a few months you can extend the number of exercises to 5 to 6 times a week.
The warm-up is of crucial importance before starting your workout. You will be preparing your body for the effort you are about to exert. In order to prevent muscle problems, you need to cool down after the exercises. We recommend the following warm-up and cool-down exercises.
Head exercises
Turn your head to the right and feel the tension in your neck. Turn your chin up to the ceiling while opening your mouth. Turn your head to the right and finally let it drop to your chest. Repeat this exercise several times.

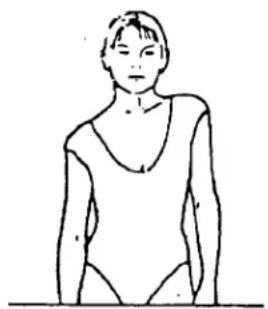
Shoulder exercises
Raise your left shoulder and then your right shoulder while you are dropping your left shoulder down again at the same time.
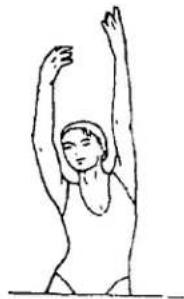
Stretching exercises for your arms
Stretch your left arm towards the ceiling. Then do the same with your right arm while you drop your left arm down again at the same time. Feel the tension in your right and left sides. Repeat this several times.
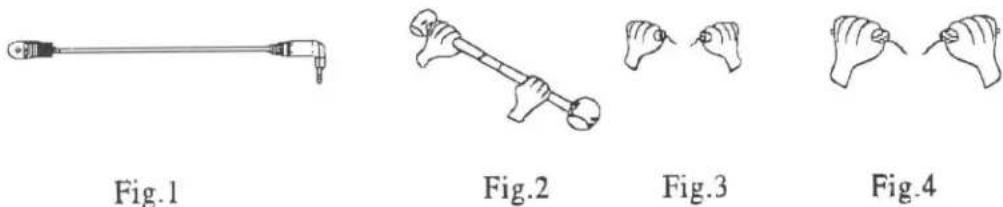
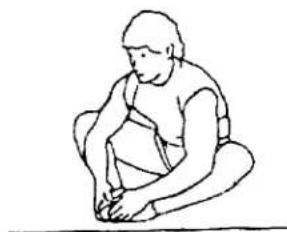
Thigh stretching exercises
Sit on the floor and place your feet together so that your knees are pointing outwards. Pull your feet as closely as possible against and into your groin area. Carefully push outwards on your knees towards the floor. If you can, repeat 15 times.
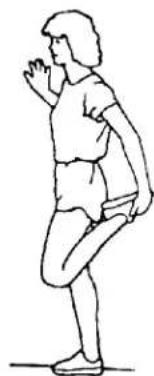
Stretch inner thigh and legs
Place one hand against the wall and reach back with your other hand to lift up your right foot. Bring your heel as closely as possible against your thigh. Repeat this 15 times, then do the same with your left foot.
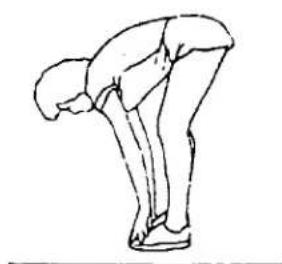
Touching your toes
Slowly bend forward and try to reach your feet with your hands. Stretch down as far as possible and repeat this 15 times.
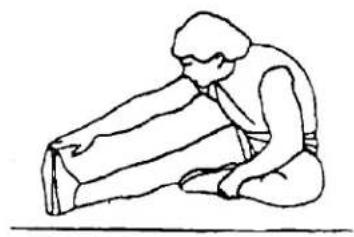
Hamstring exercises
Sit on the floor and stretch your right leg. Bend your left leg and place your foot against your right upper leg. Reach for your right foot with your right arm. Repeat this 15 times and do the same exercise with your left leg.
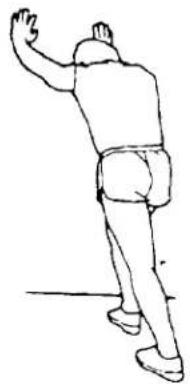
Calf/achilles exercises
Place both hands against a wall and lean the weight of your whole body on your hands. Move your legs to the rear, alternating one with the other. The leg in the rear position will be stretched. Repeat this for each leg 15 times.
Aerobic exercises & Weights
Aerobic exercises
Aerobic exercises promote a good oxygen supply to your muscles via your heart and lungs, the most important muscles in your body. It is an essential part of all exercises and needs to be considered when engaging in any sports activity.
Weight training
Aerobic exercises are useful in assisting you to reduce excessive body fat. In contrast, weight training helps you to build up and firm your muscles.
But one last warning: always consult with your physician before you start your training.