
Soyferm - Soy milk machine Lactoferm - Free user manual and instructions
Find the device manual for free Soyferm Lactoferm in PDF.
Frequently Asked Questions - Soyferm Lactoferm
User questions about Soyferm Lactoferm
0 question about this device. Answer the ones you know or ask your own.
Ask a new question about this device
Download the instructions for your Soy milk machine in PDF format for free! Find your manual Soyferm - Lactoferm and take your electronic device back in hand. On this page are published all the documents necessary for the use of your device. Soyferm by Lactoferm.
USER MANUAL Soyferm Lactoferm
text_image
Labeled diagram of a portable kettle with numbered parts for identificationOnderdelen
natural_image
Close-up of a modern kitchen brush with a cylindrical container and lid, next to a leafy plant (no visible text or symbols)
text_image
Soup Rice Paste Milk/OffTRADITIONELE CHINESE RECEPTEN
natural_image
Monochrome illustration of a plant stem with leaves and a flower bud, labeled with the number 8 below (no other text or symbols)Problemen oplossen
Oorzaak
Oplossing
text_image
Labeled diagram of a portable kettle with numbered parts for identificationComposants
natural_image
Product photo of a hairdryer with a white base and gray top, next to a plant (no visible text or symbols)
text_image
Soup RICE Paste MILK/OFFAlarme "hors service"
text_image
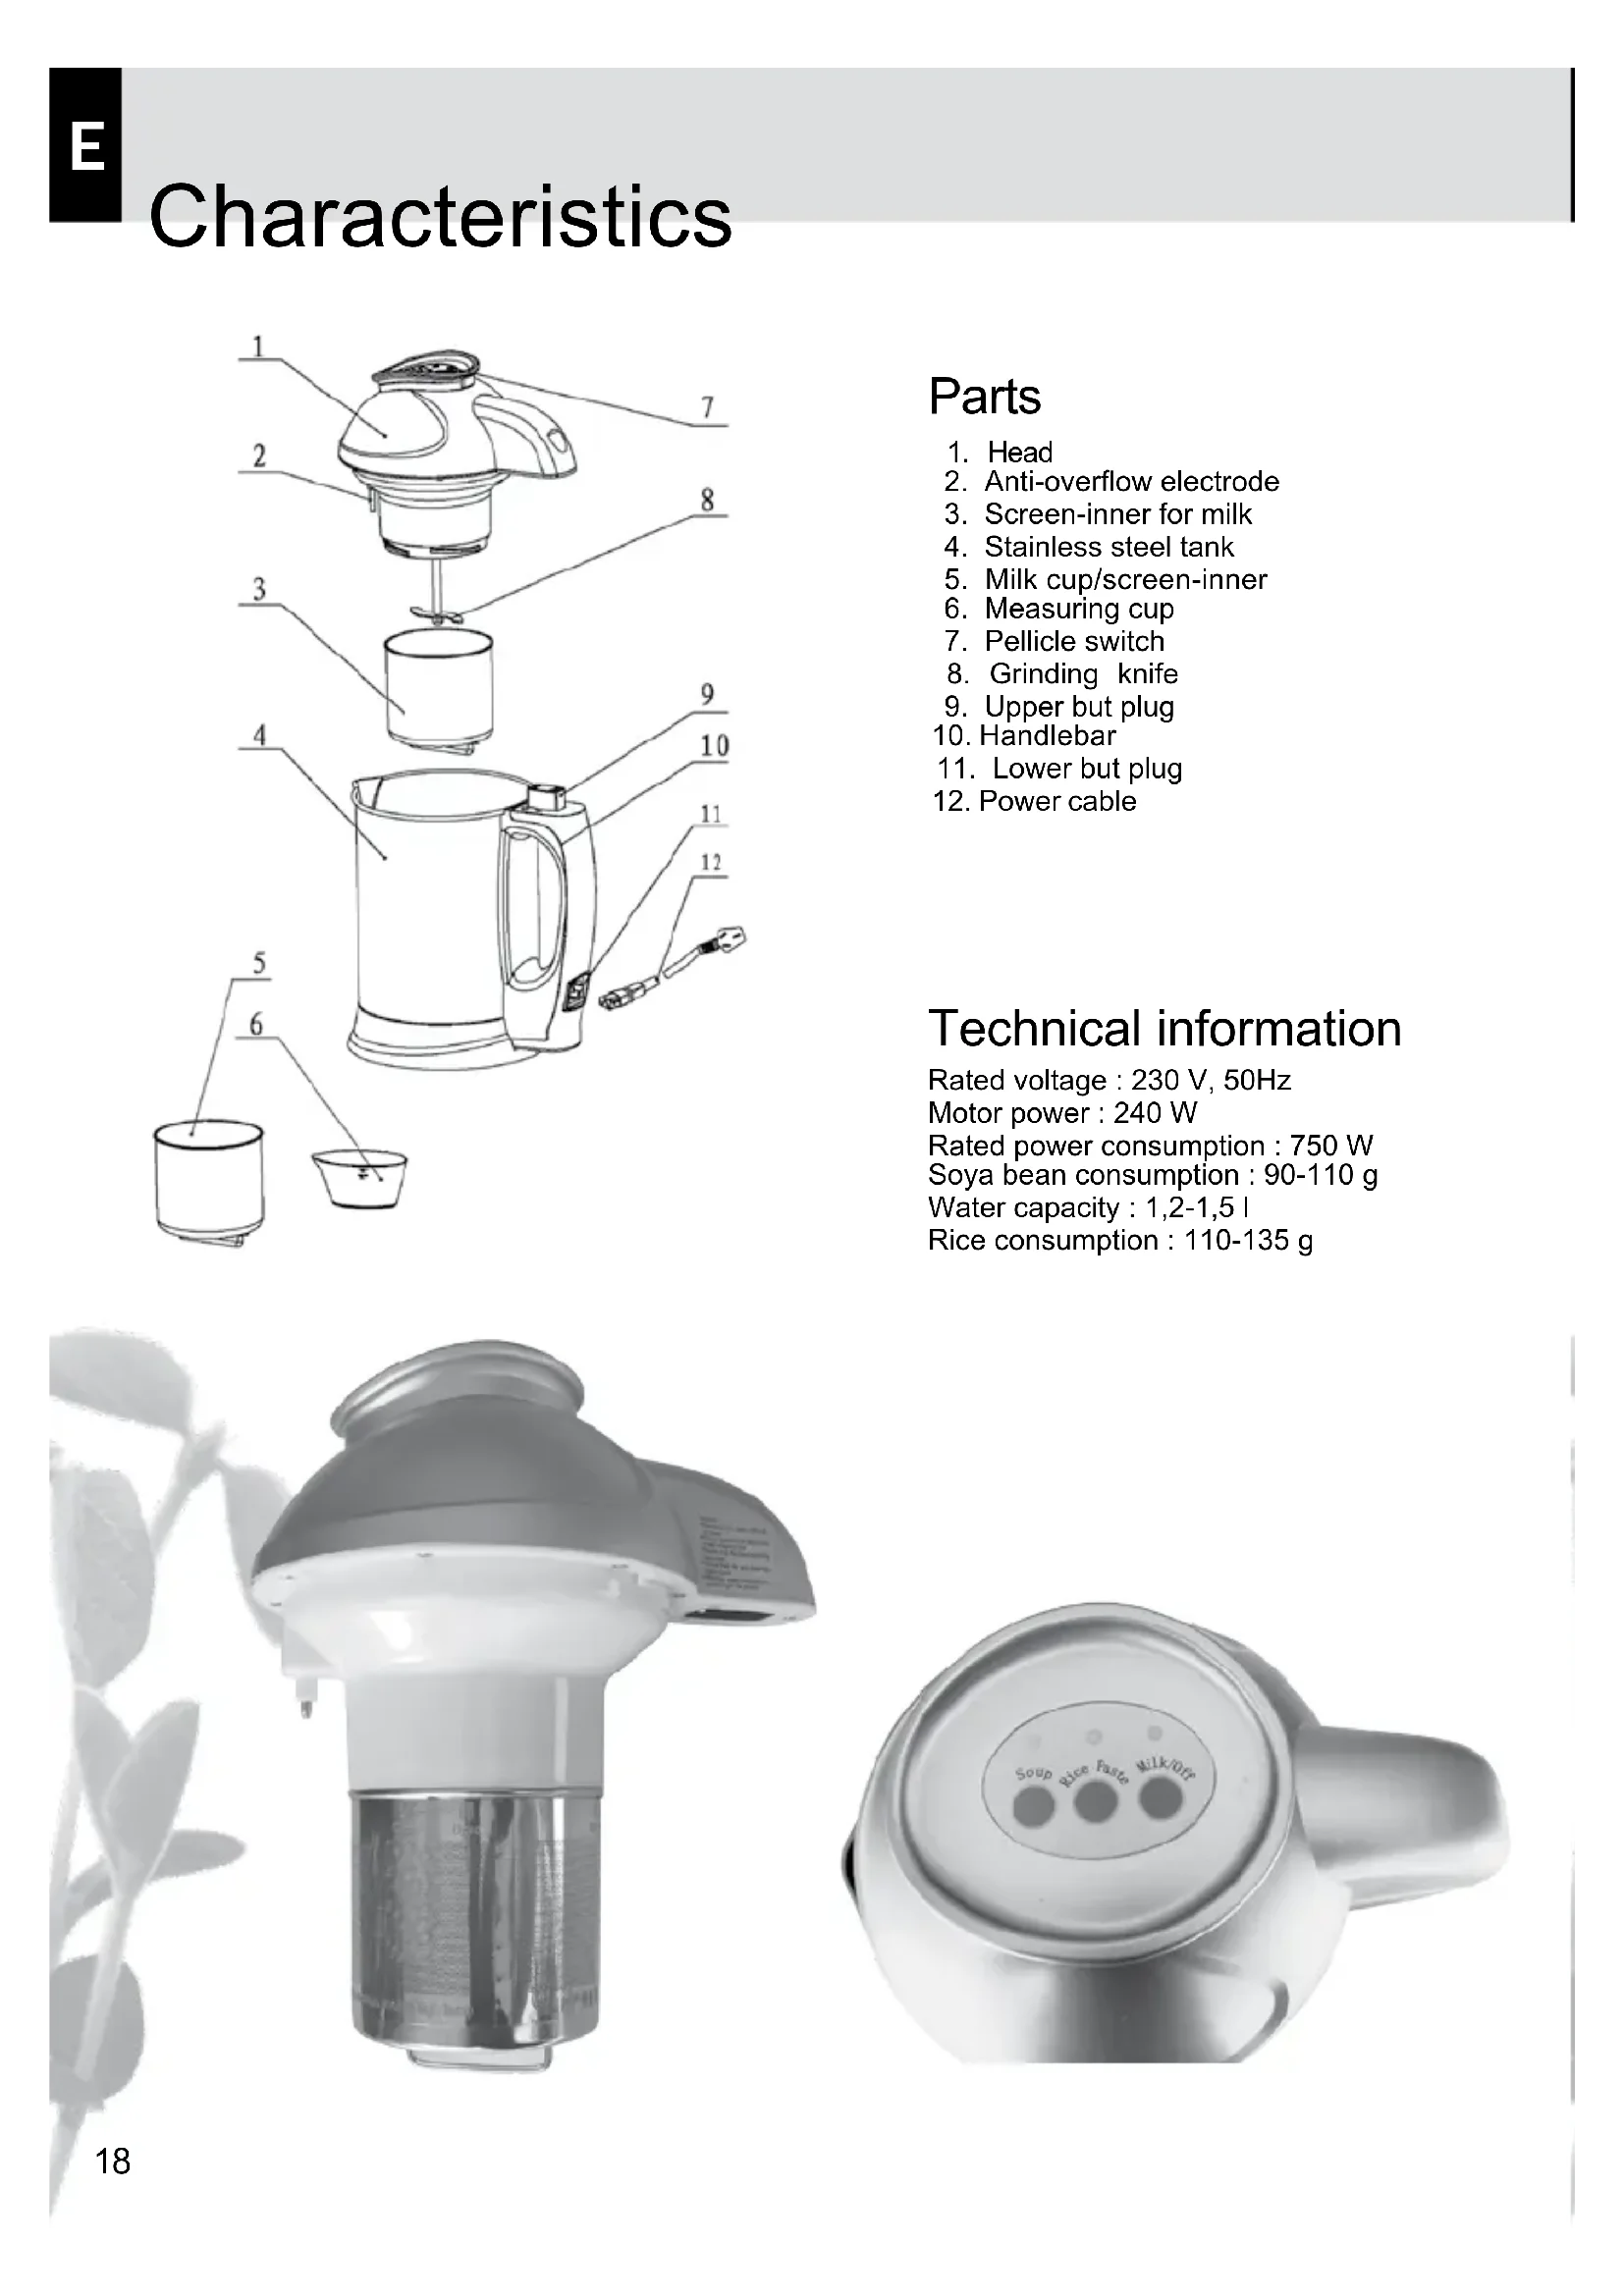
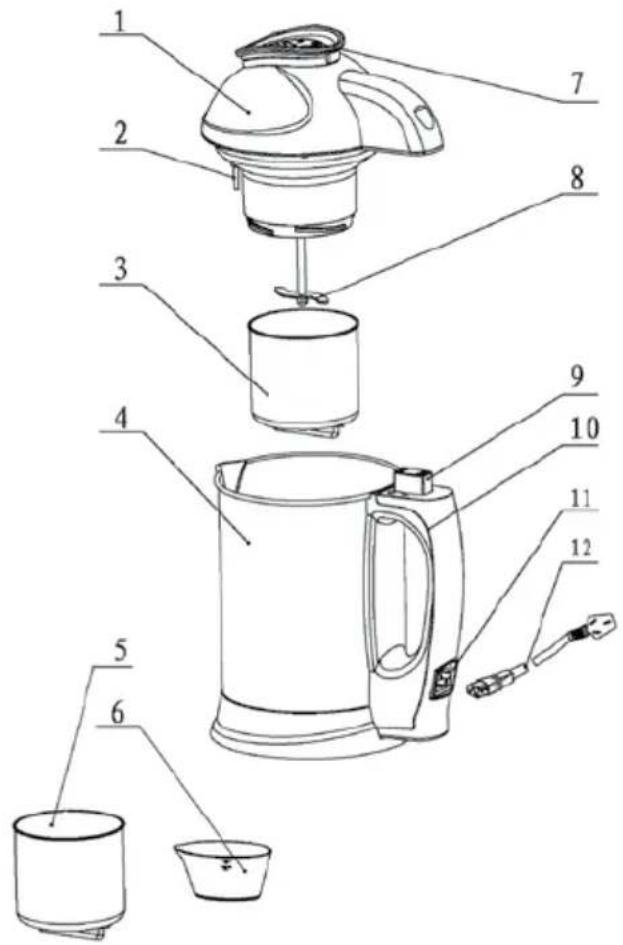
Labeled diagram of a portable kettle with numbered parts for identificationParts
- Head
- Anti-overflow electrode
- Screen-inner for milk
- Stainless steel tank
- Milk cup/screen-inner
- Measuring cup
- Pellicle switch
- Grinding knife
- Upper but plug
- Handlebar
- Lower but plug
- Power cable
Technical information
Rated voltage : 230 V, 50Hz
Motor power : 240 W
Rated power consumption : 750 W
Soya bean consumption : 90-110 g
Water capacity : 1,2-1,5 l
Rice consumption : 110-135 g

natural_image
Close-up of a modern kitchen brush with a cylindrical container and lid, next to a leafy plant (no visible text or symbols)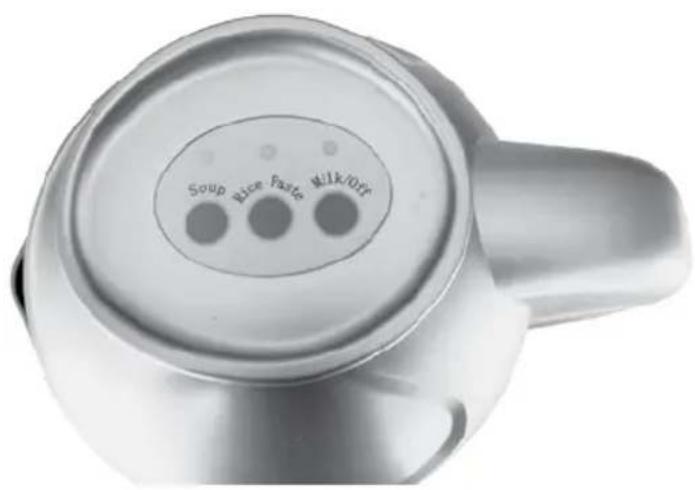
text_image
Soup Rice Paste Milk/OffImportant safety instructions
When using electrical appliances, basic safety precautions should always be followed, including the following:
- Read all instructions before use.
- To protect against risk of electrical shock, do not immerse the electric cord, plug, or motor base in water or other liquids.
-
Unplug from outlet when not in use, before putting on or taking off parts, and beforecleaning. Remove the plug by gripping the plug body and pulling out of the outlet. Never yank or twist cord to unplug the unit.
-
Close supervision is necessary when any appliance is used by or near children.
-
Avoid contact with moving parts.
-
Do not operate any appliance with a damaged cord/plug, after the appliance malfunctions, or is dropped or damaged in any manner. Return appliance to the nearest authorized service facility for examination, repair, electrical, or mechanical adjustment.
-
The use of attachments not recommended or sold by the manufacturer may cause fire, electric shock, or injury.
-
Do not use outdoors.
-
Do not let cord hang over the edge of table or counter, or touch hot surfaces.
-
To disconnect, wait until motor stops before removing plug from the electrical outlet.
-
Do not operate unattended. Make sure the motor stops completely before disassembling.
Unplug after each use. SAVE THESE INSTRUCTIONS
Operating Instructions
Please read these directions for use carefully before using the machine.
You will soon be enjoying fresh, delicious soya milk.
The soya milk maker is versatile machine. With a little practice, you will be able to produce delicious plant milk. Not only from dry or soaked soya beans, but also from sesame or almonds. However, good results will be obtained most easily with milk made from soaked soya beans.
Therefore it is wise to gain your first experience with these beans.
- The whole process of making soya bean milk is automatic.
- Thanks to the helical knives with angle dentition, food materials (dried or soaked) are grinded thoroughly which results in very strong and nice soya milk.
- The whole process is controlled by a micro-computer. The controlled proportion between water and beans, the grinding temperature and the boiling mode, result in tasty soya milk.
- You can also make vegetable soup.
- The machine has a multi-functional and an autoprotection device (such as anti-waterless heating, antioverflowing, overheating protection, etc.) to ensure a safe and reliable use.
- Alarm and light indicate the power connection, process finish and trouble appearance.
Function keys
Milk / Off : This program to make soy milk takes about 30 minutes. When the boiling temperature is reached, the mixer will start to work 4 times in a row, after which the boiling continues until the 30 minutes are passed. The machine can be interrupted during a program by pushing this button (Off-function).
Rice paste : This program also takes about 30 minutes but will mix 6 times. With this program you can prepare rice pastes.
Soup : This program takes 20 minutes and mixes 5 times. Use this button for making soup.
Precautions
- Do not use the machine to reheat cold pastes/milk.
- Do not dip the head unit into water or pour water into the top section.
- Do not dip the stainless-steel chamber into water or get the underside of the base or the handle section wet.
- Be sure the Upper Plug and the Lower Plug are dry before connecting.
- Unauthorized disassembly of the head will void the warranty.
- Be careful with the grinding blade components when cleaning.
- Do not touch the stainless-steel parts before they have cooled completely.
- The stainless steel chamber can get very hot during operation. Avoid touching the stainless-steel chamber while machine is in use. (Pay particular attention when children are present).
- Do not operate with a damaged power cable.
- Always use a grounded outlet with the power plug.
Making soy milk
Follow these instructions to make fresh soy milk, nut milk, or rice milk.
- Soak soybeans: Use the measuring cup and take a full cup of dry soybeans (2.5oz – 3.5oz., 70g – 95g). Rinse soybeans thoroughly and leave to soak.
TIP: When soaking the beans, put beans directly into the milk screen and place the screen into the utility cup. Pour water into the utility cup to soak the beans and let it sit.
- Add water to stainless steel chamber: Fill the stainless-steel chamber with water so that water level is between the upper and lower water-level lines. You can control the consistency of the soybean milk by adding more or less water. The lower level mark will be appropriate for 70g of soybeans, while the upper level mark will be appropriate for 95g of soybeans. You can add warm water to shorten the processing time. Do NOT add water over 40°C.
- Load soybeans and attach the milk screen to the head unit: Drain the soybeans and load them into the milk screen. Attach the milk screen to the head unit by moving the blade in a side-to-side motion to allow the screen to slide properly into place. Lock the milk screen by turning it counterclockwise (markings on the milk screen indicate the proper lock and unlock directions).
CAUTION: BE SURE THE SCREEN IS PROPERLY LOCKED IN PLACE! If the screen becomes loose during operation, the spinning blade could damage the screen.
- Assemble machine and make soybean milk: Connect the head unit to the stainless steel chamber. Make sure the upper plug slides into the upper plug receptacle on top of the handle. Plug the provided power cord into the power plug receptacle, and connect the other end to a wall socket. Once plugged in, the soy milk maker will beep and a red light will flash, indicating that the power is on. Choose the milk setting by pressing the "MILK" button on the head unit, and the red light will turn solid, indicating that the cycle is starting. The cycle will take approximately 15 minutes. When finished, the indicator light will blink green, and the machine will beep.
- Pour milk and enjoy: Unplug the base unit. Lift the head unit from the stainless steel chamber. When removing the head unit, be careful not to touch the screen. It will be hot. Make sure that all the milk drains from the screen before moving the head unit away from the stainless steel chamber. Place the head unit with the screen still attached into the utility cup to cool. Carefully pour milk from the stainless steel chamber.
CAUTION: Soy milk will be hot. Allow milk to cool before serving.
TIP: Add your favorite ingredients to flavour your soy milk. Add a pinch of sea salt, or brown sugar, vanilla - any other flavors you like.
Making rice paste
- Soak rice: Use the measuring cup and take a full cup of dry rice (115g). Rinse thoroughly and leave to soak. Soak rice for 30 minutes.
- Add water to the stainless steel chamber: Add water to the stainless steel pitcher between the upper and lower water-level lines.
- Load rice and assemble the machine: Drain the rice and load it into the special rice paste screen. Attach the rice paste screen to the head unit by moving the blade in a side-to-side motion to allow the screen to slide properly into place. Lock the rice paste screen by turning it counter-clockwise (markings on the milk screen indicate the proper lock and unlock directions).
CAUTION: BE SURE THE SCREEN IS PROPERLY LOCKED IN PLACE! If the screen becomes loose during operation, the spinning blade could damage the screen.
- Assemble machine and make rice paste: Connect the head unit to the stainless steel chamber. Make sure the upper plug slides into the upper plug receptacle on top of the handle. Plug the provided power cord into the power plug receptacle found on the main body, and connect the other end to a wall socket. Once plugged in, the soy milk maker will beep and a red light will flash, indicating that the power is on. Choose the paste setting by pressing the "RICE PASTE" button on the head unit, and the red light will turn solid, indicating that the cycle is starting. The cycle will take approximately 15 minutes. When finished, the indicator light will blink green.
- Pour and enjoy: Unplug the base unit. Lift the head unit from the stainless steel chamber. When removing the head unit, be careful not to touch the screen. It will be hot. Make sure that all the paste drains from the screen before moving the head unit away from the stainless steel chamber. Place the head unit with the screen still attached into the utility cup to cool. Carefully pour paste from the stainless steel chamber.
CAUTION: Rice paste will be hot. Allow paste to cool before serving.
Making soup
Follow these instructions to make delicious soups
- Add ingredients: add the ingredients for your soup directly in the stainless steel chamber.
- Add water until the water level reaches the lower line inside the boiling chamber.
- Attach the head unit, without the screen, and press the SOUP button.
- When the cycle is complete (approx. 15 minutes), carefully remove the head, and pour soup into a bowl.
- Stir in seasonings
Cleaning
Be sure to clean the machine thoroughly after every use. Proper cleaning will ensure that SoyFerm produces great results for years to come.
- Unplug the unit.
- Place head unit with screen into the utility cup to cool for about 30-45 minutes (See photo on left).
TIP: For faster cleanup, add cold water to the utility cup to soak the screen. If you want to eat the grounds, let it cool on its own.)
- After the contents have cooled, detach the screen from the head unit by turning the screen clockwise.
- Unload the soybean residue and wash the screen with hot, soapy water and the provided cleaning brush. Ensure that the screen is cleaned thoroughly, making sure all holes are open, as a blocked screen can affect the consistency of the milk in future operations.
Make soy milk using Soyfern according to instructions. When soy milk has been made, add: 1/2 teaspoon sea salt
1 teaspoon vanilla extract
3 tablespoons cane sugar
Many flavorings can be added to your soy milk. Don't be afraid to experiment. Besides vanilla extract, try using real maple syrup instead of white sugar. Molasses, brown rice syrup, date sugar, carob powder, and malted barley syrup are some other sweeteners that can be used. A coffee measuring spoon is a good place to start for gauging the amount of powder to use.
Gourmet food stores, health food stores and many coffee emporiums sell syrups to make flavored coffees. These can also be used to flavor soy, rice, and oat milk. Hazelnut, coffee, or mocha are beginners' favorites.
The following additional recipes are common Chinese recipes. Many of the ingredients can be found in Asian markets.
Five Bean Milk
Ingredients: Soybean 1.4oz (40g), Black Soybean 0.4oz (10g), Snap Bean 0.4oz (10g), Pea 0.4oz (10g), Pignut 0.4oz (10g), Water 33.8 fl. oz (1000ml).
- Soak beans for 6-8 hours and clean to prepare for use.
- Follow instructions for making soybean milk.
Salty Soybean Milk
Ingredients: Soybean 2.5oz (70g), Water 33.8 fl oz (1000ml), Pickled Vegetable 0.5oz (15g), chopped green onions, dried small shrimp, sauce, salt, etc. for flavor.
- Soak the soybeans for 6-8 hours and mince the pickled vegetables. Clean to prepare for use.
- Follow instructions for making soybean milk.
- Add the flavoring of the pickled vegetable pieces, chopped green onions, dried small shrimp and salt to a bowl, pour the hot soybean milk into the bowl and enjoy.
Soybean and Malt Sugar Drink
Ingredients: Soybean 2.8oz (80g), Water 33.8 fl oz (1000ml), Malt Sugar 1.8oz (50g).
-
Soak the soybeans for 6-8 hours and clean. Unfreeze the malt sugar by placing it into boiled water.
-
Follow instructions for making soybean milk. Add the malt sugar and enjoy.
Soybean and Yam Rice Porridge
Ingredients: Soybean 1.2oz (35g), Water 33.8 fl oz (1000ml), Rice 0.5oz (15g), Black Rice 0.5oz (15g), Yam 0.5oz (15g) and white sugar.
- Soak the black soybeans for 6-8 hours and clean to prepare for use.
- Follow instructions for making soybean milk.
- Cut yams into small pieces. Boil yams with rice, black rice, and soybean milk for 10-15 minutes and enjoy.
Black Soybean and Sesame Milk
Ingredients: Black Soybean 1.8oz (50g), Peanut 0.5oz (15g), Black Sesame 0.2-0.4oz (5-10g), Water 33.8 fl oz (1000ml).
- Soak the black soybeans and the peanuts for 6-8 hours and clean to be prepared for use.
- Load milk screen with soaked black soybeans, peanuts, black sesame, and follow instructions for making soybean milk.
Peanut and Soybean Milk
Ingredients: Milk 7.1oz (200g), Peanut 1.4oz (40g), Soybean 1.4oz (40g), Water 27.1 fl oz (800ml).
- Soak the soybeans and the peanuts for 6-8 hours and clean to prepare for use.
- Load milk screen with soaked soybeans and peanuts. Add water and milk to the chamber and follow instructions for making soybean milk.
Red Jujube and Green Soybean Milk
Ingredients: Red Jujube (non-putamen) 0.5oz (15g), Green Soybean 0.7oz (20g), Soybean 1.4oz (40g), White Sugar 1.8oz (50g), Water 33.8 fl oz (1000ml).
- Soak the soybeans and the green soybeans for 6-8 hours and clean to prepare for use.
- Wash the red jujube and load into the milk screen with the soaked beans. Follow instructions for making soybean milk.
- Add sugar, if desired, and enjoy.
Red Jujube and Lotus Seed Milk
Ingredients: Red Jujube (non-putamen) 0.5oz (15g), Lotus Seed 0.5oz (15g), Soybean 1.8oz (50g), White Sugar 1.8oz (50g), Water 33.8 fl oz (1000ml).
- Soak the soybeans for 6-8 hours and clean to prepare for use.
- Soak the lotus seeds in boiled water until they become soft.
- Load the cleaned red jujube, soaked soybeans, and lotus seeds to the milk screen and follow instructions for making soybean milk.
- Add sugar, if desired, and enjoy.
Walnut and Almond Milk
Ingredients: Almond 2.1oz (60g), Walnut Seed 0.5oz (15g), Water 33.8 fl oz (1000ml).
- Soak walnuts and almonds for 6-8 hours and clean to prepare for use.
- Load walnuts and almonds into milk screen and follow instructions for making soybean milk.
Peanut Milk
Ingredients: Peanut 2.8oz (80g), Water 33.8 fl oz (1000ml).
- Soak the peanuts for 6-8 hours and clean to prepare for use.
- Load soaked peanuts to the milk screen and follow instructions for making soybean milk.
Honey Black Sesame Milk
Ingredients: Honey 1 tbsp, Black Sesame 0.7oz (20g), Soybean 2.1oz (60g), Water 33.8 fl oz (1000ml).
- Soak soybeans for 6-8 hours and clean to prepare for use.
- Load soybeans and black sesame to the milk screen and follow instructions for making soybean milk.
- Add honey and enjoy.
Soybean Residue Biscuit
Ingredients: 2 or 3 Eggs, 14.1oz (400g) of flour, 14.1oz (400g) of Soybean Residue, 14.1oz (400g) of Water.
-
Mix all of the ingredients and season to taste with salt or sugar.
-
Fry in a frying pan and enjoy.
Problem analysis
Cause
Solution
Screen-inner slips out of joint
The screen-inner is not screwed tight enough Screw tight along the arrow head
The beans are not grinded
The voltage is too low Steady the voltage
Too much or not enough beans Add the correct quantity of beans
Not enough water The added water has to reach the lower
level line. Add the correct quantity of water
The wholes of the screen-inner are jammed Clean the inner-screen with a toothbrush
Overflow
Too much water in the machine Add the correct quantity of water
The anti-overflow tube is filthy Clean the anti-overflow tube
The beans are filthy Wash the beans
"Out of order"-alarm
Not enough water The added water has to reach the lower
level line. Add the correct quantity of water
The temperature of the added water is too low Use water between 10 and 40°C
Scorch
Too much or not enough beans Add the correct quantity of beans and water.
The consistence of the milk is not good
The whole of the screen-inner is jammed Clean the whole of the screen-inner with a toothbrush
The soaking time of the beans is not correct. Soak the beans as explained in the recipes.
Warranty
The Soyferm soy drink maker has been manufactured with the greatest care and comes with a two year warranty. Always keep proof of your purchase. Damage as a result of unauthorised use is not covered. This appliance is suited for 220 volt, 50 Hz.
Charakteristik
text_image
Labeled diagram of a portable steam cooker with numbered parts for identificationTeile
natural_image
Product photo of a hairdryer with a glass cap and lid, next to a plant (no visible text or symbols)