IDL5550S - Satellite receiver Inverto - Free user manual and instructions
Find the device manual for free IDL5550S Inverto in PDF.

| Brand | Inverto |
| Model | IDL5550S |
| Category | Satellite receiver |
| Product Type | High Definition (HD) Digital Satellite Receiver PVR-ready |
| Dimensions (L×H×D) | 280 × 190 × 45 mm |
| Weight | Approximately 1.2 kg (estimate) |
| Power Supply | 90-260 V AC, 50/60 Hz, max power consumption 42 W |
| Supported Resolutions | 576i, 576p, 720p, 1080i (via HDMI and YPbPr) |
| Video Formats | MPEG2 MP@HL/MP@ML, MPEG4 AVC High Profile Level 4.1 |
| Audio Formats | MPEG1, MPEG2, MP3, Dolby Digital (S/PDIF) |
| Connectivity | HDMI, 2 x Scart, YPbPr, CVBS, S-Video, Audio L/R, S/PDIF coaxial and optical, USB 2.0 (2 ports), RS-232, Ethernet (on some models), LNB input with Loop-Through output |
| Main Functions | Satellite reception, USB recording (PVR), Time Shift, 7-day EPG guide, favourites list (8 lists), parental lock, software update via USB, RS-232 or OTA (ASTRA 19.2E) |
| External Storage | USB hard drive (FAT16/32, Ext2/3), max file size 4 GB |
| User Interface | Menus in French, remote control with dedicated buttons, 10-character VFD display |
| Maintenance and Cleaning | Unplug before cleaning; use a soft dry cloth; do not use liquids |
| Safety | Do not expose to moisture; minimum ventilation 7 cm around; do not open (no user-serviceable parts inside) |
| Spare Parts and Repairability | External power supply; repair by qualified technician; contact Inverto support |
| General Information | Manual available in French (PDF); 24-month warranty; complies with CE, WEEE, RoHS standards |
Frequently Asked Questions - IDL5550S Inverto
User questions about IDL5550S Inverto
0 question about this device. Answer the ones you know or ask your own.
Ask a new question about this device
Download the instructions for your Satellite receiver in PDF format for free! Find your manual IDL5550S - Inverto and take your electronic device back in hand. On this page are published all the documents necessary for the use of your device. IDL5550S by Inverto.
USER MANUAL IDL5550S Inverto
FTA Communication Technologies
18 Duchscherstroos, L-6868 Wecker, Luxembourg
Tel: +352 264 367 1 Fox: +352 264 313 68
e-mail:info@inverto.tv Web:www.inverto.tv
Scena 5
IDL 5550S CI
High Definition Satellite CI Receiver - PVR ready
00
En De Fr NI
LANGUAGE
English 1
German 29
French 75
Dutch 113
Scena 5
Satellite High Definition PVR-ready Set-Top Box
User Manual
Model - IDL 5550S CI
Table of Contents
NOTICES
SAFETY PRECAUTIONS
BEFORE USING THE PRODUCT
Package content
Front Panel
Rear Panel
REMOTE CONTROL
SETUP
Connecting to the antenna
Connection to the TV set
Connection to a DVD or video recorder
Connection to a hi-fi system
Connection to main power supply
Connection Diagram
THE INSTALLATION WIZARD
User preferences
Antenna Settings
Channel search
BASIC OPERATION
Program Navigation
Volume Control
Resolution
Program Information (info-banner)
Messages
Videotext/Teletext
Audio and Subtitles language
Standby mode
USB
Recoding and Playback
THE MAIN MENU
SETTINGS
Audio/Video Settings
Time / Date
Default settings
System information
Product Information
SOFTWARE UPDATE
Software update via antenna (OTA)
Software update via serial cable (OTC)
Software update via USB
MEDIA MANAGER
Main TV list and Main Radio list
Favourite lists manager
PROGRAM GUIDE (EPG)
Program information (Now/Next)
EPG - grid view
EPG - individual channel view
PERSONAL PLANNER
PARENTAL LOCK
Set Access Rights Level
Change Pin Code
SLEEP TIMER
CONDITIONAL ACCESS SYSTEM
TECHNICAL SPECIFICATIONS
TROUBLESHOOTING
WARRANTY, SERVICE AND SUPPORT
2
3
4
4
4
5
6
7
7
7
7
7
7
8
8
8
9
10
12
12
12
12
12
13
13
13
14
14
14
1!
1!
15
15
16
16
16
17
1
1
17
18
18
18
19
19
19
20
20
21
23
2
23
2:
24
21
27
Notices
COPYRIGHT (Copyright © 2007 FTA Communication Technologies)
Not to be copied, used or translated in part or whole without FTA's prior consent in writing except approval of ownership of copyright and copyright law.
WARRANTY
This warranty does not cover parts which may become defective due to misuse of the information contained in this manual.
Read this manual carefully and make sure you understand the instructions provided. For your safety, be aware of the following precautions.

WARNING! IMPORTANT SAFETY INSTRUCTIONS
CAUTION: TO REDUCE THE RISK OF ELECTRIC SHOCK, DO NOT REMOVE COVER (OR
BACK). NO USER SERVICEABLE PARTS INSIDE. REFER SERVICING TO QUALIFIED SERVICE
PERSONNEL.
WARNING
To reduce the risk of fire or electric shock, do not expose this apparatus to rain or moisture.
To avoid explosion danger, do not dispose of batteries in an open fire.
CE MARK FOR EUROPEAN HARMONISED STANDARDS

The CE mark which is attached to these products means it conforms to EMC Directive (89/336/EEC)
and Low Voltage Directive (73/23/EEC).
WEEE CONSUMER NOTICE

The FTA Communication Technologies S.a.r.l. product you have purchased is subject to Directive
2002/96/EC of the European Parliament and the Council of the European Union on waste
electrical and electronic equipment (WEEE) and, in jurisdictions adopting that Directive, is marked
as being put on the market after August 13, 2005, and should not be disposed of as unsorted
municipal waste. Please utilize your local WEEE collection facilities in the disposition of this
product and otherwise observe all applicable requirements. For further information on how to
properly dispose of your product and for information specific to your country, please contact your vendor or
visit the "Support" section of our website: www.ftacom.com
UNIVERSAL SERIAL BUS (USB) CONNECTIVITY
USB support of the Scena 5 is designed to allow for data sharing between mass storage devices and your newly
purchased Set-Top Box. USB connectivity in this product enables recording of TV programs and sharing of
images (JPEG) and audio files (MP3) using a USB Mass Storage Device.
The Scena 5 is compatible with Mass Storage Devices via USB. It will recognize all USB1.1 and 2.0 peripherals
that support Mass Storage Device mode and are formatted as FAT or FAT32 file system. Some devices, such
as Digital Cameras . Camcorders and MP3 players may use proprietary protocols or protocols that are not
compatible with Mass Storage Devices of the USB standard. Sharing of data with such devices is not supported.
USB connectivity of the Scena 5 only supports file transfer up to a single file-size of 4GB (Fat32). Other formats
are currently not supported. Software updates with new and enhanced features are regularly provided by satellite
on ASTRA 19.2° and on website below.
Please, note that USB consists of a multitude of sub-protocols, for more information on your desired application.
please consult: www.inverto.tv/USB.
IMPORTANT INFORMATION
- Should you experience a problem with this unit, please refer to the trouble shooting section of this user manual.
Please retain the original packaging, should it be necessary at some stage to return the unit.
Disposal of Old Electrical and Electronic Equipment (Applicable in the European Union and other European countries with separate collection systems)
This symbol on the product or on its packaging indicates that this product shall not be treated as household waste. Instead it shall be handed over to the applicable collection point for the recycling of electrical and electronic equipment. By ensuring this product is disposed of correctly, you will help prevent potential negative consequences for the environment and human health, which could otherwise be caused by inappropriate waste handling of this product. The recycling of materials will help to conserve natural resources. For more detailed information about recycling of this product, please contact your local Civic Office, your household waste disposal service, or the shop where you purchased the product.
COPYRIGHTS
Television programmes, movies, video tapes, discs, and other materials may be copyrighted. Unauthorized
recording of copyrighted material may be against the copyright laws in your region. Also, use of this product with cable television transmissions may require authorization from the cable television operator or transmitter/owner.
CAUTION: PREVENTION OF SCREEN BURN-IN
Continuous display of still images and graphics, such as on-screen displays, stock market tickers, paused recordings, and other fixed (non-moving) patterns can cause permanent damage to the television. Plasma screen displays, projection televisions, and CRT televisions are especially susceptible to this.
ABOUT THIS MANUAL
- Instructions in this manual describe the operation using the controls on the remote. You can also use the corresponding controls on the front panel with the same markings.
- The on-screen display illustrations used in this manual may not match the graphics displayed on your television exactly.
All recording times referred to in this manual are approximations and depend on the content of the recording. All claims to storage capacity assume a mix of programming is recorded types, is recorded, such as televisions and radio channels.
Safety precautions
This digital video receiver has been manufactured in accordance with international safety standards. For your own safety, you should read the notes on safety precautions carefully, and take note of them, before operating your new receiver. For your own safety, please be sure to follow these safety precautions.
This product is for indoor use in moderate climates only.
This product contains no user serviceable parts. The unit should only be opened or repaired by qualified service personnel.
The supplied AC power cable must be used to power this product. If the power cord becomes damaged, it must be replaced. Always refer to qualified personnel.
Check to make sure operating voltage of the product is identical with your local power supply, prior to connecting it to the power socket.
- To prevent fire or shock hazard, do not place the product near objects filled with liquids, or near dripping or splashing liquids.
- Install the product so the AC power cable can be unplugged from power socket immediately, in the event of a problem.
- The unit should not be placed near sources of open flame. No open flame sources, such as candles, should be placed on the unit.
Should any solid object or liquid fall into the cabinet, unplug the product and have it checked by qualified personnel before operating it any further.
Proper grounding: For protection from lightning and static discharge the antenna connected to this receiver must be connected to earth ground. The proper grounding can be achieved by connection to the earth ground system of your house/building, or by a qualified installer.
- Do not expose the product to high temperatures, such as placing it on top of other product that produce heat or in places exposed to direct sunlight.
- Do not place the product in a location subject to extreme changes in temperature. The temperature gradient should be less than 10 degrees C/hour.
- Place the product in a location with adequate ventilation to prevent the build-up of heat inside the product. The minimum ventilation space around the unit should be 5cm . The ventilation should not be impeded by covering the ventilation openings with items, such as newspapers, table cloth, curtains, etc.
VENTILATION
- Do not expose the product to high temperatures, such as placing it on top of other product that produce heat or in places exposed to direct sunlight or spot lights.
- The ventilation slots on top of the product must be left uncovered to allow proper airflow into the unit. Do not stand the product on soft furnishings or carpets. Do not stack electronic equipments on top of the product.
- Do not place the product in a location subject to extreme changes in temperature. The temperature gradient should be less than 10 degrees C/hour.
- Place the product in a location with adequate ventilation to prevent the build-up of heat inside the product. The minimum ventilation space around the unit should be 7cm . The ventilation should not be impeded by covering the ventilation openings with items, such as newspapers, table cloth, curtains, etc.
POWER SOURCES
The product is not disconnected from the AC power source (mains) as long as it is connected to the power outlet or wall socket, even if the product is turned off.
- If the product will not be used for a long period of time, disconnect it from the AC power outlet or wall socket.
Before using the product
This chapter provides detailed instructions on the product and its accessories.
PACKAGE CONTENT
Remote Control

Scart Cable

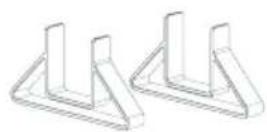
2 Vertical mounting Stands

User Manual
2 Batteries size AAA
FRONT PANEL
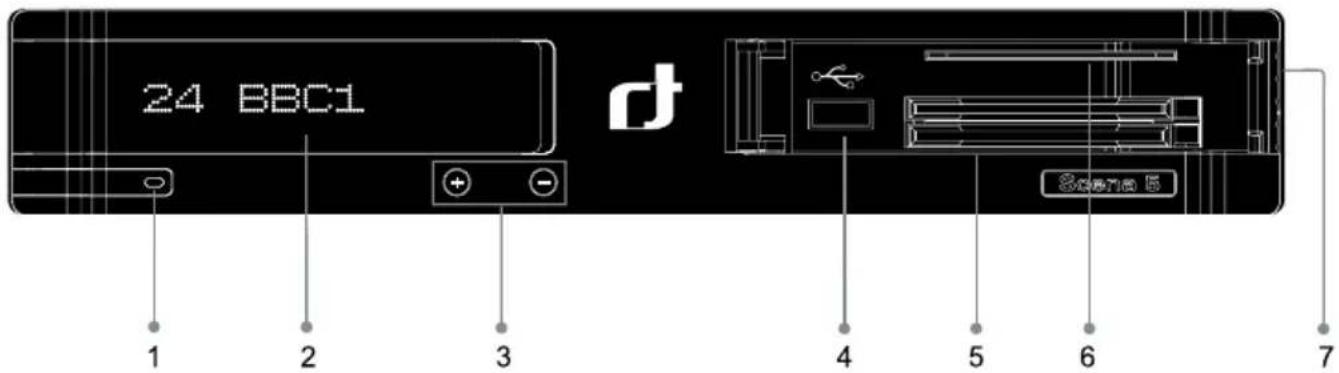
- Standby key - Switches between operation and standby modes.
- VFD Display
- Channel up and down navigation keys - Moves the TV/radio channel up or down.
- USB-A (Host) connector - Allows to connect USB mass-storage devices.
- Common Interface - Two slots for two CI modules with a Smartcard.
- CA Interface - A slot for one Smartcard (Optional)
- Flap opening point

REAR PANEL
1. VCR SCART
Connects to a VCR SCART cable. This connection supports Standard Definition TV resolutions only.
2. TV SCART
Connects to a TV SCART cable. This connection supports Standard Definition TV resolutions only.
3.HDMI
Connects to the TV using HDMI connector for High Definition signals.
4. USB Host
Connects to a USB mass storage devices.
5. Component video connectors
Connects to the analog component video connectors at the TV set. These connectors support High Definition signal.
6. S/PDIF - Coax (upper) and Optical
Outputs the digital audio signals(S/PDIF) for home cinema connection.
7.RS-232C
Connects to the PC to update the software programme of the product.
8. LNB IN and Loopthrough OUT
LNB In Connects to the satellite antenna cable. LNB Out allows to connect to another digital receiver.
9. Ethernet (RJ45) (in specific models only)
Connection to Local Area Networks. This interface is only available on specific models of this product.
10. AUDIO L/R
Connects to the TV or VCR and outputs audio signals.
11. CVBSVIDEO
Connects to the TV or VCR and outputs analog composite video signals. This connection supports Standard Definition TV resolutions only.
12. On/Off switch
Powers on/off the receiver.
Remote Control
1 Standby-switches the receiver into standby mode
2 Mute - mutes the audio outputs of the receiver
3 TV - displays the TV channel list
4 Connect - explores connected devices (this key is only functional in specific models)
5 Radio - displays the Radio channel list
6 Keypad - for user's inputs
7 Teletext - launches the teletext browser
8 Subtitles - displays the list of available subtitle languages
9 Volume up
10 Volume down
11 Channel up
12 Channel down
13 Help
14 Sleep timer - brings up the Sleep Timer dialog
15 Color keys used for selection in On-Screen-Display menus
16 Guide - displays the TV program guide
17 i - displays detailed program information
18 Fav - selects the favorite list the user want to be active
19 Up, Down, Left, Right and OK - navigation and select keys
20 Last - rotate through recently watched channels
21 Exit - leaves the menu currently on screen
22 Menu - brings up the Main Menu on the screen
23 V-Format - selects the picture resolution
24 Options - displays list of available options (this key is only functional in specific models)
25 16:9 - sets the picture format to 16:9
26 Recording and Playback navigation keys (see details below)
27 Personal Planner
28 Instant replay - replays the last 30 seconds (during playback or time-shift)
29 Library
PVR FUNCTION:


BATTERIES
Batteries are required to operate the remote control (supplied with the unit). To insert the batteries, open the battery compartment cover on the rear of the remote control. Insert the batteries (AAA size, 2 × 1.5V ), by matching the (+) and (-) markings on the batteries to the markings inside the battery compartment. Replace the compartment cover.
NOTES
- Spent batteries should not be discarded in your domestic refuse. In most countries, you are legally obliged to ensure spent batteries are properly recycled. They can be disposed of either in special bins provided in your community, or may be returned to any retailer who sells batteries.
Use the batteries correctly to avoid possible leakage and corrosion. Do not touch the liquid with bare hands, should leakage occur.
Do not use a new battery with an old battery, or batteries of different manufacturers.
Do not attempt to recharge the supplied batteries.
If you do not intend to use the remote for an extended period of time, remove the batteries.
If battery leakage occurs, wipe out any liquid inside the battery compartment and insert new batteries.
USING THE REMOTE CONTROL
For best results, point the remote control directly at the receiver while pressing keys
- Do not place the receiver in a location exposed to direct sunlight or bright fluorescent lighting, as this may interfere with the receiver and cause it not to respond to the remote.
Setup
This short instruction explains the most important functions to ensure that you can directly watch television with your new digital receiver. Please note, additional adjustments may be required.
CONNECTING TO THE ANTENNA
Note: Do not connect the digital receiver to the main power yet.
CONNECT THE LNB (LOW NOISE BLOCK) TO THE DIGITAL SATELLITE RECEIVER INPUT
Connect the LNB on the satellite dish antenna directly to the digital receiver using the "LNB in" connector of the Tuner, by means of a coaxial cable. You may use the loop-through connector to connect to a second receiver.
CONNECTION TO THE TV SET
The digital receiver and TV set can be connected by means of a SCART cable (supplied), HDMI cable (supplied), Component Video cables (not supplied) or Composite Video (Yellow) and Stereo Left/Right Audio cable (Red+White).
Simply connect the two ends of the cable you select to use in connecting the receiver to the TV set. The SCART connection ensures that audio and video signals are transmitted to the TV set in optimum quality.
In case your TV set is equipped only with a CVBS input socket, you can use the CVBS output on the digital receiver and connect your TV set via cable to provide optimum quality of the video signal. To provide audio signal to the TV set it is necessary to connect the Audio L/R output on the digital receiver to the audio input on your TV set.
The HDMI connection is recommended for Digital TV. In case the TV has a HDMI input connector, a special all-digital interface that provides the highest picture quality, connect the product to the TV with the HDMI cable.
The Component Video connection is also recommended for Digital TV. Connect the receiver to the TV with the Component cable as shown in the diagram.
CONNECTION TO A DVD OR VIDEO REORDER
Just as the TV set, the DVD or video recorder is connected to the receiver via a SCART connection. Use the VCR SCART socket for this purpose.
CONNECTION TO A HI-FI SYSTEM
The audio quality of digital TV and radio programmes can be enjoyed even more when reproduced through a hi-fi audio system. To do this, use a RCA cinch stereo cable to connect the sockets marked Audio L/R on the receiver to one of the inputs of your hi-fi system marked either Line, Aux or Extra.
If your hi-fi system is equipped with a digital audio input, you may use a digital RCA cinch cable to connect the electrical (Coax) digital audio output of your receiver (socket DIGITAL AUDIO COAX) to your hi-fi or Dolby Digital system. The receiver is also equipped with an optical digital output. If your hi-fi system is equipped with an optical audio input, you may use an optical cable to connect your hi-fi system to your digital receiver.
CONNECTION TO MAIN POWER SUPPLY
After all the connections are done you can connect your digital receiver to power. Just before plugging a power cable into the wall connector put the power switch, on the rear panel, in position 0 (off).
CONNECTION DIAGRAM
The Installation Wizard
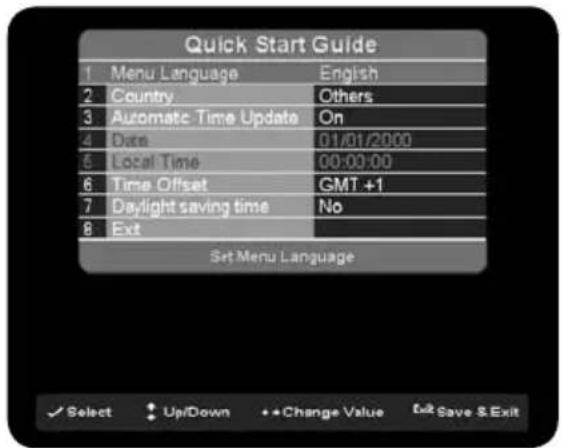
The first time you turn on the receiver, a "Quick Start Guide" menu will be open to assist you with the initial settings. This menu will also appear after you do a Factory Reset.
Use the directional keys on the remove control to change settings and the "OK" key for confirmation.
Select the correct menu language and country, to make sure the unit will operate correctly in your current location. Set the Time and Date, or leave the unit in Automatic mode, to collect the correct Time and Date automatically.
After making the necessary changes, press "Exit" to proceed to the next step.
USER PREFERENCES
This is where you can set the basic parameters of your digital receiver.
Menu Language
Select the language to be used for all menus.
Note: This does not change the language for information about programs shown in the EPG.
OSD Transparency
The transparency of OSD can also be adjusted, i.e. the degree to which the TV image is visible through the overlay of the on-screen menu.
Pop-up Timeout
When switching between programmes, for instance, a message is briefly displayed with programme information
(Now/Next EPG). The duration that this message is displayed can be set, from 1 to 9 seconds.
Soundtrack
Some programmes are broadcasted in different languages. If a multi-lingual programme is broadcast, then it is automatically set to the language of your preference.
Primary Subtitle Language
Some programmes are broadcast with different subtitles. If multi-subtitle programmes are broadcast, then it is automatically set to the language of your preference.
History depth
You can set the history of previously selected programmes from 1-5, and then use the "Last" key on the remote control to switch between them.
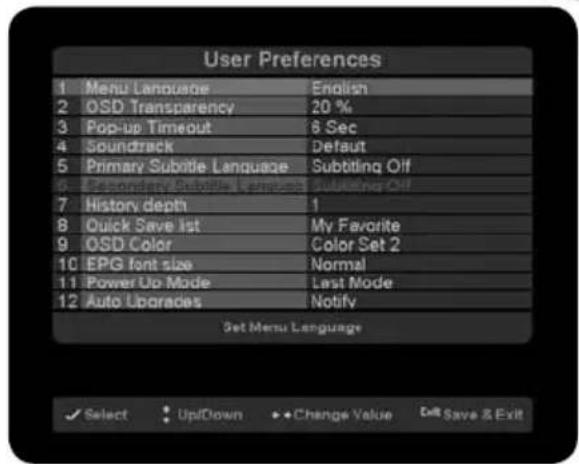
Quick Save List
You can use this option to specify into which favourite list your favourites will be automatically saved. You may select from the list of existing favourite lists or choose "Select FAV from list" to allow you to choose the location later, while adding favourites.
OSD colour
You can change the colour of the user interface with this option.
EPG font size
This option allows you to change the size of the text in the EPG, to allow you to see more or less data at once.
Power Up Mode
This option allows you to set the unit to automatically change to a specific mode during power-up. If you select "Stand-by mode", the receiver will go into stand-by immediately after power-up. If you select "Last mode", the receiver will change to the same mode it was in, prior to switching it off.
Note: The receiver is able to switch on some TV sets that use the "Slow Blanking" signal on the SCART connector. If "Last Mode" is selected, the receiver and TV will power-up at the same time.
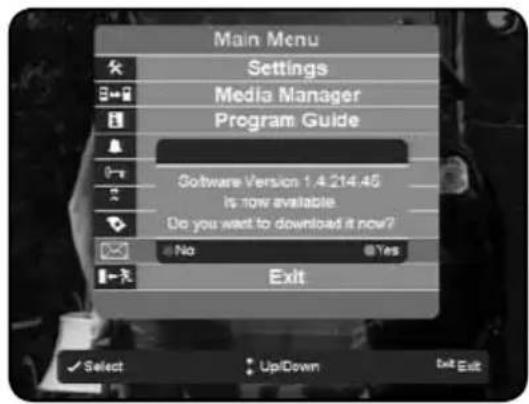
Auto Upgrades
By choosing "Notify", you will see a symbol in the upper part of the OSD when a new update is available. By choosing "Auto" your receiver will be automatically updated while in stand by.
ANTENNA SETTINGS
To set up the receiver for the type of antenna connected, follow the instructions below.
Signal strength and signal quality bars
In two level bar meters, on the right side of the screen, the user can see the strength and quality of the signal coming from the antenna dish to the tuners. These two meters can be used while doing a fine-tuning of the antenna position. The antenna has to be adjusted to have maximum possible signal strength and signal quality.
LNB Type
Select Universal for most standard LNBs, or Unicable if you have a Unicable LNB.
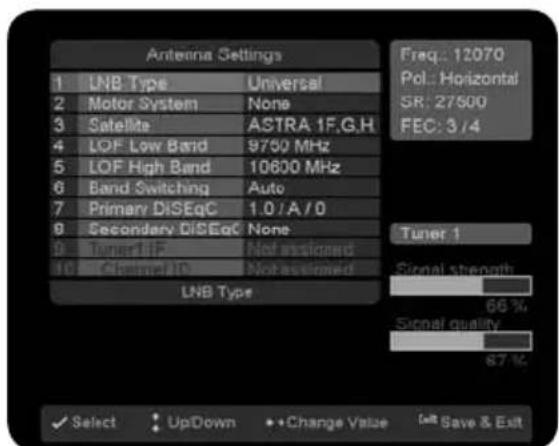
Motor System
If a motorized dish is connected to the digital receiver, use this option to set the system used for sending commands to the motor.
Motorized dish
If you select one of the options for motorized dish and press the "Yellow" function key, a new menu bar will be open. Here, you are able to adjust and set the position of this satellite. The two level bar meters can be used during adjustment. Use the color keys on the remote control, as shown at the bottom of the screen, to move the dish and set the limits.
The "Yellow" "Recalculate" key is used to recalculate all satellite positions, if the base position of the dish has been moved. If you move the dish, simply enter the menu, adjust the position for only one satellite and press the "Yellow" function key. The receiver will recalculate all positions accordingly.
Satellite
Use this option to select the satellite for which you would like to set the position.
Reference transponder
This option allows you to set which transponder is used as the reference.
Move the dish
Use this option to set the dish movement speed to "Fine" or "Coarse."
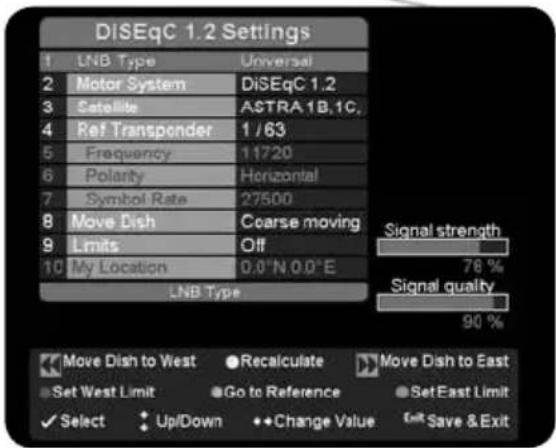
Limits
Use this option to turn on or disable the set limits.
Insert or delete a satellite from the list
You can add satellites to the list and set their individual settings and position, if using a motorized dish. Use the color keys on the remote control, as shown at the bottom of the screen, to delete, insert, or set the motorized position of each satellite.
LOF Low and High Band
The LOF (Local Oscillator Frequency) of the LNB is usually printed on the LNB itself or in its documentation. You can set the High and Low LOF frequencies to match the LNB here.
Band switching
The receiver uses a 22kHz signal to control the band of the LNB. If you do not know if your LNB supports this feature, set the option to Auto.
Primary and secondary DiSEqC
You can connect up to two cascadable DiSEqC switches to the receiver. This option allows you to set the type and input port for each switch.
Channel ID (Unicable only)
This option allows you to select the Unicable channel ID for the receiver. In a typical Unicable LNB installation, you are able to connect multiple receivers to a single LNB, with each receiver set to connect to a different Unicable channel ID.

LNB Feed (Unicable Monoblock only)
This option allows you to select which feed of a Unicable Monoblock LNB you want to use for this receiver.
CHANNEL SEARCH
In order to view video programs, you must first do a channel search.
SATELLITE SEARCH
In this option there are 3 options that user has to set before start satellite search (see picture):
1. Scan mode:
Select Quick Scan to search for channels on the transponders in the preset transponder list for the selected satellite.
- Select Complete to search for channels on all transponders for the selected satellite (also called "blind search").
2. Channels:
Select All to search for all Free-to-Air and Pay TV channels.
Select Free-to-air to search only for Free-to-air channels.
3. Satellite:
Select which satellites you want to search.
Once the options are set, press the "Red" key on the remote control to start the channel search.
FINDING AND STORING THE CHANNELS
Once a channel search is started, a progress bar and list of channels found will be displayed. At any time, you may stop the search by pressing Exit on the remote control. After the channel search is complete, press the "Green" function key on the remote control to save the channel list and exit.
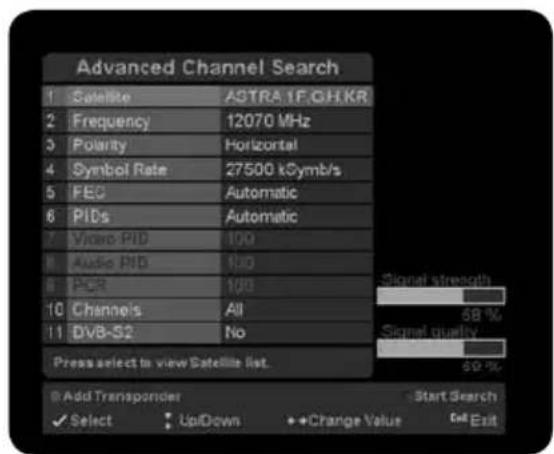
ADVANCED CHANNEL SEARCH
The advanced channel search allows you to make a channel search with customized search parameters. The process is the same as in a normal satellite search, described in the previous section.
Satellite
Use this option to select which satellite to search.
Frequency
Use this option to set the frequency of the transponder to search.
Polarity
Use this option to set the polarisation of the signal between horizontal,
vertical, right and left circular.
Symbol rate
Use this option to set the symbol rate for the signal.
FEC
Use this option to set the FEC (Forward Error Correction).
PIDs
Use this option to set the PIDs between automatic and manual. If you choose manual, you can set the individual Audio and Video PIDs and the PCR.
Video PID
Use this option to manually set the Video PID.
Audio PID
Use this option to manually set the Audio PID.
PCR
Use this option to manually set the PCR.
Basic Operation
PROGRAM NAVIGATION
You can use the numeric keys on your remote control.
- You can use the directional keys "Up" and "Down" on your remote control or on the front panel of the receiver.
You can use the Ch+ and Ch- keys on your remote control
Scroll through the programme list by pressing the "TV" key, select with the navigation key "Up" or
"Down" the programme list, and confirm the selection with "OK" key.
VOLUME CONTROL
Volume Control allows you to adjust the audio volume.
- Press the V-/V+ key to adjust the audio volume.
- Press the MUTE key to stop the audio temporarily.
Note: The mute function remains set while you switch channels.
RESOLUTION
Resolution allows you to set the resolution of the screen.
- Press the V-FORMAT key.
- The current resolution will be displayed.
- Each time you press the V-FORMAT key, the resolution changes in the following sequence: 576p -> 720p -> 1080i.
PROGRAM INFORMATION (INFO-BANNER)
Program information is always displayed for a certain period of time whenever you switch channels. You can view the program information by pressing the i key while watching a program. Press the Exit key to hide the info-banner.
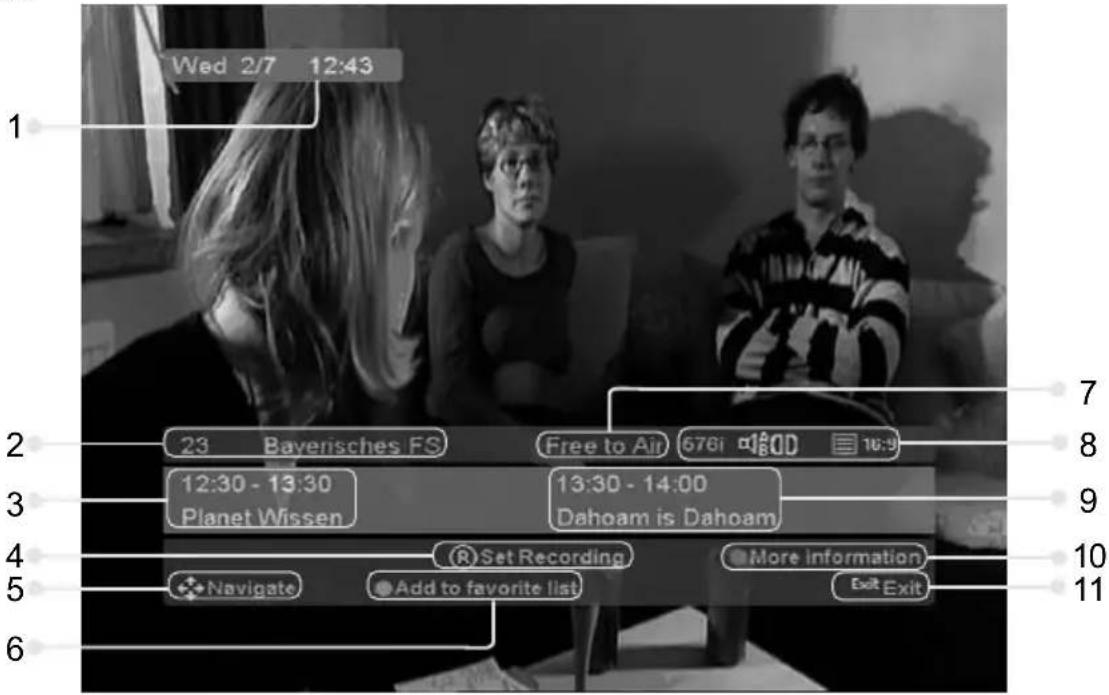
Date and Time1.
Channel number and name2.
Program schedule and title3.
press OK on the remote control to set a reminder for this program4.
Use Left/Right to scroll through the programs in this channel. Use Up/Down to change channel5.
- Press the "Yellow" function key on the remote control to store this channel in your default favorite list
- Displays "Free-To-Air" if program is not encrypted, otherwise the name of required Conditional Access Module (CI-CAM) will be displayed
- Icons providing information on services available with the current program (see details below) Next program schedule and title9.
- Press the "Blue" function key on your RCU to display detailed synopsis of the program (is available in the broadcast data)
- Exit the info-banner

Several audio sound tracks in different languages are available

Dolby digital bit stream available
16:9
Program is broadcast in 16:9 format
··
Subtitles are available

Parental rating information

Teletext information is available
MESSAGE
The symbol will appear in the upper part of the screen to indicate when you have received a message. This usually is used to notify you when a software update is available.
VIDEOTEXT/TELETEXT
If videotext or teletext information is available on the current channel, the symbol will be shown in the channel information or EPG. You can press the on the remote control to display this information.
You can use the numeric keys 0-9, on the remote control, to enter a three-digit page number if available.

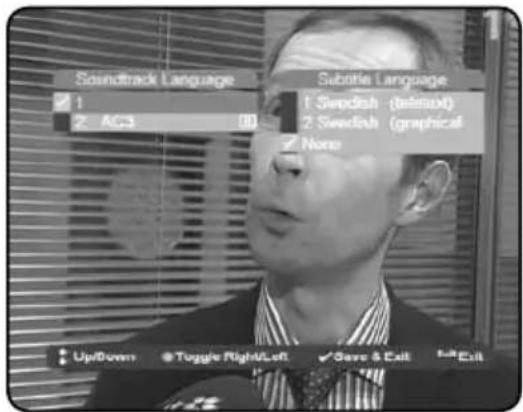
AUDIO AND SUBTITLES LANGUAGE
Some TV broadcasters provide several audio channels or subtitles information, carrying commentary in various European languages, to accompany the TV image.
Press the "Audio/Subtitles" key on your remote control to display all available audio channel options. Use the directional keys on the remote control to make a selection.
STANDBY MODE
You can put the receiver in standby mode to reduce the power consumption while the unit is not in use. The standby mode turns off some parts of the receiver, but does not fully turn off the receiver, allowing it to start up again very quickly when the unit is turned on. When in standby mode, the standby LED indication will be shown on the front panel.
Note: To reduce power consumption to zero, switch off the receiver using the power switch on the rear panel.
USB
Your digital receiver is equipped with 2 USB connections - one at the front panel behind the flap and one at the back panel - however only one port is active at the time and the two ports cannot be used simultaneously. The Built-in USB controller supports the USB 2.0 standard.
CONNECTING AN EXTERNAL USB 2.0 MASS- STORAGE DEVICE (I.E. EXTERNAL USB DRIVE)
When you connect a mass storage class device, the receiver will automatically show a message for the initialisation of the device. If you want to use the other USB port, you have to unmount the connected device first. To unmount, press the Library key on the remote control and then use the "Blue" or "Green" function key to unmount the connected device.
Mounting mass storage devices allows the following Recording and Playback features:
Time shift (Pause Live TV)
Record
Playback - of MPEG2/4 recordings, JPEGs and MP3 files
Instant Replay
Note: supported file systems - Fat16, Fat32, Ext2, and Ext3.
If you are interrupted while watching a TV program, just press the "Pause/Play" key. From this moment, your programme will be recorded on the external USB hard disk drive. On the screen, you will see a frozen picture, like the one you have when you press pause on a VCR, as well as the time-shift counter. By pressing the "Pause/Play" key again, the programme will start again, continuing from where you have stopped.
Note: During recordings, a red dot with the programme name is displayed on the upper part of the TV screen.
This information can be removed from the screen by pressing the "Blue" function key.
Recording
You can record the program you are watching or schedule a recording to a future program. While watching a program - press the "Record" key on your remote control to record the program you are watching. Scheduling a future recording can be done from either the Program Guide screen or from the Personal Planner screen.
Note: By pressing the "Record" key an endless recording is triggered, but if the Info-banner is displayed, a recording will be started with start- and end time taken from Info banner.
Playback
Pressing the Library key on your remote control will bring up the Library screen in which all the recordings available on your mass-storage device will be listed. You can then select a recoding file for playback. The Library also lists JPEG and MP3 files so you can playback slide shows and play lists too.
During playback, the Stop, Pause/Play, Fast Forward, Fast Backward, Slow motion and Next/Previous Chapter keys are used to control and navigate through the different bookmarks of the recordings.
Use the "Green" function key to set a bookmark in a recording you are watching. Use the "Red" function key to delete a bookmark. The "Yellow" function key will bring up the Go To dialog that allows you to access the file by inputting the number of minutes from the beginning of the recording.
Use the "Blue" function key to enter into Edit mode where you can remove parts marked by bookmarks from the recordings.
Instant Replay
Pressing the Instant Replay key on your remote control will playback the last 30 seconds of the recording you are watching or the program you are watching in a Time Shift mode.
The Main Menu
Besides the programme that is received from the TV station, your digital receiver is able to display different information on your TV screen like: Volume bar, Menu, Pop-ups... All those things are used as an interface between the receiver and the user (also called GUI - Graphical User Interface or OSD - On Screen Display). The actual GUI display generated by your receiver may differ slightly from those shown on the picture, as continuous updates of the software may alter the appearance or even the structure of the menus.
Navigation within the GUI display is effected by the four directional keys and "OK" key, which is used to confirm a selection, as well as in some cases by means of the coloured function keys. To enter into main menu, press "Menu" on your remote control. Being in a menu and pressing "Menu" key you will completely exit from all the open menu pages. Using "Exit" key you will exit only from
Settings
To access "Settings" press "Menu" and then select "Settings." You may select the type of settings using the navigation keys or the corresponding number keys. In this chapter, all options of the settings menu will be described.
Note: In the options you can also use navigation "Left" and "Right" key to change the settings (not for all settings).
AUDIO/VIDEO SETTINGS This is where you can set the basic audio and video parameters of your digital receiver related to connections on rear panel.
TV Resolution
Use this option to set the resolution of the display.
TV SCART
Use this option to specify the video output type on the TV SCART connector.
VCR SCART
Use this option to specify the video output type on the VCR SCART connector.
Aspect Ratio
Use this option to specify the screen aspect ratio of the connected TV set - 4:3 or 16:9.
Aspect Ratio Conversion
Set to Auto in order to adopt the Aspect Ratio of the picture to match with the aspect ration of the broadcast.
Digital Audio Out
Use this option to specify desired audio type on the digital audio output (SPDIF). This option is valid for the optical and coax outputs.
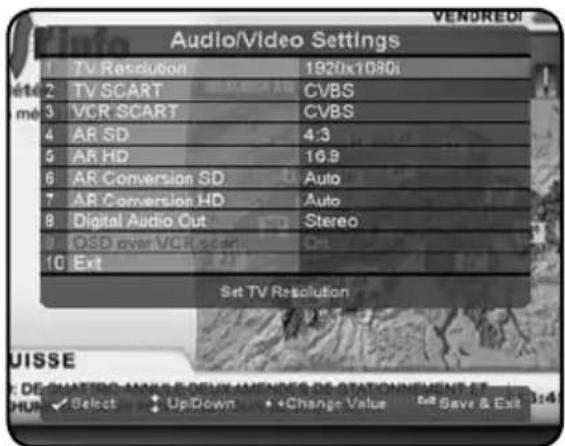
OSD over VCR SCART
Use this option to specify if you want to have the OSD appear on the VCR SCART outputs.
Note: This option is available only if TV SCART is set to RGB.
TIME / DATE
Use this menu to set the time and date.
Automatic Time Update
If the "Automatic Time Update" is set to "On", the receiver will receive the time and date automatically from the
broadcast signal.
Note: Some networks may transmit an incorrect time or date.
Date
Use this option to manually set the date.
Local Time
Use this option to manually set the time.
Time Zone
The DVB standard broadcast time and date is for the GMT time zone. In order to display the local time correctly, you must set the local time zone.
Note: If daylight savings is enabled then the receiver is changing automatically the time on the following condition (valid for Europe with no time limit).

summer times begins and ends at 1:00 am universal time (Greenwich mean time)
it begins the last Sunday in March
it ends the last Sunday in October.
This is done in disregard of DVB broadcasted information.
DEFAULT SETTINGS
Use this option to reset the receiver to default settings. This may be necessary when a large number of settings have accidentally been made incorrectly, for example. As you can see in the picture, there are three kinds of default settings: "Factory defaults", "Settings only" and "Preprogrammed Channel Lists".
Factory Defaults
Press the "OK" key and confirm with the "Green" function key, if you want to reset the unit to the "Factory default" settings.
Note: Using this option will delete all data stored in the channel lists, and favourite lists.
After this, a "Quick Start Guide" menu will be open. Please refer to the Quick Start Guide section of this user manual for further information.
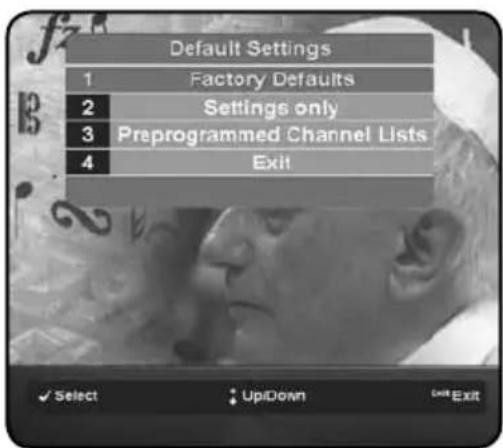
Settings only
Use this option to reset only the user preferences and settings, such as time and date. The channel lists will remain unchanged.
Note: If the menu is not displayed clearly or in black and white, after changing the settings, it is because the Video output mode was changed when you reset the unit to default settings. To correct this problem see chapter Audio/Video Settings.
Preprogrammed Channel Lists
Use this option to reset your TV channel lists to the receiver's preprogrammed default program lists.
SYSTEM INFORMATION
This menu displays information related to the software and hardware version of the receiver as well as the option to update the software. This information may be required if you request service or repair.
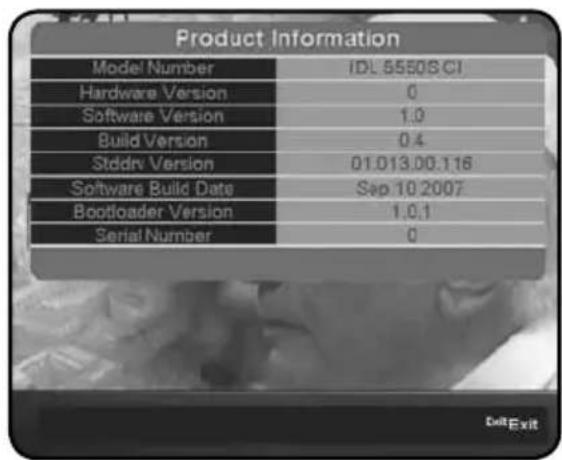
PRODUCT INFORMATION
Use this option to display the product information, such as the software and hardware version. This information may be required when you call customer service.
Software update
There are three ways to update the software of the digital receiver:
Over The Antenna (OTA), Over The Cable (OTC), and through the USB port. In the next chapters you can find more detailed information about OTA and OTC. From the Settings Menu, select System Information and then Software Update.
SOFTWARE UPDATE VIA ANTENNA (OTA)
If "Auto Upgrades" in the User Preferences is set to "Auto", the receiver will do this all in the background during stand by. At the first start after such an update, the receiver will show you a popup message with the information, that your receiver got a successful update.
During the OTA software update, the unit will first search for the update signal.
During the search, a message box "Software update" will be displayed on the TV screen - this process may take several minutes. To stop this process, press the "Red" function key or "Exit" key. If new software is available, the user will be informed and asked to confirm the download.
The user will be asked to confirm the download two times, to help prevent accidental changes.
During the download, the "OTA" message will be displayed on the TV screen, showing the progress bar. After all data has been received, the receiver will update the current software and automatically restart.
All user preferences and channel lists will remain unchanged.
Note: OTA Updates are broadcasted over ASTRA 19.2E satellite and therefore are not available in all the countries.
SOFTWARE UPDATE VIA SERIAL CABLE (OTC)
In order to update the software using the service port on the rear panel, the user will require a RS232 cable, PC with RS232 connection, and terminal software for the PC, such as HyperTerminal in Windows.
The user must also have the software file, which can be downloaded from the internet at www.ftacom.com.
To update the software using the cable, use the following steps:
1 - Switch the digital receiver off using the main power switch on the rear panel.
2 - Connect the digital receiver to the PC using a RS232 cable.
3 - In the terminal software of the PC, open a communication port with following parameters: 115200bps, 8bit, 1stop bit, no parity and no flow control.
4 - Select the new software file to send to the unit and set the protocol to 1k X modem.
5 - Start sending the file.
6 - Switch on the digital receiver to start the loading procedure.
During the transfer, the receiver will display the message "OTC" with a progress bar. After the file has been received and unpacked, the digital receiver will update the current software and automatic restart. All user preferences and channel lists will remain unchanged.
SOFTWARE UPDATE VIA USB
The software can be updated using a USB mass storage device.
To update the software using a USB mass storage device, you will require the new software file from our website and a USB device, such as a USB hard disk or memory stick.
a) Copy the software bin file to the root folder of the USB mass storage device.
b) Make sure the receiver is switched off.
c) Turn the receiver On while the "+" button is pressed until "On The USB" messaged is displayed on the front panel display
d) Insert the USB mass storage device into the USB slot on the front panel of the receiver.
e) The receiver will automatically copy the new software from the USB device into the receiver.
After the file has been installed and unpacked, the receiver will update the current software and automatically restart. All user preferences and channel lists will remain unchanged.
Caution: Be careful not to interrupt the software installation by removing the USB stick, turning off the receiver, or otherwise interrupting the installation process. If the installation is interrupted by accident, such as by a power failure, the receiver may not boot up afterwards. If so, you can recover normal operation by installing new software using the RS232 connection, or by returning the receiver for service.
Note: Installation of a complete software bundle, including boot loader, will reset all user settings and erase the channel list. The library will remain unchanged.
Media Manager
The Media Manager is where all of the channel lists are organized:
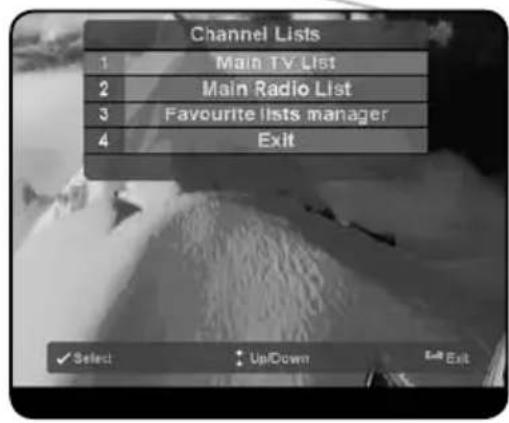
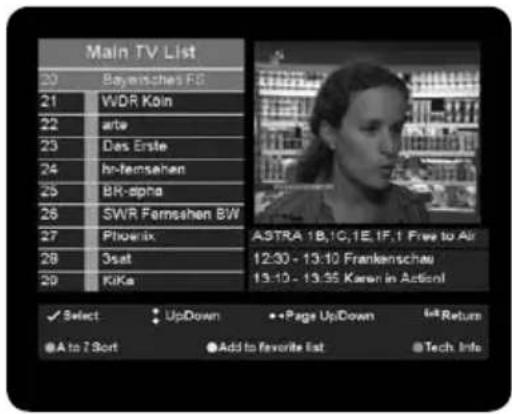
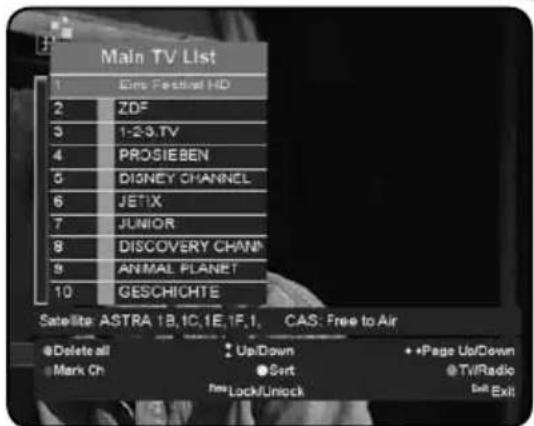
MAIN TV LIST AND MAIN RADIO LIST
You can open the Main TV or Radio list by pressing the OK key or by selecting "Media Manager" from the main menu.
The lists contain all of the TV and Radio programmes found during auto and manual search (see chapter Channel search). In a table, you can see the channel numbers with the names of the programmes. On the right side, there is a small preview screen, and at the bottom you can see all available commands.
FAVOURITE Lists MANAGER
Your receiver allows you to create separate lists of personal favourite programmes. This means that each member of the family, for instance, can create his or her own list of personal favourites, sorted according to their individual preferences. The favourite lists manager is divided into two parts. In the first part, you can add, remove, or rename favourite lists. In the second part you can edit new or already existing favourite lists.
Add, remove and rename favourite list
Selecting "Favourite lists manager" option, a new screen will be open. On this screen you can see the list of already created favourite lists and all available commands.
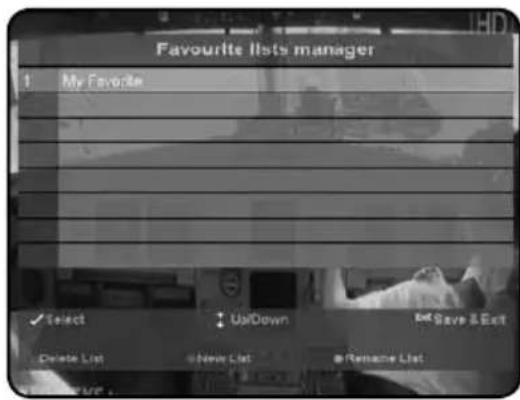
Edit favourite lists
If you select an existing list, the editor menu will be displayed. From this menu, you can select channels from the main TV list and add them to the favourite list.
Note: It is possible to put TV and radio programmes in the same favourite list.

Set the active list
The digital receiver has minimum three lists: Main TV, Main Radio and My Favorite. You can add additional favorite lists as well. Once you select one of the lists, this list will become the active list that will be used for zapping. To select a list, you can use the TV, Radio, or Fav keys on the remote control.
Program Guide (EPG)
The EPG (Electronic Program Guide) gives you information about current broadcasted programmes as well as the schedule and information for future programmes.
Tip: The message «No data available» means that the data is not provided by the channel, or the data is not yet received.
Note: In order for the EPG to function properly, the time and date must be set correctly.
PROGRAM INFORMATION [NOW/NEXT]
Each time you switch channels (outside of the EPG screen) there is a brief message on the screen, displaying the programme name, current time, starting and end time, title and content of the current programme. In addition, the start and end times, as well as the title of the next programme are displayed.
A few symbols are used to provide more information about the technical details of a programme:
![Inverto IDL5550S - PROGRAM INFORMATION [NOW/NEXT] - 1](/content/2026/02/419550/images/3b5ecadb6e8f0c4f31567b0e6ba08dde93cbdf229dda577c89b48a6be093a6a1.jpg)
Stream contains more than one audio track or language
![Inverto IDL5550S - PROGRAM INFORMATION [NOW/NEXT] - 2](/content/2026/02/419550/images/788d5559082ade44a283267ab5d5c89e1d0d121f9fab26b4ad50b3e7c7de8e71.jpg)
Broadcast in Dolby Digital
![Inverto IDL5550S - PROGRAM INFORMATION [NOW/NEXT] - 3](/content/2026/02/419550/images/0aad9dc3ec06250ad94ab95ac92ca1dc6308611318c526726a9e484a7525f742.jpg)
Additional DVB subtitles
![Inverto IDL5550S - PROGRAM INFORMATION [NOW/NEXT] - 4](/content/2026/02/419550/images/e497acc4c45c7ab1ba8a5111dbca05b0f26aa79c39aee0e2f671be1c652d21f1.jpg)
Broadcast in wide-screen
![Inverto IDL5550S - PROGRAM INFORMATION [NOW/NEXT] - 5](/content/2026/02/419550/images/0dbbd5f12e456bf0a29cb6736742f03f764b26c9a5bab1e1edad0284dd8812ab.jpg)
Teletext is provided on this programme
Note: Dolby Digital does not mean the channel is actually broadcasting a programme in 5.1 Surround sound. The channels normally broadcast in Dolby Digital, but most of the time, you will only receive Stereo Sound. Usually, only some special events and movies are broadcast in 5.1. The digital receiver cannot determine the version of Dolby Digital used in the broadcast, such as 2.0 or 5.1. If EPG data is available, it is possible to scroll the time with the "Left" and "Right" navigation keys. The additionally programme information can be displayed by pressing the "Blue" function key. You can select "Add to favourite list" using the "Yellow" function key, to add the current programme to the favourite list. The "Quick Save List" option in "User preferences" menu determines which favourite list will be used by default.
EPG-GRIDVIEW
The EPG list view can be displayed by pressing the Guide key or from Program Guide in the Main menu. The EPG data is provided by the TV broadcast channels. The receiver will display what is available for each channel. However, the receiver can only display what is provided by the broadcast and has no influence on the quality or reliability of the data. While you are watching TV, the data will be loaded and displayed while you using the EPG.
Note: You can change the font size of the of the EPG, to allow more or less information to be displayed on the screen "Menu" + "Settings" + "User preferences."
The receiver is able to display the programs available on the channel currently selected, indicating the current programme as well as all following programs. This allows you to quickly obtain an overview of programs being broadcasted that day, and possibly those of the next several days as well, depending on the availability of the EPG data from the broadcaster.
Use the "Green" function key on the remote control to move 24 hours forward or the "Red" function key to move 24 hours back.
You can use the directional keys "Up" and "Down" to select specific channels and the directional keys "Right" and "Left" to search forward and backwards in the programme schedule.
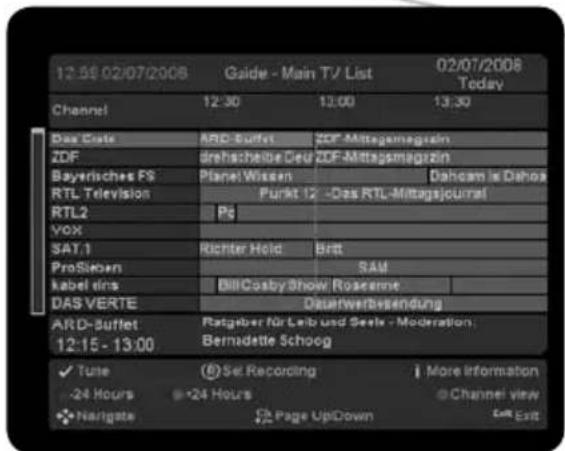
If you want to set a reminder for a future event on the selected programme, press the "OK" key. Two minutes before the start of the programme, the receiver will display a pop-up message with options to "switch to" or "ignore".
Press the "Record" key to schedule recording of the selected programme. Using the "Yellow" function key you can change the repeat mode of this event directly within the EPG.
If you want to see detailed information of the selected programme just press the "i" key.
EPG - INDIVIDUAL CHANNEL VIEW
The EPG list view can be displayed by pressing the Guide key or from Program Guide in the Main menu.
Press the "Blue" function key on your remote control to toggle between the EPG list view and EPG channel view. The EPG channel view makes it easier to see an overview of programs or an individual channel, e.g. to search for repeats of a movie or to control the timer for a specific channel.
Personal Planner
The Personal Planner shows you a summary of all planned events and events already in progress.
You can enter the Personal planner by pressing the "Menu" key + select "Personal planner" or by pressing the "Personal planner" key on your remote control.
The picture shows the Personal planner interface. In a table, you can see the names of the channel and programme as well as starting date, time and recording mode. From here, you are able to delete or add events to the Personal planner list. In the upper right corner, free hard disk space is displayed.
Note: The Personal Planner is only available if the real time clock is set.
In the first column of the Personal planner, you can see the
status of events. There are two states:

Event is in progress

There is a problem with the event
In a last column of the Personal planner, you can see the mode. The combinations available are in the table below:

Single tune (it will be deleted after processing)

Single record (it will be deleted after processing)

Weekly

Daily

From Monday to Friday.

Series timer, all EPG entries with the same title will be recorded on this channel. (this "series recording" can only be generated from the EPG screen).

Reminder, two minutes before start a pop-up message appears, allowing you to "execute" or "abort

Notify
Note: Signs for "Daily", "Weekly", "Monday to Friday" and "Series" can be in red colour for recording or green colour for tuning.
Adding events in the Personal Planner
Note: For programmes that have parental lock, it is not possible to set an event without the pin code.
To add an event to the Personal Planner, press the "Blue" function key for "New Entry." After the New Planner Event menu appears, use the "Up" and "Down" navigation keys to set the details for the event and press the "OK" key to confirm the selection.
Note: Events added in this way are set to a specific time and are not bound to the programme, as they are when added via the EPG.
Type: You can choose between four recording preferences. Record: the programme is directly programmed for recording. Tune: at the beginning of the programme the receiver switches to the respective channel, a pop up appears asking you to start or delete the recording. Reminder: at the beginning of the programme, a pop up appears asking you to start or cancel the recording.
Channel: Select the desired channel from the list using the "Up" and "Down" navigation keys. Confirm the selection with the "OK" key.
Name: Select an event name that will be displayed in the Personal planner list. This name has no influence on the real programme name. You can delete incorrect entries with the "Red" function key and enter new ones with the numeric keys 2-9. In this menu, the letters behind the alpha-numeric keys on your remote control are active (GSM SMS-like).
Start date: Select the start date of the event using the directional keys "Left" and "Right" to select the day, month, or year. To set desired value use the directional keys "Up" and "Down". Confirm your entries with the "OK" key.
Start time: Select the starting time of event. Use the directional keys "Left" and "Right" to select the hour or minutes. To set the desired value, use the directional keys "Up" and "Down". Confirm your entries with the "OK" key.
End date: Select the end date of the event. Use the directional keys "Left" and "Right" to select the day, month, or year. To set the desired value, use the directional keys "Up" and "Down". Confirm your entries with the "OK" key.
End time: Select the end date of the event. Use the directional keys "Left" and "Right" to select the day, month, or year. To set the desired value, use the directional keys "Up" and "Down". Confirm your entries with the "OK" key.
Mode: The Event Mode can be "Automatic" or "Notification". If "Automatic" mode is selected, the event will be executed automatically without any notification. If "Notification" mode is selected, 3 minutes before the event time, the pop-up menu with notification will be displayed on your TV set. Now you can confirm or cancel the event using the "Green" of "Red" function keys.
If the action is not confirmed within 3 minutes, the receiver will cancel the event automatically. Confirm your selection by pressing the "OK" key.
Cycle: You can set the event to "Single" execution, "Daily" every day execution, "Weekly" execution once per week, or "Monday to Friday" execution from Monday to Friday. Confirm your selection by pressing the "OK" key. Note: "Single" cycle events are automatically deleted from the Personal Planner list, after they are successfully executed.
Deleting an event in the Personal Planner
To delete an event from the Personal Planner, you can use the "Up" and "Down" navigation keys to select the event and then press the "Red" function key. After the pop-up message appears, confirm the event by pressing the "Green" function key or cancel by pressing the "Red" function key or "Exit" key.
Editing events in the Personal Planner
To edit events in the Personal Planner, use the direction keys "Up" and "Down" to select the event you want to edit. Press the "OK" key enter the edit dialog. This edit pop-up is identical to the edit pop-up described in the previous chapter on Adding and deleting events in Personal planner.
Changing the event modes in the Personal Planner
If you have an event that is not finished yet, or in progress, you can change the recording mode between "Record", "Tune" and "Reminder" by pressing the "Record" key. With the "Green" function key you can choose if the event will "Auto switch" or "Notify". With the "Yellow" function key you can choose if the event will be "Single", "Daily", "Weekly" or "Monday to Friday." If the event is added via the EPG the user is able to use only the "Yellow" function key to choose between "Single", "Daily", "Weekly", "Monday to Friday" or "Series."
Note: The function keys do not have to be confirmed by pressing the OK/Menu-key. The modes shown at the bottom of the Personal Planner window are the next modes that will be set when pressing the associated function keys. You can press the colored function keys repeatedly to cycle through the different modes available.
Note: While watching a TV programme, you may start a recording at any time by pressing the "Record" key on the remote control. The receiver will start recording immediately. You can stop the recording by pressing the "Exit" key.
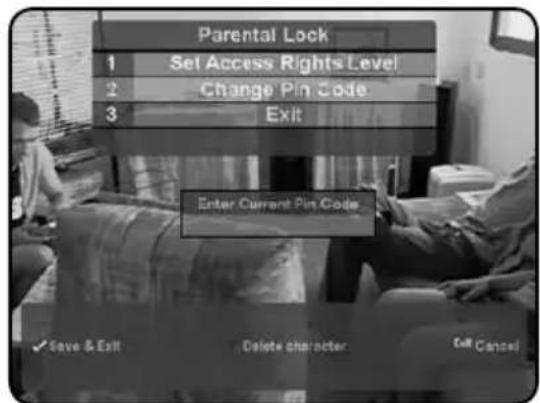
Parental lock
Not all TV and radio programmes are suitable for listeners or viewers of all age groups. The digital receiver therefore provides an active parental control (lock) function, allowing you to block specific menu settings or individual channels by means of a four-digit security PIN code (Personal Identification Number). It also makes sense to block menu settings if you want to prevent the receiver from being incorrectly programmed by unauthorised persons. The standard functions such as receiving programmes, EPG, Timer, etc., remain fully functional without a pin having to be entered.
If no pin code is activated (default setting), all receiver functions and operations can be utilised without any restrictions. On the next picture, you can see the Parental lock menu.
SET ACCESS RIGHTS LEVEL
Select Set Access Rights Level and enter the PIN. There is no PIN set by default, so you will be asked to enter the new PIN the first time. Once the PIN is entered, you can set the Access Level accordingly.
1 – Access All. All programmes and menus (except “Set Access Right Level” and “Change Pin Code”) are accessible to all users.
2 - Lock System Settings. This level blocks access to the system "Settings" menu.
3 - Lock System Settings + Channel. This level blocks access to the system "Settings" menu and to all the marked programmes in the lists. You will be required to enter the correct PIN number when the receiver is tuned to a locked channel or menu.
CHANGE PIN CODE
Select this option to set a new PIN code.
Note: In case you forget your pin code, call customer service.
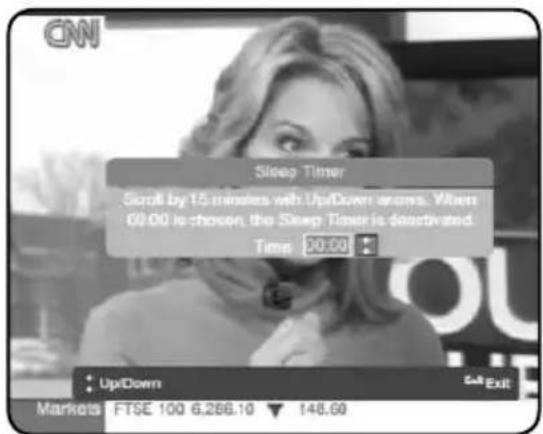
Sleep Timer
You can use the Sleep timer to specify a time (e.g. at night) at which the receiver is to switch to standby mode. This is particularly useful if there is no person available at this time to manually switch the receiver to the standby mode.
Note: When switching to standby mode, the receiver is also able to switch off some TV sets with "Slow Blanking" on the SCART connector.
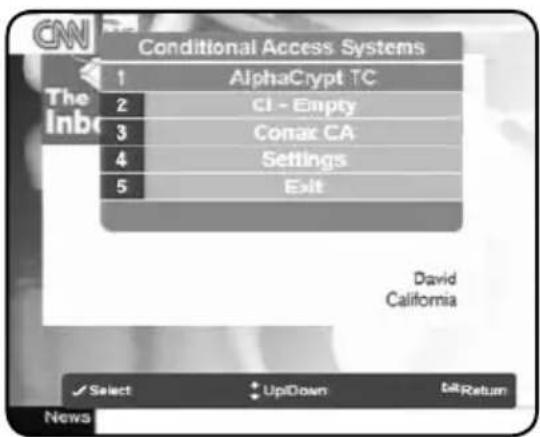
Conditional access system
If your receiver is equipped with Conditional Access features, such as a CI or CA slot, additional options may be available in the menu, as shown in the picture. Please consult your installer or card provider for information regarding use of your specific card.
Technical Specifications
GENERAL INFORMATION
High Definition and Standard Definition compatible
PVR ready
CI slots: 2, DVB-CI compliant
CA slots: 1 (Conax - optional)
Number of channels: 6000
Number of favourite list: 8
EPG: Extended electronic program guide - 7-days based on SI information
JPEG and MP3 decoding
SATELLITE FRONT-END
Modulation: DVB-S/S2
Input connector: F-connector (with Loop-through)
Frequency range: 950-2150 MHz
Symbol rate range: 1-45 MSym/s
Input level: -25 to -65 dBm
LNB voltage: 13/18V max 450 mA
- Tone control: 22kHz
DiSEqC: 1.1, 1.2, USALS, UnicableTM
SYSTEM
MPEG2, MPEG4/AVC decoder / Clock: 266MHz
- Flash memory: 16 MB
- System memory: 64MB
Video memory: 64 MB
VIDEO DECODING
- Data speed MPEG2 MP@HL, MP@ML, MPEG4 AVC high profile level 4.1
Max resolution 1920·1080 - Supported resolutions: 576i on the CVBS Video and SCART connectors, 1080i, 720p, 576p, 576i, 480p, 480i on the HDMI and Component Video connectors.
Standard PAL - Aspect ratio: 4:3 and 16:9, Automatic adjustment for 16:9 TV sets, Letter Box supported
AUDIO DECODING
Mono, Dual channel, Stereo, Joint Stereo, MPEG1, MPEG2, mp3
- Digital Audio - via S/PDIF interface (coaxial and optical):
- Dolby Digital pass-through
- PCM data output
SERIAL PORT
RS232C: Transfer rate 115,200 bps
HIGH SPEED DATA INTERFACES:
- Ethernet 10/100Mbps port (available in specific models only)
USB2.0 High Speed Host port
SOFTWARE UPGRADE
Download over RS-232 and USB
- OTA Download (ASTRA 19.2E)
REAR PANEL INTERFACE:
- Front-End: Input connector: IEC169-2, Socket (F-connector for Satellite front end)
Loop Through Output connector: IEC169-2, Plug
- TV SCART connector: CVBS (input & output), RGB/YUV (output)
L&R Audio (input & output)
S-Video (output)
Fast Blanking (output) & Slow Blanking (output) supported.
VCR SCART connector: CVBS (input & output), RGB (input)
L&R Audio (input & output)
S-Video (output)
Digital Audio SPDIF: 1Coaxial, 1Optical
CINCH (RCA): Audio - L&R, Video - CVBS (composite video), YPbPr (component video)
HDMI
Ethernet (RJ45) - available on specific models only.
Serial Port: RS-232C (Female, DB-9)
USB: host socket (Type A)
Blucom antenna (optional)
FRONT PANEL
Standby, Channel up and Channel down keys
10 digit VFD display
1 Standby LED Indicator
1 IR Sensor
2 CI Slots
USB: host socket (Type A)
POWER REQUIREMENTS
Mains input voltage: 230V
Mains input frequency: 50 / 60Hz
Power consumption: Max: 42W
PHYSICAL SPECIFICATION
Size (W^H^D) : 280*190*45
Operating temperature: +5^ to +35^
Storage temperature: -20^ to +60^
ACCESSIONS
- Remote Control unit with 2 batteries.
- User's Manual: English, German, French, Dutch
A/V Cables: 1 x SCART to SCART cable
1xHDMI cable
REGULATORY COMPLIANCE
Compliant to CE: 89/336/EEC (EMC)
73/23/EEC (low voltage directive)
ROHS compliant
Troubleshooting
| ERROR POSSIBLE CAUSES | POSSIBLE SOLUTIONS | |
| No image, no sound, no display | No power supply Check connection cables | |
| Short circuit in coaxial cable | Disconnect device from mains power supply, eliminate the short circuit in the coaxial cable or connections, reconnect, and activate device | |
| Defective or missing cables Check connecting cables | ||
| Small blocks in the video, occasionally no sound, occasionally no signal | Wrong video format selected in the OSD settings | Check the settings to make sure your TV supports the selected format |
| Signal too weak | Check for defective cables or connectors. Alternatively, reduce the coaxial cable length. | |
| Incorrect time settings | Check the settings and correct the time. | |
| The displayed time differs from the current program | The CI module or CA card is not correctly inserted | Re-insert the Card and/or module |
| Scrambled programs are not received | The CI module or CA card belong to a different decoding system | Use a CA module or Card for the specific decoding system |
| Device is set to a Radio channel Change to TV mode | ||
| Sound OK, but no image The batteries are weak Replace the batteries | ||
| The Remote Control does not work | The batteries are installed incorrectly | Install the batteries, observing the correct polarity, as marked in the battery compartment |
| The remote control is not pointed directly at the receiver | Aim the Remote Control directly at the front of the receiver | |
| The front of the receiver is blocked | Remove the obstruction from in front of the receiver | |
| The frequency has changed Start a channel search | ||
| Previously receivable programs are no longer received | There is a problem with the signal | Check all cables and connectors connected to the RECEIVER. |
Warranty, service and support
This Limited Warranty applies only to the Product sold by FTA communication Technologies, 18 Duchscherstroos, L-6868 Wecker, Luxembourg and its subsidiaries (hereby, the "Company") the Customer purchase for his own use and not for resale. The term "Product" in this Limited Warranty does not include any software programs, whether pre-loaded with the Product, installed subsequently or otherwise.
1. Disclaimer and exclusion
except as specified in this limited warranty, the foregoing warranties are given and accepted in lieu of any and all other warranties or conditions, express or implied, including, but not limited to, the implied warranties or conditions of merchantability and fitness for a particular purpose.
to the extent an express or implied warranty cannot be excluded in some states or jurisdictions, the above exclusion may not apply. In that event, such warranties are limited in duration to the warranty period. no warranties apply after that period.
because some states or jurisdictions do not allow limitations on how long an implied warranty lasts, so the above limitation may not apply.
this limited warranty gives customer specific legal rights, and customer may also have other rights which vary from jurisdiction to jurisdiction.
customer is advised to consult applicable state or country laws for a full determination of your rights.
This disclaimer and exclusion shall apply even if the express warranty set forth below fails of its essential purpose.
2. Limitations of Liability
Under no circumstances shall the Company or its supplier be liable for (a) damage to, or loss or corruption of records, programs, data or storage media, or (b) any damages whatsoever (including, but not limited to, direct or indirect damages, loss of business profits, lost savings or other special, incidental, exemplary or consequential damages whether for breach of warranty, contract, strict liability, tort) arising out of or resulting from the use of or inability to use the products and/or the enclosed written materials or the provision of or failure to provide support services, even if the Company, its supplier, an authorized Company representative, service provider or dealer have been advised of the possibility of such damages or of any claim by any third party. Any liability of the Company or its supplier which is not excluded shall be limited to the purchase price of the Product.
Some jurisdictions do not allow the limitation of incidental or consequential damages so this limitation may not apply fully to the Customer, but such limitation shall apply to the maximum extent permitted by applicable law.
3. Application of the Warranty
The Company warrants the Product against critical failure resulting from original manufacturing defects in workmanship or material, under normal use. The company does not warrant any uninterrupted or error-free operation of the product or that all deficiencies, errors, defects or nonconformities will be corrected.
Unless the company specifies otherwise, this warranty extends only for the original user of the Product and the Warranty applies only in the country or region in which the original user purchases the Product to the Company or a Company Reseller in case of a resale.
4. Warranty period
The warranty period of the Product is 24 months. The warranty period for the Product starts at the day of purchase (purchase invoice date) of the Customer, and in case of a resale by the Company Reseller not more than 45 days after the production date marked on the Product.
This Limited Warranty extends only to the original end-user purchaser of the Product and is not transferable to anyone who obtains ownership of the Product from the original end-user purchaser.
5. Limited Warranty Exclusions
This Warranty with respect to the Customer's Product is subject to the following exclusions:
(i) Failure or damage resulting from misuse (including but not limited to use of any Product capacity or capability, other than that authorized by the Company in writing), accident, modification, unsuitable physical or operating environment, or improper maintenance by the Customer;
(ii) Failure caused by a Product for which the Company is not responsible;
(iii) Any non-Company Products, including those provided with, or installed on, a Company Product at the Customer request;
(iv) Accessories, supply items and consumables (e.g. batteries), and structural parts (e.g. frames and covers);
(v) Service of Product alterations;
(vi) Service of a Product on which the Customer is using capacity or capability, other than that authorized by the Company in writing;
(vii) Any Product not manufactured by or for the Company, or sold to an end-user in a country not covered under this Warranty;
(viii) Loss of any, or damage to, programs, data, or storage media. The Company may opt to replace the Product submitted for warranty services and, thus, any data stored on the original Product may become permanently inaccessible.
This Limited Warranty is voided by removal or alteration of identification labels on the Product or its parts. Any technical or other support provided for a Product under warranty, such as, "How to" questions and those regarding the product set-up and installation, is provided WITHOUT WARRANTY OF ANY KIND.
The Company is not liable for any transport/delivery/insurance costs, import duties, taxes, licensing fees and any
charges from telephone/fax communication as consequence of the failure of the Product.
6. Service during the warranty period
In the event the Product is found to be defective within the warranty period, Customer's sole and exclusive remedy and the entire liability of the Company under this Limited warranty will be, at the Company or its Service Center, at its option:
(1) Repair the Product by means of remote support such as, but not limited to, telephone, email support.
(2) Upon the product return to the party supplying it to the Customer, freight an insurance prepaid:
(2.1) repair or replace any defective Product or parts of the Product thereof covered by the Warranty with new or factory-refurbished Products or parts that are equal to new products in performance.
(2.2) refund the amount paid for the product, less a reasonable allowance for usage
Unless the Company specifies otherwise, a Product or part that is repaired or replaced under this Warranty shall be covered for the remainder of the original warranty period applying to the Product or part. All exchanged parts and Products replaced under this Warranty will become the property of the Company.
7. To get the Limited Warranty service
In the event that a warranty service is required, you should contact your specialist dealer or the point of sale. Warranty claims cannot be made directly to the company - FTA communications Technologies. You should therefore keep your sales receipt as proof of purchase. The Company recommends the Customer first utilize support material shipped with the product, product diagnostics, information contained on the Web, and online support on http://www.inverto.tv/support.
If unsuccessful to obtain service under this warranty, the Customer must notify the Company Technical Support or its authorized Service Center representative of the defect before the expiration of the warranty period. Customers will provide appropriate assistance to the Telephone Support personnel to resolve issues.
If the technical support is unsuccessful, The Company or its authorized Service representative will instruct the customer on how to receive warranty repair.
If the Customer does not know of a Company authorized service center for the Company's product, it should contact the reseller. If the reseller is an authorized service center, they will arrange for repair.
If the Customer reseller is not a Company authorized Product's service center, they will direct the customer to an authorized service center.
The Company reserves the right to charge for service in exception cases.
8. Governing Law
The Customer and the Company consent to the application of the laws of the country, in which the Customer purchase the Product to the Company or a Reseller approved by the Company in case of a resale, to govern, interpret, and enforce all of the Customer and the Company's rights, duties, and obligations arising from, or relating in any manner to, the subject matter of this Statement of Limited Warranty, without regard to conflict of law principles.
these warranties give you specific legal rights and you may also have other rights which vary from state to state or jurisdiction to jurisdiction.
9. Jurisdiction
All of our rights, duties, and obligations are subject to the courts of the country in which you purchase the product to the Company or a Company Reseller in case of a resale.
SPRACHE
English 1
Deutsch 29
Französisch 75
Niederlandisch 113
Scena 5
Satellite High Definition PVR-ready Set-Top Box
Bedienungsanleitung
Model - IDL 5550S CI
Inhaltsverzeichnis
Videotext/Teletext 44
COPYRIGHT (Copyright © 2007 FTA Communication Technologies)
PROGRAMMINFORMATION (JETZT/NACHSTE)
Conditional access system
AVANT D'UTILISER CE PRODUIT
Contenu de la boite
Façade Avant
Façade Arrière
TELECOMMANDE
CONFIGURATION
COPYRIGHT (Copyright © 2007 FTA Communication Technologies)
INFORMATION SUR LE PRODUIT
Specifications techniques
INFORMATION GÉNÉRALES
Compatible Haute Definition et Standard Definition
Compatible PVR
Emplacements Cl : 2, DVB-Cl compatible
Emplacements CA:2 (Conax-en option)
Modulation: DVB-S/S2
VOORZORGSGMAATREGELEN
VOOR U DIT PRODUCT GAAT GEBRUIKEN
Inhoud
Frontpaneel
Achterpaneel
AFSTANDSBEDIENING
SETUP
COPYRIGHT (Copyright © 2007 FTA Communication Technologies)
WAARSCHUWING! BELANGRIJKE VEILIGHEIDSINSTRUCTIES

LET OP: OM GEVAAR VAN ELEKTRISCHE SCHOK TE VOORKOMEN MAG DE BEHUIZING (EN DE ACHTERZIJDE) NIET WORDEN VERWIJDERD. GEEN DOOR DE GEBRUIKER TE ONDERHOUDEN ONDERDELEN BINNENIN. LAAT SERVICE OVER AAN GESCHOOLD SERVICEPERSONEEL.
WAARSCHUWING
OSD-schem over VCR SCART
Conditional access system (CAM)
Mono, Dual channel, Stereo, Joint Stereo, MPEG1, MPEG2, mp3
Digital Audio - via S/PDIF-aansluiting (coaxial en optisch):
Dolby Digital pass-through
PCM data uitgang
SERIELE POORT
USB2.0 High Speed Host-poort