
IBM500 - Bread maker Ices - Free user manual and instructions
Find the device manual for free IBM500 Ices in PDF.

| Product type | Automatic bread machine |
| Brand | Ices |
| Model | IBM500 |
| Power supply | AC 220-240V, 50Hz |
| Power consumption | 560 W |
| Maximum capacity | 500 g (1.0 Lb) of bread |
| Number of programs | 8 (Basic, Sweet, French, Cake, Rapid, Dough, Noodles, Bake) |
| Crust color selection | Light, Medium, Dark |
| Delay timer | Up to 13 hours |
| Keep warm | Up to 60 minutes after baking |
| Memory function | Resume after power failure (≤10 min) |
| Material of the bread pan | Non-stick coating |
| Included accessories | Bread pan, mixing paddle, measuring cup, measuring spoon |
| Dimensions (approx.) | Approx. 30 x 25 x 30 cm |
| Weight (approx.) | Approx. 4-5 kg |
| Cleaning | Hand wash only (not dishwasher safe) |
| Safety | Short cord, automatic stop, overheat protection (display HHH/LLL) |
| Repairability | Temperature sensor replaceable by an expert |
Frequently Asked Questions - IBM500 Ices
User questions about IBM500 Ices
0 question about this device. Answer the ones you know or ask your own.
Ask a new question about this device
Download the instructions for your Bread maker in PDF format for free! Find your manual IBM500 - Ices and take your electronic device back in hand. On this page are published all the documents necessary for the use of your device. IBM500 by Ices.
USER MANUAL IBM500 Ices
natural_image
Line drawing of a standard loaf of bread machine with no text or symbolsMODEL: IBM-500
A.C. 230-240V/50HZ 560W 1.0Lb(500g)
Read this booklet thoroughly before using and save it for future reference
CONTENTS
- Important information for your safety
- Machine overview
- Proper use
- Before the first use
- Properties
- Control panel
7.Baking programmes - Setting the time
- Before baking
10.Baking bread
11.Cleaning and care - Technical data
13.Disposal - Programmes time table
15.Troubleshooting the bread maker
Read the operating instructions carefully before using the appliance for the first time and preserve this booklet for later reference. Hand over the manual to anyone you pass on the appliance to.
1. Important information for your safety
Setup
- Check the bread maker for transport damage after unpacking. If necessary, contact your supplier.
- Place the appliance on a dry, flat and heat-resistant surface.
- Do not place the appliance near gas burners, electric ovens or other heat sources.
- Do not place the appliance near any inflammable materials, explosive and/or self-igniting gases.
- Make certain that the ventilation slits of the appliance are not covered.
- Before plugging in the appliance, check whether the electricity type and mains voltage match the information on the type plate.
- Do not draw the power cord over sharp edges or close to hot surfaces or objects. This may damage the insulation of the power cord.
- To prevent anyone from tripping over, the appliance is provided with a short power cord.
- If you plan to use an extension cable, make sure that the maximum permissible power rating of the cable corresponds with that of the bread maker.
- Place the extension cable in such a way as to prevent anyone from tripping over it or pulling it accidentally.
- This appliances are not intended to be operated by means of an external timer or separate remote-control system.
•The largest bread can be made is 1.0Lb(500g), so the maximum quantities of flour and Yeast that may be used shall follow the Bread Maker Cookbook
During operation
- Check the condition of the power cord and plug frequently. If the power cord of this appliance is damaged, it must be replaced by the manufacturer, the manufacturer's customer service or a similarly qualified person to avoid associated dangers.
- Children using electrical appliances or standing close to them may be allowed only under the supervision of an adult.
- This appliance complies with the normal safety regulations. Inspection, repair and technical maintenance may only be performed by a qualified specialist.
- Do not place any objects on the appliance and do not cover it during operation. Fire Hazard!
- Caution, the bread maker becomes hot. Only touch the handles and touch buttons of the appliance. If necessary, use a kitchen cloth.
- Before taking out the accessories or inserting them, allow the appliance to cool down and unplug the power cord.
- Do not re-locate the bread baking machine if the bread pan contains hot ingredients
or liquids.
- Avoid contact with the rotating kneading paddles during operation. Injury hazard!
- Stop the appliance off by means of the On/Off button, then pull the power plug out of the wall socket to disconnect the appliance from the power supply.
Do not pull at the cable but pull out the plug from the socket. - When not in use or before cleaning the appliance, unplug the power cord as a safety measure.
- Do not use the bread baking machine for the storage of foods or utensils.
Cleaning
- Do not immerse the bread maker in water or other fluids. Hazard of lethal electrical shocks!
- Do not clean the appliance with abrasive scrubbers. Detached particles of the scrubber may come into contact with the electrical components and cause severe electric shocks.
- Appliance is not intended for use by persons (Including Children) with reduced physical, sensory or mental capabilities, or lack of experience and knowledge, unless they have been given supervision or instruction concerning use of the appliance by a person responsible for their safety.
- Children should be supervised to ensure that they do not play with the appliance.
2. Machine Overview
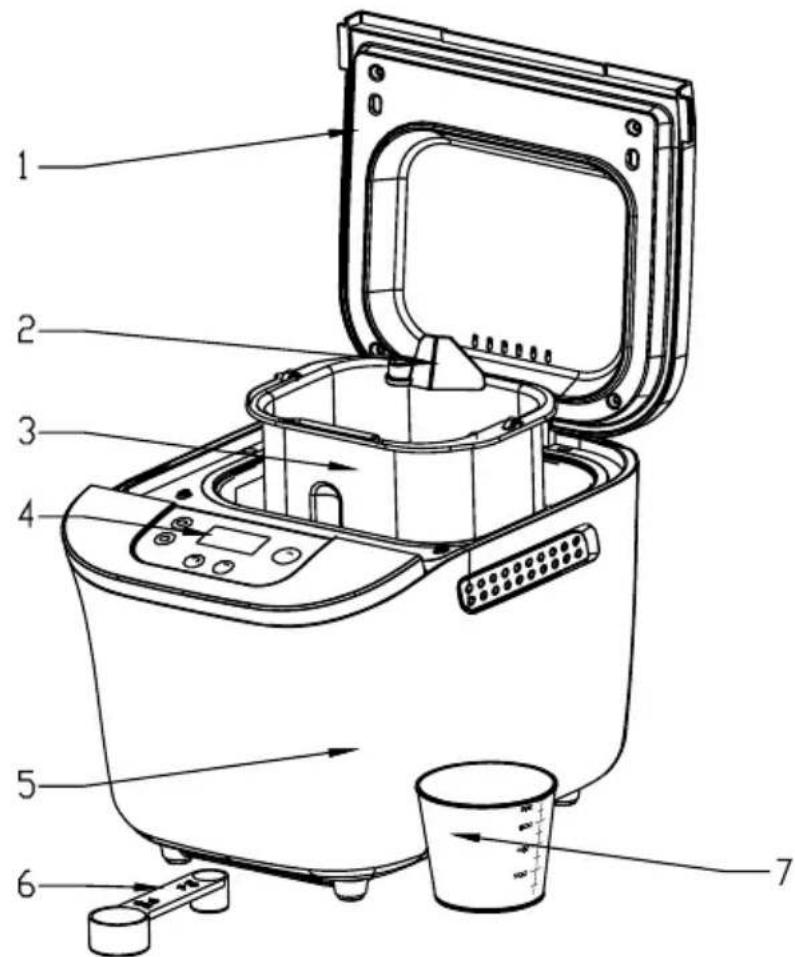
(1). Appliance lid
(2). kneading paddle
(3). Bread pan
(4). Control panel
(5). Housing
(6).Measuring spoon (tea and table size)
(7).Measuring cup
3.Proper use
Only use your bread maker for baking bread in a household environment. Do not use the appliance for drying foodstuffs or other objects.
Do not use the bread machine outdoor. Use accessories recommended by the manufacturer only. Accessories not recommended may cause damage to the appliance.
4. Before the First Use
Disposing of the packaging material
Unpack your appliance and dispose of the packaging material in accordance with the prevailing regulations.
Initial cleaning
Wipe the bread pan, kneading paddle and outer surface of the bread baking machine with a clean, damp cloth before putting into operation. Do not use any abrasive scrubbers or cleaning powders. Remove the protective film on the control panel.
5. Properties
You can use the automatic bread maker to bake according to your taste.
- You can choose from among 8 different baking programmes.
- You can use ready-to-use baking mixtures.
- You can knead noodle dough or roll dough
- You can make cake.
6. Control panel
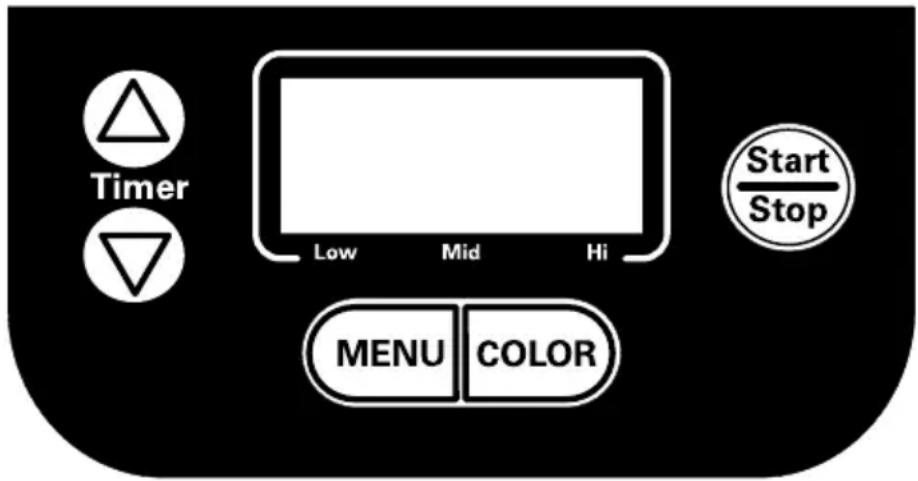
(1). LCD Display
(a). Display for selection of the loaf weight 1.0LB (500g),
(b). The remaining baking time in minutes and the programmed time
(c). The selected bread crust color light, medium, dark
(d). The selected programme number
(2). Menu
Load the desired baking programmes. The programme number and the corresponding baking time appears on the LCD display.
Important:
When pressing all buttons an acoustic signal must be audible, unless the appliance is in operation.
(3). Color
Select bread crust color (light/medium/dark). Press the button of "Color" enough times until a marking appears indicate the desired crust color.
(4). "Timer"
Time-delayed baking.
Press "Timer" △ or "Timer" ▽ button continuously to adjust the finish time.
(5). Start/Stop
To start and stop the operation or to delete a set timer. To finish operation and delete the settings, press the “Start/Stop” button for 2 seconds until one long acoustic signals are audible.
Note:
Do not press the "Start/Stop" button, if you only want to check the state of your bread.
(6).Program number
The program number appears on the LCD display of left upper corner.
Memory function
When being switched on again after a power failure of up to approx. 10 minutes, the programme will continue from the same point. This does not apply, however, when you cancel/terminate the baking process by pressing the “Start/Stop” button for 2 seconds.
Window
You can check the baking process through the window.
7. Baking programmes
You select the desired programmes by pressing the button "MENU". The corresponding programme number is showed on the LCD display. The baking time depends on the selected Programme combinations. See chapter "Working time table".
Baking programme 1: Basic
For white and mixed breads mainly consisting of wheat flour or rye flour. The bread has a compact consistency.
Baking programme 2: Sweet
For breads with additives such as fruit juices, grated coconut, raisins, dry fruits, chocolate or added sugar. Due to a longer phase of rising the bread will be light and airy.
Baking programme 3: French
For light breads made from fine flour. Normally the bread is fluffy and has a crispy crust. This is not suitable for baking recipes requiring butter, margarine or milk.
Baking programme 4: Cake
Kneading, and baking to make cake.
Baking programme 5: Ultr-fast
kneading, rise and baking in a very fast way. But the baked bread is the most rough among all bread menus.
Baking programme 6: Dough
For preparing rising dough to make style bread. In this program no baking is done.
Baking programme 7:Pasta
For preparing noodle dough. In this program no baking is done.
Programme 8: Bake
For additional baking of bread that are too light or not baked through. In this programme there is no kneading or rising.
The bread will be kept warm for nearly an hour after the end of the baking operation.
This prevents the bread from becoming too moist.
- To prematurely terminate this function press the “Start/Stop” button for 2 seconds, until one long acoustic signals are heard. To switch off the appliance, disconnect the appliance from the power supply.
In programs 1, 2, 3, 4, 5 hurried acoustic signal sounds during the program time table.
Soon thereafter, add the ingredients such as fruits or nuts.
If you have set the delayed timer, you can put all the ingredients into the bread pan at the beginning. In this case, however, fruits and nuts should be cut into smaller pieces.
8. Setting the Time
The timer function enables delayed baking.
If you want the appliance do not start working immediately you can use this button to set the delay time.
You must decide how long it will be before your bread is ready by pressing the “Time ”. Please note the delay time should include the baking time of programme. That is, at the completion of delay time, there is hot bread can be serviced. At first the programme and degree of browning must be selected, then pressing “Time ” to increase the delay time at the increment of 10 minutes. The maximum delay is 13 hours.
Example: Now it is 8:30p.m, if you would like your bread to be ready in the next morning at 7 o'clock, i.e. in 10 hours and 30 minutes. Select your menu, color, loaf size then press the "Time△" to add the time until 10:30 appears on the LCD. Then press the "Start/Stop" button to activate this delay program. You can see the dot flashed and LCD will count down to show the remaining time. You will get fresh bread at 7:00 in the morning, If You don't want to take out the bread immediately, the keeping warm time of 1 hour starts.
Note
Do not use the timer function when working with quickly spoiling ingredients such as eggs, milk, cream or cheese.
9. Before baking
For a successful baking process, please consider the following factors:
Ingredients
• Take the bread pan out of the housing, before putting in the ingredients.
If ingredients reach the baking area, a fire may be caused by them heating up on the heating elements.
• Always put the ingredients in the stated order into the bread pan.
- All ingredients should have room temperature to maintain an optimal rising result of the yeast.
- Measure the ingredients precisely. Even negligible deviations from the quantities specified in the recipe may affect the baking results.
Note
Never use larger quantities than those specified. Too much dough can rise out of the bread pan and drop onto the hot heating elements, causing a fire.
10. Baking bread
Preparation
Observe the safety instructions in this manual. Place the bread machine on an even and firm base.
Note
The bread maker maximum quantities of flour and yeast is 500g(1.0Lb) receipts, Don't used more ingredients
First add the Water ,oil and other liquids, then add sugar , salt, flour, last add the yeast .
(1). Pull the bread pan upward out of the appliance.
(2). Push the kneading paddles onto the drive shafts in the bread pan. Make sure they are firmly in place.
(3). Put the ingredients for your recipe in the stated order into the bread pan. First add the liquids, sugar and salt, then the flour, adding the yeast as the last ingredient.
Note
Make certain that yeast does not come into contact with salt or liquid.
(4). Place the bread pan back in the appliance. Make sure that it is positioned properly.
(5). Close the appliance lid.
(6). Plug the power plug into the socket. An acoustic signal sounds and the display indicates the program number and the duration of the normal program 1.
(7). Select your program with the "MENU" button. Each input is confirmed by an acoustic signal.
(8). Select the color of your bread. The marking on the display shows whether you have chosen light, medium or dark.
(9). You now have the possibility of setting the finish time of your programme via the timer function. You can enter a maximum delay of up to 13 hours.
Starting a Programme
Now start the programme using the "Start/Stop" button.
The programme will automatically run various operations. You can watch the programme time table via the window of your bread baking machine. Occasionally, condensation may occur during baking in the window. The appliance lid can be opened during kneading.
Note
Do not open the appliance lid during baking. The bread can collapse.
Ending a programme
When the baking process has been completed, acoustic signals are issued and the display indicates 0:00. At the end of the programme the appliance automatically changes to a warming mode for up to 60 minutes. In this mode, warm air circulates inside the appliance. You can prematurely terminate the warming function by keeping the “Start/Stop” button pressed until acousitc signals are heard.
Warning
Before opening the appliance lid, pull the power plug out of the wall socket. When not in use, the appliance should never be plugged in!
Taking out the bread
When taking out the bread pan, always use pot holders or oven gloves. Hold the bread pan tilted over a grid and shake lightly until the bread slides out of the bread pan. If the bread does not slip off the kneading paddles, carefully remove the kneading paddles using the enclosed kneading paddle remover.
Note
Do not use any metal objects that may lead to scratches on the non-stick coating. After removing the bread, immediately rinse the bread pan with warm water. This prevents the kneading paddles from sticking to the driving shaft.
Tip: If you remove the kneading paddles after the last kneading of the dough, the bread will remain intact when you remove it from the bread pan.
- Briefly press the Start/Stop button, to interrupt the baking process or pull the power plug out of the wall socket.
- Open the appliance lid and take out the bread pan. You can take the dough out with floured hands and remove the kneading paddles.
- Replace the dough and close the appliance lid.
- Push the plug back into the wall socket and press the “Start/Stop” button. The baking programme is continued. Let the bread cool for 15-30 minutes before eating. Before cutting bread, make sure that no kneading paddle is still in the bread pan.
Warning
Do not attempt to start operating the bread maker, before it has either cooled down or warmed up. If the display shows “HHH” after the programme has been started, it means that the temperature inside of bread pan is too high. You should stop the programme and unplugged the power outlet immediately. Then open the lid and let the machine cool down completely before using again.
If the display shows “LLL” after the programme has been started, it means that the temperature inside of bread pan is too low. You should place the bread maker on a higher environment for using.
If the display shows “EE0” after you have pressed “Start/Stop” button, it means the temperature sensor open circuit, please check the sensor carefully by Authorized expert. If the display shows “EE1”, it means the temperature sensor short circuit.
11.Cleaning and Care
Warning
Pull the power plug out of the wall socket each time and allow the appliance to cool down. Protect the appliance against splashing water and moisture, as these could lead to an electric shock. Please also observe the safety instructions.
Important
The parts and accessories of the appliance should not be washed in a dish washing machine.
Casing, lid, baking chamber
Remove all particles left behind inside the baking area using a wet cloth or a slightly wet soft sponge. Wipe the casing and the lid too with a wet cloth or sponge. Make sure that the inside area is fully dry.
Bread pan and kneading paddle
The surfaces of the bread pan and kneading paddle have a non-stick coating. While cleaning, do not use any abrasive detergents, cleaning powders or objects that may cause scratches on the surface. Due to moisture and vapor the surface of various parts may undergo changes in their appearance over a period of time. This does not affect the quality or functional performance of the appliance. Before cleaning, take the bread pans and kneading paddles out of the baking area. Wipe the outside of the bread pans with a damp cloth.
Important
Never immerse the bread pans in water or other liquids. Clean the interior of the bread pans with warm, soapy water. If the kneading paddles are incrusted and hard to release, fill the bread pan with hot water for approx. 30 minutes. If the retainer in the kneading paddle is clogged, you can clean it carefully with a wooden skewer. Do not use any chemical cleaning agents or thinners to clean the bread maker.
12. Technical data
Model: IBM-500
Power supply: A.C 220-240V/50Hz
Power consumption : 560 Watt
Bread pan compacity: Max1.0Lb(500g)
13. Disposal
Never throw the Automatic Bread Maker into the normal household waste.
Observe the currently applicable regulations. In case of doubt, please contact your waste disposal centre.


14. Programme time table
IBM-500 BREAD MAKER WORKING TIME TABLE
| Cycle\Program setting | 1.BASIC | 2.SWEET | 3.FRENCH | 4.CAKE | 5.ULTRA FAST | 6.DOUGH | 7.PASIA | 8.BAKE |
| 3:05 | 2:55 | 3:40 | 1:20 | 1:18 | 1:40 | 0:15 | ||
| KNEAD1 | 10 | 11 | 11 | 15 | 15 | 10 | 15 | N/A |
| RISE1 | 30 | 15 | 40 | 5 | N/A | 10 | N/A | N/A |
| KNEAD2 | 13 | 14 | 15 | N/A | N/A | 10 | N/A | N/A |
| RISE2 | 42 | 35 | 39 | N/A | N/A | 30 | N/A | N/A |
| RISE3 | 40 | 40 | 50 | N/A | 25 | 40 | N/A | N/A |
| BAKE | 50 | 50 | 65 | 50 | 38 | N/A | N/A | 0:10-1:00 |
| KEEWARM | 60 | 60 | 60 | 60 | 60 | N/A | N/A | 60 |
| ADDFRUIT TIME | 2: 17 | 2:13 | 2: 39 | 2: 27 | 2:49 | N/A | N/A | N/A |
| DELAY TIME | 13: 00 | 13: 00 | 13: 00 | N/A | N/A | 13: 00 | 13: 00 | N/A |
15.Trouble shooting
| What should I do if the kneading paddle is stuck inside the bread pan after baking? | Add hot water to the bread pan and turn the kneading paddle to loosen encrusted material underneath. |
| What happens if the finished bread is left inside the bread maker? | The function "Keep warm" ensures that the bread is kept warm for nearly 1 hour and protected from humidity. If the bread remains in the baking machine for longer than 1 hour, it may become moist. |
| Can the bread pans be washed in a dishwasher? | No. Please wash the bread pans and kneading paddles by hand. |
| Why doesn't the dough get stirred, even if the motor is running? | Make sure that the kneading paddles and bread pan are positioned properly. |
| What do I do if the kneading paddle remains in the bread? | Remove the kneading paddles with the kneading paddle remover. |
| What happens if there is a power failure when a program is running? | In case of power failure for up to 10 minutes, the bread maker will run the last implemented program till the end. |
| How long does it take to bake bread? | Please consult the programme time table for the exact times. |
| What size breads can I bake? With the large bread pan, you can bake bread up to 1.0Lb(500g). | |
| Why can the timer function not be used when baking with fresh milk? | Fresh products such as milk or eggs get spoilt if they remain in the appliance for too long. |
| The added raisins get crushed in the appliance. | To avoid the chopping of ingredients such as fruit or nuts, add these to the dough only after the signal is sounded. |
iCES®
MACHINE À PAIN
MANUEL D'INSTRUCTION
natural_image
Line drawing of a standard loaf of bread machine with no text or symbolsMODÈLE : IBM-500
A.C. 230-240V/50HZ 560W 1.0Lb(500g)
natural_image
Line drawing of a standard loaf of bread machine with no text or symbolsMODEL: IBM-500
A.C. 230-240V/50HZ 560W 1.0Lb(500g)
(1). Deksel
(2). Kneedhaak
(3). Broodpan
(4). Bedieningspaneel
(5). Behuizing
(6).Maatlepel (thee- en eetlepel)
(7).Maatbeker
3.Juist gebruik
Bakprogramma 3: French
Bakprogramma 6: Dough
Behuizing, deksel, bakkamer
natural_image
Line drawing of a standard loaf of bread machine with a rectangular top and side slots (no text or symbols)MODELL: IBM-500
AC 230 - 240 V / 50 Hz, 560 W, 500 g
Backprogramm 3: French
Backprogramm 6: Dough


- CONTENTS
- Important information for your safety
- Setup
- During operation
- Cleaning
- Machine Overview
- 3.Proper use
- Before the First Use
- Disposing of the packaging material
- Initial cleaning
- Properties
- Control panel
- (1). LCD Display
- (2). Menu
- Important:
- (3). Color
- (4). "Timer"
- (5). Start/Stop
- Note:
- (6).Program number
- Memory function
- Window
- Baking programmes
- Baking programme 1: Basic
- Baking programme 2: Sweet
- Baking programme 3: French
- Baking programme 4: Cake
- Baking programme 5: Ultr-fast
- Baking programme 6: Dough
- Baking programme 7:Pasta
- Programme 8: Bake
- Setting the Time
- Note
- Before baking
- Ingredients
- Baking bread
- Preparation
- Starting a Programme
- Ending a programme
- Warning
- Taking out the bread
- 11.Cleaning and Care
- Important
- Casing, lid, baking chamber
- Bread pan and kneading paddle
- Technical data
- Disposal
- Programme time table
- 15.Trouble shooting
- iCES®
- MACHINE À PAIN
- MANUEL D'INSTRUCTION
- 3.Juist gebruik
- Bakprogramma 3: French
- Bakprogramma 6: Dough
- Behuizing, deksel, bakkamer
- Backprogramm 3: French
- Backprogramm 6: Dough
Brand : Ices
Model : IBM500
Category : Bread maker