
BC4000 - Baby monitors ELRO - Free user manual and instructions
Find the device manual for free BC4000 ELRO in PDF.
| Product Type | Baby Monitor |
| Brand | ELRO |
| Model | BC4000 |
| Camera Power | 5V DC 1A adapter (included) |
| Monitor Power | 5V DC 1A adapter (included) or lithium battery 3.7V 2800mAh |
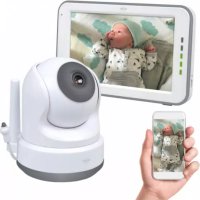
| Screen | 5 inch (12.7 cm) touchscreen, 720P resolution |
| Camera Resolution | 1920 x 1080 (HD) / 640 x 360 (SD) |
| Wireless Range | 300 meters in open field |
| Night Vision | IR LEDs 940nm, range 5 meters |
| Two-way Audio | Yes, via monitor or smartphone app |
| Main Functions | VOX, lullabies, nightlight, temperature display, digital zoom, remote pan/tilt |
| Mobile App | ELRO Baby Monitor (iOS and Android) – WiFi 2.4 GHz required |
| Expandability | Up to 2 cameras on monitor, up to 16 on app |
| Connectivity | 2.4 GHz FHSS (monitor) + WiFi (smartphone) |
| Monitor Battery Life | Approximately 6 to 8 hours in normal use |
| Cleaning | With a dry cloth, do not use water |
| Security | FHSS technology, secure pairing, out-of-range alarm |
| Warranty | Check www.elro.eu for terms |
Frequently Asked Questions - BC4000 ELRO
User questions about BC4000 ELRO
0 question about this device. Answer the ones you know or ask your own.
Ask a new question about this device
Download the instructions for your Baby monitors in PDF format for free! Find your manual BC4000 - ELRO and take your electronic device back in hand. On this page are published all the documents necessary for the use of your device. BC4000 by ELRO.
USER MANUAL BC4000 ELRO
Home is not a place, it's a feeling
EN - Content
- Properties -6-
1.1 Package Contents 6
1.2 Camera Overview 7
1.3 Monitor Overview
1.4 Monitor symbols single screen. -8-
1.5 Monitor symbols dual screen 9
- Get Started 9
2.1 Pairing the Monitor and Camera 10
2.2 Controls 10
2.3 Menu page 11-
2.4 Split screen and automatic switching between camera images 12
2.5 VOX mode 12
2.6 Battery management. 12
- ELRO Baby Monitor app. 13
3.1 Register. 13
3.2 Log in 15-
3.3 Pairing Camera with Smartphone 15
3.4 Adding multiple users 17
3.5 Receive notifications. 17
3.6 Explanation of the home screen.... Fout! Bladwijzer nicht gedefiniereid.
3.7 Understanding Multi-View.... Fout! Bladwijzer nicht gedefiniereid.
3.8 Explanation of control panel camera.... Fout! Bladwijzer nicht gedefiniereid.
3.8.1 Functions Fout! Bladwijzer nicht gedefiniert.
3.9 Explanation of the camera settings . Fout! Bladwijzer nicht gedefiniereid.
3.10 Firmware updates - 23
- Frequently Asked Questions (FAQ) and troubleshooting.. 24 -
- Technical Specifications 25-
- Safety & Compliance 25
- Service and contact 27-
Go to www.elro.eu to download the latest version of this manual!
DE-Inhalt
- Eigenschaften. 28-
3. ELRO Baby Monitor app. 59
2.4 GHz PWiFi +WiFi dual mode technology
- Expandable to 2 cameras, single (1) or split (2) monitor screen.
Language selection: English, German, French, Spanish, Italian, Dutch.
- Camera with night vision.
- Responds to sound.
Lullabies, night light and temperature display.
2-way audio: talk back to the camera via monitor or via smartphone.
- 5'' / 12.7 cm touchscreen monitor.
Panorama (left-right) + tilt (top-bottom) + digital zoom at a distance.
iOS & Android app.
Alarm when the camera is out of range.
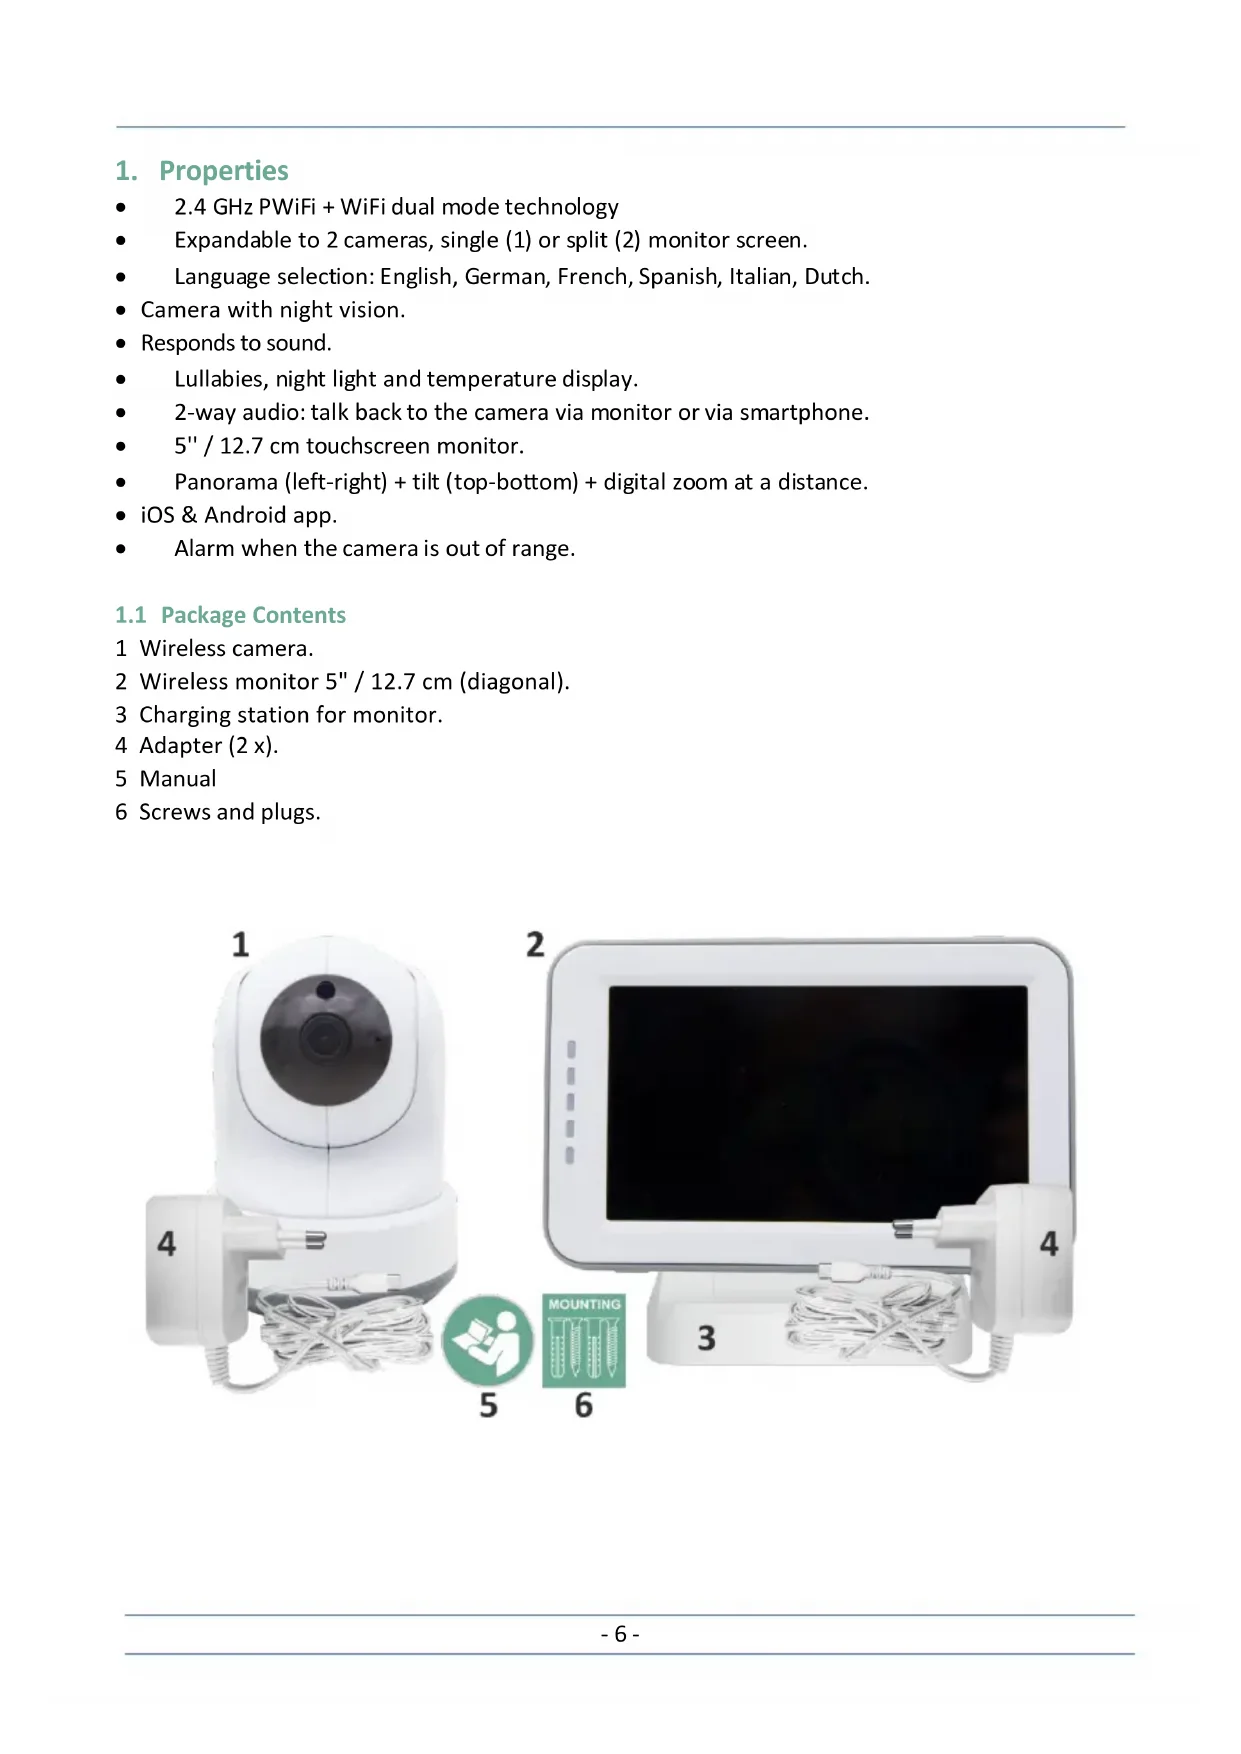
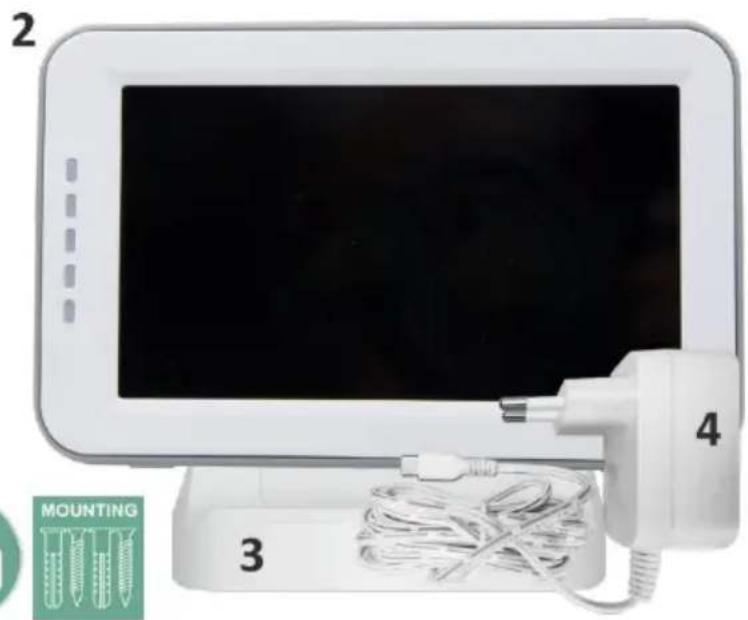
1.1 Package Contents
1 Wireless camera.
2 Wireless monitor 5^ / 12.7 cm (diagonal).
3 Charging station for monitor.
4 Adapter (2x)
5 Manual
6 Screws and plugs.

5
6
1.2 Camera Overview
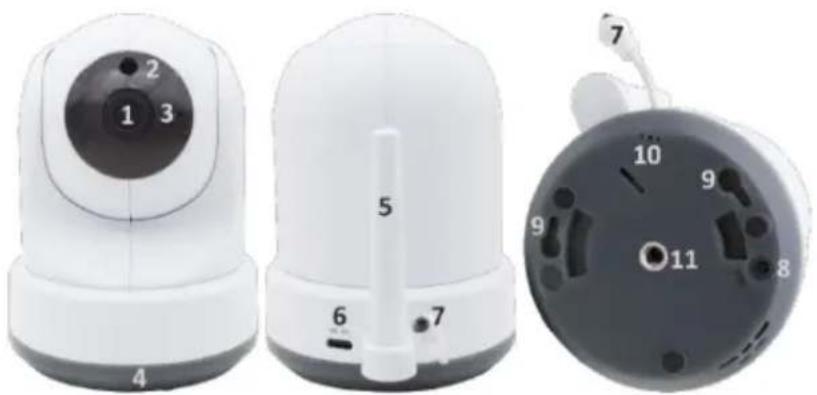
1 Camera lens.
2 IR sensor & LEDs for display in low to no light conditions.
3 Microphone.
4 Night light.
5 Antenna.
6 Connection for the power adapter.
7 Temperature sensor, the measured ambient temperature is displayed on the monitor.
8 Pair button to pair, reset, or install the camera.
9 Hanging eyelets for mounting on the wall.
10 Loudspeaker.
11 1/4 screw for tripod mounting (optional).
1.3 Monitor Overview
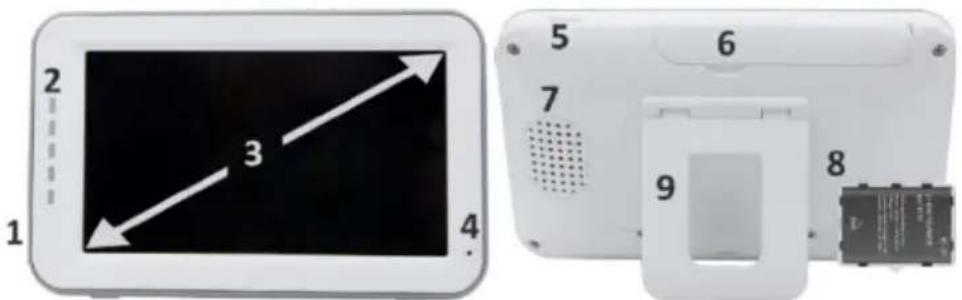
1 DC 5V USB-C Adapter connection.
2 Soundbar: Indicates the level of noise detected by the camera.
3 5^ / 12.7 cm TFT LCD screen.
4 Microphone.
5 On/off button:
- Press and hold for approx. 4 seconds to turn the monitor on or off.
Short press to put the monitor into power saving mode (Audio always on).
Antenna, transmits and receives signals to or from the camera.
7 Loudspeaker.
8 Lithium battery. Remove plastic strip before use.
9 Table stand.
1.4 Monitor symbols single screen
The icons below appear when only one camera is connected.
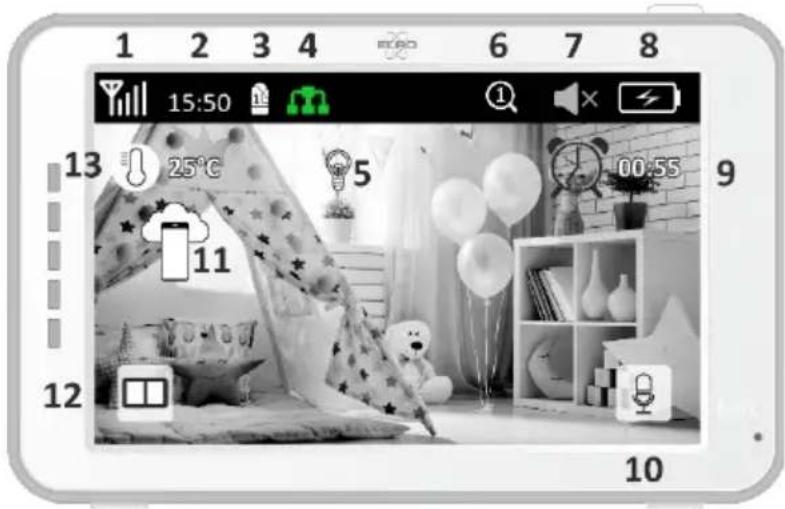
1 Signal Indicator: Shows the strength of the signal received from the camera.
2 Digital clock: Displays the time set on the monitor.
3 Camera Display Indication: Indicates which camera is displayed.
4 Network Indicator:

Red / No connection to the internet.
Green / Camera connected to the internet.
Yellow / Camera connected to WiFi, router possibly not connected to internet or camera removed from app.
5 Night light: Tap to turn on or off.
6 Zoom Mode: Indicates the zoom factor; 1 x, 1.5 x and 2 x.
7 Monitor speaker: white is on, gray is off.
8 Battery status:
-
Flashing red: The battery is almost empty.
-
1 dash: the battery still has a quarter charge.
- 2 bars: The battery still has half a charge.
- 3 bars: the battery is still 3 quarters charged.
- 4 bars: The battery is fully charged.
- Lightning bolt icon, the monitor is charging.
9 Timer with alarm signal for feeding times.
10 Talk: Press and hold this button to talk through the camera.
11 Privacy switch: When connected to the internet, this icon appears. It shows that there is an active connection. Press the icon to disconnect from the internet, without losing the settings. Press again to turn the connection back on.
12 Split mode: Press this button to switch to split mode. Up to 2 cameras can be paired.
13 Temperature display of the room where the camera is placed.
Comments:
"Talk" appears only in single screen live watching.
- When the camera plays a lullaby, it pauses when "Talk" is used.
1.5 Monitor symbols dual screen
When a second camera is paired, some new icons will appear.
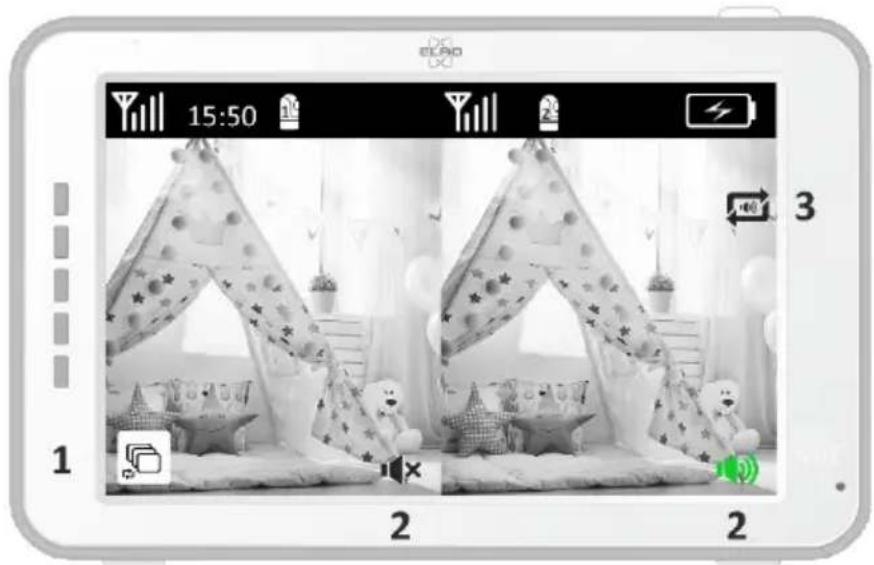
- Automatically switch camera view: Press here during dual screen to have the images switch automatically. The monitor shows the full image of one camera and switches to the other camera every 8 seconds. The letters SEQ can be seen in the lower right corner, indicating that this function is activated.
- Audio control: Press this symbol to manually play the sound from the camera of your choice. The symbol turns green when the audio is active.
- Audio switching: Tap this icon to turn on the audio switch. The monitor will play the audio from each camera for 8 seconds, to automatically switch to the other camera.
2. Get Started
- The monitor must be fully charged via the adapter or charging station before use. The camera must always be plugged into a power outlet with the adapter.
- Place the camera in the desired position. You can place the camera on a table/cabinet or attach it to the wall using the screw holes. First, test that the connection is stable enough at the location before drilling screws.
Press and hold the power button for about 4-5 seconds to turn on the monitor.
2.1 Pairing the Monitor and Camera
The monitor and camera are already paired. Only if you want to use an extra camera does it need to be paired, act as follows:


3
4
5
- Turn on the monitor and camera.
- Touch the screen and press the button in the bottom left corner of the monitor to open the menu.
- Press the icon to change the camera's settings.
- Press the icon and select the camera channel you want to pair the camera with.
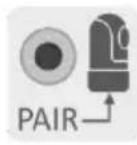
- Within the 30-second countdown period, shortly press the [RESET] button (bottom of camera).
- If the monitor has successfully paired the camera, it will automatically switch to the display of this camera.
2.2 Controls
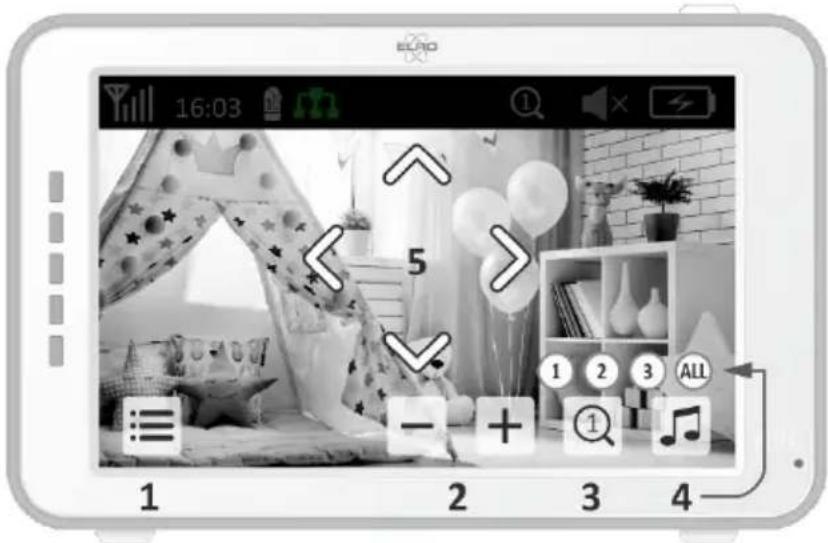
Tapping anywhere on the screen will bring up the control keys.
- Menu page: Here you can make monitor and camera settings.
- Volume up and down.
- Zoom mode: Tap to centrally zoom in to 1.5x or 2x.
- Press the icon to activate 1 of the 3 lullabies. Press the number or "All" (all 3) to play them in the room where the camera is located. Tap the musical note to turn off the lullaby. Note! The lullaby will not turn off automatically.
- Navigation controls to remotely rotate (left/right) or tilt (up/down) the camera.
2.3 Menu page
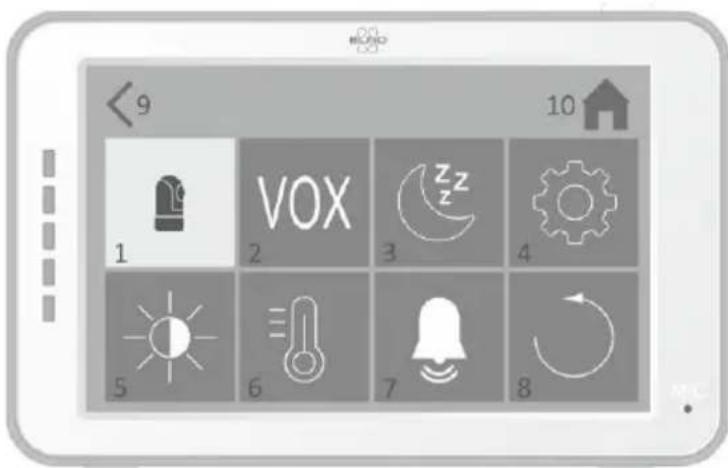
1 Camera settings:
a Pairing (un)pairing: 1 extra camera can be connected.
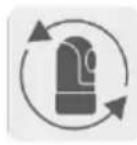
b Flip image: Rotate the image per camera when you mount the camera upside down.
c Adjust volume: Adjust the camera volume per camera.
2 VOX: Set the threshold value of the noise levels to be detected per camera. At the 'high' setting, sound will be detected more easily.
a At "High" the VOX reacts from 66db.
b At "Low" the VOX reacts from 77db.
See 2.5 "VOX Mode" for more information about the VOX.
3 Automatic Power Saving: Set how long it takes for the monitor to enter power saving mode. There is a choice of 30s, 60s, 120s or Power off.
4 General Settings:
a Here you can set the current time, date and a power timer.
b Language setting for the monitor, six options: English, German, French, Italian, Dutch and Spanish.
5 Brightness: Adjust the brightness of each individual camera.
6 Temperature Setting:
a Turn the temperature alarm on or off.
b Enter a minimum (left) and a maximum (right) temperature when the monitor should sound an alarm.
c Choose a Celsius or Fahrenheit display.
7 Alarm volume:
a Increase or decrease the sound of the alarm.
b When battery is low, camera out of range and temperature alarm.
8 Factory setting, reset the monitor to factory settings.
9 Navigation: Back to the previous page.
10 Navigation: Back to current image display (Live View).
2.4 Split screen and automatic switching between camera images
If 2 cameras are added to the monitor, it is possible to view the images in split screen. It is also possible to switch the image of the monitor between the different cameras every 10 seconds.
Split screen
1 Add an additional camera as described in 2.1 "Pairing the Monitor and Camera".
2 Press the bottom left of the main screen to go to split screen.
In this screen it is possible to view the images from both cameras. It is also possible to switch between the sound recorded by the cameras. To do this, press the symbol 'Automatic camera image switching', see 1.5 "Monitor symbols dual screen". If you press on one of the images, the monitor will only show the image from that camera.
Automatic switching between camera images (SEQ)
You can have the camera images automatically switched by clicking on the images with the tick in the split screen overview at the bottom left. The image shown by the monitor will then change every 8 seconds. The letters SEQ can be seen in the lower right corner.
2.5 VOX mode
VOX is the abbreviation of 'Voice Activated Transmission'. When this feature is enabled, the monitor will turn on when there is actual sound in the baby's room.
Action:
VOX mode kicks in when the monitor is in standby (power-saving mode). When sound is detected, the image of the camera in question will be displayed. Of course, the sound will also be audible, provided that the volume on the monitor is turned on.
When two cameras are used, the image will automatically switch if sound is detected by the other camera.
It is possible to enable the VOX mode per camera. In addition, you can also adjust the threshold of the detection. If it is set to 'high', the monitor will be switched on when there is little noise.
2.6 Battery management
It is important that the screen can be used for a long time, without having to be charged. This way, its mobility will be increased and you can always keep an eye on your child. With normal use, the battery of the screen should last around 6-8 hours. In addition, we have a few more tips to help you extend the baby monitor's battery life.
- Switch on automatic energy-saving mode. See chapter 2.3 point 3
- Switch on VOX mode so that the display is activated only when sound is detected. When the sensitivity is set to 'Low', the display will activate even less quickly.
Make sure to place the display on the charging station at night so that you can use the monitor during the day without any problems.
Of course, the battery will also last longer if the display is used less.
Please note! When the system is in use for an extended period of time, battery performance will decrease. With each charging cycle, the maximum battery life will decrease slightly.
3. ELRO Baby Monitor app
Download the free ELRO Baby Monitor App from the Google Play Store or App Store. Please read and accept User Agreement and Privacy Policy to proceed. You can only pair the camera with 2.4GHz Wi-Fi (5GHz Wi-Fi is not possible). We recommend using a well-secured network for installation to ensure the security of the system.
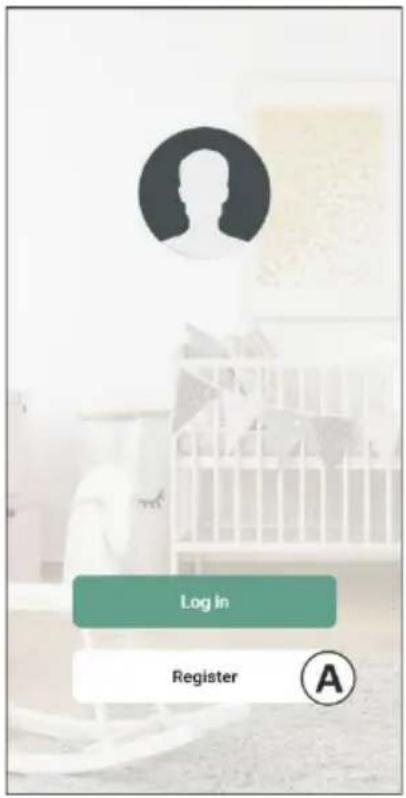
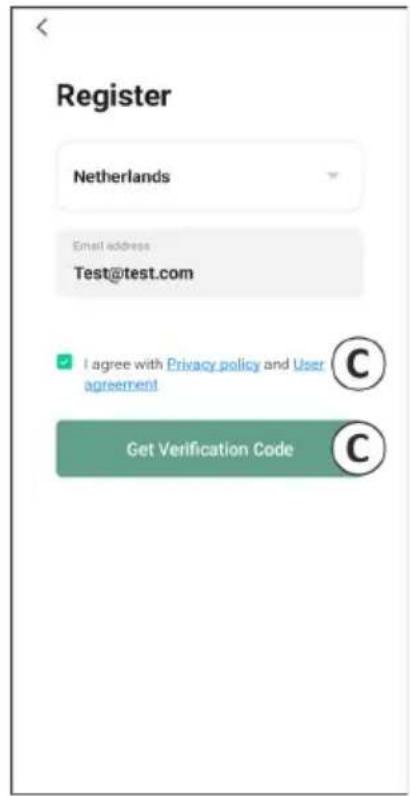
3.1 Register
If you don't have an account yet, you can register an account for free.
A. Click on "Register".
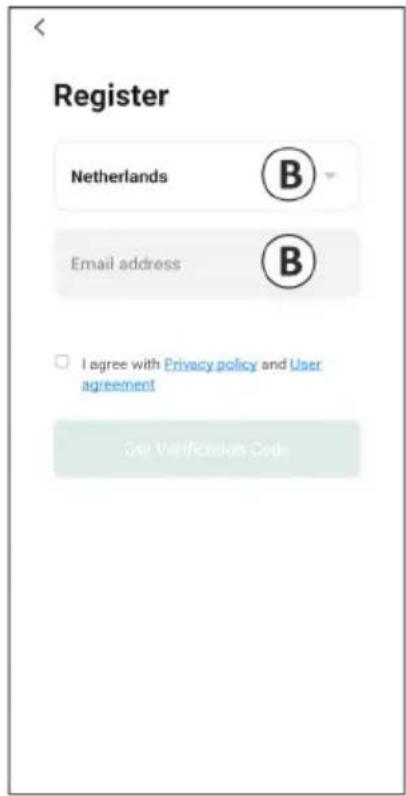
B. Enter your country and enter the correct email address.
C. Check the box next to the Privacy Policy and User Agreement. Then press "Get verification code".
D. Check if you have received an email with the verification code. Please also check the SPAM. When this code is received, enter this code.
E. Set a new password. Use 6-20 characters consisting of at least one letter, one number, one uppercase letter, and one special character. Then tap 'Done'.
F. Accept all permissions to complete the registration. When this is done, you can use the ELRO Baby Monitor app.


3.2 Log in
If you already have an account, you can log in with your details.
A. Click on "Log in".
B. Enter your country, email address and password.
C. Check the box next to the Privacy Policy and User Agreement. Press "Log In".
D. Now you are logged in and ready to use the ELRO Baby Monitor.
If you have forgotten the password of the account, you can reset the password by clicking on 'Forgot password' in the login screen. This will allow you to request a verification code to change the password.
Please note! You can log in to multiple smartphones using the same account to use the baby monitor. Image quality and speed may decrease when the image is viewed with multiple devices at the same time.
3.3 Pairing Camera with Smartphone
1 Plug the camera into the wall socket. If the plug is already inserted then remove the plug, wait a 1 minute and then insert the plug again. Wait until the camera says 'Camera activated'.
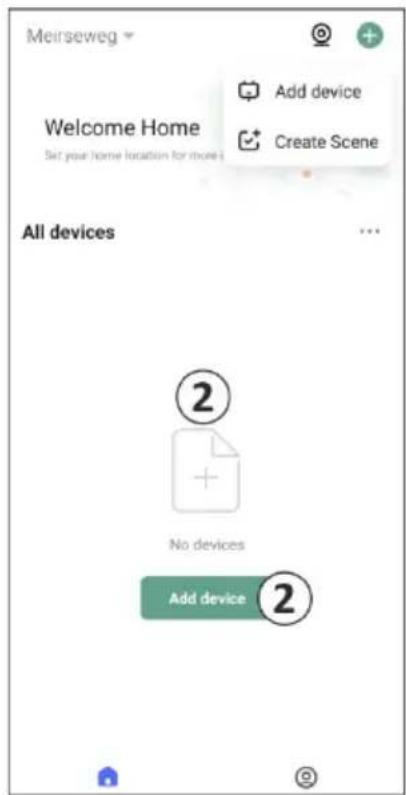
2 Press the "+" in the top right corner or press the 'Add device" button.
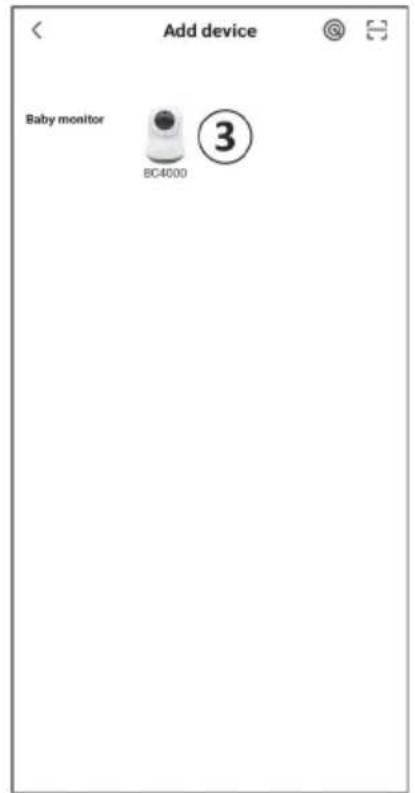
3 Select the "BC4000".
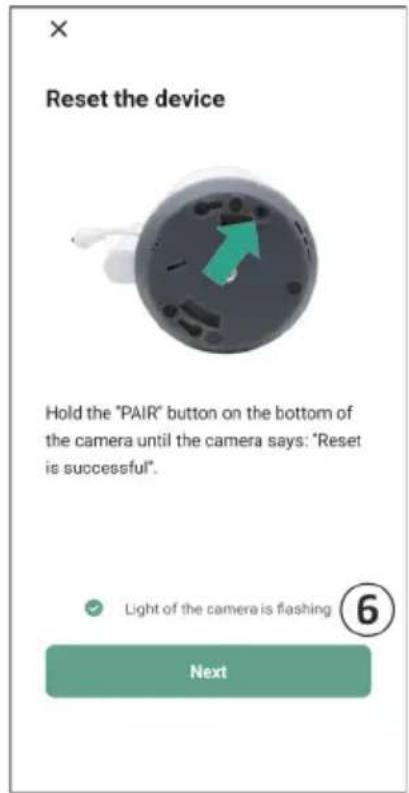
4 Press and hold the "Pair" button on the bottom of the camera for approx. 5 seconds until the camera says: "Reset successfully".
After 10-20 seconds, 'Camera activated' will be heard again and the night light will flash. The baby monitor will repeatedly say: "Scanning mode is active". This means that the camera is in pairing mode.
a Note: the camera will be temporarily out of range on the included monitor.
6 Check the box and press "Next".
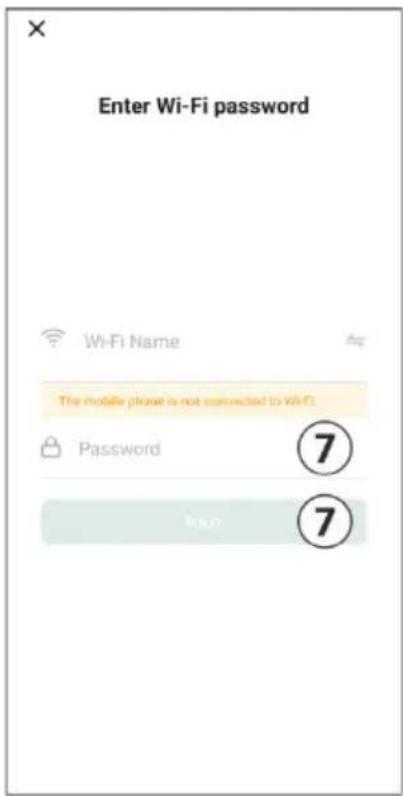
7 You will then be asked to enter the Wi-Fi network. When the location service is enabled, the network to which the smartphone is connected is automatically filled in and only the password needs to be entered. Press "Next".
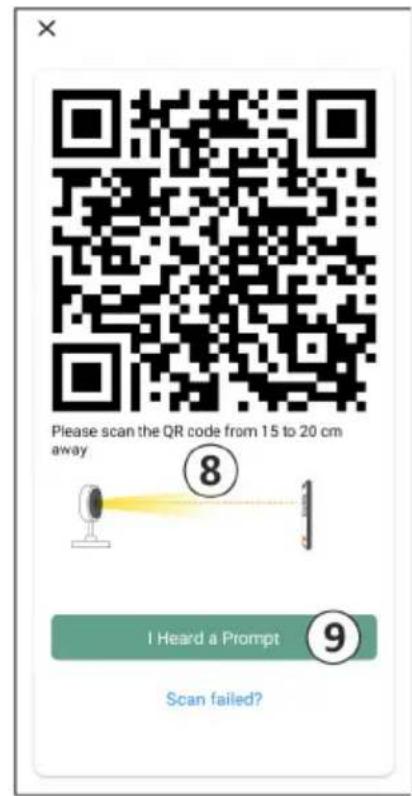
8 A QR code will appear on the smartphone. Hold this QR code approx. 20cm in front of the camera lens so that the camera can read the QR code.
9 When "Scan succeeded" is heard, you can press "Scan successful" in the app.
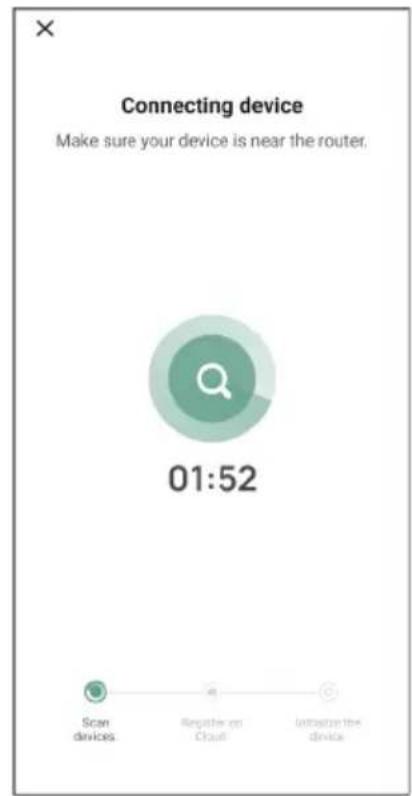
10 The camera is automatically registered on the server and added to the app. You will automatically see when the camera has been added. Optionally, change the name, if desired. This can be adjusted at a later time. Press "Continue".
11 The camera will be active on the monitor again and the night light will continue to flash.
12 The camera is added when the camera's light is turned off and will immediately show live images.
If, for some reason, you have not been able to connect the camera to your smartphone and then the app to your network, start again at this chapter. Unplug the power from the camera and plug it back in. Pay attention to the following points:
You must have a 2.4GHz Wi-Fi signal. A combined Wi-Fi band with both 2.4 and 5GHz will also work in most cases.
Make sure the lens of the camera is clean when the QR code is scanned.
Make sure you have a high-quality Wi-Fi signal.
Make sure Location Services is turned on.
Make sure the camera and the smartphone are near the router.
Make sure that there is no large distance between the smartphone and the camera.
- If all of the above doesn't work, we recommend creating a separate 2.4GHz guest network. This is a bare connection and the installation often works on such a signal.
3.4 Add multiple users
It is possible to use the app on multiple phones by logging in with the account where the camera is installed.
- Please note! The quality and speed of the image may decrease when the image from the camera is viewed by multiple users at the same time.
Another option is to share the camera with another account. To do this, the user with whom the camera is shared must also create an account. You can share the device in the camera's settings (Section 3.6.4 - Share device).
The second user will have fewer rights than the main user. This way, no adjustments can be made by the person the camera is shared with. This is useful when, for example, you want to grant someone temporary access to the camera.
3.5 Receive notifications
To receive notifications on the phone, notifications must be enabled on your phone and all permissions must be accepted. Activate the permissions as yet, or uninstall the app and reinstall so that you do now accept the permissions during installation.
For example, you can receive a notification if:
Sound Detection (VOX)
Temperature that is too high and too low
Camera offline
3.6 Explanation of the app
Below you will find an overview of the different functions and possibilities available in the app.
3.6.1 Home screen
When first opening the app, you will be directly greeted with the home screen of the app.

Personal Information
Customize the personal information of the created account, such as profile picture, username, and time zone. The ELRO logo is a standard profile picture.

Add
Use this button to add a new device. This can also be done by using the large button with the text Add device when no camera has been added to the app yet.

Device display
Change the display of all added devices. Tap it to switch. The icon changes to . Tap again to change back. Once a camera is added, you can view and use the following features.

Play
Tap to watch the live view of the camera.

Open live view
View the live view of the camera on a larger screen and use all its functions. Pressing the camera icon under 'All devices' will take you to the same screen. See section 3.6.2 and 3.6.3 for further explanation on the functionalities.

Notifications
See all the recent notifications activated by the camera. Press "All" to view and filter specific moments.

Manual recording
Tap this and a recording will be made. Tap again to stop and save the recording. The video is saved locally in the app and in the gallery. This feature therefore uses the smartphone's memory.

Screenshot
Tap this to take a photo. The photo video is saved locally in the app and in the gallery. This feature therefore uses the smartphone's memory.

Settings
Go to the camera settings. See 3.6.4 for more information on camera settings.
All devices
See all paired devices. Tap the device to open and press and hold the device to delete. From List View to Grid View and flipped, change from List View to Grid View. Furthermore, 'Device management' allows you to change the order of cameras and remove cameras from the app.
Pressing 'Profile' will take you to the overview of your account.

Settings
Go to the app settings. See 3.6.5 for more information on app settings.

Personal Information
Customize the personal information of the created account, such as profile picture, username, and time zone. The ELRO logo is a standard profile picture.
Notifications
Open the app's notification center where you can see all notifications.
1. Alarm
- Here you will find the notifications activated by the VOX mode or the temperature alarm.
2. Device
Here you will find information on when a device is removed from the app.
3. Bulletin
- When a user logs in with your account on another device, the notification about this will appear in this overview. A notification of a device reset can also be found here.
4. Notification settings
- Enable/disable notifications by category.
- For the 'Alarm' category, a 'Do not disturb' schedule can be set. This means that no notifications are transmitted to the smartphone between the specified times.

FAQ & Feedback
Overview of frequently asked questions about the app and about the baby monitor. If you have a complaint, we recommend always contacting our customer service team at info@elro.eu. You will be helped fastest by doing so.
3.6.2 Control panel of camera

Functions
Tap this and the menu with all the functions of the camera will be displayed.
Press to close the menu.

Full screen mode
The image is tilted 90 degrees, filling the entire screen of the smartphone.

Screenshot
Tap to take a photo. The photo is stored locally in the app and in your gallery. Therefore, using the smartphone's memory in this way.

Talk-One-way communication
Tap and hold. For example, you can speak through the microphone of the smartphone and you will be heard from the camera. When the Talk Mode / Two-Way Talk setting (see 3.4.6) is set, the icon will change to a phone symbol. In that case, there is no need to hold down the talk button and you will be able to speak in a similar way to a phone call.

Manual Recording
Tap this and a recording will be made. Press the recording again to stop and save. The video is stored locally in the app and in your gallery. Therefore, using the smartphone's memory in this way.

Quality
Sets the image quality, tap to change to HD and SD. This affects the images and photos that are recorded and may affect the memory of the smartphone.
Full High Definition = 1920 × 1080
Standard Definition = 640 × 360

Temperature display
Indicates the current temperature in the room where the camera is located.

Volume muted
Tap this and the volume will turn on. Press again to mute the volume again.

Fill screen
Make the screen full, without tilting the image. Please note! A part of the image of the camera will be lost.

Quality of connection
Displays signal quality between the camera and the app.
Note! You can zoom the view of the camera in and out by swiping two fingers across the screen from the inside to the outside and vice versa. It works in a similar way to when you want to zoom a picture on your smartphone.
3.6.3 Function overview

Gallery
View all photos and recordings stored locally in the app.

Theme color
Change the app's theme to Light or Dark.

Camera volume
Adjust the volume of the camera. Choice of 1 to 10.

VOX
Enable and the camera will send notifications when sound is detected. The icon will turn green when the function is enabled. Further settings can be set via the advanced settings described in section 3.6.4.

Temperature
Change the temperature display. Choice of Celcius (^) or Fahrenheit (^) . In addition, a notification can be set when the room reaches a temperature that is too high or too low. This alerts you when the room is too hot or too cold, so that action can be taken.

Night light
Turn on the camera's night light manually or set a time schedule for when you want the light to come on automatically.

Lullabies
- Choose whether to play song once, play continuously or switch between songs.
- Playback control: Play the song or skip to the next/previousong.
- Lullaby list
- Lullaby volume. Choice of 1 to 10.

Management Function Buttons
See all features and shortcuts.

Notifications
View all recent notifications detected by the camera. In addition, you can view all notifications from a specific day and delete notifications.

PTZ
Use this function to manually steer the camera. Let the camera look at different locations in the room. You can zoom in by magnifying/pinching the screen with your fingers.

Functions
Open the menu to view, enable, or disable all features.
3.6.4 Camera settings
Press at the top right to go to settings.
- Name/Icon: press to change the name and/or icon of the camera.
- Device information: here you will find information about the IP address of the camera, the unique ID of the camera and the time zone where this camera is located.
- Functions: under functions, you can rotate the image of the camera when it is mounted upside down. Furthermore, you can switch the talk mode as explained in section 3.6.2 under 'Talk'.
- Brightness: adjust the brightness of the video image of the camera. Useful when the camera is placed in a naturally bright or dark room.
- Camera volume: adjust the volume of the camera's speaker. Choose from 1 to 10.
- VOX settings: adjust the settings for the sound detection.
a. Activate sound detection.
b. Sensitivity of the VOX
c. Create a schedule when the VOX should be active. If no schedule is created, the VOX is always active.
d. Select the minimum interval between notifications you could receive in the app.
- Offline notification: receive a notification when the camera has lost it's connection to the internet.
- FAQ & Feedback: Overview of frequently asked questions about the app and about the baby monitor. If you have a complaint, we recommend always contacting our customer service team at info@elro.eu. You will be helped fastest by doing so.
- Share device: share the device with other users. See chapter 3.4 for further explanation.
- Add to home screen: add a shortcut to the home screen of your smartphone, so you can directly view the camera image without opening the app.
- Device update: check whether any updates are available. If they are available, you can download and install them from here. It is possible to have these updates installed automatically. Please note! We always recommend installing the latest firmware version to ensure system security.
- Restart device: reboot the camera.
- Remove device: remove the camera from your account.
3.6.5 App settings
Below is an overview of the app's settings. You can navigate to the settings by pressing the cogwheel in the 'profile' tab, top right.
-
Personal information: set your profile picture, name and time zone.
-
Account and security: adjust account and security settings.
a. Region: display region to which the account is connected.
b. Email address: display current mail address. Adjust mail address if necessary.
c. Change password: reset the password of your account.
d. Pattern code: enable a pattern code for the app. Each time the app is reopened, the code should be entered for app security purposes.
e. Change pattern code: adjust the current set pattern code.
f. User code: unique code linked to your account.
g. Delete account: permanently disable your account.
- Device update: check whether any updates are available. If they are available, you can download and install them from here. It is possible to have these updates installed automatically. Please note! We always recommend installing the latest firmware version to ensure system security.
- Sound: not applicable
- Notification settings: see heading 'Notifications' in chapter 3.6.1 for further explanation.
- Temperature unit: select the temperature unit of the camera temperature display.
- Language: the language in the app is the same as the language set on the smartphone.
- Other features: not applicable.
- About: information about the app.
- Privacy settings: Set your preferences regarding the processing of personal data. In addition, you can manage the various permissions in this menu.
- Privacy policy management: overview of 'Privacy policy' and 'User agreement'.
- Network diagnosis: if you experience problems with the network, you can run this diagnostic in order to solve the issues.
- Clear cache: delete temporary cache files. In case of an error message, we always recommend deleting the cache.
- Log out: log out of the app.
3.6.6 Multi-view
When two or more cameras have been added to the app, 'Multi-view' will become available for use. Tap to go to multi-view.
Control
Double-tap the screen to make the image larger. Swipe from left to right to go to the next camera. Long press and hold to go to the functionalities.

FAQ & Feedback
Open the help center for FAQ questions.

Close
Close the multi-view.
Live view
At the same time, you can watch the live images displayed by the cameras. You can tap and control each camera individually. Once you've selected a camera, the image will be outlined with a blue line. Then tap one of the functions below to control the selected camera.

PTZ
Use this function to manually steer the camera. Let the camera look at different locations in the room.
Channels
You can add multiple cameras to the app. Choose from 4, 9, or 16 channels to display.

Full screen mode
Ensures that all images are displayed larger and that all images on the smartphone are tilted.

Volume muted
Tap this and the volume will turn on. Press again to mute the volume again.

Screenshot
Tap this to take a photo. The photo is saved locally in the app and in the gallery. This function thus uses the smartphone's memory.

Talk-One-way communication
Tap and hold. For example, you can speak through the microphone of the smartphone and you will be heard from the camera. When the Talk Mode / Two-Way Talk setting (see 3.6.4) is set, the icon will change to a phone symbol. In that case, there is no need to hold down the talk button and you will be able to speak in a similar way to a phone call.

Manual recording
Tap this and a recording is made. Tap again to stop and save the recording. The video is saved locally in the app and in the gallery. So this function uses the smartphone's memory.

Settings
Not applicable for this type of camera.
3.7 Firmware updates
When a new firmware version is available, you will receive a notification in the app. In addition, it is possible to have the camera's firmware updated automatically. See chapter 3.6.4 for more information.
- Open the ELRO Baby Monitor app.
- Navigate to the camera's settings.
- At the bottom of the list, you'll find "Device Update"
- When a new version is available, you can install it.
We recommend that you always install the most recent version of the camera firmware to ensure the safety and operation of the camera.
4. Frequently Asked Questions (FAQ) and troubleshooting
Are you having problems with the installation? Check out www.elro.eu/faq to get a quick answer to your question. Here you will find the latest version of the manual, answers to frequently asked questions (FAQ) and detailed installation videos, among other things.
If you still experience problems connecting the baby monitor. Then look at our troubleshooting:
My camera is out of range.
- Make sure the monitor's antenna is unfolded when using the system. This will result in an increased range of the baby monitor.
- Check the location of the monitor and the camera to make sure they are in range of each other.
Metal, (thick) walls or other interfering signals will have a negative impact on the transmission range.
The camera doesn't connect to the app
You must have a 2.4GHz Wi-Fi signal. A combined Wi-Fi band with both 2.4 and 5GHz will also work in most cases.
Make sure the lens of the camera is clean when the QR code is scanned.
Make sure you have a high-quality Wi-Fi signal.
Make sure Location Services is turned on.
Make sure the camera and the smartphone are near the router.
Make sure that there is no large distance between the smartphone and the camera.
If all of the above doesn't work, we recommend creating a separate 2.4GHz guest network. This is a bare connection and the installation often works on such a signal.
Is my baby monitor safe?
- Yes, the baby monitor uses FHSS. This means that the frequency jumps every few seconds, making it difficult for an external party to pick up this signal.
It is only possible to install the baby monitor in the app when you have the camera in your hand. This makes it impossible for outsiders to pair the camera.
How do I reset the camera?
- You can reset the camera by pressing and holding the 'Pair' button on the bottom of the camera, until the camera indicates 'Reset successful'.
No sound is detected by the camera.
- If VOX mode is not activated when detecting sound, you can try setting the sensitivity to 'High'. Sound will then be detected at a lower threshold.
How many cameras can be connected to the monitor and the app?
- You can pair up to two cameras with the monitor. In the app, however, you can add up to 16 cameras. The images can thereby be viewed simultaneously.
5. Technical Specifications
| System | |
| Frequency | 2.4 GHz PWiFi + WiFi dual mode technology |
| Transmitting power | 15+/-1dBm (Wi-Fi) |
| RX Sensitivity | -89dBm (Wi-Fi) |
| Dissemination | FHSS, Wi-Fi |
| Modulation | GFSK, 802.11g/n | GFSK, 802.11g/n |
| Data Rate | Wi-Fi (802.11b/g/n), Wi-Fi (802.11b/g/n) |
| Wireless Range | 300 m open range (camera to monitor). |
| Camera | |
| Image sensor type | 1/2.9" Colour CMOS Image Sensor |
| Effective pixel | 1920 (H) x 1080 (V) |
| Resolution | High max. 1.7 Mbps (10fps@1920*1080) Low max. 0.7 Mbps (10fps@640*360) |
| Lens | 3.6mm F2.2 |
| Viewing angle (diagonal) | 87° (H), 45° (V), 94° (FOV) |
| IR LED / night vision range | 5m 940nm |
| Adapter | 5V DC 1A |
| Operating Temperature | -10~40°C, -10~40°C |
| Monitor | |
| LCD Format | 5"/12.7 cm touch screen |
| LCD Resolution | 720P RGB |
| Adapter | 5 V DC 1A |
| Operating Temperature | -10 ~ 40 °C / 14 °F ~ 104 °F |
| Humidity | 0% ~ 85% |
| Rechargeable lithium battery | 3.7V/2800mAh |
6. Safety & Compliance
Warnings
- Choking hazard: Keep connecting cords and small parts out of the reach of children.
- Do not place camera and connecting cords within a distance of 1.5 meters from the crib/playpen.
-
Never use extension cables in combination with AC adapters, only use the supplied AC adapters.
Adults required in assembly/installation.
This product is not intended to be a substitute for proper supervision of children. You need to monitor your child's activities regularly because this product will not alert the parents about silent activities of a child. -
Read and follow all instructions/warnings in this instruction manual before using this product.
This product is not water-resistant and is only suitable for indoor use. Clean the product only with a dry cloth.
This product is not intended for use as a medical monitor, and its use should not replace adult supervision.
The camera detects normal sound levels within a range of 2 to 3 meters from a child. If the child moves outside of this range, the camera may not be able to detect sounds coming from him or her.
It is essential that you check the operation during the initial installation and regularly thereafter. - Check receipt regularly. Test the monitor before use and after changing the location of the camera.
The body of the camera and monitor must not be opened. - To prevent overheating, keep the product and AC adapters away from direct sunlight and heat sources such as radiators, stoves, cooking appliances (e.g., stoves and ovens), and other appliances that produce heat (e.g., amplifiers, televisions, and stereos).
- Ensure proper ventilation of the product during use. Avoid contact with cushions and furniture that may block ventilation.
Use only the AC adapters supplied with the product, as other adapters may damage the product. - Connect the adapters to the standard household power (100~240 volts AC) only.
- Insert the AC adapters, avoiding pinch points to avoid damage.
- Do not touch the exposed end of the AC adapter's power cord when it is plugged in.
Images and sounds are transmitted by the product over the public airwaves and can be picked up by other devices.
Although the transmission distance is 100m or more (open space), it may vary depending on obstacles present between camera and monitor. - Caution: If you are using the system to watch a young child, do not place the camera where the child can reach the camera.
- If the monitor is only used with the battery and it is low, this may affect the image and/or sound. Plug in the AC adapter, the battery will then charge automatically.
- The transmission range of the wireless signal may be weakened if there are heavy obstacles such as a concrete, brick, or metal wall between the camera and the monitor, or if there are several Wi-Fi routers and devices in your area.
- To avoid interference with the RF signal, keep your mobile phone at least 1 meter away from the camera and the monitor.
- Risk of explosion if the battery is replaced by an incorrect type.
- Dispose of used batteries according to the instructions.
Simplified EU Declaration of Conformity
I, ELRO Europe, hereby declare that the radio equipment type BC4000 Baby Monitor Royale is in compliance with Directive 2014/53/EU. The full text of the EU declaration of conformity can be found at the following internet address: www.elro.eu/doc
Symbols

The WEEE symbol means that this product and its batteries must be disposed of separately from household waste. When this product reaches the end of its useful life, take it to a designated nearby waste collection point to ensure safe disposal or recycling. Protect the environment and public health and use natural resources responsibly!

By affixing the CE marking to a product, a manufacturer declares that the product meets all legal requirements for CE marking and can be sold throughout the EEA.

Visit www.elro.eu for the warranty terms and conditions of this product.
7. Service and contact
To ensure that we can serve our customers as well and as quickly as possible, we ask you to take the following into account:
For questions regarding the installation, use, or operation of this product:
- Go to www.elro.eu/faq to get a quick answer to your question. Here you will find answers to frequently asked questions, detailed installation videos and the latest version of the manual of this product, among other things.
- Can't figure it out via the website? Leave a question via the product page or mail to info@elro.eu. We will help you as soon as possible.
For all other questions:
- Send an e-mail to info@elro.eu. We will get back to you as soon as possible.
This product was produced by: ELRO Europe
P.O. Box 9607 - Box E8001006 GC AmsterdamNederlandwww.elro.eu
1. Eigenschaften
3. ELRO Babyphone App
1.4 Monitor symbolen single screen
3. ELRO Baby Monitor app
- EN - Content
- DE-Inhalt
- ELRO Baby Monitor app. 59
- Package Contents
- Camera Overview
- Monitor Overview
- Monitor symbols single screen
- Comments:
- Monitor symbols dual screen
- Get Started
- Pairing the Monitor and Camera
- Controls
- Menu page
- Split screen and automatic switching between camera images
- Split screen
- Automatic switching between camera images (SEQ)
- VOX mode
- Action:
- Battery management
- ELRO Baby Monitor app
- Register
- Log in
- Pairing Camera with Smartphone
- Add multiple users
- Receive notifications
- Explanation of the app
- Home screen
- Personal Information
- Add
- Device display
- Play
- Open live view
- Notifications
- Manual recording
- Screenshot
- Settings
- All devices
- Pressing 'Profile' will take you to the overview of your account.
- Alarm
- Device
- Bulletin
- Notification settings
- FAQ & Feedback
- Control panel of camera
- Functions
- Full screen mode
- Talk-One-way communication
- Quality
- Temperature display
- Volume muted
- Fill screen
- Quality of connection
- Function overview
- Gallery
- Theme color
- Camera volume
- VOX
- Temperature
- Night light
- Lullabies
- Management Function Buttons
- PTZ
- Camera settings
- App settings
- Multi-view
- Control
- Close
- Live view
- Channels
- Firmware updates
- Frequently Asked Questions (FAQ) and troubleshooting
- My camera is out of range.
- The camera doesn't connect to the app
- Is my baby monitor safe?
- How do I reset the camera?
- No sound is detected by the camera.
- How many cameras can be connected to the monitor and the app?
- Technical Specifications
- Safety & Compliance
- Warnings
- Simplified EU Declaration of Conformity
- Symbols
- Service and contact
- For all other questions:
- Eigenschaften
- ELRO Babyphone App
- Monitor symbolen single screen
Brand : ELRO
Model : BC4000
Category : Baby monitors