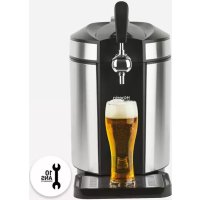
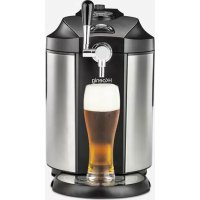
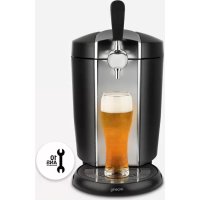
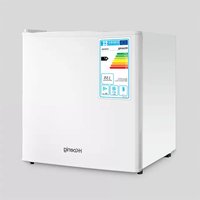
USER MANUAL BW1880 H.KOENIG
Draft beer dispenser
Tireuse à biere
Bierkühler
Bierkoeler
Erveza enfriador
Spillatore birra fredda
ENGLISH
Please read the instruction manual carefully before installing and operating, and keep it for future reference.
INTRODUCTION
This is a household beer cooler, equipped with a CO2 cartridge pressure system to keep the beer fresh. It brings the beer to the best temperature for cold storage (0 to 4^ ) within 19-21 hours.
The beer cooler will keep the 5L Keg cool for an almost indefinite period. We do, however, suggest that you initially cool your beer keg for at least 12 hours in your refrigerator before placing it into the beer cooler.
IMPORTANT SAFETY INSTRUCTION
We have provided many important safety messages in the instruction manual for the beer cooler.
Before use it, please read and obey all safety rules and operating instructions; and put the instruction manual in a safe place for future reference.
Safety Instruction
- Before use it, check whether the power cord is well connected or not; if not, please don't use it, and call service center;
-
If the supply cord is damaged, it must be replaced by the manufacturer or its service agent or a similarly qualified person in order to avoid a hazard.
-
Before use it, check whether the plug conform with the socket or not; if not, please don't use it, and call service center;
- Do not connect or disconnect the electric plug when your hands are wet.
- Place the beer cooler on a dry and horizontal surface.
- To ensure proper ventilation for the beer cooler, make sure the
beer cooler is at least 5 inches / 10cm away on either side so as to allow correct ventilation on the appliance.
Never put the beer cooler under the sunlight.
- Never cover the beer cooler when it is operating by some other object.
- The beer cooler must be installed in an area protected from the elements, such
wind, rain, water spray or drips.
- Before proceeding with cleaning and maintenance operation, make sure the power line of the unit is disconnected. Failure to do so can result in electric shock or death.
- Do not immerse the beer cooler or power plug in the water or other liquid.
- Do not use coarse cloth, abrasive stuff to clear the beer cooler
- Do not take beer keg out from the beer cooler if the beer is not drunk out completely.
- Do not take the CO2 cartridge off before the inside CO2 use out.
- Do not use the CO2 cartridge if the room temperature is over 49^ C / 120 ~F .
Failure to do so can result in explosion or death.
- Never allow children to operate, play with or crawl inside the beer cooler.
- This appliance may be used by persons with reduced physical, sensory or mental capabilities or lack of experience and knowledge provided they have received supervision or instruction in the safe use of the appliance and understand the hazards involved. Children should not play with the device.
- The appliance is not intended to be operated by an external timer or by a separate remote control system.
-
Your appliance has been designed for domestic use only. It is not intended for use in the following situations which are not covered by the warranty:
-
in staff kitchen areas in shops, offices and other professional environments,
-in farm hostels,
- by guests in hotels, motels and other residential environments,
- in bed and breakfast type environments.
-
If the power cord is damaged, it must be replaced with an after-sales service to avoid any danger.
-
The device must not be used if it has been dropped, it obvious signs of damage are visible or if it has leaks.
-
This appliance may be used by children of at least 8 years of age, as long as they are supervised and have been given instructions about using the appliance safely and are fully aware of the dangers involved.
-
Cleaning and maintenance should not be carried out by children unless they are at
least 8 years of age and are supervised by an adult.
- Keep the appliance and its power cord out of reach of children under 8 years of age
- When using electrical equipment, safety precautions must always be taken to prevent the risk of fire, electric shock and/or injury in the event of misuse.
- Make sure that the voltage rating on the type plate corresponds to your main voltage of your installation. If this is not the case, contact the dealer and do not connect the unit.
- Never leave the unit unattended while in operation.
- Please keep this document at hand and give it to the future owner in case of transfer of your device
HOW TO SELECT A KEG
-
Sealed 5L universal keg and Heineken keg applies only
-
Pay close attention to safety and storage messages about the keg / on the keg.
-
Check the keg is neither damaged nor beer out-of-date before purchasing.
-
Protect the top surface from being damaged. Otherwise it could be difficult of accession for the suction tube.
-
Keep the keg in a rather cold for 12 hours but not too cold place (e.g. refrigerator) until next use.
-
Never shake the keg before use
-
Never put the beer keg under the sunlight
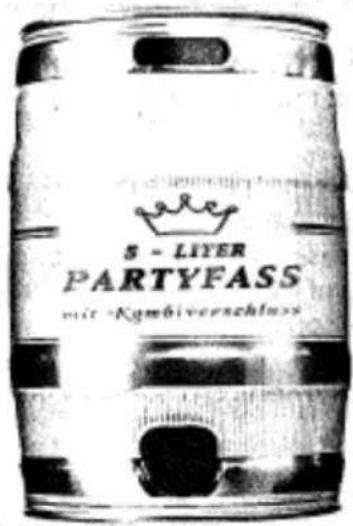
BEER KEG SEALANT
All 5 Liter beer keg with the below various appearance sealants can apply to the beer cooler, however, you should follow the information as below *The sealants with code No. 20 and 21 can be pierced simply by the cooler piercing pin.
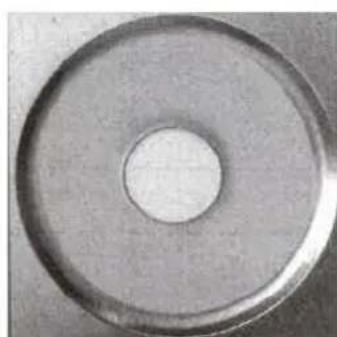
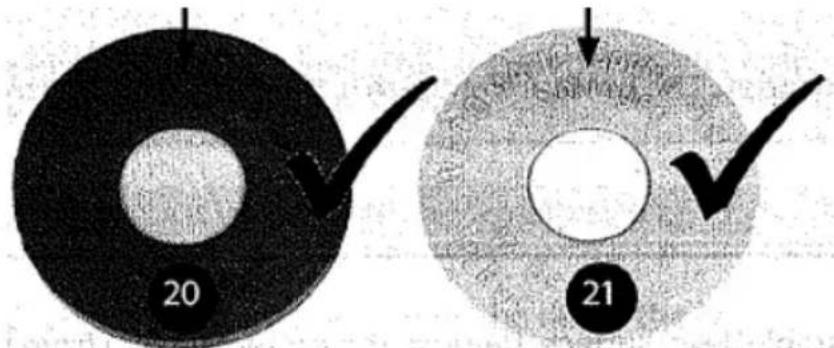
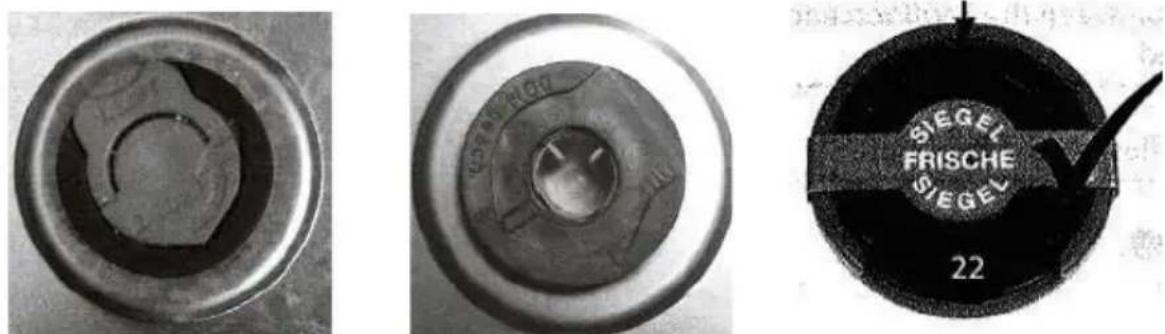
*The sealants with code No. 22 need to be removed off the marking ring from
the sealant and pierce the keg by cooler piercing pin.(Show as figure 1)
*The difference between code No 23 and 24 is the safety clasp quantity. Pull up the safety clasp carefully, turn around and take it out from the
keg; replaced it by the sealant (like code No 2 sealant) provided in the beer cooler, attach it to the beer keg, and pierce it by cooler piercing pin. (Show as Figure 3).
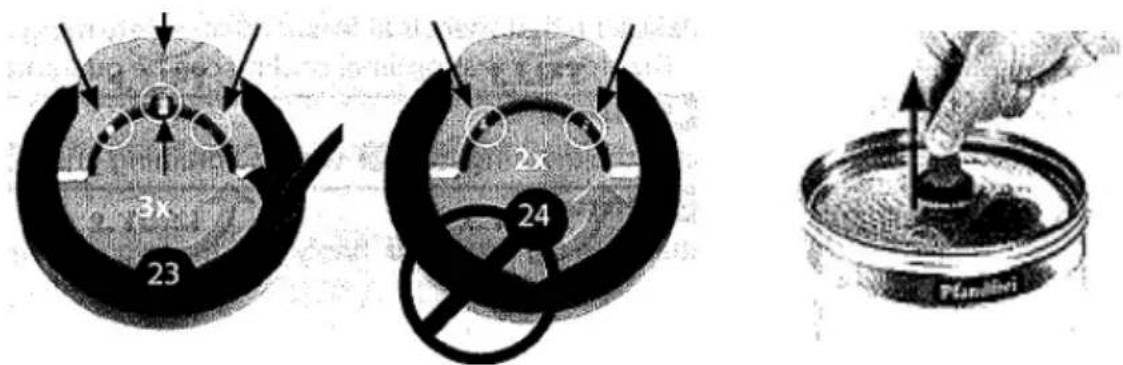
Figure 1
(Important: Before replacing the sealants or piercing the cooler kit, you must always follow the instructions marked on the keg to eliminate the excess gas and ensure that the keg has rested long enough to avoid foam coming out through the cooler piercing pin /tap faucet. And it is no need to release the gas and replace the seal rubber if you use Heineken keg, because Heineken keg has its own CO2 pressure inside, and no need to be provided from outer CO2 pressure system.

Figure 2
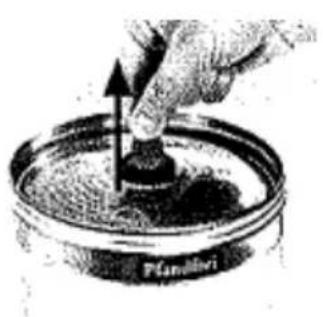
Figure 3
SPECIFICATIONS
| Item | Descriptions | Specification |
| 1 | Voltage | AC 220-240V/50Hz |
| 2 | Available capacity | 5-liter beer keg |
| 3 | Rated operating power | 65W |
| 4 | Cooling performance | 2~12°C adjustable
(room
temperature
22~24°C) |
| 5 | Noise level | ≤38dB(A); (ambient
noise ≤25dB(A)) |
| 6 | Dimensions | W272*D480*H470mm |
| 7 | Net weight | 6.4±0.3Kg |
| 8 | CO2 pressure out unit | √ |
| 9 | Stainless steel appearance | √ |
| 10 | Aluminum radiator system | √ |
| 11 | Semi-conductor cooling
technology | √ |
| 12 | Water conduction cooling
system | √ |
| 13 | LED display function | √ |
| 14 | Manual drainage outfit | √ |
| 15 | Detachable water drip tray | √ |
| 16 | Temperature adjustable | √ |
| 17 | Cool preservation system | PU insulation / Weight 310±5g |
| 18 | Climate type | N/SN |
PARTS & FEATURE
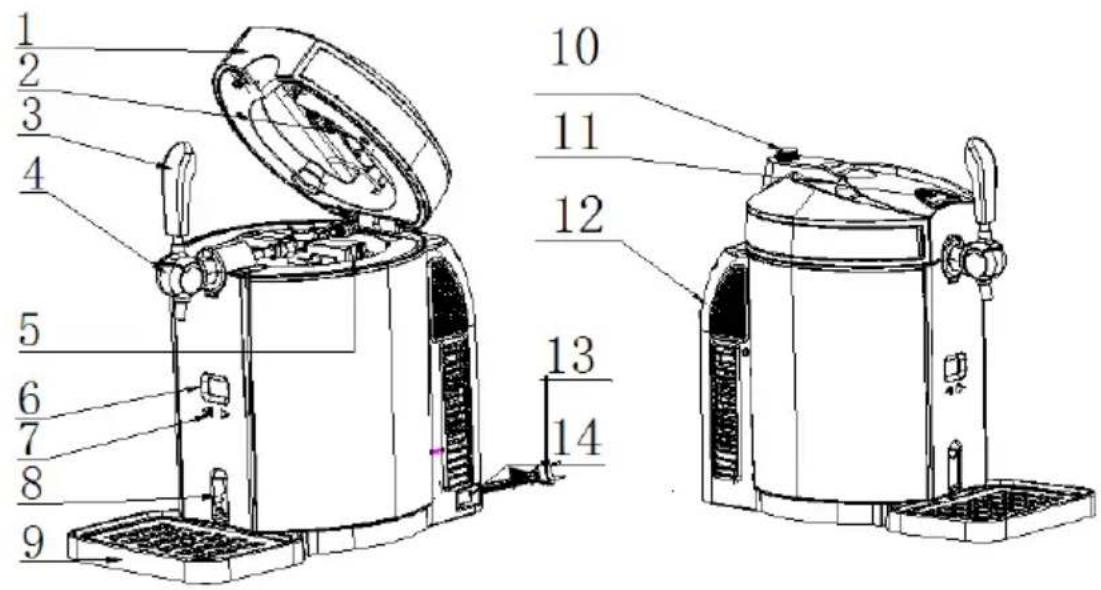
-
Top cover
-
Drain switch
-
CO2 cartridge sheath
-
Drip tray
-
Tap handle
-
CO2 pressure relief valve/ knob
-
Tap
-
Door lock button
-
Keg lifter
-
Rear cover
-
LED display
-
Power cord & plug
-
Digital control button
-
AC power switch
- Take out the beer cooler from its package. Place the beer cooler on a steady and horizontal surface, and make sure the beer cooler is at least 5 inches/10 cm away from other appliances or wall on each side so as to allow correct ventilation on the appliances, get better performance.
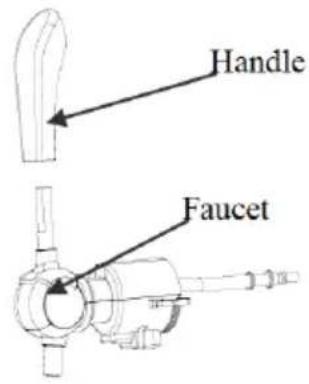
Figure 6
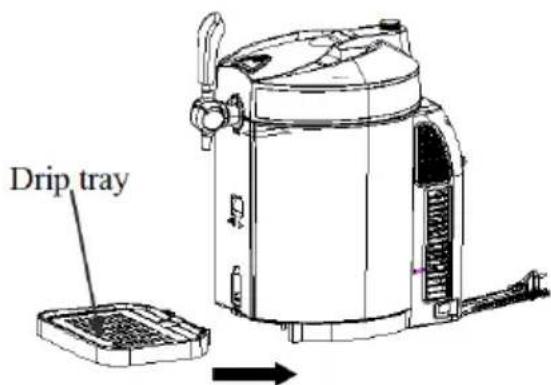
Figure 7
-
Install the tap handle connect the tap, make sure both end fit together perfectly. (Show as Figure 6)
-
Set the water drip tray into the notch provided. (Show as figure 7)
-
Plug the beer cooler.
Note: Do not connect or disconnect the electric plug when your hands are wet. Before use it, make sure the voltage is conformity with plug mark, and check whether the power cord is well connected or not; if not, please don't use it, and call service center;
- Put 800ml water into the cooling cavity or pour the water to the max mark (Show as figure 8) (It can work without water, but it can't display the best performance)
Note: Make sure the drain switch is at "Off" position, and no extra objects
in the cooling cavity.
The max water level line
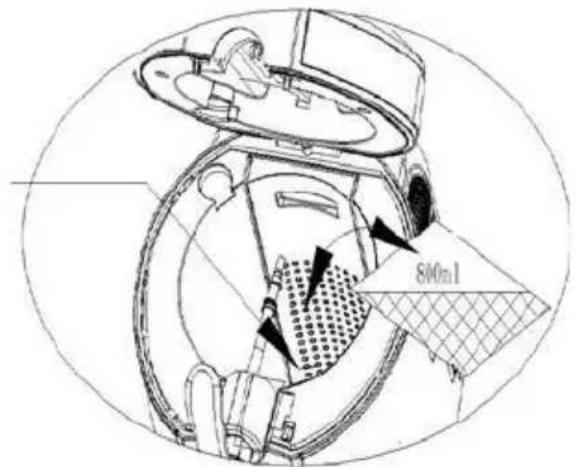
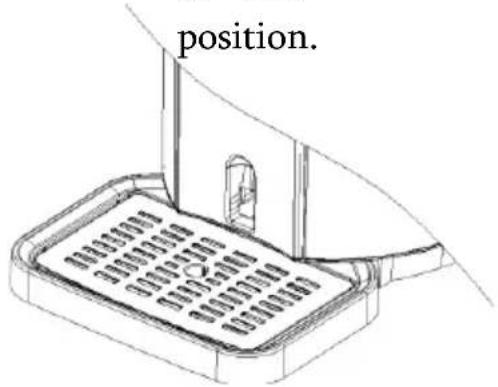
Figure 9 Figure 10
B. OPERATION
Universal 5L beer keg
-
Before piercing the plug on the top of the keg, you must always follow the instructions marked on the keg to eliminate the excess gas and ensure that the keg has rested long enough to avoid foam coming out through the tap faucet.
-
Uprightly direct the piercing pin against the sealant on the upper and then push the piercing pin all immerse in the keg quickly.
To assemble the tap mechanism until you hear a "Ka" sound that will indicate the tap mechanism fixes on the beer keg. (Show as figure 10)
Make sure the drain switch is at "OFF" position.
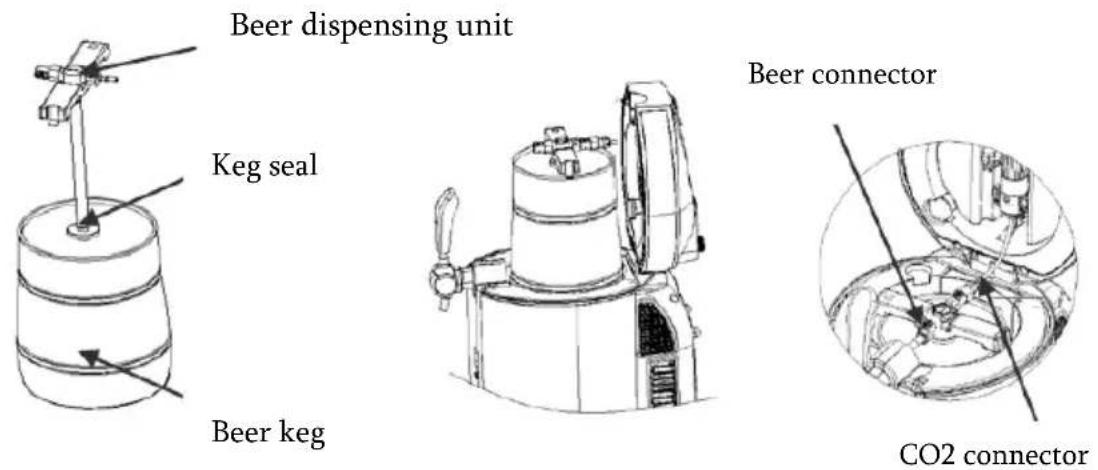
Figure 10 Figure 11 Figure 12
- Open the beer cooler with 60-80N strength and place the well-assembled keg into the cooling cavity; Connect the CO2 connector tube and beer outlet tube with the keg lifter tube connector.
NOTES: make sure all connection of tap mechanism is well connected, and without damage. And make sure tap valve is on close status, and the CO2 pressure regulator knob is at "Off" status.
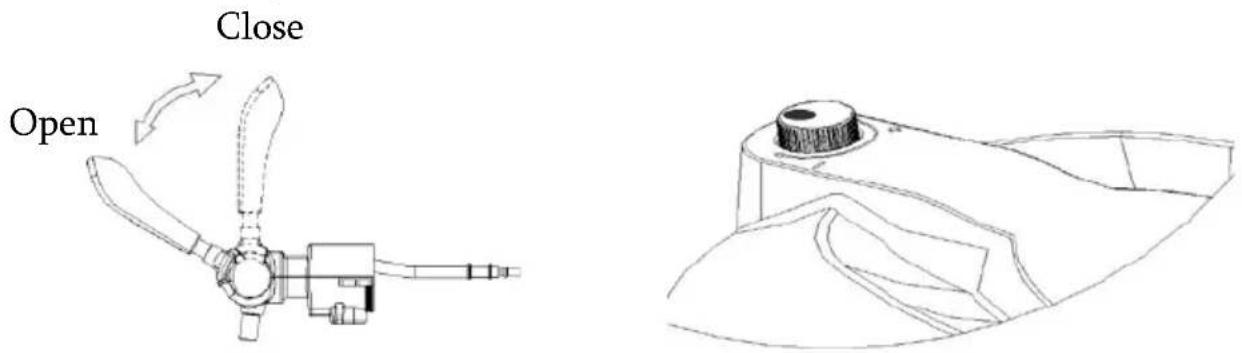
Figure 13 Figure 14
- Loosen the CO2 bottle sheath (Show as figure 15), insert a 16gram CO2 cartridge in the sheath (Figure 16), and screw the sheath tightly until you will hear a "Click"(Figure 17), which indicates that the cartridge seal has been pierced and the CO2 gas can flow into the keg freely. Make us the bottle sheath is fixed tightly to avoid the CO2 leakage. Then put CO2 bottle sheath into the top cover.
Do not excess 90^
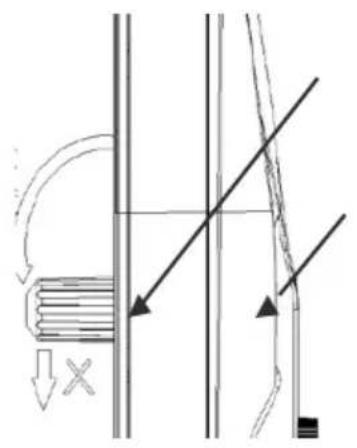
Figure 15
Figure16
Regulator assembly
Cover assembly
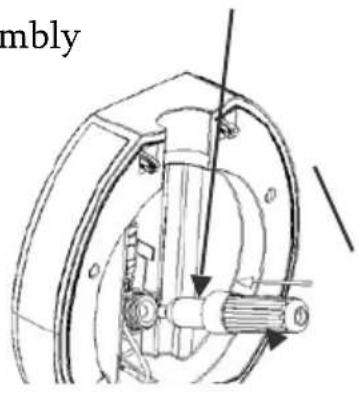
CO2 bottle sheath
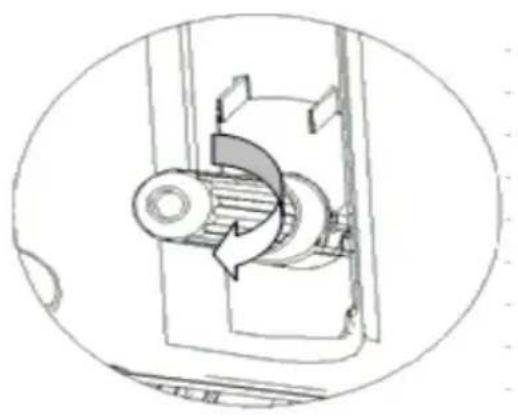
Figure 17 Figure 18
Notice:
*Turn off the C02 knob when cooling the beer
*Turn off the CO2 knob when the beer flow is paused
*Turn off the CO2 knob when changing the CO2 cartridge
When the beer cannot be tapped out (there is still beer in keg), or beer foams are not enough, turn the knob to +" position for 5 seconds, then turn off it again.
-
Close the top cover of the beer cooler; When pouring out the beer, the turn the knob on the top cover to “+” position to release the CO2, and turn it to “-”position when pause or stop pouring beer to close the CO2. Please refer to the notice label on the top cover.
-
Turn on the power switch to "T" position to power on the beer cooler. (While "0"position is to power off it).
NOTES: Please make sure your hands are dry when you operate the beer cooler, to avoid electric shock.

Figure 19
-
It will take 19-21 hours to cool the beer to 2 - 4^ at 22 - 24^ ambient temperature. And it can keep the temperature as set and displayed on the LED. We do, however, suggest that you initially cool your beer keg for at least 12 hours in your refrigerator before placing it into the beer cooler, especially when the ambient temperature is higher than 25^ .
-
You can set the temperature to fit your taste, by pressing the buttons on the front plate. The temperature can be set from 36^ to 54^ ( 2^ to 12^ ), using the temperature adjusting button (+ and -) located aside the temperature display.
The PCB has the memory function, when you power on the cooler, it memories the set temperate of last time.
The LED will default display the real temperature of beer. You can see the set temperature by pressing "+" button 1 second, it will display the set temperature, and 3 seconds later, it will recover and display the real temperature.
Preset Temperature
The beer cooler has 6 preset temperatures.
Press and hold “-” button, it enter the 6 preset temperatures, then you can press “-” button to choose a certain preset temperature, 40^ F (4°C), 46^ F (8°C), 48^ F (9°C), 50^ F (10°C), 52^ F (11°C) and 54^ F (12°C).
Press and hold “+” button, the unit can achieve conversion between
Fahrenheit and Celsius.
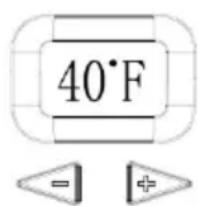
Figure 20
a. Adjust the CO2 pressure regulator knob to “+” position, to pour the beer out by pulling down the tap mechanism about 45^ , and you can adjust the pressure regulator knob to control the beer flow rate and beer bubble; (Figure 13)
Note: Clean the glass before pouring beer out; if the beer or beer cup/glass is in high temperature or the beer is not cool enough, there are many bubbles when pouring beer out;
b. When taping the beer, lean your beer glass against the pouring spout and slowly straighten it up with the beer rising, then open the tap mechanism completely to avoid much bubble; It is advisable to pour halfglass, make a short pause before continuing the rest. NOTES: Never immerse the pouring spout into the beer glass to avoid much bubble; Remember to lock the tap after finishing pouring.
c. It is normal to have more bubbles when pouring the first 3 cup of beer.
d. There will be a sharp and high-speed jet when pouring the last cup of beer from keg.
Please adjust the CO2 pressure regulation knob to “-” position to close the CO2 supplying and save the CO2.
9. Heineken Keg
Heineken kegs are pre-charged with CO2, and do not require the use of regulator, no need to install the CO2 cartridge. And the knob on the top cover does not work.
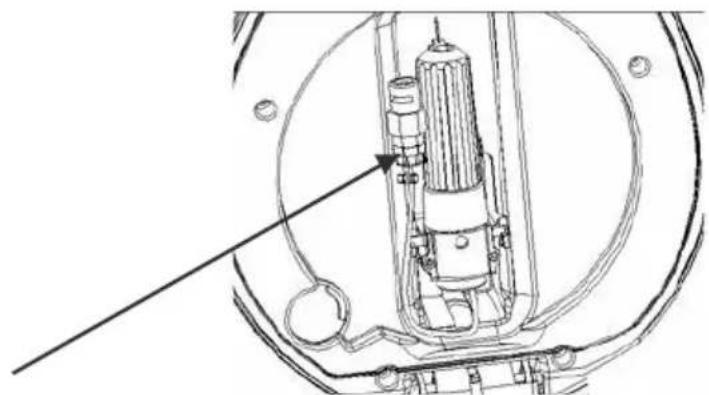
CO2 connector position
Figure 21
-
The Heineken connector that comes with your beer cooler can work with all Heineken 5 liter kegs. However you must use a flat head screwdriver to remove the green base from the keg in order to install the new connector, provided with the beer cooler.
-
When install the new connector to the Heineken keg, you must firstly install the clear beer tube one end to the connector, one end to the tap mechanism, then install the connector to the Heineken keg.

Figure 22
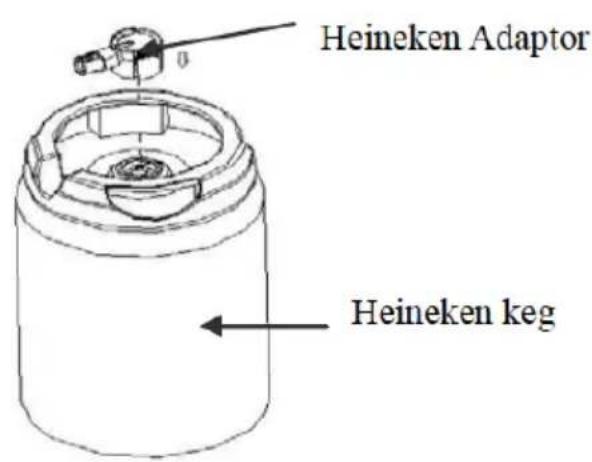
Figure 23
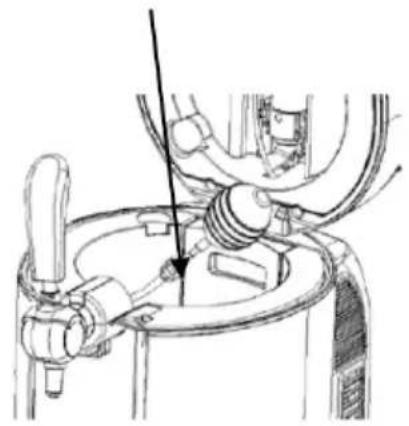
Note: Please take out the Heineken adaptor with collect ways, Press it according the arrow indication, or will damage the fastener
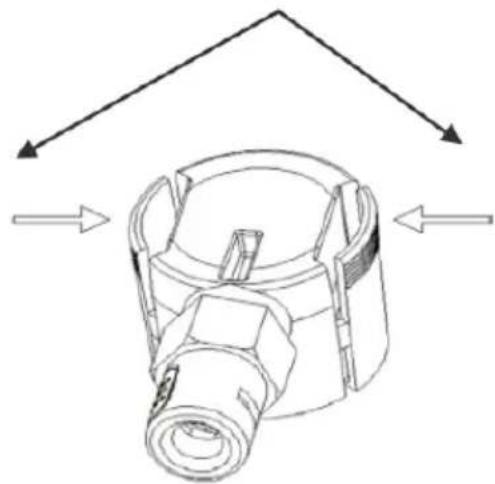
Figure 24
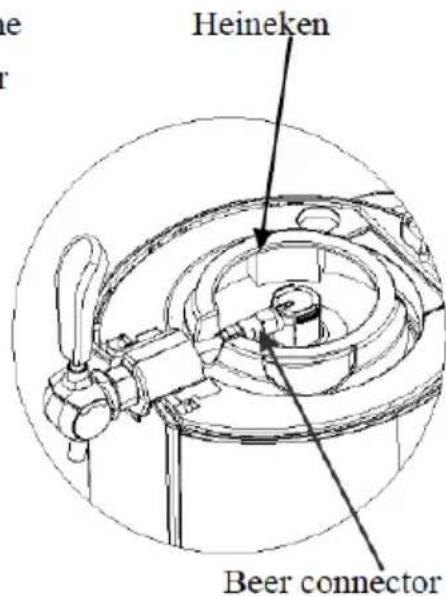
Figure 25
- Close the top cover; operate it as above step 6-12, as the universal 5 liter keg, but step 9 is exception.
10.TO CHAGE A NEW BEER KEG (5 liter universal keg)
When the beer in the keg runs out, before changing a new beer keg.
a. Adjust the CO2 pressure regulation knob to “-” switch to shut off the CO2 supplying and save the CO2.
b. Open the top cover of the beer cooler, pull down the tap handle to release the rest gas in the keg (maybe with some beer bubble).
c. Then put the piercing pin into the new keg and put into the beer cooler. Connect the gas-tube and beer tube from the keg lifter, by pressing the white parts of keg lifter.
d. Disconnect the gas-tube and beer tube from the keg lifter,
e. Take out the keg by the keg lifter, and pull out the piercing pin from
the keg.
f. It is recommended to clean the tap mechanism when changing the beer keg each time. Please refer to the below contents about cleaning.
11.TO CHAGE A NEW CO2 CARTRIDGE (No need for Heineken keg)
Please change the CO2 cartridge if can't pour beer out when the CO2 pressure knob is at "on" position and has beer in keg
- When turn the CO2 pressure knob to “-” position, to close the CO2 supplying.
- Open the top cover, loose the cartridge sheath, and take out the empty CO2 cartridge.
Insert a new 16g CO2 cartridge in the sheath, and screw the sheath tightly until you will hear a "Click", which indicates that the cartridge seal has been pierced and the CO2 gas can flow into the keg freely. Make us the bottle sheath is fixed tightly to avoid the CO2 leakage. Then put CO2 bottle sheath into the top cover.
- Close the top cover of beer cooler;

When you take out the beer connector and CO2 connector, please press the white button down
Figure 26
Figure 27
- Turn the CO2 pressure knob to "+" position to turn on the CO2 supply, and it is ready to pour beer out.
Reminder: each 16g CO2 cartridge can pressure more than 5L beer out;
Warning:
- Please use the qualified CO2 cartridge.
The below CO2 cartridge information for your reference. Never use Nitrogen gas cartridge in the beer cooler to avoid the explosion, because of its much higher pressure;
- New CO2 cartridge need good reserve, any play is forbidden, or will cause hazards.
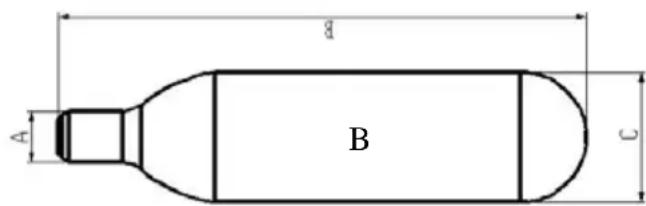
16g CO2 Cartridge
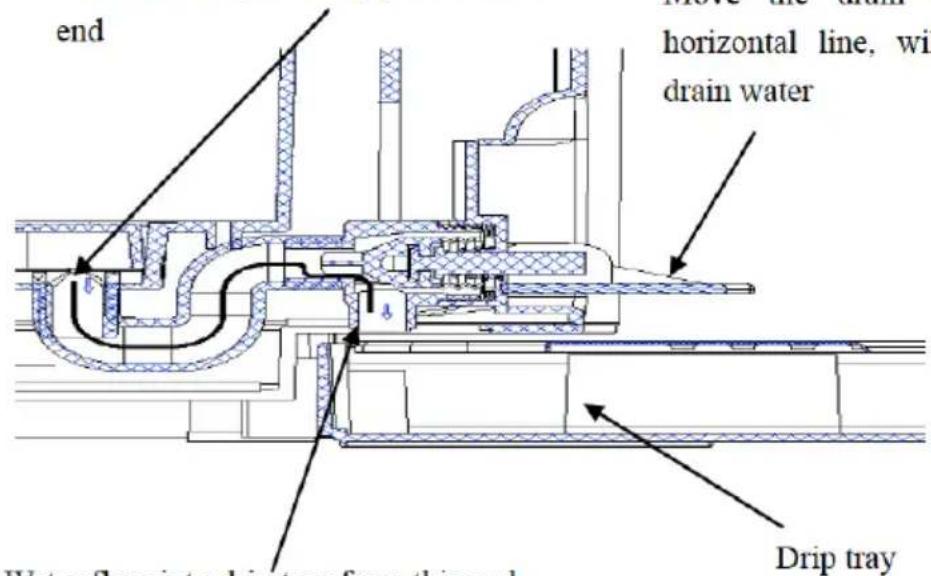
Open the drain switch, water flow into the S shape drainpipe from this end
Move the drain switch to horizontal line, will start to drain water
Water flow into drip tray from this end
| NWg | Volumeml | GWg | CartridgeWeightg | Amm | Bmm | Cmm | Dmm | PressureKgf/cm2 | Blastpressurebar |
| 15.5 | 20 | 57.0 | 42.0 | Ø8.6 | 88.0 | Ø21.7 | 10 | 60 | 450 |
| 16.5 | 58.6 | 42.6 | Ø8.9 | 89.0 | Ø22.0 | 11 |
12. REPLACE WATER INSIDE THE COOLING CAVITY
It is recommended replacing the water inside the cavity once each week. (No need to replace the water for each beer keg, one week one time recommended)
Figure 28(Sketch map of drain construction)
-
Open the drain switch to drain out the water from the cavity into the drip tray. Make sure the drip tray is fit into the notch to avoid water flow to the desk; the drip tray can load 450ml water;
-
After all water drain out, close the drain switch and put 800ml fresh water into the cavity.
-
Open the drain switch (drag the switch forward to 90 degree angle), and drain out the water inside the cavity to drip tray, and need twice to drain out the water..
Warning: 1) Clean water is necessary;
2) Make sure the drip tray is fit into the notch to avoid water flow to the desk;
3) The drip tray can load 400-500ml water;
CLEANING BEER TAP MECHANISAM
Beer cooler need conformity with hygienically demand, it need clean before the first use or for long time use, clean the whole machine with dry cloth. Otherwise two cleaning way is recommended as following:
-
Load the warm water into the cleaning kit.
-
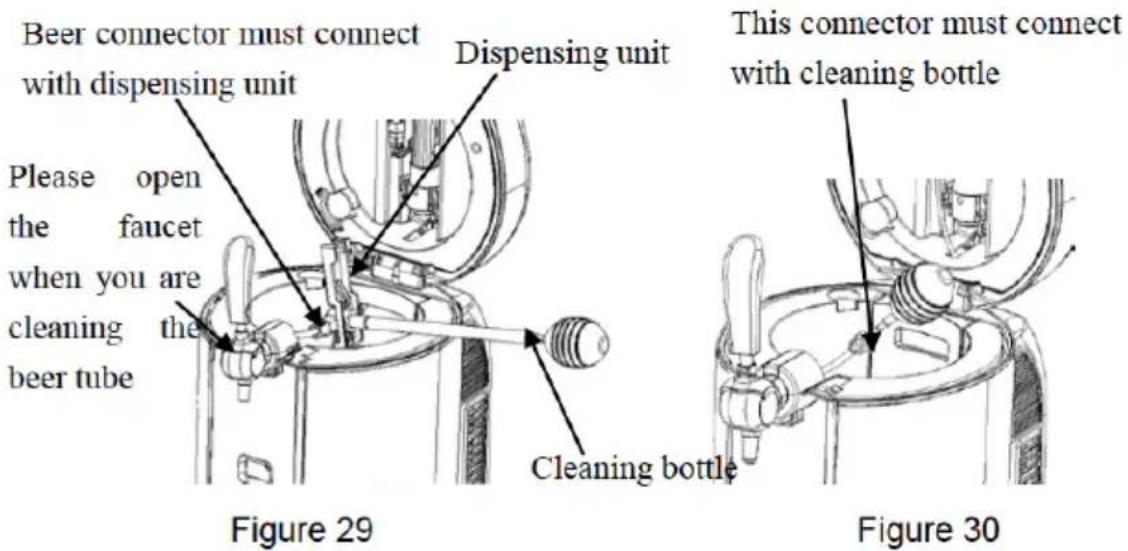
And connect the end of piercing pin, press the water into the pin to clean the pin tube, and push the water out from the beer tube at the other end. And repeat this cleaning work till the beer tube clean (need 3 bottles warm water at least), please clean the beer tap mechanism as figure 30. Note: Please disassemble the tap when make the cleaning.
(Show as figure 29)
Warning:
Never put the tap mechanism parts in the washing machine or dishwasher;
Never use the chemical cleaning detergent to clean the parts, warm or purified water is recommended.
TO CHANGE SPARE PARTS
ACCESSORIES INCLUDED WITH YOUR BEER COOLER
| Items | Name | Qty. | Installment | Picture | Spare parts |
| 1 | Connector seal | 3 | Regulator valve | | 2pcs |
| 2 | CO2 connector | 2 | Regulator valve | | 1pcs |
| 3 | Beer tube | 2 | Beer-out connector | | 1pcs |
| 4 | Tube seal circle | 4 | Beer-in pipe | | 3pcs |
| 5 | Keg seal | 2 | Standard tub | | 2pcs |
| 6 | Heineken adaptor | 3 | Heineken tub | | 3pcs |
| 7 | CO2 cartridge | 3 | Regulator valve assembly | | 3pcs |
| 8 | Cleaning pump | 1 | | | 1pcs |
A. Replace CO2 connector and seal washer
CO2 connector and seal washer maybe damaged when wrong usage or other reasons, please replace a new one.
- Firstly, pick out the seal washer with a tiny metal stick (Show as figure 31), and take out CO2 connector (if only replace the seal washer, this step can be cancelled). Be careful not damage other parts of regulator.
- Install a new CO2 connector in the regulator (leave the sharp end outside toward), and install the seal washer (Show as figure 32). Don't remove other parts of regulator in the replacing process.

Figure 31 Figure 32
Warning: Remember press the seal circle with empty cartridge instead of new cartridge, or will cause hazard.
Please replace the beer tube if beer tube is damaged and cause beer leakage.
- Pull down the locking of beer tube, and then draw out the tube.
- Screw out the joint nut of beer tube, and draw the tube out.
- Replace a new beer tube, and install the beer tube according with reverse procedure.
NOTES: Don't move other screws when processing tube replacement, otherwise, it may cause the beer leakage or gas leakage.
1) Turn the faucet to the state of releasing, and then open the cover to take out silicone tube.
2) Replace a new beer silicone tube, and install it according with reverse procedure. Cover Silicone tube
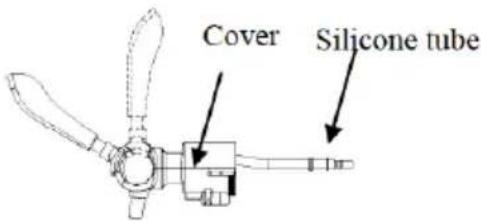
Figure 33
C. Replace the seal circle of beer tube (Show as figure 34)
Replace the new seal circle of beer tube if the connector has leakage
- Turn out the beer tube as indication of bellowing figure
- Take out the seal circle of beer tube
- Replace a new seal circle on same position
- Turn the seal circle tightly to avoid any leakage
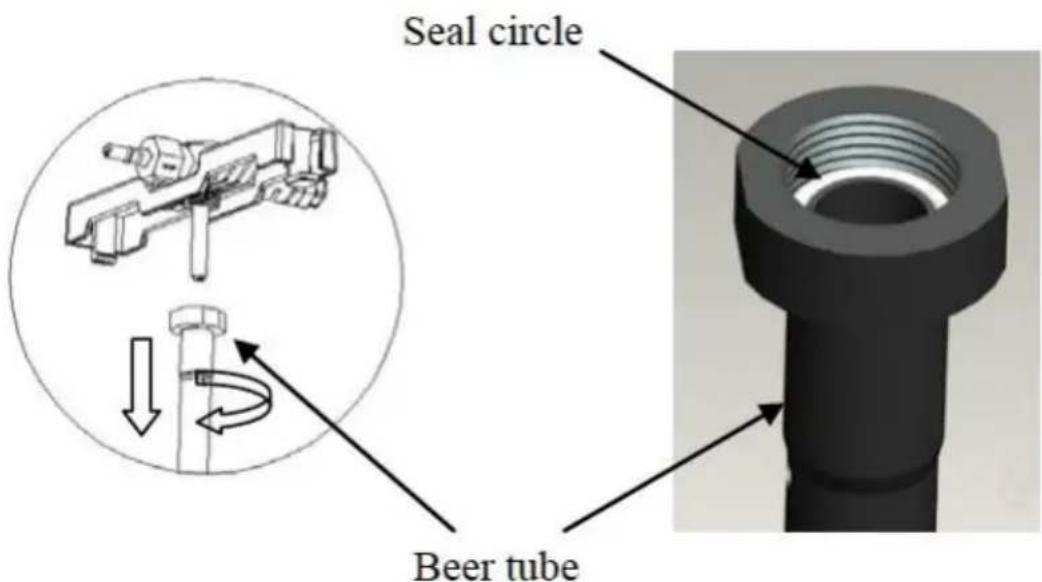
Figure 34
MAINTENANCE
If the beer cooler does not work properly, please call the service center; To save time and money, before you call for service, check the Troubleshooting Guide. It lists cause of minor operation problems that you can correct yourself.
| Trouble | Cause | Troubleshooting |
| The tap does not work / can't pour beer out | 1. The pouring tube is in poor connection or CO2 supplying is cut off2. No keg or no beer in the keg;3. No gas in the CO2 cartridge4. The CO2 pressure regulator knob is close | 1. Well connect the pouring tube and CO2 supplying2. Change a new keg3. Change a new CO2 cartridge4. Turn the CO2 pressure regulator knob on “+” position |
| Too much bubble pouring out | 1. Use a wrong way to pour beer out2. The beer temp is high (better at 3-5C)3. The keg is shaken before usage4. Almost no beer in the keg5. Too much pressure in the keg | 1. Use the right way to pour beer out2. Cool the beer down to 3-5C3. Put the beer keg aside a while till no bubble inside4. Change a new keg5. Adjust the pressure knob to “-” direction to decrease the pressure or close the knob |
| Beer flows out too slowly | 1. Inside CO2 pressure isn’t high enough2. The connection tube or pouring tube has leakage | 1. Adjust the pressure knob to release much CO2 pressure or replace a new one.2. Check whether the tube is leakage or not, if so replace the tube |
WARRANTY
The warranty period for our products is 2 years, unless otherwise stated, starting from the date of initial purchase or the date of delivery.
If you have any problems or questions, you can easily access our help pages, troubleshooting tips, FAQ, and user manuals on our service site: https://sav.hkoenig.com.
By typing the reference name of your device in the search bar, you can access all available online support, designed to best meet your needs.
If you still cannot find an answer to your question or problem, then click on "Did the answer solve your problem?" This will direct you to the Customer Support Request Form, which you can fill out to validate your request and get help.
WARRANTY CONDITIONS
The warranty covers all failures occurring under normal use, in accordance with the usage and specifications in the user's manual. This warranty does not apply to packaging or transportation problems during shipment of the product by the owner. It also does not include normal wear and tear of the product, nor maintenance or replacement of consumable parts.
EXCLUSION OF WARRANTY
-
Accessories and wearing parts (^*)
-
Normal maintenance of the device.
-
All breakdowns resulting from improper use (shocks, failure to comply with power supply recommendations, poor conditions of use, etc.), insufficient maintenance or misuse of the device, as well as the use of unsuitable accessories.
-
Damage of external origin: fire, water damage, electrical surge, etc.
-
Any equipment that has been disassembled, even partially, by persons other than those authorized to do so (notably the user).
-
The products whose serial number would be missing, deteriorated
or illegible that would not allow its identification.
- The products subjected to leasing, demonstration, or exhibition.
(*) Some parts of your device, called wear parts or consumables, deteriorate with time and frequency of use of your device. This wear and tear are normal but can be accentuated by poor conditions of use or maintenance of your device. These parts are therefore not covered by the warranty.
The accessories supplied with the device are also excluded from the warranty. They cannot be exchanged or refunded. However, some accessories can be purchased directly through our website: https://sav.hkoenig.com/.
ENVIRONMENT
CAUTION :
Do not dispose of this product as it has with other household products. There is a
separation of this waste product into communities, you will need to inform your local authorities about the places where you can return this product. In fact, electrical and electronic products contain hazardous substances that have harmful effects on the environment or human health and should be recycled. The symbol here indicates that electrical and electronic equipment should be chosen carefully, a wheeled waste container is marked with a cross.
Adeva SAS / H.Koenig Europe - 8 rue Marc Seguin, 77290 Mitry-Mory, France www.hkoenig.com - https://en.hkoenig.com - Tél: +33 164 67 00 05
CONDITIONS DE GARANTIE
Note: Please take out the Heineken adaptor with collect ways, Press it according the arrow indication, or will damage the fastener
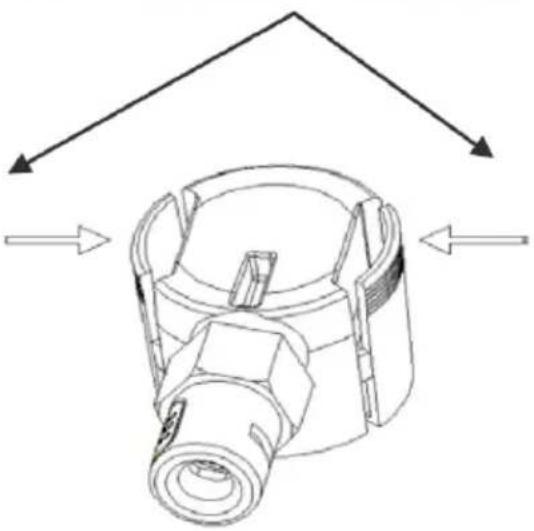
Figuur 24
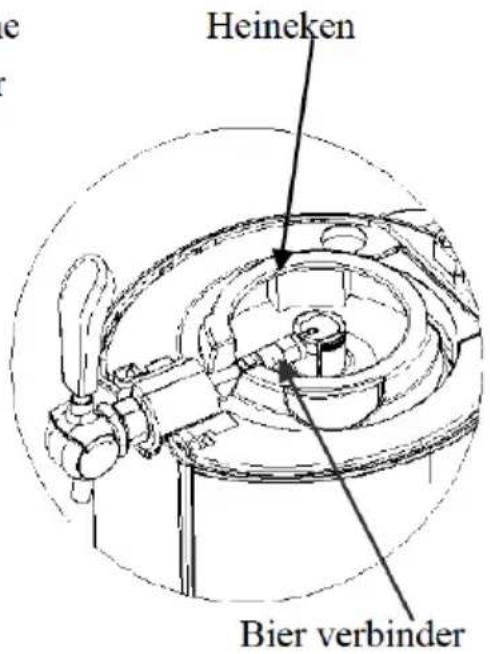
Figuur 25
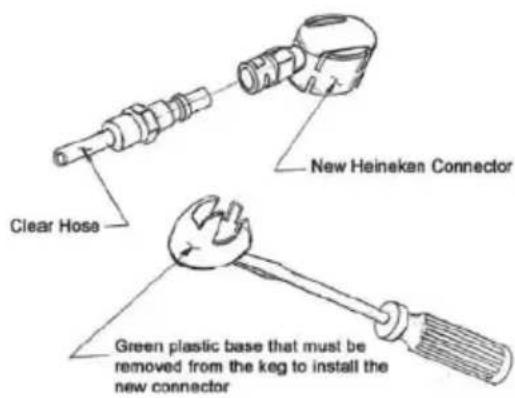
Figuur 22
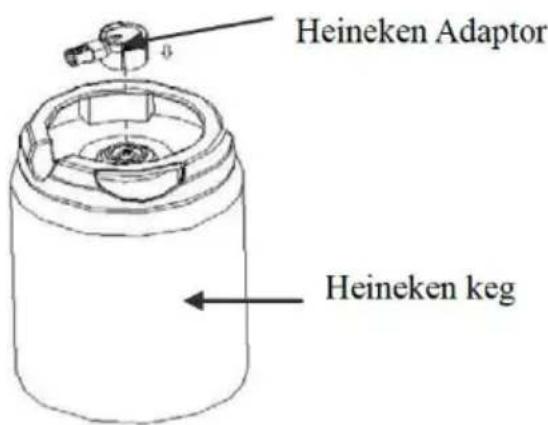
Figuur 23
SCHOONMAAK TAP MECHANISME
This verbinder must connect with Schoonmaak flesje
Figur 30
Waarschuwing: