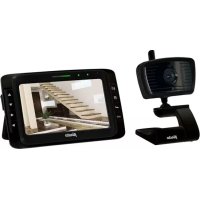
DVC255IP - Surveillance Camera ALECTO - Free user manual and instructions
Find the device manual for free DVC255IP ALECTO in PDF.
Frequently Asked Questions - DVC255IP ALECTO
User questions about DVC255IP ALECTO
0 question about this device. Answer the ones you know or ask your own.
Ask a new question about this device
Download the instructions for your Surveillance Camera in PDF format for free! Find your manual DVC255IP - ALECTO and take your electronic device back in hand. On this page are published all the documents necessary for the use of your device. DVC255IP by ALECTO.
USER MANUAL DVC255IP ALECTO
NL PRODUCTOMSCHRIJVING
Display Resolution 1280 x 960 Pixels (1300K Pixels, i.e. 1.3 Megapixel)
Lens 3.7 - 14.8mm
Mini. Illumination 0.5 Lux
Viewing Angle 90 Degree
Image Compression H.264
Image Frame Rate 30fps (VGA), 30fps (QVGA)
Resolution 1280x960 (VGA), 640x368 (VGA), 320x208 (QVGA)
Flip Mirror Images Vertical / Horizontal
Light Frequency 50Hz, 60Hz, Outdoor
Ethernet interface Build in 10/100Mbps, Auto MDI/MDIX, RJ-45
Supported Protocol TCP/IP, HTTP DNS DHCP PPPoE SMTP FTP SSL TFTP NTP ARP/RARP NFS RTSP RTP RTCP
Compress rate level 128Kbps~4Mbps
Wireless Standard IEEE 802.11b/g/n
Frequentie range 2412-2472 MHz
Transmitted power 19.27 dBm EIRP
Date Rate 802.11b: 11Mbps (max), 80211g: 54Mbps (max.), 802.11n: 150Mbps (max.)
Wireless Security WEP & WPA WPA2 Encryption
Pan/tilt Angle Horizontal: 355^ - Vertical: 120^
Infrared Light 36 IR LEDs, Night visibility up to 18 meters
TF/SD card Internal 8 GB
Power Supply DC 12 V/2.0A (adapter)
Power Consumption 7 Watts (Max.)
Operate Temper. 0^ 55^ C (14°F ~ 131°F)
Operating Humidity 20% 85% non-condensing
Storage Temper. -10^ 60^ (14°F ~ 140°F)
Operating Humidity 0% 90% non-condensing
Certification CE, FCC, RoHS
GARANTIE
FR ESSCRIPTION DU PRODUIT
Débit image 30fps (VGA), 30fps (QVGA)
Résolution 1280x960 (VGA), 640x368 (VGA),
320x208 (QVGA)
Images inverse Vertical / Horizontal
Certification CE, FCC, RoHS
GARANTIE
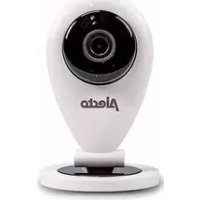
This Alecto IP camera is a security monitor, suitable for both indoor and outdoor use. The camera is splash proof and should be installed where it's not fully exposed to rain. The device is often used for monitoring a garden or garage, but also for observing babies and small children or pets.
The camera transmits its signal to your internet modem via UTP cable or Wi-Fi. Using a tablet or smartphone you can view the camera images and rotate the lens by swiping over the screen.
Thanks to our Real Plug & Play system and the UID code (Unique IDentification) it's very easy to establish a connection with the camera via our app. This app is available for iOS and Android and can be downloaded via the App Store or Play Store. Refer to the user's manual of the AlectoCam app for a quick registration and/or additional information (www.alectosecurity.com). After the initial setup, you can also view the camera images via the GSM internet or external Wi-Fi connections.
The camera is provided with night lighting for a clear view of any objects within 5 meters from the camera in a dark environment. Because this night lighting consists of infra-red lights, people cannot see it but it's sufficient for the camera to show clear images. However, these images are of course in black/white.
When everything is working properly, you should first change your password. The default factory password is not unique, which would allow others to use your UID code and gain unauthorised access to your camera.
2 REGISTRATION
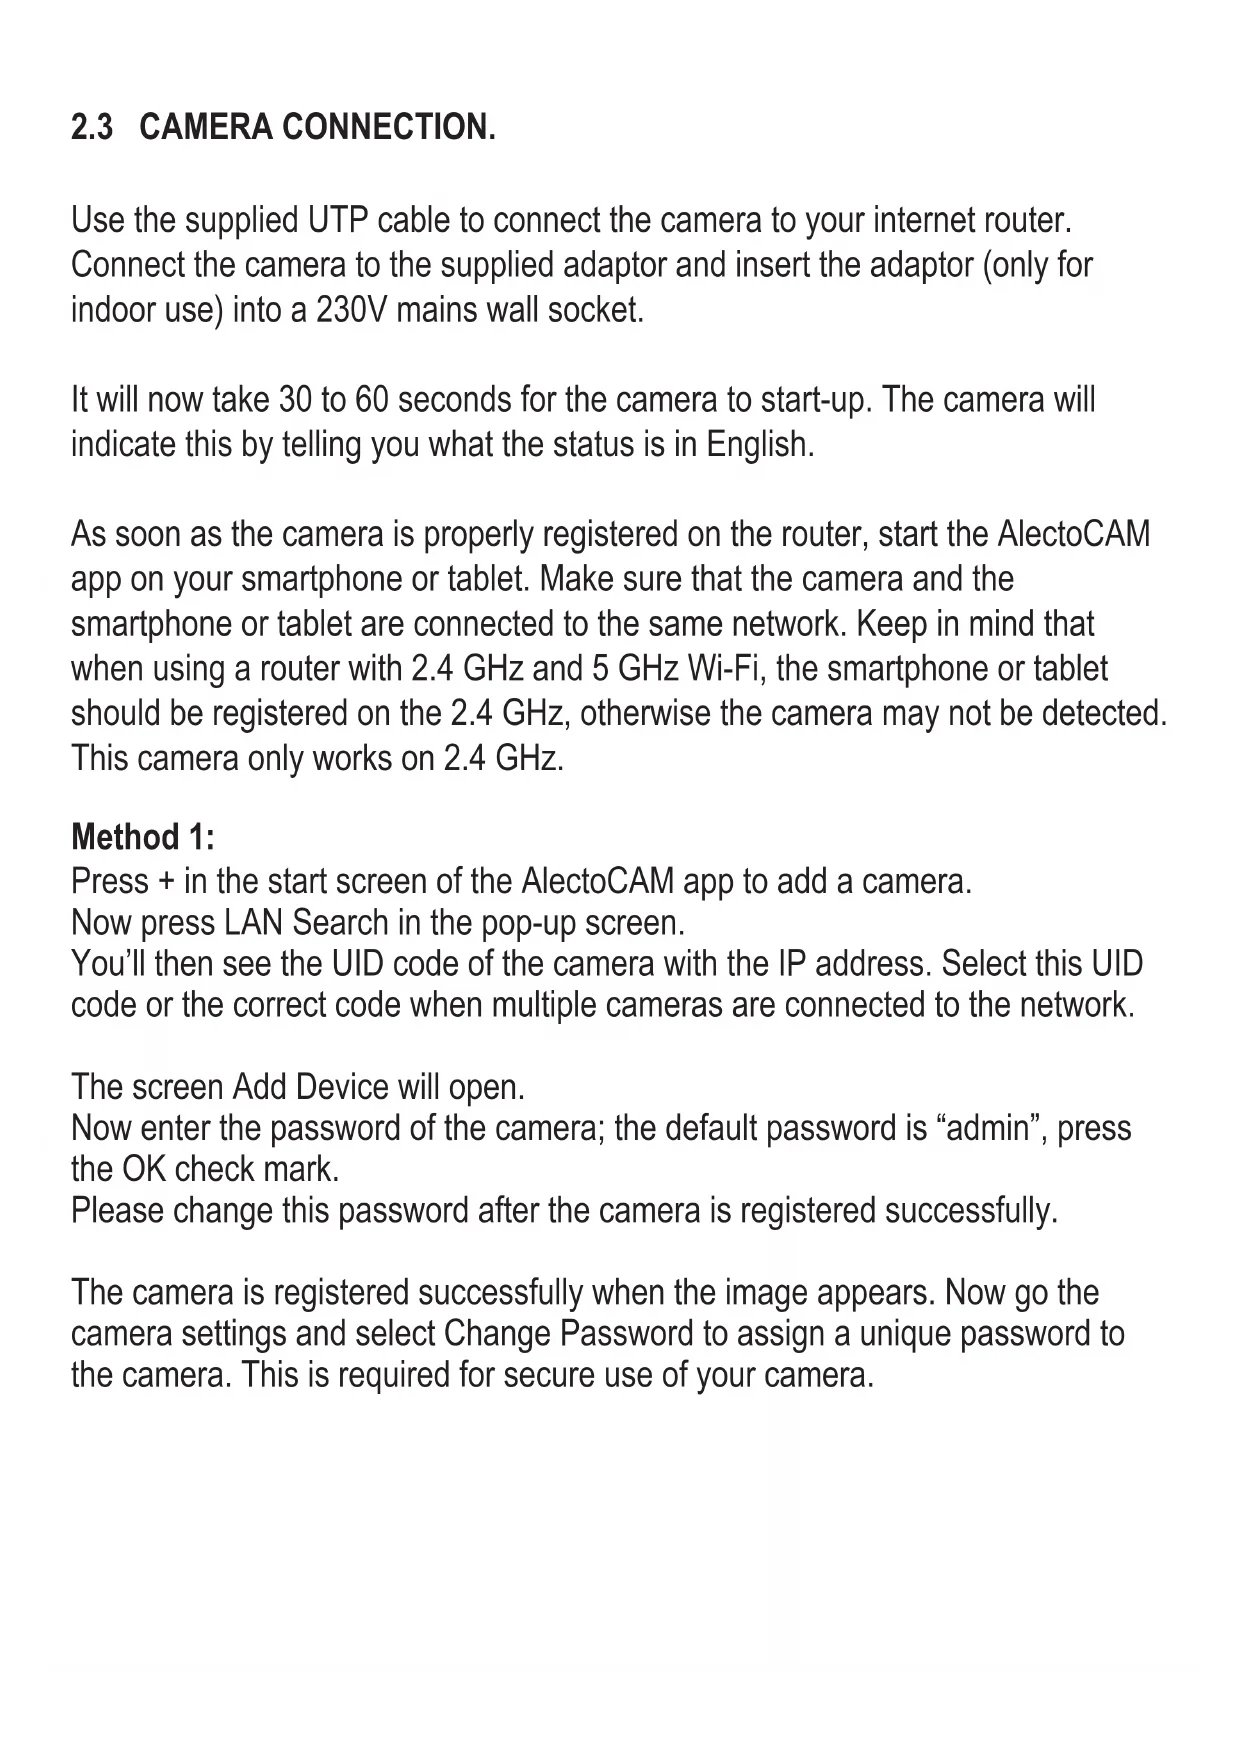
2.1 TO REGISTER THE CAMERA TO THE ROU
- UTP LAN connection
- Reset button
- Adaptor input
- Lens
- Infra-red LEDs
-
Antenna
-
UTP LAN connection
UTP cable input for the connection with the router.
- Reset button
See paragraph 4.
2.2 TO INSTALL THE ALECTOCAM+ APP ON YOUR SMARTPHONE OR TABLET.
Android:
Go to the Play Store. Search for AlectoCam Install the following APP:
IOS:
Go to the App Store. Search for AlectoCam Install the following APP:

2.3 CAMERA CONNECTION.
Use the supplied UTP cable to connect the camera to your internet router. Connect the camera to the supplied adaptor and insert the adaptor (only for indoor use) into a 230V mains wall socket.
It will now take 30 to 60 seconds for the camera to start-up. The camera will indicate this by telling you what the status is in English.
As soon as the camera is properly registered on the router, start the AlectoCAM app on your smartphone or tablet. Make sure that the camera and the smartphone or tablet are connected to the same network. Keep in mind that when using a router with 2.4 GHz and 5 GHz Wi-Fi, the smartphone or tablet should be registered on the 2.4 GHz, otherwise the camera may not be detected. This camera only works on 2.4 GHz.
Method 1:
Press + in the start screen of the AlectoCAM app to add a camera.
Now press LAN Search in the pop-up screen.
You'll then see the UID code of the camera with the IP address. Select this UID code or the correct code when multiple cameras are connected to the network.
The screen Add Device will open.
Now enter the password of the camera; the default password is "admin", press the OK check mark.
Please change this password after the camera is registered successfully.
The camera is registered successfully when the image appears. Now go the camera settings and select Change Password to assign a unique password to the camera. This is required for secure use of your camera.
Method 2:
Press + in the start screen of the AlectoCAM app to add a camera.
Now press QR Code.
The scanner of the smartphone or tablet (if supported) will be activated.
Now scan the QR Code applied to the camera.
The screen Add camera will open and here you can enter the password of the camera ("admin").
Now press OK.
It might happen that the camera of the smartphone or tablet is not able to read the QR code. In this case, press 'Cannot use QR code' in the bottom of the screen. In the field UID, enter the UID code marked on the QR code sticker and then enter the password "admin".
The camera is registered successfully when the image appears. Now press Camera Settings and select Change the password and assign a unique password to the camera. This is required for secure use of your camera.
2.4 TO REGISTER ON THE WIFI-NETWORK.
The camera must first be registered on your Wi-Fi network before you can use the camera wirelessly on the Wi-Fi network.
Press the Advanced Settings (in the app.
Go to the Wi-Fi Setup tab and then press this button.
The Wi-Fi band will now be scanned and all available SSID names will then appear.
Select and press your own network. Enter the password of your Wi-Fi network, press OK and press OK again in the following screen.
Make sure to disconnect the power supply to the camera, remove the UTP network cable and reconnect the camera to the mains.
Via the voice chip, the camera will indicate when it's ready and connected with the network.
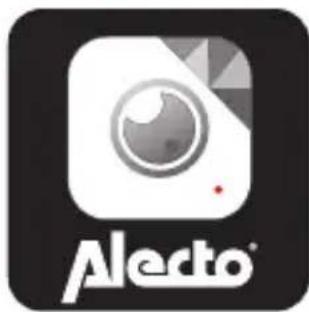
3. TO MOUNT THE CAMERA ON A FIXED SPOT.
The camera can be mounted onto a fixed wall.
Attention: Make sure the camera is already registered to the Wi-Fi network. When the camera is installed and then connected to the mains, it'll re-establish the connection with the network. If a wired network connection can be used after mounting the camera, this will not be necessary.
Determine beforehand the most suitable location for the camera. Now check whether this location is within range of your Wi-Fi network. To do this, briefly connect the camera to the mains and check whether a connection is established. When everything is working properly, drill a hole in the wall for leading the cables through. Mount the camera onto the wall using 4 screws and, if required, plugs. At the other side of the wall on the inside, connect the adaptor and insert it into a wall socket. The camera will now start functioning and is ready for use. You may connect peripherals (e.g. a speaker) to the appropriate connections.
TIP: If you consider the hole for in the wall to be too large, you may first mount a small box (not included) onto the wall for tucking away the cables and then screw the camera onto the box. You may also install the box next to it. Through the hole in the wall, now only the adaptor cable must be arranged allowing for a smaller hole.
4 RESET.
When contact with the camera is no longer possible and you can no longer determine what the IP address or the port number no longer corresponds, you can externally reset the camera to restore the default factory settings.
The camera will then be set to DHCP.
For this, a reset button is placed on the cable of the camera. Press and hold this button for at least 10 seconds after the camera is switched on.
The camera can then only be reached via the UTP network input. Use a UTP cable to connect the camera to your router. Now follow the registration process, see 2.3.
5 TIPS AND WARNINGS
5.1 GENERAL
- Read the user manual carefully and follow all instructions.
- Never place or use the adaptor in a wet or moist room or environment.
- Take care of proper heat dissipation; never cover the camera unit and/ or the power supply adapter(s), and do not place them directly beside a heat source. The camera and adaptor already become warm themselves during operation.
- Only use the supplied connecting cables; connecting cables of a different type can be dangerous or cause damage to the electronics.
- Take care that the cables and the adapter do not get damaged, and prevent that they cause tripping or falling.
- Never disassemble the camera unit and/or adaptor; this may only be performed by qualified personnel.
- The video connection occurs via the public internet and is secure according to the current standards, but can still be hacked. We are not liable for this in any way. We advise you to instantly change the password, preferably using a combination of letters, numbers and special characters.
5.2 INSTALLATION
- Only connect the power wire or disconnect the adapter is removed from the wall socket.
- Never install the camera during thunder storms.
- Never touch non-insulated wires unless the plug or adapter is unplugged.
5.3 MAINTENANCE
- Only clean the camera with a moist cloth; never use chemical cleaners. Before any cleaning, you must disconnect the adapters.
5.4 ERROR
-
In case the camera no longer shows any images, please check the following:
-
the camera is connected
- the correct UID code is used
- the correct password is used
- restart the camera by briefly interrupting its power supply
- press and hold the reset button for at least 10 seconds to reset the camera. The camera will now reboot. Repeat the entire setup and actions from the beginning, because all settings will be reset to the default factory settings
-
restart your smartphone or tablet.
-
When it becomes dark, the camera will switch to the night mode and turn on the infra-red lights. In certain environmental lighting conditions, the screen might start flashing. You can resolve this by increasing or decreasing the environmental light. When the IR LEDs are activated, the screen will be black/white.
-
If you still see no images, please contact the service department of Alecto via www.alecto.nl.
5.5 IMAGE DELAY
- Because of coding and decoding of the images, there will be a slight delay in the signal. The image quality also depends on changes in the bandwidth via internet. You may set a lower resolution.
- The camera may restart after changing certain settings. In this case it'll take some time (maximum 2 minutes) before the images return.
5.6 DATAUSE
- If you're using a mobile network, please keep in mind that the data use can increase considerably while watching video. We recommend you to use a Wi-Fi network.
- Also the battery usage of your smartphone or tablet will increase.
5.7 ENVIRONMENT AND DISCARDING
- The packaging of this camera can be collected as old paper. However, we recommend you to save it, to adequately protect the camera during transport.
- When replacing this camera, please return it to the supplier to ensure environment-friendlyly processing.
6 DECLARATION OF CONFORMITY
The Alecto camera meets the essential requirements and other relevant provisions as stipulated by the European Guideline 2014/53/EU. The declaration of conformity is available on the website: http://DOC.hesdo.com/DVC-255IP-DOC.pdf
RF Frequency: 2407 - 2475 MHz Maximum Power: < 20 dBm
7. SPECIFICATIONS CAMERA
Image Sensor 1/3" Color CMOS sensor
Display Resolution 1280 x 960 Pixels (1300K Pixels, i.e. 1.3 Megapixel)
Lens 3.7 - 14.8mm
Mini. Illumination 0.5 Lux
Viewing Angle 90 Degree
Image Compression H.264
Image Frame Rate 30fps (VGA), 30fps (QVGA)
Resolution 1280x960 (VGA), 640x368 (VGA), 320x208 (QVGA)
Flip Mirror Images Vertical / Horizontal
Light Frequency 50Hz, 60Hz, Outdoor
Ethernet interface Build in 10/100Mbps, Auto MDI/MDIX, RJ-45
Supported Protocol TCP/IP, HTTP DNS DHCP PPPoE SMTP FTP SSL TFTP NTP ARP/RARP NFS RTSP RTP RTCP
Compress rate level 128Kbps~4Mbps
Wireless Standard IEEE 802.11b/g/n
Frequentie range 2412-2472 MHz
Transmitted power 19.27 dBm EIRP
Date Rate 802.11b: 11Mbps (max), 80211g: 54Mbps (max.), 802.11n: 150Mbps (max.)
Wireless Security WEP & WPA WPA2 Encryption
Pan/tilt Angle Horizontal: 355^ - Vertical: 120^
Infrared Light 36 IR LEDs, Night visibility up to 18 meters
TF/SD card Internal 8 GB
Power Supply DC 12 V/2.0A (adapter)
Power Consumption 7 Watts (Max.)
Operate Temper. 0^ 55^ C (14°F ~ 131°F)
Operating Humidity 20% 85% non-condensing
Storage Temper. -10^ 60^ (14°F ~ 140°F)
Operating Humidity 0% 90% non-condensing
Certification CE, FCC, RoHS
WARRANTY
For the IP-camera you have a warranty of 24 months from the date of purchase. During this period, we guarantee the free repair of defects caused by material and workmanship errors. All this subjected to the final assessment of the importer.
HOW TO HANDLE: If you notice any defect, first refer to the user's manual. If the manual provides no definite answer, please contact the supplier of this camera via internet (www.alecto.nl) or contact customer service of Alecto: www.alecto.nl.
THE WARRANTY BECOMES NULL AND VOID: In case of improper use, incorrect connections, leaking and/or incorrectly installed batteries, use of unoriginal parts or accessories, negligence and in case of defects caused by moisture, fire, flooding, lightning and natural disasters. In case of unauthorised modifications and/or repairs performed by third parties. In case of incorrect transportation of the device without adequate packaging and when the device is not accompanied by this warranty card and proof of purchase.
The warranty does not cover connecting cables, plugs and batteries. All further liability, especially concerning any consequential damages, is excluded.

ServiceHelp


WWW.AECTO.NL SERVICE@AECTO.NL

Hesdo, Australielaan 1
5232 BB, 's-Hertogenbosch
The Netherlands
v3.0