
kid Tab 7 S02 - Tablet Trevi - Free user manual and instructions
Find the device manual for free kid Tab 7 S02 Trevi in PDF.
Frequently Asked Questions - kid Tab 7 S02 Trevi
User questions about kid Tab 7 S02 Trevi
0 question about this device. Answer the ones you know or ask your own.
Ask a new question about this device
Download the instructions for your Tablet in PDF format for free! Find your manual kid Tab 7 S02 - Trevi and take your electronic device back in hand. On this page are published all the documents necessary for the use of your device. kid Tab 7 S02 by Trevi.
USER MANUAL kid Tab 7 S02 Trevi
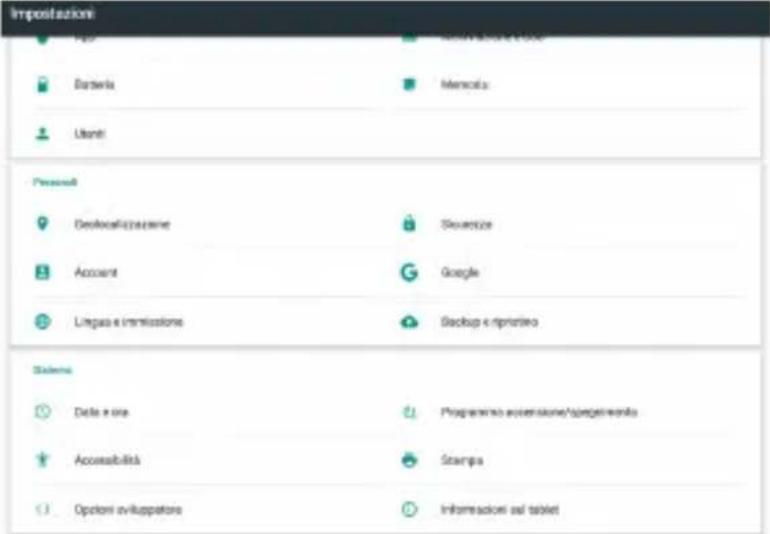
TO SET YOUR LANGUAGE DEVICE:
- Swicth on the appliance
- Go to the page with all applications
-
Select the “IMPOSTAZIONI” icon
-
Scroll through the list and select the icon - LINGUA
- Select "LINGUA" and find their own language from those available.
Note: For information and updates of this product: www.trevi.it
POUR CONFIGURER LANGUAGE DE VOTRE APPAREIL:
Display 7-inch TFT LCD, Capacitive (Touch- screen)
Resolution 1024x600 (16:9)
CPU ARM Cortex A9, 1,2GHz Quad Core
RAM 1GB
Sistema Opeartivo Android 6.0
Memoria Interna 8GB
WIFI Standard 802.11 b/g/n (2,4GHz)
Thank you for purchasing this tablet.
It brings you much convenience for your business and entertainment.
Running on Android 6.0, with a 1,2GHz processor and highly responsive capacitive touch screen, it brings you wonderful user experience.
Before beginning, please refer to this user manual carefully.
IMPORTANTNOTICES
- Keep this device away from strong magnetic field to avoid any damages.
- Do not rub this device with any hard objects and never clean this device with any chemicals or detergents or acids or it could cause damages on surfaces.
- Humidity or liquid may enter this device and causes permanent damages to the hardware inside. Do not place this device in any humid environment or under the rain.
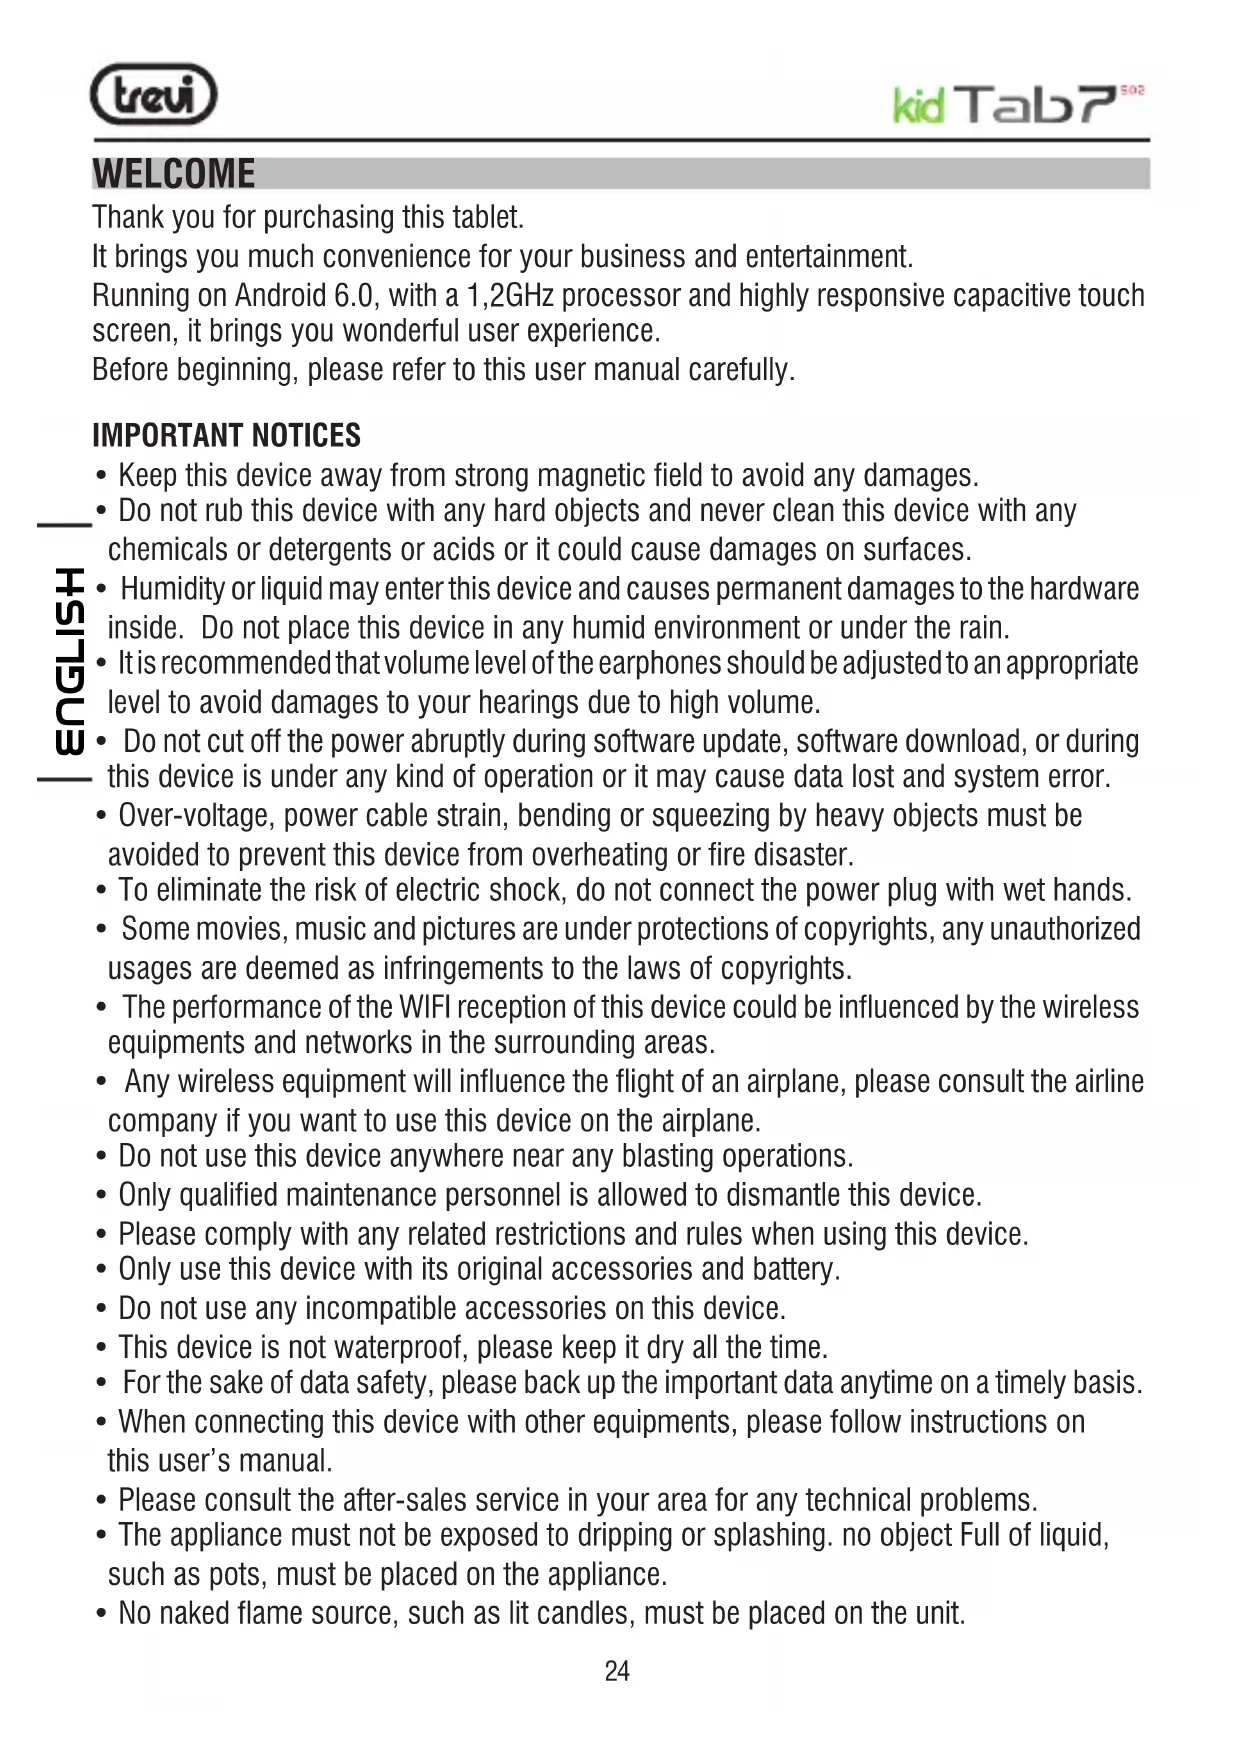
- It is recommended that volume level of the earphones should be adjusted to an appropriate level to avoid damages to your hearings due to high volume.
- Do not cut off the power abruptly during software update, software download, or during this device is under any kind of operation or it may cause data lost and system error.
- Over-voltage, power cable strain, bending or squeezing by heavy objects must be avoided to prevent this device from overheating or fire disaster.
- To eliminate the risk of electric shock, do not connect the power plug with wet hands.
- Some movies, music and pictures are under protections of copyrights, any unauthorized usages are deemed as infringements to the laws of copyrights.
- The performance of the WIFI reception of this device could be influenced by the wireless equipments and networks in the surrounding areas.
- Any wireless equipment will influence the flight of an airplane, please consult the airline company if you want to use this device on the airplane.
- Do not use this device anywhere near any blasting operations.
- Only qualified maintenance personnel is allowed to dismantle this device.
- Please comply with any related restrictions and rules when using this device.
- Only use this device with its original accessories and battery.
- Do not use any incompatible accessories on this device.
- This device is not waterproof, please keep it dry all the time.
- For the sake of data safety, please back up the important data anytime on a timely basis.
- When connecting this device with other equipments, please follow instructions on this user's manual.
- Please consult the after-sales service in your area for any technical problems.
- The appliance must not be exposed to dripping or splashing. no object Full of liquid, such as pots, must be placed on the appliance.
-
No naked flame source, such as lit candles, must be placed on the unit.
-
Keep this manual for future consultations.
With earphone or headphones use:
To prevent possible hearing damage, limit the amount of time listening at high volumes.

This product is not a toy.
To use only under adult supervision.
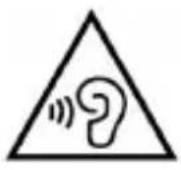
KEYS AND FUNCTIONS
- Frontal Camera.
- Power button and ON/OFF Display.
- Earphone Socket 3.5mm.
- Micro USB socket: connect the unit to PC.
-
DC socket: connect the unit to 5V adaptor.
-
Volume buttons.
- Rear Camera.
- Micro SD CARD slot.
- RESET.
- Speaker.
GETTING STARTED
Turning the Tablet on or off
To turn ON the tablet:
Press and hold the Power key (2) until the LCD screen turns on. Wait until the Home screen appears; the tablet is now ready for use.
To turn OFF the tablet:
- Press and hold the Power key (2) until the Device Options menu appears.

- Touch "Power off" on the screen to turn off the tablet.
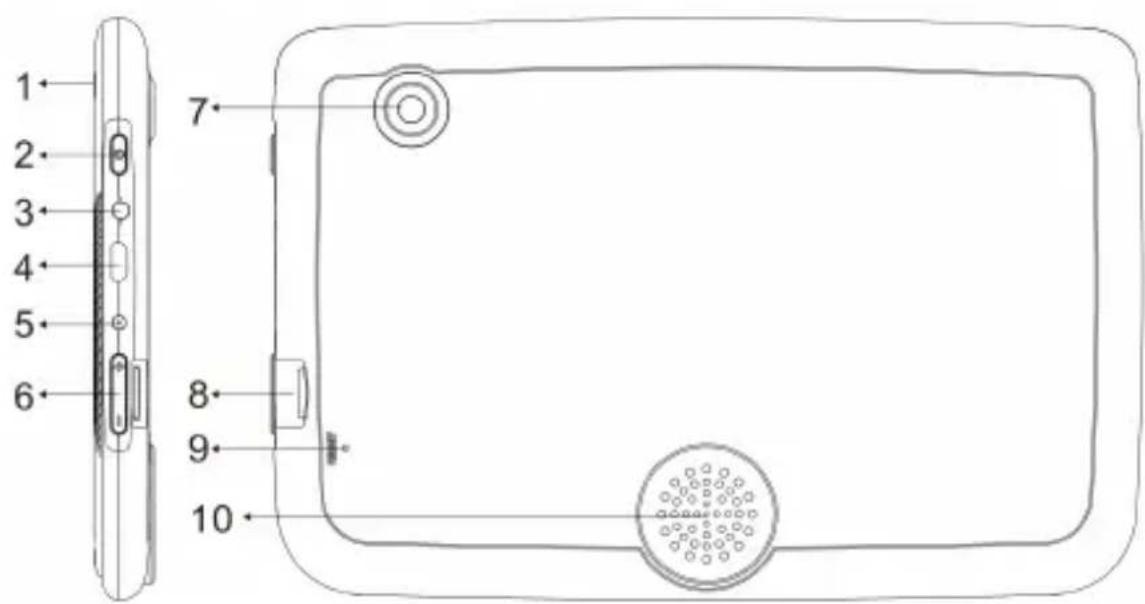
Turning the Screen On or off (Standby)
When the tablet is on, you can turn off the screen to conserve battery power. Simply press the Power key (2) once to turn the screen off. Press the Power key again to turn the screen back on.
Note: To conserve battery power, the screen can be set to turn off automatically when the tablet is not in use (between 1 minute and 30 minutes). This Screen timeout option can be found in the Display menu.
Unlocking the Screen
When the screen turns off, you will have to unlock the screen when you turn it back on. To unlock the screen, drag the lock icon across the screen towards the lock icon.
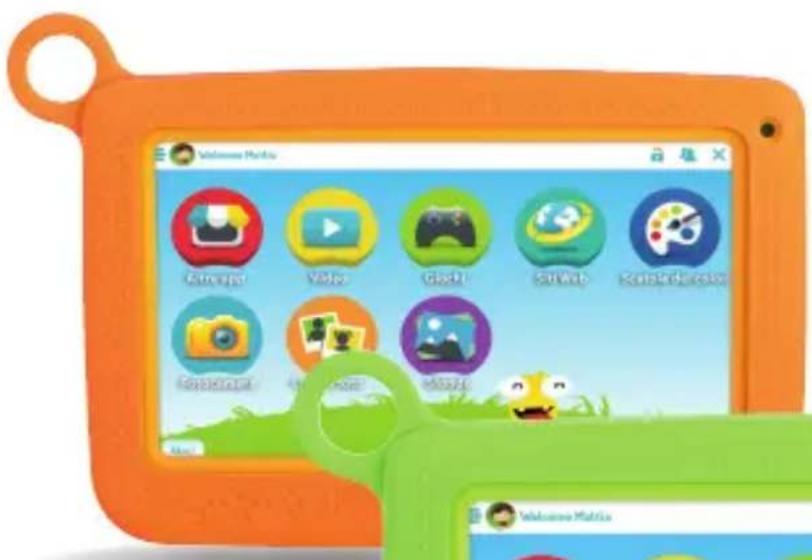
ABOUT APPLICATIONS
To open an application, touch the application icon on the home screen or in the Launcher where you can tap the icon right up on the home screen to get in.
Launcher screen:
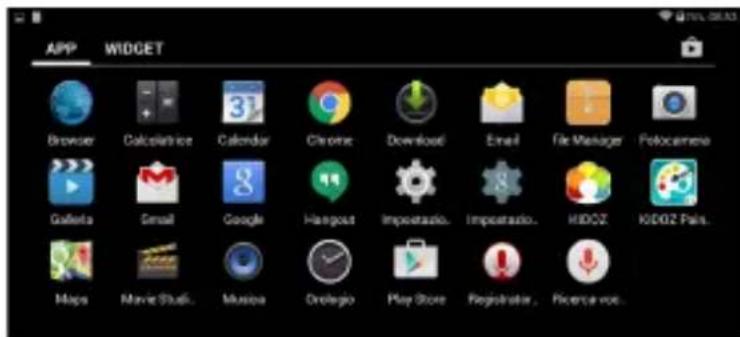
Note: The screen shown above is for illustrative purposes only. Reserves the right to modify and improve the final list of applications available on the tablet.
Installing Applications
You can also download an install additional applications from the devices applications marketplace, the web browser, or other sources.
The tablet must be set to allow installation of applications from non-Market sources. The Unknown sources option can be set in the Application settings menu.
CONNECT TO A WI-FI NETWORK
The Notification bar displays icons that indicate your tablet's Wi-Fi status.

Notification that an open Wi-Fi network is in range.

Connected to a Wi-Fi network (waves indicate connection strength).
[no icon] There are no Wi-Fi networks in range, or the Wi-Fi is off.
1. Turn on the Wi-Fi radio if it is not already on. To turn on Wi-Fi:
a. Go to the Home screen: Press the Home key.
b. Open the Settings menu: tap the icon right up on the home screen to get into the launcher, then touch Settings icon.
c. Open the Wireless menu: Slide the icon to ON status.
When Wi-Fi is on, the tablet will look for and display a list of available Wi-Fi networks.
Note: If a network that you have connected to previously is found, the tablet will connect to it. If you don't see your network in the list, you can force the tablet to re-scan. To scan for networks, tap the Menu key, and then touch Scan.
2. Select an available Wi-Fi network to connect To:
In the same Wi-Fi settings menu above, touch a network in the list.
If the network is open, the tablet will prompt you to confirm connection to the network. Touch Connect to confirm.
If the network is secured (as indicated by a Lock icon), the tablet will prompt you to enter a password or other credentials. Touch the Wireless password box to show the on-screen keyboard and then use it to enter the password. Touch Connect to confirm.
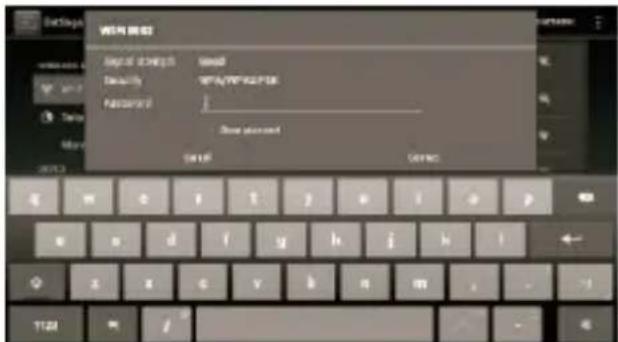
When you have successfully connected to a Wi-Fi network, the Notifications bar at the low of the screen will show a Wi-Fi signal indicator.
Note: To learn about how to add a Wi-Fi network when it is not in range or when the router is set to obscure the network name (SSID); or to configure advanced Wi-Fi options, please refer to the manual.
OPTIONAL CONNECTIONS
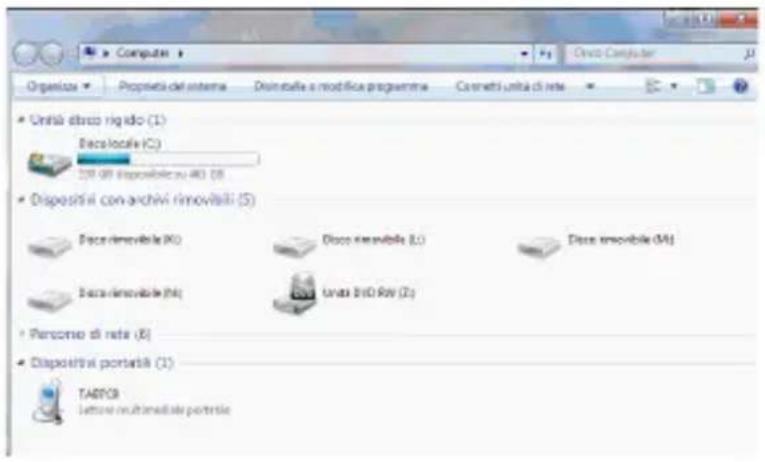
Connecting to a Computer
Connect the tablet to a computer to transfer files.
1. Connect your tablet to the computer.
With the included USB cable: Plug the small end of the cable into the USB 2.0 high speed connector of the tablet. Plug the large end of the cable into an available USB 2.0 high speed port on the computer.
2. When your tablet is connected, on PC open "My Computer" will appear under "Portable devices" "KIDTAB 7 S02".
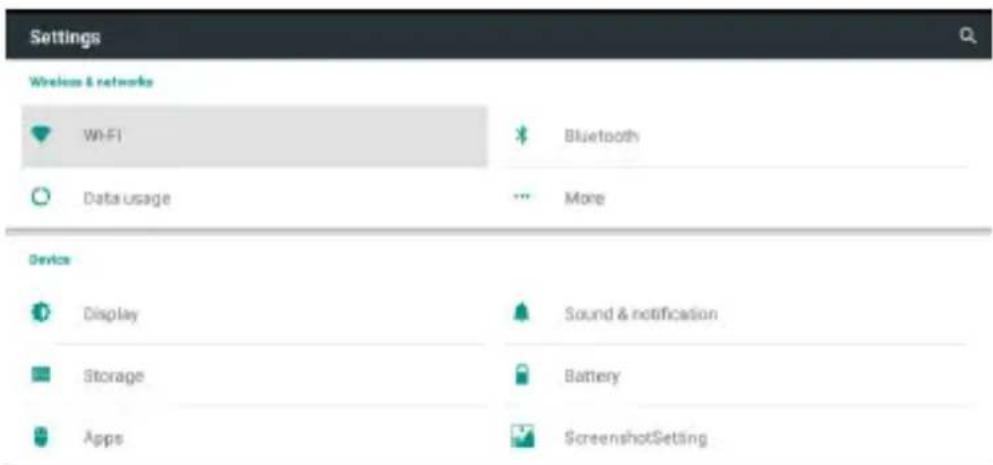
SETTING
Tap the "Settings" icon to go to settings.
You can check and set wireless networks, sound, display, storage, Battery, Accounts & sync, security, language, date time, about tablet, etc.
Wi-Fi
Command to activate and perform a network search. You will see a list of available Wi-Fi networks, pick one and enter your password if required.
Bluetooth
Command to activate and perform a network search. A list of available Bluetooth devices will be displayed, pairing the tablet with the device and entering the password if required.
Data usage
A graph on the data flow used is displayed.
Other...
List of networks that can be used to connect the KIDTAB 7 S02 differently from the Wi-Fi network, Airplane mode on/off.
Display
Command to adjust the brightness, background, adjust the panel off time, select font size, activate the "Send screen" function, etc...
Audio and Notifications
Command to adjust volumes, choose ringtone notifications, and activate sound pressure or screen lock sounds.
App
By selecting this item you can manage the various applications on your device. To delete an application just select it and tap the "Uninstall" command.
Storage and USB
Indicated internal memory occupied and SD card
Battery
Command to graphically display the battery charge status and time of use.
Storage
Command to graphically display the status of internal memory.
NOTE: Pre-installed applications and the Android OS OS occupy a considerable part of the device's internal memory capacity, so it's normal to have a difference between "Available memory space" and "Total capacity.
Users
Set device owner information or add other users.
Screenshot Setting
Settings for the Screenshot function.
Geolocation
To agree or not to submit your location data for Google search results and other Google service.
Safety
Settings to enter a screen block or administrator information.
Account
List of accounts used by the Tablet.
Google Setting.
Language and input
By selecting this item you can set the desired language, spelling correction, set some virtual keyboard functions, set voice commands, and pointer speed.
Storage and USB
Backup e Restore
By selecting this item, you can back up your data or restore the device with the factory data.
Datae and time
By selecting this item you can set the device date and time, time zone, format and day/ month/year display.
Accessibility
Selecting this item can set some parameters like Talk Back (which provides voice suggestions to help blind or visually impaired users), Big Text, Auto Rotate, Password pronunciation, Touch Delay.
About Tablet
By selecting this item you can view all the information about the unit.
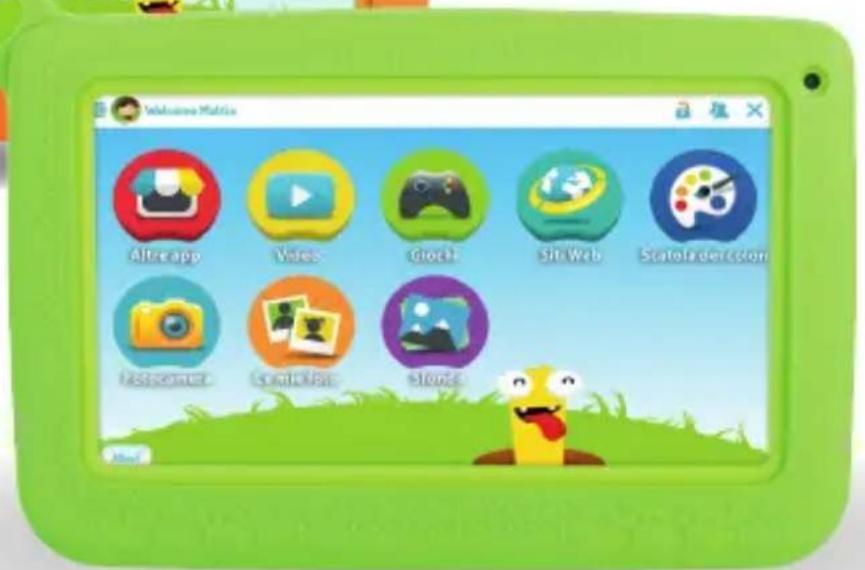
KIDOZ™-PLATFORM WITH EDUCATIONAL APPLICATIONS
Warning: The platform Kidoz is constantly changing and improving, and independent from Trevi, so the descriptions of the various themes and applications are subject to change and will not be exactly like picture, we as a description and even applications like those described.
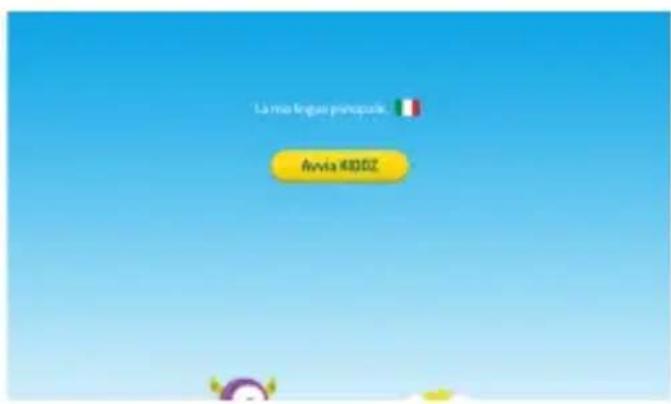
- From Android select icon "Access to application page" this on the main page, and then select the icon KIDOZ Kidoz.
- It will show the language in which the program will start, select "Start KIDOZ".
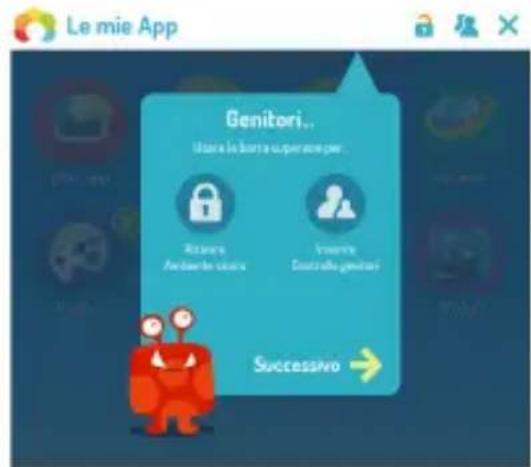
- Below it will provide some information about parental control, activation a safe and controlled environment for children and how to move itself within the environment Kidoz.
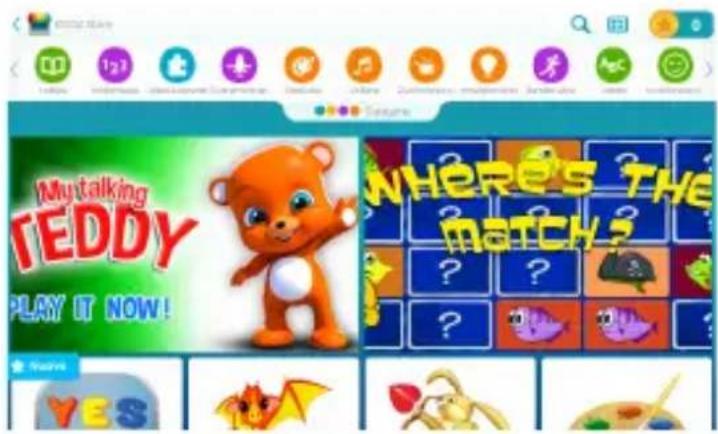
HOME PAGE
The home page (start page) gives you access to the various categories and functions:
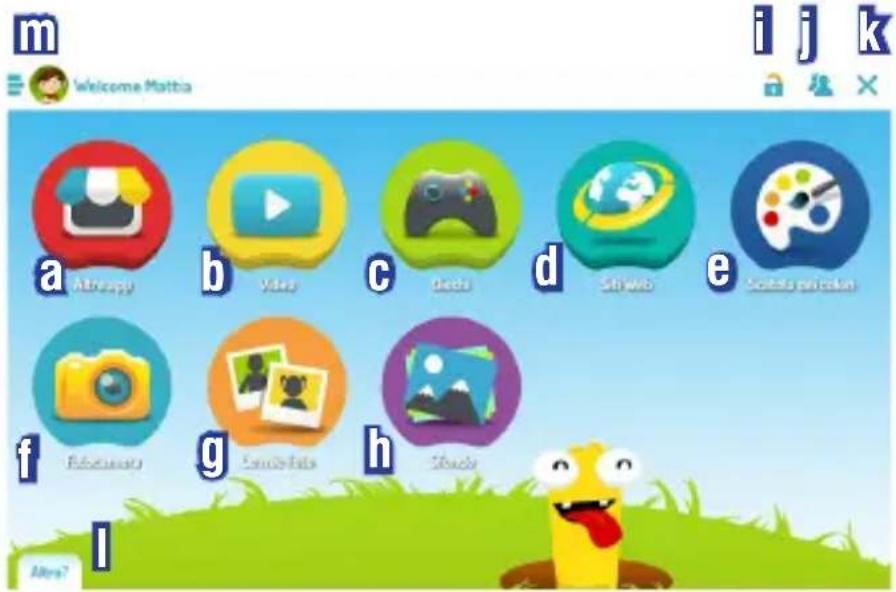
a. More Apps: Shop where you can buy and download apps.
b. Videos: Video available on the platform Kidoz, visible and connected to Wi-Fi.
c. Games: Games available on the platform Kidoz, visible and connected to Wi-Fi.
d. Web Sites: Web sites available on the platform Kidoz, visible and connected to Wi-Fi.
e. Painter: Application for drawing and coloring downloaded from the Play Store
f. Camera: Application to take pictures using the camera device.
g. My Pictures: Interface to view the pictures taken.
h. Wallpaper: Images available as wallpapers included in the platform Kidoz, visible with Wi-Fi.
i. Command to increase the safety in navigation and in-app store unauthorized.
j. Command to enter the control Parent.
k. Command to close the interface Kidoz and move on to the Android.
I. News of the day: Interface with the new items list (Videos, games) on Kidoz.
m. My elements: Interface to view/create/edit the information of account on the device, and view these bookmarks.
Warning:
- if in the window "Complete action using" select "Always", the device will always open nel'interfaccia graphics KIDOZ; to switch to the graphical Android simply select the icon X (l).
- Each input interface Kidoz, this might require constant updates to keep aggionate the news of the day, applications and videos.
MARKET, DOWNLOAD/DELETE APPLICATIONS
Download an application:
On first use of the educational platform and 'must register an account with a password, this should be done by an adult; without this the only applications available are preloaded
on the device.
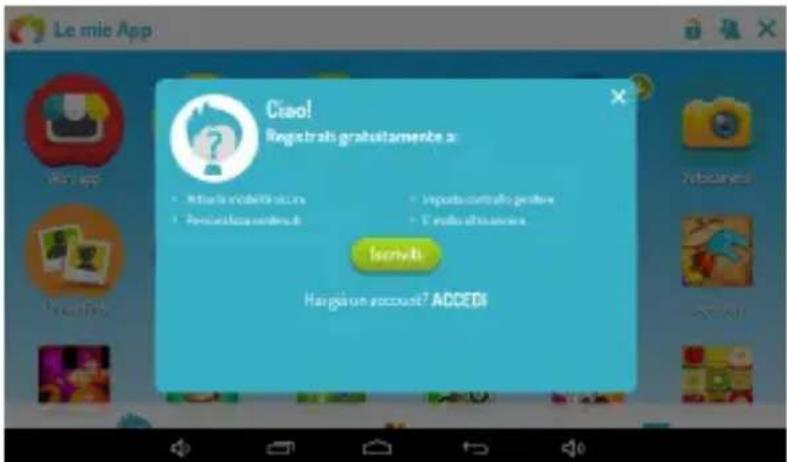
To download additional applications, proceed as follows:
- Connect the device to the Wi-Fi
- From the home page, select the icon of the market shop (a). It will open 'the following window
- At the top select the category that most interests. You will see a list applications which relate to that category.
- Select the application and select the "Download" which will appear later.
- Wait until the application is installed and after press OPEN.
Note:
- To download an application, you must be registered.
- The downloaded application will also be present in Android environment.
DELETE AN APPLICATION:
If you want to delete an application, follow the steps in Android environment (Settings - Apps).
WEB APPLICATIONS ADD TO FAVORITES/DELETE FROM FAVORITES
Additional applications by connecting to the network:
Selecting the icons "Video" (b) "Games" (c), "Web Sites" (d) or taking the news of the day (l), you will have access to more web content divided into several categories (Videos,
Games, Curiosity) or see the news of the day proposed by the platform.
Add to the list:
If you want to add to a favorite video or a game, select the icon at the top right, you will hear a sound that will confirm the selection. To view the list of favorites and quickly retrieve the video or game, simply select the "My Items" (m) from the main page.

Remove from Favorites:
If you want to delete a Video Game or a present in your favorites, select the video or the game to delete, select the icon 276 at the top right, you will hear a sound that will confirm the selection. The video or the game will not be on the list of favorites.
SETTING AN IMAGE AS WALLPAPER
Wallpaper (h)
Is possible to choose an image and have it as background on the home page.
To set the image:
- Connect the device to the Wi-Fi.
- Select the "Wallpaper" (h).
- Select one of the images presented by Kidoz or select one image present in the gallery or add one from the camera, the image will be loaded automatically as a background of the home page.
PARENTAL CONTROL SETTINGS
The device comes with the enabling functions bases for parental control (control over applications and account management). E 'can increase control over the content and management of the account by signing up directly with KIDOZ.
- Connect the device to the Wi-Fi.
- Select the icon (j).
- Enter the password you chose when registering.
-
Select one of the settings you wish to modify.
-
Select to return to the previous page.
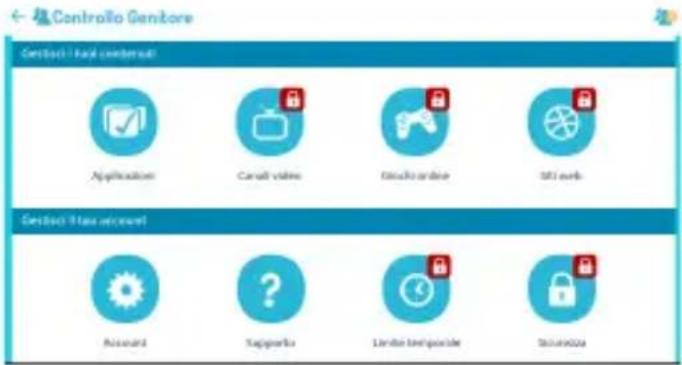
Applications
In this section you can choose which applications to enable and disable them among those present in the environment and in environment KIDOZ Adroid and then appear/eliminate the icon on the home page of KIDOZ.
Video channels
In this section you can choose which video enable and disable them among those present in the "Video" (b).
Online games
In this section you can choose which online games which enable and disable among those present in the "Games" (c).
Web sites
In this section you can choose which websites to enable and disable them among those present in the "Web Sites" (d).
Accounts
In this section you can change the account of the parent, the child or password.
Time limit
In this section you can set the time of daily use of the device or set a specific time of the day.
Security
In this section you can set or remove some blocks on safety.
INFORMATION ON BATTERY REMOVAL AND DISASSEMBLY
Caution: This operation is reserved exclusively to qualified technical personnel! The rechargeable battery installed in this unit is not replaceable by the user.
- Remove the back cover of the unit by lifting the lever upward between the part front and rear;
- Locate the battery;
- Disconnect and remove it.
Caution:
- Whatever type of battery is used, it should not be thrown away domestic, fire or water.
- Any used battery should be recycled or disposed of at any time dedicated collection centers.
WARNING: Lithium battery. Risk of explosion if battery is incorrectly replaced. Replace only with the same type or with an equivalent type.

PRECAUTIONS FOR CORRECT DISPOSAL OF THE PRODUCT.
The symbol shown on the equipment indicates that waste must be disposed of in "separate collection" and so the product must not be disposed of together with urban waste.
The user must take the product to special "separate waste collection centres" provided by local government, or deliver it to the retailer against the purchase of a new product.
Separate collection of waste and subsequent treatment, recycling and disposal operations promotes the production of equipment with recycled materials and limits negative effects on the environment and on health caused by improper handling of waste.
Illegal disposal of the product leads to the enforcement of administrative penalties.
TREVI pursues a policy of continuous research and development, the products may show different characteristics from those described.
TECHNICAL SPECIFICATION
Display 7-inch TFT LCD, Capacitive (Multi Touch)
Resolution 1024X600 (16:9)
CPU ARM Cortex A9, 1,2GHz Quad Core
RAM 1GB
Operative Sistem Android 6.0
Built-In Memory 8GB
WIFI Standard 802.11 b/g/n (2,4GHz)
Bluetooth power class 3
Bluetooth transmission band 2,4 GHz
Bluetooth Transmission Power 1mW
Bluetooth Broadcast Power 0,8mW
BIENVENUE
KIDOZ™-PLATFORM WITH EDUCATIONAL APPLICATIONS
Warning: The platform Kidoz is constantly changing and improving, and independent from Trevi, so the descriptions of the various themes and applications are subject to change and will not be exactly like picture, we as a description and even applications like those described.
SUPPRIMER UNE APPLICATION:
RECOMMANDATIONS POUR L'ELIMINATION CORRECTE DU PRODUIT.
With the included USB cable: Plug the small end of the cable into the USB 2.0 high speed connector of the tablet. Plug the large end of the cable into an available USB 2.0 high speed port on the computer.
If you want to delete an application, follow the steps in Android environment (Settings - Apps).
APLICAC. WEB ANADIR A FAVORitos/BORRAR DE FAVORitos
Simplified EU Declaration Of Conformity
Hereby TREVI S.p.a declares that the equipment model Kid Tab7 S02 is in compliance with Directive 2014/53/EU.
The full text of the EU declaration of conformity is available at the following internet address www.trevi.it
Statement on chemicals (Reach)
The concentration of SVHC substances in this unit come under quantity ≤ 0.1% (W/W) permitted by the EC Regulation 1907/2006
kidTab7
treui
Trevi S.p.A.
Strada Consolare Rimini-San Marino, 62
47924 RIMINI (RN) Italy
Tel. 0541/756420 - Fax 0541/756430
www.trevi.it - E-mail: info@trevi.it