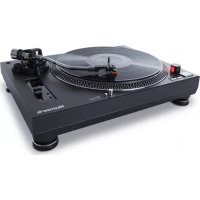
TT250USB - Turntable NUMARK - Free user manual and instructions
Find the device manual for free TT250USB NUMARK in PDF.



| Product type | Direct-drive turntable |
| Brand | Numark |
| Model | TT250USB |
| Dimensions (approx.) | 450 x 350 x 150 mm |
| Weight (approx.) | 5 kg |
| Power supply | AC 115/230 V, 50/60 Hz (voltage selector under platter) |
| Playback speeds | 33 1/3 and 45 rpm |
| Pitch | ±10% with pitch slider |
| Audio outputs | Fixed RCA cables (line level), USB port for digitization |
| USB connectivity | Yes, via included USB cable for computer transfer |
| Tone arm | S-shaped arm with counterweight, adjustable anti-skating, hydraulic lift |
| Included cartridge | Yes, pre-installed on standard headshell (recommended weight 3-5 g) |
| Special features | Stroboscope, groove light, start/stop control, remote input (3.5 mm) |
| Adjustable feet | Yes, for height adjustment |
| Supplied accessories | Platter, slip mat, counterweight, 45 rpm adapter, USB cable, dust cover |
| Maintenance | Clean the stylus with a soft brush; avoid shocks and humidity |
| Safety | Unplug before cleaning; use appropriate voltage to avoid damage |
| Repairability | Cartridge and headshell user-replaceable; other parts: contact Numark support |
Frequently Asked Questions - TT250USB NUMARK
User questions about TT250USB NUMARK
0 question about this device. Answer the ones you know or ask your own.
Ask a new question about this device
Download the instructions for your Turntable in PDF format for free! Find your manual TT250USB - NUMARK and take your electronic device back in hand. On this page are published all the documents necessary for the use of your device. TT250USB by NUMARK.
USER MANUAL TT250USB NUMARK
User Guide (English)
Introduction
Box Contents
| TT250USB | Pre-Mounted | Cartridge | (for dust cover) | Hinges |
| Platter 45 RPM Adapter | Software Download Card | |||
| Slipmat USB Cable | User Guide | |||
| Counterweight | Dust | Cover | Safety & Warranty Manual | |
Support
For the latest information about this product (system requirements, compatibility information, etc.) and product registration, visit numark.com.
For additional product support, visit numark.com/support.
Features
Rear Panel
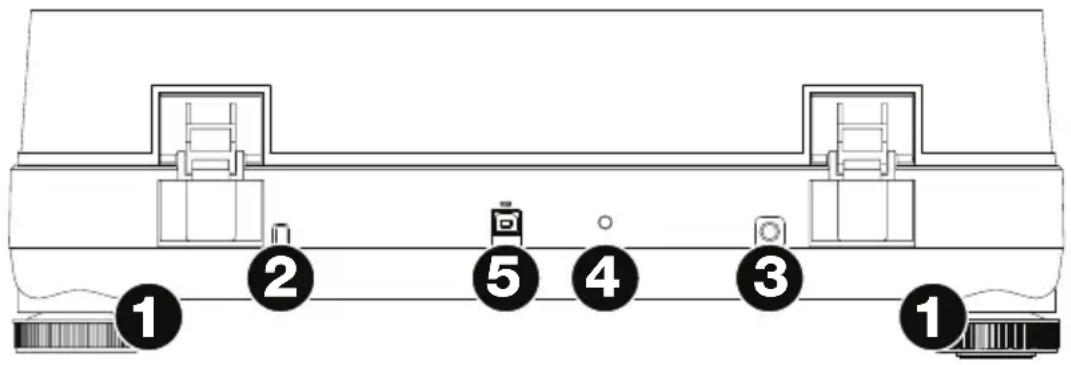
- Support Feet: If you want to (slightly) lower or raise the height of your TT250USB, you can turn the four support feet clockwise or counterclockwise, respectively.
- RCA Audio Output Cables: Connect these attached cables to the audio inputs of your mixer, stereo system, etc. Their output signal is line-level, so connect it only to line-level inputs, not phono-level.
Please note: You can still copy records to your computer (via the USB port) even if these cables are not connected to a stereo system. You can also listen to your records through your computer as long as you have configured your computer's sound input and output options correctly.
Warning: You may damage your receiver if you plug in line-level output into a phono-level input.
- Power Cable: Connect this attached power cable to a power outlet after making all of your other audio connections.
- Remote Start Input: Use connect a 1/8" (3.5 mm) cable to connect this input to the remote start output of a compatible mixer. While connected, TT250USB's platter will start rotating when the mixer's crossfader moves towards that side.
- USB Port: Use the included USB cable to connect this USB port to your computer. You can listen to your records through your computer as long as you have configured your computer's sound input and output options correctly.
Top Panel
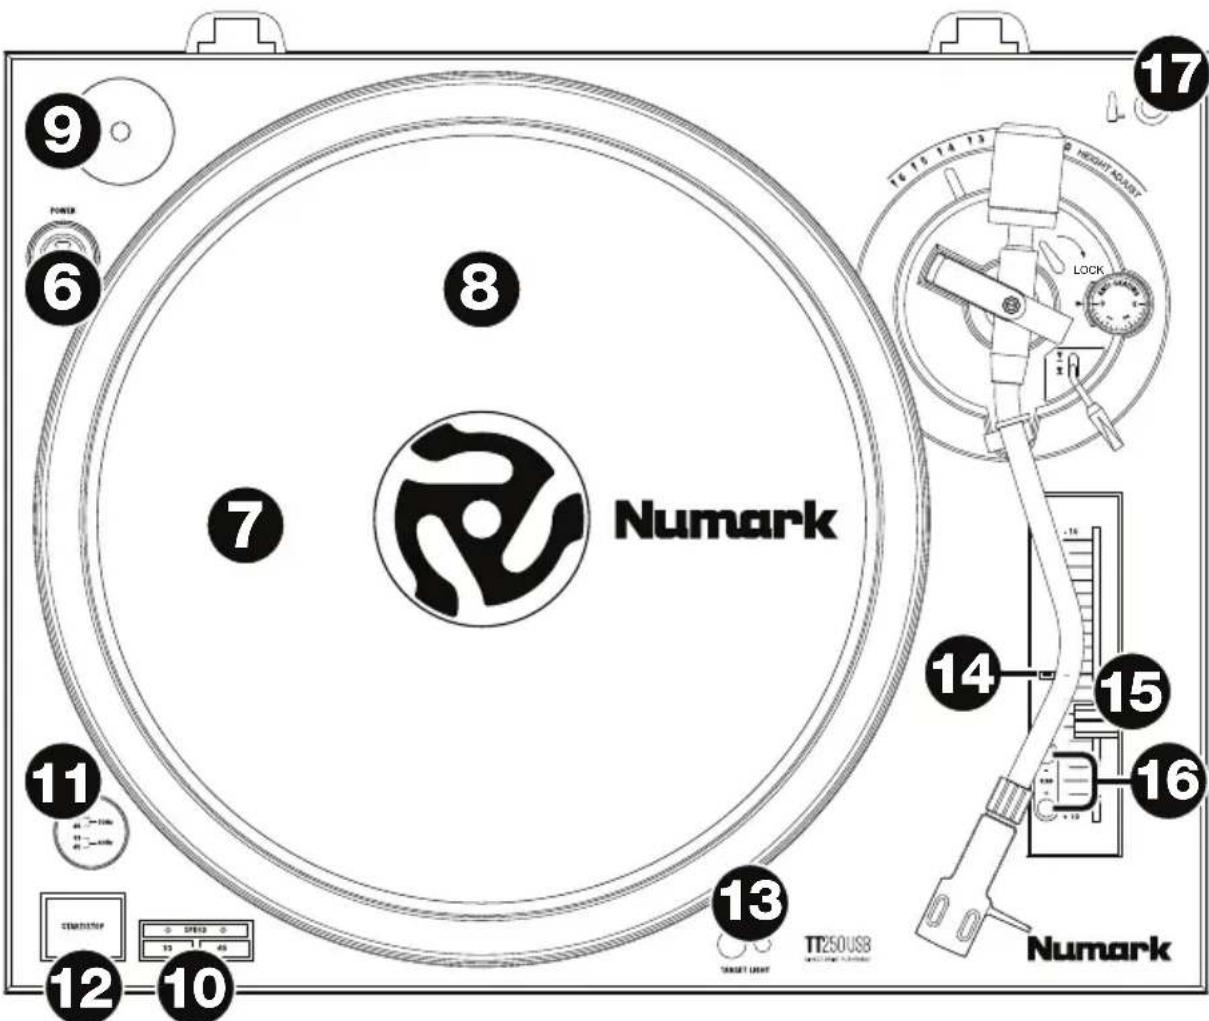
- Power Switch: Press this switch to power TT250USB on or off. The ring around the switch illuminates when TT250USB is powered on.
- Voltage Selector (under platter): Use the switch under the platter to select the voltage for your country. Change this setting only when necessary (e.g., when traveling to a country or region with a different voltage). Selecting an improper voltage setting can damage the unit.
- Platter: This platter must be properly placed to the turntable motor prior to operation. See Setup > Platter for detailed information on securing the platter.
- 45 RPM Adapter: Store your 45 RPM adapter here.
- 33 and 45 RPM Buttons: Press either of these buttons to set the rotation speed (RPM) of the platter. A light above the button indicates the current selection.
- Strobe Light: This light illuminates the edge of the platter, which indicates its current speed (RPM). While the platter rotates at each speed, one of the rows of circles on its edge will appear to remain still under the light's strobing. The first and second rows correspond to 33 and 45 RPM (respectively) when the voltage selector is set to 230 V (50 Hz). The third and fourth rows correspond to 33 and 45 RPM (respectively) when the voltage selector is set to 115 V (60 Hz).
- Start/Stop: This button starts and stops the turntable motor. If it seems not to be functioning, check to make sure that the platter is properly secured (see Setup > Platter).
-
Target Light: This light illuminates the platter so you can view the label on your record. To turn it on, press the smaller button next to it. To turn it off, push the light downward into the base until it locks in place.
-
Pitch Light: This light illuminates when the pitch slider is set at 0%.
- Pitch Fader: Move this fader to increase or decrease the pitch of the track (and speed of the platter) by up to 10%. In the center position, the pitch is at 0%.
- Pitch-Bend -/+: Press either of these buttons to temporarily reduce or increase the pitch of the track (speed of the platter). If the pitch fader is already at its lowest or highest position, you cannot use the corresponding pitch-bend button to bend the pitch further in that direction.
- Cartridge Holder: Use this space to store your cartridge while transporting TT250USB.
Tonearm
Refer to Setup > Tonearm for additional details on these controls.
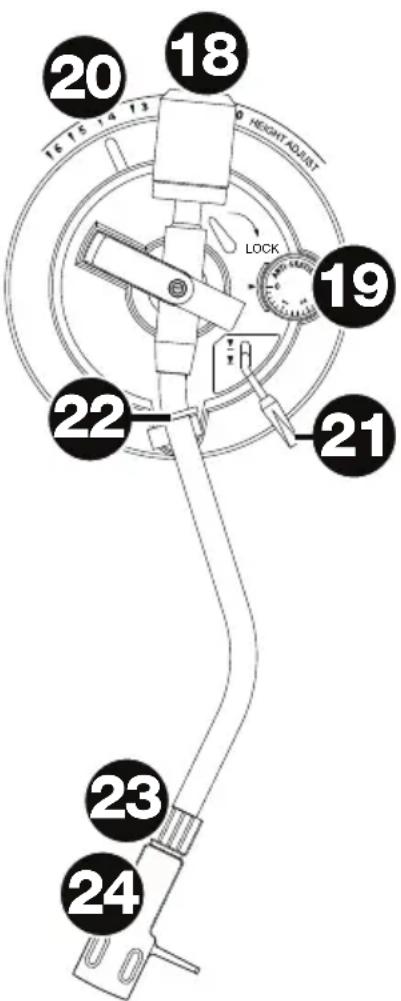
- Counterweight and Scale Ring: The counterweight balances the cartridge and headshell assembly so the tonearm can apply the proper amount of stylus pressure to the record.
- Anti-Skate Dial: Use this dial to compensate for inward tracking forces that occur with certain cartridges when the stylus nears the center of the record. In most cases, set this to 0. If you experience excessive skipping during back-cueing or scratching while nearing the center of the record, increase this dial's setting in small increments and test its performance.
- Height Adjust: Use this lever to set the height of the tonearm. Move the small Lock lever (above the Anti-Skate Dial) counterclockwise or clockwise to unlock or lock the height adjustment, respectively. See Setup > Tonearm for more details.
- Tonearm Lever: Lift this lever up or down to raise or lower the tonearm. Raise the tonearm before moving it toward or away from the record, and lower it once it is in place.
- Arm Clip: Close this clip to secure the tonearm while it is not being used. The clip remains in the "up" position while open.
Note: To prevent damage while transporting TT250USB, we recommend removing the cartridge and headshell assembly as well as securing tonearm in the arm clip.
- Tonearm Lock Nut: This nut secures the headshell and cartridge assembly to the tonearm. Turn the cartridge clockwise to loosen it or counterclockwise to tighten it, but do not over-tighten it.
- Cartridge and Headshell: The included cartridge is pre-mounted on a standard headshell. Remove the plastic cartridge cover (needle cover) before using TT250USB. This is user-replaceable and compatible with a variety of standard cartridges.
Setup
Platter
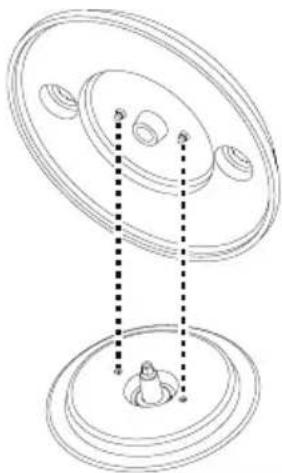
Place the platter onto the motor by aligning the pins in the bottom of the platter with the holes in the motor. Press it down firmly. Check to make sure that it rotates uniformly and does not wobble excessively, and then place the slipmat onto the platter.
Important:
- Incorrect platter setup can lead to poor turntable performance, platter instability or permanent motor damage.
- Make sure that the felt slipmat is always placed on top of the platter while using the turntable. Failure to use the slipmat may cause damage to your media as well as damage to the turntable.
Tonearm
Important: Refer to the documentation for your cartridge to determine the proper stylus pressure/weight (in grams) and tonearm height (in millimeters).
- Make sure the cartridge is on the tonearm. Turn it clockwise to loosen it or counterclockwise to tighten it. Do not over-tighten it! Remove the plastic cartridge cover (needle cover) before operating the turntable.
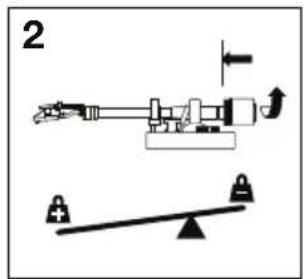
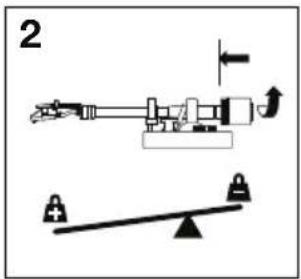
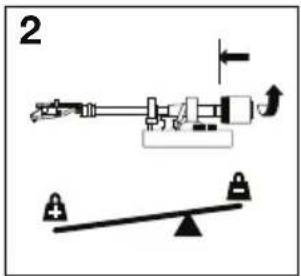
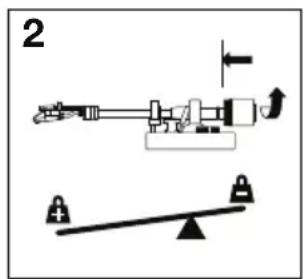
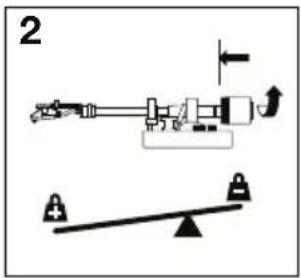
- Rotate the counterweight counterclockwise (while you are facing the scale ring) until it is in the complete forward position.
Note: This is also the maximum amount of pressure that can be applied to the cartridge.
-
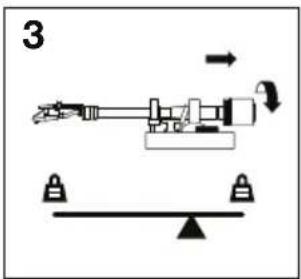
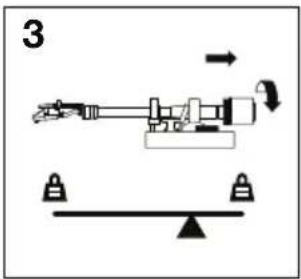
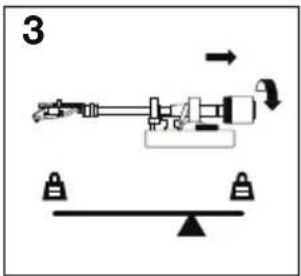
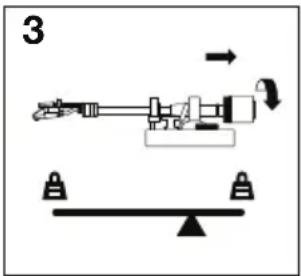
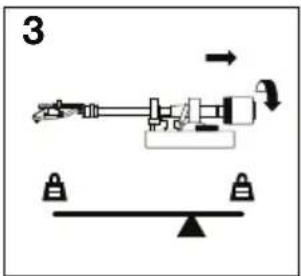
Now there should be a feeling of weight and resistance when the headshell is raised and lowered. Begin rotating the counterweight clockwise (while you are facing the scale ring) until the weight and resistance feeling is gone. If done properly, the tonearm will pivot with very little resistance back and forth indicating that there is exactly 0 grams of stylus pressure.
-
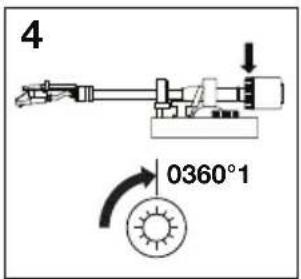
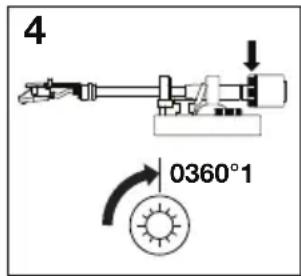
With the counterweight in its new position further away from tonearm pivot point, grasp the scale ring only and rotate it until 0 is in the vertical position.
-
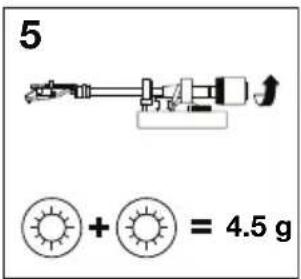
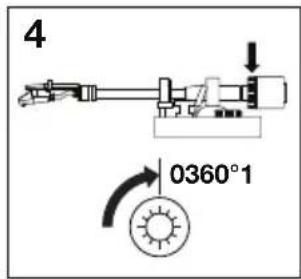
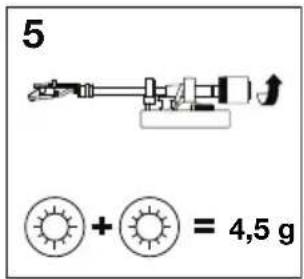
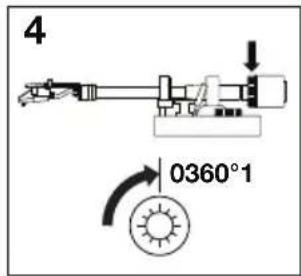
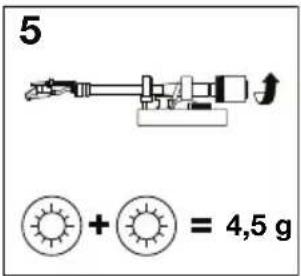
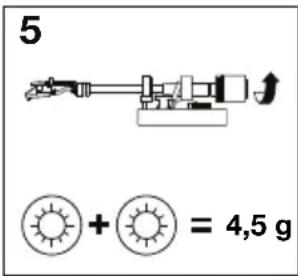
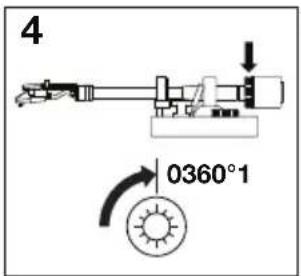
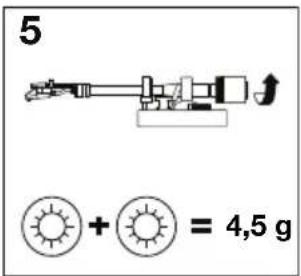
Finally, rotate the counterweight (and scale ring) counterclockwise until you reach the desired weight. A complete revolution of the scale ring corresponds to 3.5 g, so if the scale rotates 360° beyond the 0 point, add 3.5 to the new scale ring reading.
Note: The included headshell and cartridge assembly requires a minimum of 3 grams and no more than 5 grams for optimum performance.
- Push the small Lock lever (above the Anti-Skate Dial) counterclockwise to unlock the height adjustment. Place the stylus on your record, and then move the Height Adjust lever to raise or lower the tonearm so it is parallel with the record. Push the Lock lever clockwise to lock the new height adjustment.
Brazo de lectura
Bras de lecture
Braccio
Tonarm
Technical Specifications
| Motor Drive | Quartz direct-drive | |
| Starting Torque | 1.2 kg/cm | |
| Starting Time | < 0.7 seconds | |
| Braking system | Electronic | |
| Platter | Material | Aluminum die-cast |
| Diameter | 13.1" (332 mm) | |
| Weight | 1.63 lbs. (740 g) | |
| Tonearm | Effective | Length (80 mm) |
| Overhang | 0.60" (15.2 mm) | |
| Offset Angle | 22° | |
| Vertical Friction | 7 mg | |
| Speeds | 33 1/3 , 45 RPM< 0.15% wow & flutter | |
| Output | Line-level via attached stereo RCA cable | |
| Pitch Range | ±10% | |
| Connections | 1 USB port1 1/8" (3.5 mm) remote start input1 stereo RCA output cable, attached | |
| Power | Supply | 115/230 VAC, 60/50 Hz, cable attached |
| Consumption | 15 W | |
| Dimensions(width x depth x height) | 17.7" x 13.9" x 6.0"450 mm x 352 mm x 152 mm | |
| Weight | 16.5 lbs.7.5 kg | |
Specifications are subject to change without notice.
Trademarks and Licenses
Numark is a trademark of inMusic Brands, Inc., registered in the U.S. and other countries.
All other product or company names are trademarks or registered trademarks of their respective owners.
numark.com
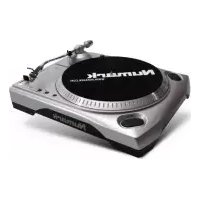

Brand : NUMARK
Model : TT250USB
Category : Turntable