
Power Roller Max - Paint spray Wagner SprayTech - Free user manual and instructions
Find the device manual for free Power Roller Max Wagner SprayTech in PDF.
| Product Type | High Performance Electric Paint Roller |
| Brand | Wagner SprayTech |
| Model | Power Roller Max |
| Power Supply | 120 V, 60 Hz, AC |
| Paint Flow Rate | 227.3 ml to 568.2 ml per minute (8 to 20 fl oz/min) |
| Compatible Paint Types | Oil-based or water-based (latex) paints and stains. Flash point >38 °C (100 °F) |
| Main Functions | Roller painting, corner pad, flat pad, interior/exterior use |
| Flow Adjustment | Variable speed dial 1 to 9 |
| Flow Reverser | Yes, PAINT/REVERSE position for purging |
| Quick Clean System | Quick-clean™ with garden hose adapter |
| Included Accessories | 9" roller with 3/8" and 3/4" naps, corner and flat pads, 18" extension, splash guard, roller rest |
| Container Capacity | Standard gallon paint container (5 gal adapter optional) |
| Hose Length | Not specified (integrated flexible hose) |
| Maintenance | Clean after each use, lubricate joints and O-rings |
| Safety | Grounding required, use of fire extinguisher and respirator recommended |
| Replacement Parts Available | Yes, full list in manual: handle, arm, roller, seals, etc. |
| Warranty | 2 years for residential use, 30 days for professional/rental use |
| Customer Service | 1-800-328-8251 (US), Monday-Friday, 8am-4:30pm Central Time |
Frequently Asked Questions - Power Roller Max Wagner SprayTech
User questions about Power Roller Max Wagner SprayTech
0 question about this device. Answer the ones you know or ask your own.
Ask a new question about this device
Download the instructions for your Paint spray in PDF format for free! Find your manual Power Roller Max - Wagner SprayTech and take your electronic device back in hand. On this page are published all the documents necessary for the use of your device. Power Roller Max by Wagner SprayTech.
USER MANUAL Power Roller Max Wagner SprayTech
Owner's Manual · Read this manual for complete instructions
English - Table of Contents
Safety Information 2
Parts and Components 3
Setup 4
Roller assembly setup 4
Handle rest area 5
Using the handle button. 6
Helpful painting tips 7
Changing accessories 7
Cleanup 8-9
Optional cleanup. 10-11
Cleaning and storage tips 12
Maintenance 12
Troubleshooting 13
Parts List. 38-39
Warranty 40
Technical service hours:
Monday through Friday, 8:00 am to 4:30 Central Time
Français - Table des matières Espanol - Tabla de Contenido
Wagner Technical Service
Register your product online at:
Call us first for answers fast.
Call Wagner Spray Tech toll-free if you have any comments or problems with this product.
Besoin d'aide?
To reduce the risks of fire or explosion, electrical shock and the injury to persons, read and understand all instructions included in this manual. Be familiar with the controls and proper usage of the equipment.

This symbol indicates a hazardous situation, which, if not not avoided could result in death or serious injury.
HAZARD: EXPLOSION OR FIRE
Solvent and paint fumes can explode or ignite, causing property damage and/or severe injury. PREVENTION:

- Exhaust and fresh air introduction must be provided to keep the air within the work area free from accumulation of flammable vapors.

- Avoid all ignition sources such as static electricity sparks, open flames, pilot lights, hot objects, cigarettes, and sparks from connecting and disconnecting power cords or working light switches.
- Fire extinguishing equipment must be present and in working order.
- Do not use materials with a flashpoint below 100^ F (38^ C). A fluid's flashpoint is the temperature at which vapors from the fluid could ignite if exposed to a flame or spark. Consult your paint supplier for information about a fluid's flashpoint.
- Keep the unit in a well ventilated location away from the work area. The pump contains arcing parts which emit sparks.
HAZARD: HAZARDOUS VAPORS
Paints, solvents, insecticides, and other materials may be harmful if inhaled, causing severe nausea, fainting, or poisoning.

PREVENTION:
- Use a respirator or mask whenever there is a chance that vapors may be inhaled. Read all instructions with the mask to insure that it will provide the necessary protection against the inhalation of harmful vapors.
HAZARD:GENERAL
May cause property damage or severe injury.
PREVENTION:
- Read all instructions and safety precautions before operating any equipment. Never leave the unit running while unattended. Unplug whenever not in use.
- Never immerse the unit into any liquid.
- Comply with all appropriate local, state and national codes governing ventilation, fire prevention, and operation.
- This paint roller system is designed to be used with authorized parts only. When using this system with parts that do not comply with the minimum specifications and safety devices of the system manufacturer, the user assumes all risks and liabilities.
- Before each use, check all hoses for cuts, leaks, abrasion or bulging of cover or damage or movement of couplings. If any of these conditions exist, call Customer Service. Never repair a paint hose, replace it with a new one.
Additional warnings are contained on the tag molded to the electrical cord of the unit. Be sure to read this tag before operating the unit.
Specifications
Flow rate 8-20 oz. per minute
Power source. 120 VAC
Power requirement 60 Hz current.
Capability Most oil and water based paints and stains. Do not use with lacquers, lacquer thinners or any other solvent with a flash point below 100^ F (38^)
General Description
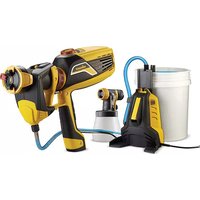
This high performance power roller is a precision power tool used for both interior and exterior painting and may be used with both water (latex) and oil based paints.
IMPORTANT: Use of oil-based paints must be limited to only those paints which can be cleaned with mineral spirits. Latex paints can be cleaned with soapy, lukewarm water. DO NOT use hot water when cleaning or flushing the unit.
Grounding Instructions
This product must be grounded. In the event of an electrical short circuit, grounding reduces the risk of electric shock by providing an escape wire for the electric current. This product is equipped with a cord having a grounding wire with an appropriate grounding plug. The plug must be plugged into an outlet that is properly installed and grounded in accordance with all local codes and ordinances.
WARNING - Improper installation of the grounding plug can result in a risk of electric shock.

If repair or replacement of the cord or plug is necessary, do not connect the green grounding wire to either flat blade terminal.
The wire with insulation having a green outer surface with or without yellow stripes is the grounding wire and must be connected to the grounding pin.
Check with a qualified electrician or serviceman if the grounding instructions are not completely understood, or if you are in doubt as to whether the product is properly grounded. Do not modify the plug provided. If the plug will not fit the outlet, have the proper outlet installed by a qualified electrician.
This product is for use on a nominal 120 volt circuit and has a grounding plug that looks like the plug illustrated below. A temporary adapter which looks like the adapter illustrated in the figure below may be used to connect this plug to a 2 pole receptacle as shown if a properly grounded outlet is not available.
The temporary adapter should be used only until a properly grounded outlet as shown below can be installed by a qualified electrician. The green colored rigid ear lug or the grounding wire extending from the adapter must be connected to a permanent ground such as a properly grounded outlet box cover. Whenever the adapter is used, it must be held in place by a metal screw.

Extension Cord Selection
If an extension cord is used, make sure that it is of the 3-conductor type with NEMA connectors so a continuous grounding circuit is provided from the tool to the power circuit receptacle. Make sure your extension cord is in good condition. Also, be sure that the conductor size is large enough to prevent excessive voltage drop which will cause loss of power and possible motor damage to the unit. A 14 or 12 gauge cord is recommended. If an extension cord is to be used outdoors, it must be marked with the suffix W-A following the cord type designation. For example, SJTW-A to indicate that it is acceptable for outdoor use.
| Cord gauge Maximu | m cord length |
| 12 150 feet | |
| 14 100 feet |
Parts and Components
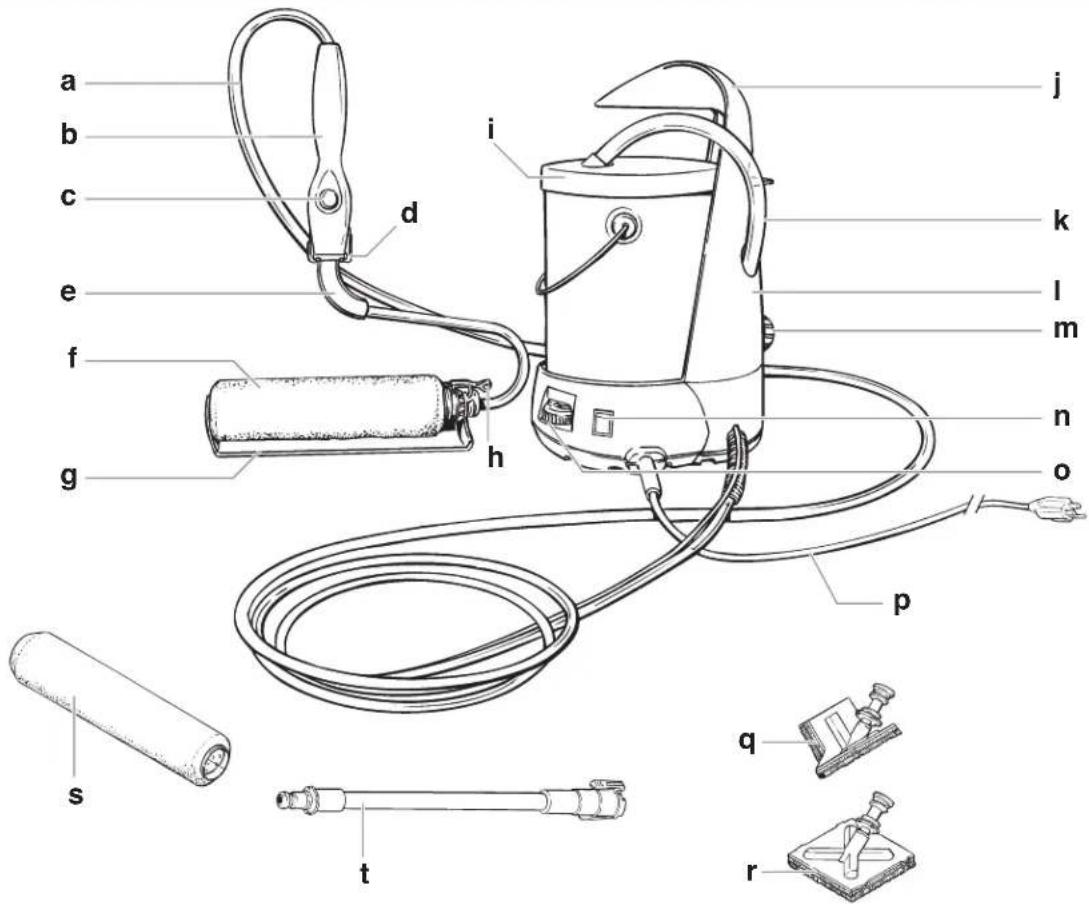

Item Description
a) Hose
b) ......... Roller handle
c) Handle button
d) .Quick-release tabs
e) .Roller arm
f) .Roller assembly
f1) 3/8" nap roller cover
f2) ......... Roller cap
f3) . Roller core
g) . Spatter shield
h) Locking tab
i) Can lid
Item Description
i) .Roller rest area
k) Suction tube
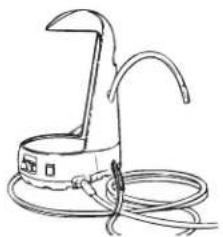
1) Tower
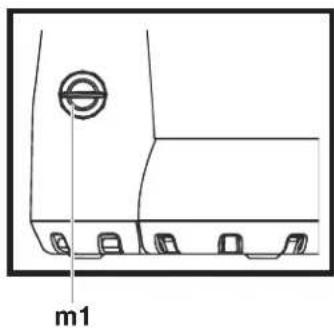
m) Quick-cleanTM adapter
m1) .Quick-cleanTM inlet plug
n).Paint flow reverse switch
o) Variable speed dial
p) . Power cord
q) .Corner pad r).Trim pad
s) 3/4" nap roller cover t) Extension
Setup
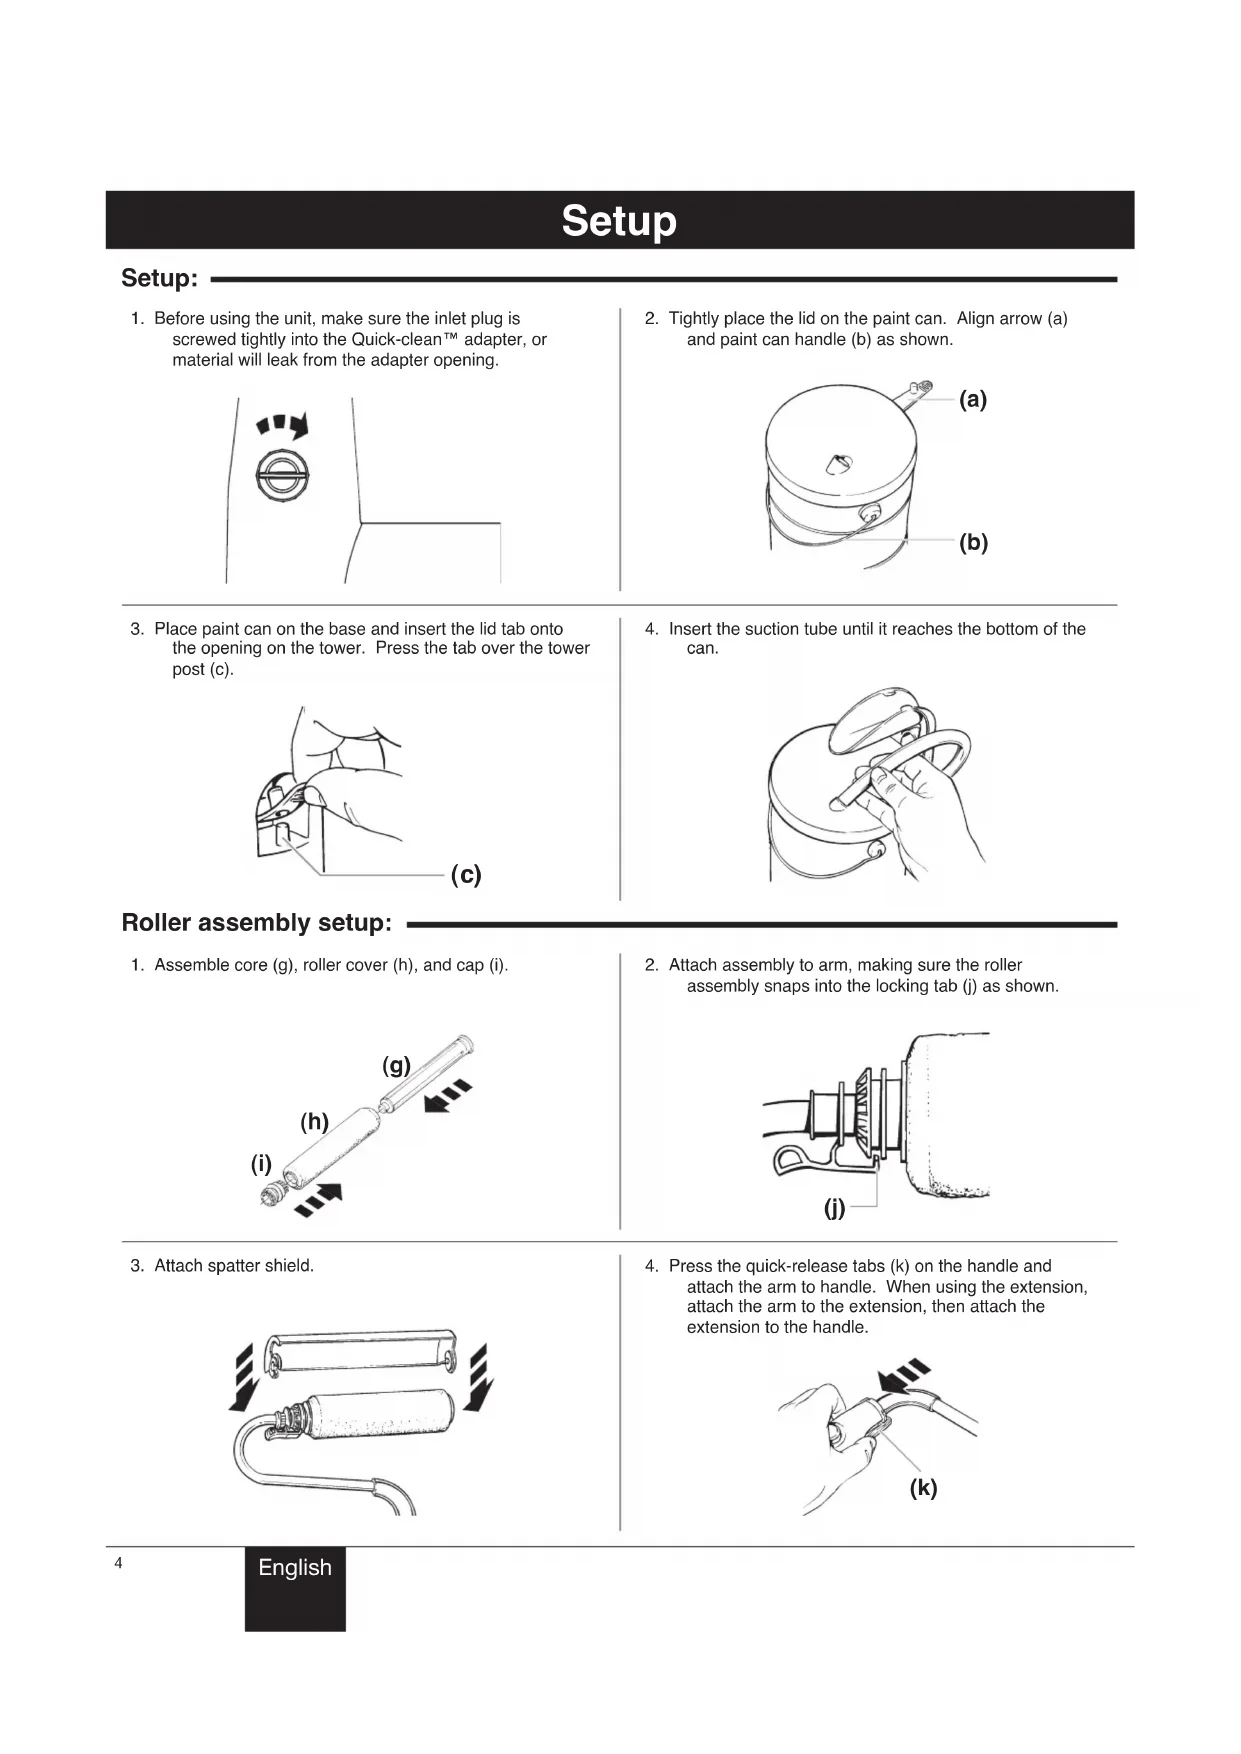
Setup:
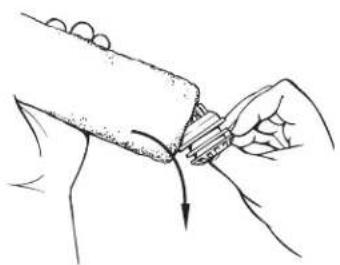
- Before using the unit, make sure the inlet plug is screwed tightly into the Quick-clean™ adapter, or material will leak from the adapter opening.

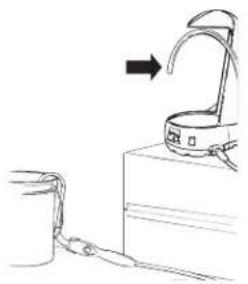
- Tightly place the lid on the paint can. Align arrow (a) and paint can handle (b) as shown.
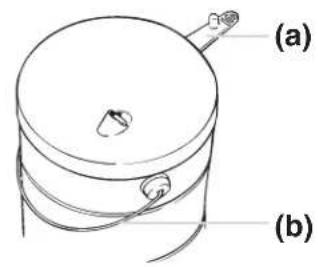
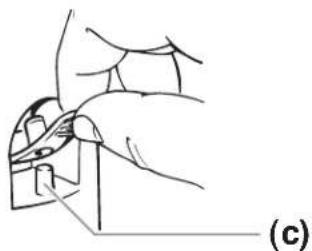
- Place paint can on the base and insert the lid tab onto the opening on the tower. Press the tab over the tower post (c).
- Insert the suction tube until it reaches the bottom of the can.

Roller assembly setup:
- Assemble core (g), roller cover (h), and cap (i).

- Attach assembly to arm, making sure the roller assembly snaps into the locking tab (j) as shown.

- Attach spatter shield.

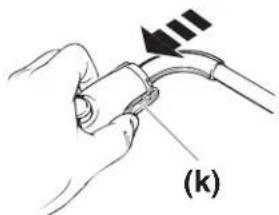
- Press the quick-release tabs (k) on the handle and attach the arm to handle. When using the extension, attach the arm to the extension, then attach the extension to the handle.
Setup (continued)
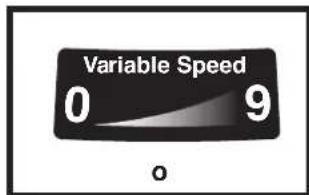
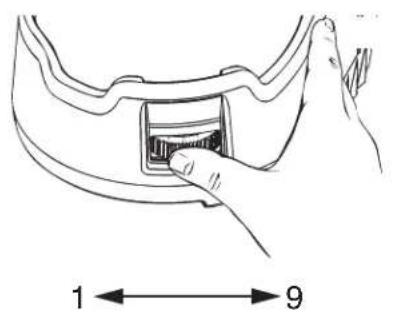
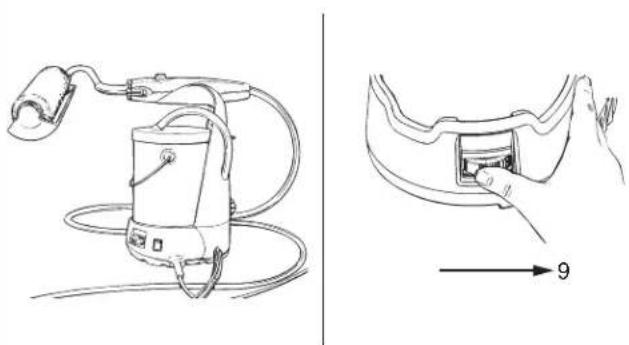
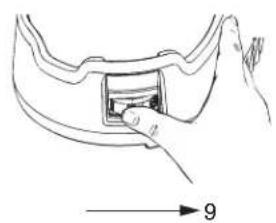
Variable speed dial:
The settings on the variable speed dial determine the flow rate of paint (1-9). The higher the setting, the higher the flow rate. A setting of zero (0) means the unit is switched off.
- Plug in the power cord. Turn the variable speed dial to desired setting. No paint will flow until the motor has been activated by the handle button (see Using the handle button on page 6).
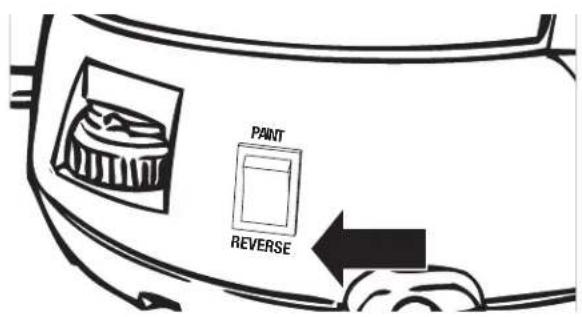
- Make sure the paint flow direction switch is set to "PAINT" position.

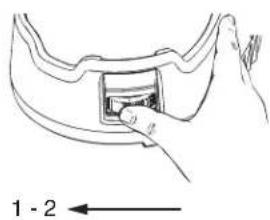
Roller handle rest area:
Use the carrying handle as a rest area for the roller handle and arm when they are not in use.
NOTE - The roller handle should not be placed into the handle rest area when it is attached to the extension! The spatter shield can be used as a rest for the roller arm when the extension is being used.
NOTE - During break periods, make sure that the roller is not saturated with paint, or it will drip and accumulate in the spatter shield.

Using the Handle Button
Use the chart below as a guide when following the painting and priming instructions below.
| When you are... Do this... | . and the unit will... | |
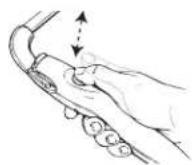
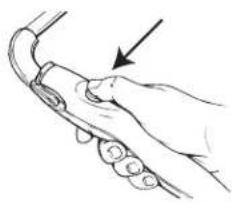
| • Starting up • Using 9" roller arm • Cleaning up | 1) Set speed dial on higher speed (3-9). 2) Fully press and release handle button to start motor. 3) Press handle button again stop. | Unit will stay running when the button is fully pressed and released. Unit will stop when the button is again pressed and released. |
| • Using 3" x 3" trim pad • Using 2" x 4" corner pad | 1) Set speed dial to slower speed (1-2). 2) Partially depress and release button. Release the button when you have the desired amount of paint. | Unit will run when the button is partially depressed, and stop when the button is released. |
Priming:
1a. If using the roller, set the variable speed dial to 9.

1b. If using one of the pads, set the variable speed dial to a lower setting (1-2).
- To start the motor, fully press and release the handle button.
| 3a) If using the roller: 3b) If | using one of the pads: |
| When paint appears through the roller, PRESS and RELEASE handle button to shut off the motor and stop the flow of paint. | PRESS and RELEASE the handle button when the material reaches the bottom of the handle. |
Painting (2 methods):
1) Stop and Start
The Stop and Start method is recommended when you are using the trim pad, or the corner pad, or swivel stain pad.
Select desired speed. Partially depress the handle button until material appears through the roller or pad. Material will continue to flow while button is held in this position. Release button to stop flow of material.
2) Continuous Flow
The continuous flow method is recommended when you are painting a large area with the roller.
Select desired speed. Fully press and release handle button. To stop flow of paint, fully press and release handle button once again.

Helpful Painting Tips
Prepping the Room
Remove all pictures, mirrors, and decorations from the walls and draperies from the windows. Remove all nails, hardware and switch and receptacle covers. Cover furniture and floor with drop cloths.
Surface Preparation
- Always remove wallpaper before painting. Wash off old adhesive and rinse with water. Allow the walls to dry before painting.
- Wash and rinse dirt, grease and oil build-up off the walls with soap and water.
- Fill all nail holes, joints and cracks with patching paste. Let dry and sand the surface until smooth. Clean sanded area with a damp cloth.
- Spot prime all patched areas and any marker and/or pen marks before applying first coat.
*TIP: Write the important information from your paint can -- color, formula, brand and paint type -- on the back of a switch plate for future reference.
Painting the Room
*Tip: If you need more than one gallon of paint to do the room's walls, mix them together to ensure color uniformity.
- Always make sure to open a window or door to ensure proper ventilation. If you are painting both the ceiling and walls in your room, start with the ceiling first and then move to the walls.
Ceilings:
- To minimize spills and spatters, use the spatter guard and paint across the short width of the ceiling.
Walls:
- Tape off around base and window and door trim.
-
Paint one wall at a time.
-
Pick an area to start where you can saturate the roller cover and evenly distribute the paint. Working in three-foot sections, begin by cutting-in around windows, doors, cabinets, base and other breaks in the wall surface with a pad or brush.
-
Press the handle button until paint appears through the roller cover.
-
Start painting at one end of a wall and roll out the letter "W". Fill it in with crosswise strokes, working your way across the wall in 3^ × 3^ sections. Finish the sections by painting one solid swipe from ceiling to floor. This will give you a nice even paint finish.
-
Press the handle button as needed for more paint. Be careful not to over-saturate the roller cover as it may drip, slide on the wall or spatter.
-
Make sure to run the roller cover over the areas you cut-in around the trim and baseboards to even out the texture.
If you need to stop and take a break; finish painting the entire wall, or stop at a break in the wall such as a doorway or corner to prevent lap marks.
Changing accessories:
- When removing or changing any accessories from the roller handle, it is likely that some material will drip from the handle and the accessory.
- Turn the variable speed dial to 0 (OFF) prior to removing any accessories or components, and make sure your floors and furnishings are protected from dripping paint.
-
To minimize dripping material from the handle and accessories, follow the steps below.
-
Press the quick-release tabs on the handle (or the extension).
- Pull the handle and the accessory apart, making sure to keep the connecting ends pointed up.
Cleanup
Purging the paint hose:
When you are finished with your project, follow these steps to return any remaining material left in the hose back into its container. These steps should be followed no matter what type of material you used.
- Switch paint flow directional switch to "REVERSE".
- Place roller arm into rest area. Turn the variable speed dial to 9.
- Fully press and release the handle button to switch the motor on. Let the motor run for 2-3 minutes to pull paint from the hoses back into the paint container. When finished, fully press and release the handle button to switch the motor off. Flip switch back to "PAINT".

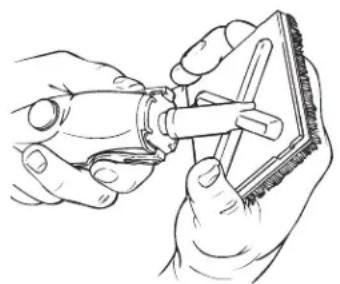
- Remove spatter shield. Press locking tab (a) and drop roller cover assembly into a bucket of the appropriate cleaning solution.
- Insert thumb to first knuckle, pry and pull the cap from the roller cover. Once the cap is removed, push the core out the other end.
IMPORTANT: Make sure your floors and furnishings are protected from dripping paint when removing or disassembling the roller assembly. Drop the parts into a bucket of the appropriate cleaning solution while you clean the unit.
Cleanup (continued)
Using the Quick-cleanTM Feature:
- Follow these steps ONLY if you used latex-based material AND you have an available garden hose. Otherwise, follow the Optional Cleanup - latex-materials or Optional Cleanup - oil-based materials instructions.
-
Make sure you have completed steps 1-5 in Purging the Paint Hose before using the Quick-clean™ feature.
-
Unplug the power cord. Remove the paint container from the unit, and place the unit on its side with the Quick-clean™ adapter facing up.
The unit should be placed on its side so material will not leak from the Quick-clean™ adapter when the plug is removed.
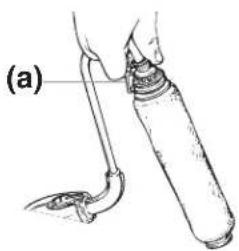
- Remove the Quick-clean™ inlet plug from the Quick-clean™ adapter. Insert a garden hose into the Quick-clean™ adapter. Turn the Quick-clean™ adapter fitting counterclockwise to secure the hose. Make sure the washer stays inside the fitting (a). Place the unit upright.


- Hang the roller arm from an empty five-gallon bucket. While holding the suction tube over the five-gallon bucket, slowly turn the garden hose ON. Let the water run through the suction tube and out the roller arm holes until the hose runs clear. Empty bucket as necessary.


- Turn the garden hose off. Remove suction tube from five-gallon bucket and replace the Quick-clean™ inlet plug. Leave the arm hanging from the bucket.

- Plug in the power cord. Make sure the paint flow direction switch is set to "PAINT" position. Turn the variable speed dial to 9. FULLY PRESS AND RELEASE the handle button, and let unit run until all fluids have been purged from the paint hose. Turn the unit OFF, and unplug the power cord. Properly dispose of the cleaning solution.
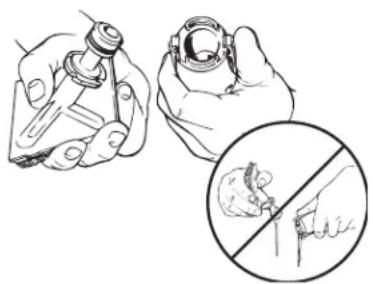
- Thoroughly clean the roller cover, core and cap. Press the quick-release tabs and remove the roller arm from the handle. Wipe any remaining paint with the appropriate cleaning solution and a damp cloth (DO NOT SUBMERGE ROLLER HANDLE!).

Optional Cleanup
Latex materials:
Follow these steps ONLY if you used latex materials and do not have a garden hose available.
- Elevate roller arm and hang from an empty bucket. The unit must be lower than the arm in order for air to be completely purged from the paint hose (do not submerge roller handle).

- Turn variable speed dial to 9. FULLY PRESS AND RELEASE the handle button, and run a minimum of one gallon of soapy, lukewarm water through the unit (cleaning time may vary depending upon type of paint used).

- While unit is self-cleaning, thoroughly clean the roller cover, core and cap.

- Remove suction tube from solution, raise unit above handle, and run motor until all cleaning solution is purged from the unit. Turn variable speed dial to 0 (OFF). Unplug power cord.
A light paint film residue may remain in the paint hose after cleaning. This is normal and will not affect the future performance of your unit.
- Press quick-release tabs and remove the roller arm from the roller handle. Remove any remaining paint with the appropriate cleaning solution and a damp cloth (DO NOT SUBMERGE HANDLE!).
Switch the unit OFF (O) prior to removing any accessories or components, and make sure your floors and furnishings are protected from dripping paint.

Optional Cleanup
Oil-based materials:
These steps should be followed for use with ONLY oil-based materials.
- Place roller arm and suction tube in a bucket of mineral spirits.

- Turn variable speed dial to 9. FULY PRESS AND RELEASE the handle button and recirculate one quart of mineral spirits through the unit for approximately 10 minutes (cleaning time may vary depending on type of paint used. Never leave unit running while unattended).

- While unit is self-cleaning, thoroughly clean the roller cover, core and cap with mineral spirits.

- Repeat steps 1-5 in Optional Cleanup - Latex materials using a half gallon of warm, soapy water to complete the cleaning process.
Steps 1-5 in Optional Cleanup - Latex Materials must be repeated using warm, soapy water in order to purge any remaining mineral spirits from the paint hose. Unpurged mineral spirits can damage the paint hose over time.
Storage
Cleaning and storage tips:
Thoroughly cleaning your unit and its components is the best way to ensure the prolonged life of your unit.
- Keep water, paint, and other residues away from the handle button. A clogged handle button will affect the performance of your unit.
- Be sure that your unit is free from all fluids before storage. After storing your unit in extreme cold temperatures, allow unit to reach room temperature before using.
- When storing your unit, be sure the paint hose is stored in a large loop without any kinks. If it is bent, it could be damaged.
Maintenance:
The areas on the roller handle and the extension indicated below must be cleaned thoroughly and lubricated after each use. ALL paint should be removed from the areas highlighted in gray below, especially the quick-release tabs and all other areas that connect with other parts. This can be done by using the appropriate cleaning solution and an old toothbrush (DO NOT SUBMERGE ROLLER HANDLE!).
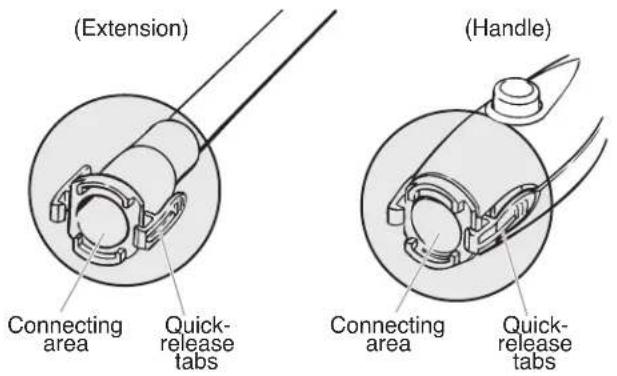
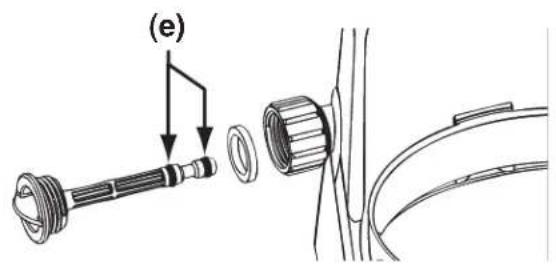
In addition to thoroughly cleaning your unit after every use, you must clean and lubricate the areas on the arm (a, b, c), extension (d), and the Quick-clean™ inlet plug O-rings (e) indicated below. Use a thin layer of petroleum jelly to lubricate the indicated areas.
IMPORTANT: DO NOT attempt to remove the Quick-clean™ inlet plug O-rings, and make sure not to lose the Quick-clean™ inlet washer.

Troubleshooting
Problem
A. The pump will not run
B. Paint fails to load the roller.
C. The motor does not turn off.
D. There is paint leakage.
Cause
- The power cord is unplugged, or no power in outlet.
- The variable speed dial is turned to 0 (OFF) and handle button has not been pressed.
-
There is a kink in the air hose.
-
The suction tube is not immersed in the paint.
- There is an obstruction in the suction tube.
- The paint can is empty.
- The O-rings on the Quick-clean™ inlet plug are worn or dirty.
-
The Quick-clean™ plug is missing from the Quick-clean™ adapter.
-
The handle button is activated.
- There is a kink in the air hose.
-
There is an air switch malfunction.
-
The seal on the roller arm is backwards.
- The seal and cap were not properly cleaned.
- The O-ring and the connecting area were not cleaned properly.
- Paint residue on connecting areas.
- The O-rings are damaged or missing.
- The roller cover is worn or damaged.
- The roller core or cap is worn or damaged.
-
The bearing areas on the roller arm are worn.
-
The pump tube is punctured.
-
The paint hose is damaged.
- The O-rings on the Quick-clean™ inlet plug are worn or dirty.
-
The Quick-clean™ plug is missing from the Quick-clean™ adapter.
-
Missing washer.
Solution
- Plug the power cord into 120V outlet
- Turn variable speed dial to higher setting (1-9) and press handle button.
- Unkink the air hose
If unit still fails to run, call Customer Service.
- Fully immerse the tube into the paint.
- Remove the obstruction.
- Fill the paint can
- Properly clean and lubricate, or replace.
-
Install Quick-cleanTM plug.
-
Press and release handle button.
- Unkink the air hose.
-
Unplug unit, then call Customer Service.
-
Turn the seal around.
- Clean and properly lubricate.
-
Clean and properly lubricate (pg 12).
-
Clean connecting areas.
- Replace the O-rings*
- Replace the roller cover*.
- Replace the roller core or cap*
-
Call Customer Service
-
Call Customer Service
- Call Customer Service
- Properly clean and lubricate, or replace.
-
Install Quick-cleanTM plug.
-
Replace.
-
Replacement parts available by calling customer service

Have you tried the recommendations above and are still having problems? In the United States, to speak to a customer service representative, call our Customer Service at 1-800-328-8251 Monday through Friday between 8:00 AM and 4:30 PM Central time.
Product Registration
Register your product online at www.wagnerspraytech.com. Proper registration will serve as proof of purchase in the event your original receipt becomes misplaced or lost.
A) The air hose and the paint hose are not included with the handle kit.
B) The air hose connects to the post (not shown) underneath the inner handle
Français
Wagner Two Year Limited Warranty - Keep on file - English
This product manufactured by Wagner Spray Tech Corporation (Wagner), is warranted to the original retail purchaser against defects in material and workmanship for two years from date of purchase if operated in accordance with Wagner's printed recommendations and instructions. This product is designed for home use only. If this product is used for professional/rental purposes, this warranty applies only for 30 days from date of purchase.
This warranty does not cover damage resulting from improper use, accidents, user's negligence or normal wear. This warranty does not cover defects or damages caused by service or repair performed by anyone other than a Wagner Authorized Service Center. This warranty does not apply to accessories.
Any implied warranty of merchantability or fitness for a particular purpose is limited to two years for home use and 30 days for professional/rental use from date of purchase.
Wagner shall not in any event be liable for any incidental or consequential damages of any kind, whether for breach of this warranty or any other reason.
If any product is defective in material and/or workmanship during the applicable warranty period, return it with proof of purchase, transportation prepaid to any Wagner Authorized Service Center. Contact Wagner Technical Service at 1770 Fernbrook Lane, Plymouth, MN 55447. Wagner's Authorized Service Center will either repair or replace the product (at Wagner's option) and return it to you, postage prepaid.
Some states do not allow limitations on how long an implied warranty lasts or the exclusion of incidental or consequential damages, so the above limitation and exclusion may not apply to you.
This warranty gives you specific legal rights and you may also have other rights which vary from state to state.
Wagner Spray Tech Corporation
1770 Fernbrook Lane
Plymouth, Minnesota 55447
Telephone 1-800-328-8251
Copyright © Wagner Spray Tech Corporation. All rights reserved, including right of reproduction in whole or in part, in any form.


- English - Table of Contents
- Français - Table des matières Espanol - Tabla de Contenido
- HAZARD: EXPLOSION OR FIRE
- HAZARD: HAZARDOUS VAPORS
- PREVENTION:
- HAZARD:GENERAL
- Specifications
- General Description
- Grounding Instructions
- WARNING - Improper installation of the grounding plug can result in a risk of electric shock.
- Extension Cord Selection
- Parts and Components
- Item Description
- Setup
- Setup:
- Roller assembly setup:
- Setup (continued)
- Variable speed dial:
- Roller handle rest area:
- Using the Handle Button
- Priming:
- Painting (2 methods):
- 1) Stop and Start
- 2) Continuous Flow
- Helpful Painting Tips
- Prepping the Room
- Surface Preparation
- Painting the Room
- Ceilings:
- Walls:
- Changing accessories:
- Cleanup
- Purging the paint hose:
- Cleanup (continued)
- Using the Quick-cleanTM Feature:
- Optional Cleanup
- Latex materials:
- Oil-based materials:
- Storage
- Cleaning and storage tips:
- Maintenance:
- Troubleshooting
- Problem
- Cause
- Solution
- Product Registration
- Français
- Wagner Two Year Limited Warranty - Keep on file - English
Brand : Wagner SprayTech
Model : Power Roller Max
Category : Paint spray