
Power Painter - Spray Paint Wagner SprayTech - Free user manual and instructions
Find the device manual for free Power Painter Wagner SprayTech in PDF.


| Product Type | Paint Sprayer (Spray Gun) |
| Brand | Wagner SprayTech |
| Model | Power Painter |
| Dimensions (L x W x H) | 30 x 20 x 25 cm |
| Weight | 2 kg |
| Power Source | 120V / 60 Hz (US) or 230V / 50 Hz (EU) |
| Power Consumption | 600 W |
| Spray Pattern | Adjustable (vertical, horizontal, circular) |
| Flow Control | Variable |
| Container Capacity | 1000 ml |
| Maximum Viscosity | Up to 100 DIN-sec (liquids) |
| Nozzle Size | 1.5 mm (standard) |
| Hose Length | 1.5 m |
| Main Functions | Spray painting for walls, ceilings, furniture, fences, and crafts |
| Maintenance & Cleaning | Flush with water (latex) or solvent (oil-based) after use; remove nozzle and needle |
| Safety Features | Locking trigger, overheat protection, requires ventilation and PPE |
| Spare Parts Available | Nozzles, needles, filters, housings, seals |
| Repairability | User-replaceable parts; service centers available |
| General Information | Suitable for latex, acrylic, enamel, varnish, stains; ideal for DIY and professional use |
Frequently Asked Questions - Power Painter Wagner SprayTech
User questions about Power Painter Wagner SprayTech
0 question about this device. Answer the ones you know or ask your own.
Ask a new question about this device
Download the instructions for your Spray Paint in PDF format for free! Find your manual Power Painter - Wagner SprayTech and take your electronic device back in hand. On this page are published all the documents necessary for the use of your device. Power Painter by Wagner SprayTech.
USER MANUAL Power Painter Wagner SprayTech
Read this manual for complete instructions

Table of Contents
| Safety Information | 2 |
| What's in the Box | 3 |
| Before you Begin | 4 |
| Selecting the proper spray tip | 4 |
| Important preparation tips | 4 |
| Setup | 5-6 |
| Material container setup | 5 |
| Remote suction set setup | 6 |
| Flow Control Knob / Practice Spraying | 7 |
| Material thinning | 7 |
| Usage | 8 |
| Priming with remote suction set | 8 |
| Spraying (Overspray) | 8 |
| Spray Technique | 9 |
| Cleanup - Latex Materials | 10-11 |
| Cleaning the material container | 10 |
| Cleaning the remote suction set | 11 |
| Cleanup - Oil-based Materials | 12 |
| Cleaning the material container | 12 |
| Cleaning the remote suction set | 13 |
| Cleaning the Components | 14 |
| Reassembly | 14 |
| Maintenance | 15 |
| Replacement parts | 15 |
| Troubleshooting | 16 |
| Product registration | 16 |
| Parts List | 50-51 |
| Warranty | 52 |

1-800-328-8251
Wagner Technical Service
Register your product online at:
http://www.wagnerspraytech.com
1770 Fernbrook Lane, Plymouth, MN 55447
Need Help? Call us first for answers fast.
Call Wagner Spray Tech toll-free if you have any comments or problems with this product.
Technical service hours: Monday through Friday, 8:00 am to 7:00 pm Central Time
To reduce the risks of fire or explosion, electrical shock and the injury to persons, read and understand all instructions included in this manual. Be familiar with the controls and proper usage of the equipment.

This symbol indicates a hazardous situation, which, if not not avoided could result in death or serious injury.
HAZARD: INJECTION INJURY
A high pressure stream of paint produced by this equipment can pierce the skin and underlying tissues, leading to serious injury and possible amputation.
DO NOT TREAT AN INJECTION INJURY AS A SIMPLE CUT! Injection can lead to amputation. See a physician immediately.
NOTE TO PHYSICIAN:
Injection into the skin is a traumatic injury. It is important to treat the injury surgically as soon as possible. DO NOT delay treatment to research toxicity. Toxicity is a concern with some coatings injected directly into the blood stream. Consultation with a plastic surgeon or reconstructive hand surgeon may be advisable.
PREVENTION:
- NEVER aim the gun at any part of the body.
- Do not aim the gun at, or spray any person or animal.
- NEVER allow any part of the body to come in contact with the fluid stream.
- NEVER put your hand in front of the gun. Wear gloves. Gloves will not provide protection against an injection injury.
- Keep hands and other body parts away from the discharge. For example, do not try to stop leaks with any part of the body.
• Always unplug the spray gun before servicing, cleaning tip guard, changing tips, or leaving unattended. - Always use the nozzle tip guard. Do not spray without nozzle tip guard in place. The tip guard provides some protection against injection injuries but is mainly a warning device. Only use a nozzle tip specified by Wagner.
HAZARD: EXPLOSION OR FIRE
Solvent and paint fumes can explode or ignite, causing property damage and/or severe injury.
PREVENTION:
- Exhaust and fresh air introduction must be provided to keep the air within the spray area free from accumulation of flammable vapors.
- Avoid all ignition sources such as static electricity sparks, open flames, pilot lights, hot objects, cigarettes, and sparks from connecting and disconnecting power cords or working light switches.
- Fire extinguishing equipment must be present and in good working order.
- Follow the material and solvent manufacturer's safety precautions and warnings.
- Do not spray flammable or combustable materials near an open flame or sources of ignition such as cigarettes, motors, and electrical equipment.
- Know the contents of the paints and solvents being sprayed. Read all Material Safety Data Sheets (MSDS) and container labels provided with the paints and solvents. Follow the paint and solvent manufacturer's safety instructions.
HAZARD: EXPLOSION HAZARD DUE TO INCOMPATIBLE MATERIALS
Will cause property damage or severe injury.
PREVENTIÓN:
- Do not use bleach.
- Do not use halogenated hydrocarbon solvents such as methylene chloride and 1,1,1 - trichloroethane. They are not compatible with aluminum and may cause an explosion. If you are unsure of a material's compatibility with aluminum, contact your coating supplier.


HAZARD: HAZARDOUS VAPORS
Paints, solvents, insecticides, and other materials can be harmful if inhaled or come in contact with the body. Vapors can cause severe nausea, fainting, or poisoning.
PREVENTION:
- Use a respirator or mask if vapors can be inhaled. Read all instructions supplied with the mask to be sure it will provide the necessary protection.
- Wear protective eyewear.
- Wear protective clothing as required by coating manufacturer.

HAZARD: GENERAL
Can cause severe injury or property damage.
PREVENTION:
- Read all instructions and safety precautions for equipment and spray material before operating any equipment.
- Comply with all appropriate local, state, and national codes governing ventilation, fire prevention, and operation.
- Keep sprayer out of the reach of children.
• Hearing protection is recommended for extended use. - Always wear appropriate gloves, eye protection and a respirator or mask when painting.
- Do not operate or spray near children. Keep children away from equipment at all times.
- Do not overreach or stand on an unstable support. Keep effective footing and balance at all times.
- Stay alert and watch what you are doing.
- Do not operate the unit when fatigued or under the influence of drugs or alcohol.
HAZARD: ELECTRIC SHOCK HAZARD
May cause severe injury.
PREVENTION:
- Keep electrical cord plug and spray gun trigger free from paint and other liquids. Never hold cord at plug connections to support cord. Failure to observe may result in an electrical shock.
- Never immerse electrical parts in water or any other liquid. Wipe the exterior of the sprayer with a damp cloth for cleaning. Always make sure the sprayer is unplugged before taking it apart for cleaning.

IMPORTANT: Use only a 3-wire extension cord that has a 3-blade grounding plug and a 3-slot receptacle that will accept the plug on the product. Make sure your extension cord is in good condition. When using an extension cord, be sure to use one heavy enough to carry the current your product will draw. For lengths less than 50 feet, use a No. 18 AWG extension cord. For lengths more than 50 feet, use a No. 14 or No. 16 AWG extension cord. An undersized cord will cause a drop in line voltage resulting in loss of power and overheating.
Wagner Spray Tech accessory extension cords recommended:
P/N 0090241 20 foot extension cord.
P/N 0090242 35 foot extension cord.
| Minimum gauge for extension cords | |||||||||
| Ampere rating range | Cord length (feet)Voltage | ||||||||
| 120V | 25-50 | 100 | 150 20 | 20 250 | 300 40 | 40 500 | |||
| 2 - 3 | 18 | 16 | 14 14 | 12 12 | 10 10 | ||||

Important Safety Information • Read all safety information before operating the equipment. SAVE THESE INSTRUCTIONS.
Grounding Instructions
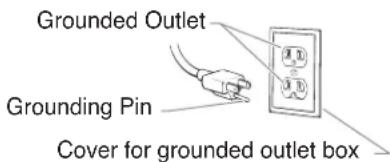
This product must be grounded. In the event of an electrical short circuit, grounding reduces the risk of electric shock by providing an escape wire for the electric current. This product is equipped with a cord having a grounding wire with an appropriate grounding plug. The plug must be plugged into an outlet that is properly installed and grounded in accordance with all local codes and ordinances.
WARNING - Improper installation of the grounding plug can result in a risk of electric shock.

If repair or replacement of the cord or plug is necessary, do not connect the green grounding wire to either flat blade terminal. The wire with insulation having a green outer surface with or without yellow stripes is the grounding wire and must be connected to the grounding pin.
Check with a qualified electrician or serviceman if the grounding instructions are not completely understood, or if you are in doubt as to whether the product is properly grounded. Do not modify the plug provided. If the plug will not fit the outlet, have the proper outlet installed by a qualified electrician.
This product is for use on a nominal 120 volt circuit and has a grounding plug that looks like the plug illustrated below. Make sure that the product is connected to an outlet having the same configuration as the plug. No adapter should be used with this product.
What's in the Box
a) Sprayer assembly
b) Spray tip
c) Suction tube with filter
d) Material container
e) Flow control knob
f) Trigger
g) Pump assembly
1) Locking nut
2) Atomizer valve
3) Pump housing ring
4) Pump housing
5) Spring
6) Piston
h) Dual hose fitting
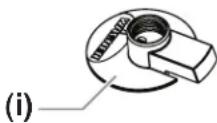
i) Quick Flush lid
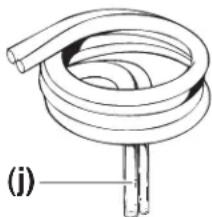
j) Remote suction hoses
k) Container clip
I) Oil lubricant*
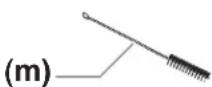
m) Cleaning brush
* Included in some models.




Before You Begin
Selecting the Proper Spray Tip:
It is important that you use the proper spray tip based on your type of spraying job and the type of material you plan to spray. Read below for details.
Optimus™ Spray Tip (included)
An Optimus ™ spray tip produces a wide pattern that can be adjusted horizontally or vertically.
To adjust:
- Make sure the sprayer is unplugged and that spray tip is sufficiently hand-tightened.
- Orient the spray tip to achieve your desired spray pattern.
a. If you plan to spray horizontally (side to side), orient the spray tip as shown in (a).
b. If you plan to spray vertically (up and down), orient the spray tip as shown in (b).
(a)


(b)
Round Tip (sold separately)
A round tip produces a round pattern. Use a round tip if the surface you are spraying is too small for use with the wide angle tip.
A round tip is available at your local retailer.
Stain Tip (sold separately)
The stain tip has a specially designed opening for use with thin materials such as thin stains, sealers and waterproofers, and can be adjusted to reduce overspray. If you did not receive a stain tip and will be spraying one of these materials, the tip can be purchased at your local retailer.
The stain tip pattern is round with a fine spray. To adjust the spray pattern size and coarseness, turn the tip slightly counterclockwise to narrow the pattern and make the spray more coarse. Turn the tip slightly clockwise to widen the pattern and make the spray more fine.
IMPORTANT: Make sure to tighten all spray tips firmly by hand. If the spray tip is not tightened firmly enough, the sprayer could leak or the tip could be damaged. Do not use a tool to tighten the spray tip. If the tip is too tight, it may be damaged.
IMPORTANT: Use only Optimus™-labeled spray tips with this sprayer. Other tips are not compatible with this sprayer.
Important Preparation Tips:
- It is important to mix the material thoroughly before you begin. Do not shake the material to mix it. Always stir the material gently but thoroughly before use.
- Remove any skin that has formed on the top of the material. Do not mix the skin into the material. The skin can break up and clog the sprayer. Older paint may need to be strained.
Material Container Setup
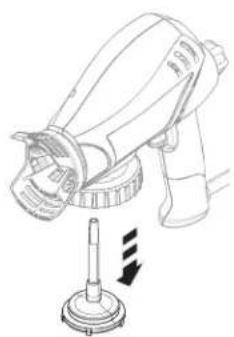
- Remove the material container from the pump housing by turning the pump housing ring counterclockwise.

- Remove the suction tube.

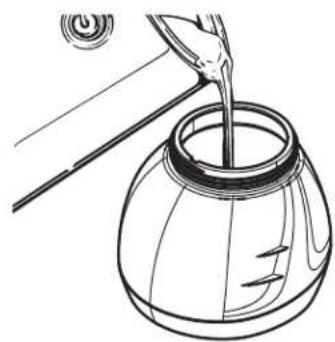
- Fill the container with the material to be used.
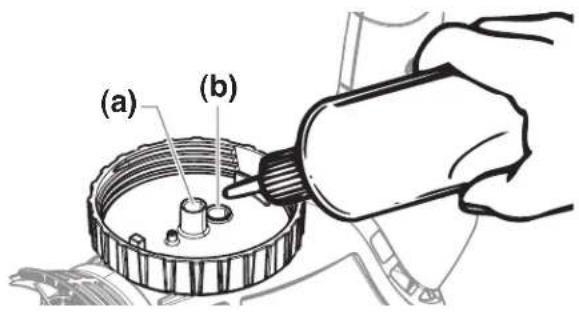
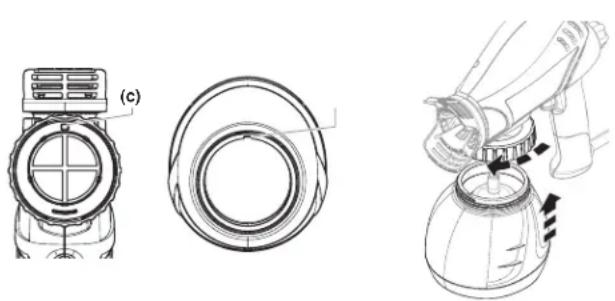
- Place a few drops of household oil down the intake (a) and return openings (b) in the pump housing.
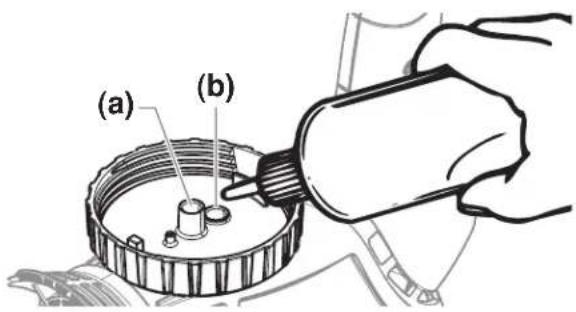
- Insert the suction tube into the intake opening.

- Line up the tab (c) on the pump housing with the notch (d) on the material container.
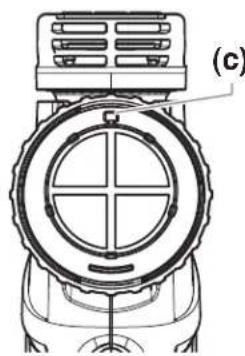

- Twist the pump housing ring to thread the container onto the pump housing. Plug in the unit.

Remote Suction Set Setup (optional)
- Remove the material container from the pump housing by turning the pump housing ring counterclockwise.
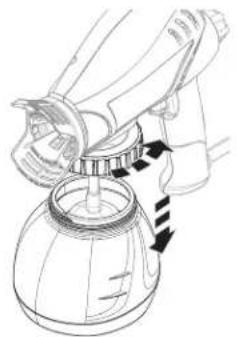
- Remove the suction tube.
- Place a few drops of household oil down the intake (a) and return (b) openings in the pump housing.
- Push the dual hose fitting (c) into the intake and return openings on the bottom of the housing. The fitting with the ridge (d) goes into the return opening. Twist the pump housing ring (e) clockwise to tighten the dual hose fitting into place.

- Push the remote suction hose onto the intake and return ports of the dual hose fitting. The larger hose (f) goes onto the intake port (g).

- Slide the intake hose [(h), the larger hose] through the container clip (i). You may need to pull the hoses slightly apart.
Push the intake hose onto the suction tube so that it is flush with the ridge (j). Make certain that the intake filter (k) is in place on the suction tube.

- Submerge the suction tube assembly into the material container and attach the container clip (l) to the side to hold it securely. Make certain the return line (m) is inside the container.

Flow Control Knob / Practice Spraying
Flow Control Knob:
The spray pattern is controlled by the Flow Control Knob on the rear of the sprayer, and by the thickness of the material being sprayed.
Turning the flow knob counterclockwise increases the amount of material flow. Turning the flow knob clockwise decreases the amount of material flow.

Practice Spraying :
- Turn the flow knob fully counterclockwise to maximum.

- Point the sprayer at a scrap piece of wood or cardboard, and pull the trigger to prime the sprayer. Release trigger when material sprays evenly from the spray gun.

- Turn the flow knob clockwise until you have a good spray pattern.

- A poor spray pattern (a) will concentrate the paint in the center of the spray pattern and go on blotchy. A good spray pattern (b) has an even amount of material throughout the pattern and will go on smoothly.

• Always practice spraying on a piece of scrap wood or cardboard to test your spray pattern.
- If you adjust the flow knob and still cannot get a good pattern, you may need to thin the material you are using. Always test spraying without thinning the material. Thin as required to achieve optimum spraying performance (refer to #4).
- If you are spraying a material that needs to be thinned, make sure to follow the manufacturer's recommendations.
Thinning the Material:
Always test spraying without thinning the material.
If you are spraying with a material that needs to be thinned, make sure to follow the manufacturer's recommendations.
Usage
Priming with the Remote Suction Set:
- The time needed to prime will vary from 30 seconds to 3 minutes depending upon the thickness of the material you are spraying.
- If your sprayer is properly cleaned and oiled and it takes longer than three minutes to prime, your piston and/or pump housing may be worn and will need to be replaced before using your remote suction set.
- Using the remote suction set will decrease the material flow, so it will take longer to apply the same amount of material to the surface being sprayed.
-
A 75% duty cycle is recommended when using the remote suction set. For example, trigger the gun for 15 seconds, and then allow the gun to remain idle (untriggered) for 5 seconds.
-
If you are using the remote suction set, you will need to prime the sprayer by removing air from the system. To prime:
Make sure the sprayer is plugged in, and turn the flow control knob counterclockwise to maximum.

- Hold the sprayer below the level of the paint. This will speed up the priming.

- Aim the sprayer at a piece of scrap wood or cardboard. Squeeze the trigger and hold until all air is out of the system and material is flowing freely out of the sprayer tip. This could take up to three minutes.

IMPORTANT: The suction tube must remain completely submerged in the material. If it is not completely submerged and air is sucked into the system, the piston could seize. If the piston seizes, the sound the gun makes will change to a low hum and the gun will quickly become hot to the touch. Never run the sprayer when the piston is seized. Should this happen, clean the piston and the pump housing thoroughly using the cleanup procedures found in this manual.
Overspray:
IMPORTANT
Some sprayed materials create a cloud of paint. Some of that cloud will spray past your intended object and also bounce off of it. Wind and air currents may cause this cloud to drift onto surfaces not intended to be sprayed. You can control the amount of overspray and bounce-back by adjusting your flow and moving the sprayer closer to the work piece, but always make sure that you have a good spray pattern. Always test your pattern on a scrap piece of wood or cardboard, and make sure that you have drop cloths protecting anything not being sprayed.
Anything you don't want painted that is in the area of your spraying surface should be covered or removed.
Spraying Technique
- Keep your arm moving at constant speed and keep the sprayer at a constant distance from the surface. The sprayer should be triggered at the beginning of the stroke and released at the end of the stroke.

- Keep the sprayer at right angles to the surface. This means moving your entire arm back and forth rather than just flexing your wrist.

Never tip the sprayer at more than a 45° angle when spraying overhead. Material could get into the motor housing and cause an electric shock.
IMPORTANT: If material is leaking from the threads of the spray tip, turn off the sprayer immediately or the sprayer could be damaged. The sprayer will leak from behind the spray tip if the atomizer valve is not seated properly. If you notice material leaking from this area:
- Unplug the sprayer immediately. Remove the spray tip by turning it counterclockwise.

Light Coat Light Cblavy Coat
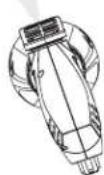

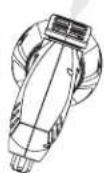
Do not flex wrist while spraying.
- Remove the atomizer valve and see if it needs to be cleaned or replaced (see page 15). Also check the pump housing opening for any dirt or other obstruction and clean if necessary.

- Put the atomizer valve back in place, making sure it can seat properly without any obstruction.
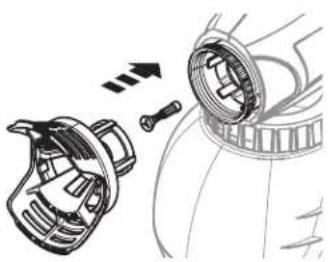
- Thread on the spray tip by turning it clockwise and tighten firmly by hand.
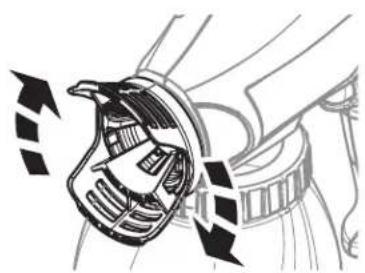
Using the Quick Flush Lid (latex materials only)
Cleaning the material container:
You will need a garden hose to complete the steps below. If you do not have a garden hose available, or if you used oil-based materials, follow the Cleanup for Oil-Based Materials instructions on page 12-13.
- Unplug the sprayer. Pour the remaining material back into the original container. Remove the suction tube.


- Turn the spray tip counterclockwise until it is removed. Pull out the atomizer valve, being careful not to lose it.
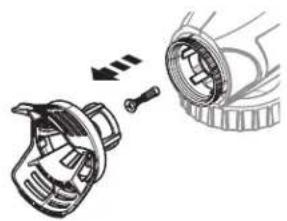
- Using the spray tip, turn the locking nut counterclockwise until it is removed.


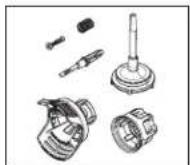
- Slide the pump housing assembly off the sprayer. Remove the piston and spring from the pump housing. Place all removed parts (except the pump housing) into the material container (see inset).
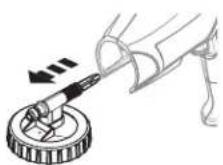
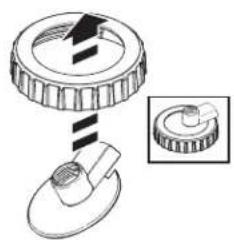
- Snap Quick Flush lid into place on the pump housing ring as shown.
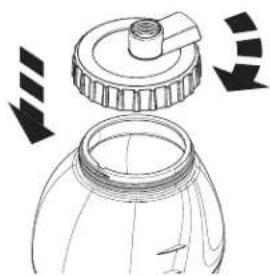
- Thread the Quick Flush lid onto the material container.
- Thread a garden hose into the Quick Flush lid, and place entire container and cap into an empty bucket.

IMPORTANT: An empty bucket is needed because water will flow from the side port (a) of the Quick Flush lid when the hose is turned on.
- SLOWLY turn on the garden hose. Let the water run for approximately 30 seconds. Turn the water off, remove the garden hose and Quick Flush lid from the material container, and properly dispose of the cleaning solution. Be careful not to lose any of the parts that are still in the material container!

- Depending on the thickness of the material, some residue may remain on the sprayer parts. Remove any remaining residue with the cleaning brush and the appropriate cleaning solution.

- IMPORTANT: Make sure to completely remove all material from the inside of the piston chamber by scrubbing with the brush. Even a small amount of material can dry like glue and keep the piston from moving, causing damage to the sprayer.

- IMPORTANT: Make sure to keep the vent hole (a) on the pump housing clean and unblocked or a vacuum can build up in the container and cause damage to the sprayer. A toothpick or straightened paper clip can be used to clean it.
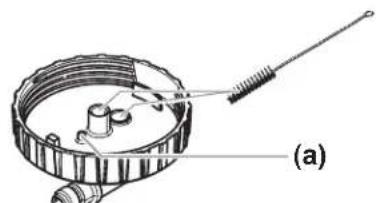
Using the Quick Flush Lid (latex materials only)
Cleaning the Remote Suction Set:
You will need a garden hose to complete the steps below. If you do not have a garden hose available, or if you used oil-based materials, follow the Cleanup for Oil-Based Materials instructions on page 12-13.
- To remove any remaining material that is left in the suction hose, remove the suction tube from the material container and place into a waste container.

- Point sprayer into the side of the waste container. Trigger the sprayer until nothing more comes from the spray tip.
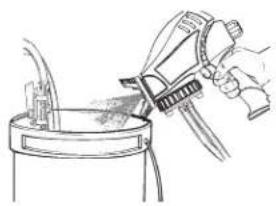
- Unplug the sprayer. Turn the spray tip counterclockwise until it is removed. Pull out the atomizer valve, being careful not to lose it.

- Using the spray tip, turn the locking nut counterclockwise until it is removed.

- Slide the pump housing assembly off the sprayer. Remove the piston and spring from the pump housing. Place all removed parts (except the pump housing) into the material container (see inset).

- Unlock dual hose fitting (with hoses still attached) from pump assembly ring.
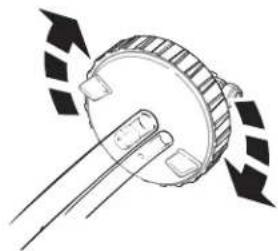
- Snap Quick Flush lid into place on the pump housing ring as shown.

- Push the dual hose fitting (a) into the intake and return openings on the bottom of the Quick Flush lid. The fitting with the ridge (b) goes into the return opening.

- Thread a garden hose into the Quick Flush lid. Place hoses (with suction tube attached) into an empty bucket.

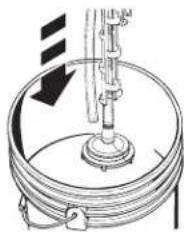
- SLOWLY turn on the garden hose. Let the water run for approximately 30 seconds. Turn the water off. Remove the dual hose fitting from the Quick Flush lid.

- Remove the suction tube and dual hose fitting from the suction hoses. Place suction tube into the material container.

- Perform steps 6-11 in Cleaning the material container (previous page) in order to clean the remaining components of your sprayer.

Cleaning the Material container:

Make sure you clean the sprayer in a well-ventilated area whenever cleaning with flammable solvents.
- Unplug the sprayer. Pour the remaining material back into the original container.
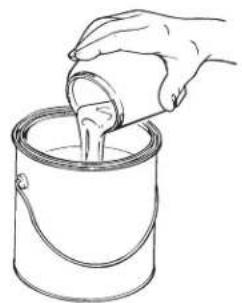
- Fill the container half full of the cleaning solution appropriate to the type of material you sprayed (warm, soapy water for latex-based materials; mineral spirits for oil-based materials). Plug in the sprayer.

- Attach the container and plug in the sprayer. Squeeze the trigger until the solution comes though the sprayer for several seconds.

- Unplug the sprayer. Remove the container and properly dispose of the remaining solution.

- Make certain the sprayer is unplugged. Remove the suction tube.

- Move on to Cleaning the Components, page 14.
Cleanup - Oil-based Materials
Cleaning the Remote Suction Set:

Make sure you clean the sprayer in a well-ventilated area whenever cleaning with flammable solvents.
-
Make sure the sprayer is unplugged.
-
Remove the suction tube from the material container
and submerge into a container of the solvent appropriate to the type of material you sprayed (warm, soapy water for latex-based materials; mineral spirits for oil-based materials.

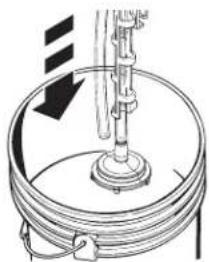
- Plug in the sprayer, and squeeze the trigger and spray into a second container until the solvent coming through the sprayer is free of material. Unplug the sprayer.

- Remove the suction tube from the cleaning solution. Unlock the pump housing locking collar (a) by turning it counterclockwise.

- Remove the suction tube and dual hose fitting from the suction hoses.
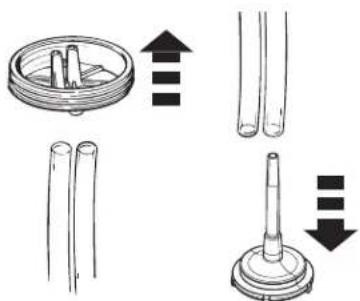
- Move on to Cleaning the Components, page 14.
Cleaning the Components - Oil-based materials
- Turn the spray tip counterclockwise until it is removed. Pull out the atomizer valve, being careful not to lose it.

- Using the spray tip, turn the locking nut counterclockwise until it is removed.

3 Slide the pump housing assembly off the sprayer.

- Remove all parts from the pump housing assembly. Clean all parts thoroughly with the brush provided using a solution appropriate to the type of material you sprayed.
![graph TD A["Central Component"] --> B["Main Ring"] B --> C["Top Right"] B --> D["Bottom Left"] B --> E["Bottom Right"] B --> F["Bottom Left"] style A fill:#f9f,stroke:#333 style B fill:#ccf,stroke:#333 style C fill:#cfc,stroke:#333 style D fill:#fcc,stroke:#333 style E fill:#cff,stroke:#333 style F…](/content/2026/05/859724/images/ac6350bda5b47315483e3b7c33b85812364cadd80036e3942e8cf06a9b57121e.jpg)
- IMPORTANT: Make sure to completely remove all material from the inside of the piston chamber by scrubbing with the brush. Even a small amount of material can dry like glue and keep the piston from moving, causing damage to the sprayer.

- IMPORTANT: Make sure to keep the vent hole (a) on the pump housing clean and unblocked or a vacuum can build up in the container and cause damage to the sprayer. A toothpick or straightened paper clip can be used to clean it.
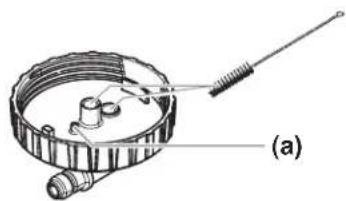
Reassembly - all materials
- Slide the spring onto the front end of the piston.

- Insert the piston into the back of the pump housing.
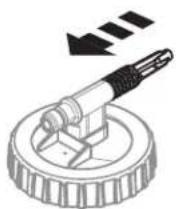
- Insert the pump housing assembly into the front of the sprayer.

- Place the locking nut onto the motor housing. Press in while turning the locking nut clockwise. Tighten firmly with the spray tip.
Do not cross-thread the locking nut. Make certain it is threaded correctly before tightening. Make certain that the pump housing is pushed far enough into the sprayer and the locking nut is screwed on tightly.

- Insert the atomizer valve into the front end of the pump housing. Place the spray tip onto the pump housing and turn it clockwise until it is tightened securely.

Maintenance
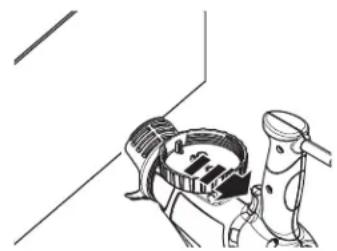
Lubricating your sprayer prior to storage is important to prolong the life of the pump housing components.
- Turn the sprayer upside-down while the material container is removed. Squeeze a small amount of standard household oil into both the intake (a) and return (b) openings on the pump housing.

- Plug in the sprayer. Aim at piece of scrap wood or cardboard and squeeze the trigger of the sprayer for 2 to 3 seconds while sprayer is still inverted.
- Replace the suction tube.

- Replace the material container.
Replacement Parts
- Parts of your sprayer wear out with use and require regular replacement. They include the atomizer valve, piston and spring. These parts are not covered by your sprayer warranty.
- More abrasive materials such as latex paints and stains cause these parts to wear out faster than less abrasive materials such as oil-based paints and stains, thin stains and sealers.
Atomizer valve:
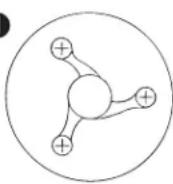
The atomizer valve is shaped to cause the material to spin as it comes out of the sprayer. The spinning breaks the material up into a fine spray. As more material goes through the atomizer valve, it wears out the valve and the shape of the valve changes. When it changes too much to produce a good spray pattern, the valve needs to be replaced.
① Front view of a good atomizer valve.
② Front view of a atomizer valve after spraying 7-10 gallons of latex paint. Replace.
3 Front view of a atomizer valve after spraying 7-10 gallons of latex stain. Replace.
1
2

3

Piston and Spring:
The average life of a piston and spring will vary depending on the types of material being sprayed.
Replace the piston if the sprayer takes longer than 15 seconds with the suction tube or 3 minutes with the remote suction set to prime when well lubricated, or if there is an excess amount of material leaking, refer to the troubleshooting suggestions listed in this manual. Replace the spring if you notice that it is broken when you clean the sprayer.
To replace either the atomizer valve or the piston and spring, follow steps 1-4 in Cleaning the Components (page 14), and replace the old parts with new ones. When replaced, follow steps 1-5 in Reassembly (page 14).
Troubleshooting
Problem
A. Motor will not run.
B. Motor has a low hum and does not spray.
C. Motor operates properly but does not spray.
D. Material spitting or globbing.
E. Excessive fogging.
F. Runs and sags in paint.
G. Material drips from spray tip guard.
H. Motor overheats.
I. Material leaking from between spray tip and locking nut.
Cause
- No power at wall outlet. Electrical problem or defective motor.
- Control knob turned in too far.
- Seized piston.
- Failure to prime with remote suction set.
- Loose or damaged suction tube.
- Plugged or worn atomizer valve.
- Atomizer valve missing.
- Material too thick.
- Plugged spray tip
- Intake filter plugged.
- Control knob needs adjusting
-
Worn piston.
-
Low on paint.
- Paint too thick.
-
Loose suction tube drawing in air.
-
Worn atomizer valve.
-
Worn spray tip.
-
Control knob needs adjusting.
-
Worn piston.
-
Pressure too high.
-
Holding sprayer too far from work surface.
-
Arm movement too slow, holding spray gun too close to work surface or applying too much paint at one time.
-
Guard is for safety and cannot be removed. Some dripping is unavoidable with some paints.
-
Seized piston.
- Extension cord too long.
-
Operating continuously.
-
Spray tip is loose.
-
Atomizer valve not positioned properly.
-
Worn atomizer valve.
-
Eroded pump housing
Solution
- Try new wall outlet. Take to Authorized Service Center for repair.
- Turn control knob counterclockwise.
- Disassemble sprayer and clean.
- Thin paint. Hold sprayer below level of paint can. Oil intake opening.
- Tighten or replace.
- Clean or replace as needed.
- Put in atomizer valve.
- Thin material.
- Clean tip
- Clean intake filter.
- Adjust.
-
Clean and oil or replace.
-
Refill container.
-
Thin paint.
-
Clean and insert firmly in intake opening on pump housing.
-
Replace atomizer valve.
-
Replace if worn.
-
Adjust.
-
Replace or clean and oil.
-
Turn flow control knob clockwise to reduce pressure and flow.
-
Hold sprayer closer to work surface.
-
See section on spraying (page 9).
-
Use a small brush on drips that fall on surface being sprayed. Use a drop cloth.
-
Clean piston.
- Replace with proper size.
-
Release trigger at end of pass, allow to cool
-
Tighten securely.
-
Unplug the sprayer, remove the spray tip and reposition the atomizer valve.
-
Replace.
-
Replace pump housing

Any attempt to open the motor housing or repair any electrical parts within the unit by anyone other than an authorized repair technician could cause serious injury and will void the warranty.

Have you tried the recommendations above and are still having problems? In the United States, to speak to a customer service representative, call our Customer Service at 1-800-328-8251 Monday through Friday between 8:00 AM and 4:30 PM Central time.
Product Registration
Register your product online at www.wagnerspraytech.com. Proper registration will serve as proof of purchase in the event your original receipt becomes misplaced or lost.
This product, manufactured by Wagner Spray Tech Corporation (Wagner) is warranted against defects in material and workmanship for one year following date of purchase if operated in accordance with Wagner's printed recommendations and instructions. This warranty does not cover damage resulting from improper use, accidents, user's negligence or normal wear. This warranty does not cover any defects or damages caused by service or repair performed by anyone other than a Wagner Authorized Service Center.
ANY IMPLIED WARRANTY OF MERCHANTABILITY OR FITNESS FOR A PARTICULAR PURPOSE IS LIMITED TO ONE YEAR FOLLOWING DATE OF PURCHASE. THIS PRODUCT IS DESIGNED FOR HOME USAGE ONLY. IF USED FOR COMMERCIAL OR RENTAL PURPOSES, THIS WARRANTY APPLIES ONLY FOR 30 DAYS FROM DATE OF PURCHASE. WAGNER SHALL NOT IN ANY EVENT BE LIABLE FOR ANY INCIDENTAL OR CONSEQUENTIAL DAMAGES OF ANY KIND, WHETHER FOR BREACH OF THIS WARRANTY OR ANY OTHER REASON. THIS WARRANTY DOES NOT APPLY TO ACCESSORIES.
If any product is defective in material and/or workmanship during the applicable warranty period, return it with proof of purchase, transportation prepaid, to any Wagner Authorized Service Center. (A listing of Service Center locations is enclosed with this product.) Wagner's Authorized Service Center will either repair or replace the product (at Wagner's option) and return it to you, postage prepaid.
Spray Tip Lifetime Warranty
The spray tip you have purchased with your Wagner Power Painter is warranted against wear for the life of the Power Painter. The spray tip warranty does not cover damage resulting from improper use, accidents or user's negligence.
If the spray tip fails due to wear, return it, postage prepaid, to Wagner Spray Tech Corporation, Spray Tip Replacement, 1770 Fernbrook Lane, Plymouth, MN 55447. Please include your name, complete address and telephone number with the spray tip. Allow 6 to 8 weeks for delivery.
SOME STATES DO NOT ALLOW LIMITATIONS ON HOW LONG AN IMPLIED WARRANTY LASTS OR THE EXCLUSION OF INCIDENTAL OR CONSEQUENTIAL DAMAGES, SO THE ABOVE LIMITATION AND EXCLUSION MAY NOT APPLY TO YOU.
THIS WARRANTY GIVES YOU SPECIFIC LEGAL RIGHTS, AND YOU MAY ALSO HAVE OTHER RIGHTS WHICH VARY FROM STATE TO STATE.
GARANTIE LIMITÉE D'UN AN - À conserver
Wagner Spray Tech Corporation
1770 Fernbrook Lane
Plymouth, Minnesota 55447
Telephone 1-800-328-8251
Copyright © Wagner Spray Tech Corporation. All
rights reserved, including right of reproduction in
whole or in part, in any form.


- 1-800-328-8251
- NEED HELP? CALL US FIRST FOR ANSWERS FAST
- HAZARD: INJECTION INJURY
- NOTE TO PHYSICIAN
- PREVENTION
- HAZARD: EXPLOSION OR FIRE
- HAZARD: EXPLOSION HAZARD DUE TO INCOMPATIBLE MATERIALS
- PREVENTIÓN
- HAZARD: HAZARDOUS VAPORS
- HAZARD: GENERAL
- HAZARD: ELECTRIC SHOCK HAZARD
- IMPORTANT SAFETY INFORMATION • READ ALL SAFETY INFORMATION BEFORE OPERATING THE EQUIPMENT. SAVE THESE INSTRUCTIONS
- GROUNDING INSTRUCTIONS
- WARNING - IMPROPER INSTALLATION OF THE GROUNDING PLUG CAN RESULT IN A RISK OF ELECTRIC SHOCK
- WHAT'S IN THE BOX
- BEFORE YOU BEGIN
- SELECTING THE PROPER SPRAY TIP
- OPTIMUS™ SPRAY TIP (INCLUDED)
- TO ADJUST
- ROUND TIP (SOLD SEPARATELY)
- STAIN TIP (SOLD SEPARATELY)
- IMPORTANT PREPARATION TIPS
- MATERIAL CONTAINER SETUP
- REMOTE SUCTION SET SETUP (OPTIONAL)
- FLOW CONTROL KNOB / PRACTICE SPRAYING
- FLOW CONTROL KNOB
- PRACTICE SPRAYING
- THINNING THE MATERIAL
- USAGE
- PRIMING WITH THE REMOTE SUCTION SET
- OVERSPRAY
- IMPORTANT
- SPRAYING TECHNIQUE
- USING THE QUICK FLUSH LID (LATEX MATERIALS ONLY)
- CLEANING THE MATERIAL CONTAINER
- CLEANING THE REMOTE SUCTION SET
- CLEANUP - OIL-BASED MATERIALS
- CLEANING THE COMPONENTS - OIL-BASED MATERIALS
- REASSEMBLY - ALL MATERIALS
- MAINTENANCE
- REPLACEMENT PARTS
- ATOMIZER VALVE
- PISTON AND SPRING
- TROUBLESHOOTING
- PROBLEM
- CAUSE
- SOLUTION
- PRODUCT REGISTRATION
- SPRAY TIP LIFETIME WARRANTY
- GARANTIE LIMITÉE D'UN AN - À CONSERVER
Brand : Wagner SprayTech
Model : Power Painter
Category : Spray Paint