
FLEXiO 590 - Paint gun Wagner SprayTech - Free user manual and instructions
Find the device manual for free FLEXiO 590 Wagner SprayTech in PDF.


| Brand | Wagner SprayTech |
| Model | FLEXiO 590 |
| Category | HVLP Paint Sprayer |
| Power Source | Electric corded |
| Voltage | 120 V (nominal) |
| Air Power Control | Variable speed dial (1-9) |
| Nozzle Included | iSpray Nozzle and Detail Finish Nozzle |
| Cup Capacity | 1.5 qt (600 ml) |
| Material Flow Control | Red knob on trigger, adjustable |
| Spray Patterns | Horizontal, vertical, diagonal (Detail Finish); wide/narrow (iSpray) |
| X-Boost Turbine | Yes, variable speed |
| Air Filters | Two replaceable filters (smooth side toward turbine) |
| Grounding | 3-prong plug, connect to grounded outlet |
| Material Compatibility | Water-based and mineral spirit-type materials with flashpoint >70°F (21°C) |
| Usage | Household use, indoor/outdoor |
| Warranty | 1 year limited warranty |
| Technical Service | 1-800-328-8251 |
| Included Accessories | Funnel (2), thinning accessory, spray poster |
| Suction Tube | Adjustable angled end for upward/downward spraying |
| Cleaning Solvent | Warm soapy water for latex; mineral spirits for oil-based |
| Weight | Not specified |
Frequently Asked Questions - FLEXiO 590 Wagner SprayTech
User questions about FLEXiO 590 Wagner SprayTech
0 question about this device. Answer the ones you know or ask your own.
Ask a new question about this device
Download the instructions for your Paint gun in PDF format for free! Find your manual FLEXiO 590 - Wagner SprayTech and take your electronic device back in hand. On this page are published all the documents necessary for the use of your device. FLEXiO 590 by Wagner SprayTech.
USER MANUAL FLEXiO 590 Wagner SprayTech
2 Important Safety Information
4 Controls and Functions
6 Material Preparation
7 Assembly
8 Air and Material Controls
9 Spray Pattern Adjustment
10 Proper Spraying Technique
12 Cleanup
14 Reassembly
15 Maintenance
16 Troubleshooting
49 Parts List
56 Warranty
Questions?
Call Wagner Technical Service at:
1-800-328-8251
Register your product online at:
www.wagnerspraytech.com
Important Safety Information

Read all safety information before operating the equipment. Save these instructions.

Indicates a hazardous situation which, if not avoided, could result in death or serious injury.
To reduce the risks of fire or explosion, electrical shock and the injury to persons, read and understand all instructions included in this manual. Be familiar with the controls and proper usage of the equipment.
Grounding Instructions
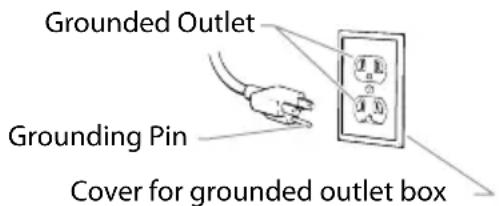
This product must be grounded. In the event of an electrical short circuit, grounding reduces the risk of electric shock by providing an escape wire for the electric current. This product is equipped with a cord having a grounding wire with an appropriate grounding plug. The plug must be plugged into an outlet that is properly installed and grounded in accordance with all local codes and ordinances.

WARNING - Improper installation of the grounding plug can result in a risk of electric shock.
If repair or replacement of the cord or plug is necessary, do not connect the green grounding wire to either flat blade terminal. The wire with insulation having a green outer surface with or without yellow stripes is the grounding wire and must be connected to the grounding pin.
Check with a qualified electrician or serviceman if the grounding instructions are not completely understood, or if you are in doubt as to whether the product is properly grounded. Do not modify the plug provided. If the plug will not fit the outlet, have the proper outlet installed by a qualified electrician.
This product is for use on a nominal 120 volt circuit and has a grounding plug that looks like the plug illustrated below. Make sure that the product is connected to an outlet having the same configuration as the plug. No adapter should be used with this product.


WARNING - To reduce the risk of fire or explosion:
- Do not spray flammable or combustible materials near an open flame, pilot lights or sources of ignition such as hot objects, cigarettes, motors, electrical equipment and electrical appliances. Avoid creating sparks from connecting and disconnecting power cords.
- For use with only water-based or mineral spirit-type materials with a minimum flash point of 21^ C ( 70^ F) — Do not spray or clean with liquids having a flash point of less than 21^ C ( 70^ F). Flash point is the temperature at which a fluid can produce enough vapor to ignite.
- Verify that all containers and collection systems are grounded to prevent static discharge.
- Connect to a grounded outlet and use grounded extension cords (electric models only). Do not use a 3 to 2 adapter.
- Keep spray area well ventilated. Keep a good supply of fresh air moving through the area to keep the air within the spray area free from accumulation of flammable vapors.
- Do not smoke in the spray area.
- Do not operate light switches, engines, or similar spark producing products in the spray area.
- Keep area clean and free of paint or solvent containers, rags, and other flammable materials.
- Know the contents of the paint and solvents being sprayed. Read all Material Safety Data Sheets (MSDS) and container labels provided with the paints and solvents. Follow the paint and solvent manufacture's safety instructions.
- Fire extinguisher equipment shall be present and working.
Important Safety Information

WARNING - To reduce the risk of injury:
- Always wear appropriate gloves, eye protection, clothing and a respirator or mask when painting. Hazardous vapors – Paints, solvents, insecticides, and other materials can be harmful if inhaled or come in contact with body. Vapors can cause severe nausea, fainting or poisoning.
- Do not operate or spray near children. Keep children away from equipment at all times.
- Do not overreach or stand on an unstable support. Keep effective footing and balance at all times.
- Stay alert and watch what you are doing.
- Do not operate the unit when fatigued or under the influence of drugs or alcohol.
- Never aim spray gun at any part of the body.
- Follow all appropriate local, state, and national codes governing ventilation, fire prevention, and operation.
- The United States Government Safety Standards have been adopted under the Occupational Safety and Health Act (OSHA). These standards, particularly part 1910 of the General Standards and part 1926 of the Construction Standards should be consulted.
- Use only manufacturer authorized parts. User assumes all risks and liabilities when using parts that do not meet the minimum specifications and safety devices of the turbine manufacturer.
- Power cord must be connected to a grounded circuit.
- Do not spray outdoors on windy days.

WARNING - To reduce the risk of electric shock:
- Always remove turbine before cleaning.
- Power cord must be connected to a grounded circuit.
- Never submerge electrical parts.
- Never expose the equipment to rain. Store indoors.
- Keep electrical cord plug and spray gun trigger free from paint and other liquids. Never hold the cord at plug connections to support the cord. Failure to observe may result in an electrical shock.
Important Electrical Information
Use only a 3-wire extension cord that has a 3-blade grounding plug and a 3-slot receptacle that will accept the plug on the product. Make sure your extension cord is in good condition. When using an extension cord, be sure to use one heavy enough to carry the current your product will draw. An undersized cord will cause a drop in line voltage resulting in loss of power and overheating. A 14 gauge or 12 gauge cord is recommended. If an extension cord is to be used outdoors, it must be marked with the suffix W-A after the cord type designation. For example, a designation of SJTW-A would indicate that the cord would be appropriate for outdoor use.
IMPORTANT: Household use only. Intended for indoor/outdoor use ONLY with materials having flashpoint above 70°F (21°C).
Thank you for your purchase!
Thank you for purchasing the Wagner FLEXiO sprayer with best-in-class features that are designed for spraying residential paint, un-thinned, indoors or out. Only the FLEXiO sprayers have the power of the X-Boost® turbine and versatility of the iSpray nozzle that will help you finish projects fast and professionally. They are easy to use right out of the box and with low overspray and less clogging you will enjoy the flexibility to tackle all the painting projects on your list. We appreciate your feedback, so please visit our website and write a review on the FLEXiO handheld sprayer so we can continue to learn and improve our products.
Just click on www.wagnerflexio.com
Controls and Functions - Model 570

natural_image
Technical line drawing of a mechanical component with no visible text or symbolsX-Boost™ Power Dial:
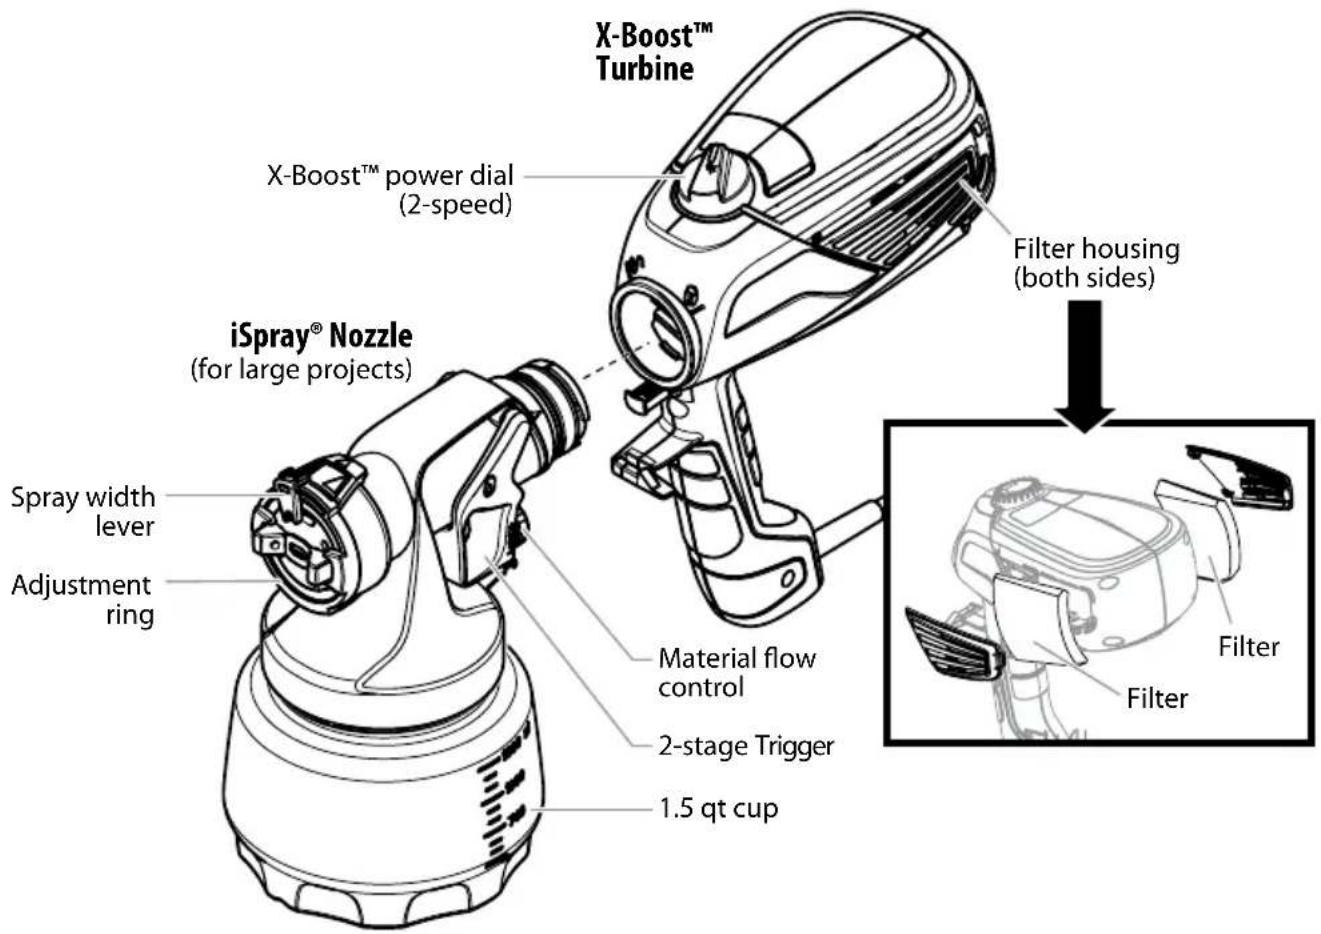
The X-Boost power dial adjusts the level of air power produced by the turbine.
The FLEXiO sprayer model 570 is equipped with a 2-speed air power control (HI / LO).

Spray Width Lever:
The spray width lever determines the width of the spray pattern.
Adjustment Ring:
The spray pattern shape is adjusted by turning the adjustment ring to either the vertical or horizontal positions.

natural_image
Mechanical component diagram showing a valve or knob with an arrow pointing to it, no visible text or symbolsMaterial Flow Control:
The material flow control determines the amount of spray material that is sprayed from the spray gun.
Controls and Functions - Model 590


natural_image
Diagram of a mechanical component with curved arrows indicating rotational direction (no text or symbols)X-Boost™ Power Dial:
The X-Boost power dial adjusts the level of air power produced by the turbine.
The FLEXiO sprayer model 590 is equipped with a variable speed air power control (1 - 9).

natural_image
Line drawing of a spray gun mounted on a conical base (no text or symbols)Detail Finish Nozzle:
FLEXiO sprayer model 590 only. Ideal for detail projects and finer finishes. It is designed for spraying thinner materials, such as oil based stains and paints. The Detail Finish nozzle leaves a smoother finish.
natural_image
Line drawing of a mechanical device with no visible text or symbolsiSpray Nozzle:
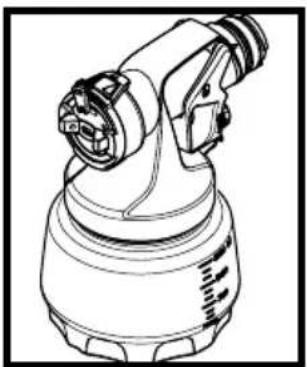
FLEXiO sprayer model 570 and 590. Designed to provide a roller-like finish on broad indoor and outdoor surfaces. Sprays all un-thinned materials including un-thinned latex.
Material Preparation
Note: Material to be sprayed may need to be strained to remove any impurities in the paint which may enter and clog the system. Impurities in the paint will give poor performance and a poor finish.
Note: Only thin the material if absolutely necessary to improve spray performance. Optimal spray performance should be achieved simply by adjusting the various controls on the unit.
To Prepare the Material:
- Stir the spraying material thoroughly.
- Unscrew the cup from the nozzle.
- After the material has been properly thinned and strained, fill the container to desired level.
Note: Model 590 only. Use the included paper funnels in order to more easily fill the cup.
Thinning the material:
For certain spraying situations or desired finishes, thinning the material may be desired. It is not necessary for most materials when used with the iSpray nozzle. For use with the Detail Finish nozzle thinning may be needed to achieve a finer finish. Make sure you adjust the X-Boost™ and Material flow settings for your specific material needs.
If thinning is necessary, use the proper solvent as specified by the material manufacturer. Never exceed the thinning advice given by the coating manufacturer.
FLEXiO model 590 sprayers come with a thinning accessory that can be used to accurately thin spray material. Refer to the included instruction sheet.

Do not thin with materials that have a flashpoint below 70°F (21°C). The material flashpoint should be shown on the material container.

natural_image
Illustration of a hand using a stick to stir contents in a pot (no text or symbols)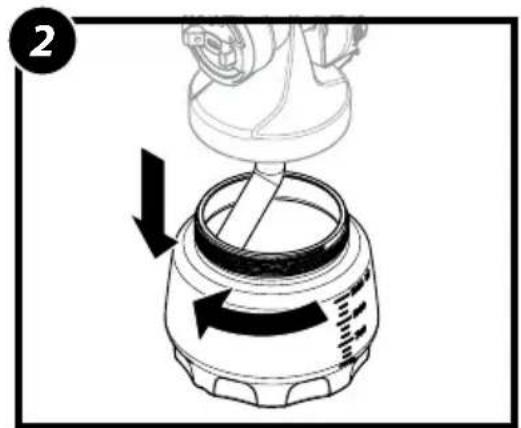

Assembly
Before you begin:

NEVER point the spray gun at any part of the body.
To Assemble:
IMPORTANT: Make sure the power cord is unplugged.
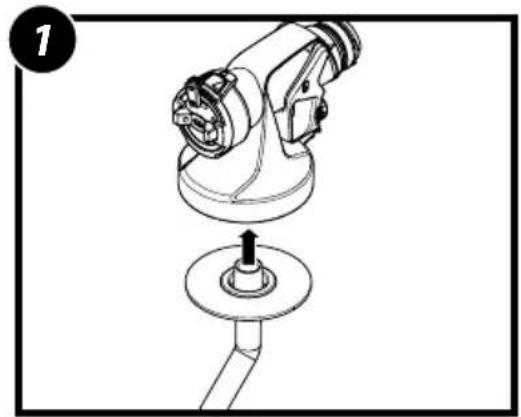
- Insert the suction tube into the intake opening.
- Align the suction tube -
a. If you are going to be spraying in a downward direction, the angled end of the suction tube should be pointing toward the front of the gun.
b. If you are going to be spraying in an upward direction, the angled end of the suction tube should be pointing toward the rear of the gun.
Note: Make sure the suction tube is inserted as far as it will go to ensure a tight fit.
IMPORTANT: Never tip the sprayer at more than a 45° angle. Material could get into the turbine and damage the sprayer.
- Carefully screw the cup back onto the nozzle assembly. Tighten firmly.
- Align the arrow on the nozzle with the "unlock" symbol on the turbine.
- Insert and twist the nozzle into the turbine toward the "lock" symbol on the turbine.
The tab below the trigger will lock the two pieces into place.
natural_image
Mechanical assembly diagram showing a robotic arm and a circular base with a pointer (no text or symbols)
natural_image
Technical line drawing of a spray gun assembly with no visible text or symbols
natural_image
Line drawing of a spray gun with a hand operating the nozzle (no text or symbols)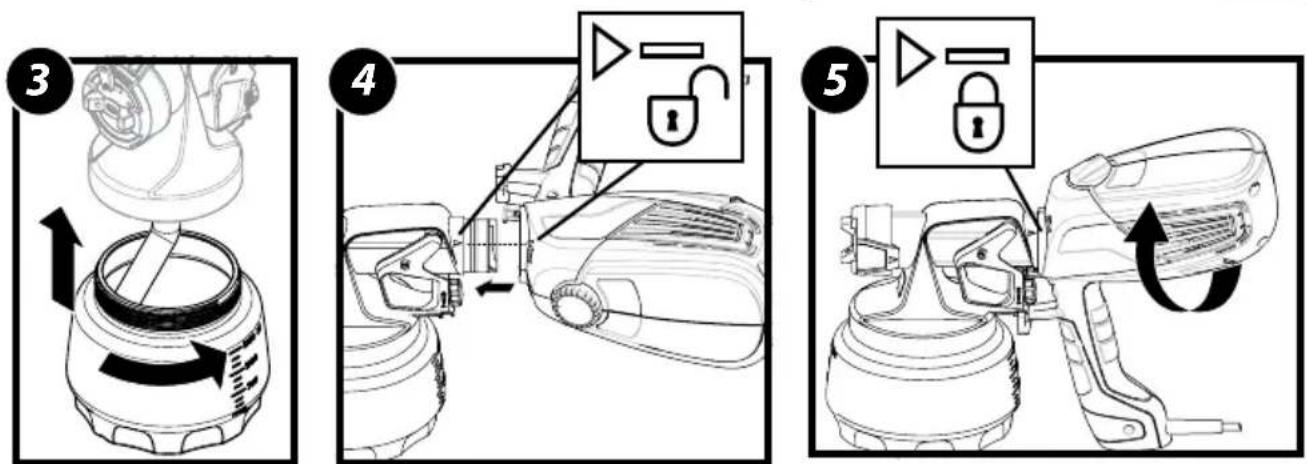
Air and Material Controls
Spray performance will depend upon a number of factors: material thickness, spray pattern selected, and material flow. Testing different variations of the control settings will help you achieve the desired results. See descriptions and suggested Air and Material Settings Guide below to help with your project.
X-Boost™ Power Dial
The X-Boost ^™ power dial adjusts the level of air pressure produced by the turbine. The X-Boost ^™ power dial is factory-set at maximum out of the box.
- A high air power level will result in faster coverage and a smoother finish with thicker materials.
- Lowering the air power will result in larger drops of material being sprayed from the gun, and will create a slightly rougher finish.
Tip: The thicker the material you are spraying, the higher the turbine power you will need.
Tip: For fine-finish work with thinner materials, you may want to decrease the air power. Spraying a thinner material at high air power will result in more overspray. Overspray is sprayed material that does not stick to the spray surface and bounces back.
2-Speed Air Power Control
The FLEXiO model 570 is equipped with a 2-speed air power control (high / low).
Variable Air Power Control
The FLEXiO model 590 is equipped with a variable air power control (1-9).

natural_image
Pure mechanical diagram showing a circular component with positive and negative charges, no text or symbols present
natural_image
Pure diagram of a circular object with arrows indicating direction, no text or symbols presentMaterial Flow Control
The material flow control determines the amount of spray material that is sprayed from the spray gun.
- For thicker materials, it is recommended that you start with the highest material flow setting and then gradually decrease the flow to suit your particular spraying needs.
- For thinner materials, it is recommended that you start with a low material flow setting, and then gradually increase the flow to suit your particular spraying needs.
- The higher the flow setting, the quicker you will have to work in order to avoid drips and sags in your spray pattern.
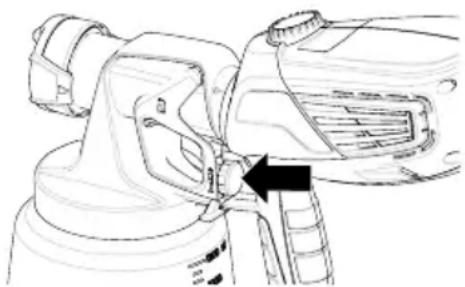
natural_image
Line drawing of a spray gun with an arrow pointing to the handle (no text or symbols present)Set the material flow by turning the red knob on the trigger of the spray gun.
Tip: Spraying with the control set too high will result in a spray pattern that runs and sags (too much material).
Tip: Spraying with the control set too low will result in a spray pattern that does not cover (not enough material).
Tip: To ensure desired results are achieved with the controls, test your spray pattern on the spray poster (590 only) or a scrap piece of wood or cardboard.
Air and Material Settings Guide
| Coating | iSpray Nozzle Detail Finish Nozzle | ||||
| Material Flow | Air Power (570) | Air Power (590) | Material Flow | Air Power (590) | |
| Transparent / semi-transparent stains, sealers | Light LO 1-3 | Med/Heavy 1-3 | |||
| Lacquers Light LO 1-3 Med/Heavy 1-3 | |||||
| Solid stains Med LO 3-5 Med 3-5 | |||||
| Polyurethane Med HI 4-6 Med/Heavy 4-6 | |||||
| Oil enamels Heavy HI 7-9 Heavy | 7-9 | ||||
| Latex paints plus primers, Latex paints | Heavy HI 7-9 | N/A N/A | |||
| Oil or latex primers | Heavy HI 7-9 | N/A N/A | |||
Spray Pattern Adjustment
Adjust Spray Shape - both nozzles
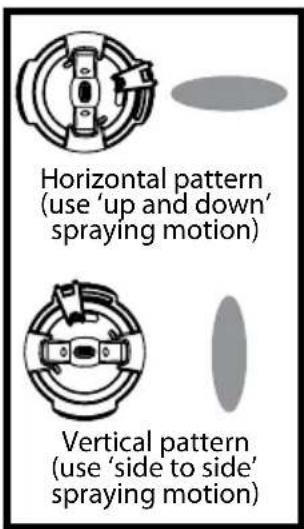
The spray pattern shape is adjusted by turning the adjustment ring (iSpray) or air cap ears (Detail Finish) to either the vertical, horizontal, or diagonal positions. The positions of the air cap and the corresponding spray pattern shapes are illustrated below.
Test each pattern and use whichever pattern is suitable for your application.

NEVER trigger the gun while adjusting the ears on the air cap. NEVER point the spray gun at any part of the body.

Horizontal pattern

Vertical pattern

→ Use 'side to side' spraying motion
Diagonal pattern*
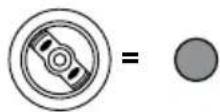
→ Use 'up and down' or 'side to side' spraying motion
→ Use lower air power / material flow
→ For coating smaller areas, corners and edges
*Note: The air cap can be set diagonally on the Detail Finish nozzle only. To achieve a round pattern with the iSpray nozzle, see the "Adjust Spray Width" section.
Adjust Spray Width - iSpray only
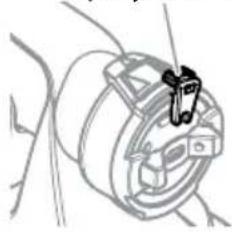
The spray width lever on the iSpray nozzle determines the width of the spray pattern.
Spray width lever
natural_image
Mechanical component diagram showing a lever mechanism (no text or symbols)

Wide pattern
→ For coating large surfaces
→ Use higher air power
→ Use higher material flow

Narrow pattern
→ For coating smaller areas, corners and edges
→ Use lower air power
→ Use lower material flow
Tips:
- Start with a fan pattern for painting trim work (1-5" width) and larger surfaces like doors and walls (>5" width).
- Adjust Material & Air Flow settings as shown in chart based on coating, fan pattern width, and nozzle.
- Fine tune the Material and Air Power settings to achieve the best results for your application.
- Pull trigger slightly to start the turbine before pulling all the way to spray material.
- Use narrow pattern for detailed work, touch up.
- Recommended settings for Material and Air Power may change if the coating is thinned.
Proper Spraying Technique
STOP
The room you are spraying must be properly masked in order to prevent overspray from covering woodwork, floors or furnishings. Make sure you have properly masked the room per the instructions on the enclosed "Taping Guide".
If spraying with an air-assisted spray system is new or unfamiliar to you, it is advisable to practice on a piece of scrap wood or cardboard before beginning on your intended workpiece and/or test with water.
Spray Poster
If you purchased a FLEXiO sprayer model 590, a spray poster is included with your unit. The spray poster can be adhered to a spraying surface and can be used for practice. Follow the guidelines on the poster.
Surface Preparation
All objects to be sprayed should be thoroughly cleaned before spraying material on them. Areas not to be sprayed may, in certain cases, need to be masked or covered.
Spray Area Preparation
The spray area must be clean and free of dust in order to avoid blowing dust onto your freshly sprayed surface.
How to Spray Properly
STOP
It is important to keep your arm moving whenever the gun is being triggered. If you pause or linger in one spot too long, too much material will be sprayed to the surface.
STOP
Partially pulling the trigger will start the turbine, but no material will spray until the trigger is pulled fully. It is recommended that the trigger first be pulled partially in order to start the turbine before a spray pass is made.
- Position the spray gun perpendicular to and six (6) or more inches from the spray surface, depending upon the spray pattern size desired. With reduced material flow and air power, you can get closer to the spraying surface.
- Spray parallel to the surface with smooth passes at a consistent speed as illustrated below. Doing this will help avoid irregularities in the finish (i. e. runs and sags).
Even coat throughout
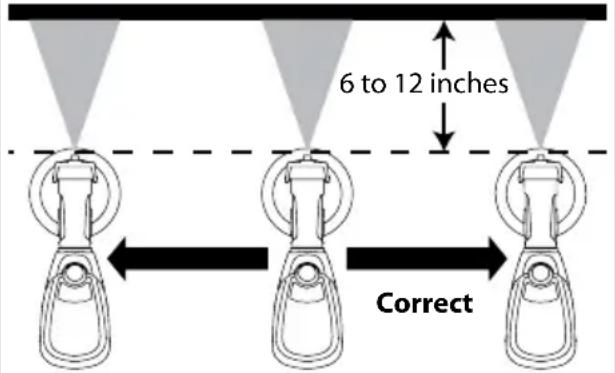
Keep stroke smooth and at an even speed
- Always apply a thin coat of material on the first pass and allow to dry before applying a second, slightly heavier coat.
- When spraying larger surfaces, overlap each spray pass by at least 50% This will ensure full coverage.
- When spraying, always trigger the spray gun after spray pass has begun and release trigger before stopping the pass. Always keep the gun pointed squarely at the spray surface and overlap passes slightly to obtain the most consistent and professional finish possible.
Light coat Heavy coat Light coat
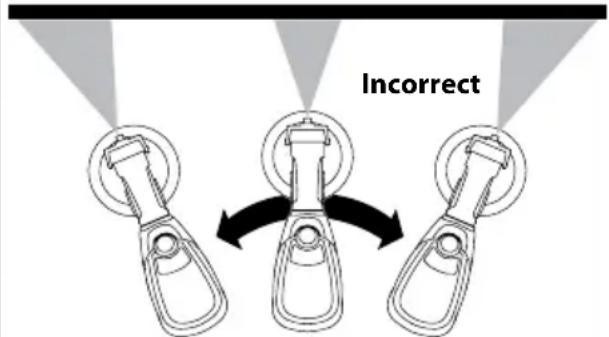
Do not flex wrist while spraying.
Note: When you quit spraying for any length of time, unplug the sprayer. When you restart, wipe the nozzle with a damp cloth to remove any dried paint.
Proper Spraying Technique
Pattern Examples
Use the images and guidelines below in order to assist you in achieving the desired spray pattern for your project. These are meant to be general starting points - you may have to slightly modify certain controls on the system in order to get the exact performance you need.
Note: It is recommended that the trigger first be pulled partially in order to start the turbine before a spray pass is made.
Large Surface Projects
Generally, high material flow and air power are needed for spraying large surface areas, such as walls and decks.
The iSpray nozzle is ideal for these applications and is designed for broad coverage in either horizontal or vertical spraying.

• The air cap position will determine the movement direction of the spray gun.
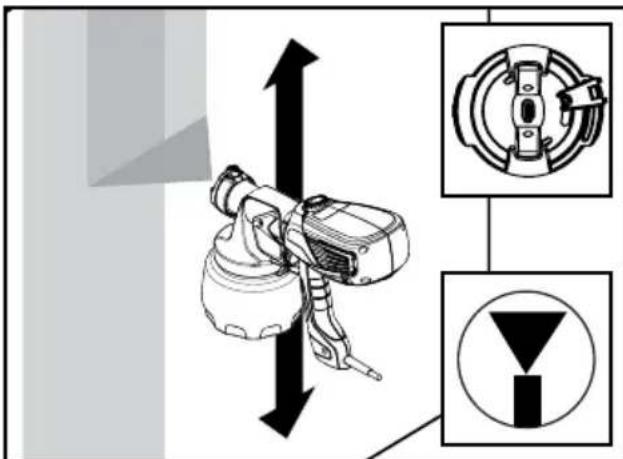
Small Surface Projects
Generally, low material flow and air power are needed for spraying smaller surface areas, such as corners, lattice, or spindles.
For this type of project, reduce power, material flow and switch to a narrow width when using the iSpray nozzle.
The Detail Finish Nozzle (standard with model 590, or sold separately) provides an even narrower pattern for smaller surface projects and fine finishing. Moving closer to the spray surface narrows the fan and moving farther away widens it.

- If you feel the material is going on too thin, increase the material flow.
- If you feel the material is going on too thick, decrease the material flow even further or move the spray gun further away from the surface.
Note: If after following the guidelines on these two pages you are still not getting the spray performance you need, refer to the 'Troubleshooting' section on page 15.
Besides adjusting the controls, other factors that should be considered when spraying:
- Distance from the spray object - if you are too far from the spraying surface, the material will go on too thin, and vice versa.
- Material thickness - if the spray pattern runs and/or is too splotchy, the material may need to be thinned.
Note: Only thin the material if absolutely necessary to improve spray performance. Optimal spray performance should be achieved simply by adjusting the various controls on the unit.
If the material needs to be thinned, dilute the material in steps of 5% - 10% until the desired spray pattern is acheived.
- Spray gun movement - moving the gun too quickly will cause the spray pattern to be too thin and excess overspray. Moving the gun too slowly will cause the spray pattern to be too coarse or thick.
Flushing the unit
Before you begin:
When cleaning, use the appropriate cleaning solution (warm, soapy water for latex materials; mineral spirits for oil-based materials)
IMPORTANT: Never clean air cap or air holes in the nozzle with sharp metal objects. Do not use solvents or lubricants containing silicone.

Special cleanup instructions for use with flammable solvents (must have a flashpoint above 70°F (21°C):
• Always flush spray gun outside.
• Area must be free of flammable vapors.
• Cleaning area must be well-ventilated.
• Do not submerge turbine!
To Flush the Unit:
- Unplug the power cord. Loosen the material container by 1/2 turn, but do not remove it. This will relieve any pressure left over in the system.
Pull the trigger so that the material inside the spray nozzle drains back into the container. - Unscrew the container and remove. Empty any remaining material back into the material container.
- Pour a small amount of the appropriate cleaning solution into the cup (Water=1/2 full. Mineral spirits=1/4 full).
- Attach the cup to the nozzle and plug in the sprayer.
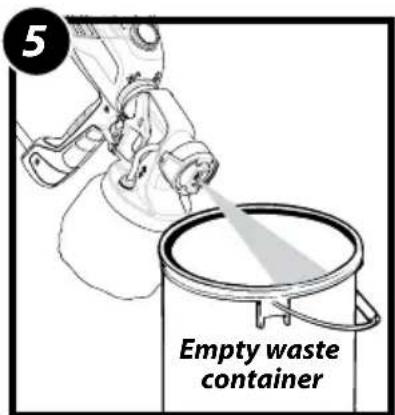
- Spray the cleaning solution into a safe area.
While spraying, gently shake the spray gun. This slight agitation will help break up smaller particles of spray material. - Unplug the power cord. Loosen the material container by 1/2 turn, but do not remove it. This will relieve any pressure left over in the system.
Pull the trigger so that the material inside the spray nozzle drains back into the container.
IMPORTANT: If you cleaned the sprayer using mineral spirits, repeat steps 1-6 using warm, soapy water.
Move on to "Cleanup - Cleaning the Nozzle", next page.


natural_image
Line drawing of a container pouring liquid into a cylindrical container (no text or symbols)
natural_image
Hand pouring liquid into a jar (no text or symbols visible)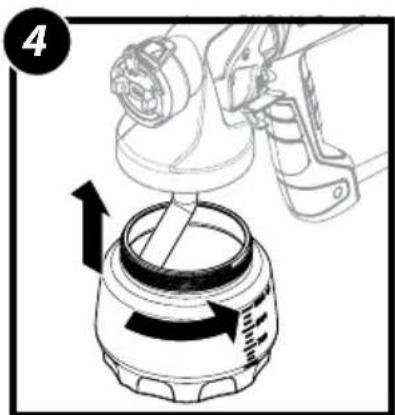

Cleanup (continued)
Cleaning the Nozzle
To Clean the Nozzle:
-
Make sure power cord is unplugged. Push the tab below the trigger, twist and separate the nozzle from the turbine. Wipe the exterior of the cup and nozzle until clean.
-
iSpray nozzle only -
a. Remove the adjustment ring (a) carefully from the connecting nut (b). Loosen the connecting nut.
b. Remove the parts as shown. Clean all parts with a cleaning brush and the appropriate cleaning solution.
To reassemble, see the instructions on the next page.
- Detail Finish nozzle only -
a. Unscrew the nut and remove the air cap and nozzle.
b. Remove the parts as shown. Clean all parts with a cleaning brush and the appropriate cleaning solution.
Reassemble all parts when clean* (see "Nozzle Seal").
- Clean the air vent (c) on the suction tube with a soft bristled cleaning brush.
- Clean the rear of the nozzle (d) with the appropriate cleaning solution. Use a thin layer of petroleum jelly to lubricate the O-ring (e).

natural_image
Exploded view diagram of a cleaning or cleaning device showing internal components and assembly (no text or labels)
natural_image
Diagram of a mechanical device with rotating components and directional arrows (no text or symbols)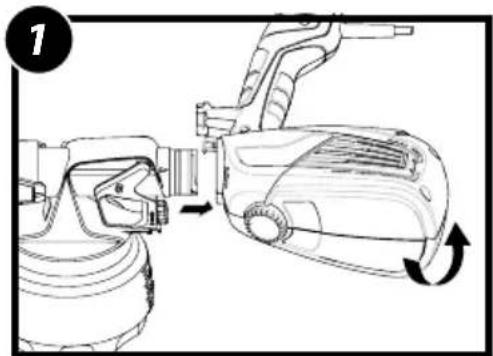
natural_image
Diagram of a spray gun system with two components and directional arrows indicating motion (no text or symbols)


Reassembly
To Reassemble:
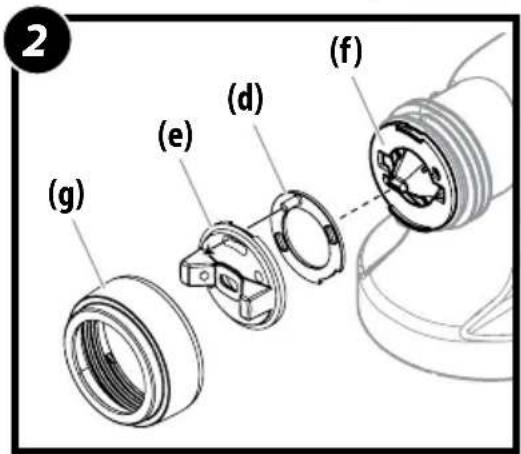
- Install the nozzle seal* with the groove (a) (slot) facing toward the nozzle (away from the front end assembly). Insert the nozzle. Make sure to align the groove (b) and notch (c) and align the nozzle opening with the needle.
- Put the air screen (d) in the air cap (e). Put both on the nozzle (f) and secure with the connecting nut (g).
note: This step is easier if the iSpray nozzle is facing up.
- Snap the adjustment ring (h) into the connecting nut, enabling the adjustment lever (i) on the peg (j) to be positioned in the air cap.
note: Make sure that the two recesses on the adjustment ring are engaged in the air cap tabs.
note: Make sure the air valve tube is free of paint. If not, clean the air valve tube by following the instructions on the next page. If clean, make sure it is attached securely at both ends (see inset).
- Reattach the nozzle to the turbine.
\* nozzle seal
It is important that the nozzle seal inside the nozzle be re-installed properly. Make sure the cup side of the seal (the side with the groove) is facing out towards the front of the nozzle.


natural_image
Technical line drawing of a mechanical assembly with no visible text or symbolsMaintenance
Cleaning the Filters:
IMPORTANT: Before every use, you should inspect the air filters in the turbine to see if it is excessively dirty. If it is dirty, follow these steps to replace it.
IMPORTANT: Never operate your unit without the air filters. Dirt could be sucked in and interfere with the function of the unit.
- Unplug the spray gun. Push the snap levers (a) on the two turbine covers and remove them. Remove the dirty filters and replace with new ones. The smooth side of the air filter must be placed toward the turbine. Secure the covers back onto the turbine.

Cleaning the Air Valve Tube (iSpray only):
Note: If paint has entered the air tube, proceed as follows.
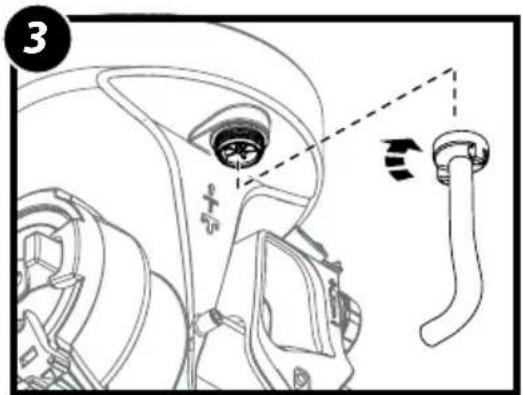
- Pull the air tube (a) at the top from the nozzle. Screw off the valve cover (b). Remove the valve seal (c). Clean all the parts carefully.
IMPORTANT: The air tube and valve seal (c) are only solvent-resistant to a limited extent. Do not immerse in solvent, only wipe.
- Place the valve seal (c) in the valve cover (b) with the pin facing into the tube.
Note: Installing the valve seal into the valve cover will be much easier if the valve cover is inverted.
- Turn the nozzle upside down and screw on the valve cover (with valve seal inside) from underneath.
Note: Turning the nozzle upside down will prevent the valve seal from falling out of the valve cover during reinstallation.
- Place the air tube on the valve cover and on the nipple at the nozzle.



Troubleshooting
| PROBLEM CAUSE SOLUTION | ||
| Problem A: Little or no material flow | 1. Nozzle clogged.2. Suction tube clogged.3. Material flow setting too low.4. Suction tube loose.5. Air vent on suction tube blocked.6. No pressure build up in container.7. Air valve tube disconnected.8. Air filter clogged.9. Spray material too thick. | 1. Clean.2. Clean.3. Increase material flow setting.4. Remove and replace as tightly as possible.5. Clean (see page 13)6. Tighten container.7. Reconnect both ends of the air tube.8. Change9. Thin*. |
| Problem B: Material leaking | 1. Nozzle loose.2. Nozzle worn.3. Nozzle seal worn.4. Material build-up on air cap and nozzle | 1. Tighten.2. Replace.3. Replace.4. Clean. |
| Problem C: Spray pattern too thick, runs and sags | 1. Material flow setting too high.2. Air power setting too low.3. Applying too much material.4. Nozzle clogged.5. Air filter clogged.6. Too little pressure build-up in container.7. Spray material too thick. | 1. Decrease material flow setting.2. Increase air power setting.3. Adjust material flow or increase movement of spray gun.4. Clean.5. Change.6. Tighten container.7. Thin*. |
| Problem D: Spray jet pulsates | 1. Material in container running out.2. Air filter clogged.3. Air valve tube disconnected. | 1. Refill.2. Change.3. Reconnect both ends of the air tube. |
| Problem E: Too much overspray | 1. Gun too far from spray object.2. Air power setting too high. | 1. Reduce distance.2. Decreasae air power setting. |
| Problem F: Pattern is very light and splotchy | 1. Moving the spray gun too fast.2. Material flow setting too low.3. Air power setting too high. | 1. Adjust material flow or decrease movement of spray gun.2. Increase material flow setting.3. Decreasae air power setting. |
*Note: Generally, material should only need to be thinned when using the Detail Finish nozzle. Only thin the material as a last resort to improve spray performance. Optimal spray performance should be achieved simply by adjusting the various controls on the unit.

natural_image
Technical line drawing of a mechanical device with internal components (no text or symbols)
This unit contains no servicable electrical parts. Do not attempt to service yourself. Store indoors with the cord wrapped around the turbine handle.

Have you tried the recommendations above and are still having problems? In the United States, to speak to a customer service representative, call our Technical Service at 1-800-328-8251. See www.wagnerspraytech.com in the "Contact Us" section for Technical Service hours.
Replacement parts available by calling customer service

natural_image
Technical line drawing of a mechanical device with labeled part '5' (no text or symbols beyond label)Replacement parts available by calling customer service
| # Part No. N° de pièce Pieza No. | English Description | Français Description | Español Descripción | Qty. Qte. Cant. | |
| 1 | 0529013 Detail Finish | Nozzle assembly (includes items 1-8) | Ensemble de buse de Detail Finish (inclut des pièces 1 à 8) | Ensamblaje de boquilla de Detail Finish (incluye los articulos 1-8) | 1 |
| 2 | 0414353 Nozzle seal | Joint d'étanchéité de buse | Sello de boquilla 1 | ||
| 3 | 0417349 Nozzle Buse Boquilla 1 | ||||
| 4 | 0414368 Air cap Chapeau d'air Tapa de aire 1 | ||||
| 5 | 0414351 | Connecting nut | Écrou d'assemblage | Tuerca de conexión | 1 |
| 6 | 0417356 | Tube / Valve seal | Tube / Joint de clapet | Tube / Junta de la válvula | 1 |
| 7 | 0417341 | Container seal | Joint d'étanchéité de réservoir | Sello de recipiente | 1 |
| 8 | 0414363 | Suction tube | Tube d'aspiration | Tubo de succión | 1 |
| 9 | 0414313 | Material container (600 ml) | Réservoir de liquide (600 ml) | Recipiente (600 ml) | 1 |
| 10 | 2301990 | Thinning accessory | Accessoire de dilution | Accesorio para diluir | 1 |
| 11 | 0529929 | Funnel | Entonnoir | Embudo | 2 |
Accessories • Accessoires • Accesorios
| Part No.N° de piècePieza No. | EnglishDescription | FrançaisDescription | EspañolDescripción |
| 0529014 iSpray nozzle assembly Ensemble de buse de iSpray Ensamblaje del boquilla de iSpray | |||
| 0529013 Detail Finish NozzleTMassembly | Ensemble de buse de DetailFinishTM | Ensamblaje del boquilla deDetail FinishTM | |
| 2331571 X-Boost® turbine filters Filtres de turbine de X-Boost® Filtros de turbine de X-Boost® | |||
Limited Warranty
HVLP paint spray equipment
This product, manufactured by Wagner Spray Tech Corporation (Wagner), is warranted against defects in material and work-manship for one year following date of purchase if operated in accordance with Wagner's printed recommendations and instructions. This warranty does not cover damage resulting from improper use, accidents, user's negligence or normal wear. This warranty does not cover any defects or damages caused by service or repair performed by anyone other than a Wagner Authorized Service Center.
ANY IMPLIED WARRANTY OF MERCHANTABILITY OR FITNESS FOR A PARTICULAR PURPOSE IS LIMITED TO one year FOLLOWING DATE OF PURCHASE. WAGNER SHALL NOT IN ANY EVENT BE LIABLE FOR ANY INCIDENTAL OR CONSEQUENTIAL DAMAGES OF ANY KIND, WHETHER FOR BREACH OF THIS WARRANTY OR ANY OTHER REASON. THIS WARRANTY DOES NOT APPLY TO ACCESSORIES.
THIS PRODUCT IS DESIGNED FOR HOME USAGE ONLY. IF USED FOR COMMERCIAL OR RENTAL PURPOSES, THIS WARRANTY APPLIES ONLY FOR 30 DAYS FROM DATE OF PURCHASE.
If any product is defective in material and/or workmanship during the applicable warranty period, return it with proof of purchase, transportation prepaid to any Wagner Authorized Service Center. (Service Center listing is enclosed with this product.) Wagner's Authorized Service Center will either repair or replace the product (at Wagner's option) and return it to you, postage prepaid.
SOME STATES DO NOT ALLOW LIMITATIONS ON HOW LONG AN IMPLIED WARRANTY LASTS OR THE EXCLUSION OF INCIDENTAL OR CONSEQUENTIAL DAMAGES, SO THE ABOVE LIMITATION AND EXCLUSION MAY NOT APPLY TO YOU. THIS WARRANTY GIVES YOU SPECIFIC LEGAL RIGHTS, AND YOU MAY ALSO HAVE OTHER RIGHTS WHICH VARY FROM STATE TO STATE.
Questions? Product Registration
Call Wagner Technical Service at:
1-800-328-8251
See www.wagnerspraytech.com in the "Contact Us" section for Technical Service hours.
In order to register your product today, visit:
www.wagnerspraytech.com/registration
We value your opinion. To complete your review, please visit:
www.wagnerspraytech.com/reviews



- Questions?
- Important Safety Information
- Grounding Instructions
- WARNING - To reduce the risk of injury:
- WARNING - To reduce the risk of electric shock:
- Important Electrical Information
- Thank you for your purchase!
- Controls and Functions - Model 570
- X-Boost™ Power Dial:
- Spray Width Lever:
- Adjustment Ring:
- Material Flow Control:
- Controls and Functions - Model 590
- Detail Finish Nozzle:
- iSpray Nozzle:
- Material Preparation
- To Prepare the Material:
- Thinning the material:
- Assembly
- Before you begin:
- To Assemble:
- Air and Material Controls
- X-Boost™ Power Dial
- 2-Speed Air Power Control
- Variable Air Power Control
- Material Flow Control
- Spray Pattern Adjustment
- Adjust Spray Shape - both nozzles
- Adjust Spray Width - iSpray only
- Tips:
- Proper Spraying Technique
- STOP
- Spray Poster
- Surface Preparation
- Spray Area Preparation
- How to Spray Properly
- Pattern Examples
- Large Surface Projects
- Small Surface Projects
- Flushing the unit
- To Flush the Unit:
- Cleanup (continued)
- Cleaning the Nozzle
- To Clean the Nozzle:
- Reassembly
- To Reassemble:
- \* nozzle seal
- Maintenance
- Cleaning the Filters:
- Cleaning the Air Valve Tube (iSpray only):
- Troubleshooting
- Accessories • Accessoires • Accesorios
- Limited Warranty
- HVLP paint spray equipment
- Questions? Product Registration
Brand : Wagner SprayTech
Model : FLEXiO 590
Category : Paint gun