Space Station 49114500 - Telescope TASCO - Free user manual and instructions
Find the device manual for free Space Station 49114500 TASCO in PDF.

| Product type | Reflecting telescope (Newtonian) |
| Brand | Tasco |
| Model | Space Station 49114500 |
| Objective diameter | 114 mm (4.5 inches) |
| Focal length | 500 mm |
| Magnifications with included eyepieces | H25mm : 20x, H10mm : 50x, SR4mm : 125x |
| Maximum magnification with 3x Barlow | 375x |
| Included eyepieces | H25mm (low), H10mm (medium), SR4mm (high) |
| Barlow lens | 3x, included |
| Finder | StarPointer red dot (zero magnification) |
| Additional accessories | Moon filter, moon map |
| Finder power supply | Battery (CR2032 type, not included) |
| Tripod material | Steel tube with telescoping legs |
| Accessory tray | Included, attaches between legs |
| Warranty | Limited lifetime warranty for original owner (except electrical components: 2 years) |
| Usage | Astronomical (primarily) and terrestrial observation (with limitations) |
| Maintenance | Clean optics with a soft cloth; avoid touching surfaces; store in a dry place |
| Safety | NEVER observe the Sun – risk of irreversible eye damage |
| Spare parts and repairability | Contact local distributor or Tasco GmbH for repairs |
Frequently Asked Questions - Space Station 49114500 TASCO
User questions about Space Station 49114500 TASCO
0 question about this device. Answer the ones you know or ask your own.
Ask a new question about this device
Download the instructions for your Telescope in PDF format for free! Find your manual Space Station 49114500 - TASCO and take your electronic device back in hand. On this page are published all the documents necessary for the use of your device. Space Station 49114500 by TASCO.
USER MANUAL Space Station 49114500 TASCO
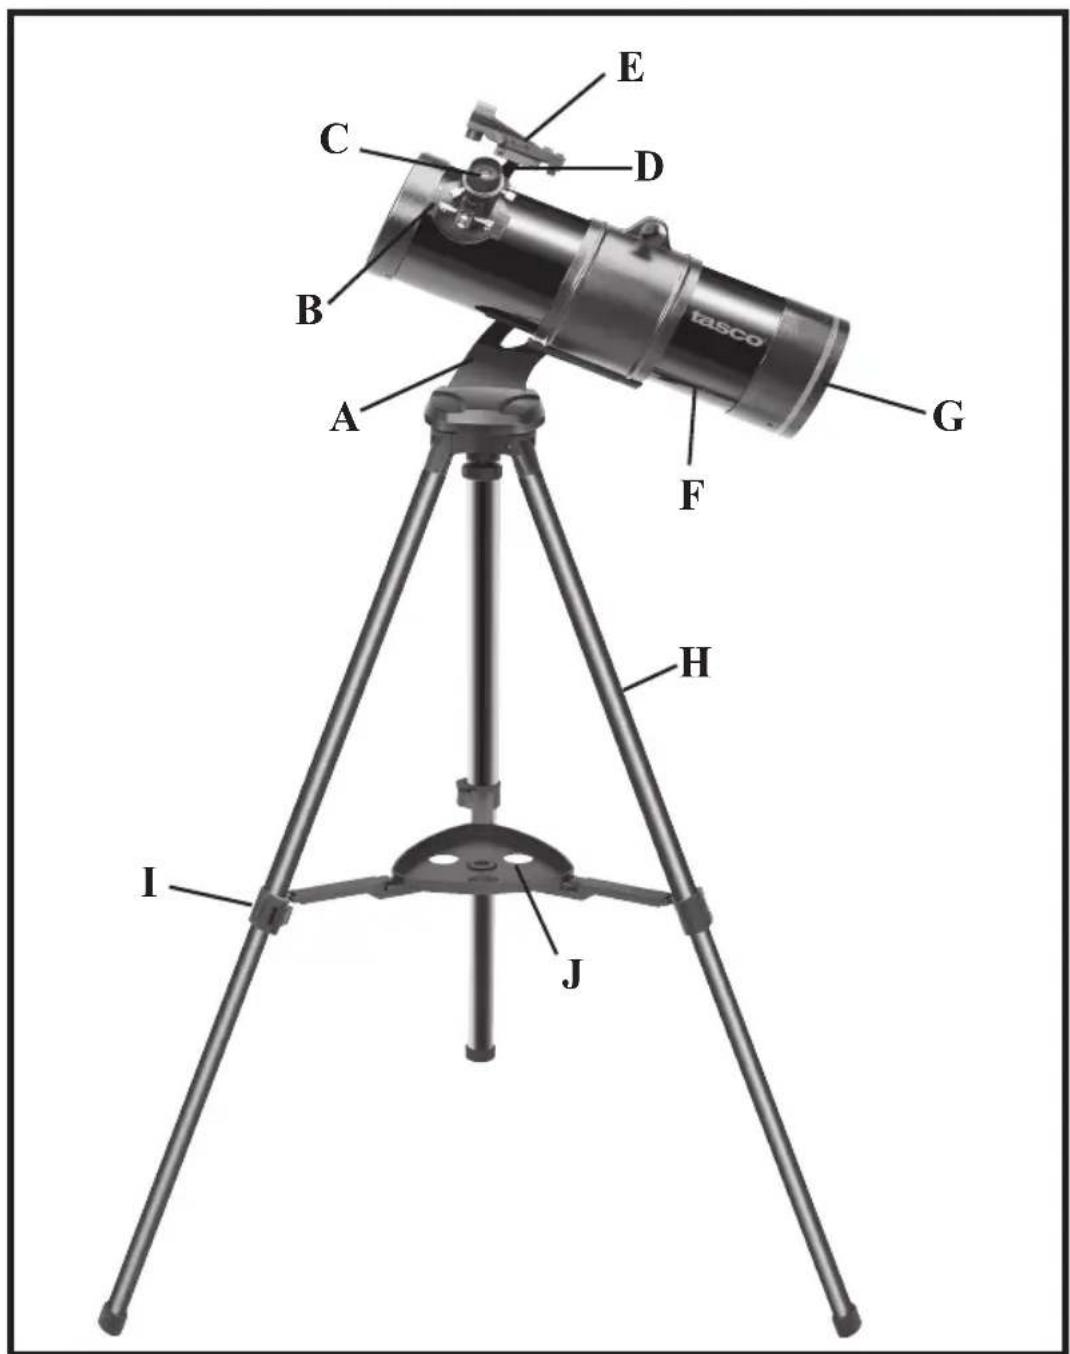
NOTE: Actual product may have improvements that are not shown in this diagram.
A. Yoke Mount
F. Telescope Main Body
B. Focus Knob
G. Main Mirror (internal)
C. Eyepiece
H. Tripod Leg
D. Finderscope Bracket
I. Tripod Leg Adjusting Clamp
E. Finderscope
J. Accessory Tray
2
PARTS DIAGRAM
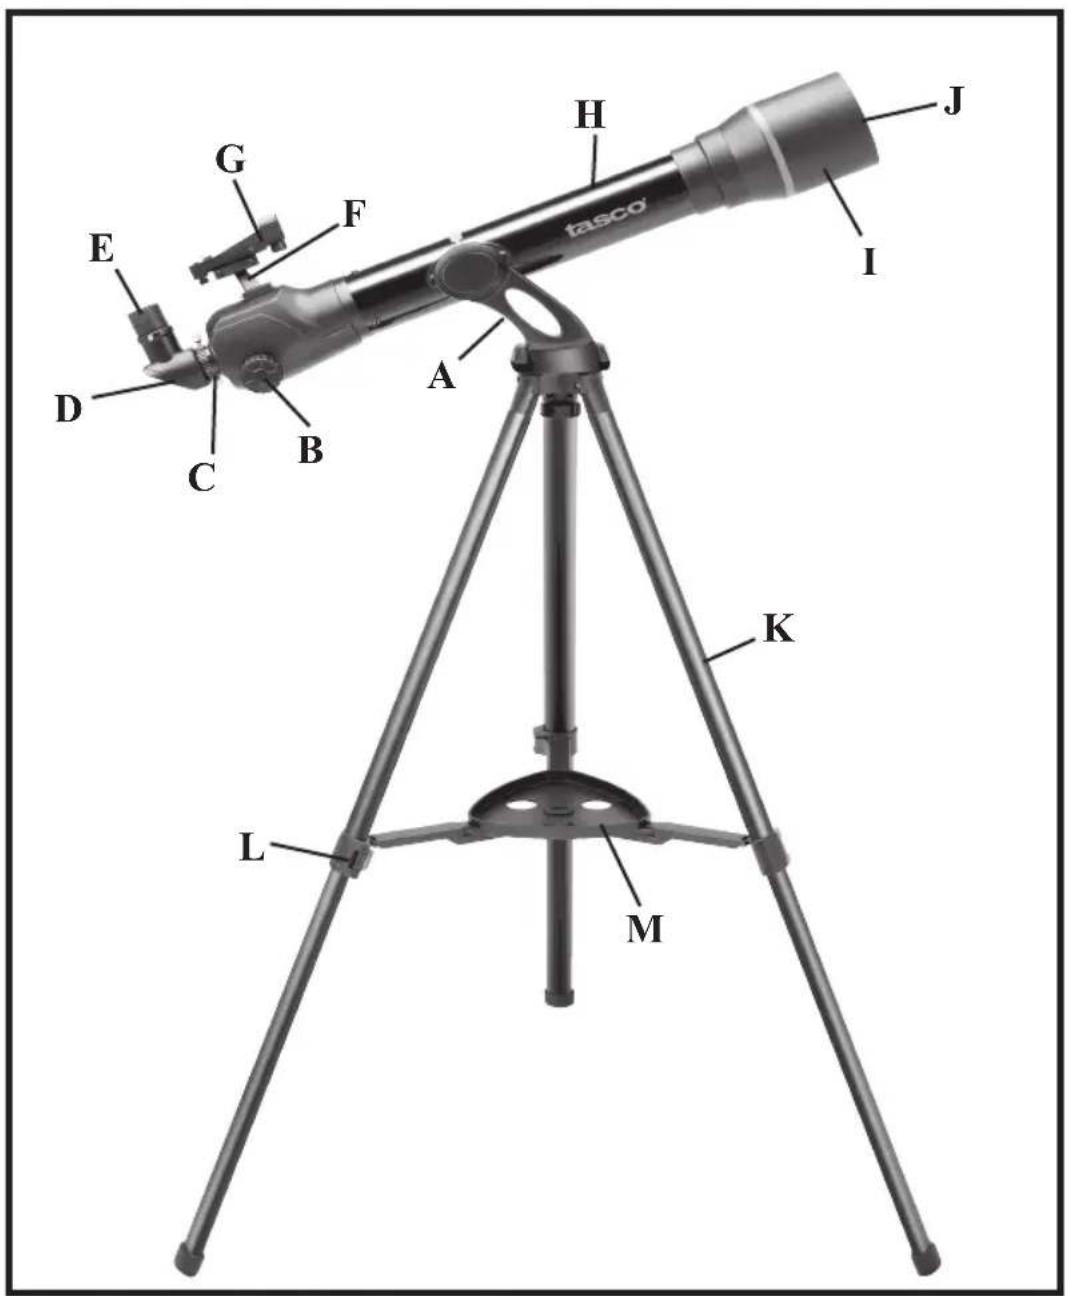
NOTE: Actual product may have improvements that are not shown in this diagram.
A. Yoke Mount
H. Telescope Main Body
B. Focus Knob
I. Sun Shade
C. Focus Tube
J. Objective Lens (not shown)
D. Diagonal
K. Tripod Leg
E. Eyepiece
L. Tripod Leg Adjusting Clamp
F. Finderscope Bracket
M. Accessory Tray
G. Finderscope
3
ASSEMBLY DIAGRAMS

4
TELESCOPE ASSEMBLY INSTRUCTIONS
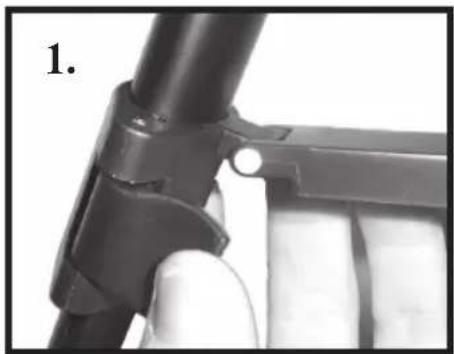
- Your telescope has adjustable (telescoping) legs (Fig. 1).
- Stand tripod and spread legs. Loosen the three leg clamps. Grab tripod head and lift. Extend the tripod legs to the desired height (at equal lengths) and tighten the clamps on each leg to hold it in position (Fig. 1).
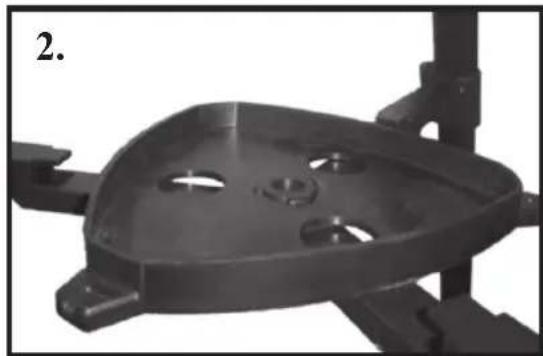
- Attach the accessory tray (P) to the center leg braces on the tripod legs (Fig 2) and insert accessory tray and bolt through center of tray into braces and tighten bolt.
- Remove telescope main body from the box. Attach telescope main body (H) by aligning the hole in the telescope saddle with that in the yoke.
- Remove the finderscope (G) with finderscope bracket (F) attached from the box. Position the finderscope bracket on the telescope main body (Fig. 3).
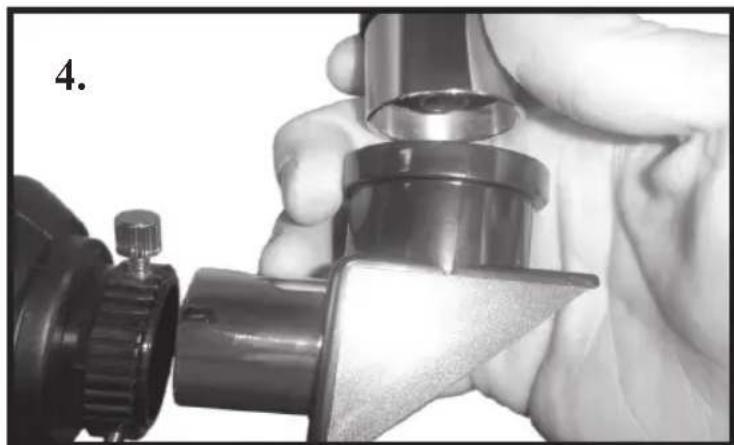
- (Refractor models) Put an eyepiece (H25mm) into the diagonal, then attach the diagonal to the telescope, tightening the retaining screws (Fig. 4). (Reflector models) Insert eyepiece into focusing tube and tighten set screw to begin viewing.
NOTE (Refractor Models only): In all astronomical telescopes, the image appears upside down. With the use of the diagonal the image appears erect but with a left to right inversion (mirror like). To use the telescope for terrestrial view and to correct the mirrored image, remove the diagonal and replace with the erecting eyepiece (fig 5). We recommend the use of the low magnification eyepiece when the telescope is used for terrestrial viewing. Only refractor telescopes come with erector eyepieces. Reflectors (mirrors) are used mainly for astronomical purposes.
The telescope is now fully assembled and ready for use.
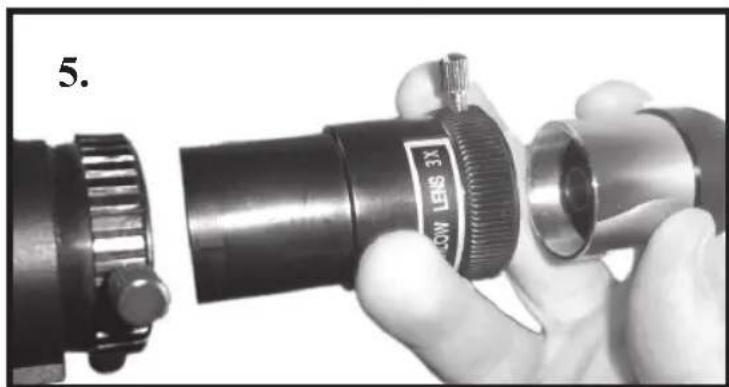
- To use the Barlow, insert Barlow (Fig. 5) into the focus tube. Secure by tightening small retaining screw. Insert eyepiece into open end of Barlow and secure.
CAUTION! Viewing the sun can cause permanent eye damage.
Do not view the sun with this telescope or even with the naked eye.
USING THE STAR POINTER
- The StarPointer is the quickest and easiest way to point your telescope exactly at a desired object in the sky. It's like having a laser pointer that you can shine directly into the night sky. The star pointer is a zero magnification pointing tool that uses a coated glass window to superimpose the image of a small red dot into the night sky. Like all finderscopes, the StarPointer must be properly aligned with the main telescope before it can be used.
- To turn on the StarPointer, rotate the variable brightness control clockwise until you hear a "click." To increase the brightness level of the red dot, continue rotating the control knob about 180^ until it stops.
- Locate a bright star or planet and center it in a low power eyepiece in the main telescope. If the StarPointer is perfectly aligned, you will see the red LED dot overlap the alignment star. If the StarPointer is not aligned, take notice of where the red dot is relative to the bright star. 5

USING THE STAR POINTER (con't)
Without moving the main telescope, turn the StarPointer's azimuth and altitude alignment controls until the red dot is directly over the alignment star. If the LED dot is brighter than the alignment star, it may make it difficult to see the star. Turn the variable brightness control counterclockwise, until the red dot is the same brightness as the alignment star. This will make it easier to get an accurate alignment. The StarPointer is now ready to be used. Remember to always turn the power off after you have found an object. This will extend the life of both the battery and the LED.
FINDING OBJECTS
- Look through the finderscope and pan the telescope until the object appears in the field of view. Once it's in the field of view, tighten the altitude and azimuth locks.
FOCUSING
- Once you have found an object in the telescope, turn the focus knob until the image is sharp.
- To focus on an object that is nearer than your current target, turn the focusing knob toward the eyepiece (i.e., so that the focus tube moves away from the front of the telescope). For more distant objects, turn the focus knob in the opposite direction.
- To achieve a truly sharp focus, never look through glass windows or across objects that produce heat waves, such as asphalt parking lots.
MAGNIFICATION
- The magnification (or power) of a telescope varies depending upon the focal length of the eyepiece
being used and the focal length of the telescope. - To calculate magnification, use the following formula, in which FL = focal length:
Magnification = FL (telescope) in mm
FL (eyepiece)
EYE LENS CHART & THEORETICAL POWER LIMITS
| Eyepiece / Model # 49060 | 700 Refractor | 49070800 Refractor | 49114500 Reflector |
| H25mm Eye Lens Power | 28x 32x 20x | ||
| H10mm Eye Lens Power | 70x 80x 50x | ||
| SR4 Eye Lens Power 175x | 200x 125x |
6
TECHNICAL SPECIFICATIONS
| Spec / Model # 49060700 | Refractor | 49070800 Refractor | 49114500 Reflector |
| Objective Diameter 60mm | (2.36") 70mm | (2.75") 114mm | (4.5") |
| Focal Length 700mm 800mm | mm 500mm | ||
| Eyepiece-Low Power H 25mm H 25mm H 25mm | |||
| Eyepiece-Medium Power H 10mm H 10mm H 10mm | |||
| Eyepiece-High Power SR 4mm SR 4mm SR 4mm | |||
| Erecting Eyepiece Inc. | Yes | Yes | No |
| Barlow Inc. | Yes, 3x | Yes, 3x | Yes, 3x |
| Maximum Magnification | 525x | 600x | 375x |
| Accessories | Diagonal, Finderscope, Moon Filter, Moon Map | Diagonal, Find-erscope, Moon Filter, Moon Map | Finderscope, Moon Filter, Moon Map |
NOTE: Magnification is calculated magnification.
Low power is recommended for most viewing conditions.
HELPFUL HINTS
- Your telescope is a very sensitive instrument. For best results and fewer vibrations set your telescope up on a level location on the ground rather than your concreted driveway or your wooden deck. This will provide a more stable foundation for viewing, especially if you've drawn a crowd with your new telescope.
- If possible, view from a location that has relatively few lights. This will allow you to see much fainter objects. You'd be surprised how much more you'll see from your local lake or park when compared to a backyard in the city.
- Using your telescope out a window is NEVER recommended.
- View objects that are high in the sky if possible. Waiting until the object rises well above the horizon will provide a brighter and crisper image. Objects on the horizon are viewed through several layers of earth's atmosphere. Ever wonder why the moon appears orange as it sets on the horizon? It's because you are looking through a considerable more amount of atmosphere than you would directly overhead. (Note: If objects high in the sky are distorted or wavy, you are probably viewing on a very humid night.) During nights of unstable atmosphere, viewing through a telescope can be frustrating if not impossible. Astronomers refer to crisp, clear nights as nights of "good seeing." 7


NOTES
WARRANTY/REPAIR INFORMATION
TELESCOPE LIFETIME LIMITED WARRANTY
Your Tasco telescope is warranted to be free of defects in materials and workmanship for the lifetime of the original owner. The Lifetime Limited Warranty is an expression of our confidence in the materi als and mechanical workmanship of our products and is your assurance of a lifetime of dependable service.
If your telescope contains electrical components, these components are warranted to be free of defects in materials and workmanship for two years after the date of purchase.
In the event of a defect under this warranty, we will, at our option, repair or replace the product, provided that you return the product postage prepaid. This warranty does not cover damages caused by misuse, improper handling, installation, or maintenance provided by someone other than a Tasco Authorized Service Department.
Any return made under this warranty must be accompanied by the items listed below:
1) A check/money order in the amount of $15.00 to cover the cost of postage and handling
2)Name and address for product return
3)An explanation of the defect
4) Proof of Date Purchased
5)Product should be well packed in a sturdy outside shipping carton, to prevent damage in transit, with return postage prepaid to the address listed below:
IN U.S.A. Send To: IN CANADA Send To:
Tasco Tasco
Attn.: Repairs Attn.: Repairs
8500 Marshall Drive 25A East Pearce Street, Unit 1
Lenexa, Kansas 66214 Richmond Hill, Ontario L4B 2M9
For products purchased outside the United States or Canada please contact your local dealer for applicable warranty information. In Europe you may also contact Tasco at:
Tasco Gmbh
European Service Centre
MORSESTRASSE 4
D-50769KOLN
GERMANY
Tel: +49 (0) 221 709 939 3
Fax: +49 (0) 221 709 939 8
This warranty gives you specific legal rights.
You may have other rights which vary from country to country.
©2007 B.O.P
FRANÇAIS
NOMENCLATURE DES PIECES
8500 Marshall Drive 25A East Pearce Street, Unit 1
Lenexa, Kansas 66214 Richmond Hill, Ontario L4B 2M9
European Service Centre
MORSESTRASSE 4
D-50769 Cologne
Allemagne
Tel: +49 (0) 221 709 939 3
Fax: +49 (0) 221 709 939 8
8500 Marshall Drive 25A East Pearce Street, Unit 1
Lenexa, Kansas 66214 Richmond Hill, Ontario L4B 2M9
European Service Centre
MORSESTRASSE 4
D-50769KOLN
ALEMANIA
Tél: +49 (0) 221 709 939 3
Fax: +49 (0) 221 709 939 8
8500 Marshall Drive 25A East Pearce Street, Unit 1
Lenexa, Kansas 66214 Richmond Hill, Ontario L4B 2M9
European Service Centre
MORSESTRASSE 4
D-50769KOLN
Deutschland
Tél: +49 (0) 221 709 939 3
Fax: +49 (0) 221 709 939 8
8500 Marshall Drive 25A East Pearce Street, Unit 1
Lenexa, Kansas 66214 Richmond Hill, Ontario L4B 2M9
European Service Centre
MORSESTRASSE 4
D-50769-Cologne
Germany
Tél: +49 (0) 221 709 939 3
Fax: +49 (0) 221 709 939 8
8500 Marshall Drive 25A East Pearce Street, Unit 1
Lenexa, Kansas 66214 Richmond Hill, Ontario L4B 2M9
European Service Centre
MORSESTRASSE 4
D-50769KOLN
Alemanha
Té: +49 (0) 221 709 939 3
Fax: +49 (0) 221 709 939 8