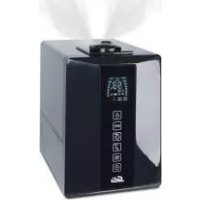
Ultrasonic 715 - Humidifier Solis - Free user manual and instructions
Find the device manual for free Ultrasonic 715 Solis in PDF.


User questions about Ultrasonic 715 Solis
0 question about this device. Answer the ones you know or ask your own.
Ask a new question about this device
Download the instructions for your Humidifier in PDF format for free! Find your manual Ultrasonic 715 - Solis and take your electronic device back in hand. On this page are published all the documents necessary for the use of your device. Ultrasonic 715 by Solis.
USER MANUAL Ultrasonic 715 Solis
Description of the appliance
- Vapour outlet (rotating)
- Handle
- Evaporation chamber
- Water tank
- Water-level sensor
- Recency
- Power cord
2 Months - MeHbAe 2. Dye
- Brus
- Main body
- Control panel
- Demineralization cartridge
- Turn lock
Bedianungsanleitung. 4-7
Mode d'emploi Page 8-11
Modo d'uso.. 12-15
User's manual Page 16-19
Liebe Kundin/Lieber Kunde
Chere cliente, Cher client,
Tension 230 Volt/50 Hz
Pausisssorbite 45 Ws (sans prechaufage)
Congratulations on your choice of the SOLIS Ultrasonic Nebulizer!
The physical well-being of people and animals is influenced by numerous factors, one of which is the right humidity level of room air. During heating periods, cold and dry outside air flows into rooms through the windows, where its temperature rises. This leads to a massive drop in relative room air humidity, creating an unfavourable climate for people, animals and plants. Your well-being suffers, you become more vulnerable to cold an flu germs.
Humidification by Ultrasonics:
A highly efficient technology allowing controlled humidification. High frequency oscillations transform the water into a microfine mist which is then passed into the room where it immediately evaporates.
Ultrasonic humidifiers have a low power consumption. A replaceable demineralisation cartridge cleans the water from minerals and other waterborne residues thus providing a pure mist. Ultrasonic humidifiers are equipped with an integrated hygrostat and output control.
General Information
A comfortable atmosphere indoors is reached with a relative humidity level between 40 and 60% . Your humidifier controls automatically the humidity level according to desired setting. If the air is too dry, the humidifier will automatically switch on. As soon as the desired humidity level is reached, it will switch off.
Safety Instructions:
- Read the operating instructions carefully before using the humidifier and keep them for later reference.
- Connect the unit only to alternating current with voltage according to the rating label.
Only use the humidifier indoors and within the specified technical data. It used for a purpose for which it is not intended it could cause
Children cannot recognise the hazards associated with the usage of electrical appliances. For this reason, always supervise children when they are near the humidifier. - Persons who are not familiar with the operating instructions, as well as children and persons under the influence of medication, alcohol, or drugs are not permitted to operate the appliance, or are only permitted to operate it under supervision.
- Never use the appliance if there is any damage to the appliance or cable, after malfunction, after the appliance has been dropped or damaged in any other way.
Only operate the humidifier when it is completely assembled. - Repairs of electrical appliances are only to be made by qualified service engineers. Improper repair work can cause considerable danger to the user.
- Disconnect the appliance from the mains power before filling/emptying the water tank, before cleaning/ maintenance, assembling/ dismantling of individual parts and before moving the appliance.
- Place the humidifier on a dry, level surface. Do not place the device directly on the floor or next to heating.
- Do not pour water into the vapour outlet of the humidifier.
- Do not put any additives in the water (e.g. fragrances, essential oils, water fresheners,
- Do not submerge the main body in water or other liquids.
Putting Into operation
- Finding the ideal location for your humidifier: - A slightly heightened place, approx. 30 to 50~cm above the floor.
- Please note that:
- Do not place the device directly on the floor or next to heating.
- The vapour outlet must not be pointed directly at plants or other objects.
- Make sure that no foreign objects are in the water tank.
- Fill the tank with clean, cold water from the tap (water no hotter than 40^ ). Close the cap of the water tank properly. Do not add any conditioners to the water.
- Soak the cartridge in water for a few hours before using it.
- The demineralization cartridge should be replaced every 2-3 months.
- Place the water tank on the base and insert the vapour outlet.
- Insert the plug into the socket and switch on the appliance using the on/off switch.
- About 10 to 15 minutes after having been switched on the device will reach its full power.
Attention!
- The water tank is equipped with a demineralization cartridge. This cartridge has to be replaced every 2-3 months.
- If the water is very hard, it may be necessary to replace the cartridge earlier.
We do not recommend the use of this Ultrasonic Nebulizer if your water is harder than 25 ft! - White dust around the device is a sure sign that the cartridge is empty.
- If while precipitate still forms around the device after a new cartridge has been inserted, please make sure that the water you are using is really untreated. (no conditioner)
- If the water flows through a decalcification system in the building before it is used in the humidifier, salt will precipitate around the device.
Replacement of the demineralization cartridge
Turn around the tank and open the turn-lock. The domineralization cartridge is attached to the inside of the cap. Unscrew the cartridge turning it anti-clockwise and replace it with a new one.
Operating
On-Off
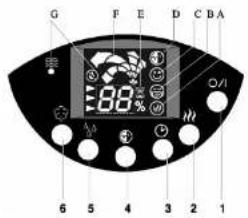
Press button (1) to turn the air humidifier on and off.
Operating with preheating
Button (2) is used to turn the pre-heating on (symbol A appears on the display) to off. When it is on, the water is pre-heated to 80^ before it enters the fogging chamber. The fog is now at a comfortable 40^ when it is emitted from the appliance. This is advantageous as it does not cause the room temperature to fall, in addition there is substantial improvement in maintaining the purity of the water (bacteria are killed).
Timer
You can use button (3) to determine the operating time. It can be regulated between 1 and 9 hours or for continuous operation. If the timer has been activated, the symbol (E) appears on the display.
Auto
Pressing button (4) activates the automatic mode. If the automatic function has been added symbol (D) with "Auto" appears on the display. The ideal humidity in relation to temperature and evaporation rate is maintained.
Hygrostat/Set humidity
Set the desired humidity in % by pressing button (5). We recommend a relative humidity between 40% and 60% . The appliance can be regulated from 40% to 75% . If the humidity exceeds the desired setting, the appliance turns itself off. The appliance does not turn itself off; if it has been set for continuous operation, the desired value is shown while you are making the selection. After a few seconds, the display automatically switches to the current value.
Symbol B on the display indicates that the set humidity has not been reached yet.
Symbol C on the display indicates that the desired humidity has been reached.
Regulating evaporation rate
You can regulate the evaporation rate by pressing button (6) several times. If the arrow (F) is fully displayed, you have selected the highest evaporation rate.
Water level display
The transparent water tank makes it easy to see how much water is in the appliance. In addition the symbol (G) is displayed when water must be refilled.
Cleaning/Maintenance
- Switch of the appliance and unplug it from the socket before cleaning it.
- Clean the water tank and the reservoir regularly once a week (Use water only, no detergents). When operating with pre-heating every two weeks.
Use decalcification agents found in stores everywhere to remove deposits from the membrane regularly. Rinse out the decalcification agent thoroughly with plenty of water.
Attention
- Make sure that no water gets into the lower part of the main body.
- Clean the Inner parts with a soft cloth. Do not use any solvents or aggressive cleaning agents to clean the appliance.
Only use the brush to clean the membrane. This should be done once a week. - Change the water in the tank at least once a week.
Storing the appliance
Clean the humidifier as described earlier and dry it thoroughly. Preferably store the appliance in its original box. Avoid high temperatures.
Disposal
Appliance that have reached the end of their service life must be rendered inoperable. Disconnect the appliance from mains power and separate mains cable and appliance. Deposit the appliance at an appropriate waste collection point or return it to your dealer. Electric appliances should not be disposed of as household waste. You can obtain information on other ways to dispose of the humidifier from your local council.
Technical data
Input voltage: 230 Volt / 50 Hz
Power consumption:
45 W (without pre-heating)
120-130 W (with pre-heating)
Hurmidification performance: 400 g/h
Suitable for rooms up to 60m ?/150m
Water capacity: 5.7 Liter
Weight (empty): 3.0 kg
Dimensions: 397 x 220 x 340 mm
Operating noise < 25 dB(A)
Accessories: demineralization cartridge
Trouble shooting
| Problem | Possible cause | What to do | |
| Humidifier does not operate | Power cable not plugged in | Plug in power cable | |
| No water in the tank(Empty-light flashing) | Fill tank with water | ||
| No vapour output | Desired humidity level lowerthan actual | Increase desired setting | |
| Residues of washing-up liquid | Rinse with clear water | ||
| Week vapour output | Water temperature too low | Set vapour output to maximum,after 10 min. the humidifierwill work properly again | |
| Mineral deposits on membrane | Clean membrane | ||
| White dust around thehumidifier | Demineralisation cartridgeexhausted | Replace cartridge | |