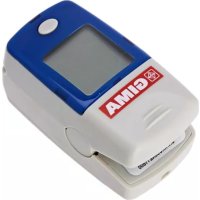
OXY5 - Heart rate monitor GIMA - Free user manual and instructions
Find the device manual for free OXY5 GIMA in PDF.


Frequently Asked Questions - OXY5 GIMA
User questions about OXY5 GIMA
0 question about this device. Answer the ones you know or ask your own.
Ask a new question about this device
Download the instructions for your Heart rate monitor in PDF format for free! Find your manual OXY5 - GIMA and take your electronic device back in hand. On this page are published all the documents necessary for the use of your device. OXY5 by GIMA.
USER MANUAL OXY5 GIMA
ATTENTION: The operators must carefully read and completely understand the present manual before using the product.
natural_image
Silhouette of a person sitting on a chair, enclosed in a circular frame (no text or symbols)
0476
text_image
Technical diagram showing exploded and assembled views of a medical device with labeled parts and components5.2. Batterie
natural_image
Illustration of a hand holding a dental pressure tool, pointing at the fingers (no text or symbols present)Instructions to User
Read these instructions carefully before using this equipment. These instructions describe the operating procedures to be followed strictly. Failure to follow these instructions can cause measuring abnormality, equipment damage and personal injury. The manufacturer is NOT responsible for the safety, reliability and performance issues and any monitoring abnormality, personal injury and equipment damage due to user's negligence of the operation instructions. The manufacturer's warranty service does not cover such faults.
- The uncomfortable or painful feeling may appear if using the device ceaselessly, especially for the microcirculation barrier patients. It is recommended that the sensor should not be applied to the same finger for over 2 hours.
- For the individual patients, there should be a more prudent inspecting in the placing process. The device can not be clipped on the edema and tender tissue.
- The light (the infrared is invisible) emitted from the device is harmful to the eyes, so the user and the maintenance man, can not stare at the light.
- Testee can not use enamel or other makeup on the finger.
- Testee's fingernail can not be too long.
- Please peruse the relative content about the clinical restrictions and caution.
1. Safety
1.1 Instructions for Safe Operations
- Check the main unit and all accessories periodically to make sure that there is no visible damage that may affect patient's safety and monitoring performance. It is recommended that the device should be inspected once a week at least. When there is obvious damage, stop using the oximeter.
- Necessary maintenance must be performed by qualified service engineers ONLY. Users are not permitted to maintain it by themselves.
- The oximeter cannot be used together with the devices not specified in User's Manual.
1.2Warnings

- Explosive hazard—DO NOT use the oximeter in environment with inflammable gas such as some ignitable anesthetic agents.
- DO NOT use the oximeter while the testee measured by MRI and CT
- To dispose the device, the local law must be followed.
1.3 Attentions

- Keep the oximeter away from dust, vibration, corrosive substances, explosive materials, high temperature and moisture.
- If the oximeter gets wet, please stop operating it. When it is carried from cold environment to warm and humid environment, please do not use it immediately.
- DO NOT press the keys on front panel with sharp materials.
- High temperature or high pressure steam disinfection to the oximeter is not permitted. Refer to User's Manual for instructions of cleaning and disinfection.
- DO NOT have the oximeter immersed in liquid. When it needs cleaning, please wipe its surface with disinfect solution by soft material. Do not spray any liquid on the device directly.
- When cleaning the device with water, the temperature of water should be lower than 60^ C.
2. Overview
The pulse oxygen saturation is the percentage of HbO_2 in the total Hb of the blood, so-called the O_2 concentration in the blood. It is an important bio-parameter to the respiration. Many of the respiration disease will cause hypoxemia, even endanger the patient's health. As a result, monitoring the SpO_2 is indispensable in the clinical rescuing. The traditional method to measure SpO_2 is to analyze the sample of the patient's blood, so can get the partial pressure of oxygen and calculate the SpO_2 by use the blood-gas analyzer. This method is inconvenient and can not be used to monitor continuously. For the purpose of measuring the SpO_2 more easily and accurately, GIMA developed the Fingertip Oximeter. The device can measure the pulse rate simultaneously.
The Fingertip Oximeter is compact, convenient to use and carry and with low power consumption. You just need to put the fingertip into the sensor of the device, the SpO_2 value will appear on the screen immediately.
2.1 Features
- Accurately measure SpO2 value and pulse rate value;
- Perfusion index display is available;
- Automatic start measuring after putting finger into rubber cushion;
- Power off automatically without signal for more than 8 seconds;
- Audible & visible alarm function;
- Low voltage indication;
2.2 Major Applications and Scope
The Fingertip Oximeter can detect SpO_2 and pulse rate through patient's finger, and indicate the pulse intensity by the bar-display. This device is applicable to home, hospital (including internal medicine, surgery, anesthesia, pediatrics, emergency room etc.), oxygen bar, the community medical center, alpine area and it also can be used before or after sports, and the like.

This device is not appropriate to be used for continuous monitoring.
2.3 Environment Requirements
Temperature:
Operating Temperature: 10°C \~40°C
Storage Temperature: -20°C\~55°C
Humidity:
Operating Humidity: 35%\~80%
Storage Humidity: 10%\~100%
Atmospheric pressure:
Operating Pressure: 70kPa\~106kPa
Storage Pressure: 50kPa\~106kPa
2.4 Principle of Measurement
The measurement of pulse oximeter is that it uses a multi-functional oxyhemoglobinometer to transmit some narrow spectrum light bands through blood samples and to measure attenuation of spectrum with different wavelengths according to the characteristic that RHb, O 2 HB, Met Hb and COHb absorb the light of different wavelength, thereby determining O 2 Hb saturation of different fractions. O 2 Hb saturation is called “fractional” O 2 Hb saturation.
Fractional O_2Hb saturation = [O_2Hb / (RHb + O_2Hb + MetHb + COHb)]× 100
Oppositely, pulse oxygen oximeter measures functional O₂Hb saturation:
Functional O_2Hb saturation = [O_2Hb / (RHb + O_2Hb)]× 100
Present SpO_2 oximeter transmits light of two wavelengths only, red light (wavelength 660 nm) and infrared (wavelength 940 nm), to differentiate HbO_2 from HbR. One side of the sensor contains two LEDs, and the other side contains a photoelectric detector. SpO_2 oximeter measures HbO_2 saturation in the blood by the light plethysmograph when the pulse beats. The result is quite precise when HbO_2 saturation is over 70% 95% .
2.5 Caution
A. The finger should be placed properly (see the attached illustration of this manual), or else it may cause inaccurate measurement.
B. The SpO_2 sensor and photoelectric receiving tube should be arranged in a way with the subject's arteriole in a position there in between.
C. The SpO _2 sensor should not be used at a location or limb tied with arterial canal or blood pressure cuff or receiving intravenous injection.
D. Do not fix the SpO_2 sensor with adhesive or else it may result in venous pulsation and inaccurate measure of SpO_2 .
E. Make sure the optical path is free from any optical obstacles like rubberized fabric.
F. Excessive ambient light may affect the measuring result. It includes fluorescent lamp, dual ruby light, infrared heater, direct sunlight and etc.
G. Strenuous action of the subject or extreme electrosurgical interference may also affect the accuracy.
H. Testee can not use enamel or other makeup on the finger.
3. Technical Specifications
A. Display mode: LCD Display
B. Power supply requirement:
1.5V (AAA size) alkaline battery × 2
Supply voltage: 3VDC
Operating current: <=15mA (backlight off)
C. SpO_2 Parameter Specifications
Measuring range: 35%\~99%
Accuracy: ±2% (during 75%\~99%)
±3% (during 50%\~74%)
SpO, alarm:
Lower limit: 90%
D. Pulse Rate Parameter Specifications
Measuring range: 30bpm\~240bpm
Accuracy: ±2bpm or ±2% (whichever is greater)
Pulse Rate alarm: Upper limit: 120bpm
Lower limit: 50bpm
E. Blood Perfusion Display
Range: 0\~20%
F. Resistance to interference of surrounding light
The difference between the value measured in the condition of indoor natural light and that of darkroom is less than ± 1% .
G. Resistance to interference of man-made light
Values of SpO_2 and Pulse Rate can be accurately measured by pulse oxygen simulator.
H. Dimensions
66 mm (L) × 36 mm (W) × 33 mm (H)
Net Weight: 60g (including batteries)
I. Classification
The type of protection against electric shock: Internally powered equipment.
The degree of protection against electric shock: Type BF applied part.
The degree of protection against harmful ingress of liquids: Ordinary equipment without protection against ingress of water.
Electro-Magnetic Compatibility: Group I, Class B
4. Accessories
A. A hanging cord
B. A pouch
C. A User's Manual
5. Installation
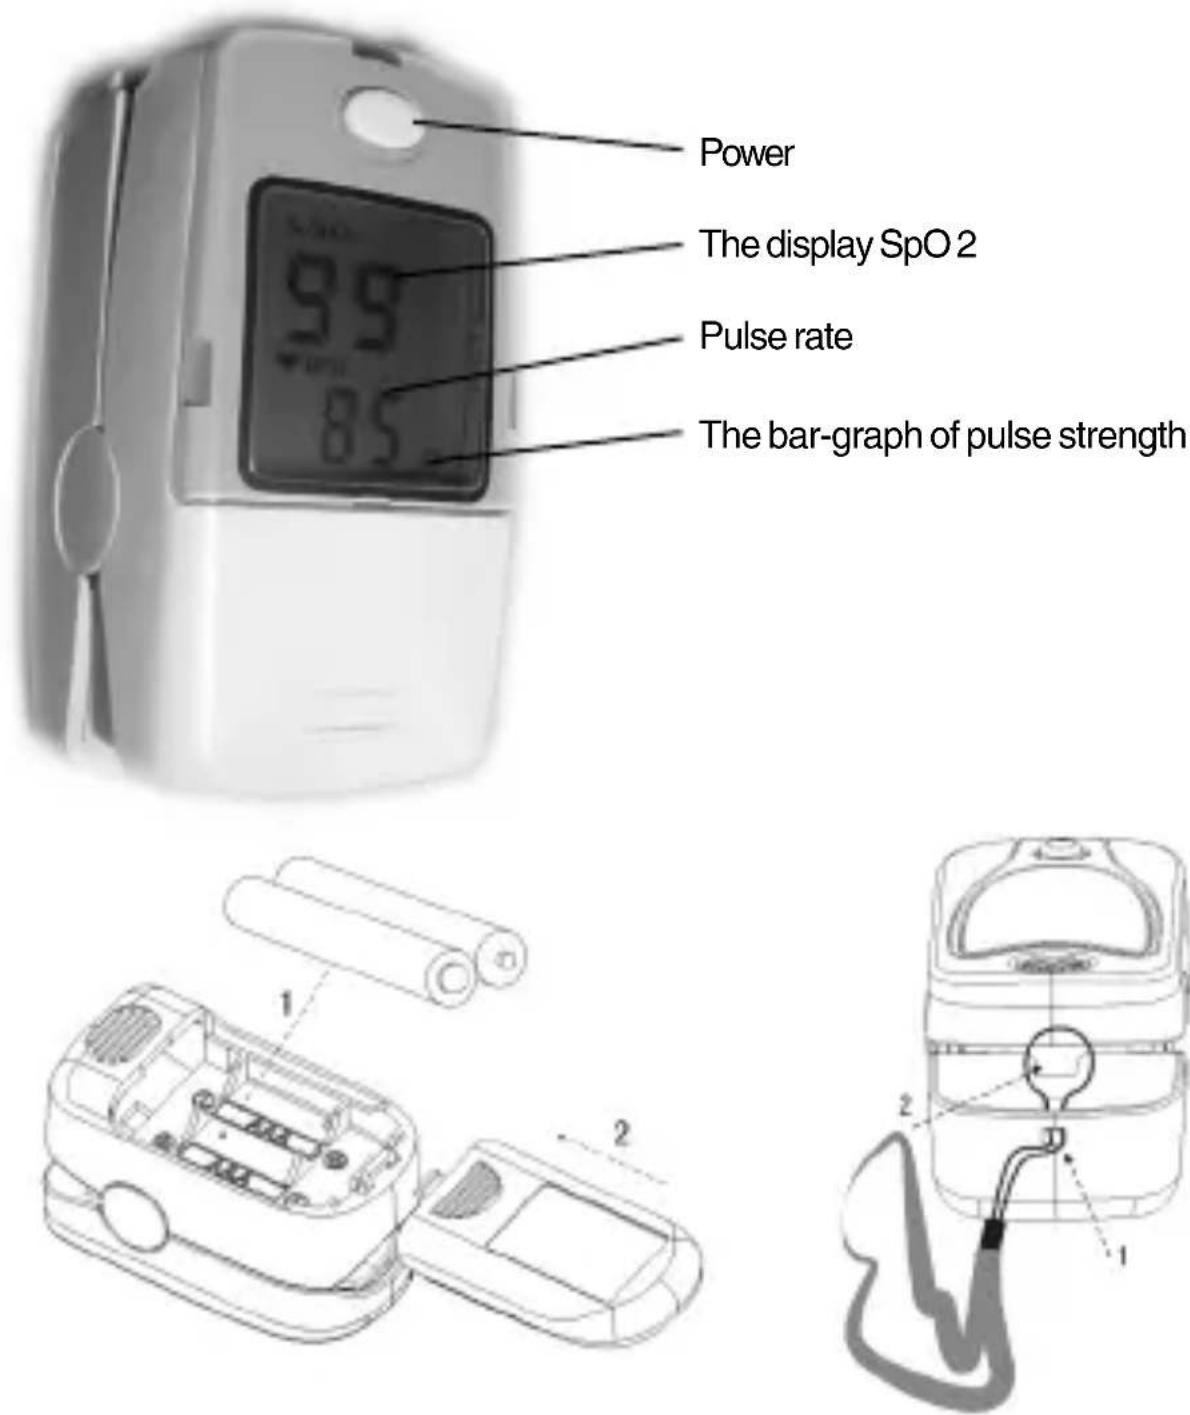
5.1. View of the Front Panel
text_image
Power The display SpO 2 Pulse rate The bar-graph of pulse strength5.2. Battery
Refer to the figure, and insert the two AAA size batteries properly in the right direction. Replace the cover.
- Please take care when you insert the batteries for the improper insertion may damage the device.
5.3. Mounting the Hanging Cord
Step 1. Put the end of the cord through the hole.
Step 2. Put another end of the cord through the first one and then tighten it.
6. Operating Guide
A. Insert the two batteries properly to the direction, and then replace the cover.
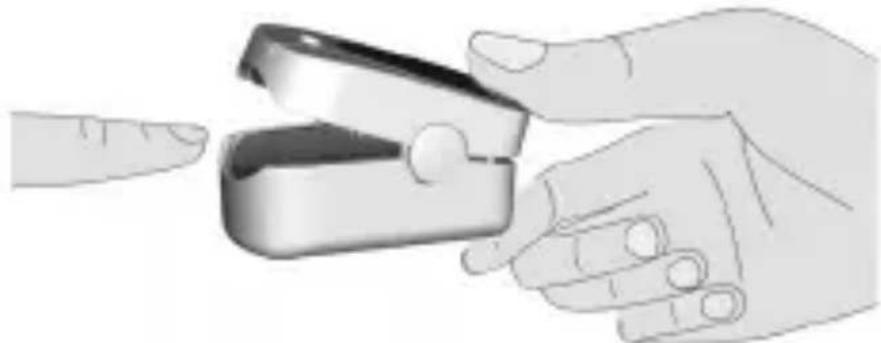
B. Open the clip as shown in Figure 5.
C. Let the patient's finger put into the rubber cushions of the clip (make sure the finger is in the right position), and then clip the finger.
natural_image
Illustration of a hand holding a dental pressure tool, with fingers pointing to it (no text or symbols present)D. The device will power on automatically in 2 seconds, and start to measure.
E. Do not shake the finger and keep the patient at ease during the process.
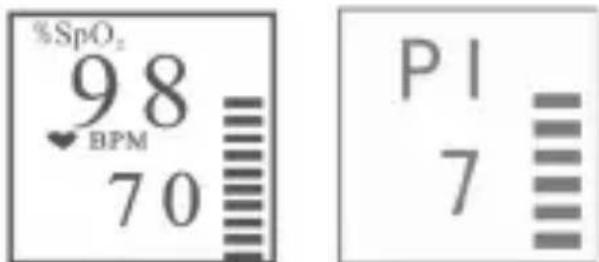
F. Measurement result will be displayed on the screen (as shown in figure). User can read SpO_2 and HR values from display screen.
“%SpO 2 ”: SpO 2 symbol
“♥”: Pulse rate symbol; “BPM”: the unit of pulse rate (beats per minute);
“≡”: Pulse intensity histogram.
text_image
%SpO₂ 98 BPM 70 PI 7When the display screen is shown as figure, press Display Key to turn on the backlight; if no key is pressed, the backlight will be off automatically in 6 seconds.
G. Longtime press Display Key during monitoring, display screen will be shown as figure; "PI" indicates perfusion index.
H. Alarm Indicator
When measuring, if SpO_2 value or pulse rate value exceeds the preset alarm limit, the device will alarm automatically and the value which exceeds limit on the screen will flash (refer to Technical Specifications for alarm limits).
7. Repair and Maintenance
A. Please change the batteries when the low-voltage indicator lightens.
B. Please clean the surface of the device before using. Wipe the device with alcohol first, and then let it dry in air or wipe it dry.
C. Please take out the batteries if the oximeter will not be used for a long time.
D. The best storage environment of the device is -20^ to 55^ ambient temperature and 10% to 100% relative humidity.
High-pressure sterilization cannot be used on the device.
Do not immerse the device in liquid.
It is recommended that the device should be kept in a dry environment. Humidity may reduce the useful life of the device, or even damage it.
8. Troubleshooting
| Trouble | Possible Reason | Solution |
| The SpO2 and Pulse Rate can not be displayed normally | 1. The finger is not properly positioned.2. The patient's SpO2 is too low to be detected. | 1. Place the finger properly and try again.2. Try again; Go to a hospital for a diagnosis if you are sure the device works all right. |
| The SpO2 and Pulse Rate display instable | 1. The finger is not placed inside enough.2. The finger is shaking or the patient is moving. | 1. Place the finger properly and try again.2. Let the patient keep calm |
| The device can not turn on | 1. The batteries are drained or almost drained2. The batteries are not inserted properly.3. The device's malfunction | 1. Change batteries.2. Reinstall batteries.3. Please contact the local service center. |
| The indicator light is off suddenly | 1. The device will power off automatically when it gets no signal for 8 seconds. | 1. Normal.2. Change batteries. |

Disposal: The product must not be disposed of along with other domestic waste. The users must dispose of this equipment by bringing it to a specific recycling point for electric and electronic equipment.
For further information on recycling points contact the local authorities, the local recycling center or the shop where the product was purchased. If the equipment is not disposed of correctly, fines or penalties may be applied in accordance with the national legislation and regulations.
GIMA WARRANTY CONDITIONS
Congratulations for purchasing a GIMA product.
This product meets high qualitative standards both as regards the material and the production.
The warranty is valid for 12 months from the date of supply of GIMA.
During the period of validity of the warranty, GIMA will repair and/or replace free of charge all the defected parts due to production reasons. Labor costs and personnel traveling expenses and packaging not included.
All components subject to wear are not included in the warranty.
The repair or replacement performed during the warranty period shall not extend the warranty. The warranty is void in the following cases: repairs performed by unauthorized personnel or with non-original spare parts, defects caused by negligence or incorrect use.
GIMA cannot be held responsible for malfunctioning on electronic devices or software due to outside agents such as: voltage changes, electro-magnetic fields, radio interferences, etc.
The warranty is void if the above regulations are not observed and if the serial code (if available) has been removed, cancelled or changed.
The defected products must be returned only to the dealer the product was purchased from.
Products sent to GIMA will be rejected.
Exactitude: ±2bpm ou ±2%
text_image
Technical diagram showing exploded and assembled views of a medical device with labeled parts and components5.2. Piles
natural_image
Illustration of a hand holding a dental pressure tool, with another hand pointing to it (no text or symbols present)text_image
Technical diagram showing exploded and assembled views of a medical device with labeled parts and components5.2 Batterie
natural_image
Illustration of a hand holding a dental pressure tool, with fingers pointing to it (no text or symbols present)66 mm (L) × 36 mm (A) × 33 mm (H)
text_image
Technical diagram showing exploded and assembled views of a medical device with labeled parts5.2. Pilas
natural_image
Illustration of a hand holding a dental pressure tool, with another hand pointing to it (no text or symbols present)text_image
Technical diagram showing exploded and assembled views of a medical device with labeled parts5.2 Pilhas
natural_image
Illustration of a hand holding a dental pressure tool, pointing at the index finger (no text or symbols present)natural_image
Illustration of a hand holding a dental pressure tool, with fingers pointing to it (no text or symbols present)text_image
Power The display SpO 2 Pulse rate The bar-graph of pulse strengthالتركيب 5
5-1 مية
5-2