
RI8523 - Coffee machine GAGGIA - Free user manual and instructions
Find the device manual for free RI8523 GAGGIA in PDF.
| Product type | Espresso coffee machine with steam wand |
| Brand | GAGGIA |
| Model | RI8523 (Type SIN 042 GB) |
| Dimensions (L x W x H) | 210 x 300 x 280 mm |
| Weight | 4.5 kg (approx) |
| Body material | Plastic |
| Water tank capacity | 1.25 liters (removable) |
| Pump pressure | 15 bar |
| Boiler type | Stainless steel |
| Power supply | 230 V ~ 50 Hz, 1050 W |
| Safety devices | Thermal cut-out, automatic shut-off in case of overheating |
| Compatible coffee types | Ground coffee, ESE pods |
| Filter holder | Pressurized filter holder Carezza Style (patented) |
| Main functions | Espresso coffee (1 or 2 cups), steam for cappuccino, hot water |
| Steam wand | Swivel Pannarello wand (classic milk frother) |
| Automatic rinsing | Yes, at every startup |
| Energy saving | Automatic shut-off after 9 minutes of inactivity |
| Descaling indicator | LED (19) « C »: on = recommended, flashing = mandatory |
| Optional water filter | Intenza+ (reduces limescale) |
| Cleaning and maintenance | Regular cleaning of the filter holder and steam wand; periodic descaling |
| Warranty and repairability | Conditional warranty; repairs exclusively by Gaggia authorized centers |
Frequently Asked Questions - RI8523 GAGGIA
User questions about RI8523 GAGGIA
0 question about this device. Answer the ones you know or ask your own.
Ask a new question about this device
Download the instructions for your Coffee machine in PDF format for free! Find your manual RI8523 - GAGGIA and take your electronic device back in hand. On this page are published all the documents necessary for the use of your device. RI8523 by GAGGIA.
USER MANUAL RI8523 GAGGIA
RI8525, Type SIN 042 GM
RI8523, Type SIN 042 GB
ISTRUZIONI PER L'USO
OPERATING INSTRUCTIONS
BEDIENUNGSANLEITUNG
MODE D'EMPLOI
INSTRUCCIONES DE USO
INSTRUÇOÉS DE USO
CE

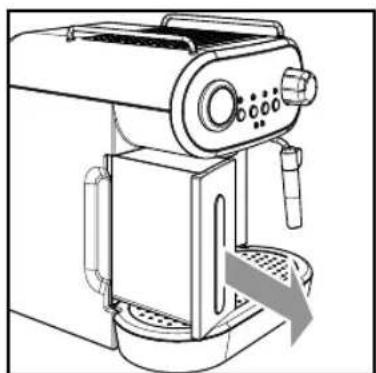
Fig. -Abb. -Afb. -Rys. -Kuva. -Eik. (1)
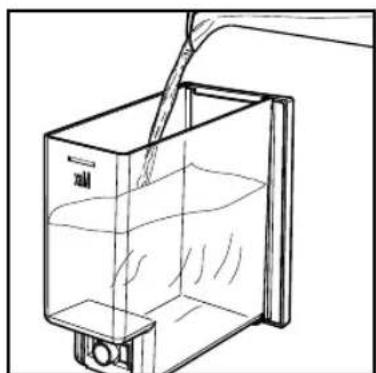
Fig.-Abb.-Afb.-Rys.-Kuva.-Euk.2
Fig. - Abb. - Afb. - Rys. - Kuva. - Eik. (3)
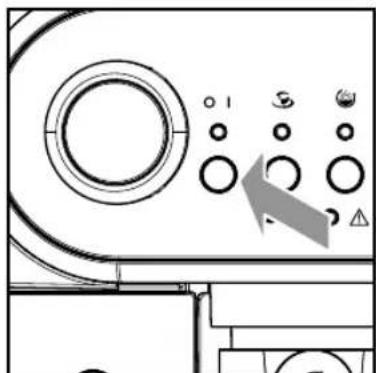
Fig. -Abb. -Afb. -Rys. -Kuva. -Eik. (4)
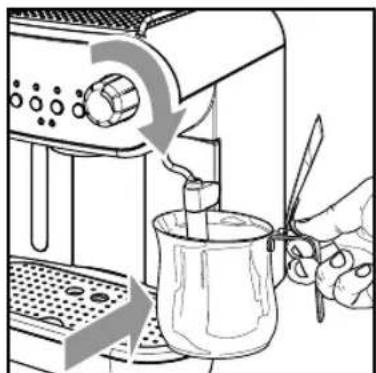
Fig. -Abb. -Afb. -Rys. -Kuva. -Eik. (5)
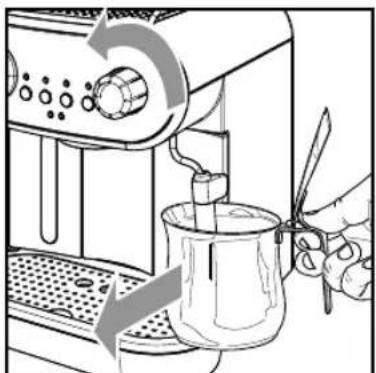
Fig. -Abb. -Afb. -Rys. -Kuva. -Eik. (6)
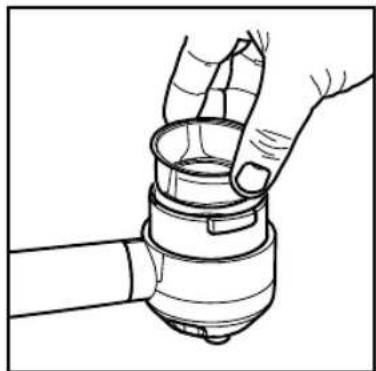
Fig. - Abb. - Afb. - Rys. - Kuva. - Eik. (7)
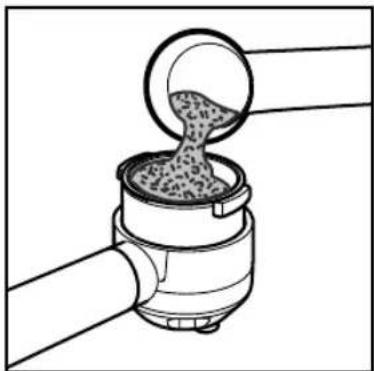
Fig.-Abb.-Afb.-Rys.-Kuva.-Eik.8
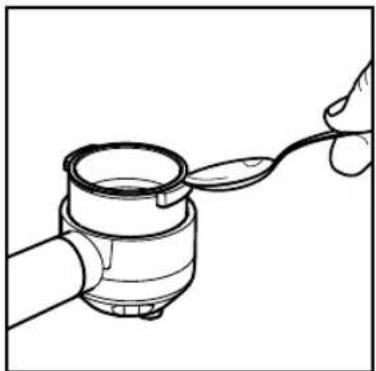
Fig. -Abb. -Afb. -Rys. -Kuva. -Eik. (9)
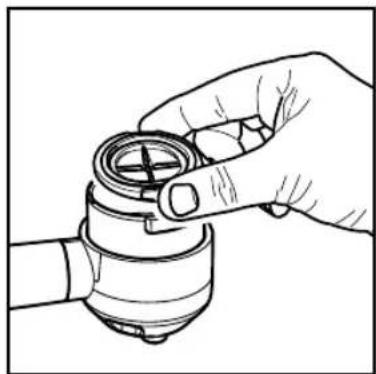
Fig. - Abb. - Afb. - Rys. - Kuva. - Eik. (10)
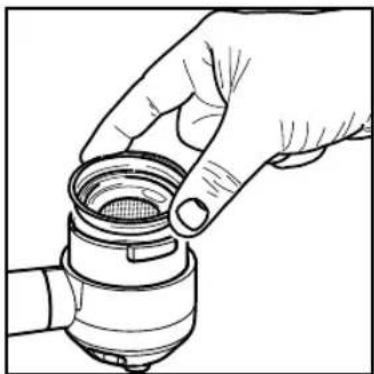
Fig. - Abb. - Afb. - Rys. - Kuva. - Euk. (11)

Fig. - Abb. - Afb. - Rys. - Kuva. - Eik. (12)
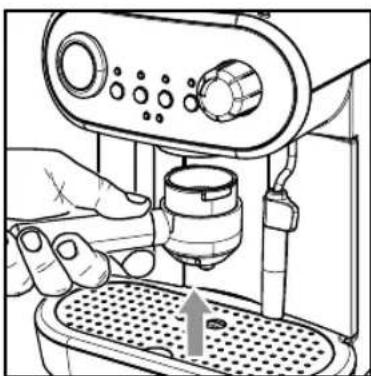
Fig. - Abb. - Afb. - Rys. - Kuva. - Eik. (13)
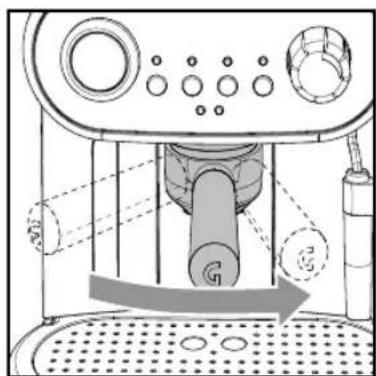
Fig. - Abb. - Afb. - Rys. - Kuva. - Eik. (14)
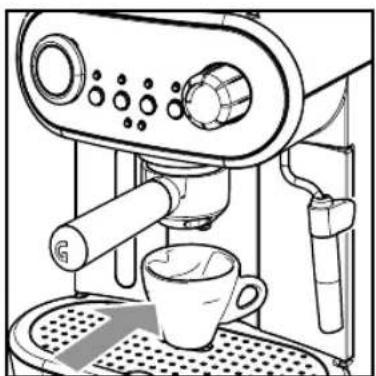
Fig. - Abb. - Afb. - Rys. - Kuva. - Eik. (15)
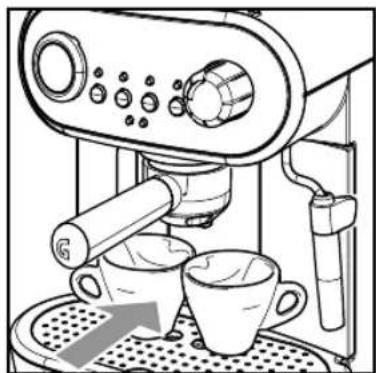
Fig. - Abb. - Afb. - Rys. - Kuva. - Eik. (16)
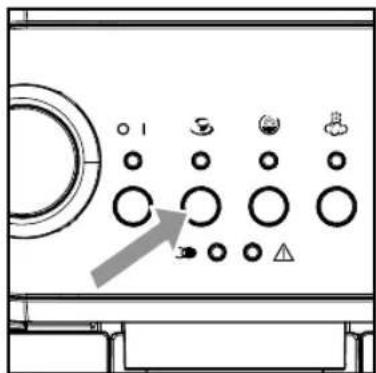
Fig. - Abb. - Afb. - Rys. - Kuva. - Eik. (17)
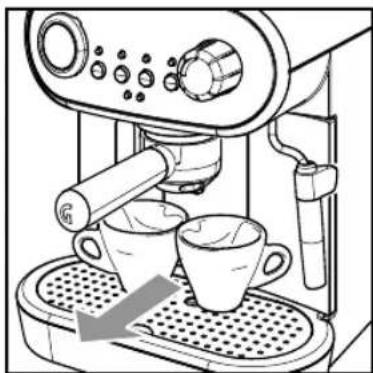
Fig. - Abb. - Afb. - Rys. - Kuva. - Eik. (18)
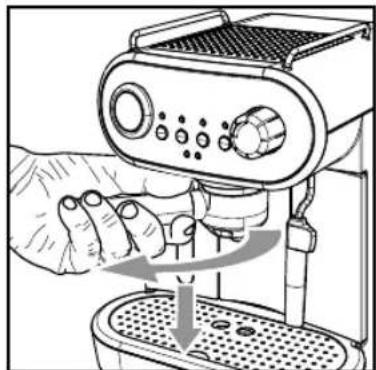
Fig. - Abb. - Afb. - Rys. - Kuva. - Eik. (19)
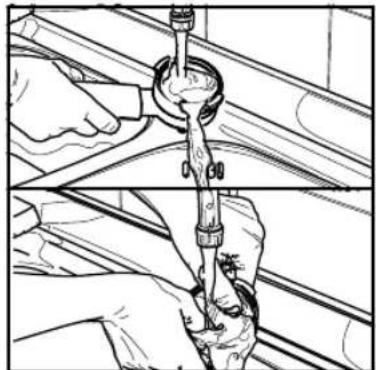
Fig. - Abb. - Afb. - Rys. - Kuva. - Eik. (20)
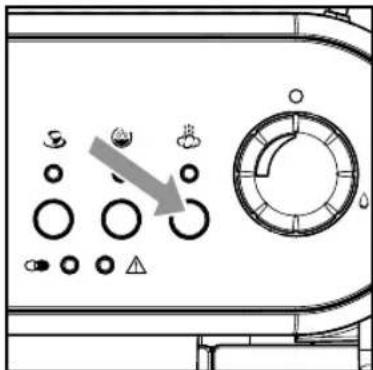
Fig. - Abb. - Afb. - Rys. - Kuva. - Eik. (21)
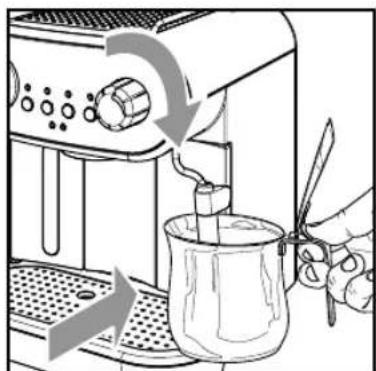
Fig. - Abb. - Afb. - Rys. - Kuva. - Eik. (22)
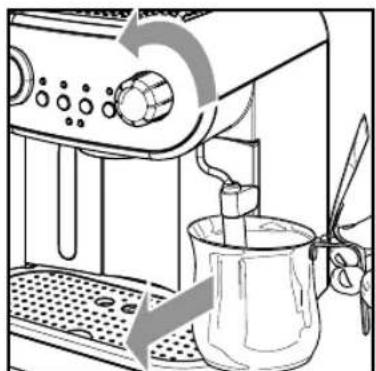
Fig. - Abb. - Afb. - Rys. - Kuva. - Eik. (23)
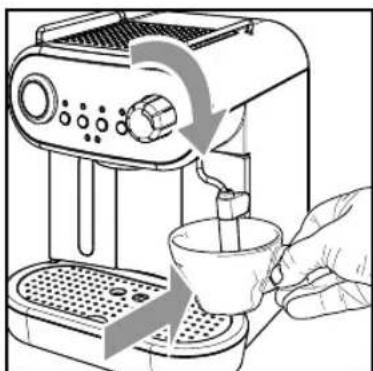
Fig. - Abb. - Afb. - Rys. - Kuva. - Eik. (24)
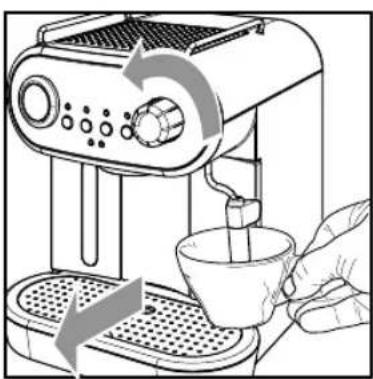
Fig. - Abb. - Afb. - Rys. - Kuva. - Euk. (25)
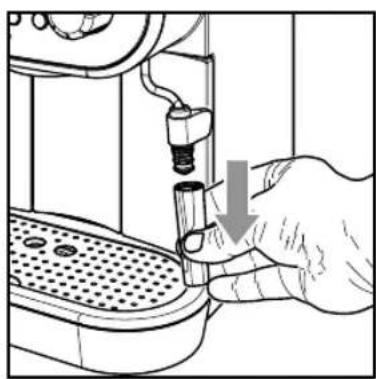
Fig. - Abb. - Afb. - Rys. - Kuva. - Eik. (26)
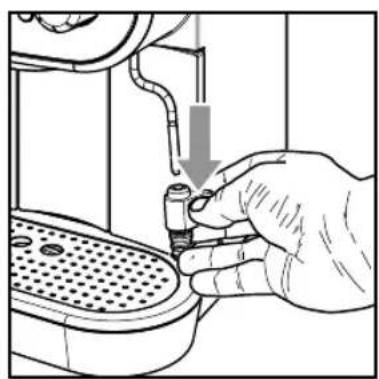
Fig. - Abb. - Afb. - Rys. - Kuva. - Eik. (27)
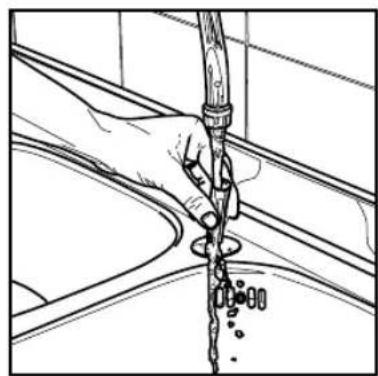
Fig. - Abb. - Afb. - Rys. - Kuva. - Euk. (28)
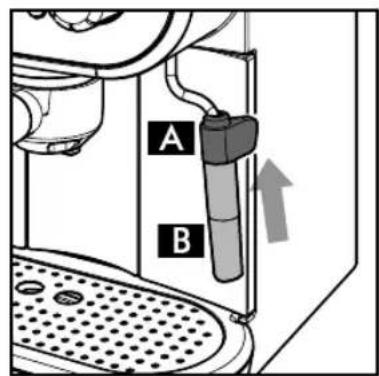
Fig.-Abb.-Afb.-Rys.-Kuva.-Eik. (29)

Fig. - Abb. - Afb. - Rys. - Kuva. - Eik. (30)
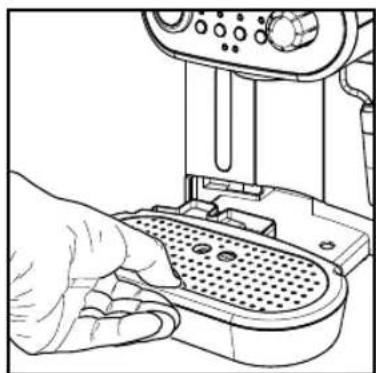
Fig.-Abb.-Afb.-Rys.-Kuva.-Euk. (31)
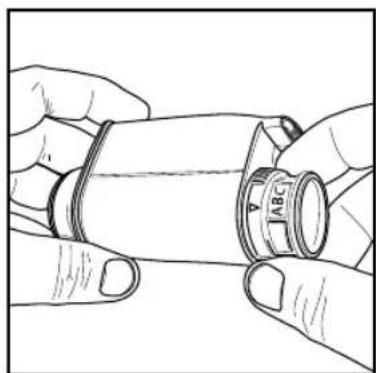
Fig.-Abb.-Afb.-Rys.-Kuva.-Euk. (32)
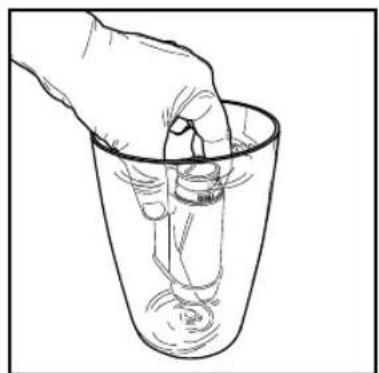
Fig. - Abb. - Afb. - Rys. - Kuva. - Eik. (33)
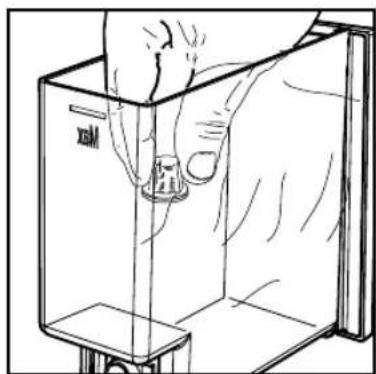
Fig. - Abb. - Afb. - Rys. - Kuva. - Eik. (34)
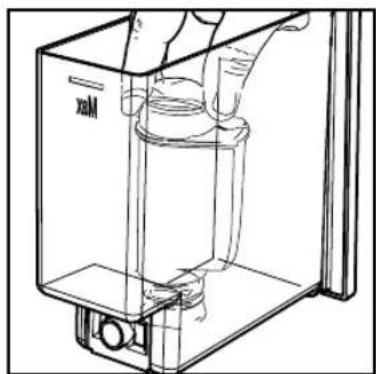
Fig. - Abb. - Afb. - Rys. - Kuva. - EtK. (35)
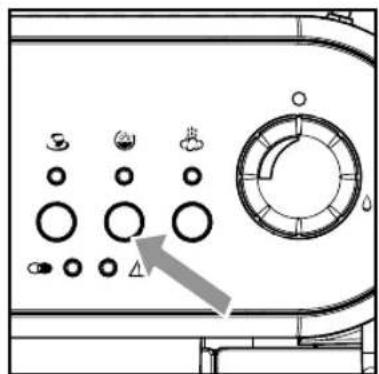
Fig. - Abb. - Afb. - Rys. - Kuva. - Eik. (36)
RI8525, Type SIN 042 GM
RI8523,Type SIN 042 GB
Dimensioni (I x a x p) (mm)
210 × 300 × 280
Peso
RI8525, Type SIN 042 GM = 5 kg
R18523, Type SIN 042 GB = 4.8 kg
Lunghezza cavo
1,3 m
Pannello di lavoro
Se先进技术 are used in the following areas: - the use of a computer - the use of a computer - the use of a computer - the use of a computer - the use of a computer - the use of a computer - the use of a computer - the use of a computer - the use of a computer - the use of a computer - the use of a computer - the use of a computer - the use of a computer - the use of a computer - the use of a computer and the use of a computer.
IMPORTANT SAFETY INFORMATION
This machine is equipped with safety features. Nevertheless, read and follow the safety instructions carefully and only use the machine as described in these instructions, to avoid accidental injury or damage due to improper use of the machine. Keep this safety booklet for future reference.
Warning
General
- Check if the voltage indicated on the machine corresponds to the local mains voltage before you connect the appliance.
- Connect the machine to an earthed wall socket.
- Do not let the power cord hang over the edge of a table or worktop and do not let it touch hot surfaces.
- To avoid the danger of electric shock, never immerse the machine, mains plug or power cord in water or any other liquid.
- Do not pour liquids on the power cord connector.
- To avoid the danger of burns, keep body parts away from hot water jets produced by the machine.
- Do not touch hot surfaces. Use handles and knobs.
-
Switch off the machine with the main switch located on the back (if present) and remove the mains plug from the wall socket:
-
If a malfunction occurs.
- If you are not going to use the appliance for a long time.
-
Before you clean the machine.
-
Pull at the plug, not at the power cord.
- Do not touch the mains plug with wet hands.
- Do not use the machine if the mains plug, the power cord or the machine itself is damaged.
- Do not make any modifications to the machine or its power cord.
- Only have repairs carried out by a service center authorized by Gaggia to avoid a hazard.
- The machine should not be used by children younger than 8 years old.
- This machine can be used by children aged from 8 years and above and by per
sons with reduced physical, sensory or mental capabilities or lack of experience and knowledge if they have been given supervision or instruction concerning use of the machine in a safe way and if they understand the hazards involved.
- Cleaning and user maintenance shall not be made by children unless they are older than 8 and supervised.
- Keep the machine and its cord out of the reach of children aged less than 8 years.
- Children should be supervised to ensure that they do not play with the machine.
- Be careful when you dispense hot water. Dispensing may be preceded by small jets of hot water. Wait until the end of the dispensing cycle before you remove the hot water dispensing spout.
Caution
General
- This machine is intended for normal household use only. It is not intended for use in environments such as staff kitchens of shops, offices, farms or other work environments.
- Always put the machine on a flat and stable surface. Keep it in upright position, also during transport.
- Do not place the machine on a hotplate or directly next to a hot oven, heater or similar source of heat.
- Only put ground coff ee in the pressurized fi Iter holder. Putting coff ee beans, instant coff ee, unroasted coff ee beans or any other substance in the pressurized fi Iter holder may cause damage to the machine. In this case repair is not covered by warranty.
- Let the machine cool down before you insert or remove any parts. The heating surfaces may retain residual heat after use.
- Never fill the water tank with warm, hot or sparkling water, as this may cause damage to the water tank and the machine.
-
Never use souring pads, abrasive cleaning agents or aggressive liquids such as petrol or acetone to clean the machine. Simply use a soft cloth dampened with water.
-
Descale your machine regularly. Not doing this will make your appliance stop working properly. In this case repair is not covered by your warranty.
- Do not keep the machine at temperatures below 0^ / 32^ . Water left in the heating system may freeze and cause damage.
- Do not leave water in the water tank when you are not going to use the machine for a long period of time. The water can become contaminated. Use fresh water every time you use the machine.
- Never use any accessories or parts from other manufacturers or that Gaggia does not specifically recommend. If you use such accessories or parts, your warranty becomes invalid.
- Regular cleaning and maintenance prolongs the lifetime of your machine and ensures optimum quality and taste of your coffee.
- The machine is exposed continuously to moisture, coff ee and scale. Therefore it is very important to regularly clean and maintain the machine as described in the user manual. If you do not perform these cleaning and maintenance procedures, your machine eventually may stop working. In this case repair is not covered by warranty.
- Do not clean the pressurized filter holder in the dishwasher and do not use washing-up liquid or a cleaning agent to clean it. This may cause the pressurized filter holder to malfunction and may have a negative effect on the coffe taste.
- Do not dry the brew group with a cloth to prevent fibers from collecting inside the brew group.
- Never drink the solution dispensed during the descending process.
- Do not remove the pressurized fiiter holder while brewing coffe. Hot water drips may spill out during the warm-up phase of the brew group.
- The machine shall not be placed in a cabinet when in use.
Machines with classic milk frother
Warning
- To avoid the danger of burns, be aware that dispensing may be preceded by small jets of hot water.
- Never touch the classic milk frother with bare hands, as it may become very hot. Use the appropriate protective handle only.
Caution
- After frothing milk, quickly clean the classic milk frother by dispensing a small quantity of hot water into a container. Then remove the external part of the classic milk frother and wash it with lukewarm water.
Machines with automatic milk frother
Warning
- To avoid the danger of burns, be aware that dispensing steam or hot water may be preceded by small jets of hot water. Never touch the hot water/steam dispensing spout with bare hands, as it may become very hot. Use the appropriate protective handle only.
- Never drink the solution dispensed during the monthly cleaning procedure of the automatic milk frother.
Caution
- For hygienic reasons, make sure that the outer surface of the hot water/steam dispensing spout is clean.
- After frothing milk, quickly clean the automatic milk frother by dispensing a small quantity of hot water. Follow the cleaning instructions in the user manual.
- Be careful, the hot water/steam dispensing spout could be hot if the machine has recently been used.
- Do not push the rubber fi tting too far on the hot water/steam dispensing spout when you insert it. In this case, the automatic milk frother would not work correctly as it would not be able to suck up milk.
Electromagnetic fields (EMF)
This machine complies with all applicable standards and regulations regarding exposure to electromagnetic fi elds.
Recycling

- This symbol means that this product shall not be disposed of with normal household waste (2012/19/EU).
- Follow your country's rules for the separate collection of electrical and electronic products. Correct disposal helps prevent negative consequences for the environment and human health.
Warranty and support
For support, contact your local dealer or an authorised service center. Contact details are included in the warranty booklet supplied separately or visit www.gaggia.com/n-m-co/espresso/world-wide or www.gaggia.it/n-m-co/espresso/contact.
DEAR CUSTOMER,
THIS FILTER HOLDER USES AN EXCLUSIVE PATENTED TECHNOLOGY FROM PHILIPS SAECO, INTENDED TO DELIVER A CAFÉ QUALITY ESPRESSO IN YOUR CUP, BUT NOT NECESSARILY REQUIRING THE EXPERIENCE AND SKILLS OF A PROFESSIONAL BA-RISTA.
COFFEE CREAM, SCENTS AND FLAVOURS ARE ENHANCED BY MAINTAINING A GIVEN PRESSURE INSIDE THE FILTER HOLDER DURING THE BREWING PROCESS. THIS PRESSURE SHOULD BE RELEASED AUTOMATICALLY AFTER BREWING, BUT TO AVOID ANY PROBLEM, YOU SHOULD:
- NEVER REMOVE THE FILTER HOLDER AFTER BREWING WHILE THE GREEN BREWING LIGHT IS STILL FLASHING
- IN THE EXCEPTIONAL CASE YOU DON'T SEE ANY BEVERAGE COMING FROM THE FILTER HOLDER, BEFORE REMOIVING IT, SWITCH OFF THE MACHINE, READ THE "TROUBLESHOOTING" TABLE AND FOLLOW THE INSTRUCTIONS. IF NO DESCRIPTION OR SOLUTION APPLIES, WAIT ONE HOUR WITH THE MACHINE SWITCHED OFF BEFORE REMOIVING THE FILTER HOLDER.
1 General Information
The coff ee machine is suitable for preparing 1 or 2 cups of espresso coff ee and is provided with a swivel steam and hot water wand. The controls on the front side of the machine are labelled with easy-to-read symbols.
The machine has been designed for domestic use and is not suitable for professional, continuous use.

Warning. No liability is held for damage caused by:
- Incorrect use not in accordance with the intended purposes;
- Repairs not carried out in authorised service centres;
- Tampering with the power cord;
Tampering with any part of the machine; - Use of non-original spare parts and accessories;
- Failure to descale the machine and storage at temperatures below 0^ .
In these cases, the warranty is void.
1.1 To Simplify Manual Reading


The warning triangle indicates all important instructions for the user's safety. Carefully follow these
instructions to avoid serious injury!
References to illustrations, parts of the appliance or controls, etc. are indicated by numbers or letters. Whenever possible, refer to the illustration.
2 Technical Specification
The manufacturer reserves the right to make changes to the technical specifications of the product.
Nominal Voltage - Power Rating - Power Supply See label on the appliance
Housing Material
Plastic model
RI8525, Type SIN 042 GM
RI8523,Type SIN 042 GB
Size(wxhxd)(mm)
210 × 300 × 280
Weight
RI8525, Type SIN 042 GM = 5 kg
R18523, Type SIN 042 GB = 4.8 kg
Power Cord Length
1.3 m
Control Panel
Front side
Filter Holder
Pressurized type
Pannarello
Special for cappuccinos
Water Tank
1.25 litres - Removable type
Pump Pressure
15 bar
Boiler
Stainless steel
Safety Devices
Thermal fuse

This symbol is used to highlight information
that is particularly important to ensure opti
mal use of the machine.
The illustrations corresponding to the text can be found on the first pages of the manual. Please refer to these pages while reading the operating instructions.
1.2 How to Use these Operating Instructions
Keep these operating instructions in a safe place and make them available to anyone who may use the coffe machine. For further information or in case of problems, please refer to an authorised service centre.
3 Key to Machine Parts (Page 2)
1 Control panel
2 Cup holder surface
3 Hot water/steam knob
4 Coffebrewunit
5 Water tank
6 Water recovery tray
7 Cup holder grill
8 Steam wand (Pannarello)
9 Power cord socket
10 Water temperature thermometer (RI8525, Type SIN042 GM only)
11 ON/OFF button
12 "Machine on" light
13 "Coffee brew" button
14 "Temperature" light
15 "Rinsing" button
16 "Rinsing" light
17 "Steam" button
18 "Steam" light
19 "Descending" light
20 "Alarm" light
21 Carezza Deluxe pressurized filter holder
(RI8525, Type SIN042 GM only)
22 Ground coff ee measuring scoop
23 Ground coff ee filter (single piece for 1 or 2 coff ee(s))
24 Coffe pod filter adapter
25 Coffe pod filter
26 Power cord
27 "Intenza+" water filter (Optional)
28 Carezza Style pressurized fi Iter holder
(RI8523, Type SIN042 GB only)
4 Installation
For your own and other people safety, carefully follow instructions in chapter "Important Safety Information".
4.1 Packaging
The original packaging has been designed and manufactured to protect the machine during transport. We recommend keeping the packaging material for possible future transport.
4.2 Installation Precautions

Do not move the machine by grabbing the cup protection grilles.
Before installing the machine, read the following safety precautions carefully:
- Place the machine in a safe place.
-
Make sure children cannot play with the machine.
-
Do not place the machine on hot surfaces or near open flames.
The coff ee machine is now ready to be connected to the electric network.

Note: we recommend washing the components before using them for the first time and/or af
ter they have not been used for a certain period of time.
4.3 Water tank
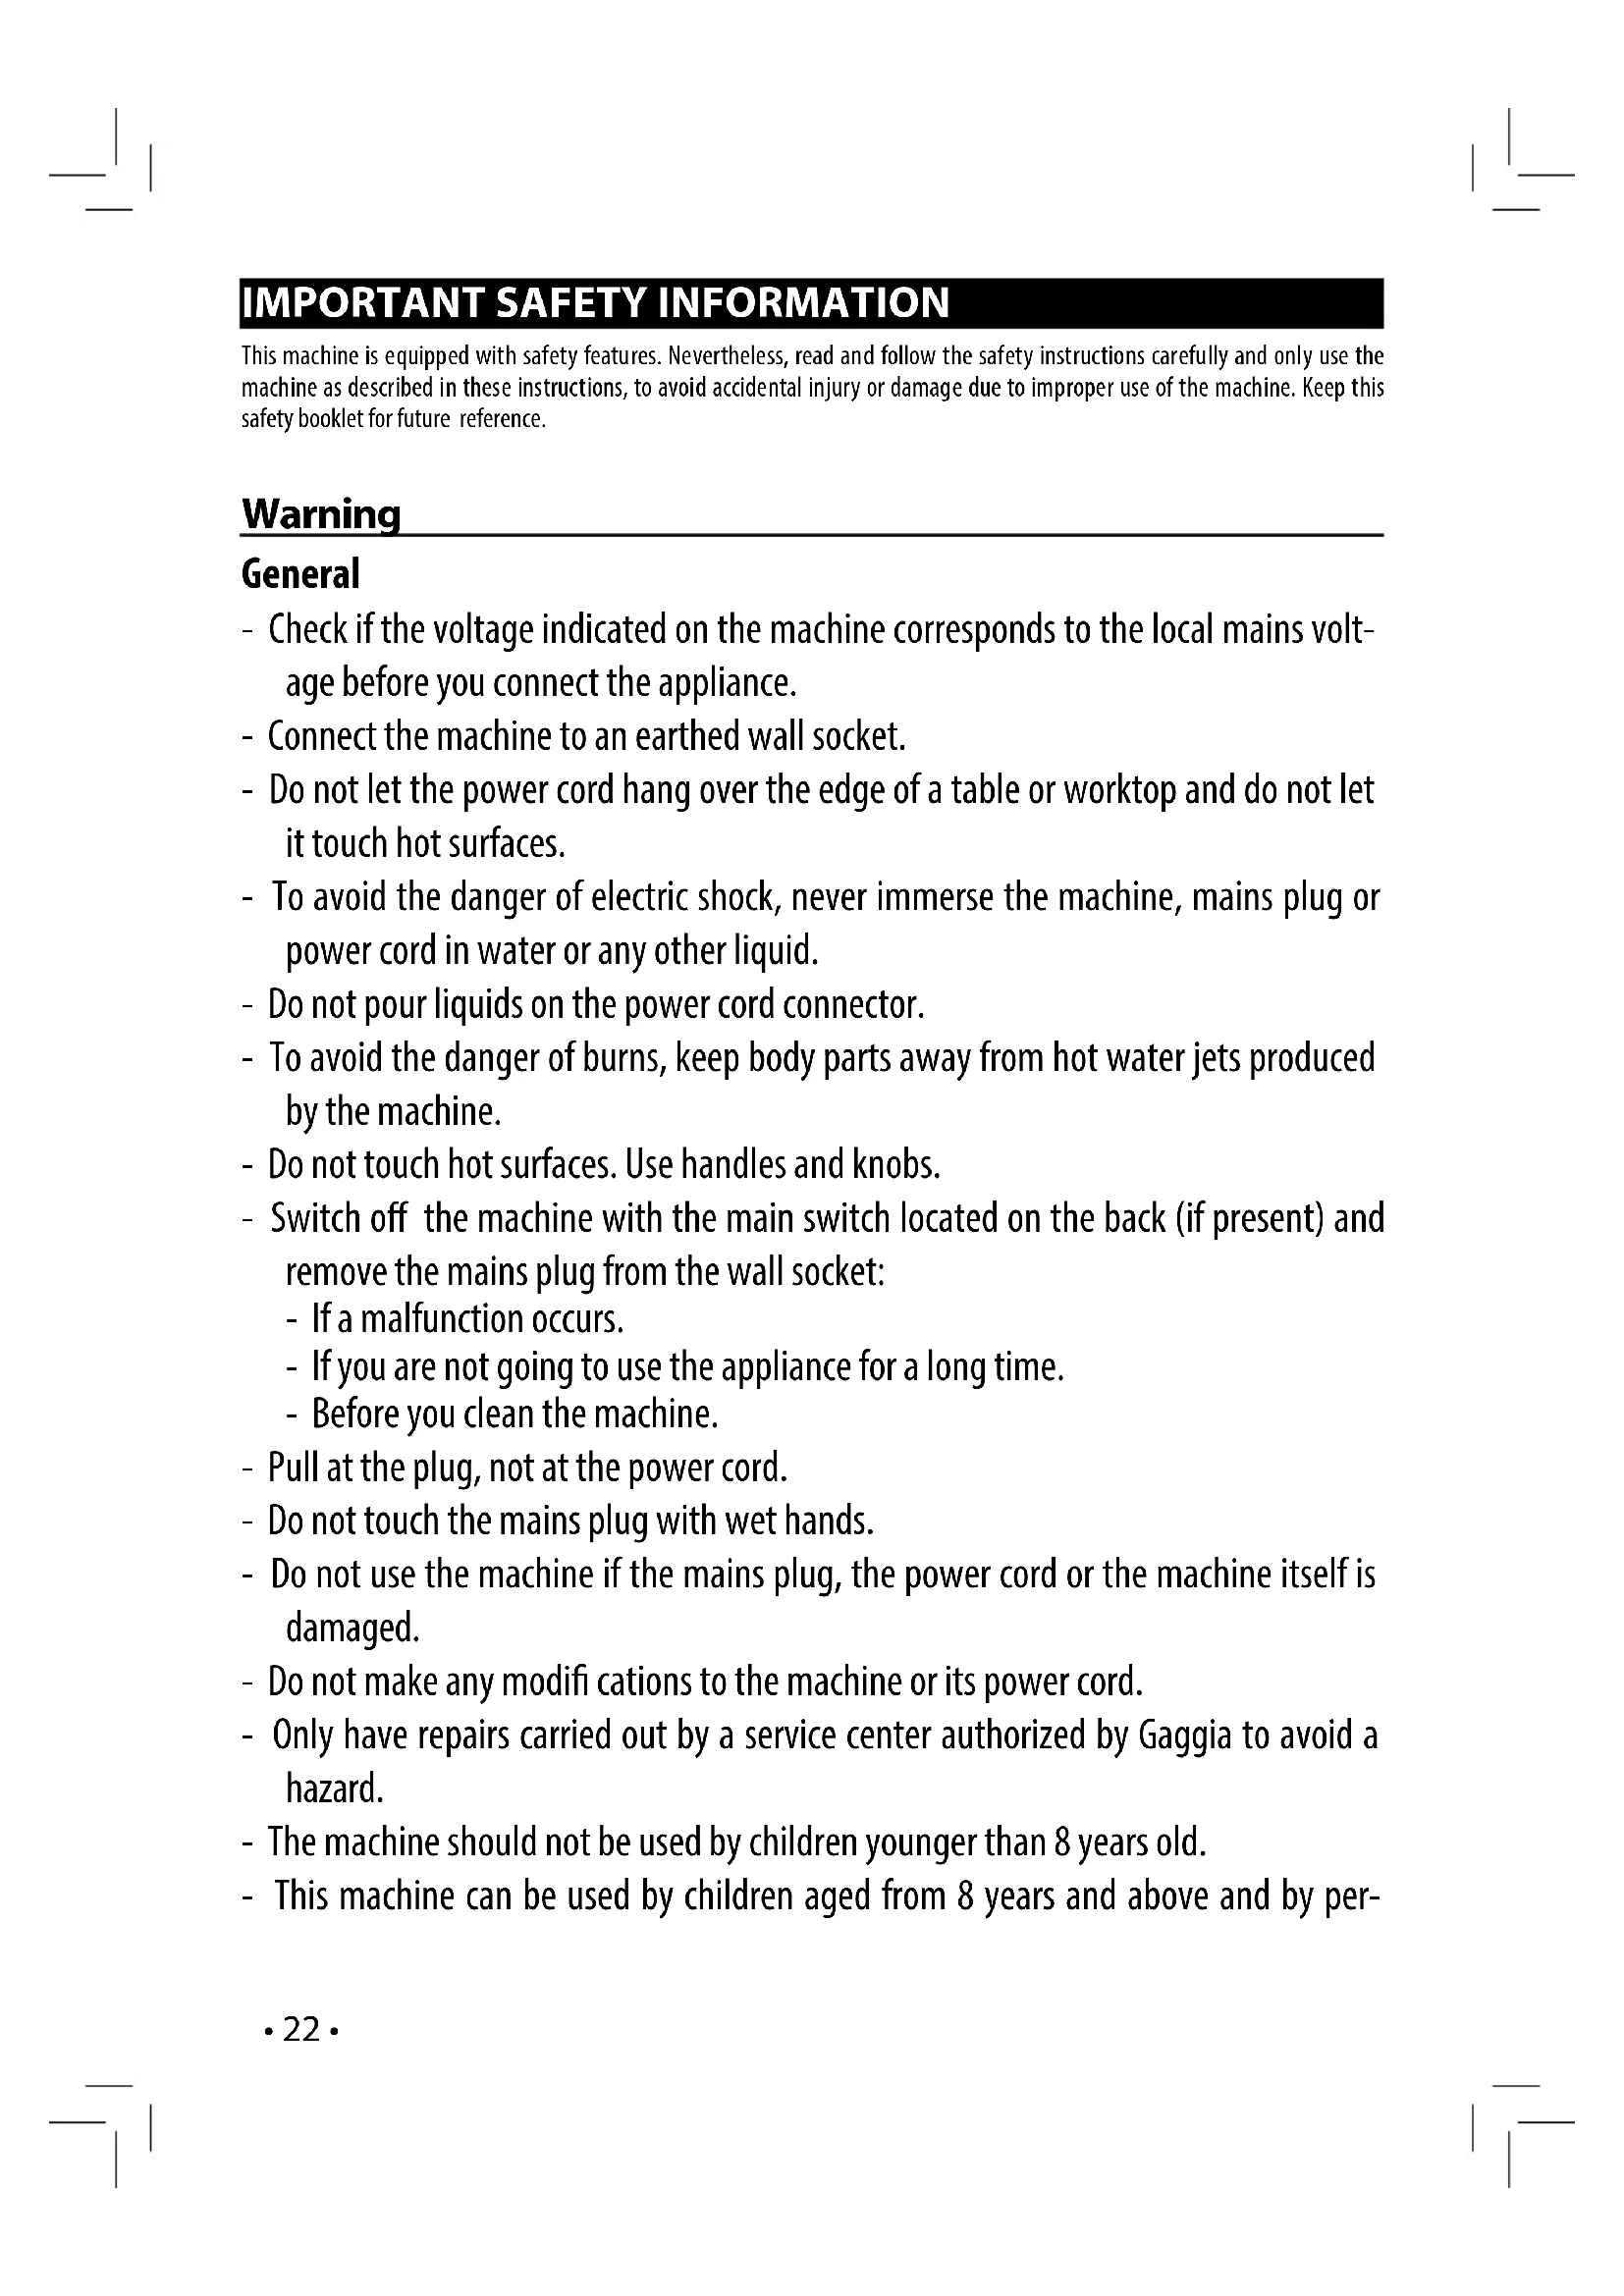
1 Remove the water tank (5).
- 2 Rinse it and fi II it with fresh drinking water, making sure that the (MAX) level indicated in the tank is not exceeded.

Fill the tank only with fresh, non-sparkling, drinking water. Hot water or any other liquid
may damage the tank. Do not operate the machine when the water level in the tank is below the MIN threshold. Make sure there is enough water in the water tank.
- Insert the water tank back into its seat in the coff ee machine and make sure that it locks into place - its profle should adhere to that of the coff ee machine.

Note: the water level can be checked looking
through the window on the front side of the
tank.
4.4 Machine Connection

Electric power may be very dangerous! It is therefore necessary to strictly follow the safety
regulations. Do not use faulty power cords. Faulty cords and plugs must be replaced immediately by Authorised Service Centres.
The voltage of the appliance has been pre-set by the manufacturer. Check that the voltage matches the indication on the data plate at the bottom of the appliance.
- 3A Insert the plug into the socket on the back of the machine.
- 3B Insert the other end of the plug into a wall socket with suitable power voltage.
4.5 First Use
At first start-up, the coffe machine circuit must be primed.

Press the ON/OFF button (11): the "O I" light (12) turns on and the "S" (14), "A" (20) and "B" (18) lights blink, prompting the user to prime the circuit.
5 Place a container under the steam wand (Pannarello).
Open the "hot water/steam" knob (3) by turning it clockwise. The pump is activated automatically. Wait until a steady jet of water flows out of the steam wand (Pannarello).
6 Close the "hot water/steam" knob (3) by turning it counter-clockwise. Remove the container.
The machine begins the warm-up phase only after the water circuit has been correctly primed.

Note: if the knob is left open, the pump is automatically disengaged after a few seconds and
the" "light (20) starts blinking.
4.6 Circuit Priming
When the water tank is empty, the machine circuit must be primed again.

Note: if the machine has been operating without water for a lot of time and the " ^ (14),
"△"(20) and "318) lights are blinking, please refer to the "Troubleshooting" table.
- Place a container under the steam wand (Pannarello).
- Open the "hot water/steam" knob (3) by turning it clockwise. The pump is activated automatically.
- Wait until a steady jet of water flows out of the steam wand (Pannarello).
- Close the "hot water/steam" knob (3) by turning it counter-clockwise. Remove the container.

Note: if the steam knob is opened by mistake during the warm-up phase, the " light (20)
starts blinking. Close the knob and wait until the machine is ready.
4.7 Using the Machine for the First Time or After a Period of Inactivity
This simple operation ensures an optimum brewing and must be performed:
- at first start-up;
- when the machine remains inactive for a long time (more than 2 weeks).

Dispensed water must be emptied into an adequate drain. It is not suitable for food use. If
the container fills up during the cycle, stop dispensing water and empty the container before resuming the operation.
A 2 Rinse the water tank and refill it with fresh drinking water. Insert the water tank back into its seat in the coff ee machine and make sure that it locks into place - its profle should adhere to that of the coff ee machine.
B Turn on the machine by pressing the (11) button. Wait until the " light (14) turns on steady.
C 5 Place a container under the steam wand (Pannarello). Open the knob (3) by turning it clockwise. The pump is activated automatically.
D Dispense the whole water tank content from the steam/ hot water wand (Pannarello); to stop the dispensing process, close the knob (3) by turning it counter-clockwise.

During this operation the pump is automatically disengaged and the "△" light (20) is blink
ing: this is a normal behaviour of the machine. Close the knob. Wait until the " light (14) is steady on before opening the knob again.

- Fill the water tank with fresh drinking water. Insert a water tank back into its seat in the coffe machine and use sure that it locks into place - its profle should adhere to that of the coffe machine.

14 Insert the fi liter holder (21) into the brew unit (4) on the bottom. Turn the pressurized fi liter holder from to right until it locks into place. Release the pressurized fi liter holder grip. The handle will turn slightly to the left. Is movement guarantees optimum fi liter holder performance.

Place a suitable container under the fi lter holder.

Press the " " button and dispense a cup of hot wa
At the end of the process, stop the operation by pressing the " " button.
Repeat the operations described in step (H) until the water tank is completely empty.

Refi II the water tank with fresh drinking water.

- Remove the filter holder from the unit by turning it to right to left and rinse it with fresh drinking water.
Now the machine is ready. Please see related chapters for operating details on how to brew coffee and dispense steam.

Rinsing

Note: make sure the filter holder is inserted to ensure a proper warm-up of the machine.
The machine is set so as to automatically rinse the coff ee circuit with fresh water every time it is turned on. This is conceived to ensure the correct machine warm-up and an optimum coff ee aroma.

Place a container under the dispensing spout.
On newly purchased machines this function is active (the light (16) is on) and is performed at the end of the warm-up phase, when the "light (14) turns on steady.
Note: should no water pour from the fi liter holder, perform a manual rinse as described in sect. 7.1.
The rinsing procedure may: A be stopped by pressing the " (15) or (13) button.
B be deactivated by pressing the " button (15) while the light (14) is blinking or steady on ; in this case the light (16) turns off.
Note: if the rinsing procedure is deactivated, it can be reactivated only by pressing the " " button.
Energy Saving
The machine is designed for energy saving. After 9 minutes of inactivity, the machine turns off in order to save energy and respect nature. Press the ON/OFF "O f' button (11) to operate the machine.
7 Coff ee Brewing
Warning! During coff ee brewing it is forbidden to remove the pressurized fi iter holder by manually turning it from right to left. Danger of burns!
- During this operation, the " light (14) is blinking; this is to be considered as a standard and not a faulty operating mode.
- Before using the machine, make sure that there is enough water in the machine tank.
i Note: if the steam knob is opened by mistake during the warm-up phase, the " light (20) starts blinking. Close the knob and wait until the machine is ready.
If coff ee is NOT brewed after pressing the brew button " 忍 (13), press the brew button " 忍 (13) again and check the "Troubleshooting" table before removing the filter holder.
Ensure the machine is ready before brewing coffe. The machine is ready when the " 一 light (14) is steady on.
7.1 Filter Holder Warm-Up
If the "rinse" function is not activated and/or the fi lter holder is to be warmed-up manually, do as follows:
- 13 Insert the pressurized fiiter holder into the brew unit (4) from the bottom.
14 Turn the pressurized filter holder from left to right until it locks into place. Release the pressurized filter holder grip. The handle will turn slightly to the left. This movement guarantees optimum filter holder performance.
17 Preheat the pressurized fi liter holder by pressing the (13) button; some water will flow out of the pressurized fi liter holder (this operation is necessary only for the fi rst coff ee).
After 50~cc of water have been dispensed, press the (13) button again to stop the dispensing procedure. - Remove the pressurized fiiter holder by turning it from right to left and then drain the remaining water.

Place a container under the dispensing spout.
Now you can go on with the coff ee brewing procedures described in the following sections.
7.2 Using Ground Coff ee
- Insert the fi lter (23) in the pressurized fi lter holder (21); at first use, the fi lter is already on. With the special fi lter (23) provided there is no need to change the fi lter to make one or two coff ee(s).
- Add 1-1.5 measuring scoop(s) for a single coff ee and 2 measuring scoops for a double coff ee. Remove any coff ee residues from the rim of the pressurized fi lter holder.
Note: do not press the coff ee, since the fi iter holder is provided with an optimized system for original espresso brewing.
- Insert the fi iter holder (21) into the brew unit (4) from the bottom.
- 14 Turn the pressurized fi/iter holder from left to right until it locks into place. Release the pressurized fi/iter holder grip. The handle will turn slightly to the left. This movement guarantees optimum fi/iter holder performance.
16 Take 1 or 2 preheated cups and place them under the pressurized fi Iter holder. Make sure that they are placed correctly under the coff ee brewing nozzles.
17 Press the " button (13).
18 When the desired quantity of coff ee has been brewed, press the " button (13) again to stop the brewing procedure. Wait for a few seconds after brewing, then remove the cups of coff ee.
19 After brewing, wait until the " " coff ee light (14) stops blinking, then remove the pressurized fi I ter holder by turning it from right to left and empty the remaining coff ee grounds.
i Note: a small quantity of water remains in the pressurized fi lter holder. This has to be considered as absolutely normal and is due to the fi lter holder characteristics.
i Important note: the fi Iter (23) should be kept clean to guarantee perfect results. Clean daily after use.
7.3 Using Coffee Pods
9 Remove the ground coff ee filter (23) from the pressurized fi lter holder (21).
- 10 Insert the pod adapter (24) into the pressurized filter holder (21) ensuring that its convex part faces down.
11 Then insert the pod fi Iter (25) into the pressurized fi I- ter holder (21).
- 12 Insert the pod into the fi filter holder; make sure that the paper of the pod does not stick out of the fi filter holder.
13 Insert the pressurized fiiter holder into the brew unit (4) from the bottom.
14Turn the pressurized fi liter holder from left to right until it locks into place. Release the pressurized fi liter holder grip. The handle will turn slightly to the left. This movement guarantees optimum fi liter holder performance.
15 Take 1 preheated cup and place it under the fi liter holder. Check that it is placed correctly under the coff ee brewing nozzles.
17 Press the "Button (13).
- When the desired quantity of coff ee has been brewed, press the " " button (13) again to stop the brewing procedure. Wait for a few seconds after brewing, then remove the cup of coff ee.
19 After brewing, wait until the " " off ee light (14) stops blinking, then remove the pressurized fi iter holder by turning it from right to left and dispose of the used pod.
Important note: the filter (25) and the adapter (24) should be kept clean to guarantee perfect results. Clean daily after use.
8 Tips for Choosing Coff ee
As a general rule, any type of coff ee available on the market can be used. However, coff ee is a natural product and its flavour changes according to its origin and blend; therefore, it is advisable to try different types of coff ee in order to find out the blend that best suits your personal tastes.
For optimal results, we recommend using espresso machine blends. As a rule, coffe should always come out of the pressurized fiiter holder, without dripping. The coffe brewing speed can be modifi ed by slightly changing the amount of coffe in the fi liter and/or using a diff erent coffe grind. Gaggia recommends using ESE single-dose coffe pods for a tasty coffe and easier cleaning and preparing.

BEFORE PERFORMING ANY OPERATIONS RELATED TO HOT WATER/STEAM DISPENSING, MAKE SURE THAT THE STEAM WAND (PANNARELLO) IS DIRECTED OVER THE WATER RECOVERY TRAY.
Hot Water
Danger of scalding! Dispensing may be preceded by small jets of hot water. The steam wand may reach high temperatures: never touch it with bare hands.
13 Insert the pressurized fiiter holder into the brew unit (4) from the bottom.
14Turn the pressurized fiiter holder from left to right until it locks into place. Release the pressurized fiiter holder grip. The handle will turn slightly to the left. This movement guarantees optimum fiiter holder performance.
- Press the ON/OFF button (11): the "O" (12) and "O" (16) lights turn on while the "O" light (14) starts blinking. Wait until the "O" light (14) turns on steady.
- Place a container or a tea glass under the steam wand (Pannarello).
- Open the knob (3) by turning it clockwise: the " ^ light (14) turns off.
6 When the desired amount of hot water has been dispensed, close the knob (3) by turning it counter-clockwise.
- Remove the hot water container.
i Note: if the steam knob is opened by mistake during the warm-up phase, the " " light (20) starts blinking. Close the knob and wait until the machine is ready.
During this operation the pump is automatically disengaged and the "△" light (20) is blinking: this is a normal behaviour of the machine. Close the knob. Wait until the "S" light (14) is steady on before opening the knob again.
10 Steam/Cappuccino
Danger of scalding! Dispensing may be preceded by small jets of hot water. The steam wand may reach high temperatures: never touch it with bare hands.
13 Insert the pressurized filter holder into the brew unit (4) from the bottom.
14Turn the pressurized fi Iter holder from left to right until it locks into place. Release the pressurized fi Iter holder grip. The handle will turn slightly to the left. This movement guarantees optimum fi Iter holder performance.
- Press the ON/OFF button (11): the "O I" (12) and "O (16) lights turn on while the "S" light (14) starts blinking. Wait until the "S" light (14) turns on steady.
21 Press the " 念 " button (17). The " 念 " light (14) turns off and the " 念 " light (18) starts blinking.
i Note: if the steam knob is opened by mistake during the warm-up phase, the " light (20) starts blinking. Close the knob and wait until the machine is ready.
- Wait until the " light (18) is steady on. Now the machine is ready for dispensing steam.
Place a container under the steam wand. - Open the knob (3) for a few seconds so that the remaining water can flow out of the steam wand (Pannarello). Within a short time only steam will come out.
- 23 Close the knob (3) and remove the container.
- Fill 1/3 of the container - the one you wish to use to prepare the cappuccino - with cold milk.
i Use cold milk to get a better result.
- 24 Immerse the steam wand in the milk and open the (3) knob by turning it clockwise; the pump is automatically engaged. Rotate the milk container with slow upward movements to obtain uniform warmth.
25 Once finished, close the knob (3) by turning it counterclockwise and remove the cup with frothed milk.
After this operation, clean the steam wand with a wet cloth.
The same procedure can be performed to heat other beverages.
- To stop the steam dispensing procedure, press the " button (17). The (14) " _ 口 ^ 山 , (18) " and (20) " light blink fast at the same time. This is to indicate that the machine temperature is too high to brew coffe.
10.1 Machine Cooling
Proceed as follows to lower the temperature:
- Place a container or a tea glass under the steam wand (Pannarello).
- Open the knob (3) by turning it clockwise.
- When the machine reaches the proper temperature, the pump is automatically disengaged and the " " light (20) is blinking.
6 Close the knob (3) by turning it counter-clockwise and remove the container. - Ensure the machine is ready before brewing coffe. The machine is ready when the "S" light (14) is steady on.
11 Cleanings
Maintenance and cleaning can only be carried out when the machine is cold and disconnected from the electric network.
- Do not immerse the machine in water or place any of its parts in a dishwasher.
- Do not use spirit, solvents and/or aggressive chemical agents.
- We recommend cleaning the water tank and refill it with fresh water every day.
-
30 Clean the boiler ring with a wet cloth weekly when the machine is off, cold and disconnected from the mains.
26 28 Every day, after heating milk, remove the external part of the Pannarello and wash it with fresh drinking water.
26 27 28 Clean the steam wand weekly. In order to do this, perform the following operations: -
Remove the external part of the Pannarello (for standard cleaning).
-
Remove the upper part of the Pannarello from the steam wand.
-
Wash the upper part of the Pannarello with fresh drinking water.
- Wash the steam wand with a wet cloth and remove any milk residue.
- Refi t the upper part in the steam wand (make sure it is completely inserted).
29 After cleaning, reassemble the external part of the Pannarello and make sure it reaches its limit stop. Make also sure that the plastic part is correctly fit in the metal part.
31 Empty and wash the drip tray daily.
- Use a soft, dampened cloth to clean the appliance.
20 Clean the pressurized fiiter holder as follows:
- Remove the fi Iter and wash it thoroughly with hot water.
- Remove the adapter (if fi tted), and wash it thoroughly with hot water.
-
Wash the internal part of the pressurized filter holder.
-
Do not dry the machine and/or its parts using a microwave and/or standard oven.

Note: do not wash the pressurized fi Iter holder in the dishwasher.
12 Dscaling
Limescale is a natural part of the water used for machine operation. It needs to be removed regularly as it may clog the water and coffe circuit of your appliance.
This is an easy procedure for your Gaggia machine. When
"CD" light (19) turns on, a descending cycle is recommended.
When the "light (19) starts blinking, descending is compulsory.

This operation needs to be carried out before the appliance stops working properly, as in this pair is not covered by warranty.

Use the Gaggia descaling product (Fig. B). Its formula has been designed to ensure better
machine performance and operation for its whole operating life. If correctly used, it also avoids alterations in the brewed product. Before starting a descending cycle make sure that: THE WATER FILTER (if used) HAS BEEN REMOVED.

Never drink the descending solution or any products dispensed until the cycle has been fully cart. Never use vinegar as a descending solution.
1 13 14 Insert the fi liter holder (21) into the brew unit (4) from the bottom. Turn the pressurized fi liter holder from left to right until it locks into place. Release the pressurized fi liter holder grip. The handle will turn slightly to the left. This movement guarantees optimum fi liter holder performance.
2 Remove and empty the water tank.
3 Pour HALF the content of the Gaggia concentrated.
descending solution into the water tank, then fi II the tank with fresh drinking water up to the MAX level.
4 4 Turn on the machine by pressing the ON/OFF button (11). The light (12) turns on.
5 Following the instructions provided in chapter 9 of this manual, dispense 2 cups of water (about 150ml each) from the steam wand (Pannarello) and turn the machine off by pressing the ON/OFF button (11); the "O" light (12) turns off.
5 Let the descending solution take effect for approx. 15-20 minutes with the machine turned off.
6 Turn on the machine by pressing the ON/OFF "O button (11).
5 Following the instructions provided in chapter 9 of this manual, dispense 2 cups of water (about 150ml each) from the steam wand (Pannarello). Turn off the machine by pressing the ON/OFF "O f" button (11) and leave it off for 3 minutes.
7 Repeat the operations described in step 6 until the water tank is completely empty.

10 Turn on the machine by pressing the "ON/OFF button (11); press the" button (13) and dispense the whole content of the tank by means of the fiiter holder. Press the " button (13) again to stop the dispensing process.
11 2 Refi II the tank with fresh water.
During this operation the pump is automatically disengaged and the "△" light (20) is hung: this is a normal behaviour of the machine.
Close the knob. Wait until the " ^ light (14) is steady on before opening the knob again.
8 2 Rinse the water tank with fresh drinking water and fi I it up.
9 Place a container under the fi tter holder.
5 Place a large container (about 1 l capacity) under the steam wand (Pannarello).
Open the water dispensing knob (3) by turning it clockwise and dispense the whole content of the water tank by means of the steam wand (Pannarello).
12 6 After the water dispensing process is complete, close the water dispensing knob (3) by turning it counter-clockwise.
13 Repeat the operations once again from step (8), for a total of 4 tanks.
14 19 Remove the filter holder from the unit by turning it from right to left and rinse it with fresh drinking water.
The descending cycle is now complete.
At the end, press and hold the coff ee brewing and steam dispensing buttons for 3 seconds: the descending light turns off.
During this operation the pump is automatically disengaged and the (16) light is blinking: this is a normal behaviour of the machine. Close the knob. Wait until the (14) light is steady on before opening the knob again.
Now the fi Iter is active and the machine is ready for use.
2 Refi II the tank with fresh water. If necessary, prime the circuit as described in section 4.6.
The descending solution is to be disposed of according to the manufacturer's instructions and/or the regulations in force in the country of use.
13 "Intenza+" Filter (Optional)
The "INTENZA+" water fi filter can improve the quality of water. Using the "INTENZA+" filter will prevent limescale from building up and will ensure a much more intense aroma to your espresso coffe. We therefore recommend you install the "INTENZA+" water fi Iter, which can be purchased from your local dealer or on-line at the Philips on-line store http://shop. philips.com or at authorized service centres.
- 34 Remove the small white fi Iter from the tank and store it in a dry place sheltered from dust.
- Remove the "INTENZA+" water fi filter from its package. Set the fi filter according to the water hardness.
- 33 Immense the "INTENZA+ water fi tter vertically in cold water (with the opening positioned upwards) and gently press its sides to let the air bubbles out.
- 35 Put the filter into the empty tank. Press it until its limit stop.
- Fill the water tank with fresh drinking water and reinsert it into the machine.
Carry out the following steps to activate the "Intenza+ filter:
4 Press the ON/OFF button (11): the "O f" (12) and "O" (16) lights turn on while the "S" light (14) starts blinking. Wait until the "S" light (14) turns on steady.
- Place a container or a tea glass under the steam wand (Pannarello).
- Open the knob (3) by turning it clockwise.
- 6 When about 1 litre of hot water has been dispensed, close the knob (3) by turning it counter-clockwise.
- Empty the hot water container.
| Problem Possible Causes Solution | ||
| The machine does not switch on. | The machine is not connected to the elec-tric network. | Connect the machine to the electric network. |
| The pump is very noisy. No water in the tank. | Fill the tank up with water and prime the circuit (section 4.6). | |
| The (14) " ", (18) " and (20) " lights blink simulta-neously. | This is the fi rst start-up or the machine is overheated. | Make sure the tank is full and fully inserted and lower the temperature as described in section 10.1. |
| Coff ee is too cold. | The fi lter holder is not inserted for pre-heating (chapter 7). | Preheat the fi lter holder. |
| The cups are cold. Preheat the cups with hot water. | ||
| The milk does not froth. | The milk is not suitable: powdered milk, low-fat milk. | Use whole milk. |
| It is not possible to prepare a cappuccino. | Dirty Pannarello. Clean the Pannarello as described in chapter 11. | |
| No water in the tank. | Fill the tank up with water and prime the circuit (section 4.6). | |
| Coff ee is brewed too fast,crema does not form. | There is too little coff ee in the fi lter holder. Add coff ee (chapter 7). | |
| The grind is too coarse. Use a diff erent blend (chapter 8). | ||
| Coff ee is old or not suitable. Use a diff erent blend (chapter 8). | ||
| The pod is old or not suitable. Change the pod. | ||
| Missing component in the fi lter holder. | Make sure that all the components are present and properly installed. | |
| Coff ee does not come out or drips only. | No water. | Fill the tank up with water and prime the circuit (section 4.6). |
| The grind is too fi ne. Use a diff erent blend (chapter 8). | ||
| Coff ee tamped in the fi lter holder. Shake the ground coff ee. | ||
| There is too much coff ee in the fi lter holder. | Reduce the quantity of coff ee in the fi lter holder. | |
| The machine has limescale build-up. | Descale the machine (chapter 12). | |
| The fi lter in the fi lter holder is clogged. | Turn the machine offand let it cool down (approx. 1 hour), then remove and wash the fi lter holder thoroughly. If the problem persists, contact the service centre. | |
| Not suitable pod. | Change type of pod. | |
| Problem Possible Causes Solution | |
| Coff ee flows out of the edges. | The fi liter holder is not correctly inserted in the brew unit. Insert the fi liter holder correctly (chapter 7). |
| The upper rim of the fi liter holder is dirty. Clean the rim of the fi liter holder. | |
| Pod inserted incorrectly. Insert the pod correctly. Make sure it does not come out of the fi liter holder. | |
| There is too much coff ee in the fi literReduce the quantity of coff ee using the measur- holder. ing scoop. | |
| The "▲" light (20) is on. | The water knob (3) is open. Close the knob (3). |
| The "●" light (19) is on. Descale the machine. Please refer to chapter (12). | |
| The pump turns off during water orsteam dispensing and the""light (20) turns on. | Safety time-out. Close the water knob. |
Please contact an authorised service centre for any problems not covered in the above table or when the suggested solutions do not solve the problem.
RI8525, Type SIN 042 GM
RI8523, Type SIN 042 GB
RI8525, Type SIN 042 GM = 5 kg
RI8523, Type SIN 042 GB = 4.8 kg
Kabellange
1,3 m
Bedienfeld
Auf der Vorderseite
Filterhalter
Druckverdichtet
Pannarello
RI8525, Type SIN 042 GM = 5 kg
R18523, Type SIN 042 GB = 4.8 kg
Longueur du cable
1,3 m
Bandeau de commande
En façade
PortefnItre
Pressurise
Pannarello
RI8525, Type SIN 042 GM = 5 kg
R18523, Type SIN 042 GB = 4.8 kg
Longitud del cable
1,3 m
Panel de mandos
RI8525, Type SIN 042 GM
RI8523, Type SIN 042 GB
Dimensoes (cxaXP) (mm)
210 × 300 × 280
Peso
RI8525, Type SIN 042 GM = 5 kg
R18523, Type SIN 042 GB = 4.8 kg
Complemento do cabo
1,3 m
Painel de commande
Na parte frontal
Porta-fItro
Pressurizado
Pannarello
A这其中 is a非常好. It's very good.
GAGGIA S.p.A. reserves the right to make any necessary modification.
170/82
GAGGIA S.p.A.
Sede Legale/Registered Offi ce
Piazza A. Diaz, 1
20123 MILANO
Sede Amministrativa/Administrative Offi ce
Via Torretta, 240
40041 Gaggio Montano (BO)
+390534771111
www.gaggia.com

MILANO
- Se先进技术 are used in the following areas: - the use of a computer - the use of a computer - the use of a computer - the use of a computer - the use of a computer - the use of a computer - the use of a computer - the use of a computer - the use of a computer - the use of a computer - the use of a computer - the use of a computer - the use of a computer - the use of a computer - the use of a computer and the use of a computer.
- IMPORTANT SAFETY INFORMATION
- Warning
- General
- Caution
- Machines with classic milk frother
- Machines with automatic milk frother
- Electromagnetic fields (EMF)
- Recycling
- Warranty and support
- DEAR CUSTOMER,
- General Information
- Warning. No liability is held for damage caused by:
- To Simplify Manual Reading
- Technical Specification
- How to Use these Operating Instructions
- Key to Machine Parts (Page 2)
- Installation
- Packaging
- Installation Precautions
- Water tank
- Machine Connection
- First Use
- Circuit Priming
- Using the Machine for the First Time or After a Period of Inactivity
- Rinsing
- Place a container under the dispensing spout.
- Energy Saving
- Coff ee Brewing
- Filter Holder Warm-Up
- Using Ground Coff ee
- Note: do not press the coff ee, since the fi iter holder is provided with an optimized system for original espresso brewing.
- Using Coffee Pods
- Tips for Choosing Coff ee
- Hot Water
- Steam/Cappuccino
- i Use cold milk to get a better result.
- The same procedure can be performed to heat other beverages.
- Machine Cooling
- Proceed as follows to lower the temperature:
- Cleanings
- Dscaling
- "Intenza+" Filter (Optional)
- Carry out the following steps to activate the "Intenza+ filter:
Brand : GAGGIA
Model : RI8523
Category : Coffee machine