
VLL5 - Wall mount SANUS - Free user manual and instructions
Find the device manual for free VLL5 SANUS in PDF.
| Product type | TV wall mount |
| Brand | Sanus |
| Model | VLL5 |
| Maximum supported weight | 79.3 kg (175 lbs) |
| Compatible wall materials | Wood studs, poured concrete, concrete blocks |
| Required tools | Tape measure, pencil, screwdriver, 13 mm socket wrench, level, stud finder, electric drill, 5.5 mm wood drill bit, 10 mm concrete drill bit |
| Features | Leveling, lateral TV shift, TV retraction, cable management |
| Tilt | Non-tilting (fixed) |
| Rotation | Non-rotating |
| Extension | Non-extendable (fixed to wall) |
| Bracket depth | Approximately 50 mm (estimate) |
| Wall plate width | Approximately 600 mm (estimate) |
| Wall plate height | Approximately 200 mm (estimate) |
| TV attachment | Adjustable mounting brackets with spacers |
| Safety | Wall must support 5 times total weight, safety lock, release cables |
| Maintenance | Clean with a soft dry cloth, do not use abrasive products |
| Spare parts and repairability | Contact customer service for missing or damaged parts |
Frequently Asked Questions - VLL5 SANUS
User questions about VLL5 SANUS
0 question about this device. Answer the ones you know or ask your own.
Ask a new question about this device
Download the instructions for your Wall mount in PDF format for free! Find your manual VLL5 - SANUS and take your electronic device back in hand. On this page are published all the documents necessary for the use of your device. VLL5 by SANUS.
USER MANUAL VLL5 SANUS
Want to watch a video that shows how easy this DIY project will be?

Watch it now at: SANUS.com/495
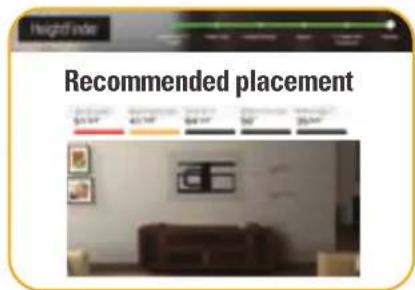
Get it right the first time. HeightFinderTM shows you where to drill.

Check it out at: SANUS.com/2567

Our install experts are standing by to help.

Call us at:
US: +1 (800) 359-5520
EMEA: +31 (0) 495 580 852
UK: +44 (0) 800 056 2853
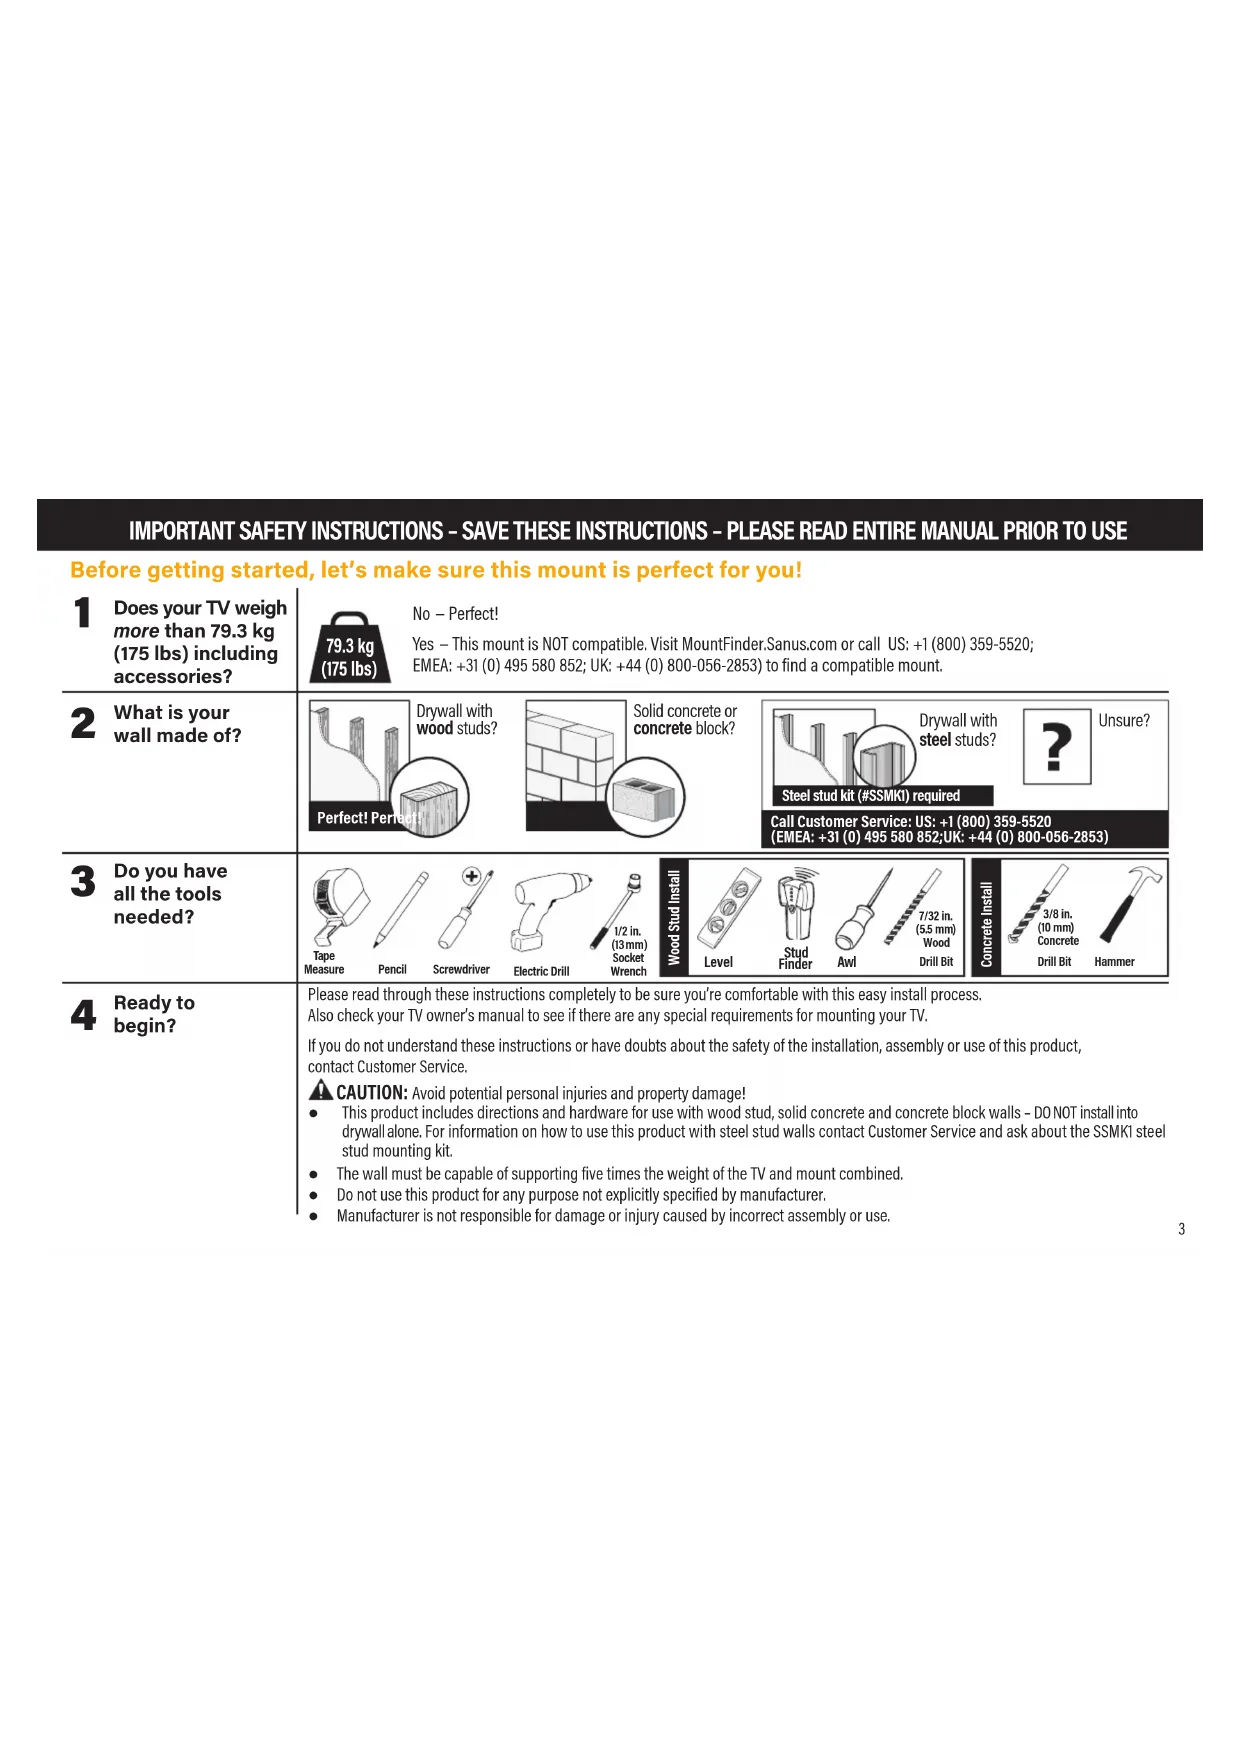
IMPORTANT SAFETY INSTRUCTIONS - SAVE THESE INSTRUCTIONS - PLEASE READ ENTIRE MANUAL PRIOR TO USE
Before getting started, let's make sure this mount is perfect for you!
| 1 Does your TV weigh more than 79.3 kg (175 lbs) including accessories? | No - Perfect! Yes - This mount is NOT compatible. Visit MountFinder.Sanus.com or call US: +1 (800) 359-5520; EMEA: +31 (0) 495 580 852; UK: +44 (0) 800-056-2853) to find a compatible mount. | ||||||||||||
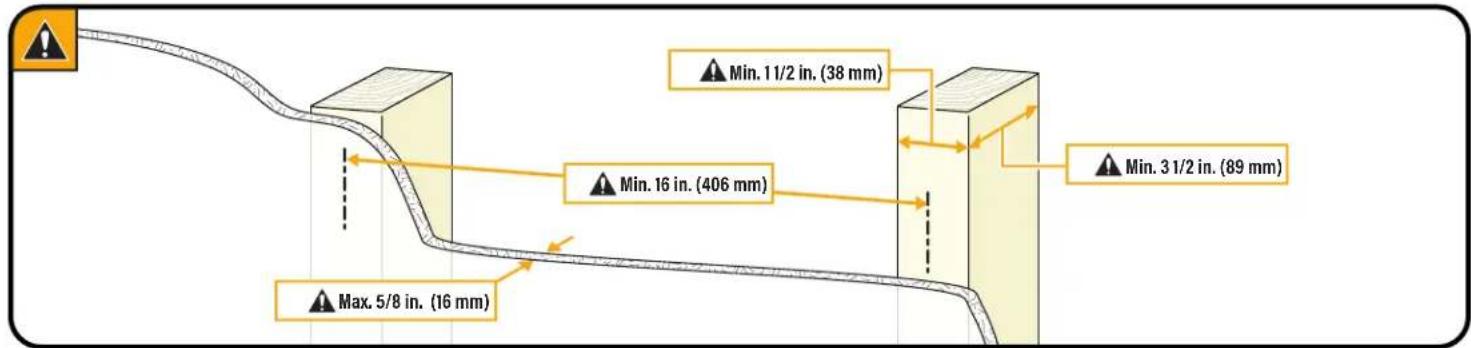
| 2 What is your wall made of? | Drywall with wood studs? Perfect! Permac | Solid concrete or concrete block? | Drywall with steel studs? ? Steel stud kit (#SSMKI) required | Unsure? | |||||||||
| Call Customer Service: US: +1 (800) 359-5520 (EMEA: +31 (0) 495 580 852;UK: +44 (0) 800-056-2853) | |||||||||||||
| 3 Do you have all the tools needed? | Tape Measure | Pencil | Screwdriver | Electric Drill | 1/2 in. (13mm) Socket Wrench | Wood Stud Install | Level | Stud Finder | Aml | 7/32 in. (5.5 mm) Wood Drill Bit | Concrete Install | 3/8 in. (10 mm) Concrete Drill Bit | Hammer |
| 4 Ready to begin? | Please read through these instructions completely to be sure you're comfortable with this easy install process. Also check your TV owner's manual to see if there are any special requirements for mounting your TV. If you do not understand these instructions or have doubts about the safety of the installation, assembly or use of this product, contact Customer Service. CAUTION: Avoid potential personal injuries and property damage! · This product includes directions and hardware for use with wood stud, solid concrete and concrete block walls - DO NOT install into drywall alone. For information on how to use this product with steel stud walls contact Customer Service and ask about the SSMK1 steel stud mounting kit. · The wall must be capable of supporting five times the weight of the TV and mount combined. · Do not use this product for any purpose not explicitly specified by manufacturer. · Manufacturer is not responsible for damage or injury caused by incorrect assembly or use. | ||||||||||||
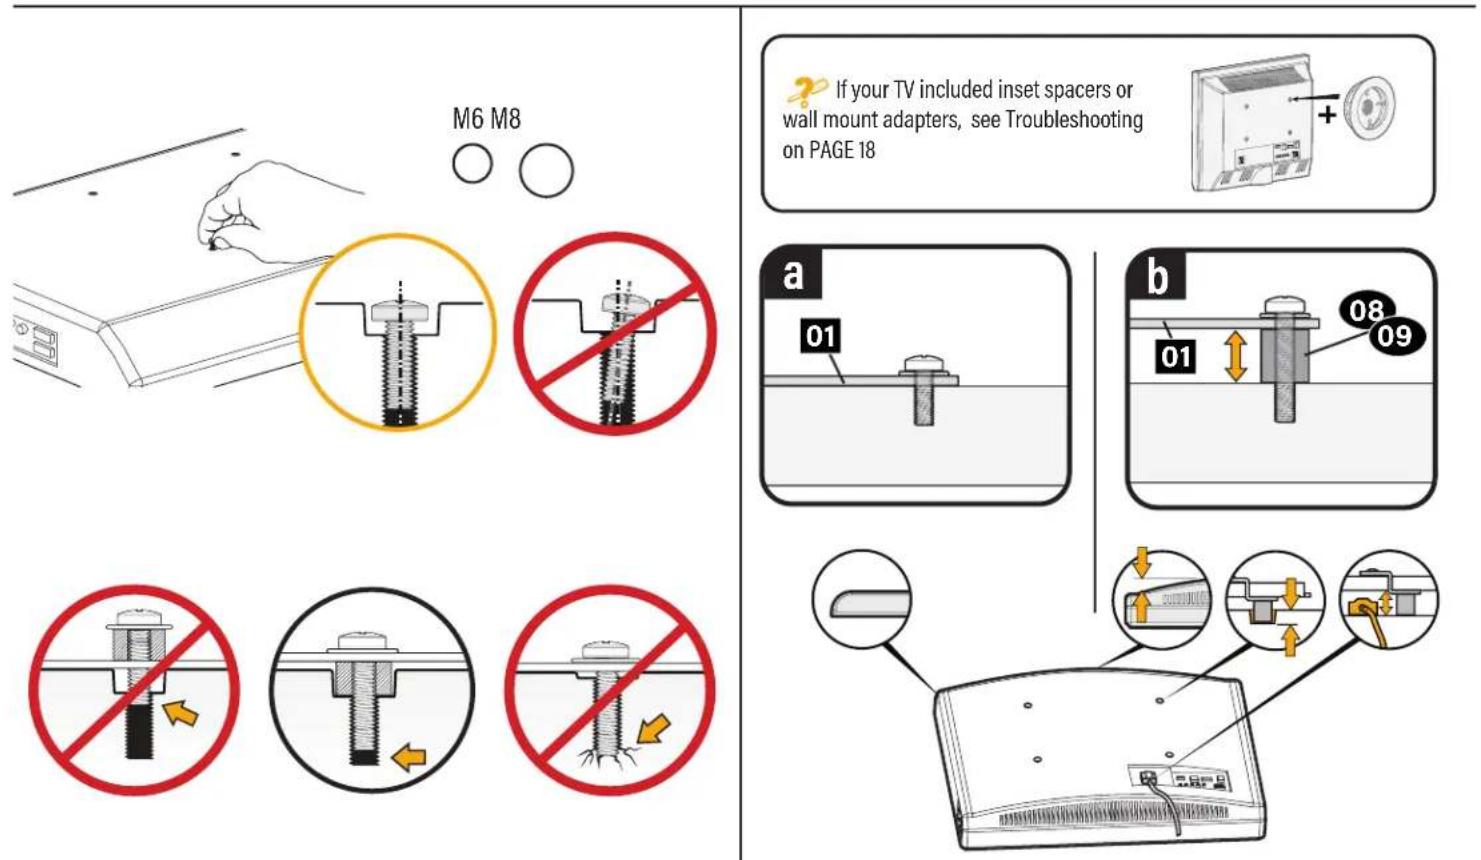
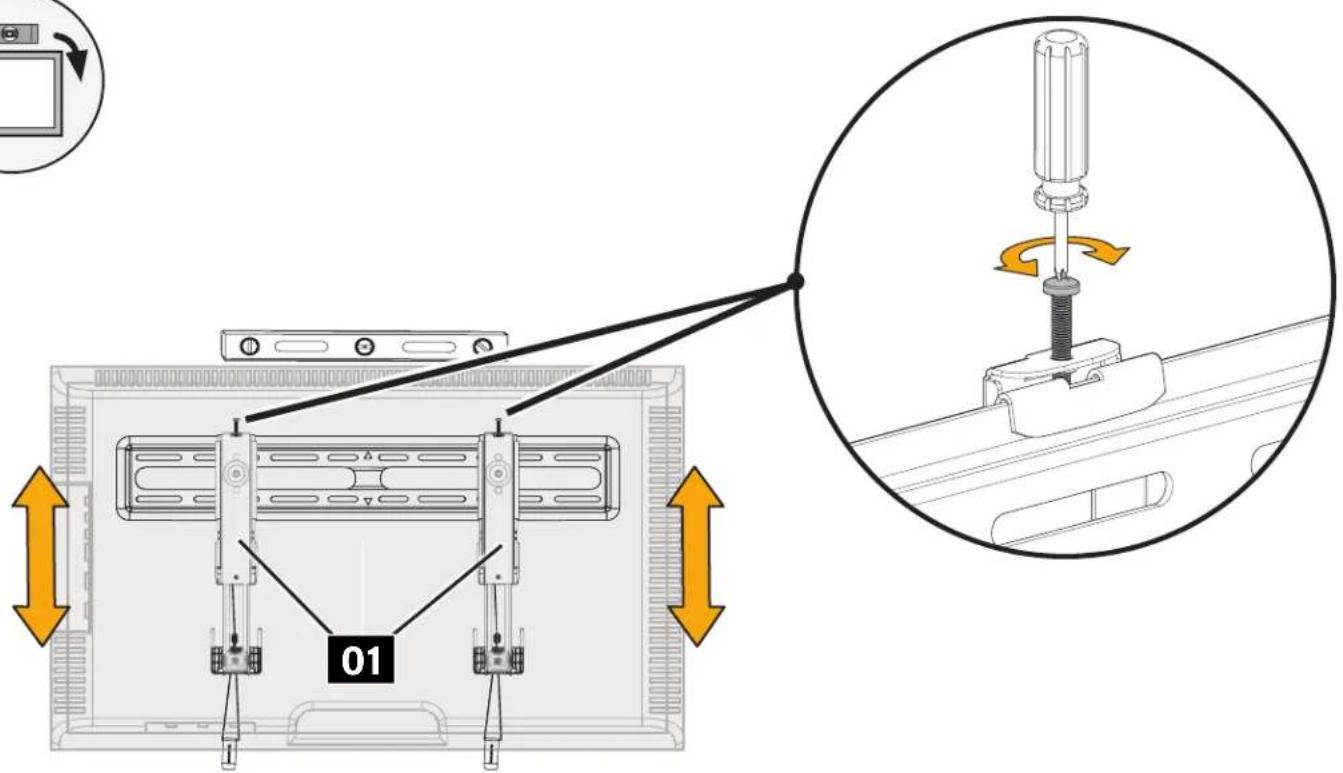
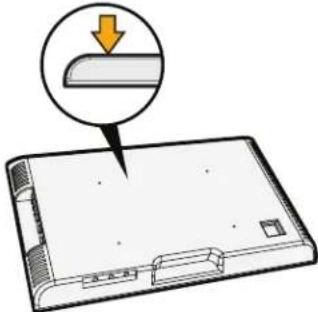
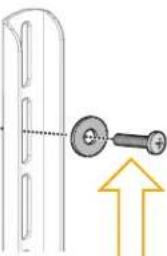
STEP 1 Attach Bracket to TV
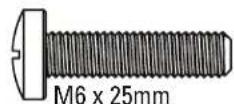
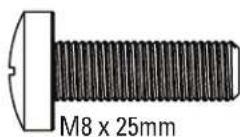
Parts and Hardware for STEP 1
WARNING: This product contains small items that could be a choking hazard if swallowed.
Before starting assembly, verify all parts are included and undamaged. If any parts are missing or damaged, do not return the damaged item to your dealer; contact Customer Service. Never use damaged parts!

NOTE: Not all hardware included will be used.

02x4
03x4
04x4
TV Screws
05x4
06x4

TV Washers
07x4
Spacers
08x4
2.5mm
09x4
1-1 Select TV Screws
1-3 Attach TV Brackets
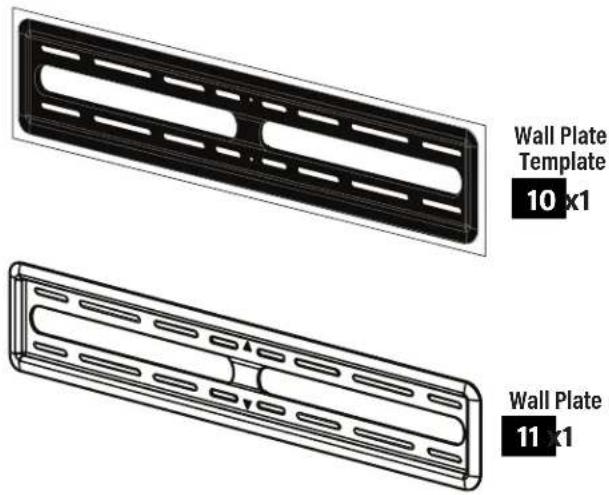
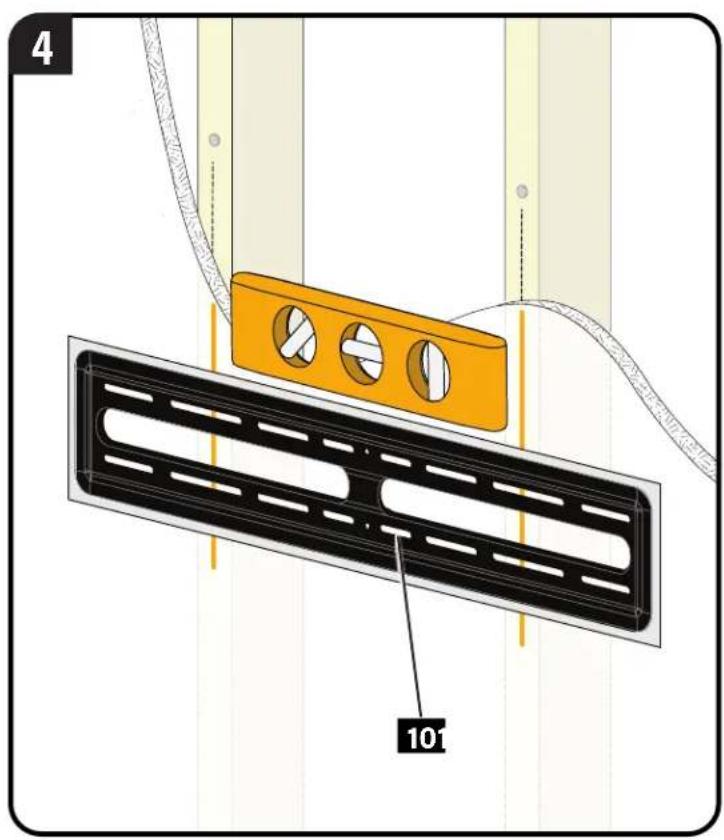
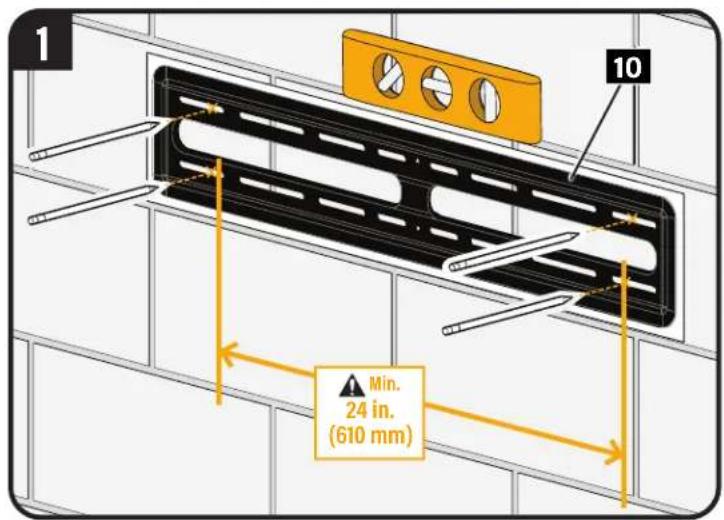
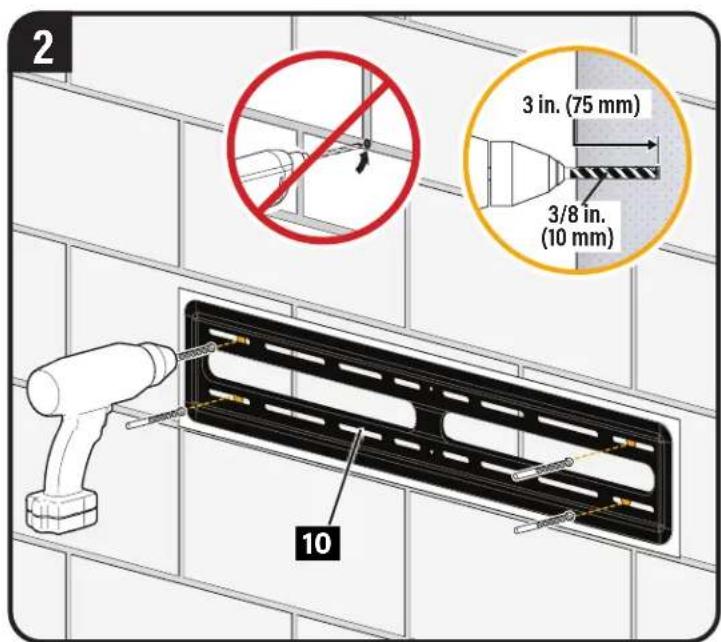
STEP 2 Attach Wall Plate to Wall
For wood stud installations, follow STEP 2A on PAGE 8
For concrete installations, follow STEP 2B on PAGE 11
Parts and Hardware for STEP 2
WARNING: This product contains small items that could be a choking hazard if swallowed.
Before starting assembly, verify all parts are included and undamaged. If any parts are missing or damaged, do not return the damaged item to your dealer; contact Customer Service. Never use damaged parts!

NOTE: Not all hardware included will be used.
STEP 2A od Stud Option
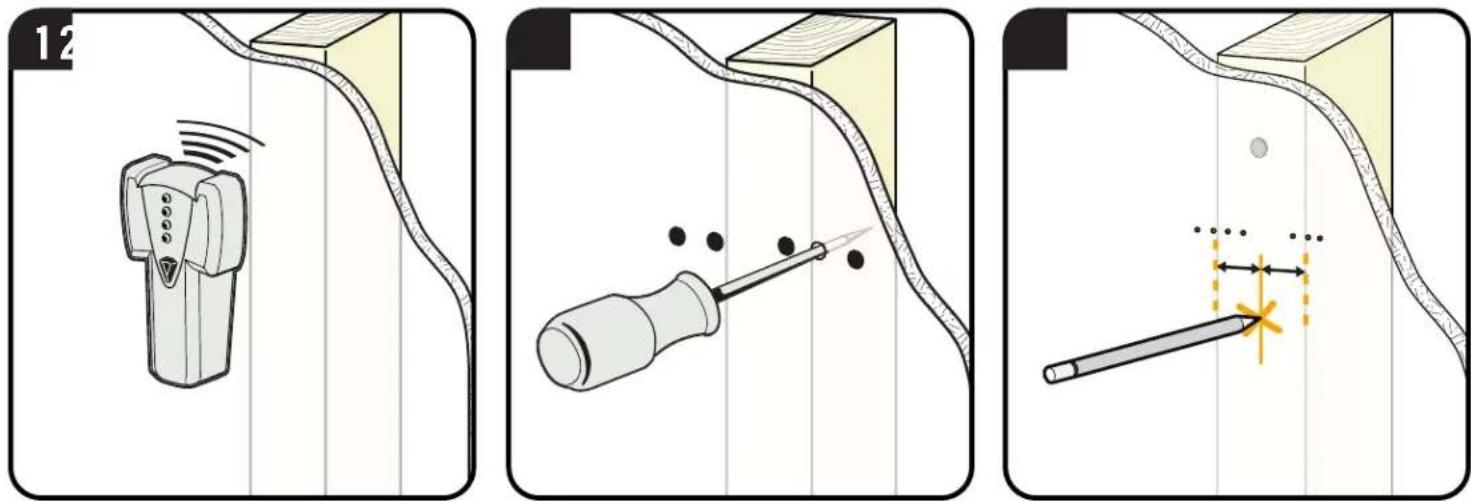
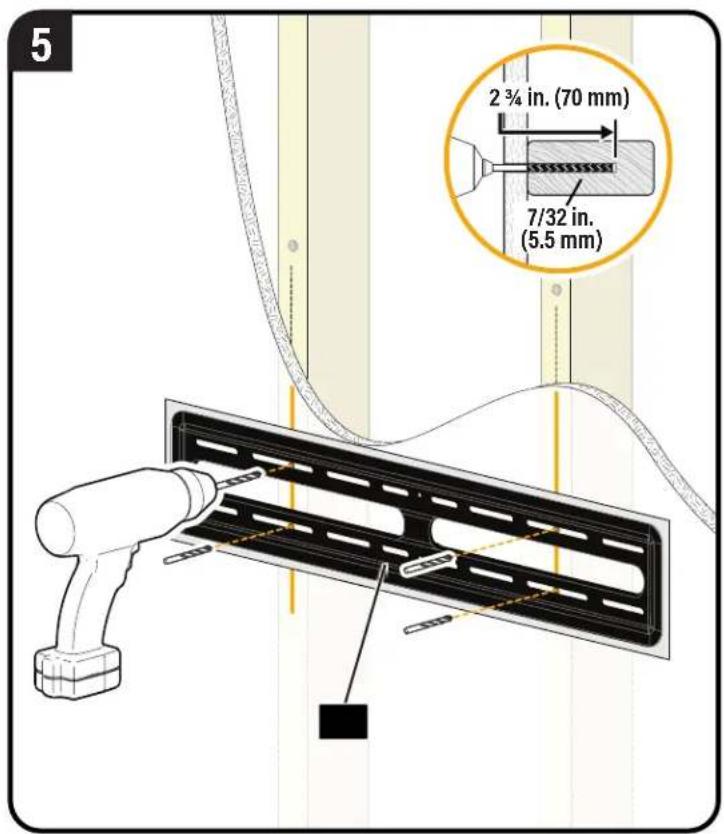
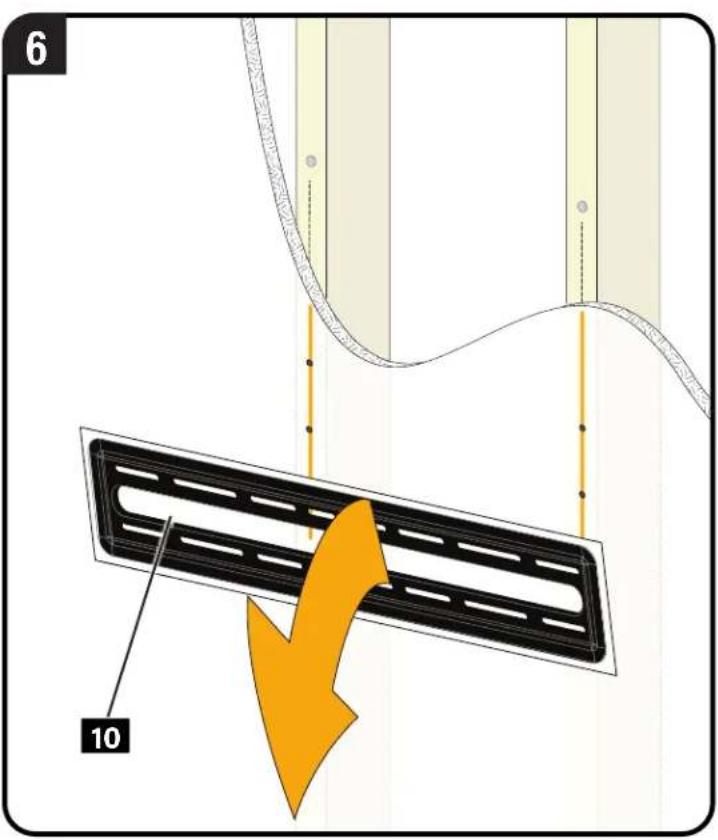
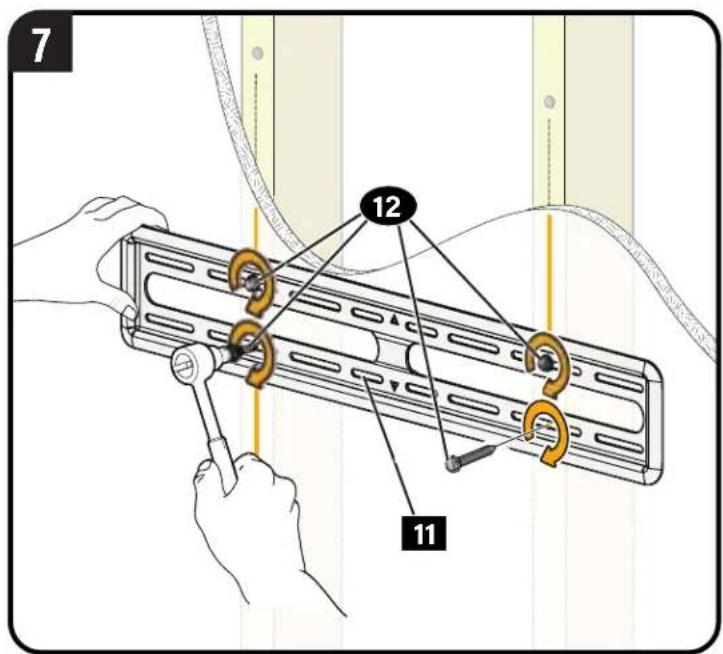
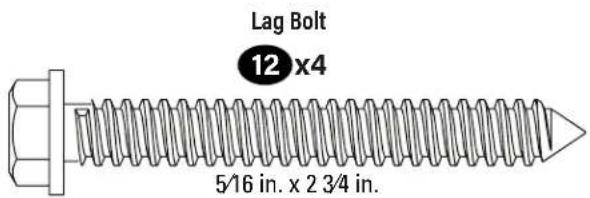
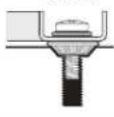
CAUTION: Avoid potential personal injury or property damage! All four lag bolts 12 MUST BE firmly tightened to prevent unwanted movement of the wall plate 11 Ensure the wall plate is securely fastened to the wall before continuing on to the next step.
Go to STEP 3 on PAGE 13
STEP2B
id Concrete or Concrete Block Option
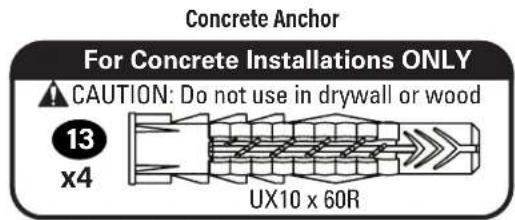
CAUTION: Avoid potential personal injuries and property damage! Mount the wall plate n directly onto the concrete surface.
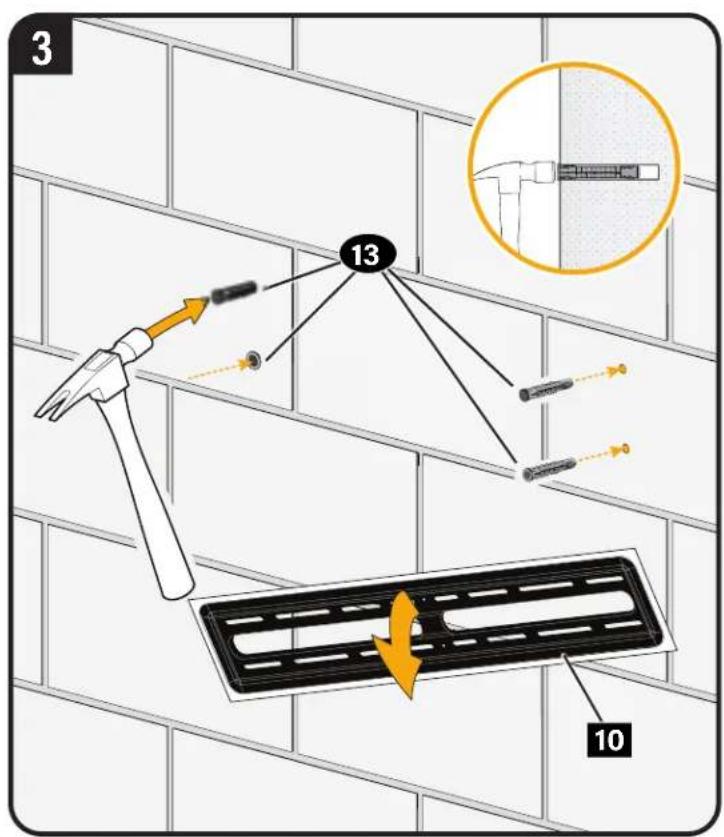
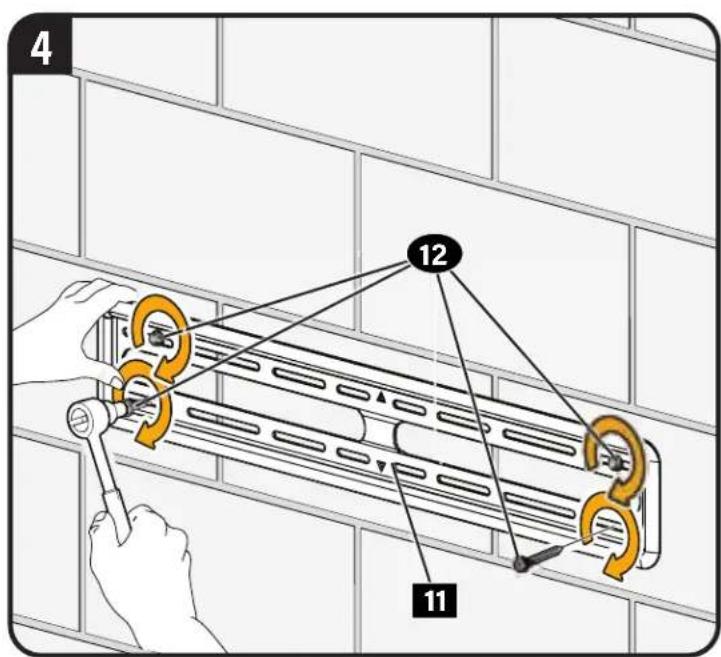
CAUTION: Avoid potential personal injury or property damage! All four lag bolts 12 MUST BE firmly tightened to prevent unwanted movement of the wall plate 11. Ensure the wall plate is securely fastened to the wall before continuing on to the next step.
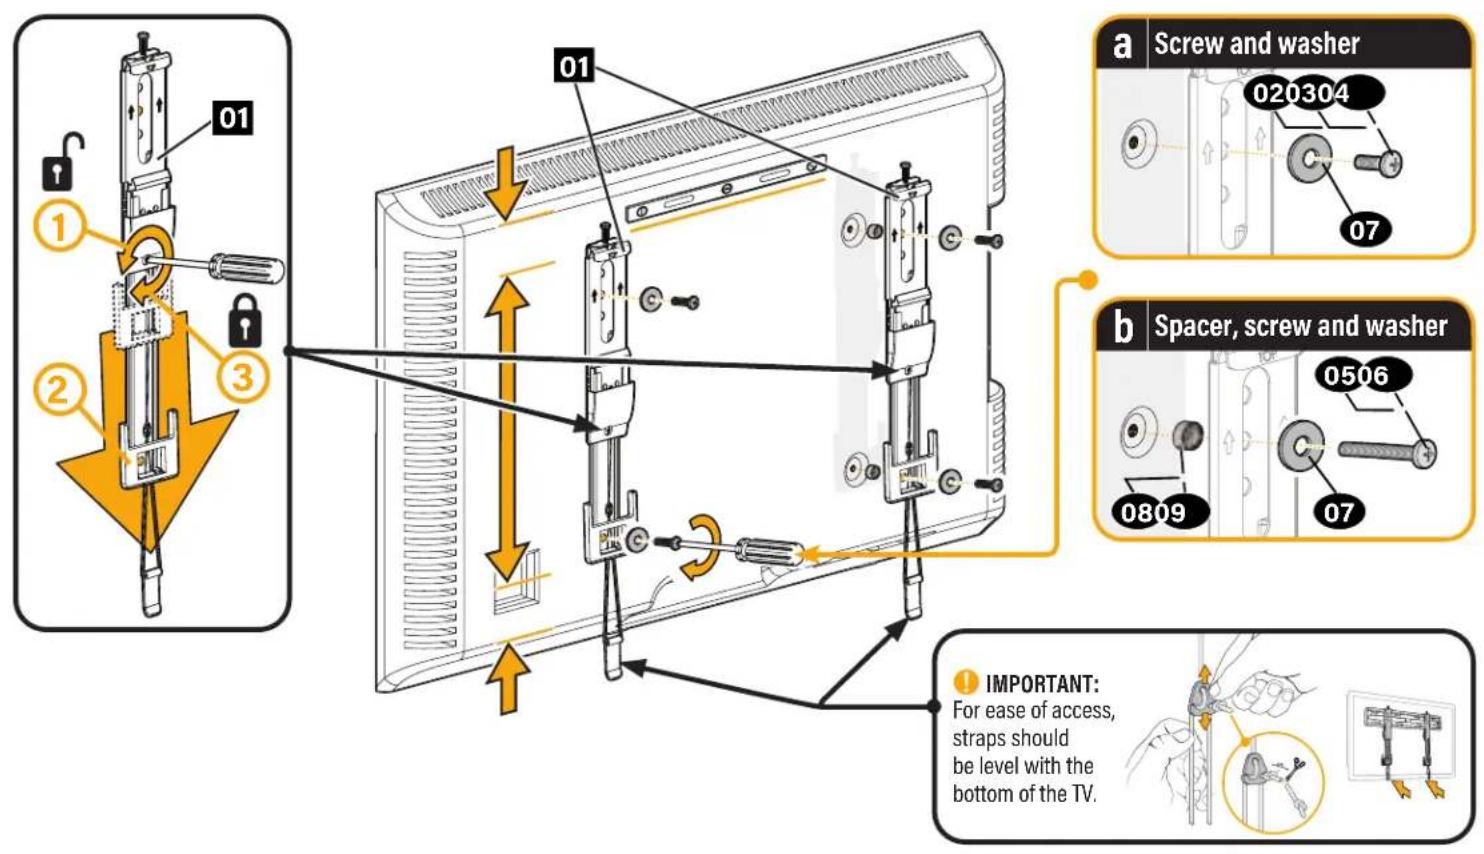
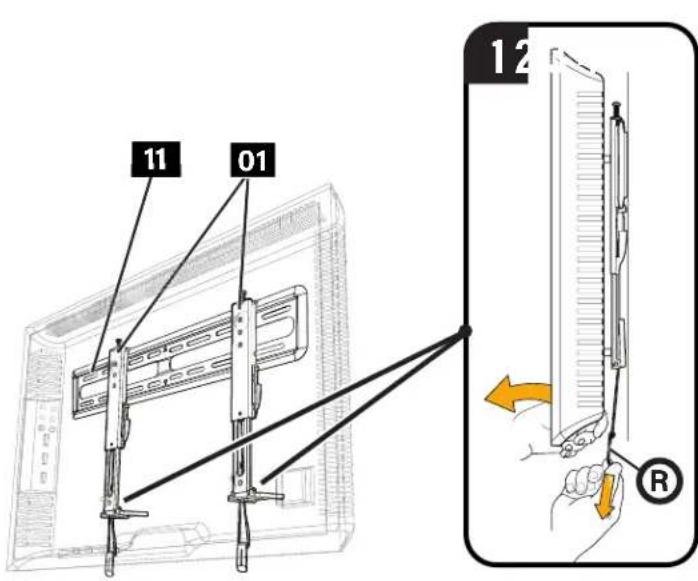
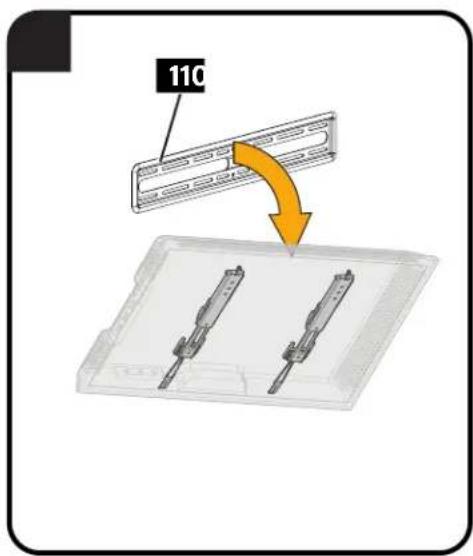
STEP 3 Attach TV to Wall Plate

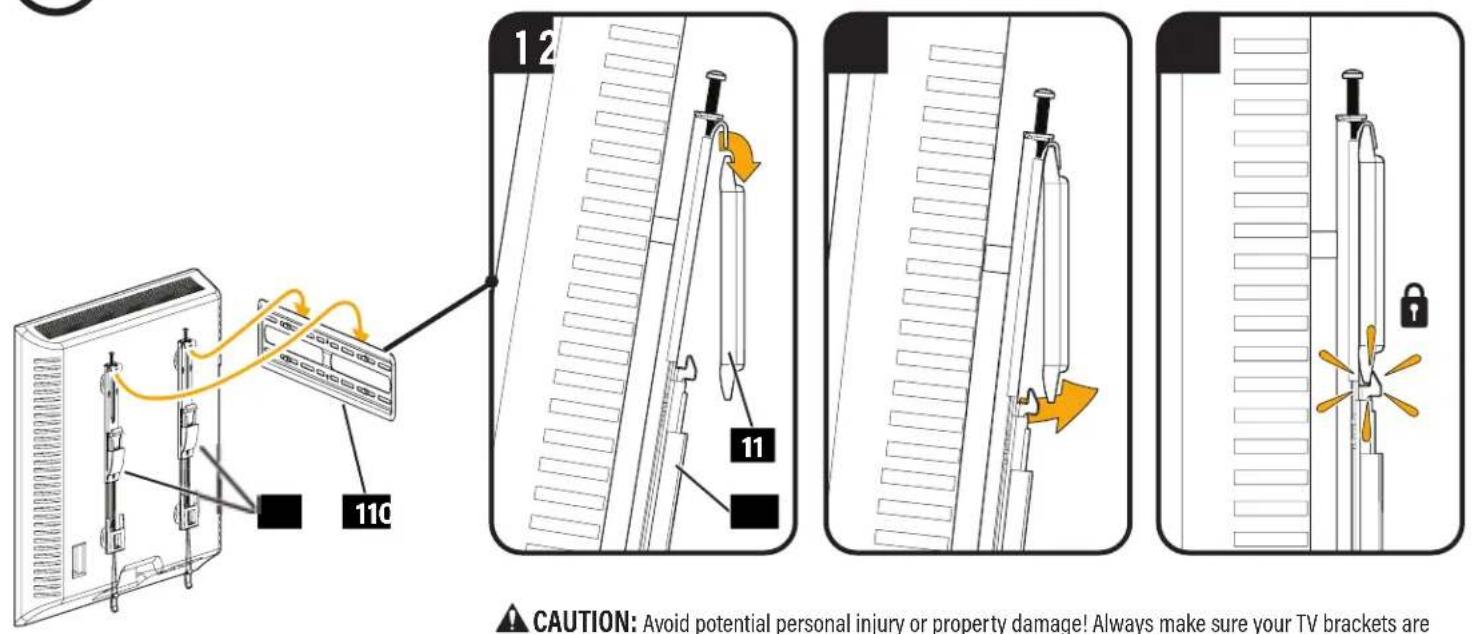
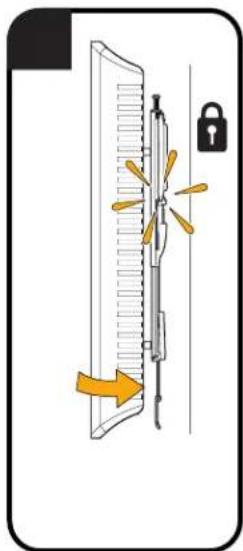
CAUTION: Avoid potential personal injury or property damage! Always make sure your TV brackets are in the locked position so the TV is securely fastened to the wall plate 11.
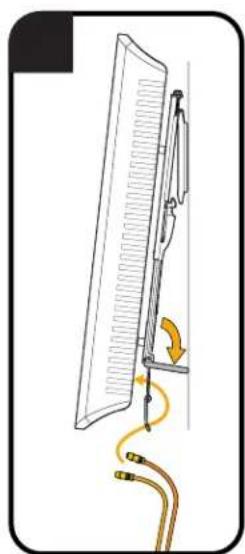
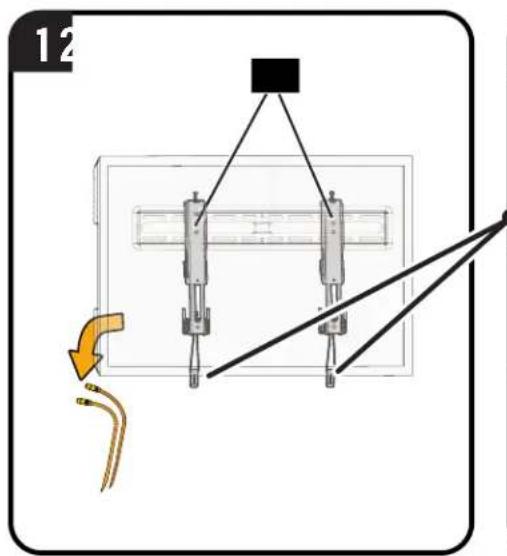
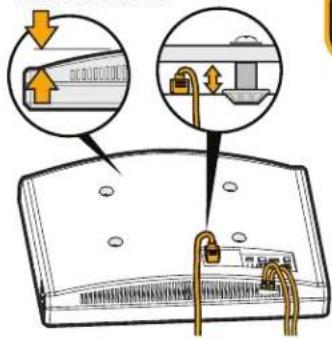
Manage Cables
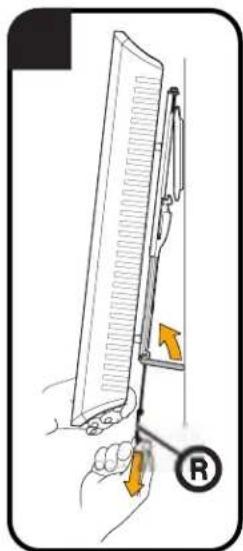
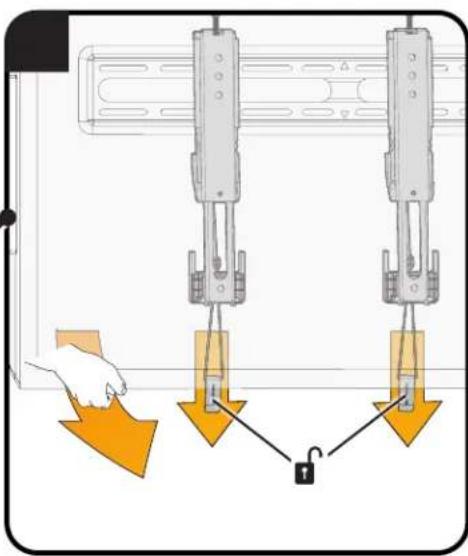
CAUTION: Avoid potential personal injury or property damage! To prevent breaking the locking latch: always pull and hold the release cords down while pulling the TV away from the wall.
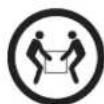
CAUTION: TV is not secured to the wall when it is in the kick stand position. Assistance is recommended for this step.
Adjustments
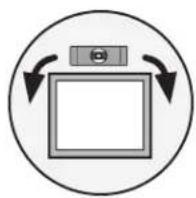
LEVEL
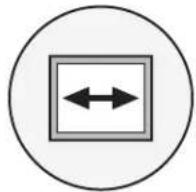
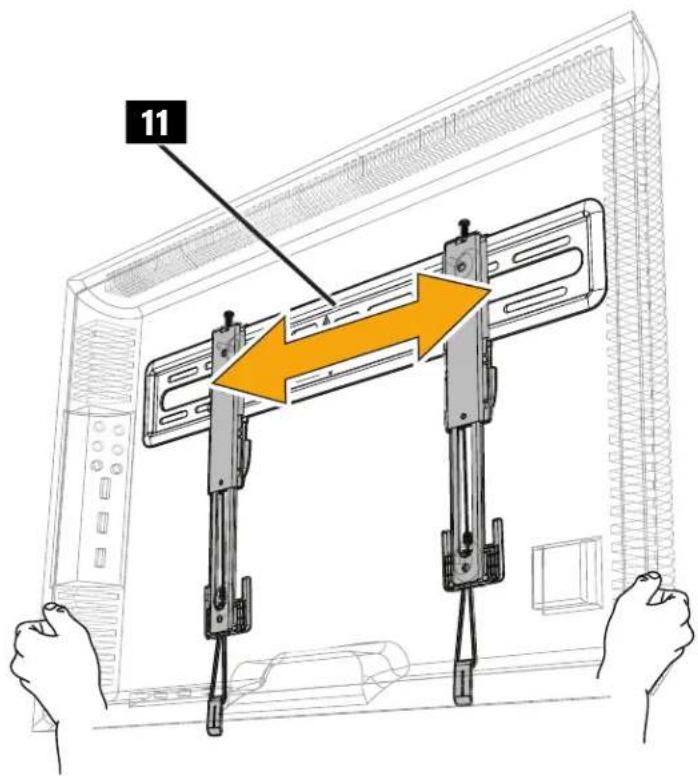
TV LATERAL SHIFT
REMOVING THE TV
CAUTION: To prevent breaking the locking latch; always pull and hold the release cords R down while pulling the TV away from the wall.

Troubleshooting
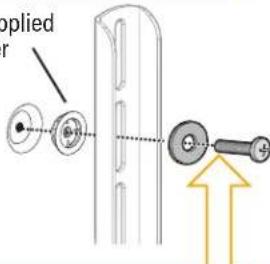
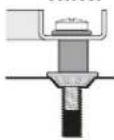
TV supplied spacers
TV Supplied Spacer
Espaciador suministrado con el tevelisor
Entretoise fouinie avec le televiseu
Mit dem Fornsoher mitgelieforter Abstandhalter
Bij tv geleverde afstandhouser
TV:ns medfoljande distansbrickor
KOMNNEKTHA8STyNKa
电视随附的垫片
テレに含てるスを
TV Supplied
Spacers
2 : x^ ( x) = 10y^ ( y) : 2 : x^ ( x) = - 4,y^ ( y) : x^ y^ = 0 x^ y^ = 0 x^ y^ = - 4.
a
1
(1)
(2)
TV Supplied
Spacer
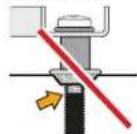
CAUTION: Avoid potential injury or property damage!
Use the correct screw length for adequate thread engagement.
- Too short will not
hold the TV.
- Too long will
damage the TV.
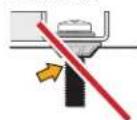
Too Short
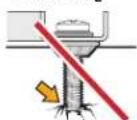
Too Long
Correct
If you are uncertain about your hardware selection, contact
Customer Service at US: +1 (800) 359-5520
(EMEA: +31 (0) 495 580 852; UK: +44 (0) 800-056-2853).
b: Use your TV supplied spacer and spacer 08 or 09 for:
-
Round (irregular) back TVs
-
Extra space needed for cables
ROUND BACK CABLES

TV Supplied
Spacer

CAUTION: Avoid potential injury or property damage!
Use the correct screw length for adequate thread engagement.
- Too short will not
hold the TV.
- Too long will
damage the TV.
Too Short
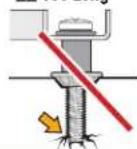
Too Long
Correct
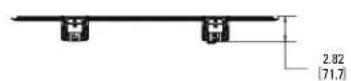
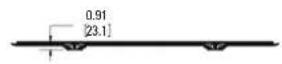
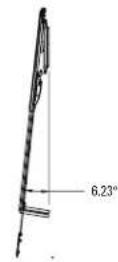
Dimensions
in.[mm]
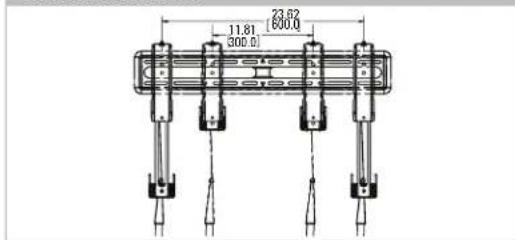
TV INTERFACE 3-D
WALLPLATE
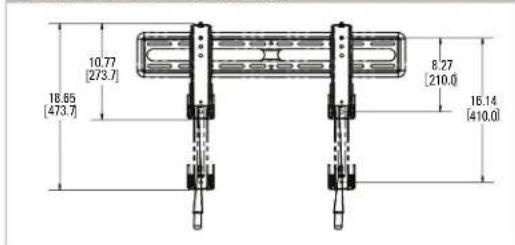
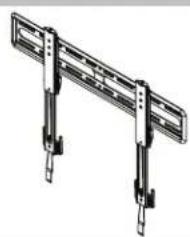
FULLY ASSEMBLED MOUNT
TOP VIEW-EXTENDED
TOP VIEW-RETRACTED
SIDE VIEW-EXTENDED

SIDE VIEW - RETRACTED
ABHUMAHNE! Co6nIaTe OCToPozKHOCTb IyI npEeOToBpaUeHMa BO3MOXhblx TpaEBM NII NOpeKJeHMa HMyueCTBa!
B KomnneKt NocTaBKnIeNn BkIOuHb HbNCTpyKmH KnpeKeXhble IeMeHbIa YIcYsTaNOBHbHa DepeBaBHHe CToKb, CTeHy N3 6eToHa M 6eTOHbHE 6nOko. 3AIPUELAECTC yCtAHOBKa TOnHO KaHrOcKapToHe. NIOyUeHHa HApOpMaOHu CNoIb3oBaHN daHORo npOyKTA HA cTeHax CO tAnbHM KAPkAcOM oBpATntec b OToJenTexNHueCKo NoDpeKxCB BonPcOsO hOaboe KpeKeNa K CTaJIbHM CTOaKM SSMK1.
CTeHa DoJXHa BbIepKmbaTb HApY3K, BnPaTb pa3 npeBbIaHoo6uO bec TeneBmOp a KpOHTuHa.
He nCnoB3yTe u3dEnne Ia KaKoI-NbO cenn, ABO He orOBopeHHn pOn3BOuTeNEM.
- PpOIN3BOUInTeNB He Hecet OTBETCTBEHOCTH 3a NOBpeXeHne O6OpYIOBaHn Hnn NOnyueHne NOnb3OBaTeNem TpaMbI No pPnuHHe HnpabNbHOc0pKn Hn EKcnpyaTaunn M3dEHH.
WAF13aKpennneHKePOHTeHaHaTeJeBn3ope
cm.CTPAHMLU4
PYCCKM
KOMNNEKTYUOuHnKpenEnbIe 3neMeNTbIa IWA1
PNEyPENKDEHIE. BmDnEMCTbMeNkHe DetanH, KOtbpE MOrT CTaB PnHNOUdyuHnepn NOnaAHH BdxAtaeIbHne TYN. PpeD cOepko yedteCb, 0to BcTeTANHMMOTCA B HAIHNH He NobpeKeHb. Ecn KAKHe-NHO, Detamn OTCYTBQHTMNNOBPEKeHb, he 8o3BaauaTne NOBpckDeHHyo Detanb npdauy; o6paTHe b OTdien TeKHeCKNo dApck. HIKoHa de HcNlONbYite NopeKDeHbte Detanl!
1-1 Bb60B BuHToB dIe TbeBn3opa (cm. CTPAHNl5). 1-2 Btynk (cm. CTPAHNl5).
1-3 Kpenne Hne KpohteHOB K TeBnOpy (cm. CTPAHU 6). BAXHO: nla o6nerHeHIOCTyna peHmdoJHXb bIbPBOBeH c HxKHe CHACTBo TeneBnOpa
WAR2PnKpEnJIeHneCTeHOBoIIaTINbIKCTeHE
cm.CTPAHNUUY7
Ja yctanobkn ha Kapkachny ctehy co6noidaite 7A 2A hCTPAHNIe 8. Jn yctanobkn ha 6etnohny ctehy co6noidaite 7A 2B hCTPAHNIe 11.
KOMNNEKTYUOHTI KPNENKHBLE 3nEMeHTbI JNA 2
PNEyPKEHHE. HnEHN cTb MeKHe Detan, KOtOpB MEOT CTb PnHHOY UdyENHn PnN ONaDAHn B DkxtAEhne NIT. Nepc CboKo YbEaTeC, 0TO BCE TEANm EMeKoTc B HnMn Hn NOBpckDn. ECNI KAKe-16o 0eTAL
OTCYCTBYKHTNIOBOPKKeHb,He 03BaauaIte NOBpckDeHHyTeTalnbPdoabuy;OpaTnIECBbTcENTexHmeccknoDpekKn. HNKoRa He McnoIb3yTe NOBpckHHe bTeTAN!
WAT2A BapnAHrYcTaHOBKn Ha DepeBbHHyO KapKaChyIO CTeHy
I PEPDOCTEPEXHENE. 60nDaeitoe octopoxHcctb I pndoTbpauenH TpaBm nnoBpexdHnMmuuecbBa! Bce tyeblte 60nta 12 DONKHyBbIbTy tpo3aHTyBo nKBeJHnHe HxNBeHne HeKeJeNaHOrO CmeuHnene TcnHOBn BaneHn 11. PpeJe
YEMNEPENK CnEduOeMy Wary, yoeHNTecb. 1TO CTHeOBa naHb HaeKeHb 3akpenneHa HA CTHe.
Ipepepeke K WAI 93 HA CTPAHUE 13.
BapnaHT yCTaHOBKn Ha CTeHy 36eToHa/6eToHHbIX 6nOKOB
I PEPDCTEPEXHENE. CoNHOJAE TpeBnna 630NAHCTW, YTObI npOeTBPATMb Bo3MOKHBIE TpABMb I NOBPEXHENE IMYUcETBA! UCTAHOBITE CTENBOHYI pAACTMH1 HENOCPEADTBENHO HA BEOHTHNO IOBEPHXOCTB.
PNEOCTEPEXHEH. CoBnDaiote OTOPOKHOCTb Ia PNOOTBPAUENI TPA Bm NIOBPEKHN MMMUIIECTBAI Bce CHTbpe 60TBA 12 DIOKNbI BbITb TY 3aETNbI BO H36EkanHe HKeJenatelho HO CMeHHN CTeHOBn PAHNI 11.PeKae
YHnepnK CnEynouemy Wary, yBdntcB, YTO CTHeOBa NaHbI HaDExHO 3aKpnHeHa CTHe.
UAT3 PnKpeHHe TeJebu3opa KCTeHOBoI pAACTInHe
cm.CTPAHNUY 13
I PEPIOCTEPEXEHIE. COBONATTE TINARNA TEPHNIK BOPANACHOTN. 10671PENNTNDATHTR RAOOMKVIH TAHMIV NORNEPHHE MMVIIIECTRAV VEPINTTE, NT TEPEIRIMHNHP KNOOHITBEH KHOYDTB R NIOXPHH DMKCAH. H TEPERIMON HAIKPHO
nPKENH KCTHOBONIACTHE 11
PpoklaKa Ka6eJe
cm.CTPAHNILY 14
I PEPIOCTEPEXHEH. dI pnpotbpaueHH pa3bBA KpeaeKHO OphiKaTPOBa: bcTaOn anykaite H ydepKbAte trocB (R) OToDBaRA TeneBH3OPOT CTCHM.
PNEIOCTEPEKHEHNE. TeJeB3Op He 3aKePiHHe HA CTHe, KOrDa HxOAnTcB NIOIOKHeHHn Ha IpeoXpAHTeBHO CTKe.IIb BnIOHHeHHa DnHrO OaA rpeKOMeHcyTcBOCIOb3oBaTcDOnIOHtBHO HOMOuBIO
PerynipobKu
CM.CTPAHNILY 15
YPOBEHb (cm. CTPAHU 15). BOKOBOE INPEEMEUEHENE TEJEBN3OPA (cm. CTPAHU 15). CHRTME TELEBN3OPA (cm. CTPAHU 16).
YcTpaHeHMe HeuCnPaBHOCTe
cm.CTPAHNILY 18
PazMepbl daima.[MM]
CM. CTPAHNLY 19
Thank you for choosing SANUS!
Please take a moment to let us know how we did:
Legrand AV Inc.
6436 City West Parkway
Eden Prairie, MN 55344 USA
US: +1 (800) 359-5520
Legrand AV Netherlands B.V.
Franklinstraße 14
6003 DK Weert Netherlands
UK: +44 (0) 800 056 2853
EMEA: +31 (0) 495 580 852
Authorized Representative for the UK
Starline Holding Technology Ltd.
Unit C Island Road
Reading RG2 ORP UK
Legrand AV Inc. and its affiliated corporations and subsidiaries (collectively, "Legend"), intend to make this manual accurate and complete. However, Legrand AV makes no claim that the information contained herein covers all details, conditions, or variations. Nor does it provide for every possible contingency in connection with the installation or use of this product. The information contained in this document is subject to change without notice or obligation of any kind. Legrand AV makes no representation of warranty, expressed or implied, regarding the information contained herein. Legrand AV assumes no responsibility for accuracy, completeness or sufficiency of the information contained in this document.
Espanol
Inargn 143, y qu esus sotioes coi hioe cie oedr tge rne a mea nae aoe pco. I enhng, ng an ge n e gntin che in qoicnion ne cie ioue iue bles oies coidredy uocnsions, thc ie cie fte dale pote cie cie cie cie cie cie cie cie cie cie cie cie cie cie cie cie cie cie cie cie cie cie cie cie cie cie cie cie cie cie cie cie cie cie cie cie cie cie cie cie cie cie cie cie cie cie cie cie cie cie cIE CIOI.
Françals
©2021 Legrand AV Inc. All rights reserved. SANUS is a brand of Legrand.
All other brand names or marks are used for identification purposes and are trademarks of their respective owners.
Legrand AV · 6436 City West Parkway · Eden Prairie, MN 55344 USA 6901-602923 00