
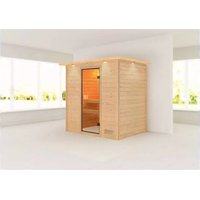
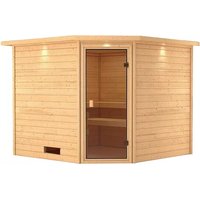
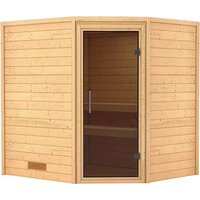
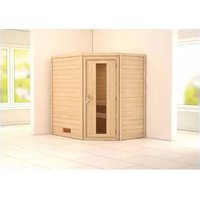
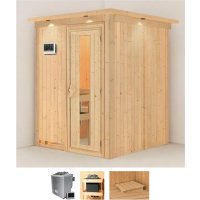
Sodin - Sauna Karibu - Free user manual and instructions
Find the device manual for free Sodin Karibu in PDF.
| Product type | Sauna |
| Brand | Karibu |
| Model | Sodin |
| Power | 4.5 kW or 9 kW depending on version |
| Supply voltage | 400 V AC 3N |
| Recommended cabin volume | Up to 14 m³ |
| Heating type | Electric stove with stones |
| Functions | Finnish sauna, wet bath, herbal bath (with evaporator) |
| Water tank capacity (evaporator) | Approximately 3.3 liters |
| Recommended stone quantity | Maximum 12 kg |
| Safety temperature limiter | 140°C |
| Built-in timer | Maximum 6 hours (no automatic restart) |
| Maximum cabin temperature | 135°C (limited by controller) |
| Minimum cabin height | 1.75 m |
| Authorized cabin materials | Resin-free wood (spruce, poplar, lime) |
| Cabin lighting | Sauna lamp max 40 W, splash protection |
| Connection cable cross-section | 5x2.5 mm² or 7x1.5 mm² (depending on power, silicone cable resistant to 140°C) |
| Fuse protection | 16 A |
| Usage | Private domestic use, commercial use prohibited |
| Warranty | 2 years |
| Stone maintenance | Clean annually, replace every 2 years |
| Evaporator maintenance | Descale with citric acid or vinegar, rinse thoroughly |
Frequently Asked Questions - Sodin Karibu
User questions about Sodin Karibu
0 question about this device. Answer the ones you know or ask your own.
Ask a new question about this device
Download the instructions for your Sauna in PDF format for free! Find your manual Sodin - Karibu and take your electronic device back in hand. On this page are published all the documents necessary for the use of your device. Sodin by Karibu.
USER MANUAL Sodin Karibu
natural_image
3D rendering of a stainless steel industrial device with mounting legs and internal compartments (no text or symbols visible)natural_image
3D rendering of a gray industrial machine with internal cooling fins (no text or symbols visible)Allgemeines
natural_image
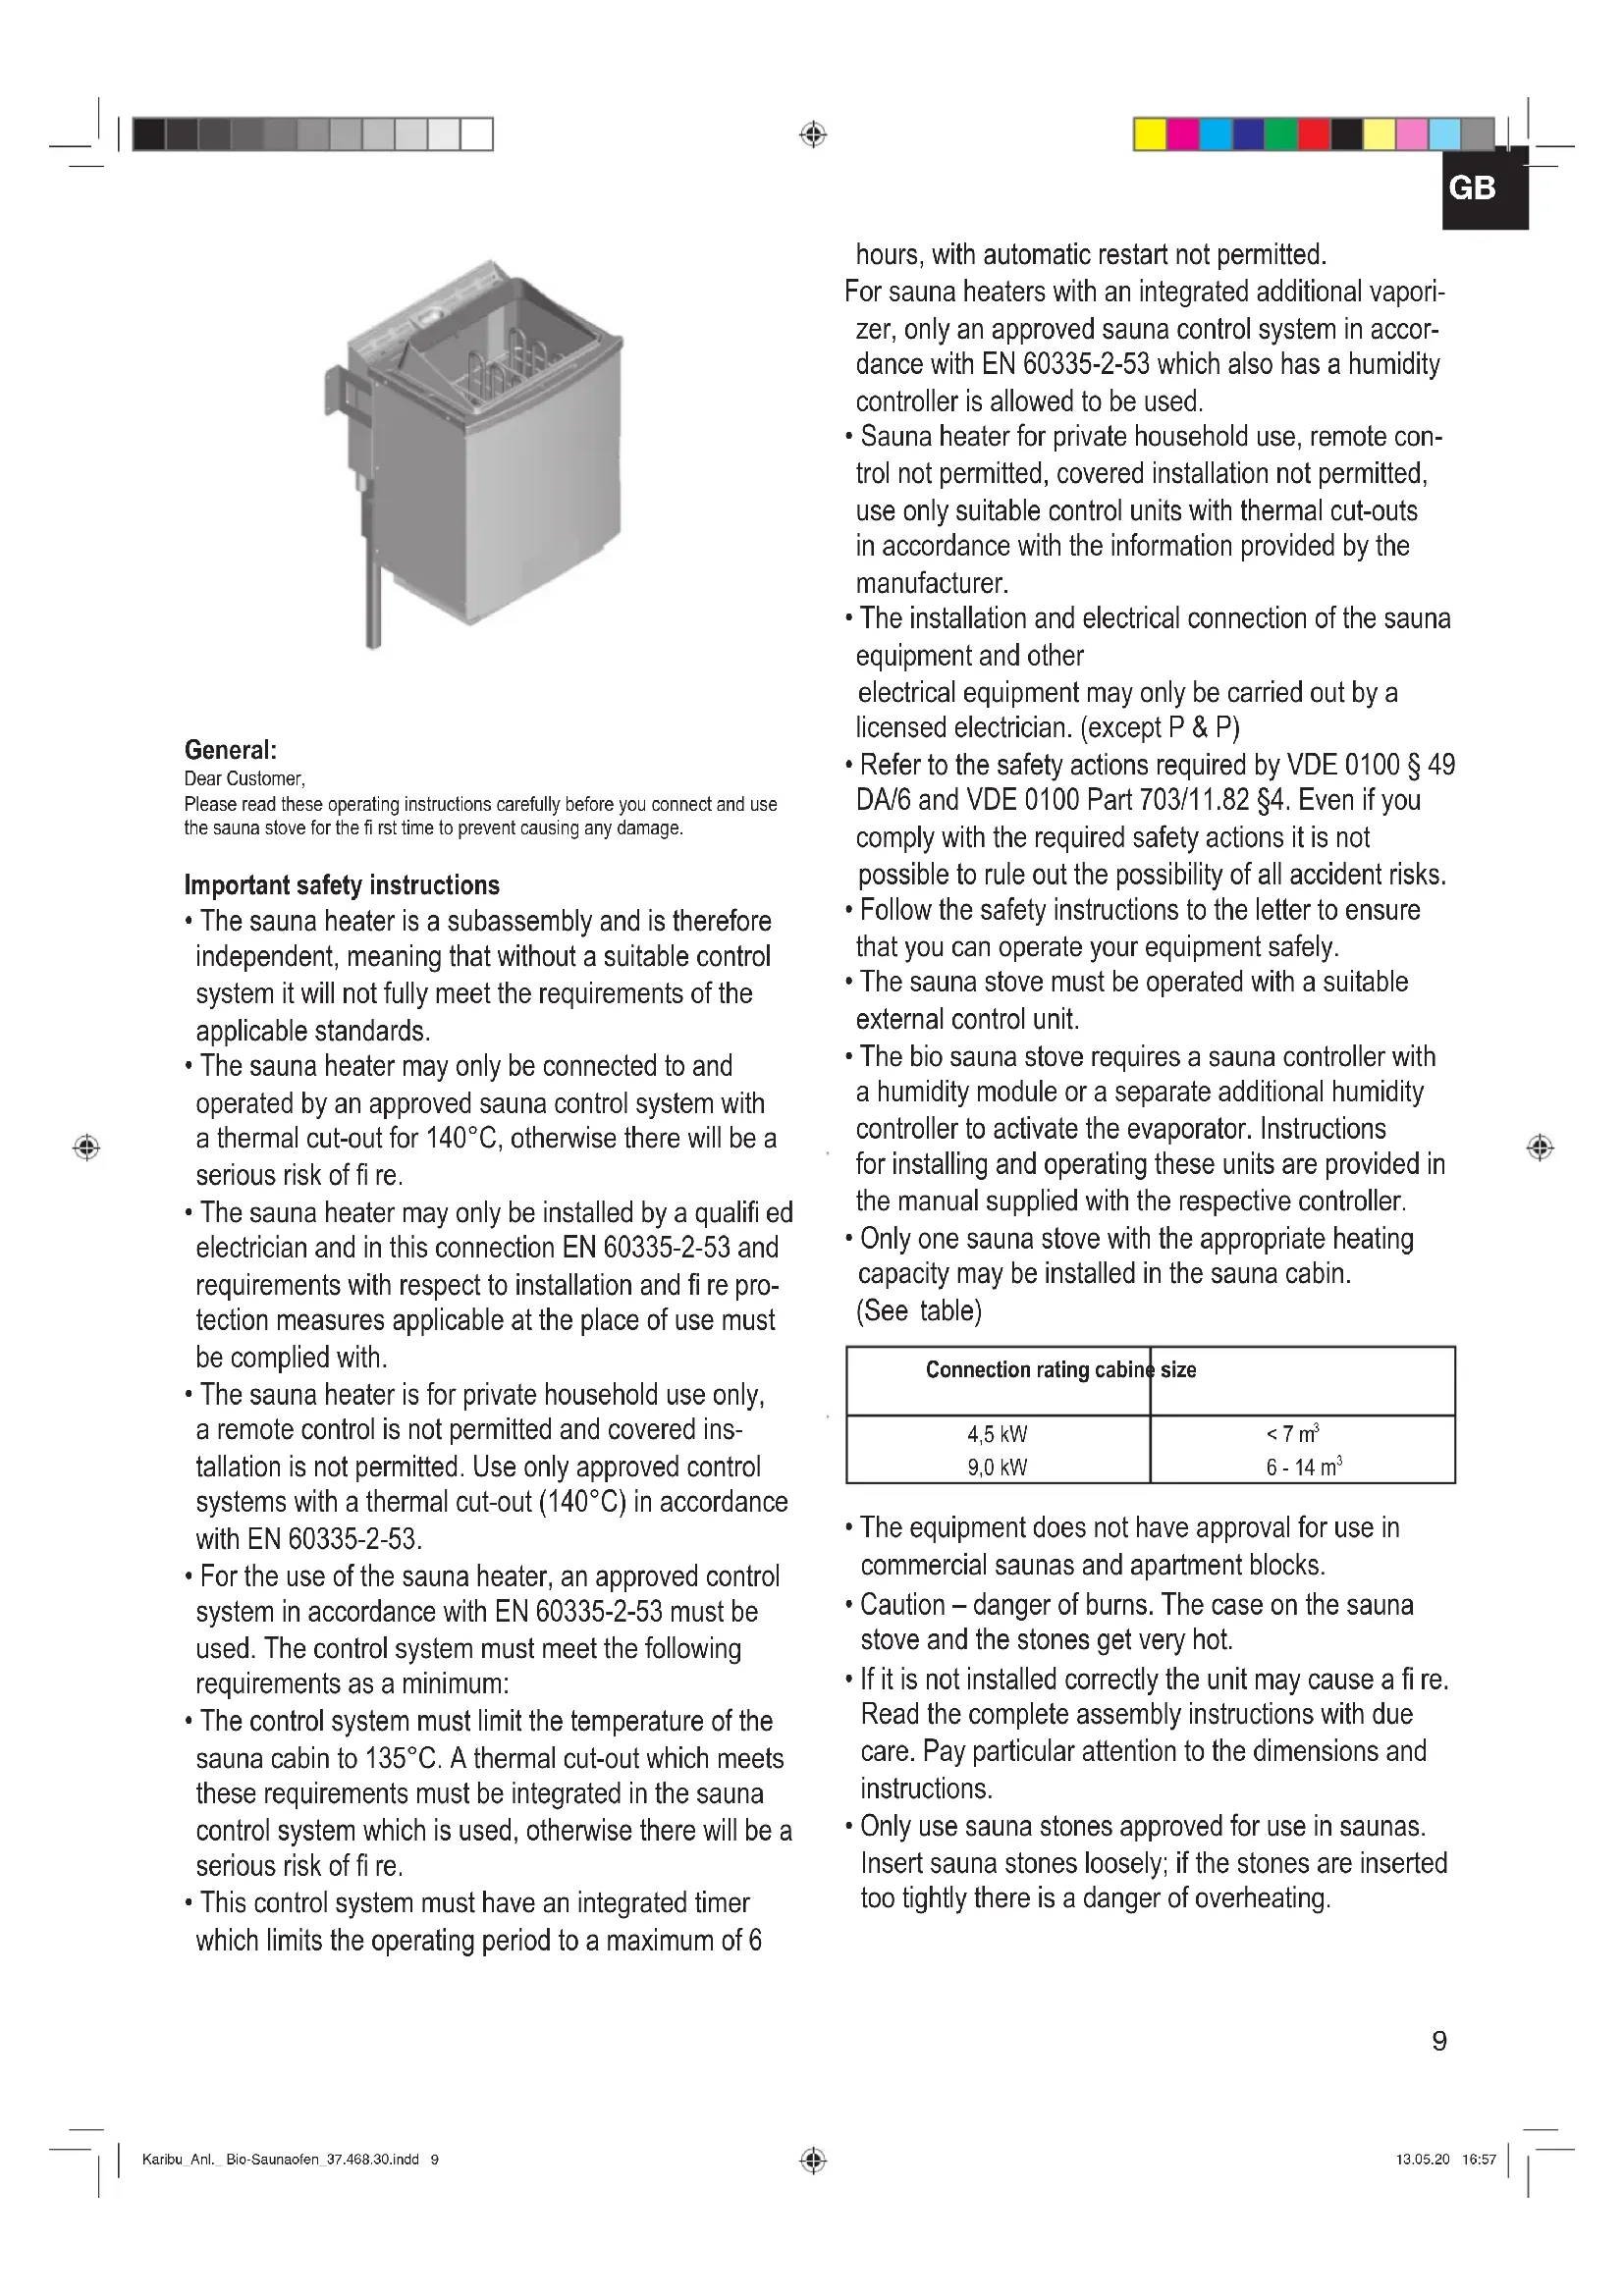
3D rendering of a mechanical component with internal channels and mounting bracket (no text or symbols visible)General:
Dear Customer,
Please read these operating instructions carefully before you connect and use the sauna stove for the first time to prevent causing any damage.
Important safety instructions
- The sauna heater is a subassembly and is therefore independent, meaning that without a suitable control system it will not fully meet the requirements of the applicable standards.
- The sauna heater may only be connected to and operated by an approved sauna control system with a thermal cut-out for 140^ , otherwise there will be a serious risk of fire.
- The sauna heater may only be installed by a qualified electrician and in this connection EN 60335-2-53 and requirements with respect to installation and fire protection measures applicable at the place of use must be complied with.
- The sauna heater is for private household use only, a remote control is not permitted and covered installation is not permitted. Use only approved control systems with a thermal cut-out (140°C) in accordance with EN 60335-2-53.
- For the use of the sauna heater, an approved control system in accordance with EN 60335-2-53 must be used. The control system must meet the following requirements as a minimum:
- The control system must limit the temperature of the sauna cabin to 135°C. A thermal cut-out which meets these requirements must be integrated in the sauna control system which is used, otherwise there will be a serious risk of fire.
- This control system must have an integrated timer which limits the operating period to a maximum of 6
hours, with automatic restart not permitted.
For sauna heaters with an integrated additional vaporizer, only an approved sauna control system in accordance with EN 60335-2-53 which also has a humidity controller is allowed to be used.
- Sauna heater for private household use, remote control not permitted, covered installation not permitted, use only suitable control units with thermal cut-outs in accordance with the information provided by the manufacturer.
- The installation and electrical connection of the sauna equipment and other electrical equipment may only be carried out by a licensed electrician. (except P & P)
- Refer to the safety actions required by VDE 0100 § 49 DA/6 and VDE 0100 Part 703/11.82 §4. Even if you comply with the required safety actions it is not possible to rule out the possibility of all accident risks.
- Follow the safety instructions to the letter to ensure that you can operate your equipment safely.
- The sauna stove must be operated with a suitable external control unit.
- The bio sauna stove requires a sauna controller with a humidity module or a separate additional humidity controller to activate the evaporator. Instructions for installing and operating these units are provided in the manual supplied with the respective controller.
- Only one sauna stove with the appropriate heating capacity may be installed in the sauna cabin. (See table)
| Connection rating cabine size | |
| 4,5 kW | < 7 m3 |
| 9,0 kW | 6 - 14 m3 |
- The equipment does not have approval for use in commercial saunas and apartment blocks.
- Caution – danger of burns. The case on the sauna stove and the stones get very hot.
- If it is not installed correctly the unit may cause a fire. Read the complete assembly instructions with due care. Pay particular attention to the dimensions and instructions.
- Only use sauna stones approved for use in saunas. Insert sauna stones loosely; if the stones are inserted too tightly there is a danger of overheating.
GB
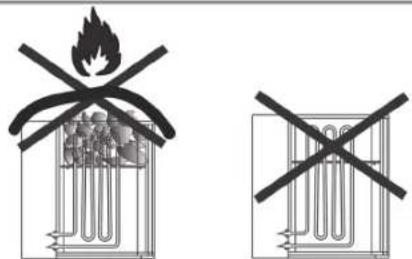
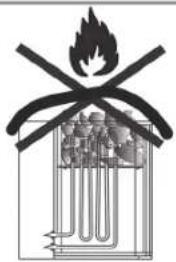
- Do not operate the stove without sauna stones.
- Keep children away from the sauna stove. They may suffer burns.
- Seek medical advice about the sauna temperature and how long people with medical problems, infants, children, pensioners and handicapped people may stay in the sauna.
- Do not allow the sauna stove to be used by people who are under the influence of medication, alcohol or drugs.
- Pour small amounts of liquid on to the stones; if you pour too much liquid on to them you may suffer scalds. The quantity of liquid on the stones should not exceed 15g / m^3 of cabin volume.
- Do not use the sauna to dry items, clothing or laundry. They may catch fire.
- Do not place any items on the stove. They may catch fire.
- Do not place any items, apart from the sauna controller's temperature sensor, in the convection current of the stove.
- Metal surfaces may rust in a damp, saltwater climate.
- The stove may generate cracking noises while it is heating up and while it is operating (metal heating elements and stones expanding)
- Sauna equipment and sauna cabins may only be made of suitable, low resin and untreated materials (for example Norway spruce, poplar or linden).
- The maximum temperature for the wall and ceiling of the sauna cabin is +140^ .
• Over time the cabin walls will become darker near the sauna stove than in the rest of the cabin; this is normal. Complaints about this will not be accepted. - The minimum height of the sauna cabin must be 1.75m (interior height)
- Ventilation openings must be provided in every sauna cabin. The ventilation opening must be on the wall directly below the sauna stove approx. 5-10 cm above floor level. The waste air must be discharged through an opening diagonally opposite the stove in the rear wall between the top and bottom benches. The ventilation openings must not be sealed. The cabin light and its installation must have a splash-proof of design and be suitable for an ambient temperature
of 140°C. Therefore only an approved sauna light with max. 40W may be installed with the sauna stove.
- This equipment can be used by children of 8 years and older and by people with limited physical, sensory or mental capacities or those with no experience and knowledge if they are supervised or have received instruction in how to use the equipment safely and understand the dangers which result from such use. Children are not allowed to play with the equipment. Unless supervised, children are not allowed to clean the equipment or carry out user-level maintenance work.
Installation instructions
Important.
Do not use any floor coverings under the stove if they are made of inflammable material such as wood, plastic, etc. Ceramic tiles are ideal for use in a sauna. The area under the stove may suffer discoloration, even on non-flammable flooring or joint material. No compensation will be paid for discoloration or damage to flooring or the sauna walls. The distance between the rear of the stove and the cabin wall depends on the design (wall mounting). The stove must be connected to the electricity supply before it is mounted on the wall holder. The sauna stove is designed for cabin sizes up to 9-14m ^3 .
Installing the sauna oven
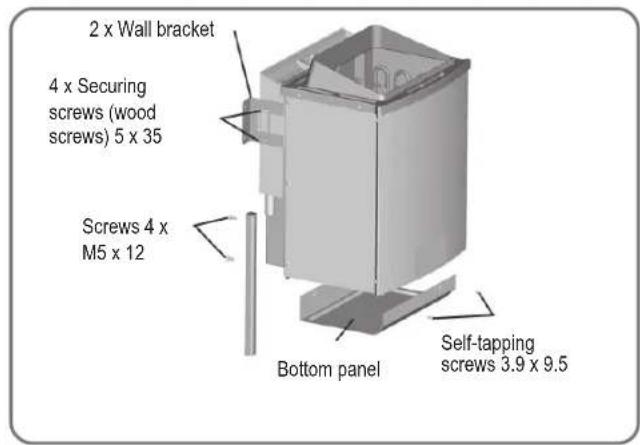
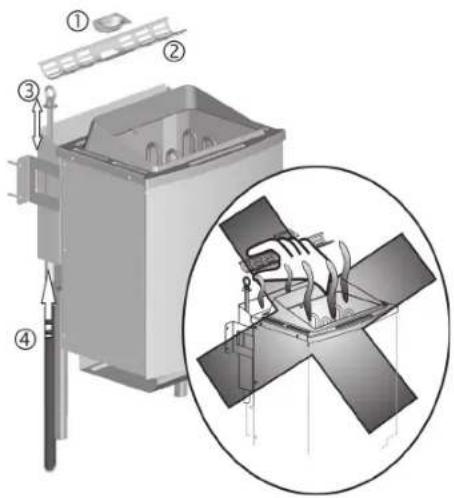
- Affi x the feet on the rear wall of the oven the screws supplied (4 screws M5 x 12).
- Fasten the bottom panel to the inner sheath with 4 self-tapping screws 3.9 × 9.5 .
- Thread the mains cable into the terminal box through the hole provided for it.
• After making the electrical connection of the mains cable, close the cover on the terminal box again (with the spacer on the outside). - Position the sauna oven in front of the air intake opening. Secure the wall bracket to the wall of the cabin using the wood screws supplied. Insert the stone grate (see description entitled "Placing the sauna stones on the stone grate", section entitled "Cleaning and care").
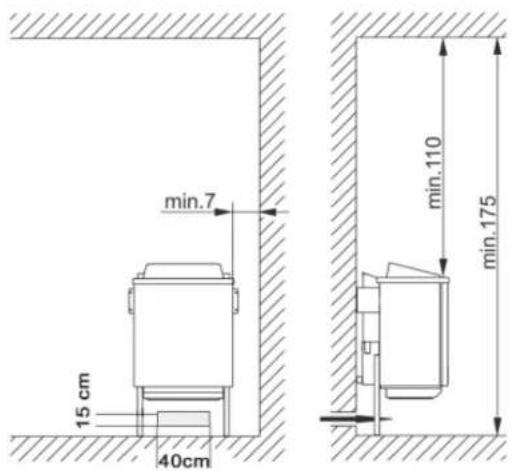
- For the installation of the sauna oven ensure that the vertical distance between the top of the sauna oven and the ceiling of the sauna booth is at least 110 cm and the horizontal (lateral) distance between the oven and the wall of the booth is at least 7 cm. The distance between the bottom of the oven and the floor depends on the design of the oven (adjustable feet). However, it should be ensured that the oven is not placed on a floor made of highly inflammable material (wood, plastic flooring, etc.). Ideally ceramic tiles or the like should be used in the sauna. The distance between the rear wall of the oven and the wall of the booth also depends on the design (wall bracket).
- The distance between the oven safety grille or the bench and other inflammable materials from the oven must be at least 7 cm. The height of the safety grille must be equal to the height of the oven at the front.

The control equipment may be destroyed even if it is incorrectly connected only once. The warranty will be voided if the electrical connection is not correct.
Instructions for the electrician
DIN VDE 0100 and Accident Prevention Regulation BGV A2 must be observed for connecting the stove and all electrical systems. An external all-pole disconnecting device with full isolation according to overvoltage category III must be installed.
Important:
Mains connection leads must be flexible cables with polychlorophene sheaths. No connection leads are supplied with the stove. All the cables installed inside the cabin must be capable of withstanding temperatures of at least 140 °C. Heat-resistant silicon cables must be used. The minimum cross-section of the connection cable and the minimum size of the sauna cabin are shown in the table (page 5 Table 1). A connection diagram is affixed to the inside of the duct cover. Please note that for safety reasons live cables are not allowed to be routed visibly along the internal walls of the cabin. In prefabricated sauna cabins the wall element with the air supply opening generally has empty cable conduits or a duct for routing the cable. If your cabin does not have any cable routing preparations, we recommend that you install a connection socket (not supplied) to the outside of the cabin. Drill a hole in the cabin wall near the cable infeed from the stove and the connection socket. Thread the cable through the hole to the external connection socket. All cables must be protected from damage. This can be achieved using installation ducting/piping or using wooden cover The sauna heater must not be used without a suitable protective device! Installation is only allowed to be carried out by a qualified person. Compliance with EN 60335-2-35 and installation and fire protection measure requirements applicable at the place of use is mandatory!
Test the insulation resistance
The resistance values between the various conductor terminals and the case (protective earth) can be measured using an insulation resistance measuring unit. The total insulation resistance between the conductor terminals and case (protective earth) must definitely be greater than 1 MOhm. Ohm values of the stoves 33 – 39 Ω Bio-Kombiofen 9 kW.
| Oven type | Connection rating in kW | Suitable for booth size in m^3 | Minimum cross-sections mm^2 (copper cable) Bio-Saunaofen oven connect to 400 V AC 3N | ||
| Bio sauna stove | Mains cable from mains to control unit | Oven connection cable from control unit to oven (silicon) | Fuse in A | ||
| 4,5 kW | 4,5 < 7 5x2,5 | 7 x 1,5 16 | |||
| 9,0 kW | 9,0 6 -14 5x2,5 | 7 x 1,5 16 | |||
Connection diagram Bio-Saunaofen

flowchart
graph TD
    A["Terminal WM only for control with water-storage indicator"] --> B["400V~(U;V;W;N;PE)"]
    B --> C["N"]
    B --> D["U1"]
    B --> E["V2"]
    B --> F["W3"]
    B --> G["WM"]
    B --> H["U1WB L1hum"]
    C --> I["Switch"]
    D --> J["Switch"]
    E --> K["Switch"]
    F --> L["Switch"]
    G --> M["Switch"]
    H --> N["Switch"]
    I --> O["Power Supply"]
    J --> P["Power Supply"]
    K --> Q["Power Supply"]
    L --> R["Power Supply"]
    M --> S["Power Supply"]
    N --> T["Power Supply"]
    O --> U["Power Supply"]
    P --> V["Power Supply"]
    Q --> W["Power Supply"]
    R --> X["Power Supply"]
    S --> Y["Power Supply"]
    T --> Z["Power Supply"]
    U --> AA["Power Supply"]
    V --> AB["Power Supply"]
    W --> AC["Power Supply"]
    X --> AD["Power Supply"]
    Y --> AE["Power Supply"]
    Z --> AF["Power Supply"]
Position the sauna stones on the stone grid
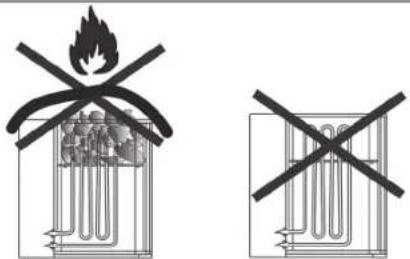
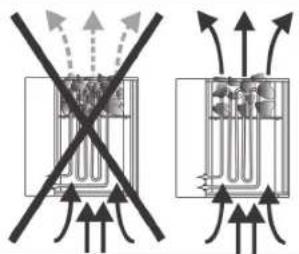
Sauna stones are a natural product. We recommend that you clean the stones with clean water before placing them on the stove. Do not use stones unless they are designed for use in a sauna. Use a maximum of 12 kg of stones. Important. Position the stones loosely and remove any stones that are too small. If the stones are packed too tightly they will affect the air circulation and will result in the sauna stove and cabin walls overheating and a fire risk. Do not use the stove without stones.
Only use stones that are marked as sauna stones in shops. Warranty claims will not be accepted if stones other than those designed for use in saunas are used or for claims resulting from filling of the stone chambers incorrectly. Turn the stones at least once per year, remove any stones that are too small and remove all stone dust and stone splinters. We recommend that you replace the stones every two years.
Important.
If you cover the stove and fill the stone container incorrectly the unit may cause a fire. Do not use the stove without sauna stones.
General instructions for using liquids and the evaporator
Do not fill the tank beyond the mark that corresponds to a volume of approximately 3 liters.
The tank must be filled with fresh liquid before every sauna and emptied and

cleaned after every sauna for hygiene reasons.
Only use water that meets the quality requirements for domestic water.
Water that contains high levels of lime or iron will leave residue on the stones and metal in the water tank.
To prevent scalds caused by rising steam whilst pouring liquid over the stones, liquids should always be poured from the side using a ladle.
Dripping water may cause permanent marks on the cabin floor.
Pour small amounts of liquid on to the stones; if you pour too much liquid on to them you may suffer scalds.
Use as much liquid as you are comfortable with, but do not exceed a volume of 15 g/m^3 of cabin volume.
The liquid should be poured straight on to the stones in the stove and must be spread evenly over all the stones.
If you use liquid concentrates (for example essential oils), follow the instructions for use provided by the manufacturer.
Using excessive concentrations of these products may result in explosions.
Do not use mixtures of alcoholic drinks or other additives not recommended for use in saunas as they pose a risk of fire, explosion and may be harmful.
Do not pour any water into the cavity for mounting the water tank.
The warranty will be voided if you fail to follow these instructions.
Instructions for the bio stove (with evaporator)
The evaporator is controlled by the humidity module in the relevant sauna controller or using an external humidity controller. Details of installing and connecting the control units are set out in the relevant operating instructions.
General information about the evaporator IMPORTANT! RISK OF SCALDING!
Steam will be discharged from the top when the evaporator is operating. There is a risk of scalding in the area around the steam discharge point.
The evaporator tank should generally be left in the mounting shaft provided for it whilst the sauna stove is in use. Only remove the tank to fill and/or clean it.
Do not allow the sauna stove to be used by people, including children, whose physical, sensory or mental abilities or lack of experience and/or knowledge mean that they are incapable of using the evaporator safely without supervision.
Never operate the device without water. Operating it without water can result in the evaporator developing a defect.
Only use water that meets the quality requirements for domestic water.
Water that contains high levels of lime or iron will leave residue on the stones and metal in the water tank.
Add herbal packs and fill the evaporator tray before starting the device. Switch off the evaporator during operation. Remove it if necessary. Do not refill the evaporator tray until after the cover has cooled.
Do not place sauna liquids straight into the evaporator tank. Additional products in the evaporator tank tend to generate foam and boil over. Refer to the manufacturer's instructions.
Do not fill the tank above the top mark.
The empty tank has a capacity of 3 liters. This quantity is adequate for around 90 minutes of continuous operation (depending on the level of scale formation on the hot plate).
The tank can be taken out of its mounting shaft for filling purposes.
Never pour water into the mounting shaft for the evaporator tank.
Do not operate the evaporator without the evaporator grating. Risk of scalding! Beware of hot water slopping over the edge of the tank.
Do not use mixtures of alcoholic drinks or other additives not recommended for use in saunas as they pose a risk of fire, explosion and may be harmful.
After using the stove for a humid sauna, allow the device to cool and remove all remaining water and clean the tank.
Failure to follow the above points will void the warranty.
Note: The sauna temperature is limited to 60-70°C for safety reasons on most controllers with a humidity module.
GB
Cleaning and care of the evaporator
Drain the water each time after you have used the evaporator. Any impurities caused by herb essences can be removed by rinsing them with clean water. To do this you can connect a hose to the drain cock and drain the water through it. Caution: The water may still be hot. The evaporator is suitable for use with water of hardness class 1 (1 - 7 German hardness classes). If necessary, contact your water supply company to ask the hardness of your water. If the water is harder than this you should use demineralized water. The evaporator tank should be descaled as often as required depending on the water hardness, similar to a coffee machine. If the water contains a high level of lime, we advise that you descale the tank every two to three weeks if you use the sauna every day. Please note, however, that this period depends on the hardness of the water and how much water you evaporate. Do not allow the system to run dry frequently since this may damage the heating elements. This is why you should never refill the evaporator tank with water during or shortly after use. The heating elements would be quenched too quickly and could thus suffer damage.
Sauna types
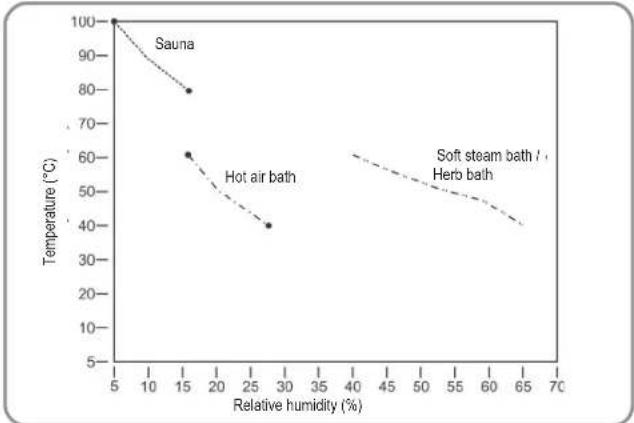
The integral evaporator and corresponding control unit makes it possible for you to enjoy several different types of sauna. In addition to the classical Finnish sauna with temperatures between 70^ C and 110^ C and very low relative humidity (max. 15%), you can also enjoy a steam sauna or herbal sauna at temperatures between 30^ C and 60^ C.
The length of a steam sauna should be between 15 and 30 minutes depending on how you feel at the time. After taking breaks you may then enjoy further saunas.
Sauna types (steam / temperature diagram)
line
| Temperature (°C) | Relative humidity (%) | Label | |---|---|---| | 100 | 5 | Sauna | | 80 | 15 | Sauna | | 60 | 15 | Hot air bath | | 40 | 27 | Hot air bath | | 40 | 30 | Soft steam bath / Herb bath | | 60 | 40 | Soft steam bath / Herb bath | | 40 | 65 | Soft steam bath / Herb bath |The humidity in the cabin depends on the size and design of the sauna cabin and the temperature.
Please note that as the temperature rises, the volume of water vapor required to reach saturation point also increases
Use of sauna additives
Use only pure water-soluble herbal essences or packed bags of herbs consisting of vegetable or synthetic oils. Add these products, diluted with a little water, to the evaporator tray, place packs of herbs on the evaporator grating provided for this purpose. The rising steam will release the aromatic substances from the herbs and will distribute them in the cabin as the steam rises. Never use undiluted sauna concentrates. Never place products or sauna concentrates directly into the evaporator tank. Additional products in the evaporator tank tend to generate foam and boil over. Important. Liquids may cause marks on metal surfaces and sauna stones. Sauna liquids with citrus fragrance may cause rust patches as a result of their acid content. In this case you should only use products in the diluted form specified by the manufacturer.
Never use alcohol or other additives not designed for use in saunas. They may pose a risk of fire or explosion and may be harmful.
Troubleshooting
The stove will not heat up
•Have you activated all the necessary switches?
- Has the fuse in the domestic installation tripped?
•Have you set the temperature controller correctly?
- Defective sauna control unit (sensor breaker, see operating manual for the control unit).
•RCCB trips – see the section entitled "Testing the insulation resistance"
The stove causes "cracking noises"
•The case parts and heating elements expand when the stove is heating up operating. The heating elements may move the sauna stones and cause noises. Cracking noises are normal and are not grounds for complaint.
•Sauna stones split and cause an odor
- Use only sauna stones recommended by the manufacturer.
•Sauna stones are too old; replace them.
The cabin does not get hot enough
•The sauna stove is too small
- Humidity mode activated? The cabin temperature may be limited. Switch of humidity mode for Finnish saunas.
- Excessive temperature loss from the sauna cabin, for example due to poor lack of sealing.
- Incorrect display on the sauna thermometer. Mount the thermometer higher and at a distance of approx. 3 cm from the sauna wall.
- Have a defective heating element (heating element does not glow) checked and measured by an electrician.
The evaporator does not work
•The evaporator controller has not been activated
• No water in the tank

natural_image
3D rendering of a gray industrial electrical enclosure with internal wiring (no text or symbols visible)Généralités
Chère Cliente, Cher Client,
à sauna!
des déflagrations.
natural_image
3D rendering of a gray industrial machine with internal cooling fins (no text or symbols visible)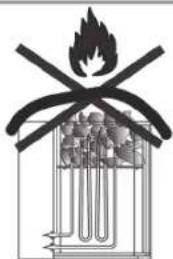
natural_image
Diagram of a combustion chamber with flame and smoke, showing internal combustion components (no text or labels)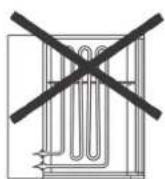
natural_image
3D rendering of a gray industrial electrical enclosure with internal wiring (no text or symbols visible)
natural_image
3D rendering of a mechanical device with internal components and mounting bracket (no text or symbols visible)Algemeen:

natural_image
3D rendering of a mechanical component with internal structure and mounting bracket (no text or symbols visible)Všeobecne:
| Příkon [kW] | Velikost kabiny [m3] |
| 4,59,0 | < 7 m36-14 m3 |
natural_image
Diagram of a combustion engine with flame and smoke crossed around it (no text or labels)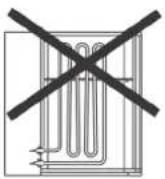
All of our products undergo strict quality checks to ensure that they reach you in perfect condition. In the unlikely event that your device develops a fault, please contact our service department at the address shown on this guarantee card. Of course, if you would prefer to call us then we are also happy to offer our assistance under the service number printed below. Please note the following terms under which guarantee claims can be made:
-
These guarantee terms cover additional guarantee rights and do not affect your statutory warranty rights. We do not charge you for this guarantee.
-
Our guarantee only covers problems caused by material or manufacturing defects, and it is restricted to the rectification of these defects or replacement of the device. Please note that our devices have not been designed for use in commercial, trade or industrial applications. Consequently, the guarantee is invalidated if the equipment is used in commercial, trade or industrial applications or for other equivalent activities. The following are also excluded from our guarantee: compensation for transport damage, damage caused by failure to comply with the installation/assembly instructions or damage caused by unprofessional installation, failure to comply with the operating instructions (e.g. connection to the wrong mains voltage or current type), misuse or inappropriate use (such as overloading of the device or use of non-approved tools or accessories), failure to comply with the maintenance and safety regulations, ingress of foreign bodies into the device (e.g. sand, stones or dust), effects of force or external influences (e.g. damage caused by the device being dropped) and normal wear resulting from proper operation of the device. This applies in particular to rechargeable batteries for which we nevertheless issue a guarantee period of 12 months. The guarantee is rendered null and void if any attempt is made to tamper with the device.
-
The guarantee is valid for a period of 2 years starting from the purchase date of the device. Guarantee claims should be submitted before the end of the guarantee period within two weeks of the defect being noticed. No guarantee claims will be accepted after the end of the guarantee period. The original guarantee period remains applicable to the device even if repairs are carried out or parts are replaced. In such cases, the work performed or parts fitted will not result in an extension of the guarantee period, and no new guarantee will become active for the work performed or parts fitted. This also applies when an on-site service is used.
-
In order to assert your guarantee claim, please send your defective device postage free to the address shown below. Please enclose either the original or a copy of your sales receipt or another dated proof of purchase. Please keep your sales receipt in a safe place, as it is your proof of purchase. It would help us if you could describe the nature of the problem in as much detail as possible. If the defect is covered by our guarantee then your device will either be repaired immediately and returned to you, or we will send you a new device.
Of course, we are also happy offer a chargeable repair service for any defects which are not covered by the scope of this guarantee or for units which are no longer covered. To take advantage of this service, please send the device to our service address.
BULLETIN DE GARANTIE
Chère Cliente, Cher Client,
natural_image
Simple line drawing of a trash bin with crossed lines indicating no waste or prohibition (no text or symbols)
For EU countries only
Never place any electric tools in your household refuse.
To comply with European Directive 2002/96/EC concerning old electric and electronic equipment and its implementation in national laws, old electric tools have to be separated from other waste and disposed of in an environment-friendly fashion, e.g. by taking to a recycling depot.
Recycling alternative to the demand to return electrical devices:
As an alternative to returning the electrical device, the owner is obliged to cooperate in ensuring that the device is properly recycled if ownership is relinquished. This can also be done by handing over the used device to a returns center, which will dispose of it in accordance with national commercial and industrial waste management legislation. This does not apply to the accessories and auxiliary equipment without any electrical components which are included with the used device.

- Allgemeines
- General:
- Important safety instructions
- GB
- Installation instructions
- Important.
- Installing the sauna oven
- Instructions for the electrician
- Important:
- Test the insulation resistance
- Position the sauna stones on the stone grid
- General instructions for using liquids and the evaporator
- Instructions for the bio stove (with evaporator)
- General information about the evaporator IMPORTANT! RISK OF SCALDING!
- Cleaning and care of the evaporator
- Sauna types
- Use of sauna additives
- Troubleshooting
- The stove will not heat up
- The stove causes "cracking noises"
- •Sauna stones split and cause an odor
- The cabin does not get hot enough
- The evaporator does not work
- Généralités
- Algemeen:
- Všeobecne:
- BULLETIN DE GARANTIE
- Chère Cliente, Cher Client,
- For EU countries only
Brand : Karibu
Model : Sodin
Category : Sauna