
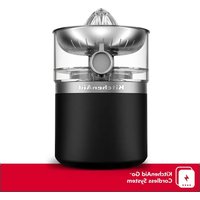
KVJ0111OB - Juicer KITCHENAID - Free user manual and instructions
Find the device manual for free KVJ0111OB KITCHENAID in PDF.

| Brand | KitchenAid |
| Model | KVJ0111OB |
| Product Type | Maximum Extraction Juicer |
| Power Supply | 120 V, 60 Hz, 3-prong grounded plug |
| Power | Approx. 500 W (estimated) |
| Dimensions (approx.) | 30 x 20 x 40 cm (height with hopper) |
| Weight (approx.) | 4.5 kg |
| Color | Obsidian Black (OB) |
| Juice Container Capacity | Approx. 1 L |
| Pulp Container Capacity | Approx. 1.5 L |
| Materials | Plastic body, stainless steel strainer, food-grade plastic auger |
| Main Functions | Juice extraction, sauce preparation (pulp chute closed), reusable pulp |
| Included Accessories | Juice bowl, strainer (juice and sauce), auger, pulp chute, pusher, hopper, cleaning brush, pulp container, juice container, sealing ring |
| Maintenance and Cleaning | Removable parts dishwasher safe (top rack); wipe body with damp cloth; cleaning brush included |
| Safety | Cover lock, sharp blade, pusher required, auto shut-off if overloaded, reverse direction for unclogging |
| Warranty | 1 year comprehensive warranty, hassle-free replacement |
| Country of Manufacture | United States (American brand) |
| Intended Use | Household only, for fresh fruits and vegetables |
Frequently Asked Questions - KVJ0111OB KITCHENAID
User questions about KVJ0111OB KITCHENAID
0 question about this device. Answer the ones you know or ask your own.
Ask a new question about this device
Download the instructions for your Juicer in PDF format for free! Find your manual KVJ0111OB - KITCHENAID and take your electronic device back in hand. On this page are published all the documents necessary for the use of your device. KVJ0111OB by KITCHENAID.
USER MANUAL KVJ0111OB KITCHENAID
natural_image
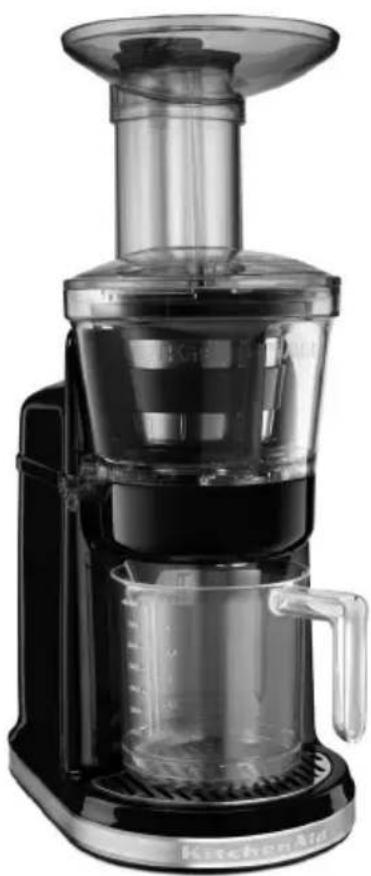
Exterior view of a modern kitchen brush unit with clear glass and handle (no text or symbols visible)KitchenAid®
WELCOME TO THE WORLD OF KITCHENAID.
We're committed to helping you create a lifetime of delicious meals for family and friends. To help ensure the longevity and performance of your appliance, keep this guide handy. It will empower you with the best way to use and care for your product. Your satisfaction is our #1 goal. Remember to register your product online at www.kitchenaid.com or by mail using the enclosed Product Registration Card.
natural_image
Exterior view of a modern kitchen brush unit with clear glass and black casing (no visible text or symbols)Join us in the kitchen at www.kitchenaid.com.
TABLE OF CONTENTS
Important safeguards....4
Electrical requirements 5
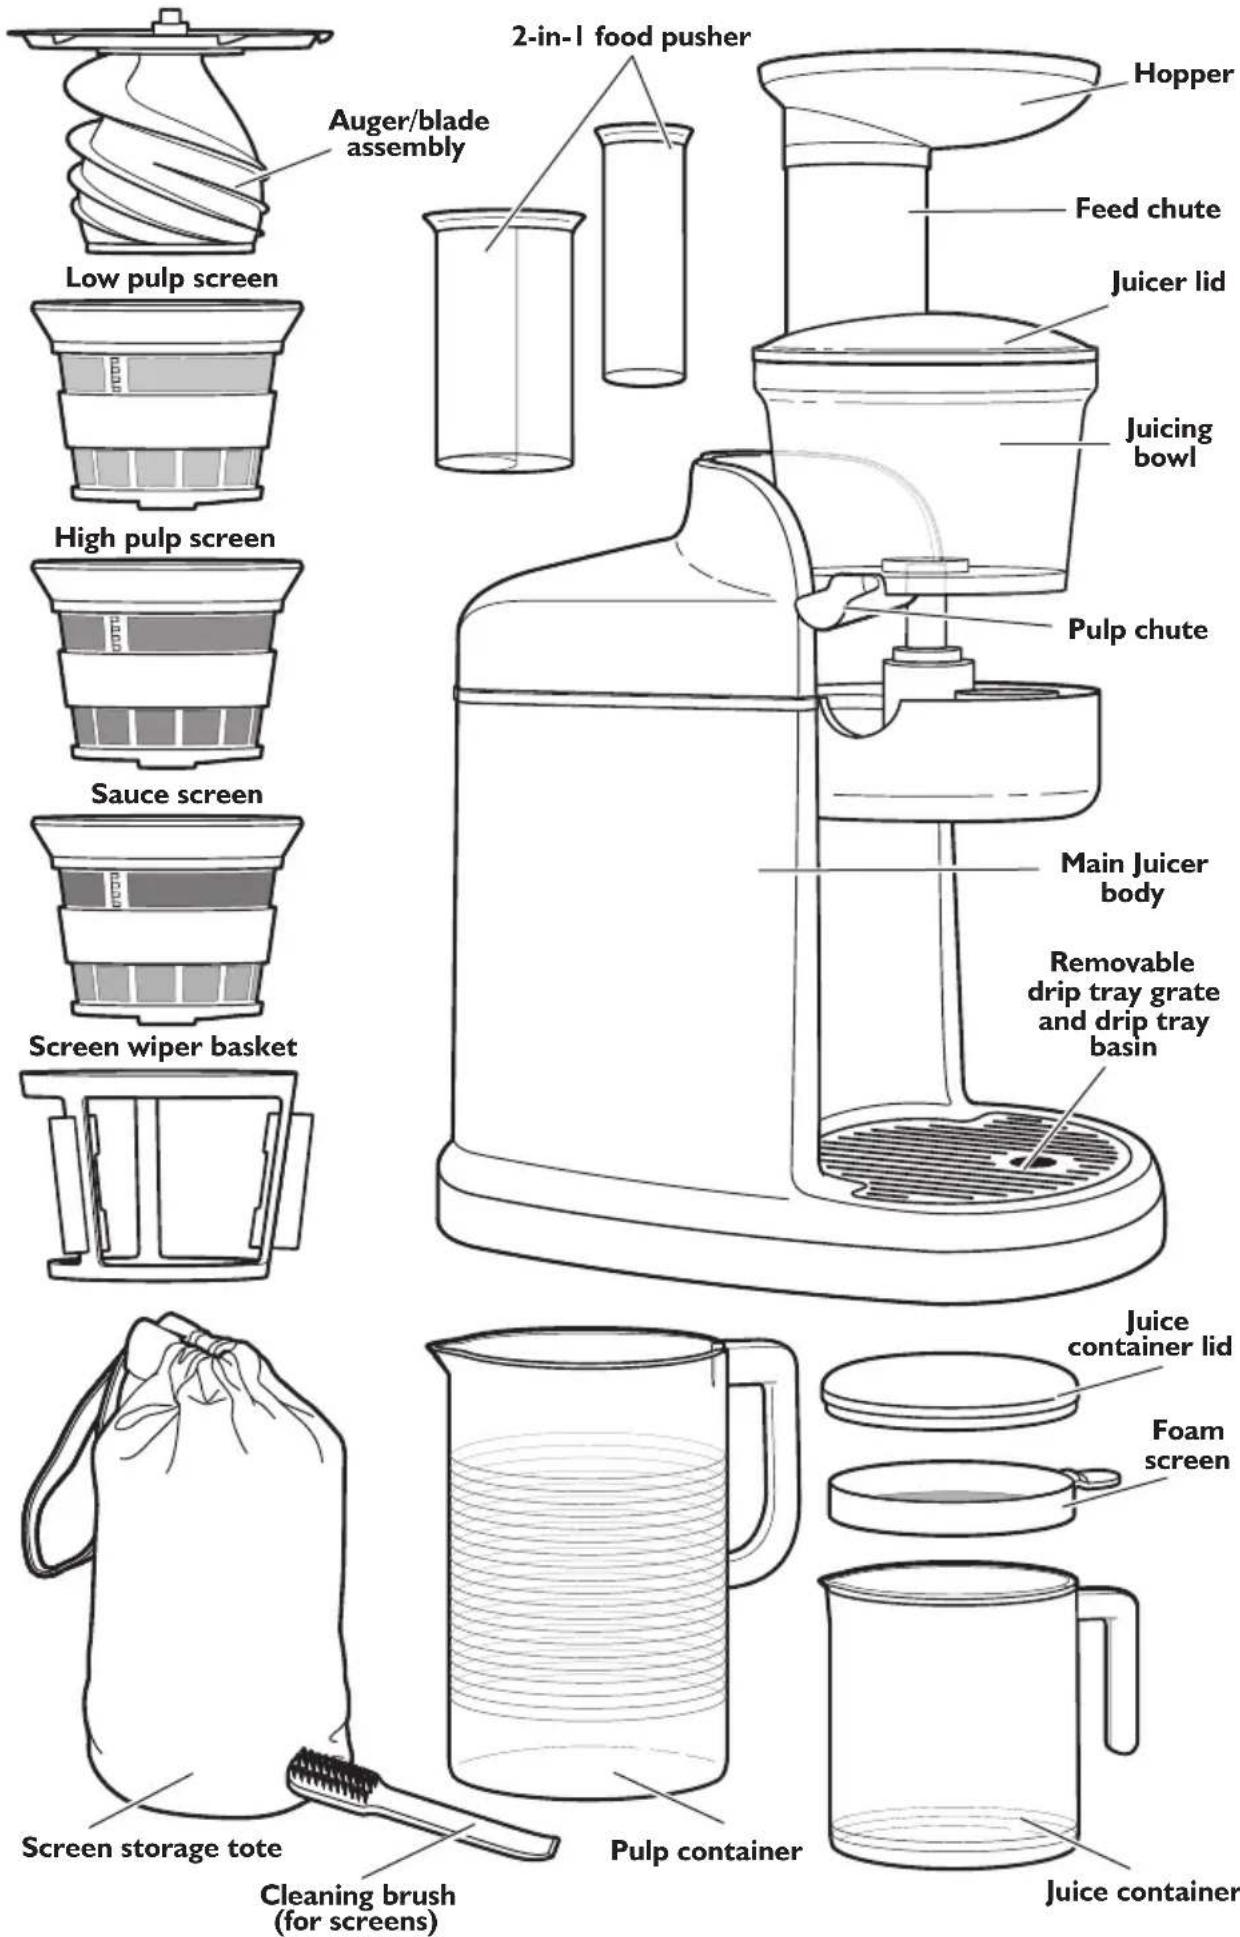
PARTS AND FEATURES
Parts and accessories....6
ASSEMBLING THE MAXIMUM EXTRACTION JUICER
Assembling the Maximum Extraction Juicer parts....7
Cleaning the Maximum Extraction....17
TROUBLESHOOTING....18
WARRANTY AND SERVICE....19
PROOF OF PURCHASE & PRODUCT REGISTRATION
Always keep a copy of the itemized sales receipt showing the date of purchase of your Maximum Extraction Juicer. Proof of purchase will assure you of in-warranty service. Before you use your Maximum Extraction Juicer, please fill out and mail your product registration card packed with the unit, or register on-line at www.kitchenaid.com. This card will enable us to contact you in the unlikely event of a product safety notification and assist us in complying with the provisions of the Consumer Product Safety Act. This card does not verify your warranty. Please complete the following for your personal records:
Model Number
Serial Number
Date Purchased
Store Name ____
Your safety and the safety of others are very important.
We have provided many important safety messages in this manual and on your appliance. Always read and obey all safety messages.

This is the safety alert symbol.
This symbol alerts you to potential hazards that can kill or hurt you and others.
All safety messages will follow the safety alert symbol and either the word "DANGER" or "WARNING." These words mean:
! DANGER
You can be killed or seriously injured if you don't immediately follow instructions.
WARNING
You can be killed or seriously injured if you don't follow instructions.
All safety messages will tell you what the potential hazard is, tell you how to reduce the chance of injury, and tell you what can happen if the instructions are not followed.
State of California Proposition 65 Warnings:
WARNING: This product contains one or more chemicals known to the State of California to cause cancer.
WARNING: This product contains one or more chemicals known to the State of California to cause birth defects or other reproductive harm.
IMPORTANT SAFEGUARDS
When using electrical appliances, basic safety precautions should always be followed, including the following:
I. Read all instructions.
2. Always make sure Maximum Extraction Juicer lid is securely closed before motor is turned on. Do not remove the lid while Maximum Extraction Juicer is in operation.
3. Do not attempt to defeat the cover interlock mechanism.
4. Be sure to turn the Maximum Extraction Juicer off and unplug it from the power outlet when not in use, after each use, before putting on or taking off parts, and before cleaning. Make sure the motor stops completely before disassembling.
5. Do not open until blades and rotating sieve stops.
6. Blades are sharp. Handle carefully.
7. Do not operate without the pulp container in place.
8. Avoid contacting moving parts.
9. The use of attachments not recommended or sold by KitchenAid may cause fire, electric shock, or injury.
10. Do not use outdoors.
II. Close supervision is necessary when any appliance is used by or near children.
- Do not put your fingers or other objects into the Maximum Extraction Juicer opening while it is in operation. If food becomes lodged in opening, use pusher or another piece of fruit or vegetable to push it down. Never feed by hand. Always use the pusher. When this method is not possible, turn the motor off and disassemble Maximum Extraction Juicer to remove the remaining food.
- Do not operate the appliance if the rotating sieve or rotating parts are damaged. Return appliance to the nearest Authorized Service Facility for examination, repair, or electrical or mechanical adjustment.
- Do not operate the appliance if the cord or plug is damaged, after the appliance malfunctions, or is dropped or damaged in any manner. Return appliance to the nearest Authorized Service Facility for examination, repair, or electrical or mechanical adjustment.
- To protect against risk of electrical shock, do not immerse Juicer body in water or other liquids.
- Do not let the cord hang over the edge of table or counter.
- To prevent damage to gear assembly, do not immerse Juicer body in water or other liquids.
- This product is designed for household use only.
SAVE THESE INSTRUCTIONS
Electrical requirements
WARNING

Electrical Shock Hazard
Plug into a grounded 3 prong outlet.
Do not remove ground prong.
Do not use an adapter.
Do not use an extension cord.
Failure to follow these instructions can result in death, fire, or electrical shock.
Voltage: 120 Volts A.C. only
Frequency: 60 Hz
NOTE: If the plug does not fit in the outlet, contact a qualified electrician. Do not modify the plug in any way. Do not use an adapter.
Do not use an extension cord. If the power supply cord is too short, have a qualified electrician or serviceman install an outlet near the appliance.
Parts and accessories
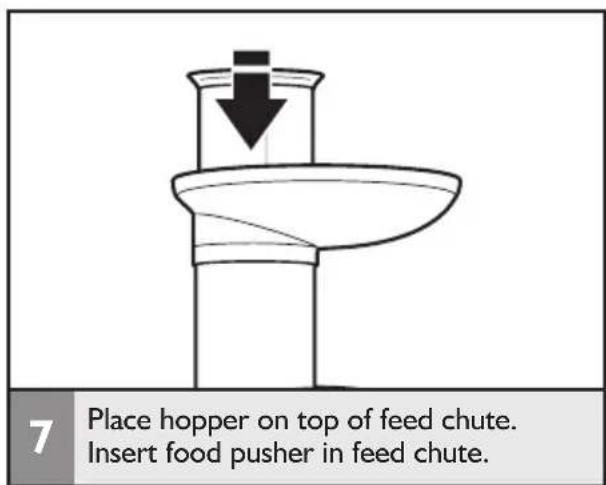
Assembling the Maximum Extraction Juicer parts
Before First Use
Before using your Maximum Extraction Juicer for the first time, the Main Juicer body should be wiped clean with a damp cloth. All other parts should be washed by hand or in the top rack of the dishwasher. See “Care and Cleaning” section.
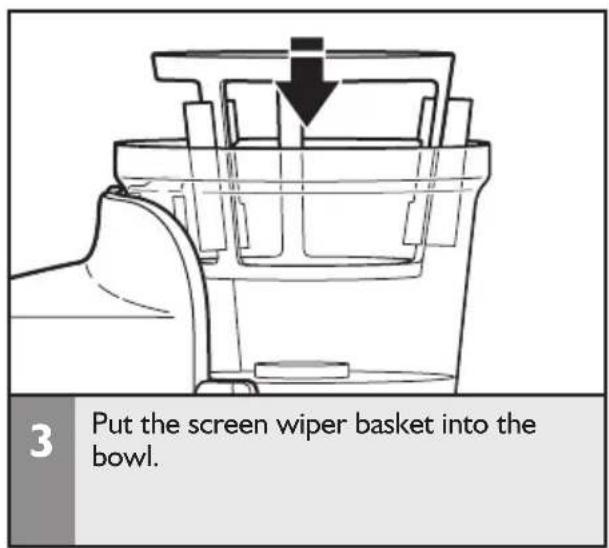
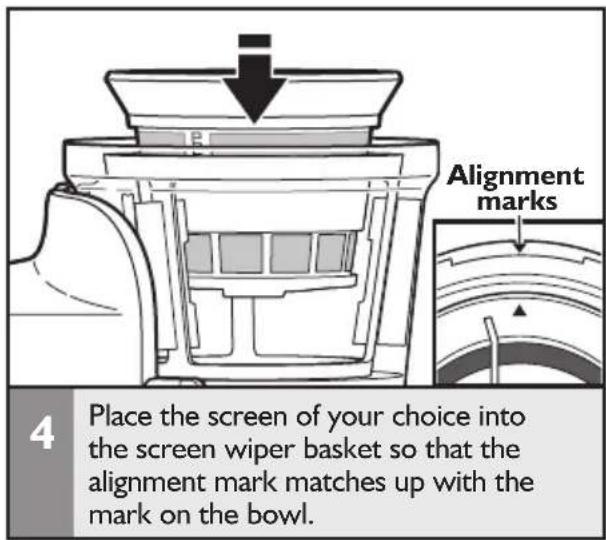
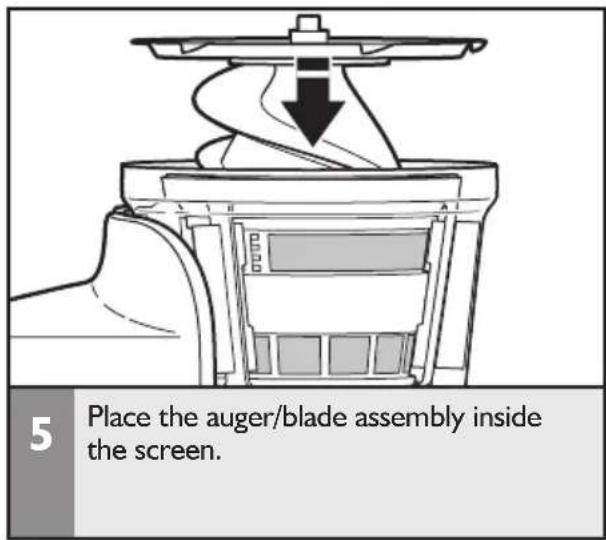
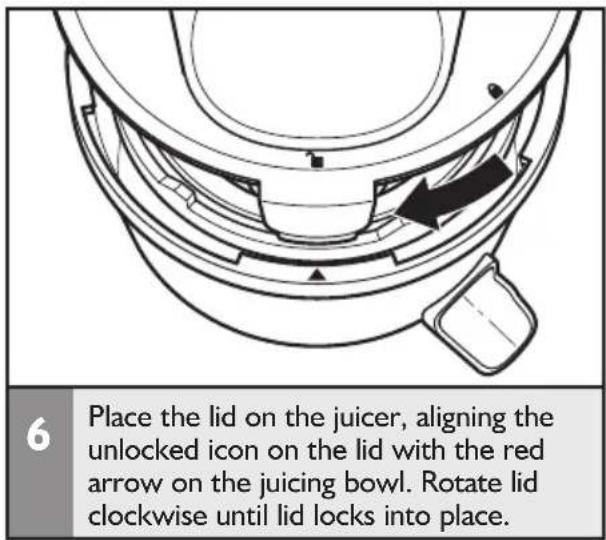
ASSEMBLING THE MAXIMUM EXTRACTION JUICER
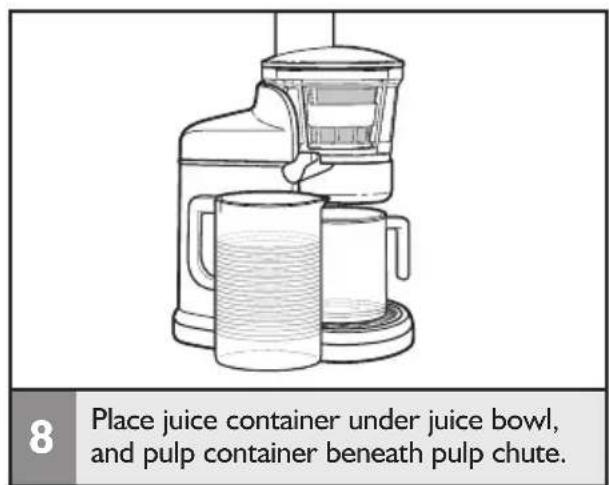
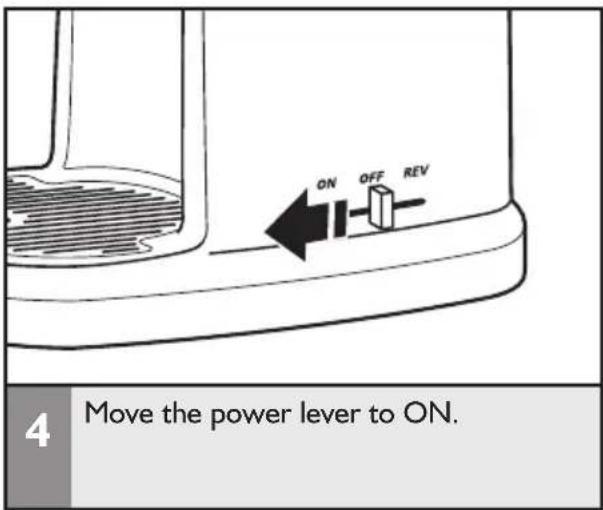
Making juice
WARNING

Electrical Shock Hazard
Plug into a grounded 3 prong outlet.
Do not remove ground prong.
Do not use an adapter.
Do not use an extension cord.
Failure to follow these instructions can result in death, fire, or electrical shock.

natural_image
Line drawing of a plug inserted into an electrical outlet (no text or symbols)Plug into a grounded 3-prong outlet.
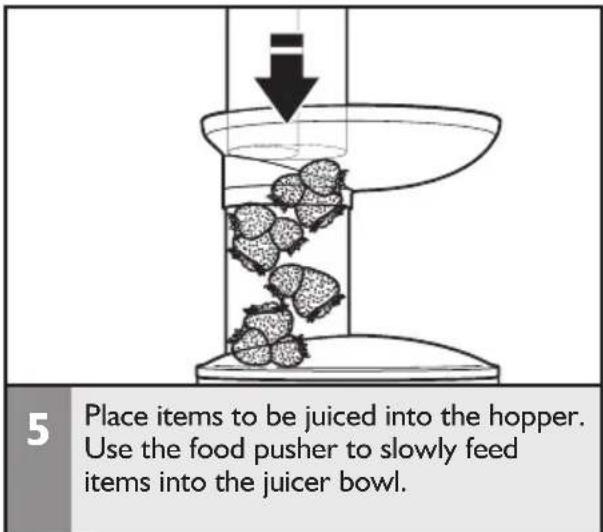
BEFORE JUICING: Large seeds or pits need to be removed prior to juicing to avoid damage to the auger or screens. This includes fruits such as; nectarines, peaches, mangoes, apricots, plums, cherries, etc.
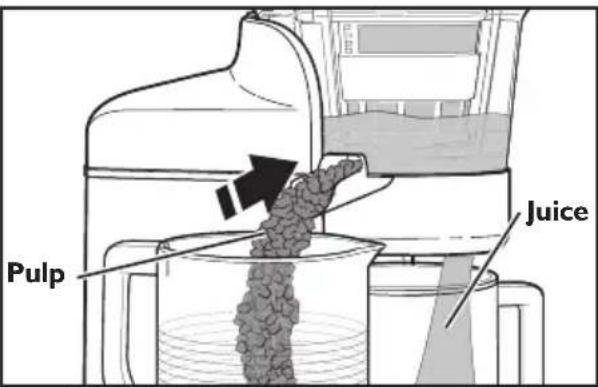
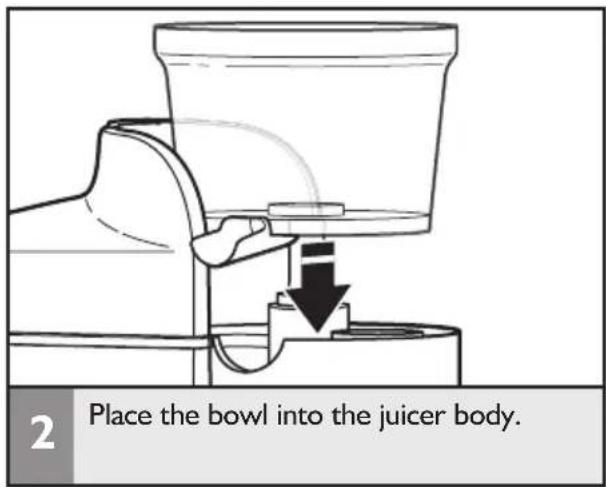
2 To make juice, the pulp chute should always be pushed in; this is the open positon. When the pulp chute is open, pulp created while juicing will flow through the pulp chute, separating it from the juice.
natural_image
Line drawing of a juice maker using a grimmer, showing the blade and handle (no text or symbols)3 To make sauces, make sure the rubber gasket is in place, and sauce screen is installed. Pull the pulp chute out; this is the closed position. When the pulp chute is closed, the juice and fiber exit through the juice chute as a sauce.

Quick tips
Before juicing:
- Thoroughly wash your fruits and vegetables, making sure they are free of soil, leaves, and stems. Small leaves, such as on strawberries, do not have to be removed.
- To avoid damaging the juicer, do not juice frozen fruits or vegetables. For optimal performance, always use fresh fruits and vegetables.
- Large seeds or pits must be removed prior to juicing to avoid damage to the auger or screens. This includes fruits such as; nectarines, peaches, mangoes, apricots, plums, cherries, etc.
• Always peel fruits with hard or inedible skins. Examples include mangoes, citrus fruits, melons, and pineapples. - Some vegetables, such as cucumbers or yellow squash, do not have to be peeled first, depending on the softness of the skin and recipe requirements. Leaving the peels on will change the color and flavor of the finished juices.
While juicing:
- For optimum results, insert one piece of ingredients at a time.
- When juicing celery with other fruits/vegetables, it is recommended to interchange the celery with other items to prevent pulp build-up inside the juice bowl.
- When juicing leafy greens like spinach and kale, it is recommended to juice with a combination of watery or fibrous fruits and vegetables to help with juice flow and to increase juice yield.
- You should not juice bananas.
- For less foam build-up and seeds/particles in your juice, use the foam screen to strain these sediments before they go into the juice.
After juicing:
- Saved pulp can be used for other recipes, as compost for your garden, or can be discarded.
For easy cleanup:
- As you juice, clean parts to avoid dried-on juice and pulp.
• After each use, immediately rinse removable parts in hot water to remove pulp and juice. It may be necessary to use the cleaning brush to remove pulp from the screen. Let parts air dry.
JUICES
Apple Carrot Zinger
Makes 2 servings
2 apples, cored
4 carrots, ends trimmed
14 cucumber
I inch fresh ginger, peeled
Juice all ingredients together.
Stir; serve immediately.
Cucumber Refresher
Makes 2 servings
2 large English cucumbers
I cup packed fresh spinach
12 lemon, peeled and seeded
Juice all ingredients together.
Stir; serve immediately.
NOTE: For a sweeter juice, add one apple, quartered and cored.
Double Green Pineapple
Makes I serving
14 pineapple, peeled
4 leaves Swiss chard
4 leaves kale
Juice all ingredients together.
Stir; serve immediately.
Fantastic Five juice
Makes 2 servings
I tangerine, peeled
12 peach, pitted
12 apple, cored
12 pear
12 cup green seedless grapes
Juice all ingredients together.
Stir; serve immediately.
Jicama Pear Carrot
Makes I serving
I cup cut-up peeled jicama
12 pear
2 large or 3 medium carrots, ends trimmed
12 inch fresh ginger, peeled
Pinch ground red pepper (optional)
Juice jicama, pear, carrots and ginger. Stir in red pepper until well blended or sprinkle over juice, if desired. Serve immediately.
Papaya Power Juice
Makes 2 servings
14 papaya, peeled and seeded
I orange, peeled
^3/_4 cup fresh parsley
I clove garlic
2 tablespoons soy protein powder
Juice papaya, orange, parsley and garlic.
Stir in soy protein powder until well blended; serve immediately.
Sprout Apple Carrot
Makes 2 servings
2 apples, cored
I carrot, ends trimmed
I cup alfalfa sprouts
I cup bean sprouts
4 sprigs fresh parsley
Juice all ingredients together.
Stir; serve immediately.
Sweet and Spicy Citrus
Makes 2 servings
I orange or 2 clementines, peeled
5 carrots, ends trimmed
13 cup strawberries, hulled
I lemon, peeled and seeded
12 inch fresh ginger, peeled
Juice all ingredients together.
Stir; serve immediately.
MARINADES
Lemon Basil Marinade
Makes 2 cups of marinade or salad dressing
5 lemons, peeled and seeded
I cup packed fresh basil leaves
6 cloves garlic
6 tablespoons extra virgin olive oil
I teaspoon coarse salt
12 teaspoon freshly ground black pepper
Juice 2 lemons, basil, and garlic. Juice remaining 3 lemons. Pour juice into jar with tight-fitting lid.
NOTE: Juicing the lemons after the garlic will help to clean the garlic from the screen.
Add olive oil, salt and pepper; seal jar and shake to blend. Store in airtight jar or container in refrigerator up to 2 weeks.
TIP: Use as a marinade or salad dressing.
Orange Ginger Marinade
Makes 2 cups
3 large navel oranges, peeled and halved
4 ounces fresh ginger, peeled and cut into chunks
14 cup dark sesame oil
I tablespoon honey
I teaspoon coarse salt
12 teaspoon freshly ground black pepper
Juice oranges and ginger. Measure 1 ^3/4 cups juice; pour into jar with tight-fitting lid.
Add sesame oil, honey, salt and pepper; seal jar and shake to blend. Store in refrigerator up to 2 weeks.
TIP: Use as a marinade for grilled salmon.
SAUCES AND JELLIES
Pear Caramel Sauce
Makes 34 cup sauce
2 to 3 Comice or Anjou pears, quartered
12 cup sugar
Pinch cream of tartar
2 tablespoons heavy cream
I tablespoon butter
1 / 8 teaspoon salt
I tablespoon pear-flavored vodka or liqueur
Juice pears. Strain juice through fine-mesh sieve. Measure I cup juice.
Pour juice into small saucepan. Cook over medium-high heat for 10 minutes or until thickened and reduced to 14 cup, stirring occasionally. Set aside.
Combine sugar, 2 tablespoons water and cream of tartar in medium saucepan. Bring to a boil over medium heat, stirring until sugar dissolves. When mixture boils, cover pan 2 minutes to dissolve sugar crystals on side of pan. Remove cover; cook without stirring 8 to 10 minutes or until mixture is light amber in color, swirling pan occasionally.
Remove from heat; carefully whisk in reduced pear juice, cream, butter and salt until smooth (mixture will bubble vigorously). Stir in vodka; cool completely.
Store in airtight jar or container in refrigerator up to 2 weeks.
Pineapple Orange Jelly
Makes 3 (8-ounce) jars
I large pineapple, peeled, cored and cut into eighths
2 navel oranges, peeled and halved
2 cups sugar
3 tablespoons powdered pectin
3 (8-ounce) canning jars
Juice pineapple and orange. Measure 4 cups juice; pour into 5-quart saucepan.
Whisk sugar and pectin in medium bowl; add to juice. Bring to a boil over high heat. Boil 15 to 20 minutes or until thickened, stirring frequently. Jam is done cooking when it forms thick layer on side of pan and registers 221°F when tested with candy thermometer. Transfer jam to clean, hot jars. Wipe off any jam from tops of jars; seal jars.
Meanwhile, fill stockpot with enough water to cover jars; bring to a boil over high heat. Reduce heat slightly to stop boiling; carefully lower jars into water. Add additional water to fully submerge jars, if necessary. Return water to a boil; boil 10 minutes. Carefully remove jars from stockpot; cool on kitchen towel. Store sealed jars at room temperature up to 1 year.
RECIPES USING PULP
Tropical Twist
Makes I serving
18 seedless watermelon, rind removed
I orange, peeled
12 mango, peeled
18 pineapple, peeled
13 cup strawberries, hulled
Juice watermelon, orange, mango, strawberries and pineapple. Stir; serve immediately.
NOTE: Use the leftover pulp from this juice to make Zucchini Date Bread. Use the low pulp screen for the maximum amount of pulp.
Zucchini Date Bread
Makes I loaf
I cup chopped pitted dates
I cup water
I cup whole wheat flour
I cup all-purpose flour
2 tablespoons sugar
I teaspoon baking powder
12 teaspoon each baking soda, salt and ground cinnamon
1 / 4 teaspoon ground cloves
2eggs
I cup shredded zucchini, squeezed dry
I cup pulp from Tropical Twist, juiced with low pulp screen
Preheat oven to 350^ F. Spray 8x4-inch loaf pan with nonstick cooking spray.
Combine dates and water in small saucepan; bring to a boil over medium-high heat. Remove from heat; let stand 15 minutes.
Combine flours, sugar, baking powder, baking soda, salt, cinnamon and cloves in large bowl. Beat eggs in medium bowl; stir in date mixture, zucchini and juice pulp. Stir egg mixture into flour mixture just until moistened. Pour into prepared pan.
Bake 30 to 35 minutes or until toothpick inserted into center comes out clean. Cool in pan 5 minutes. Remove to wire rack to cool completely.
Ruby Red Juice
Makes I serving
I small apple, cored
I beet, peeled
3 medium carrots, ends trimmed
12 cup packed kale leaves
Juice apple, beet, carrots and kale.
Stir; serve immediately.
NOTE: Use the leftover pulp from this juice to make Sweet Vegetable Fritters. Peel the carrots and beet before juicing to get pulp with a better consistency for the fritters. Juice with the low pulp screen for the maximum amount of pulp.
Sweet Vegetable Fritters
Makes 20 fritters
1 12 cups pulp from Ruby Red Juice, juiced with low pulp screen
2eggs
14 cup all-purpose flour
12 teaspoon ground cinnamon
14 teaspoon salt
4 tablespoons vegetable oil
Honey
Combine juice pulp, eggs, flour, cinnamon and salt in large bowl; mix well.
Heat 2 tablespoons oil in large nonstick skillet over medium heat. Drop batter by tablespoonfuls into skillet; flatten into circle with back of spoon (do not crowd pan). Cook 1 to 2 minutes per side or until browned and firm. Repeat with remaining batter, adding additional oil if needed. Serve fritters warm with honey.
Tropical Fruit Fling
Makes 2 servings
14 pineapple, peeled
I orange, peeled
12 mango, peeled
12 cup strawberries, hulled
12 cup coconut water
Juice strawberries, mango, orange and pineapple. Stir in coconut water; serve immediately.
NOTE: Use the leftover pulp from this juice to make Fruit Leather Rolls. Use the low pulp screen and make two batches of juice to get enough pulp.
Fruit Leather Rolls
Makes 4 to 6 rolls
I large pineapple, peeled, cored and cut into eighths
112 cups pulp from two batches of Tropical Fruit Fling, juiced with low pulp screen
1 / 4 cup honey
2 tablespoons water
Preheat oven to 200^ F. Line baking sheet with parchment paper.
Combine juice pulp, honey and water in blender; purée until smooth paste forms. Pour fruit mixture onto prepared baking sheet; spread into 14 -inch-thick rectangle, leaving 1-inch border on all sides.
Bake 2 to 3 12 hours or until fruit mixture is firm and not too sticky. Cool completely on baking sheet.
Roll up fruit leather jelly-roll style from long end. Cut into pieces with serrated knife. Store in airtight container at room temperature 2 to 3 weeks.
Back to Your Roots Juice
Makes 2 servings
2 beets, peeled
I turnip
I sweet potato, peeled
2 carrots, ends trimmed
2 parsnips, ends trimmed
Corn Fritters
Makes 16 fritters
12 cup all-purpose flour
I teaspoon sugar
12 teaspoon each baking powder and salt
1 / 8 teaspoon dried thyme
Pinch ground red pepper
I egg
14 cup milk or half-and-half
I cup cooked fresh or thawed frozen corn
12 cup pulp from Back to Your Roots, juiced with low pulp screen
Vegetable oil for frying
Salsa
Juice beets, carrots, parsnips, turnip and sweet potato. Stir; serve immediately.
NOTE: Use the leftover pulp from this juice to make Corn Fritters. Peel the beets, turnip, sweet potato, carrots and parsnips before juicing to get pulp with a better consistency for the fritters. Juice with the low pulp screen for the maximum amount of pulp.
Combine flour, sugar, baking powder, salt, thyme and red pepper in large bowl. Beat egg and milk in small bowl; stir into flour mixture. Stir in corn and juice pulp.
Heat 14 inch of oil in large skillet over medium heat until drop of batter sizzles and turns golden in less than 1 minute. Drop batter by rounded tablespoonfuls into hot oil. Cook 3 minutes or until golden; turn and cook 1 minute or until golden.
Remove fritters with slotted spoon to paper towel-lined plate. Serve hot with salsa.
Cleaning the Maximum Extraction Juicer
IMPORTANT: To avoid damaging the Juicer, do not wash or immerse the juicer body in water or other liquids. All other parts are top rack dishwasher safe.
Before cleaning, make sure juicer has been turned off and unplugged from the wall outlet.
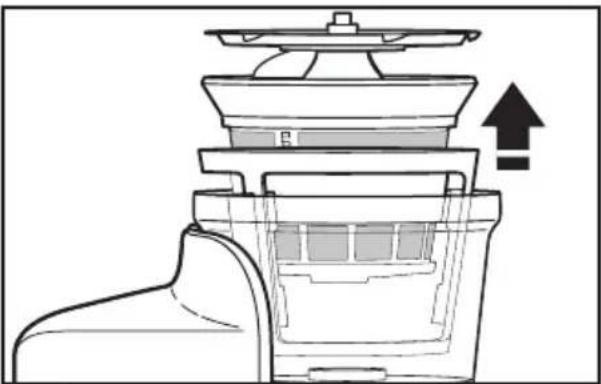
natural_image
Cross-sectional diagram of a mechanical device with layered structure and upward arrow indicating motion (no text or symbols)To disassemble juicing bowl: Remove the lid. Remove the auger. Lift the assembled screen and screen wiper basket out of the bowl, and separate.
natural_image
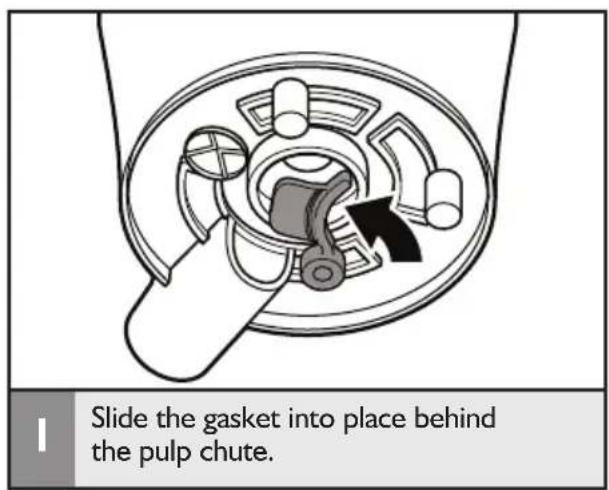
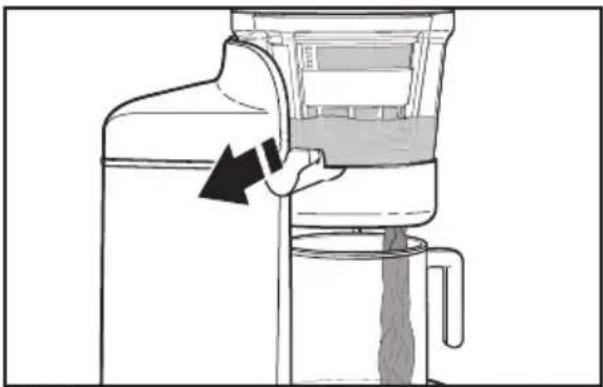
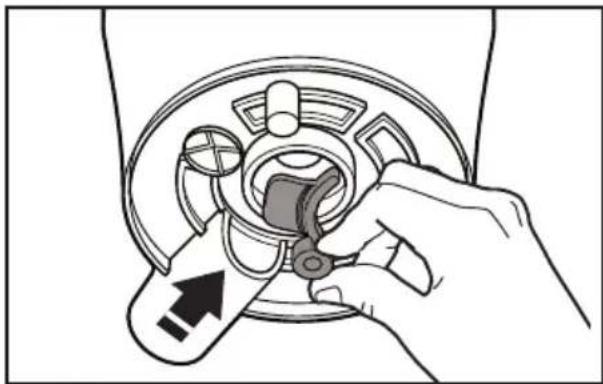
Illustration of a hand turning a circular mechanical component with a directional arrow (no text or symbols)2 To disassemble pulp chute for cleaning: Pull gasket out from back of chute. Slightly pinch gasket hinge while sliding chute in towards the center of the juicing bowl.
NOTE: Juice may drip onto the drip tray grate after juicing. Both the grate and drip tray basin may be removed and washed in the top rack of the dishwasher for easy cleaning.
natural_image
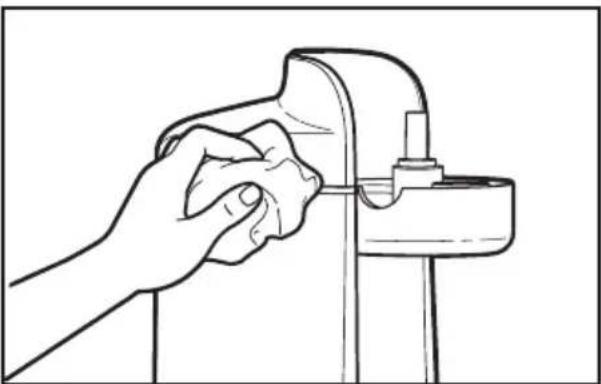
Line drawing of a hand using a tool to adjust or install a mechanical component (no text or symbols present)3 Wipe the juicer body with a warm, damp cloth. Avoid using abrasive cleaners or scouring pads as they may scratch the juicer. Thoroughly dry with a soft cloth. To avoid damaging the juicer, do not wash or immerse the juicer body in water or other liquids, or wash in the dishwasher.
natural_image
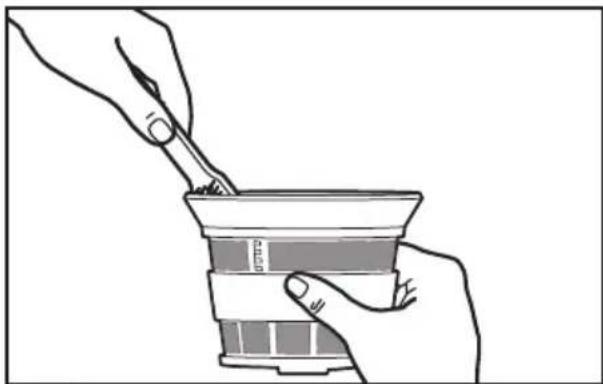
Line drawing of hands using chopsticks to handle a bowl with food (no text or symbols)4 Use the brush with warm soapy water to clean out any stuck food or residue in the screens.
natural_image
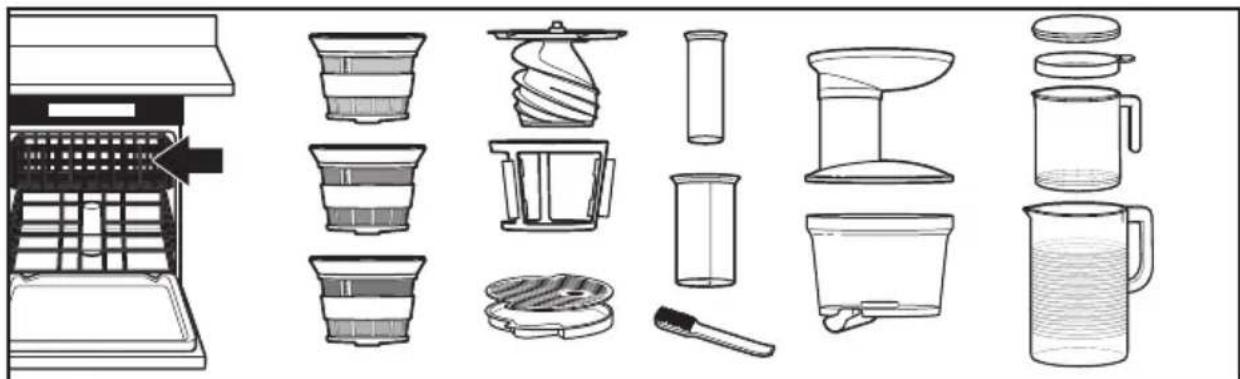
Illustration of various kitchen utensils and containers arranged in a grid, including grates, washers, and mugs (no text or labels present)5
All parts other than the juicer body are top rack dishwasher safe.
TROUBLESHOOTING
Maximum Extraction Juicer does not operate
WARNING

Electrical Shock Hazard
Plug into a grounded 3 prong outlet.
Do not remove ground prong.
Do not use an adapter.
Do not use an extension cord.
Failure to follow these instructions can result in death, fire, or electrical shock.
- Check to see whether the Juicer is plugged into a grounded 3 prong outlet. If it is, check the fuse or circuit breaker on the electrical circuit the Juicer is connected to and make sure the circuit is closed.
- Check to make sure the Juicer was assembled correctly. See “Assembling the Maximum Extraction Juicer” section.
- Check to see if the screen is clean and clear of pulp. Too much pulp on the screen may affect performance, and will need to be removed. See “Cleaning the Maximum Extraction Juicer” section.
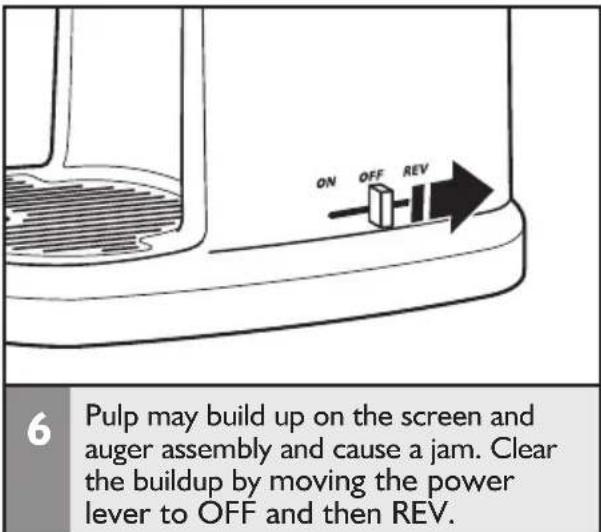
- The juicer might be jammed. Turn Juicer off and reverse direction. Turn off Juicer again, unplug unit, and remove lid to clean out pulp build up. See “Cleaning the Maximum Extraction Juicer” section.
If the problem cannot be corrected: See the "Warranty and Service" section. Do not return the Juicer to the retailer; retailers do not provide service. The serial number for service is on the bottom of the Juicer body.
Juice does not flow sufficiently, or is flowing out of the pulp ejector
Check to see whether the rubber gasket on the bottom of the Juicer is placed properly.
Makes a squeaking or clicking noise or shakes when making juice
- A squeaking noise is normal. It is the sound of juice being squeezed by the auger.
- Some shaking is normal. It is the sign of the motor working properly.
KitchenAid® Maximum Extraction Juicer Warranty for the 50 United States, the District of Columbia, Puerto Rico, and Canada
This warranty extends to the purchaser and any succeeding owner for Maximum Extraction Juicers operated in the 50 United States, the District of Columbia, Puerto Rico, and Canada.
Length of Warranty: One Year Full Warranty from date of purchase.
KitchenAid Will Pay Hassle-Free Replacement of your Maximum Extraction for Your Choice of: Juicer. See the next page for details on how to arrange for service, or call the Customer eXperience Center toll-free at 1-800-541-6390.

OR
KitchenAid Will A. Repairs when Maximum Extraction Juicer is used in other Not Pay for: than normal single family home use.
B. Damage resulting from accident, alteration, misuse or abuse.
C. Extraction Juicer Any shipping or handling costs to deliver your Maximum to an Authorized Service Center.
D. Replacement parts or repair labor costs for Maximum Extraction Juicer operated outside the 50 United States, District of Columbia, Puerto Rico, and Canada.
DISCLAIMER OF IMPLIED WARRANTIES; LIMITATION OF REMEDIES
IMPLIED WARRANTIES, INCLUDING TO THE EXTENT APPLICABLE WARRANTIES OF MERCHANTABILITY OR FITNESS FOR A PARTICULAR PURPOSE, ARE EXCLUDED TO THE EXTENT LEGALLY PERMISSIBLE. ANY IMPLIED WARRANTIES THAT MAY BE IMPOSED BY LAW ARE LIMITED TO ONE YEAR, OR THE SHORTEST PERIOD ALLOWED BY LAW. SOME STATES AND PROVINCES DO NOT ALLOW LIMITATIONS OR EXCLUSIONS ON HOW LONG AN IMPLIED WARRANTY OF MERCHANTABILITY OR FITNESS LASTS, SO THE ABOVE LIMITATIONS OR EXCLUSIONS MAY NOT APPLY TO YOU.
IF THIS PRODUCT FAILS TO WORK AS WARRANTED, CUSTOMER'S SOLE AND EXCLUSIVE REMEDY SHALL BE REPAIR OR REPLACEMENT ACCORDING TO THE TERMS OF THIS LIMITED WARRANTY. KITCHENAID AND KITCHENAID CANADA DO NOT ASSUME ANY RESPONSIBILITY FOR INCIDENTAL OR CONSEQUENTIAL DAMAGES. This warranty gives you specific legal rights and you may also have other rights which vary from state to state or province to province.
Hassle-Free Replacement Warranty – 50 United States, District of Columbia, and Puerto Rico
We're so confident the quality of our products meets the exacting standards of KitchenAid that, if your Maximum Extraction Juicer should fail within the first year of ownership, KitchenAid will arrange to deliver an identical or comparable replacement to your door free of charge and arrange to have your original Maximum Extraction Juicer returned to us. Your replacement unit will also be covered by our one year limited warranty. Please follow these instructions to receive this quality service.
If your Maximum Extraction Juicer should fail within the first year of ownership, simply call our toll-free Customer eXperience Center at 1-800-541-6390 Monday through Friday. Please have your original sales receipt available when you call. Proof of purchase will be required to initiate the claim. Give the consultant your complete shipping address. (No P.O. Box numbers, please.) When you receive your replacement Maximum Extraction Juicer, use the carton and packing materials to pack up your original Maximum Extraction Juicer.
Hassle-Free Replacement Warranty – Canada
We're so confident the quality of our products meets the exacting standards of the KitchenAid brand that, if your Maximum Extraction Juicer should fail within the first year of ownership, KitchenAid Canada will replace your Maximum Extraction Juicer with an identical or comparable replacement. Your replacement unit will also be covered by our one year limited warranty. Please follow these instructions to receive this quality service.
If your Juicer attachment should fail within the first year of ownership, take the Maximum Extraction Juicer or ship collect to an Authorized KitchenAid Service Centre. In the carton include your name and complete shipping address along with a copy of the proof of purchase (register receipt, credit card slip, etc.). Your replacement Maximum Extraction Juicer will be returned prepaid and insured. If you are unable to obtain satisfactory service in this manner call our toll-free Customer eXperience Centre at 1-800-807-6777.
Or write to us at: Customer eXperience Centre KitchenAid Canada 200 - 6750 Century Ave. Mississauga, ON L5N 0B7
Arranging for Service after the Warranty Expires, or Ordering Accessories and Replacement Parts
In the United States and Puerto Rico:
For service information, or to order accessories or replacement parts, call toll-free at 1-800-541-6390 or write to:
Customer eXperience Center, KitchenAid Small Appliances, P.O. Box 218, St. Joseph, MI 49085-0218
Outside the United States and Puerto Rico:
Consult your local KitchenAid dealer or the store where you purchased the Maximum
Extraction Juicer for information on how to obtain service.
For service information in Canada:
Call toll-free I-800-807-6777.
Or write to:
Customer eXperience Centre
KitchenAid Canada
200 - 6750 Century Ave.
Mississauga, ON L5N 0B7
BIENVENUE DANS LE MONDE DE KITCHENAID.
natural_image
Exterior view of a kitchen grimmer with clear glass and handle (no text or symbols visible)natural_image
Cross-sectional diagram of a mechanical device showing internal components and a downward arrow indicating flow or movement (no text or symbols)5
natural_image
Technical line drawing of a mechanical component with internal channels and a directional arrow (no text or symbols)6
natural_image
Simple line drawing of a toilet with a downward arrow indicating flow or direction (no text or symbols)7
natural_image
Line drawing of a kitchen blender with a glass mug and straw, no text or symbols present8
natural_image
Line drawing of a cable inserted into an electrical outlet with two outlets (no text or symbols)natural_image
Line drawing of a juice maker pouring liquid into a container (no text or symbols)3
natural_image
Cross-sectional diagram of a mechanical device with an upward arrow indicating motion or force (no text or symbols present)1
natural_image
Illustration of a hand adjusting a mechanical component with an arrow indicating direction (no text or symbols present)2
natural_image
Line drawing of a hand adjusting a mechanical component (no text or symbols)3
natural_image
Line drawing of hands using a tool to feed food into a cup (no text or symbols)4
natural_image
Illustration of various kitchen utensils and containers, including a grater, filter, and water dispenser (no text or labels)5
Customer eXperience Center, KitchenAid Portable Appliances, P.O. Box 218, St. Joseph, MI 49085-0218
natural_image
Exterior view of a modern kitchen brush unit with clear glass and black casing (no text or symbols visible)Únase a nosotros en la cocina, visite www.kitchenaid.com.
ÍNDICE
natural_image
Cross-sectional diagram of a mechanical device showing internal components and a downward arrow indicating flow or movement (no text or symbols)5
natural_image
Technical line drawing of a mechanical component with internal channels and a directional arrow (no text or symbols)6
natural_image
Simple line drawing of a toilet with a downward arrow indicating flow or direction (no text or symbols)7
natural_image
Line drawing of a modern kitchen brush with a glass pitcher and a filter (no text or symbols)8
natural_image
Line drawing of a hand inserting a plug into an electrical outlet (no text or symbols)natural_image
Line drawing of a juice maker using a griddle, showing the blade and handle (no text or symbols)natural_image
Illustration of various kitchen utensils and containers, including a grater, filter, and water dispenser (no text or labels present)5
®/™ © 2014 KitchenAid. All rights reserved. Used under license in Canada.


- WELCOME TO THE WORLD OF KITCHENAID.
- TABLE OF CONTENTS
- PARTS AND FEATURES
- ASSEMBLING THE MAXIMUM EXTRACTION JUICER
- PROOF OF PURCHASE & PRODUCT REGISTRATION
- Your safety and the safety of others are very important.
- ! DANGER
- WARNING
- IMPORTANT SAFEGUARDS
- SAVE THESE INSTRUCTIONS
- Electrical requirements
- Electrical Shock Hazard
- Assembling the Maximum Extraction Juicer parts
- Before First Use
- Making juice
- Quick tips
- Before juicing:
- While juicing:
- After juicing:
- For easy cleanup:
- JUICES
- Apple Carrot Zinger
- Cucumber Refresher
- Double Green Pineapple
- Fantastic Five juice
- Jicama Pear Carrot
- Papaya Power Juice
- Sprout Apple Carrot
- Sweet and Spicy Citrus
- MARINADES
- Lemon Basil Marinade
- Orange Ginger Marinade
- SAUCES AND JELLIES
- Pear Caramel Sauce
- Pineapple Orange Jelly
- Makes 3 (8-ounce) jars
- RECIPES USING PULP
- Tropical Twist
- Makes I serving
- Zucchini Date Bread
- Makes I loaf
- 2eggs
- Ruby Red Juice
- Sweet Vegetable Fritters
- Tropical Fruit Fling
- Fruit Leather Rolls
- Back to Your Roots Juice
- Corn Fritters
- Cleaning the Maximum Extraction Juicer
- TROUBLESHOOTING
- Maximum Extraction Juicer does not operate
- Juice does not flow sufficiently, or is flowing out of the pulp ejector
- Makes a squeaking or clicking noise or shakes when making juice
- KitchenAid® Maximum Extraction Juicer Warranty for the 50 United States, the District of Columbia, Puerto Rico, and Canada
- DISCLAIMER OF IMPLIED WARRANTIES; LIMITATION OF REMEDIES
- Hassle-Free Replacement Warranty – 50 United States, District of Columbia, and Puerto Rico
- Hassle-Free Replacement Warranty – Canada
- Arranging for Service after the Warranty Expires, or Ordering Accessories and Replacement Parts
- In the United States and Puerto Rico:
- Outside the United States and Puerto Rico:
- For service information in Canada:
- BIENVENUE DANS LE MONDE DE KITCHENAID.
- 3
- 1
- 2
- 4
- ÍNDICE
Brand : KITCHENAID
Model : KVJ0111OB
Category : Juicer