
5KSM1JA - Juicer KITCHENAID - Free user manual and instructions
Find the device manual for free 5KSM1JA KITCHENAID in PDF.


| Product Type | Juicer Attachment for Stand Mixers |
| Model | 5KSM1JA |
| Brand | KitchenAid |
| Compatible Mixers | All KitchenAid stand mixers with attachment hub (e.g., Artisan, Pro 600, Pro 6500) |
| Dimensions | Approx. 8.5 x 6.5 x 12 inches (21.6 x 16.5 x 30.5 cm) |
| Weight | Approx. 2.5 lbs (1.13 kg) |
| Main Material | Stainless steel strainer and cutting disc, BPA-free plastic housing |
| Juice Container Capacity | 1.5 liters (included) |
| Pulp Container Capacity | 1 liter (included) |
| Cutting Disc | Stainless steel, 1.5mm micro-mesh filter |
| Speed Settings | 2 speeds (depends on mixer speed control; typically speed 1 for soft fruits, speed 2 for hard vegetables) |
| Pulp Control | Adjustable pulp setting via adjustable cap on the juicer |
| Dishwasher Safe Parts | Yes, all removable parts are top-rack dishwasher safe |
| Cleaning Brush Included | Yes, a small cleaning brush for the filter |
| Safety Features | Interlocking design; juicer will not operate if not properly assembled |
| Warranty | 1-year limited warranty |
| Certifications | UL, CUL, CE listed |
Frequently Asked Questions - 5KSM1JA KITCHENAID
User questions about 5KSM1JA KITCHENAID
0 question about this device. Answer the ones you know or ask your own.
Ask a new question about this device
Download the instructions for your Juicer in PDF format for free! Find your manual 5KSM1JA - KITCHENAID and take your electronic device back in hand. On this page are published all the documents necessary for the use of your device. 5KSM1JA by KITCHENAID.
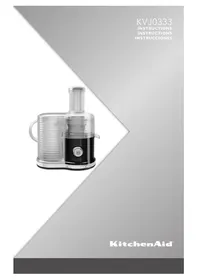
USER MANUAL 5KSM1JA KITCHENAID
natural_image
Exterior view of a kitchen electric shaver with smooth blade and control panel (no text or symbols visible)KitchenAid


English 5
Deutsch....17
Français 29
Italiano....41
Nederlands 53
Español 65
Português....77
Ελληνικά 89
Svenska 101
Norsk....113
Suomi....125
Dansk....137
Íslenska....149
Русский .... 161
Polski....173
Český 185
العربية....197


TABLE OF CONTENTS
JUICER SAFETY
Important safeguards....6
PARTS AND ACCESSORIES 8
ASSEMBLING THE JUICER
Assembling the Juicer parts 9
Attaching the Juicer assembly to the Stand Mixer 10
Cleaning the Juicer.... 13
TROUBLESHOOTING....14
WARRANTY AND SERVICE....15


IMPORTANT SAFEGUARDS
When using electrical appliances, basic safety precautions should always be followed, including the following:
I. Read all instructions.
2. Misuse of appliance may result in personal injury.
3. Always make sure Juicer lid is securely closed before Stand Mixer motor is turned on. Do not remove the lid while Juicer is in operation.
4. Unplug the Stand Mixer (and detach Juicer from Stand Mixer) after each use of the Juicer and before cleaning. Make sure the motor stops completely before disassembling.
5. Do not put your fingers or other objects into the Juicer opening while it is in operation. If food becomes lodged in opening, use pusher or another piece of fruit or vegetable to push it down. Never feed by hand. Always use the pusher. When this method is not possible, turn the motor off and disassemble Juicer to remove the remaining food.
6. Avoid contacting moving parts.
7. The use of attachments not recommended or sold by KitchenAid may cause fire, electric shock, or injury.
8. Do not use outdoors.
JUICER SAFETY
- Children must be supervised to ensure that they do not play with, reach or use the appliance and its cord.
- This appliance is not intended for use by persons with reduced physical, sensory or mental capabilities, or lack of experience and knowledge, unless they have been given supervision or instruction concerning the use of the appliance in a safe way by a person responsible for their safety and if they understand the hazards involved.
II. Do not use the appliance if the rotating auger or rotating parts are damaged. Return appliance to the nearest Authorized Service Facility for examination, repair, or electrical or mechanical adjustment. - To protect against risk of electrical shock, do not put mixer in water or other liquid.
- Do not let the cord hang over the edge of table or counter.
- Blades are sharp. Handle carefully.
- Do not open until blade stops.
- To prevent damage to gear assembly, do not immerse in water or other liquids.
- This product is designed for household use only.

SAVE THESE INSTRUCTIONS
The KitchenAid Juicer is designed exclusively for use with all KitchenAid household Stand Mixers, except KSM6573C.
For complete information on the use of these Stand Mixers, please read the instructions that came with your Stand Mixer.
PARTS AND ACCESSORIES
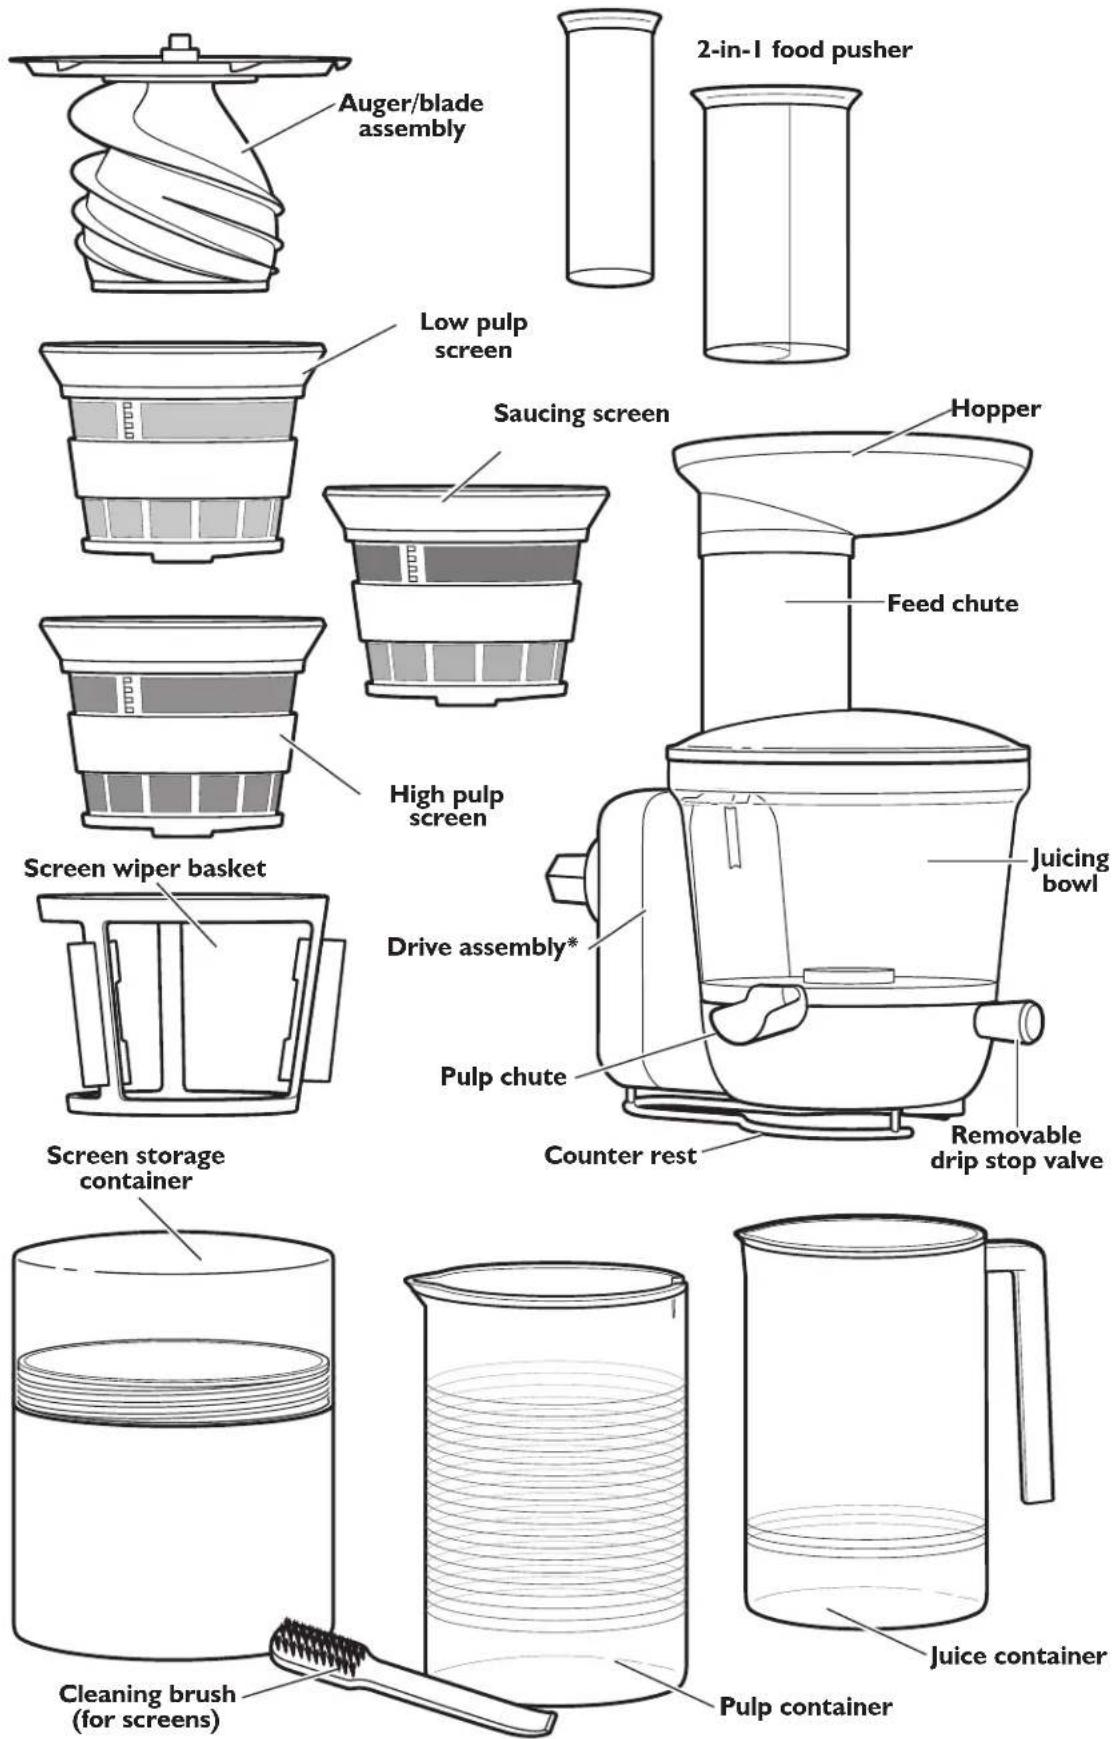
*Wipe clean only. See "Care and cleaning" section for more information.
ASSEMBLING THE JUICER
Assembling the Juicer parts
Before First Use
Before using your Juicer for the first time, wipe Juicer parts with a warm damp cloth, then wipe clean with a damp cloth. Do not wash the gear housing assembly. Dry with a soft cloth. See "Care and Cleaning" section.
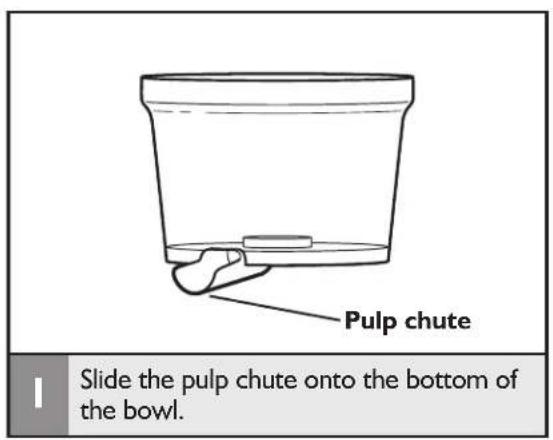
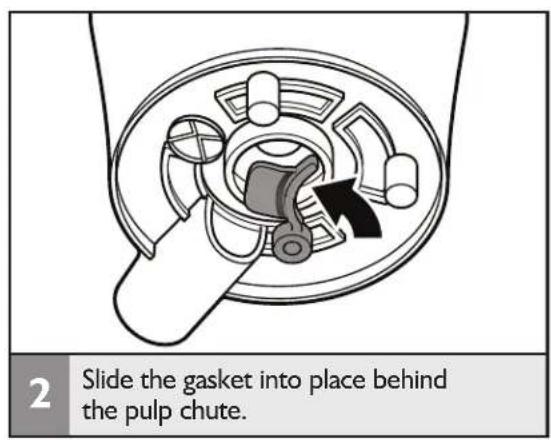
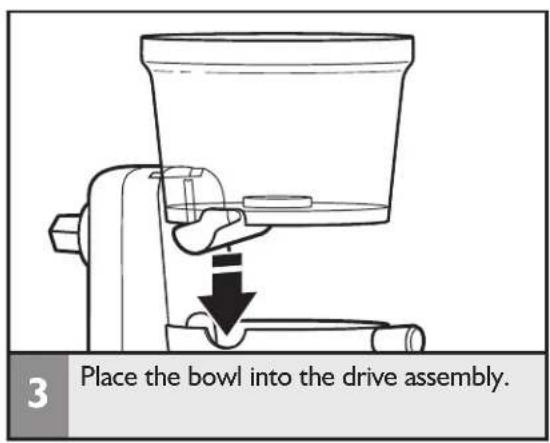
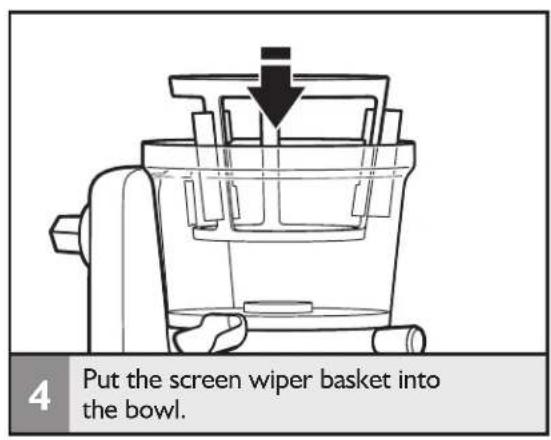
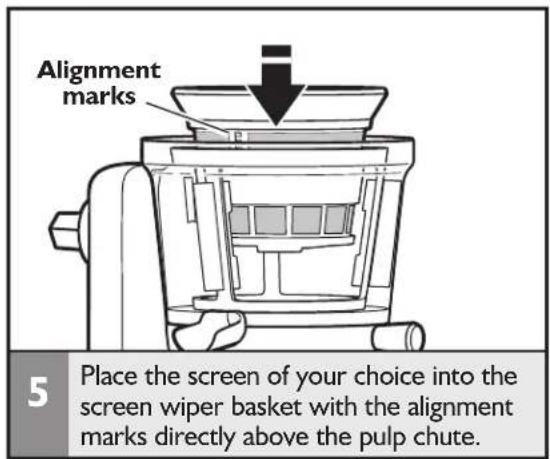
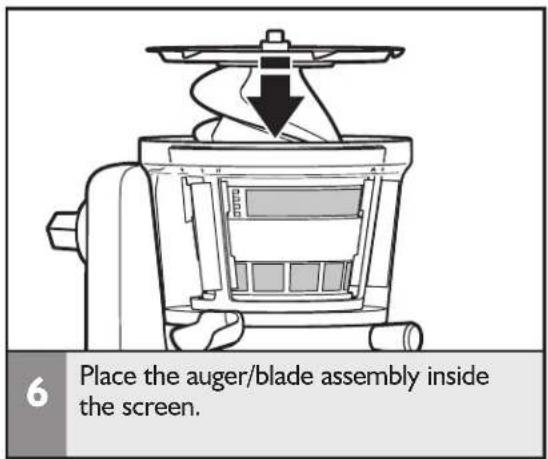
ASSEMBLING THE JUICER
Attaching the Juicer assembly to the Stand Mixer
1
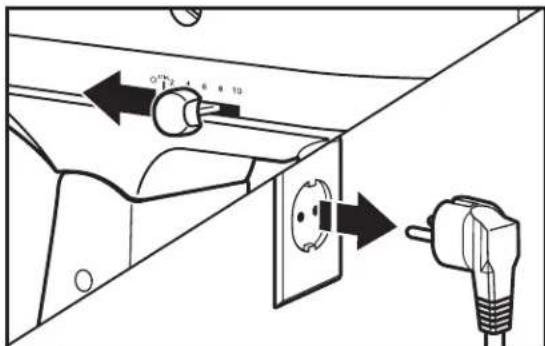
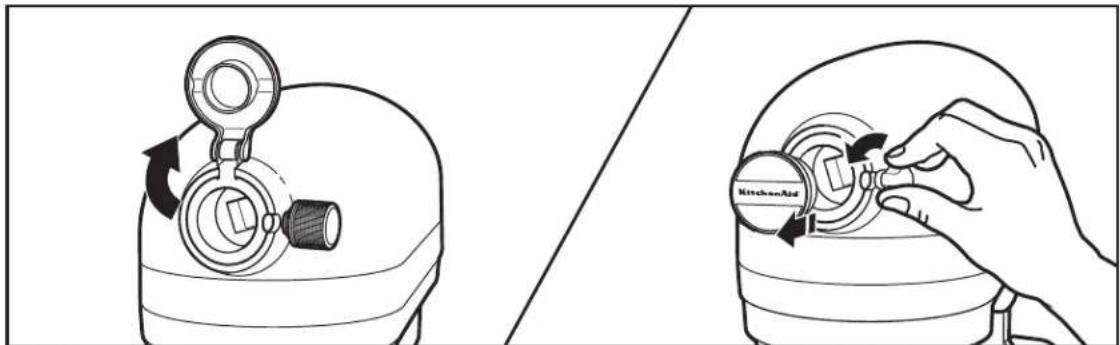
Turn Stand Mixer OFF and unplug.
natural_image
Illustration showing a kitchen卫士操作的步骤: left panel shows valve mechanism with rotation arrow, right panel shows hand holding a button labeled 'KitchenAid'2
For Stand Mixers with a hinged attachment hub cover: Flip up to open.
For Stand Mixers with a removable attachment hub cover: Turn the attachment knob counterclockwise to remove attachment hub cover.
natural_image
Diagram of a kitchen mixer with a valve, showing internal components and a close-up view (no text or labels)3
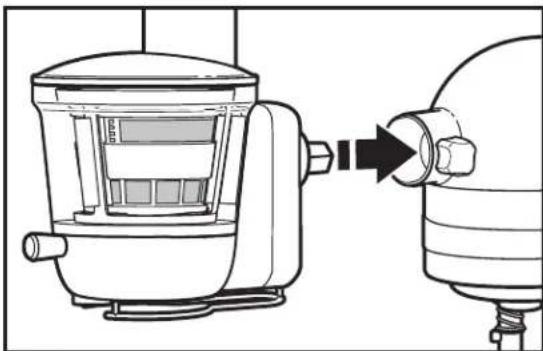
Insert the juicer into the attachment hub. Rotate attachment back and forth if necessary. The pin on the attachment housing will fit into the notch of the hub rim when in proper position.
natural_image
Line drawing of a hand using a tool to adjust or install a small electronic device (no text or symbols visible)4
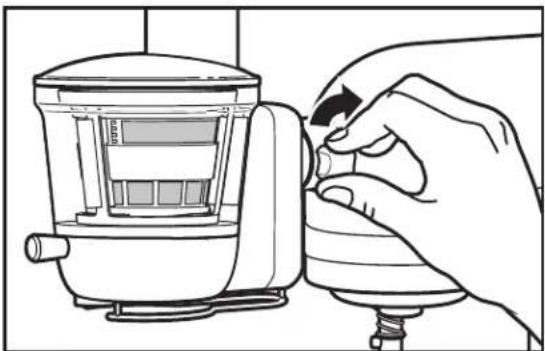
Tighten attachment knob until the Juicer attachment is completely secured to Stand Mixer.
ASSEMBLING THE JUICER
natural_image
Line drawing of a kitchen mixer with a side dish (no text or symbols)5
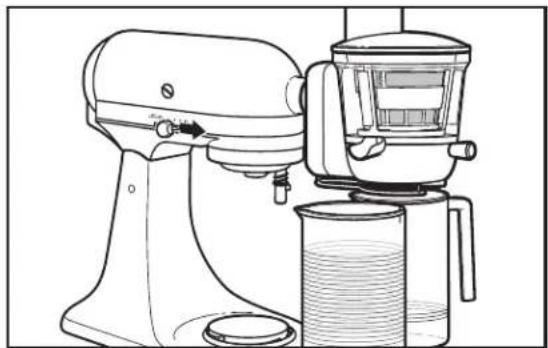
Place a container under both the juice spout and pulp ejector.
IMPORTANT: Large seeds or pits need to be removed prior to juicing to avoid damage to the auger or baskets. This includes fruits such as: nectarines, peaches, mangoes, apricots, plums, cherries, etc.

|
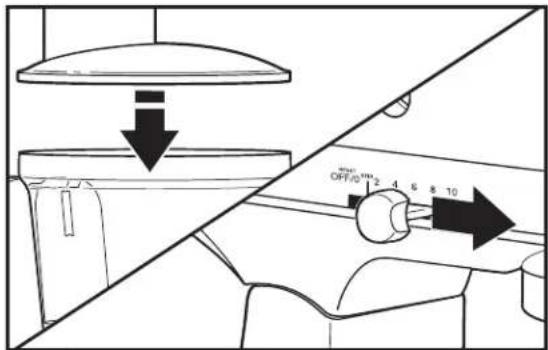
Place the lid on the Juicer, and rotate the lid to lock it in place and engage the interlock. Turn on the Stand Mixer to speed 10.
natural_image
Diagram of a funnel with granular material inside, showing a downward arrow and a base (no text or symbols)2
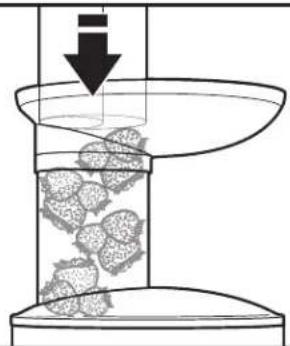
Place items to be juiced into the hopper. Use the food pusher to slowly feed items into the Juicer bowl.
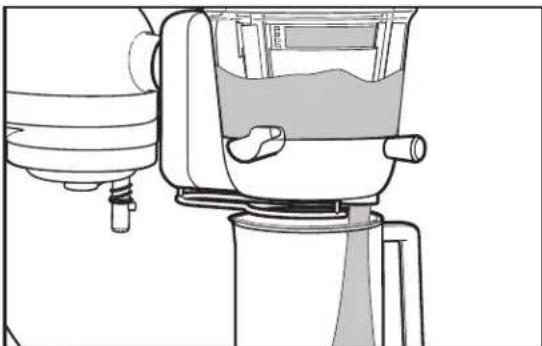
To make juice, the pulp chute should always be pushed in; this is the open position. When the pulp chute is open, pulp created while juicing will flow through the pulp chute, separating it from the juice.
natural_image
Line drawing of a mechanical device with lever and base, no text or symbols present4
To make sauces, pull the pulp chute out; this is the closed position. Make sure the rubber gasket is in place. When the pulp chute is closed, the juice and fiber exit through the juice chute as a sauce.
TIPS FOR GREAT RESULTS
- The pulp chute controls how much fibrous material or pulp exits through the juice chute.
- Pulling the pulp chute out closes the chute, increasing the amount of pulp and fiber for your sauce recipes.
- Pushing the pulp chute in opens the chute, reducing the amount of pulp for your juice recipes.
- Remember to open the pulp chute when using the high or low pulp screens. Keeping the pulp chute open will prevent the Juicer from locking up.
- The rubber gasket on the bottom of the juicer should be placed properly to reduce loss of juice into the pulp chute. Only remove the rubber gasket if you want juice to flow into the pulp ejector.
• The drip stop should be opened before juicing.
- Large seeds or pits need to be removed prior to juicing to avoid damage to the auger or baskets. This includes fruits such as: nectarines, peaches, mangoes, apricots, plums, cherries, etc.
- Before saucing hard fruits (such as apples), it is recommended that you steam the fruit for 2-3 minutes.
CARE AND CLEANING
Cleaning the Juicer
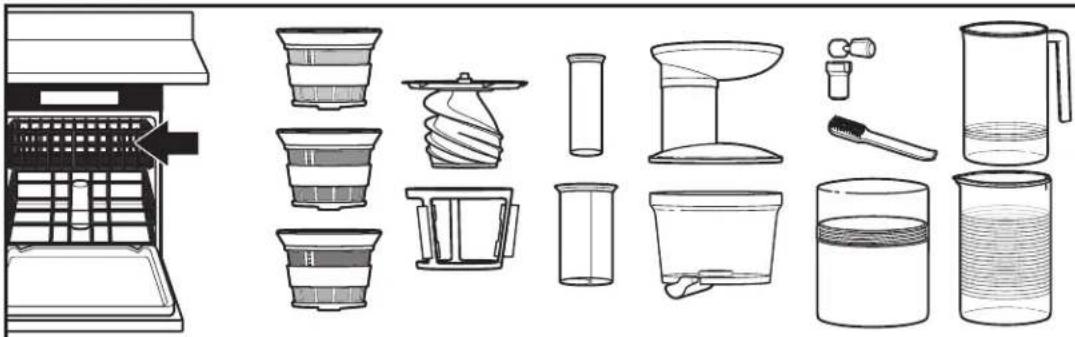
IMPORTANT: Never wash or immerse the drive assembly in water. All other parts are top rack dishwasher safe.
natural_image
Cross-sectional diagram of a mechanical device with no visible text or symbols1
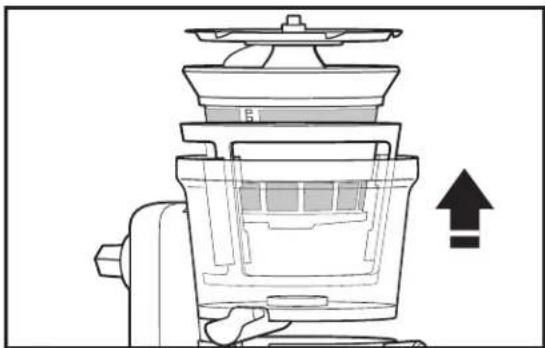
To disassemble: Remove the lid. Remove the auger. Lift the assembled screen and screen wiper basket out of the bowl, and separate. Disassemble the pulp chute.
natural_image
Illustration of hands using a tool to spread food into a cup (no text or symbols visible)2
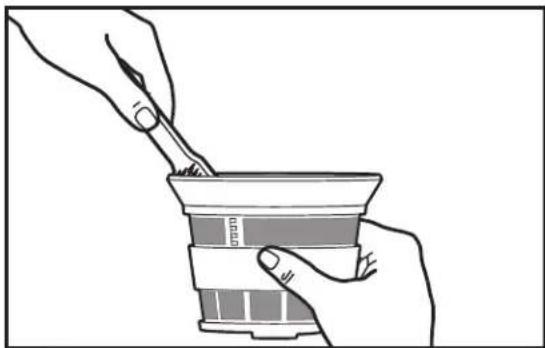
Use the brush with warm soapy water to clean out any stuck food or residue in the screens. Never wash or immerse the drive assembly in water. All other parts are dishwasher safe.
natural_image
Illustration of various household cleaning and cleaning items including a coffee maker, filter, straw, and beaker (no text or labels)3
Do not wash the drive assembly in the dishwasher. Never wash or immerse the drive assembly in water. All other juicer parts are top rack dishwasher safe.
TROUBLESHOOTING
Juicer does not operate
- Check to see whether the Stand Mixer is plugged into a grounded 3 prong outlet. If it is, check the fuse or circuit breaker on the electrical circuit the Stand Mixer is connected to and make sure the circuit is closed.
- Check to make sure the Juicer attachment was assembled correctly.
If the problem cannot be corrected: See the “Warranty and Service” section. Do not return the Juicer attachment to the retailer; retailers do not provide service. The serial number for service is on the bottom of the drive assembly.
Juice does not flow sufficiently, or is flowing out of the pulp ejector
I. Check the rubber gasket:
- Check to see whether the rubber gasket on the bottom of the juicer is placed properly. If you do want juice to flow into the pulp ejector, make sure the rubber gasket is removed.
2. Make sure you are using fresh fruits or vegetables.
- All carrots, including baby carrots, should only be fed through the small chute one at a time.
Clutch engages
- Check to make sure there are not too many items in the Juicer.
• Make sure any hard seeds are removed.
Makes a squeaking or clicking noise or shakes when making juice
- A squeaking noise is normal. It is the sound of juice being squeezed by the auger.
- Shaking is normal. It is the sign of the motor working properly.
- A clicking noise means the auger has stopped rotating. This is not normal. Turn off the Stand Mixer, then unclog the auger.
KitchenAid Stand Mixer attachment warranty
| Length of Warranty: | KitchenAid Will Pay For: | KitchenAid Will Not Pay For: |
| Europe, Middle East and Africa:Two years full warranty from date of purchase. | The replacement parts and repair labor costs to correct defects in materials or workmanship. Service must be provided by an Authorized KitchenAid Service Center. | A. Repairs when attachment is used for operations other than normal household food preparation.B. Damage resulting from accident, alterations, misuse, abuse, or installation/operation not in accordance with local electrical codes. |
KITCHENAID DOES NOT ASSUME ANY RESPONSIBILITY FOR INDIRECT DAMAGES.
Customer service
In U.K. and Ireland:
For any questions, or to find the nearest KitchenAid Authorized Service Center, please find our contact details below.
NOTE: All service should be handled locally by an Authorized KitchenAid Service Center.
Contact number for U.K. and Northern Ireland:
Tollfree number 0800 988 1266 (calls from mobile phones are charged standard network rate)
Contact number for Ireland:
Tollfree number +44 (0) 20 8616 5148
E-mail contact for U.K. and Ireland:
Go to www.kitchenaid.co.uk, and click on the link "Contact Us" at the bottom of the page.
Address for U.K. and Ireland:
KitchenAid Europa, Inc.
PO BOX 19
B-2018 ANTWERP II
BELGIUM
In other countries:
For all product related questions and after sales matters, please contact your dealer to obtain the name of the nearest Authorized KitchenAid Service/Customer Center.
www.KitchenAid.eu
© 2014. All rights reserved.
Specifications subject to change without notice.
KitchenAid
© 2014. All rights reserved.
Specifications subject to change without notice.
W10631037A
05/14

- TABLE OF CONTENTS
- JUICER SAFETY
- PARTS AND ACCESSORIES 8
- ASSEMBLING THE JUICER
- TROUBLESHOOTING....14
- WARRANTY AND SERVICE....15
- IMPORTANT SAFEGUARDS
- When using electrical appliances, basic safety precautions should always be followed, including the following:
- SAVE THESE INSTRUCTIONS
- PARTS AND ACCESSORIES
- Assembling the Juicer parts
- Before First Use
- Attaching the Juicer assembly to the Stand Mixer
- 4
- TIPS FOR GREAT RESULTS
- CARE AND CLEANING
- Cleaning the Juicer
- TROUBLESHOOTING
- Juicer does not operate
- Juice does not flow sufficiently, or is flowing out of the pulp ejector
- Check the rubber gasket:
- Make sure you are using fresh fruits or vegetables.
- Clutch engages
- Makes a squeaking or clicking noise or shakes when making juice
- KITCHENAID DOES NOT ASSUME ANY RESPONSIBILITY FOR INDIRECT DAMAGES.
- Customer service
- In U.K. and Ireland:
- In other countries:
- KitchenAid
Brand : KITCHENAID
Model : 5KSM1JA
Category : Juicer