
KVJ0333WH - Juicer KITCHENAID - Free user manual and instructions
Find the device manual for free KVJ0333WH KITCHENAID in PDF.

| Brand | KitchenAid |
| Model | KVJ0333WH |
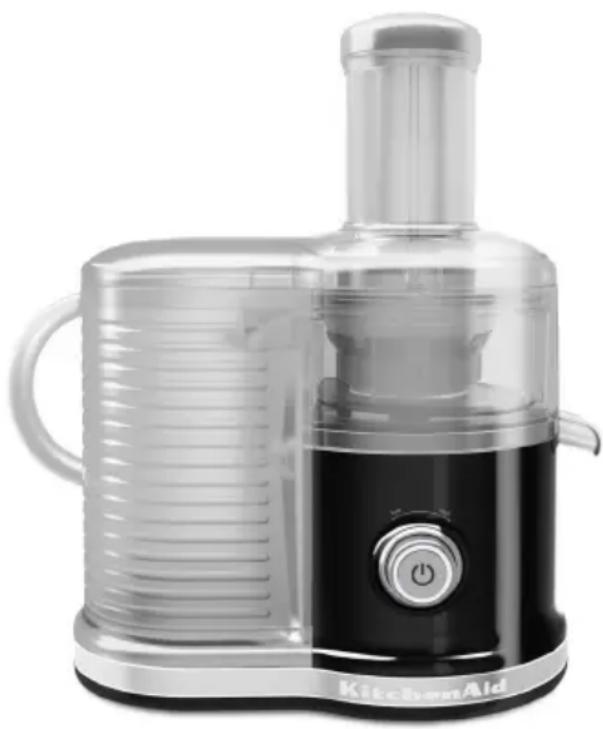
| Product Type | Juice Extractor (Centrifugal Juicer) |
| Power Supply | 120 V, 60 Hz, AC only |
| Number of Speeds | 2 (Low and High) |
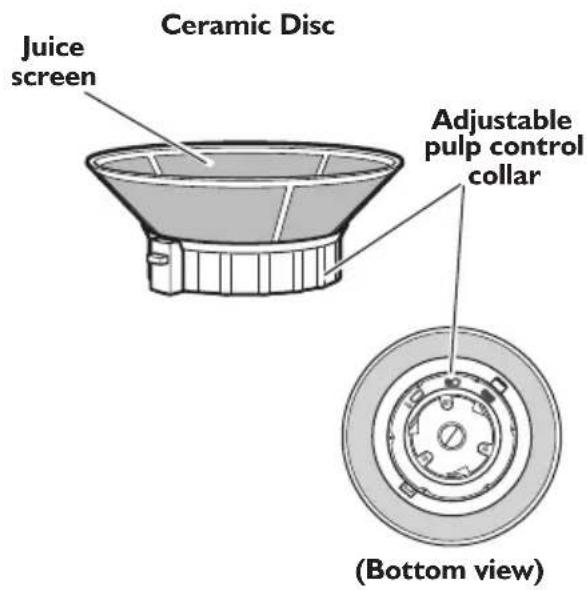
| Extraction Disc | Ceramic Disc |
| Juice Collector Bowl | Included, with pour spout |
| Juice Pitcher | With foam-filtering lid |
| Pulp Bin | Removable, generous capacity |
| Pulp Adjustment Ring | 3 positions: high, medium, low pulp flow |
| Pusher | Included, with guide groove |
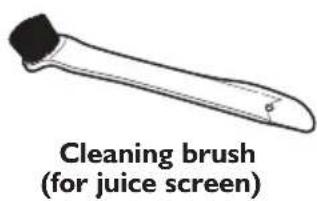
| Cleaning Brush | Included |
| Materials of Removable Parts | Plastic, ceramic disc |
| Cleaning | Removable parts are dishwasher safe (top rack) or hand wash; motor body wipe clean with damp cloth |
| Safety | Lockable lid, auto shut-off when opened |
| Warranty | 1 year full warranty (free replacement first year) |
| Usage | Household use only |
| Dimensions (approx.) | 30 x 25 x 40 cm (estimated) |
| Weight (approx.) | 5 kg (estimated) |
| Country of Origin | Not specified |
Frequently Asked Questions - KVJ0333WH KITCHENAID
User questions about KVJ0333WH KITCHENAID
0 question about this device. Answer the ones you know or ask your own.
Ask a new question about this device
Download the instructions for your Juicer in PDF format for free! Find your manual KVJ0333WH - KITCHENAID and take your electronic device back in hand. On this page are published all the documents necessary for the use of your device. KVJ0333WH by KITCHENAID.
USER MANUAL KVJ0333WH KITCHENAID
We're committed to helping you create a lifetime of delicious meals for family and friends. To help ensure the longevity and performance of your appliance, keep this guide handy. It will empower you with the best way to use and care for your product. Your satisfaction is our #1 goal. Remember to register your product online at www.kitchenaid.com or by mail using the enclosed Product Registration Card.
Join us in the kitchen at www.kitchenaid.com.
TABLE OF CONTENTS
EASY CLEAN JUICER SAFETY
Important safeguards. 4
Electrical Requirements 5
PARTS AND FEATURES
Parts and accessories 6
ASSEMBLING THE EASY CLEAN JUICER
Before first use 7
Assembling the Easy Clean Juicer parts 7
Disassembling the Easy Clean Juicer 14
Cleaning the Easy Clean Juicer 16
Cleaning tips 17
TROUBLESHOOTING 17
WARRANTY AND SERVICE 18
PROOF OF PURCHASE & PRODUCT REGISTRATION
Always keep a copy of the itemized sales receipt showing the date of purchase of your Juicer. Proof of purchase will assure you of in-warranty service. Before you use your Juicer, please fill out and mail your product registration card packed with the unit, or register on-line at www.kitchenaid.com. This card will enable us to contact you in the unlikely event of a product safety notification and assist us in complying with the provisions of the Consumer Product Safety Act. This card does not verify your warranty. Please complete the following for your personal records:
Model Number
Serial Number
Date Purchased
Store Name
Your safety and the safety of others are very important.
We have provided many important safety messages in this manual and on your appliance. Always read and obey all safety messages.

This is the safety alert symbol.
This symbol alerts you to potential hazards that can kill or hurt you and others.
All safety messages will follow the safety alert symbol and either the word "DANGER" or "WARNING." These words mean:
DANGER
You can be killed or seriously injured if you don't immediately follow instructions.
WARNING
You can be killed or seriously injured if you don't follow instructions.
All safety messages will tell you what the potential hazard is, tell you how to reduce the chance of injury, and tell you what can happen if the instructions are not followed.
State of California Proposition 65Warnings:
WARNING: This product contains one or more chemicals known to the State of California to cause cancer.
WARNING: This product contains one or more chemicals known to the State of California to cause birth defects or other reproductive harm.
IMPORTANT SAFEGUARDS
When using electrical appliances, basic safety precautions should always be followed, including the following:
I. Read all instructions.
2. Always make sure Juicer lid is securely closed before motor is turned on. Do not remove the lid while Juicer is in operation.
3. Be sure to turn the Juicer OFF and unplug from outlet when not in use, before putting on or taking off parts, and before cleaning. Make sure the motor stops completely before disassembling.
4. Do not put your fingers or other objects into the feed tube while it is in operation. If food becomes lodged in opening, use food pusher or another piece of fruit or vegetable to push it down. Never push by hand. Always use the food pusher provided. When this method is not possible, turn the motor off and disassemble Juicer to remove the remaining food.
5. Avoid contacting moving parts.
6. Do not use outdoors.
7. Close supervision is necessary when any appliance is used by or near children.
8. Do not operate any appliance with a damaged cord or plug or after the appliance malfunctions, or is dropped or damaged in any manner.
EASY CLEAN JUICER SAFETY
- Do not use the appliance if the ceramic disc or rotating parts are damaged. Return appliance to the nearest Authorized Service Facility for examination, repair, or electrical or mechanical adjustment.
- To protect against risk of electrical shock, do not put Juicer's main body in water or other liquid.
II. The use of attachments not recommended or sold by KitchenAid may cause fire, electric shock or injury. - Do not let cord hang over edge of table or counter.
- Do not operate Juicer without the pulp container in place.
SAVE THESE INSTRUCTIONS
Electrical requirements
WARNING

Electrical Shock Hazard
Plug into a grounded 3 prong outlet.
Do not remove ground prong.
Do not use an adapter.
Do not use an extension cord.
Failure to follow these instructions can result in death, fire, or electrical shock.
Voltage: 120 Volts A.C. only
Frequency: 60 Hz
NOTE: If the plug does not fit in the outlet, contact a qualified electrician. Do not modify the plug in any way. Do not use an adapter.
Do not use an extension cord. If the power supply cord is too short, have a qualified electrician or serviceman install an outlet near the appliance.

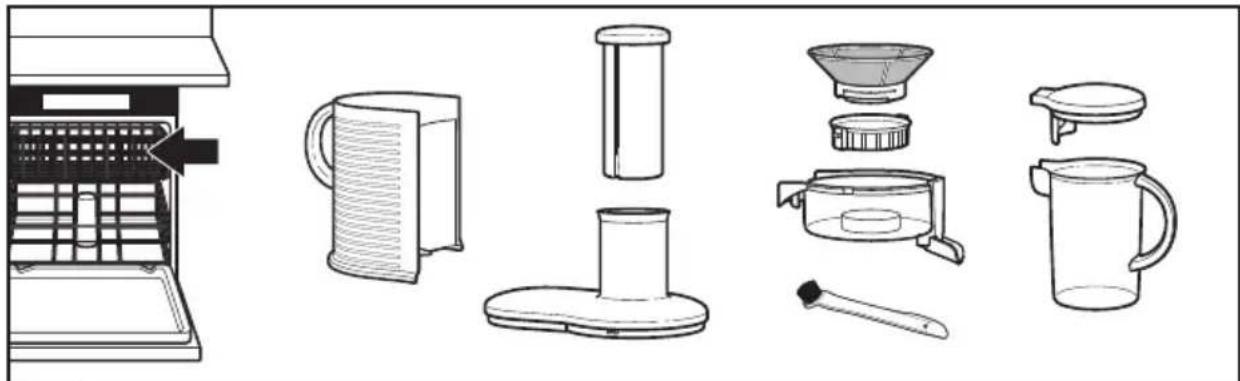
Parts and accessories
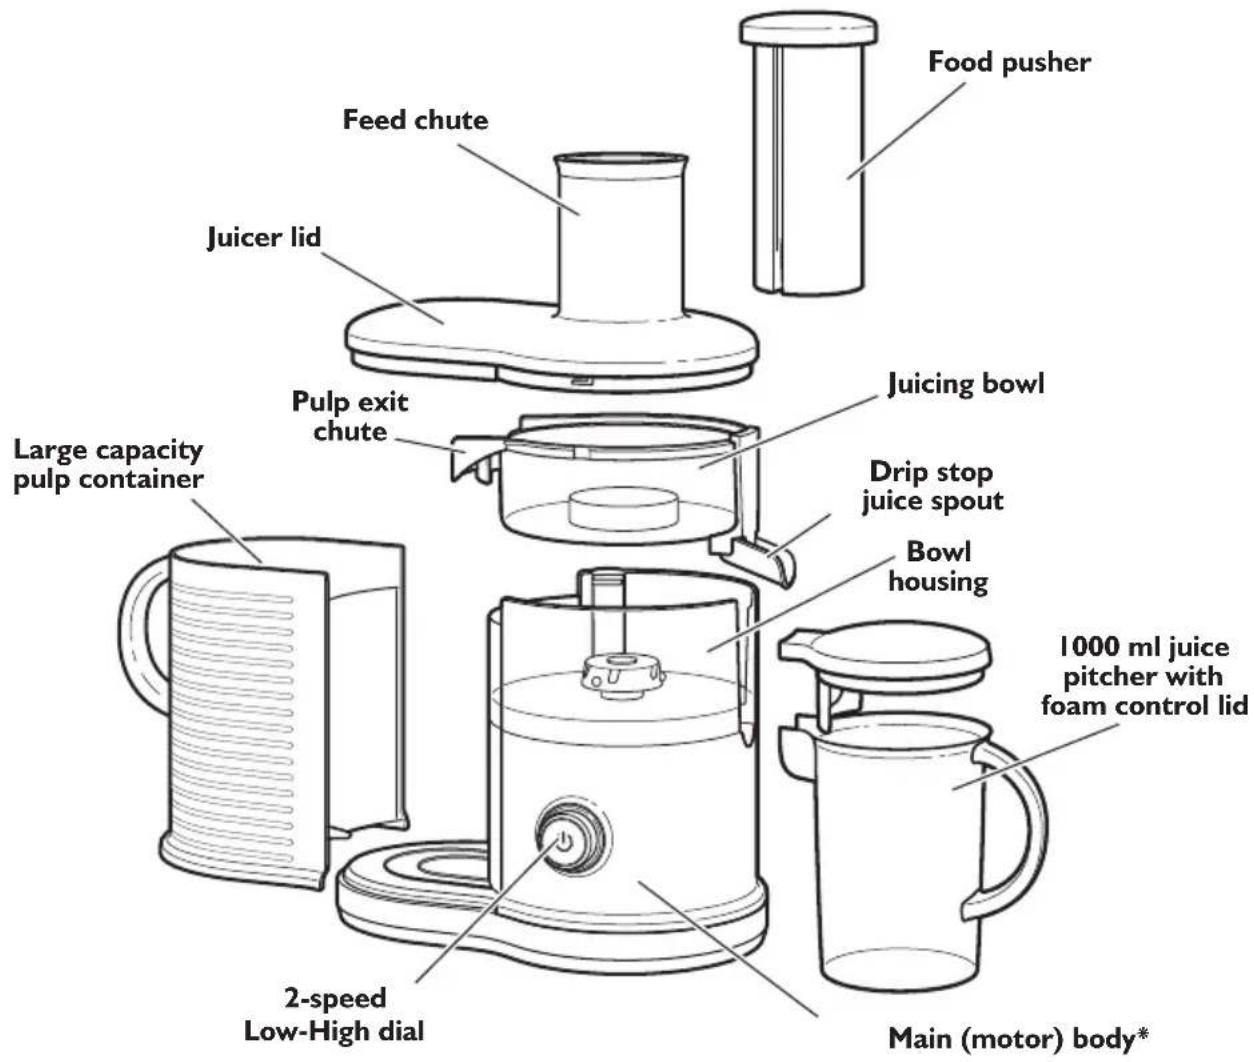
*Wipe clean only. See "Care and cleaning" section for more information.
Before first use
Your Easy Clean Juicer will come fully assembled in the box. Before using your Juicer for the first time, remove the pulp container first, and then disassemble the rest of the unit. The pulp container must be pulled out from the juicer before the lid can be removed. Once disassembled, wash all parts and accessories either by hand or in the dishwasher. See "Care and Cleaning" section for more detail.
NOTE: This product is designed for household use only.
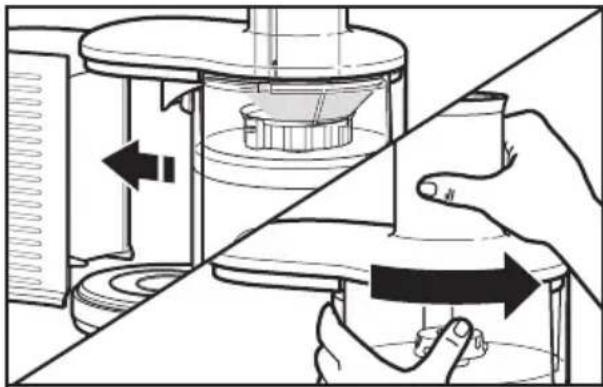
Remove pulp container. Grasp the feed chute on the Juicer lid and turn it counter-clockwise to remove it from the Juicer.
Assembling the Easy Clean Juicer parts
IMPORTANT: Place Juicer on a dry, level countertop with the 2-speed dial facing you. Do not plug in the Juicer until it is completely assembled.
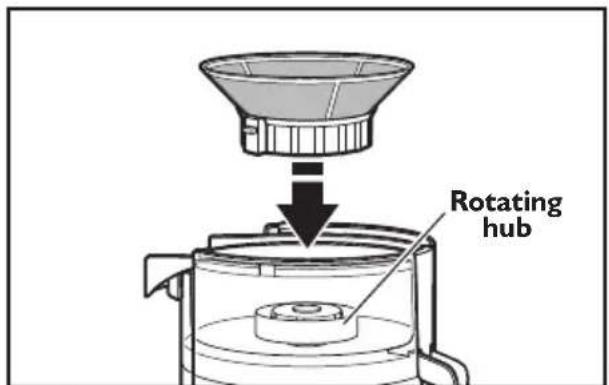
3 Place the ceramic disc inside the juicing bowl on top of the rotating hub. Rotate the disc until the tabs on the inside of the collar match up with the notches on the hub and the disc settles easily into place.
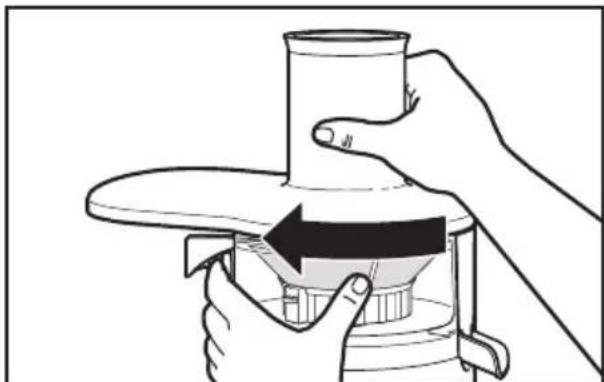
4 Place the juicer lid over the bowl housing so that the long lid section is slightly to the right of the pulp exit chute. Grip the feed chute, turning the lid clockwise until it locks into place.
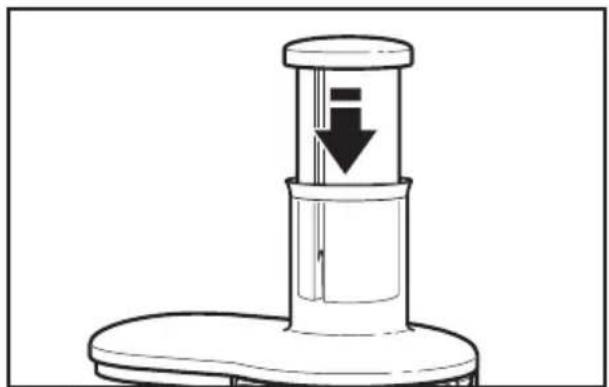
5 Slide the food pusher down the feed chute, aligning the groove in the food pusher with the protruding rib on the inside of the feed chute.
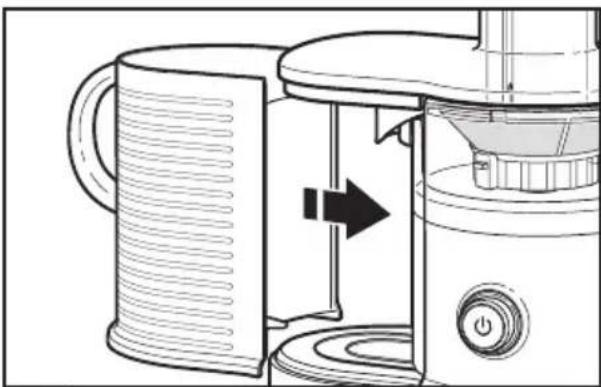
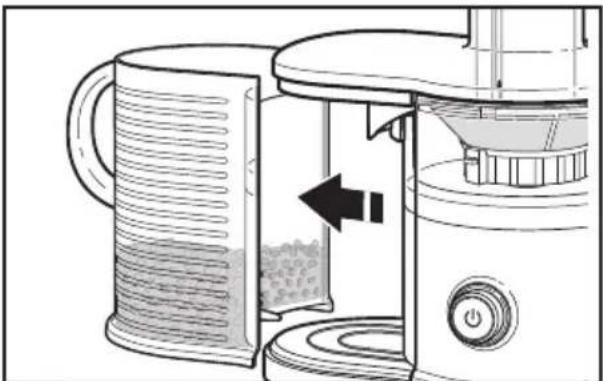
6 Slide the pulp basket into position under the long lid section until it rests against the motor body.
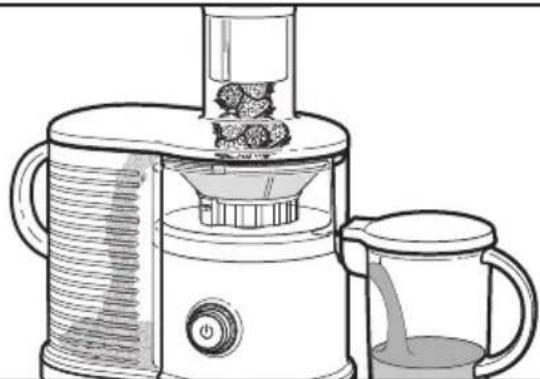
7 Place juice pitcher under the juice spout. Make sure juice spout is in the down position.
NOTE: The lid of the juice pitcher comes equipped with a foam guard. To include the foam with your juice, simply remove the lid before pouring juice into your glass.
Making juice
WARNING

Electrical Shock Hazard
Plug into a grounded 3 prong outlet.
Do not remove ground prong.
Do not use an adapter.
Do not use an extension cord.
Failure to follow these instructions can result in death, fire, or electrical shock.
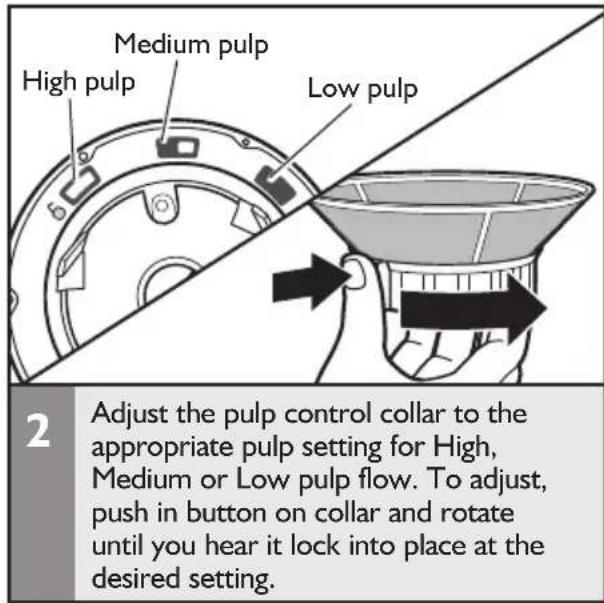
Before operating your Easy Clean Juicer, make sure the Juicer is assembled correctly, and the adjustable pulp collar is set to the appropriate pulp level for your recipe (see "Assembling the Easy Clean Juicer").
Plug the power cord into a grounded 3-prong outlet.

1
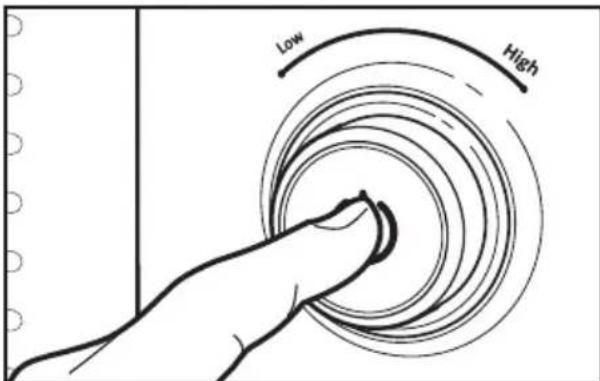
Adjust the speed dial to the desired setting. See the Speed Selector Table in the "Tips for great results" section for more information. Press (Power button) to turn on Juicer.
WARNING

Rotating Blade Hazard
Always use food pusher.
Keep fingers out of openings.
Keep away from children.
Failure to do so can result in amputation or cuts.
2
With motor running, place food into feed chute using the food pusher. As food is processed, the extracted juice will flow into the juice pitcher, and the separated pulp will flow into the pulp basket.
NOTE: Do not allow the pulp basket to overfill while juicing, as it may affect operation of the Juicer.
To empty pulp basket while juicing, first turn off Juicer by pressing the Power button. Once the power is off, remove the pulp basket and empty its contents. Make sure to replace the empty pulp basket before turning power back on and continuing to juice.
TIP: To prevent drips to your counter, turn up the juice spout when removing the juice pitcher.
Speed selector table
| Food Item Dial Speed | |
| Apples High | |
| Apricots (pit removed) Low | |
| Beets (trimmed) High | |
| Blueberries High | |
| Broccoli High | |
| Brussels sprouts (trimmed) | High |
| Carrots High | |
| Cauliflower High | |
| Celery High | |
| Cucumber (peeled) High | |
| Fennel High | |
| Grapes (seedless) High | |
| Kale High | |
| Kiwi Fruit (peeled) Low |
| Food Item | Dial Speed |
| Mangoes (peeled, pit removed) | Low |
| Melons (peeled) | Low |
| Nectarines (pit removed) | High |
| Oranges (peeled) | High or Low |
| Peaches (pit removed) | Low |
| Pears (stalks removed) | High for hard or Low for soft |
| Pineapple (peeled) Low | |
| Plums (pit removed) | Low |
| Raspberries | Low |
| Spinach High | |
| Strawberries | High |
| Tomatoes | High |
| Watermelon (peeled) | Low |
Quick tips
Before juicing:
- Thoroughly wash your fruits and vegetables, making sure they are free of soil, leaves, and stems. Small leaves, such as on strawberries, do not have to be removed.
- To avoid damaging the juicer, do not juice frozen fruits or vegetables. For optimal performance, always use fresh fruits and vegetables.
Large seeds or pits must be removed prior to juicing to avoid damage to the ceramic disk. This includes fruits such as; nectarines, peaches, mangoes, apricots, plums, cherries, etc. - Always peel fruits with hard or inedible skins. Examples include mangoes, citrus fruits, melons, and pineapples.
- Some vegetables, such as cucumbers or yellow squash, do not have to be peeled first, depending on the softness of the skin and recipe requirements. Leaving the peels on will change the color and flavor of the finished juices.
After juicing:
- There may be pieces of fruit or vegetables remaining in the pulp after juicing. These should be removed prior to using the pulp in any recipes.
- Saved pulp can be used for other recipes, as compost for your garden, or can be discarded.
For easy cleanup:
- As you juice, clean parts to avoid dried on juice and pulp.
After each use, immediately rinse removable parts in hot water to remove pulp and juice. It may be necessary to use the cleaning brush to remove pulp from the screen. Let parts air dry.
JUICES
Cranberry Apple Twist
Makes 3 servings
2 apples
3/4 cup cranberries
12 cucumber
12 lemon, peeled
I inch fresh ginger, peeled
Juice ingredients together. Stir; serve immediately.
Garden Fresh Juice
Makes 3 servings
3 tomatoes, stemmed
3 carrots, ends trimmed
2radishes
Juice ingredients together. Stir; serve immediately.
Mojo Mojito Juice
Makes 3 servings
Icucumber
I pear
I cup fresh mint
12 lime, peeled
Juice ingredients together. Stir; serve immediately.
Pineapple Mango Cucumber
Makes 2 servings
14 pineapple, peeled
I mango, peeled and pitted
Icucumber
12 lemon, peeled
Juice ingredients together. Stir; serve immediately.
Daily Green
Makes 2 servings
I green apple
3 leaves kale
12 cucumber
12 lemon, peeled
2 stalks celery
I inch fresh ginger, peeled
Juice ingredients together. Stir; serve immediately.
Melon Raspberry Medley
Makes 2 servings
1 / 8 honeydew melon, rind removed
1/8 seedless watermelon, rind removed
13 cup raspberries
Ice cubes (optional)
Juice ingredients together. Stir; serve immediately over ice, if desired.
Morning Veggie juice
Makes 2 servings
2tomatoes
1 / 2 cucumber
8 green beans
12 lemon, peeled
Dash hot pepper sauce
Juice first 4 ingredients together. Sitr in hot pepper sauce until well blended; serve immediately.
Pomegranate Lime Coconut
Makes 2 servings
I pomegranate, peeled
1 / 2 cucumber
I lime, peeled
1 / 4 cup coconut water
Juice first 3 ingredients together. Stir in coconut water until well blended; serve immediately.
Ruby Apple Stinger
Makes 2 servings
2beets
2 carrots, ends trimmed
½ apple
I inch fresh ginger, peeled
14 lemon, peeled
Juice ingredients together. Stir; serve immediately.
Tropical Veggie Juice
Makes 2 servings
_8 pineapple, peeled
5 leaves kale
12 cucumber
12 cup coconut water
Juice first 3 ingredients together. Stir in coconut water until well blended; serve immediately.
RECIPES USING PULP
Citrus Carrot
Makes 2 servings
I orange, peeled
12 lemon, peeled
2 carrots, ends trimmed
Juice ingredients together. Stir; serve immediately.
Note: Use the leftover pulp from this juice to make Carrot and Oat Muffins. Juice the orange and carrots first and measure 12 cup pulp for the muffins before juicing the lemon. For pulp with a better consistency, peel the carrots before juicing them and remove any large pieces of orange rind.
Carrot and Oat Muffins
Makes 12 muffins
2 eggs
12 cup milk
12 cup unsweetened applesauce
2 tablespoons canola oil
12 cup shredded carrot (I medium carrot)
12 cup orange and carrot pulp from Citrus Carrot
3/4 cup old-fashioned oats
3/4 cup all-purpose flour
3/4 cup whole wheat flour
12 cup sugar
1½ teaspoons baking powder
34 teaspoon ground cinnamon
12 teaspoon baking soda.
12 teaspoon salt
14 cup finely chopped walnuts (optional)
Preheat oven to 350^
Spray 12 standard (212 -inch) muffin cups with nonstick cooking spray.
Whisk eggs in a medium bowl. Whisk in milk, applesauce and oil until blended. Stir in carrot and juice pulp. In a large bowl, combine oats, all-purpose flour, whole wheat flour, sugar, baking powder, cinnamon, baking soda and salt; mix well. Add applesauce mixture; stir just until moistened. Do not overmix.
Spoon batter evenly into prepared muffin cups. Sprinkle I teaspoon walnuts over each muffin, if desired.
Bake 20 to 22 minutes or until muffins are golden brown. Cool in pan 5 minutes; remove to wire rack to cool completely.
Carrot Cuke Parsnip Juice
Makes 2 servings
1 / 2 cucumber
I lemon, peeled
2 parsnips, ends trimmed
2 carrots, ends trimmed
Juice ingredients together. Stir; serve immediately.
NOTE: Use the leftover pulp from this juice to make Vegetarian Chili with Brown Rice. Juice the cucumber, parsnips and carrots first and measure 1 cup pulp for the chili before juicing the lemon. For pulp with a better consistency, peel the parsnips and carrots before juicing them, if desired.
Vegetarian Chili with Brown Rice
Makes 6 servings
I tablespoon canola oil
I onion, chopped
I green bell pepper, diced
I red bell pepper, diced
I stalk celery, diced
I jalapeño pepper, minced
I clove garlic, minced
2 cups vegetable broth
I can (about 14 ounces) diced tomatoes
I cup cooked brown rice
I cup canned pinto beans, rinsed and drained
12 teaspoon dried oregano
12 teaspoon chipotle chili powder
12 teaspoon salt
14 teaspoon black pepper
1 / 4 teaspoon ground cumin
I cup pulp from Carrot Cuke Parsnip Shredded Cheddar cheese
Heat oil in large saucepan over medium-high heat. Add onion, bell peppers, celery, jalapeño and garlic; cook and stir 7 minutes or until vegetables are softened.
Add broth, tomatoes, rice, beans, oregano, chili powder, salt, black pepper and cumin; bring to a boil over high heat. Reduce heat to medium; cover and cook 15 minutes or until vegetables are tender. Stir in juice pulp. Cook, uncovered, 10 minutes or until thickened.
Ladle chili into bowls; top each serving with cheese.
Sweet Pepper Carrot Juice
Makes 2 servings
I red bell pepper, stemmed
I yellow bell pepper, stemmed
3 carrots, ends trimmed
Juice ingredients together. Stir; serve immediately.
NOTE: Use the leftover pulp from this juice to make Penne Pasta with Chunky Tomato Sauce and Spinach. For pulp with a better consistency, peel the carrots before juicing them, if desired.
Penne Pasta with Chunky Tomato Sauce and Spinach
Makes 4 to 6 servings
4 cups uncooked whole wheat or multigrain penne pasta
I jar (24 ounces) spicy marinara sauce
large ripe tomato, chopped (about 112 cups)
4 cups packed baby spinach or torn spinach leaves (4 ounces)
12 cup pulp from Sweet Pepper Carrot
14 cup grated Parmesan cheese
14 cup chopped fresh basil
Cook pasta according to package directions.
Meanwhile, heat marinara sauce and tomato in medium saucepan over medium heat 3 to 4 minutes or until hot and bubbly, stirring occasionally. Remove from heat; stir in spinach and juice pulp.
Drain pasta; return to saucepan. Add sauce mixture; toss to combine. Divide evenly among serving bowls; top with cheese and basil.
CARE AND CLEANING
Disassembling the Easy Clean Juicer
Turn off Juicer by pressing power button).Unplug the power cord.
2 Remove pulp basket by sliding it away from the Juicer.

3 Grasp the feed chute on the Juicer lid and turn it counter-clockwise to unlock and remove it from the Juicer.
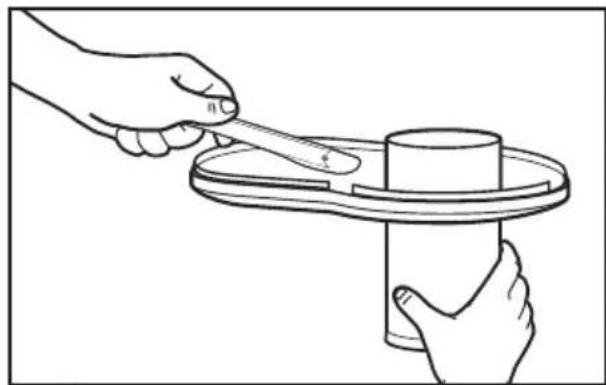
4 There may be pulp stuck to the underside of the lid. Use the flat side of the cleaning brush to carefully scrape the stuck pulp into the pulp container.

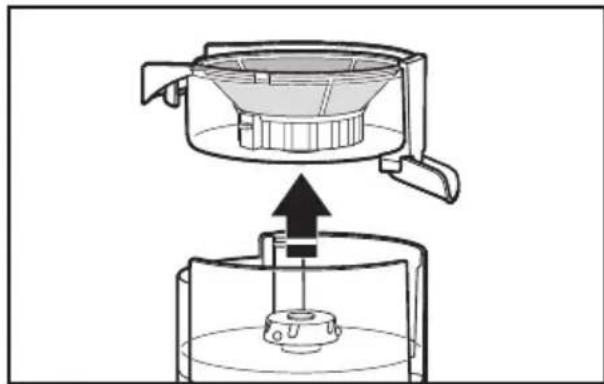
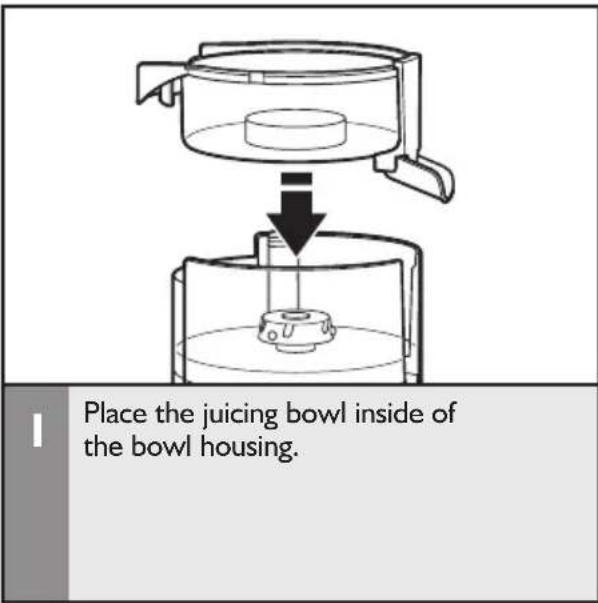
Gently lift juicing bowl out of bowl housing with ceramic disc still in place.
NOTE: For easy cleanup, it is recommended to remove the ceramic disc from the juicing bowl over sink.
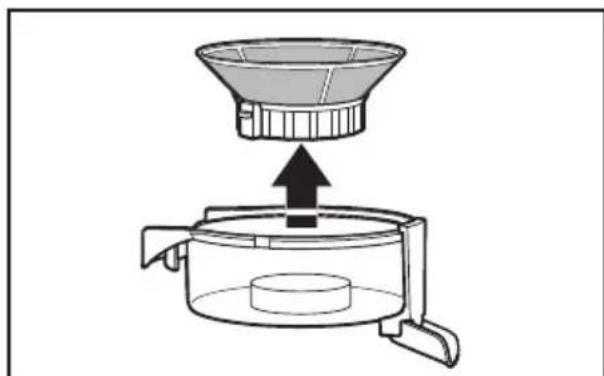
6 Lift ceramic disc out of juicing bowl.
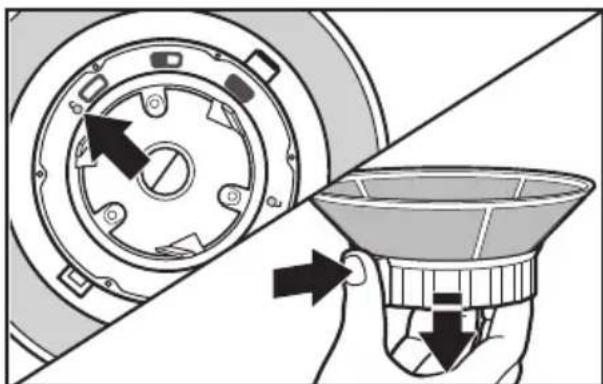
7 Remove adjustable pulp collar from the juice screen for cleaning: Turn collar to "unlock." Press spring button and pull collar down, removing it from the screen.
Cleaning the Easy Clean Juicer
IMPORTANT: To avoid damaging the Juicer, do not wash or immerse the motor body in water or other liquids. All other parts are top rack dishwasher safe.
Before cleaning, make sure Juicer has been turned off, unplugged, and disassembled correctly. See "Disassembling the Easy Clean Juicer."
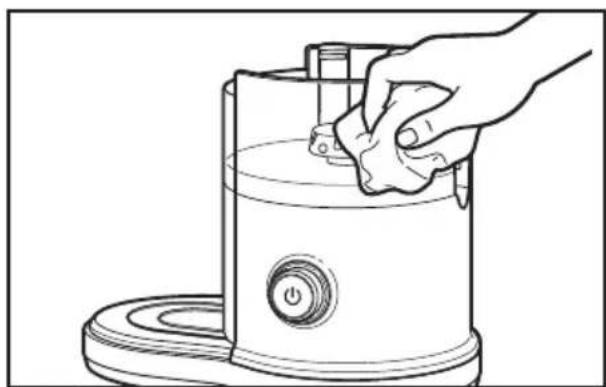
Wipe the motor body and power cord with a soft, damp cloth. Dry thoroughly. Do not use abrasive cleansers or scouring pads.
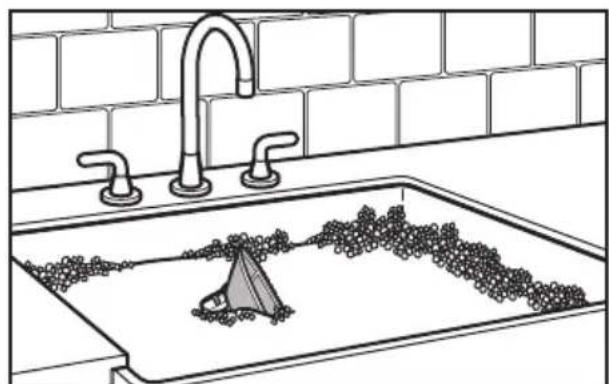
Soak juice screen in hot, soapy water for 10 minutes. Hold screen under running water and use cleaning brush to clean out any stuck food or residue in the screen.
NOTE: The fine mesh of the juice screen may become clogged if pulp is left to dry on it. Clean immediately after usage.
After cleaning the juice screen, check to see if the mesh holes are clear of debris by holding it up towards a light. If debris remains, repeat Step 2.
3 Ceramic Disc and all parts other than motor body may be washed in warm, sudsy water or placed in the top rack of the dishwasher for cleaning.
Cleaning tips
After each use, immediately rinse all removable parts in hot water to remove pulp and juice. It may be necessary to use the cleaning brush to remove pulp from the screen. Let parts air dry.
- To prevent staining of plastic parts from brightly colored fruit and vegetables, wash parts immediately after use.
- If discoloration from ingredients occurs, soak plastic parts in a solution of water and 10% lemon juice. You can also clean them with a non-abrasive cleanser. Do not soak plastic parts or ceramic disc in bleach to remove stains.
TROUBLESHOOTING
Juicer does not operate when turned on
- Check to make sure the Juicer has been assembled correctly, and the lid is in the locked position.
Motor sounds strained during operation
- The wrong speed was selected for ingredients being juiced, putting excess strain on motor.
Refer to the Speed Selection Table in the "Tips for great results" section to determine the correct juicing speed for your ingredients.
Build-up of excess pulp in the ceramic disk
-
Stop the juicing process and follow the directions in the "Care and cleaning" section to disassemble and clean the juicer lid. Scrape off pulp, reassemble, and resume juicing.
-
Once excess pulp is removed, try alternating between soft and hard vegetables and fruit.
Pulp is too wet; not enough juice being extracted
-
Juicing screen may be clogged. Follow directions in the "Care and cleaning" section to disassemble Juicer and clean the screen.
-
Check your pulp setting. You may need to change it based on your preferred juice thickness.
Juice is spraying out of the spout
- Try a slower speed and push ingredients more slowly through the feed tube.
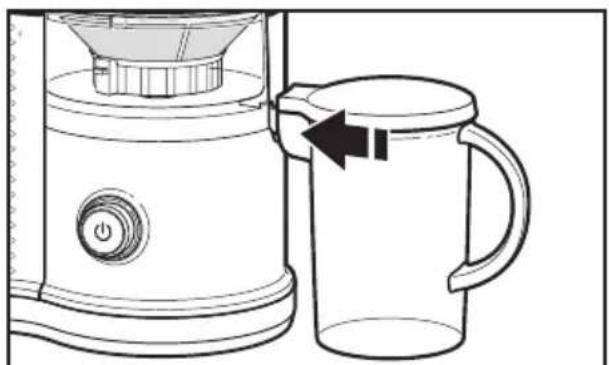
Make sure juice pitcher is pushed close to the juicer and fits snugly against it.
KitchenAid® Easy Clean Juicer Warranty for the 50 United States, the District of Columbia, Puerto Rico, and Canada
This warranty extends to the purchaser and any succeeding owner for Easy Clean Juicers operated in the 50 United States, the District of Columbia, Puerto Rico, and Canada.
Length of Warranty: One Year Full Warranty from date of purchase.
KitchenAid Will Pay for Your Choice of:

Hassle-Free Replacement of your Easy Clean Juicer. See the next page for details on how to arrange for service, or call the Customer eXperience Center toll-free at 1-800-541-6390.
OR The replacement parts and repair labor costs to correct defects in materials and workmanship. Service must be provided by an Authorized KitchenAid Service Center.
KitchenAid Will Not Pay for:
A. Repairs when Easy Clean Juicer is used in other than normal single family home use.
B. Damage resulting from accident, alteration, misuse or abuse.
C. Any shipping or handling costs to deliver your Easy Clean Juicer to an Authorized Service Center.
D. Replacement parts or repair labor costs for Easy Clean Juicer operated outside the 50 United States, District of Columbia, Puerto Rico, and Canada.
DISCLAIMER OF IMPLIED WARRANTY; LIMITATION OF REMEDIES
IMPLIED WARRANTY, INCLUDING TO THE EXTENT APPLICABLE WARRANTY OF MERCHANTABILITY OR FITNESS FOR A PARTICULAR PURPOSE, ARE EXCLUDING TO THE EXTENT LEGALLY PERMISSIBLE. ANY IMPLIED WARRANTY THAT MAY BE IMPOSED BY LAW ARE LIMITED TO ONE YEAR, OR THE SHORTEST PERIOD ALLOWED BY LAW. SOME STATES AND PROVINCES DO NOT ALLOW LIMITATIONS OR EXCLUSIONS ON HOW LONG AN IMPLIED WARRANTY OF MERCHANTABILITY OR FITNESS LASTS, SO THE ABOVE LIMITATIONS OR EXCLUSIONS MAY NOT APPLY TO YOU.
IF THIS PRODUCT FAILS TO WORK AS WARRANTYED, CUSTOMER'S SOLE AND EXCLUSIVE REMEDY SHALL BE REPAIR OR REPLACEMENT ACCORDING TO THE TERMS OF THIS LIMITED WARRANTY. KITCHENAID AND KITCHENAID CANADA DO NOT ASSUME ANY RESPONSIBILITY FOR INCIDENTAL OR CONSEQUENTIAL DAMAGES. This warranty gives you specific legal rights and you may also have other rights which vary from state to state or province to province.
Hassle-Free Replacement Warranty – 50 United States, District of Columbia, and Puerto Rico
We're so confident the quality of our products meets the exacting standards of KitchenAid that, if your Easy Clean Juicer should fail within the first year of ownership, KitchenAid will arrange to deliver an identical or comparable replacement to your door free of charge and arrange to have your original Juicer returned to us. Your replacement unit will also be covered by our one year limited warranty.
If your Easy Clean Juicer should fail within the first year of ownership, simply call our toll
free Customer eXperience Center at I-800-541-6390 Monday through Friday. Please have your original sales receipt available when you call. Proof of purchase will be required to initiate the claim. Give the consultant your complete shipping address. (No P.O. Box numbers, please.)
When you receive your replacement Easy Clean Juicer, use the carton, packing materials, and prepaid shipping label to pack up your original Easy Clean Juicer and send it back to KitchenAid.
Hassle-Free Replacement Warranty - Canada
We're so confident the quality of our products meets the exacting standards of the KitchenAid brand that, if your Easy Clean Juicer should fail within the first year of ownership, KitchenAid Canada will replace your Easy Clean Juicer with an identical or comparable replacement. Your replacement unit will also be covered by our one year limited warranty.
If your Easy Clean Juicer should fail within the first year of ownership, simply call our
toll-free Customer eXperience Center at 1-800-807-6777 Monday through Friday. Please have your original sales receipt available when you call. Proof of purchase will be required to initiate the claim. Give the consultant your complete shipping address.
When you receive your replacement Easy Clean Juicer, use the carton, packing materials, and prepaid shipping label to pack up your original Easy Clean Juicer and send it back to KitchenAid.
Arranging for Service after the Warranty Expires, or Ordering Accessories and Replacement Parts
In the United States and Puerto Rico:
For service information, or to order accessories or replacement parts, call toll-free at 1-800-541-6390 or write to:
Customer eXperience Center, KitchenAid Small Appliances, P.O. Box 218, St. Joseph, MI 49085-0218
Outside the United States and Puerto Rico:
Consult your local KitchenAid dealer or the store where you purchased the Easy Clean Juicer for information on how to obtain service.
For service information in Canada:
Call toll-free 1-800-807-6777.
For service information in Mexico:
Call toll-free 01-800-0022-767.
BIENVENUE DANS LE MONDE DE KITCHENAID.
Customer eXperience Center, KitchenAid Portable Appliances, P.O.Box 218,St. Joseph,MI 49085-0218
/ ^M © 2014 KitchenAid. All rights reserved. Used under license in Canada.


- TABLE OF CONTENTS
- EASY CLEAN JUICER SAFETY
- PARTS AND FEATURES
- ASSEMBLING THE EASY CLEAN JUICER
- PROOF OF PURCHASE & PRODUCT REGISTRATION
- Your safety and the safety of others are very important.
- DANGER
- WARNING
- IMPORTANT SAFEGUARDS
- SAVE THESE INSTRUCTIONS
- Electrical requirements
- Parts and accessories
- Before first use
- Assembling the Easy Clean Juicer parts
- Making juice
- Quick tips
- Before juicing:
- After juicing:
- For easy cleanup:
- JUICES
- Cranberry Apple Twist
- Garden Fresh Juice
- Mojo Mojito Juice
- Pineapple Mango Cucumber
- Daily Green
- Melon Raspberry Medley
- Morning Veggie juice
- Pomegranate Lime Coconut
- Ruby Apple Stinger
- Tropical Veggie Juice
- RECIPES USING PULP
- Citrus Carrot
- Carrot and Oat Muffins
- Carrot Cuke Parsnip Juice
- Vegetarian Chili with Brown Rice
- Sweet Pepper Carrot Juice
- Penne Pasta with Chunky Tomato Sauce and Spinach
- CARE AND CLEANING
- Disassembling the Easy Clean Juicer
- Cleaning the Easy Clean Juicer
- Cleaning tips
- TROUBLESHOOTING
- Juicer does not operate when turned on
- Motor sounds strained during operation
- Build-up of excess pulp in the ceramic disk
- Pulp is too wet; not enough juice being extracted
- Juice is spraying out of the spout
- KitchenAid® Easy Clean Juicer Warranty for the 50 United States, the District of Columbia, Puerto Rico, and Canada
- Length of Warranty: One Year Full Warranty from date of purchase.
- KitchenAid Will Pay for Your Choice of:
- KitchenAid Will Not Pay for:
- DISCLAIMER OF IMPLIED WARRANTY; LIMITATION OF REMEDIES
- Hassle-Free Replacement Warranty – 50 United States, District of Columbia, and Puerto Rico
- Hassle-Free Replacement Warranty - Canada
- Arranging for Service after the Warranty Expires, or Ordering Accessories and Replacement Parts
- BIENVENUE DANS LE MONDE DE KITCHENAID.
Brand : KITCHENAID
Model : KVJ0333WH
Category : Juicer