X76001G1S Sport Class XXL - Watch Gc - Free user manual and instructions
Find the device manual for free X76001G1S Sport Class XXL Gc in PDF.
Frequently Asked Questions - X76001G1S Sport Class XXL Gc
User questions about X76001G1S Sport Class XXL Gc
0 question about this device. Answer the ones you know or ask your own.
Ask a new question about this device
Download the instructions for your Watch in PDF format for free! Find your manual X76001G1S Sport Class XXL - Gc and take your electronic device back in hand. On this page are published all the documents necessary for the use of your device. X76001G1S Sport Class XXL by Gc.
USER MANUAL X76001G1S Sport Class XXL Gc
- Simple Time and....Mini....Sweep....
- Multifunction 5
- Chronograph
12,6, 9 Three-Eye .... Chrono.... 1/10.... sec....
3,6,9 Three-Eye ....Chrono....
2,6,10 Three-Eye Chrono 1/5 sec
3,6,9 Three-Eye Chrono 1/10 sec
Automatic Movements 10
Warranty 12
FRANCAIS
Quartz movements
- Heure Simple &......mini......trotteuse......
- Multifonction 14
Chronographe 12,6, 9 Three-Eye .... Chrono.... 1/10.... sec. 3,6,9 Three-Eye .... Chrono. 2,6,10 Three-Eye Chrono.... 1/5.... sec. 3,6,9 Three-Eye Chrono.... 1/10.... sec.
- Simple Time and....Mini....Sweep....
- Multifunction 32
- Chronograph
12,6, 9 Three-Eye .... Chrono.... 1/10.... sec....
Automatic Movements 37
Warranty 40
使用说明书
Quartz movements
- 说明 42
- 多功能 42
- 三眼日/日期/第二时区
Automatic Movements 47
保修 48
INDONESIA
Quartz movements
- Simple Time and....Mini....Sweep....
- Multifungsi 51
- Chronograph
12,6, 9 Three-Eye Chrono.1/10......sec......
3,6,9 Three-Eye Chrono 53
2,6,10 Three-Eye Chrono 1/5......sec......
3,6,9 Three-Eye Chrono 1/10......sec......
Automatic Movements 56
Garansi 58
JAPANESE
Quartz movements
- Simple Time and....Mini....Sweep....
- Multifunction 60
- Chronograph
12,6, 9 Three-Eye Chrono.1/10......sec....
3,6,9 Three-Eye Chrono 62
2,6,10 Three-Eye Chrono 1/5......sec......
3,6,9 Three-Eye Chrono 1/10......sec......
Automatic Movements 65
Warranty 67
KOREAN
Quartz movements
- Simple Time and....Mini....Sweep....
- Multifunction 69
- Chronograph
12,6, 9 Three-Eye ....Chrono....1/10....sec....
Automatic Movements 74
Warranty 76
RUSSIAN
Quartz movements
- Simple Time and....Mini....Sweep....
- Multifunction 79
- Chronograph
12,6, 9 Three-Eye .... Chrono.... 1/10.... sec....
Automatic Movements 84
Warranty 86
Gc offers a unique fusion of timeless fashion and quality Swiss watchmaking... Smart Luxury. This is the essence of the Gc brand – an intelligent way to live luxury. Each Gc timepiece is an expression in luxurious sophisticated aesthetics and refined European design, offering substance, value and fine craftsmanship and an infinite attention to detail, to fulfil dreams of self-expression and success, reflecting personal achievement. Gc stands for people who are successful, are proud of it and feel good about themselves.
A Swiss precision movement beats at the heart of each Gc timepiece. All Gc timepieces are manufactured with the finest materials and luxurious details - from certified diamonds, sapphire and mineral crystals, mother-of-pearl dials, high-tech ceramic, 316L stainless steel and luxurious leather straps. Security features include deployment clasps and a screw-in crown and screw-down case back, for optimal water resistance. The Gc logo figures on the crown, clasp and case back, which also bears the engraved style number of the watch.
WATCH FEATURES:
ENGLISH
PLEASE READ THE FOLLOWING BEFORE OPENING THE WATCH.
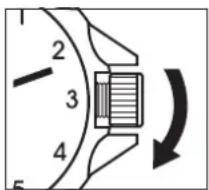
SCREW DOWN CROWN
Screw down crowns are used to ensure water resistance. Do NOT pull crown unless it is unscrewed first
- UNSCREW the crown counter-clockwise (towards you) until it turns freely without tension.
- GENTLY pull the crown out to desired position for watch setting (see specific operating instructions on following pages).
- When finished setting the watch, GENTLY push the crown in towards the watch.
- While pushing in on the crown, begin to turn clockwise (away from you) until it is SECURELY screwed down.
NOTE: Failure to securely screw down the crown after setting the watch may affect its water resistance
text_image
1 2 3 4 5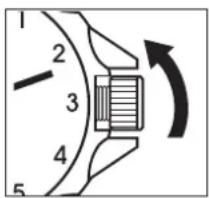
text_image
1 2 3 4 5WATER RESISTANCE
Your watch is water resistant to the depth noted on the caseback. If exposed to salt or chemical water, please rinse the watch with fresh
water and wipe with a soft, dry cloth.
Guidelines:
30 M/3 ATM/100 Ft. - Accidental splashes. Not suitable for swimming
50 M/5 ATM/165 Ft. - Suitable for swimming in shallow water
100 M/10 ATM/330 Ft. - Suitable for swimming and snorkelling
200 M/20 ATM/660 Ft. - Suitable for recreational scuba diving
300 M/30 ATM/1000 Ft. - Suitable for professional diving
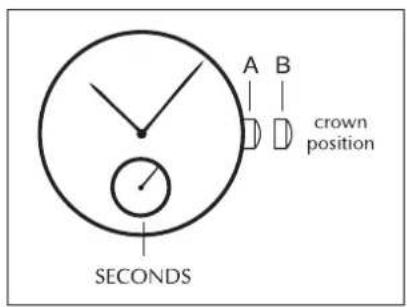
SIMPLE TIME & MINI SWEEP
To set the time:
- PULL out crown to position 2.
- TURN crown either way to correct time.
- PUSH back crown to position 1.
text_image
A B crown position SECONDSMULTIFUNCTION
TWO- EYE DAY DATE
To set the time:
- PULL out crown to position 2.
- TURN crown clockwise to correct time. Day and date will also change.
- PUSH back crown to position 1.
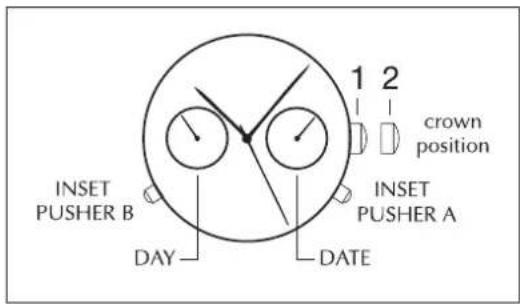
text_image
1 2 crown position INSET PUSHER A INSERT PUSHER B DAY DATE INSET PUSHER ATo set date:
- PULL out the crown to position 2.
- TURN crown clockwise to correct date.
- PUSH in crown to position 1.
NOTE: Press inset pusher A with a pointy object to "quick change" date. Do not use this pusher between 11:30 p.m. and 5:30 a.m.
To set the day:
- PULL out the crown to position 2.
- Advance time 24 hours to change the day.
- PUSH back crown to position 1.
NOTE: Press inset pusher B with a pointy object to "quick change".
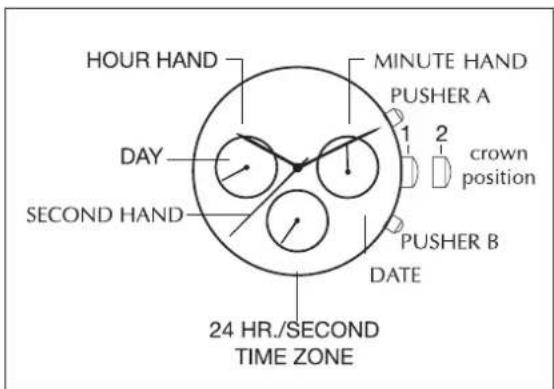
THREE-EYE DAY/DATE/SECOND TIME ZONE
To set the time:
- PULL out crown to position 2.
- TURN crown clockwise to correct time. Day and date will also change.
- PUSH back crown to position 1.
To set the second time zone:
- SET the crown to position 1.
- PRESS pusher B step by step to advance the hour hand of the second time zone until the desired time is set.
- stop pressing the button after finishing the setting.
NOTE: when using pusher B to set the second time zone hour, the centre minute hand must be set to between 55th minute and 5th minute at any hour.
text_image
HOUR HAND MINUTE HAND PUSHER A 1 2 crown position DAY SECOND HAND PUSHER B DATE 24 HR./SECOND TIME ZONETo set the day and date:
- PULL out the crown to position 2.
- TURN crown clockwise to correct day or date. The day hand will advance one day when 4:30 in the morning is reached.
- PUSH back crown to position 1.
NOTE: to "quick change" the date set the crown at position 1 then press pusher A.
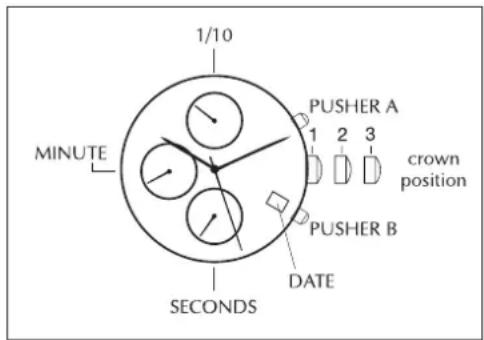
CHRONOGRAPH
12,6,9 THREE-EYE CHRONO 1/10 SEC
NOTE:
Crown position '1', '2' & '3'
Pushers 'A' (top) and 'B' (bottom)
Left eye "30 minutes elapsed"
Right eye "1/10 seconds elapsed"
Center eye "seconds elapsed"
THIS CHRONOGRAPH WATCH HAS 3 FUNCTIONS:
Time, Calendar, Stopwatch
TIME:
To set the time:
- PULL crown to position 3.
- TURN crown either way to correct time (same for Day when this function is available).
- PUSH back crown to position 1.
text_image
1/10 MINUTE PUSHER A 1 2 3 crown position PUSHER B DATE SECONDSCALENDAR:
- PULL crown to position 2.
- TURN crown clockwise to correct calendar.
- PUSH back crown to position 1.
STOPWATCH:
The stopwatch is capable of measuring:
- One minute elapsed up to 30 minutes.
- Chronograph hand 1/10 or 1/5 second.
Before using the stopwatch, reset the stopwatch hands to the '60' position by pressing pusher 'B'. If stopwatch hands move improperly, reset the hands as follows:
TO RESET STOPWATCH HANDS:
BIG CHRONOGRAPH HAND IN THE CENTER
- PULL crown to position 2
- PRESS pusher B until the chronograph hand is reset to '60'
- RESET crown to position 1
COUNTER HAND 1/10 AT 12 O'CLOCK:
- PULL crown to position 2
- PRESS pusher A until the top eye hand is reset to '0'
- RESET crown to position 1
COUNTER MINUTE HAND AT 9 O'CLOCK:
- PULL crown to position 3
- PRESS pusher A until the left eye hand is reset to '30'
- RESET crown to position 1
STANDARD STOPWATCH MEASUREMENT:
- PRESS pusher A to start timing
- PRESS pusher A to stop timing
- PRESS pusher B to reset
ACCUMULATED ELAPSED TIME MEASUREMENT:
- PRESS pusher A to start timing
- PRESS pusher A to stop timing
- PRESS pusher A to restart timing
- PRESS pusher A to stop 2nd timing
- PRESS pusher B to reset
SPLIT TIME MEASUREMENT:
- PRESS pusher A to start timing
- PRESS pusher B to 'split'
- PRESS pusher B to begin again
- PRESS pusher A to stop
- PRESS pusher B to reset
TIMING 2 COMPETITORS:\*
- PRESS pusher A to start timing of 1st event
- PRESS pusher B to stop timing of 1st event; stopwatch continues to run internally
- PRESS pusher A to start timing of 2nd event
- PRESS pusher B to view time of 2nd event
- PRESS pusher B to reset
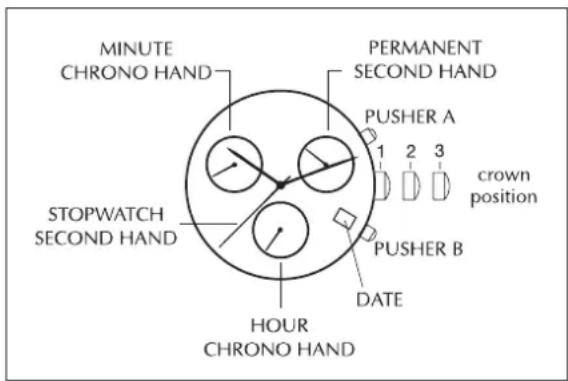
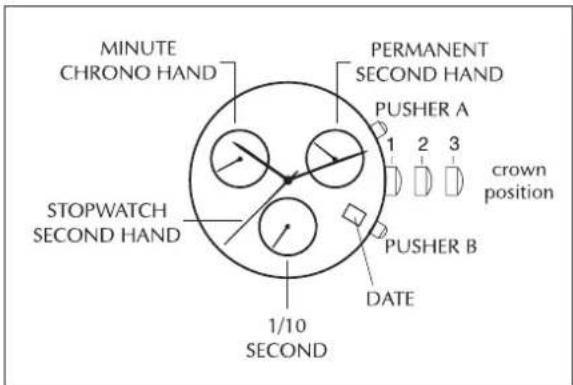
3,6,9 THREE-EYE CHRONO
NOTE:
Crown position 'A', 'B' and 'C'
Pushers A (Top right) & B (Bottom right)
6 o'clock eye - Hours elapsed up to 12 hours
9 o'clock eye - Minutes elapsed up to 30 minutes
3 o'clock eye - Permanent second hand
These instruction also apply to the 6, 9 Two-Eye
Chronograph movement. Please note that the only difference is that such movements do not have second eye.
text_image
MINUTE CHRONO HAND PERMANENT SECOND HAND PUSHER A 1 2 3 crown position STOPWATCH SECOND HAND PUSHER B DATE HOUR CHRONO HANDTHIS CHRONOGRAPH WATCH HAS 3 FUNCTIONS:
Time, Calendar, Stopwatch
TIME:
To set the time:
- PULL crown to position 3.
- TURN crown either way to correct time (same for Day when this function is available).
- PUSH back crown to position 1.
CALENDAR:
- PULL crown to position 2.
- TURN crown clockwise to correct calendar.
- PUSH back crown to position 1.
STOPWATCH:
This stopwatch is capable of measuring:
Chrono Hours elapsed up to 12 hours (6 o'clock eye)
Chrono Minutes elapsed up to 30 minutes (9 o'clock eye)
Stopwatch seconds up to 1 minute (Big second hand)
Before using the stopwatch, reset the stopwatch Chrono hands to the '12' and the '0' position.
STANDARD STOPWATCH MEASUREMENT:
- PRESS pusher A to start timing
- PRESS pusher A to stop timing
- PRESS pusher B to reset
ACCUMULATED ELAPSED TIME MEASUREMENT:
- PRESS pusher A to start timing
- PRESS pusher A to stop timing
- PRESS pusher A to restart timing
- PRESS pusher A to stop 2nd timing
- PRESS pusher B to reset
SPLIT TIME MEASUREMENT:
- PRESS pusher A to start timing of the first and second events
- PRESS pusher B to stop and record the timing of the 1st event
- PRESS pusher B to catch up to the timing of the 2nd event
- PRESS pusher A to stop the timing of the 2nd event and record the time
- PRESS pusher B to reset. All stopwatch Chrono hands return to '12' and '0' position.
2,6,10 THREE-EYE CHRONO 1/5 SEC
NOTE:
Crown position 'A', 'B' and 'C'
Pushers A (Top right) & B (Bottom right)
6 o'clock eye -Day counter
10 o'clock eye - Minutes elapsed up to 30 minutes
2 o'clock eye - Permanent second hand
THIS CHRONOGRAPH WATCH HAS 3 FUNCTIONS:
Time, Calendar, Stopwatch
TIME:
To set the time:
- PULL crown to position 3.
- TURN crown either way to correct time (same for Day when this function is available).
- PUSH back crown to position 1.
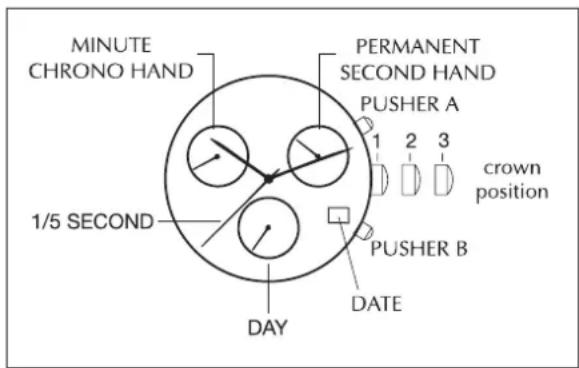
text_image
MINUTE CHRONO HAND 1/5 SECOND DAY PUSHER A 1 2 3 PUSHER B DATE PUMANENT SECOND HAND crown positionCALENDAR:
- PULL crown to position 2.
- TURN crown clockwise to correct calendar.
- PUSH back crown to position 1.
STOPWATCH:
This stopwatch is capable of measuring:
Chrono Hours elapsed up to 12 hours (6 o'clock eye)
Chrono Minutes elapsed up to 30 minutes (9 o'clock eye)
Stopwatch seconds up to 1 minute (Big second hand)
Before using the stopwatch, reset the stopwatch Chrono hands to the '12' and the '0' position.
STANDARD STOPWATCH MEASUREMENT:
- PRESS pusher A to start timing
- PRESS pusher A to stop timing
- PRESS pusher B to reset
ACCUMULATED ELAPSED TIME MEASUREMENT:
- PRESS pusher A to start timing
- PRESS pusher A to stop timing
- PRESS pusher A to restart timing
- PRESS pusher A to stop 2nd timing
- PRESS pusher B to reset
SPLIT TIME MEASUREMENT:
- PRESS pusher A to start timing of the first and second events
-
PRESS pusher B to stop and record the timing of the 1st event
-
PRESS pusher B to catch up to the timing of the 2nd event
- PRESS pusher A to stop the timing of the 2nd event and record the time
- PRESS pusher B to reset. All stopwatch Chrono hands return to '12'
and '0' position.
3,6,9 THREE-EYE CHRONO 1/10 SEC
NOTE:
Crown position 'A', 'B' and 'C'
Pushers A (top right) & B (Bottom right)
6 o'clock eye - 1/10 second elapsed up to 30 minutes
9 o'clock eye - Minutes elapsed up to 10 hours
3 o'clock eye - Permanent second hand
THIS CHRONOGRAPH WATCH HAS 3 FUNCTIONS:
Time, Calendar, Stopwatch
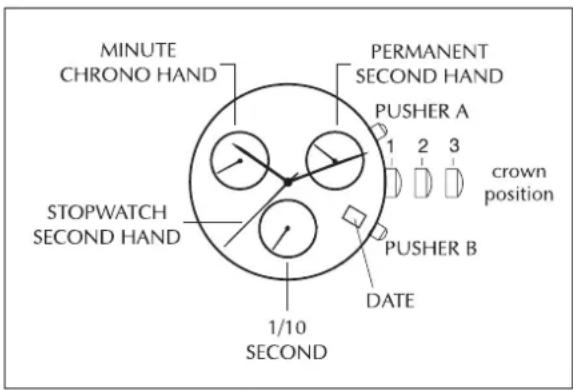
text_image
MINUTE CHRONO HAND PERMANENT SECOND HAND PUSHER A 1 2 3 crown position STOPWATCH SECOND HAND PUSHER B DATE 1/10 SECONDTIME:
To set the time:
- PULL crown to position 3.
- TURN crown either way to correct time (same for Day when this function is available).
- PUSH back crown to position 1.
CALENDAR:
- PULL crown to position 2.
- TURN crown clockwise to correct calendar.
- PUSH back crown to position 1.
STOPWATCH:
This stopwatch is capable of measuring:
Chrono 1/10 second elapsed up to 30 minutes (6 o'clock eye)
Chrono Minutes elapsed up to 10 hours (9 o'clock eye)
Stopwatch seconds up to 1 minute (Big second hand)
Before using the stopwatch, reset the stopwatch Chrono hands to the '12' and the '0' position.
STANDARD STOPWATCH MEASUREMENT:
- PRESS pusher A to start timing
- PRESS pusher A to stop timing
- PRESS pusher B to reset
ACCUMULATED ELAPSED TIME MEASUREMENT:
- PRESS pusher A to start timing
- PRESS pusher A to stop timing
- PRESS pusher A to restart timing
- PRESS pusher A to stop 2nd timing
- PRESS pusher B to reset
SPLIT TIME MEASUREMENT:
- PRESS pusher A to start timing of the first and second events
- PRESS pusher B to stop and record the timing of the 1st event
- PRESS pusher B to catch up to the timing of the 2nd event
- PRESS pusher A to stop the timing of the 2nd event and record the time
- PRESS pusher B to reset. All stopwatch Chrono hands return to '12' and '0' position.
CORRECTIVE MODE FOR STOPWATCH CHRONO HANDS
On all Chrono movements, if the largest hands do not reset perfectly back to the 12 o'clock or zero position:
- PULL crown to position 3.
- If center stopwatch second hand or Chrono hands do not reset to the 12 o'clock or zero position, press pusher A and B simultaneously for at least 2 seconds.
- The center stopwatch second hand will rotate by 360 degrees to activate corrective mode.
- If center stopwatch second hand or Chrono hands are not located at
'12' or '0' position, either press pusher A continuously or repeatedly until the center stop second hand moves by each interval and returns to '12' and '0' position. Press pusher B once to activate corrective move of next minute Chrono hand, hour Chrono hand, or 1/10 second Chrono hand. Press pusher A continuously or repeatedly until the minute Chrono hand and hour Chrono hand or
1/10 second Chrono hand moves by each interval and returns to
'12' and '0' position.
5. PUSH back crown to position 1 to activate the adjustment.
AUTOMATIC
TIME CORRECTION
To set time:
- UNSCREW and PULL out crown to position 3. The second hand will stop.
- To adjust to the second, place second hand at 12H.
- TURN crown to set the correct hour and minute.
- PUSH back crown to position 1.
DATE CORRECTION
To set date:
- UNSCREW and PULL out crown to position 2.
- TURN crown clockwise to correct the date.
- PUSH back crown to position 1 and screw tightly to the case.
text_image
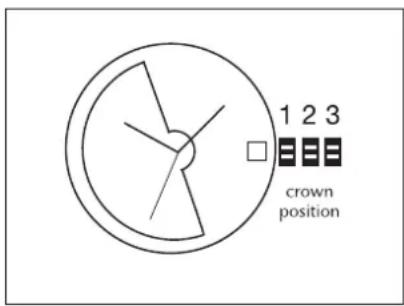
1 2 3 crown positionWINDING
The Gc Automatic is equipped with a high-quality mechanism with automatic winding. With the slightest movement of your wrist, a silent rotor conveys power to the spring. When it is fully wound, the minimum power reserve is 38 hours. If the watch is not used during a certain time, we recommend winding your Gc Automatic manually by means of winding the crown in position 1.
AUTOMATIC / CHRONOGRAPH
TECHNICAL SPECIFICATIONS
The Gc Automatic Chronograph features:
-A Valjoux 7750 Chronograph movement with 28,800 vibrations per hour and 25 jewels
-A 42-hour power reserve indicator
Time Correction
Unscrew and pull the crown to position 3. The second hand will stop.
To adjust it to the second, place the second hand at 12. Set the hands to the correct hour and minute.
Date Correction
Unscrew and pull the crown to position 2. Turn it clockwise until the displayed date is correct. Then, push back the crown to position 1 and screw down tightly to the case.
CHRONOGRAPH FUNCTION
The Gc Automatic chronograph has a three-counter automatic chronograph movement indicating the hour at 6, the minute at 12 and the second at 9 o'clock.
TO USE THE STOPWATCH:
This stopwatch is capable of measuring:
Chrono Hours elapsed up to 12 hours (6 o'clock eye)
Chrono Minutes elapsed up to 30 minutes (12 o'clock eye)
Stopwatch seconds up to 1 minute (9 o'clock eye)
Before using the stopwatch, reset the stopwatch Chrono hands to the '12' and the '0' position.
STANDARD STOPWATCH MEASUREMENT
- PRESS pusher A to start timing
- PRESS pusher A again to stop timing
- PRESS pusher B to reset
ACCUMULATED ELAPSED TIME MEASUREMENT:
- PRESS pusher A to start timing
- PRESS pusher A again to stop timing
- PRESS pusher A to restart timing
- PRESS pusher A again to stop 2nd timing
- PRESS pusher B to reset
SPLIT TIME MEASUREMENT:
- PRESS pusher A to start timing of the first and second events
- PRESS pusher B to stop and record the timing of the 1st event
- PRESS pusher B to catch up to the timing of the 2nd event
- PRESS pusher A to stop the timing of the 2nd event and record the time
- PRESS pusher B to reset. All stopwatch Chrono hands return to '12' and '0' position.
CORRECTIVE MODE FOR STOPWATCH ON A CHRONOGRAPH AUTOMATIC TIMEPIECE
On all Chronograph movements, if the largest hands do not reset perfectly back to the 12 o'clock or zero position:
- PULL crown to position 3.
- If center stopwatch second hand or Chrono hands do not reset to the 12 o'clock or zero position, press pusher A and B simultaneously for at least 2 seconds.
-
The center stopwatch second hand will rotate by 360 degrees to activate corrective mode.
-
If center stopwatch second hand or Chrono hands are not located at '12' or '0' position, either press pusher A continuously or repeatedly until the center stop second hand moves by each interval and returns to '12' and '0' position. Press pusher B once to activate corrective move of next minute Chrono hand, hour Chrono hand, or 1/10 second Chrono hand. Press pusher A continuously or repeatedly until the minute Chrono hand and hour Chrono hand or 1/10 second Chrono hand moves by each interval and returns to '12' and '0' position.
-
Press crown back to position 1 to activate the adjustment.
GENERAL INFORMATION
WINDING
The Gc Automatic chronograph is equipped with a high-quality mechanism with automatic winding. With the slightest movement of your wrist, a silent rotor conveys power to the spring. When it is fully wound, the minimum power reserve is 42-hours. The power reserve indicator on the dial indicates the level of power left before rewinding the watch is necessary. If it has not been worn recently, we recommend winding your Gc Automatic chronograph manually by winding the crown to position 1.
SCREW DOWN
The Gc Automatic chronograph has a screw down crown. It is important to screw it in correctly and fully after each adjustment to ensure that the watch remains water resistant. Do not pull the crown unless it
is unscrewed first. Unscrew the crown counter-clockwise (towards you) until it turns freely without tension, and then pull the crown out to desired position for watch settings. After time change, push the crown to position 1, keep it in this position and turn it clockwise. Screw it down until it is secure.
WATER RESISTANCE
Your Gc Automatic chronograph is water resistant to 100 Meters (10 ATM/330 feet of pressure). If exposed to salt or chemical water, please rinse the watch with fresh water and wipe with a soft, dry cloth.
DIAMONDS
Your Gc timepiece is crafted with genuine natural diamonds and reflects our dedication to quality and design. The diamonds in your Gc timepiece have been purchased from legitimate sources and are conflict free, based on the guarantee provided by the supplier of these diamonds.
Warranty
Your Gc watch is covered by an international guarantee against any manufacturing defects for a period of 24 months* from the date of purchase indicated on the guarantee card. Any part found to be defective within this period will be repaired or replaced at no charge. In order to benefit from this guarantee, you will be required to present the Gc Watches international guarantee certificate, duly completed, dated, stamped and signed by an authorized Gc Watches retailer.
THE GC WATCHES INTERNATIONAL GUARANTEE CERTIFICATE DOES NOT COVER:
- Defects arising from damage, mishandling, incorrect or abusive use (knocks, crushing, moisture in the case of non water resistant watches), alteration or repairs not performed by an authorized Gc Watches retailer
- Leather straps or bracelets
- Batteries
- Normal wear of base metal, surface-coated watches
- Theft or loss of the complete watch or components
*USA and CANADA warranty length is 10 years
text_image
MINUTE CHRONO HAND PERMANENT SECOND HAND PUSHER A 1 2 3 crown position STOPWATCH SECOND HAND PUSHER B DATE HOUR CHRONO HANDCE CHRONOGRAPHE PRÉSENTE 3 FONCTIONS :
text_image
MINUTE CHRONO HAND PERMANENT SECOND HAND PUSHER A 1 2 3 crown position STOPWATCH SECOND HAND PUSHER B DATE HOUR CHRONO HANDESTE RELOJ CRONÓGRAFO TIENE 3 FUNCIONES:
text_image
MINUTE CHRONO HAND PERMANENT SECOND HAND PUSHER A 1 2 3 crown position STOPWATCH SECOND HAND PUSHER B DATE HOUR CHRONO HANDPosisi Crown 'A', 'B' and 'C'
Tombol A (Kanan atas) & B (Kanan bawah)
text_image
MINUTE CHRONO HAND PERMANENT SECOND HAND PUSHER A 1 2 3 crown position STOPWATCH SECOND HAND PUSHER B DATE HOUR CHRONO HANDCHRONOGRAPH INI MEMPUNYAI 3 FUNGSI:
Posisi Crown 'A', 'B' and 'C'
Tombol A (Kanan atas) & B (Kanan bawah)
Posisi crown 'A', 'B' and 'C'
Tombol A (Atas kanan) & B (bawah kanan)
SPLIT TIME MEASUREMENT:
- PRESS pusher A to start timing of the first and second events
- PRESS pusher B to stop and record the timing of the 1st event
- PRESS pusher B to catch up to the timing of the 2nd event
- PRESS pusher A to stop the timing of the 2nd event and record the time
- PRESS pusher B to reset. All stopwatch Chrono hands return to '12' and '0' position.
text_image
MINUTE CHRONO HAND PERMANENT SECOND HAND PUSHER A 1 2 3 crown position STOPWATCH SECOND HAND PUSHER B DATE 1/10 SECONDMODE PENGOREKSI PADA JAM PENUNJUK CHRONO:
text_image
MINUTE CHRONO HAND PERMANENT SECOND HAND PUSHER A 1 2 3 crown position STOPWATCH SECOND HAND PUSHER B DATE HOUR CHRONO HANDhttp://gcwatches.com/en/service