Davos - Air purifier Sonnenkönig - Free user manual and instructions
Find the device manual for free Davos Sonnenkönig in PDF.
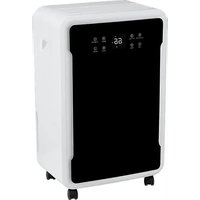
| Product Type | Air Washer |
| Brand | Sonnenkönig |
| Model | Davos |
| Dimensions (W x H x D) | 40.5 x 32 x 32 cm |
| Weight | 7.0 kg |
| Power Supply | 220-240 V~ / 50/60 Hz, 15 W |
| Water Tank Capacity | 6.2 liters |
| Programs | Auto, Low, Mid, High, Ionizer, Night |
| Timer | 1 to 8 hours |
| Child Safety | Yes (key lock) |
| Automatic Shut-off | Empty tank or top part removed |
| Cleaning | Tank: weekly; discs: every 4 weeks |
| Descaling | Monthly or bimonthly depending on water hardness |
| Filter | Integrated fixed filter (non-removable) |
| Warranty | 24 months |
| Certifications | CE |
Frequently Asked Questions - Davos Sonnenkönig
User questions about Davos Sonnenkönig
0 question about this device. Answer the ones you know or ask your own.
Ask a new question about this device
Download the instructions for your Air purifier in PDF format for free! Find your manual Davos - Sonnenkönig and take your electronic device back in hand. On this page are published all the documents necessary for the use of your device. Davos by Sonnenkönig.
USER MANUAL Davos Sonnenkönig
Festnetz 14 Cent/Minute
Modifications techniques
Telephone Fixe 14 Cent/Minute
Mobiel network 42 Cent/Minute
AROSA / DAVOS
Air washer User's manual
INDEX
1 Safety instructions 74
2 Appliance description 77
3 How works. 79
4 Before first use. 79
5 The function buttons 81
6 Operation 83
7 After use 84
8 Cleaning and maintenance 84
9 Storage. 85
10 Troubleshooting 86
11 Technische specificaties 87
12 Warranty / disposal / technical change 87
1 Safety instructions
GB
Please read before first commissioning the safety instructions carefully and observe the safety instructions to prevent damage due to misuse, improper operation, and improper environmental conditions to be avoided. Keep these for later reference.
Check the device after removing the packaging for damage. Do not put the unit in case of suspected corruption in operation and consult a specialist. The recyclable packaging material must not be stored or disposed accessible for young children, but must be disposed of properly.
This appliance is only for the purpose for which it was explicitly developed. Any other use is regarded as improper and therefore dangerous. The supplier is not liable for damage to persons and/or property damage due to an improper or incorrect use.
This appliance can be used by children aged from 8 years and above and persons with reduced physical, sensory or mental capabilities or lack of experience and knowledge if they have been given supervision or instruction concerning use of the appliance in a safe way and understand the hazards involved. Children shall not play with the appliance. Cleaning and user maintenance shall not be made by children without supervision. Please make sure to place the device on a suitable and waterproof surfaces, so that spilled liquids can not cause harm.
Repairs to electrical appliances must only be carried out by trained personnel only. Improperly performed repairs and alterations to the equipment can have dangerous consequences for the user according to what the warranty will be rejected. Please read through this user manual thoroughly before using your Airwasher, so that you become familiar with your appliance and can use it safely. We thoroughly recommend that you keep these instructions and, if you pass the appliance on, that you also hand these instructions to the new owner.
For your own safety, please observe the following safety measures when using electrical appliances:
- To prevent electric shock, neither the appliance top connected to the power nor the outside of the water basin, the power cord or the power plug resp. the connection adapter or the appliance jack must come into contact with water or other liquids. Risk of electric shock! Should the appliance top, the outside of the water basin resp. the power cord or the power plug / the connection adapter or the appliance jack come into contact with water, use dry rubber gloves to immediately pull the power plug from the socket.
- Do not operate or unplug the appliance with wet or moist hands or feet.
- Before using the appliance, check that the voltage stated on the type plate matches your mains voltage.
- Do not make any adjustments to the appliance, cable, plug or accessories.
- Only use the appliance as described in this manual for air humidification and air cleaning of living quarters. Do not use the appliance outdoors and protect it from moisture and wetness.
- Do not leave the power cable hanging over table edges so that it can be pulled. Make sure that it does not come into contact with hot surfaces, such as hotplates or a radiator, or that they come into contact with the appliance itself (except for the appliance jack).
- Install the power cord so that nobody can trip over it. Do not place under rugs. Keep clear of pointed objects.
- Always fully unwind the power cord before connecting the connection adapter to the appli
ance jack resp. the power plug to the power socket.
9.Never carry the appliance by the power cord and do not place anything on the power cord. Never pull on the power cord to disconnect the appliance from the power mains. Only pull on the plug.
10. We recommend that you do not use an extension cable with this appliance. Do not place the appliance directly underneath a power socket.
11. Keep the appliance away from hot gas, hot ovens and other heatemitting appliances or heat sources. Never use the appliance on a hot or wet surface. Never place the appliance near moisture, heat and naked flames. Keep the appliance away from moving parts or appliances.
12. The appliance has to be placed on a solid, level, dry, stable and moisture resistant surface during use (deeppile rugs are not suitable). Place the appliance somewhere it can not be knocked or tipped over.
13. Keep a minimum distance of 50~cm between the appliance and walls, curtains or other moisture sensitive materials and objects and make sure that the air around the appliance can circulate freely.
14. Never cover the appliance with cloths or the like while it is in use. The air inlet and outlet openings must never be obstructed. Do not place anything on the Airwasher and under no circumstances sit down on the appliance.
15. Do not use the appliance in wet rooms or in moist surroundings as f.e. a bathroom or a swimming pool. Danger of electric shock and fire! Also, the appliance must not be used in rooms with explosive or aggressive atmospheres, high concentrations of solvents or extremely high dust exposure.
16. The appliance is not designed for outdoor use. The appliance must not come into contact with rain. Do not use in vehicles or on boats.
17. Unplug the appliance when it is not in use or unattended, and before cleaning. We recommend the use of a residual current device (RCD safety switch) to ensure additional protection during the use of electrical appliances. It is advisable to use a safety switch with a rated residual operating current of 30mA maximum. For professional advice consult an electrician.
18. Incorrect use may cause injury!
19. Never reach for an appliance that has fallen into water or other liquids. Always pull the plug before removing it. Do not start using it again before having it checked for functionality and safety by Sonnenkönig or a service centre authorized by Sonnenkönig.
20. Never place the appliance so that it might fall into water or, on its outside, come into contact with water or another liquid.
21. Never submerge the appliance top, the outside of the water basin or parts of the appliance like power cord or power plug / connection adapter resp. appliance jack in water or bring them into contact with water resp. other liquids.
22. Place the appliance so that it is never exposed to direct sunlight.
23. Never insert any objects or tool into appliance openings. The appliance may become damaged - danger of electric shock!
24. Before refilling the Airwasher with water resp. installing or removing parts, always switch the appliance off, pull the power plug and drain the water remaining in the water basin.
25. Never use the appliance without water. Caution: Only fill the water basin with fresh tap water while the appliance is switched off and unplugged, for this, the appliance top has to be taken off. Only connect the appliance to the power and switch it on once the water basin is filled and the appliance is correctly reassembled.
26. Only use fresh, hand warm tap water (10^ to max. 30^) to fill the water basin. Only fill
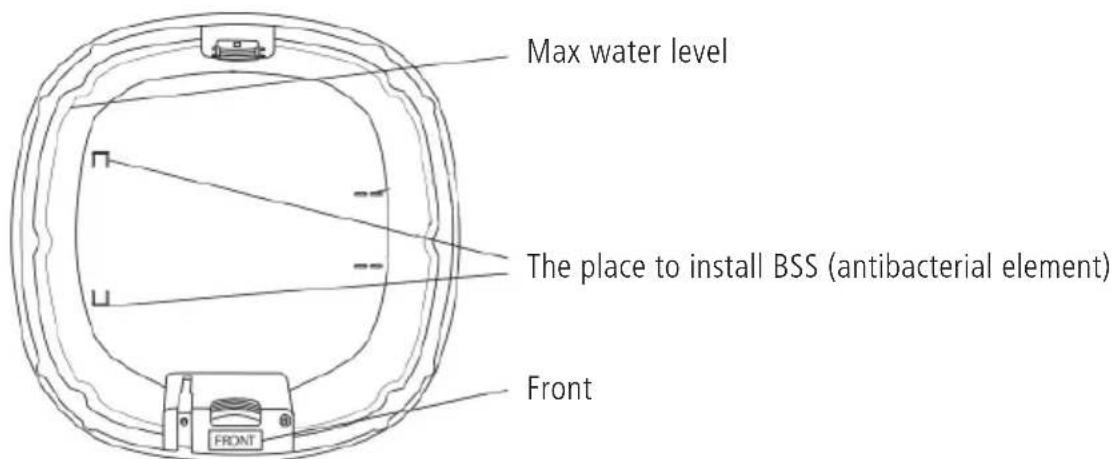
the water basin to the MAX marking with water (approx. 3cm below the upper edge of the water basin there is a line marked with WATER LEVEL. When filling the water basin, please make sure that the water level does never exceed this line). Under no circumstances add additives like essential oils or perfumes to the water.
- When filling the water basin, never hold it directly under a water faucet. Pour the water into the water basin with a container. For filling the water basin, always lift off the appliance top and never fill the appliance by pouring water into the air outlet on the appliance top side.
- Do not shake or move the appliance while it is in use. Never replace the waterfilled, switched on appliance! Before moving the appliance, you should switch it off, pull the plug and drain the water basin.
- Only use the appliance as described in this manual. Only use accessories that are included or recommended by Sonnenkönig. Improper accessories can damage the appliance resp. cause fire, electric shock or personal damage.
- Never use the appliance with a timer switch or a remote control.
- The appliance is only suited for domestic use and not for commercial use.
- Remove and discard all packaging materials and potential stickers or labels before using the appliance for the first time.
- Check your Airwasher Ionic before every use and make sure that the appliance, the power cord and plug resp. the connection adapter are undamaged.
- To prevent electric shock, do not use the appliance if cord or power plug are damaged or if the appliance has other faults, has fallen down resp. is damaged in any other way or is leaking water. Never attempt repairs yourself, but take your appli ance to Sonnenkönig or a Sonnenkönig approved service centre in order to get it inspected or mechanically and electrically repaired.
- Always keep the appliance and the power cord out of the reach of children during use. Always store it out of the reach of children.
- Children must be supervised, so that they do not play with the appliance.
- Never lift off the appliance top during use - the appliance will immediately switch off.
- The appliance will also switch off by itself if the water basin is almost empty and in need of refilling. Switch the appliance off and pull the power plug from the socket before removing the appliance top to fill the water basin with water (never exceed the MAX marking - see point 26). For filling the water basin, always remove the appliance top and never fill the appliance by pouring water into the air outlet on the appliance top side.
- Always switch the appliance off before pulling the plug, otherwise the appliance might be damaged.
- All the time during use, the appliance top has to be correctly placed on the water basin, closing it. Do not place anything on the appliance while it is in use or in storage.
- Pull the plug after every use. Only then, the appliance is fully switched off.
- If you do not use the appliance for two days or longer, always drain the remaining water and let it dry on the inside. Best store the appliance in a dark, cool place with good air circulation.
- The appliance has to be cleaned regularly. Please refer to the notes given in the section "Cleaning and maintenance" on page 84 of this manual.
- Only clean the appliance with a dry or slightly moist cloth. Never use aggressive, abrasive or acidic detergents for cleaning.
- When lifting or moving the appliance, please use the carrying handles of the water basin. Always switch the appliance off, pull the plug and drain the water first. Always move the appliance very carefully, do not shake or throw it, it might be damaged or start leaking.
2. Appliance description
GB
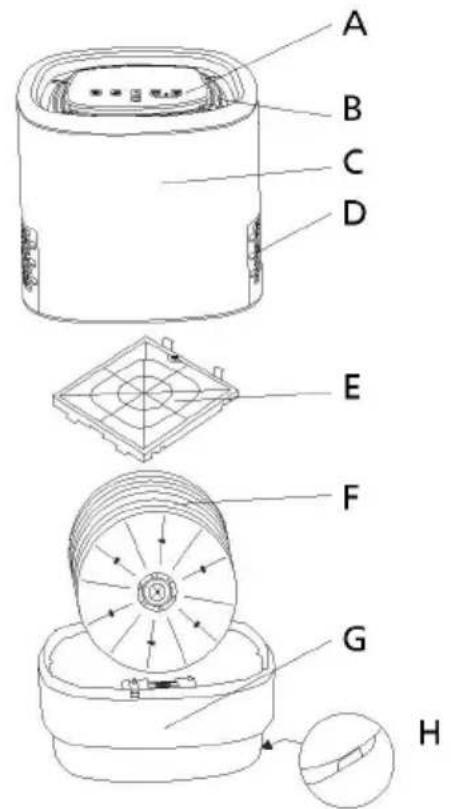
A. Control panel with touch sensitive sensor buttons and function display
B. Air outlet for cleaned and humidified air
C. Appliance top with builtin carrying handles
D. Air inlet (on both sides)
E. Filter (firmly installed)
F. Humidification plates
G. Water basin
H. Water basin carrying handles

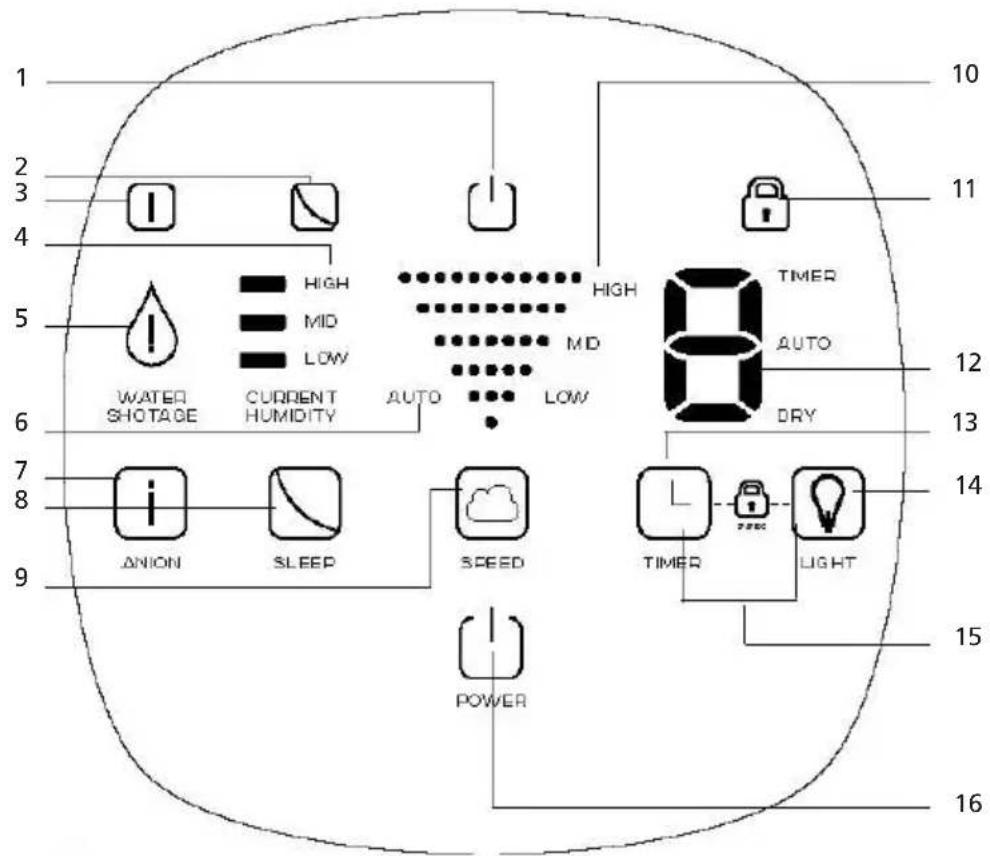
- Power supply display
- Night mode display
- Ion function display
- Current room humidity display
- "WATER SHORTAGE" display (indicates water basin is almost empty)
- Automatic mode display
- "anion" button for ion function
- "sleep" button for night mode
- "speed" button for program selection (humidification power)
- Program selection display (humidification power)
- Child safety mode display (buttons locked and inoperable)
- Timer display
- "timer" button for timer function
- "light" button for light function
- "timer" and "light" buttons together: Child safety mode
- "power" button for switching the appliance on and off
All function buttons are touch sensitive sensor buttons and only have to be touched gently to activate
3. How works
- Dry air will dry out the mucous membranes, leading to coughs and sneezes, respiratory infections and headaches. Tiredness, lack of concentration as well as cracked lips and dry eyes are often caused by dry air. Also, insufficient humidity might be a burden for people with allergies, pets and indoor plants. It will put music instruments out of tune and increase dust formation and the electrostatic charge of synthetic clothing.
- With this product you have made a good choice for counteracting these symptoms. It humidifies and cleans the air in the room based on a natural model, just like a refreshing shower of summer rain: On the inside of the Airwasher, 43 humidification plates are spun through a water basin, the pollutants in the suctioned, dry air are naturally collected in the water. The air that is released back into the room is humid and clean. Thanks to a selectable ion function, dirt particles and bacteria are also removed from the air.
4. Before first use
- Before using your Airwasher for the first time, remove all possibly attached advertisement stickers.
- Should the outside temperature be below 0^ C you should let the appliance stand at room temperature for approx. 1 hour before using it.
- Only use the appliance when the room temperature lies somewhere between 5^ and 40^ . The relative humidity should not exceed 80% . By the way: Relative humidity between 40% and 60% is ideal.
- Place the Airwasher on a stable, solid, dry, level and moisture resistant surface where it can not be knocked over. Soft rugs and carpets are not a suitable surface for the appliance to be placed on. Unimpeded air circulation around the appliance is extremely important for proper humification. We recommend a minimum distance of 50~cm to walls, heaters and other objects.
- Carefully remove the appliance top by lifting it up. Use both hands and both carrying handles.
- Pour fresh water into the water basin using a container. Please make sure not to exceed the MAX marking (see point 26 on page 71 of this manual). The water should not be too cold, but also not warmer than 30^ . If it makes it any easier for you, feel free to remove the humidification plates when filling up.
- CAUTION: Do not mix any additives like essential oils or perfumes into the water! These additives damage the appliance resp. cause discolorations to the plastic. Appliances that are damaged by adding additives are excluded from warranty. For filling up, always lift the appliance top off the water basin and never fill the appliance by pouring water into the air outlet on the appliance top.
- NOTE: Humidification will be even more effective if the filled water is not very cold. However, the water temperature should not exceed 30^ , otherwise the humidification plates and other appliance parts might be damaged. To prevent fast calcification, you can use filtered
water if the water is very calciferous. However, slight limescale on the humidification plates improve the humidification power, as the microstructure of the limescale causes even more water to stick to the plates.
- Check if the axle with the humidification plates is correctly placed in the socket in the water basin. The gear wheel of the humidification plates should be near the rear end of the basin. NOTE: The humidification plates will only properly fit into the socket when the gear wheel is placed in the rear end of the basin.
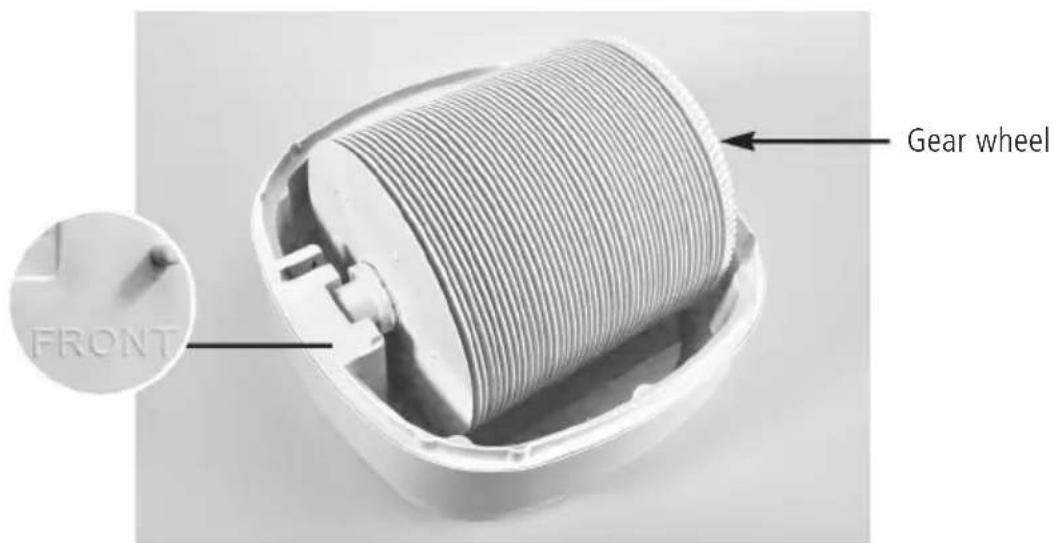
- Place the top back on the water basin. The small gear wheel on the appliance top (next to the filter) should be in position directly above the big gear wheel of the humidification plates.
- Plug the connection adapter into the appliance jack on the appliance back side and the power plug into the power outlet. The power supply symbol (1) illuminates.
5. The function buttons
The function buttons are touch sensitive sensor buttons. Briefly touching the function buttons will switch on the corresponding functions and illuminate the respective function displays. Every touch is accompanied by a signal sound.
GB
1. Power button for switching the appliance on and off (16)
- Touching the "power" button switches the appliance on with the "CURRENT HUMIDITY" (4) display lighting up and displaying the corresponding value immediately.
- Touching the "power" button a second time switches the appliance off.
2. Speed button for program selection resp. for setting humidification power (9)
- With the speed button, you can choose from 4 programs:
AUTO: In automatic mode, the humidification power will be automatically adjusted to the current room humidity, meaning:
- If the current room humidity is less than 40% (the "CURRENT HUMIDITY" display (4) will state "LOW"), the appliance works at high speed.
- If the current room humidity is between 40% and 60% (the "CURRENT HUMIDITY"
display (4) will state "LOW" and "MID"), the appliance works at intermediate speed.
- If the current room humidity is above 60% (the "CURRENT HUMIDITY" display (4) will state "LOW", "MID" and "HIGH"), the appliance works at lowest speed.
In the control panel, "AUTO" as well as the 6 bars indicating humidification power light up in an ascending order.
LOW: In "LOW" mode, the lowest humidification power is set. The display "LOW" (10) and the first two bars light up in the control panel.
MID: In "MID" mode, intermediate humidification power is set. The display "MID" (10) and the first four bars light up in the control panel.
HIGH: In "HIGH" mode, the highest humidification power is set. The display "HIGH" (10) and all six bars light up in the control panel.
3. Anion button for activating the ion function (7)
- With the "anion" button, you can activate the negative ion generator to additionally remove dirt particles and bacteria from the air.
- The display (3) illuminates.
4. Sleep button for activating night mode (8)
- With the "sleep" button, you can activate night mode, meaning all displays (except for the night mode and power supply displays) go out and the humidification power is set to a low level.
5. Timer button for activating the timer function (13)
- With the "timer" button you can determine the operation time of the Airwasher. Every touch of the "timer" button increases operation time by one hour, you can set the operation time
between 1 and 8 hours. The control panel will state the set number of hours (12) and count down. After the set time has elapsed, the appliance automatically switches off.
GB
6. Light button for activating backlight (14)
- By pressing the "light" button, you can switch the control panel backlight on and off.
7. Activating child safety mode (13 + 14)
- Simultaneously touching both the "timer" (13) and the "light" (14) button for 3 seconds will activate child safety mode. Now, no further changes can be made to the appliance settings and the buttons will no longer react to being touched. The display will indicate that the child safety mode is switched on (11).
- If you wish to deactivate child safety mode, touch the buttons "timer" and "light" again for 3 seconds and the display for child safety mode (11) will go out.
The following displays illuminate even when you have not activated a function:
- "CURRENT HUMIDITY" display (4)
The "CURRENT HUMIDITY" display illuminates once the appliance has been activated with the "power" button and displays the current degree of relative humidity in the room:
LOW: room humidity is low, below 40%
LOW e MID: room humidity is intermediate, between 40% and 60%
LOW, MID e HIGH: room humidity is high, above 60%
NOTE: The humidity switch built into the appliance measures humidity directly at the appliance. Another humidity switch, placed outside of the appliance, might show a different humidity value.
- "WATER SHORTAGE" display (5)
Should the water level in the water basin fall below the minimum, the display "WATER SHORTAGE" (5) will illuminate on the control panel and the appliance will automatically switch off.
6. Operation
If the water basin is filled to the MAX marking (see point 26 on page 71 of this manual) with fresh tap water and the appliance is correctly assembled and connected to the power, you can start using it.
GB
1. Switching the appliance on
- Touch the "power" button to switch the appliance on. The current humidity will illuminate in the control panel, also "CURRENT HUMIDITY" and "LOW" for low humidity, "LOW + MID" for intermediate humidity or "LOW, MID + HIGH" for high humidity.
2. Choosing functions
- Choose the desired functions. Set humidification power with the "speed" button. If you wish, activate the ion, night and light functions. If needed, set the operation time with the "timer" button. The child safety mode can also be activated.
- In general: The higher the room temperature is, the faster the humidification will be.
- NOTE: Should you lift the appliance top and separate it from the water basin, the appliance will automatically stop. Only after the appliance top has been properly replaced on the water-filled water basin the appliance will reactivate.
- The appliance will also switch off if the water basin is no longer filled with enough water. In this case, the display (5) illuminates and the appliance switches off.
- Before refilling the appliance with water, please always switch the appliance off with the "power" button (16) and pull the power plug from the power socket resp. the connection adapter from the appliance jack first. Then, use both hands to lift off the appliance top. Fresh tap water can now be refilled. Please make sure that the water level does not exceed the MAX marking (see point 26 on page 71 of this manual).
7. After use

- If you want to fully deactivate the appliance, always touch the "power" button (16) before disconnecting the power cord from the power socket resp. the appliance.
- If you do not want to use the appliance for more than 2 days, we recommend pouring out the water in the water basin and drying the water basin with a dry cloth as well as letting the humidification plates airdry with the appliance opened.
- In general, we recommend always pouring the water remaining in the water basin away before refilling fresh water.
- Important: Before pouring away the water, always remove the humidification plates.
8. Cleaning and maintenance
- The recommended cleaning intervals are dependent on air and water quality as well as operation time and frequency.
- Before cleaning, always switch the appliance off and pull the power plug from the socket resp. the power cord from the appliance by pulling the connection adapter from the appliance jack.
We recommend refilling fresh water on a daily basis.
1. Weekly cleaning of the water basin and humidification plates
- Dirt particles and microorganisms collect in the water basin during use, which is why the basin has to be cleaned regularly, at least once a week. Use tap water (max. 30^ warm!) with a small amount of mild detergent and a soft cloth resp. a soft sponge. After that, thoroughly rinse the basin inside with water. Dry the basin inside with a soft cloth and let it airdry while the appliance is open.
- Approx. every 4 weeks, the humidification plates should be cleaned. Remove the humidification plates from the water basin and loosen the plastic screw on the front side of the axle. The humidification plates can now be removed from the axle one by one. Clean the humidification plates with a cloth resp. soft sponge and warm (max. 30^ ) tap water containing some mild detergent. Then, replace the humidification plates on the axle and finally replace the plastic screw before reinserting the humidification plates in the water basin.
- It is vital that the Airwasher Ionic is completely drained and cleaned if the waterfilled appliance has been out of use for more than one week.
- CAUTION: The humidification plates and the water basin can not be cleaned in the dishwasher!
- In general, do not use any aggressive or abrasive detergents or metal sponges, as these might damage the surface.
2. Decalcifying the water basin and the humidification plates
- If the water basin and the humidification plates are calcified, both should be cleaned with a decalcifying agents, depending on water hardness, this should be done at least once a
month, if the water is very hard even once every two weeks.
- Pour 3 liters of water (approx. 30^ warm) into the water basin and add the decalcifier. Reassemble the appliance and let it run for at least one hour in a well ventilated spot (ideally outside, f.e. on the balcony). The remedy of defects caused by improper decalcifying agents is excluded from warranty.
- Depending on the limescale deposits it may take longer for all limescale deposits to be removed.
- Afterwards, carefully rinse water basin and humidification plates with water and dry them.
3. Cleaning the appliance top and the water basin outside
- Clean the appliance top and the outside of the water basin regularly with a slightly wet cloth and a mild detergent.
- In general, do not use any aggressive or abrasive detergents or metal sponges, as these might damage the surface.
9. Storage
- Check if the appliance is switched off and the power plug is pulled resp. the power cord is removed. The water has to be drained completely.
- Check if the appliance inside is completely clean and dry. If necessary, let the appliance stand open until the humidification plates and the water basin are dry on the inside.
- Keep the appliance standing upright in a dry, dark spot, best in the original packaging. Do not place anything on the appliance.
- Always keep the appliance and power cord out of the reach of children.
10. Troubleshooting
| GB | Problem Possible cause Solution | ||
| 1 | Little humidification power. | ·The function "LOW" was selected, using the "speed" button. ·The water in the water basin is very cold. | ·Select a higher humidification power, f.e. "MID" or "HIGH". ·Select the humidification power "HIGH" with the "speed" button. After 10 minutes, humidification power will have increased. |
| 2 | No humidification power. | ·The power plug is not connected to the power outlet or the connection adapter is not correctly plugged into the appliance jack. ·The warning light "WATER SHORT-AGE" has illuminated, then the appliance and all displays have turned off. | ·Firmly connect the power plug to the socket and the connection adapter to the appliance jack. ·Fill the water basin up to the MAX marking with fresh tap water, then reinstall the appliance top. |
| 3 | An independent humidity switch measures a different humidity value from the display on the appliance. | ·Dirt has collected in the air outlet or inlet opening. ·The appliance is placed near a window or an open door. | ·Clean the air inlet and outlet openings. NOTE: Even within one room, different values for humidity can be measured. The "CURRENT HUMIDITY" value only refers to the humidity directly by the appliance. ·Place the appliance in a spot free of draft. |
| 4 | The escaping air smells unpleasantly. | ·There is old water in the water basin. ·Old water was left over in the water basin and merely mixed with new water. | ·Drain the water and clean the appliance as described in "Cleaning and maintenance". Fill the water basin with fresh tap water. |
11. Technische specificaties
| Arosa Davos | ||
| Product description Airwasher Airwasher | ||
| Voltage / frequency 2 | 20-240 V~ / 50/60 Hz 220-240 V~ / 50/60 Hz | |
| Output 15 Watt 15 Watt | ||
| Capacity 2.2 Liter 6.2 | Liter | |
| Measurements (W x H x D) | 32 x 24 x 24 cm 40.5 x 32 x 32 cm | |
| Weight 3.5 kg 7.0 kg | ||
12 Warranty / Disposal / Technical change
Warranty
The Products are controlled just before delivery. If despite a lack of your product, try trustfully your seller. Please bring your receipt, as this is to be submitted for each warranty. The guarantee period is 24 months from date of purchase.
Disposal
The device must be disposed of properly. The device can be distributed free of charge for disposal at each dealer.
Technical changes
Subject to changes in technology and design. We shall not be liable for technical or editorial changes or omissions in this document.
Please save the packaging materials of the unit.
CE Declaration of Conformity
This device complies with the following standards
EN 60335-1:2012 +A11:2014
EN 60335-2-98:2003 +A1:2005 +A2:2008
EN 62233:2008
Firma
Armin Schmid
Olensbachstrasse 9-15
CH-9631 Ulisbach
Tel. Int. +41 71 987 60 60
Tel.Nat.0848870850
www.sonnenkoenig.ch
Firma
Armin Schmid
Landline 14 Cent/Minute
Mobiel network 42 Cent/Minute