
V7U3IDESATABLK1E - Computer and peripheral cables V7 - Free user manual and instructions
Find the device manual for free V7U3IDESATABLK1E V7 in PDF.

| Product Type | USB 3.0 to SATA/IDE Adapter |
| Brand | V7 |
| Model | V7U3IDESATABLK1E |
| Dimensions (approx.) | 10 x 5 x 2 cm |
| Weight (approx.) | 100 g |
| Power Supply | 5V/2A AC adapter included (AC power cable and block) |
| Connectivity | USB 3.0 (backward compatible with USB 2.0); SATA 15-pin; IDE 40-pin (3.5") and IDE 44-pin (2.5") |
| Supported Devices | SATA and IDE hard drives and SSDs 2.5" and 3.5" |
| Operating Systems | Windows 2000/XP/Vista/7, Mac OS X |
| Main Features | Connection of SATA/IDE devices via USB; SATA/IDE selection switch; power indicator LED; dual power for 3.5" devices |
| Maintenance and Cleaning | Wipe with a soft dry cloth; do not use abrasive products or solvents |
| Safety | Operating temperature: 0°C to 40°C; do not expose to moisture; unplug before handling |
| Spare Parts and Repairability | Not user-serviceable; removable USB and power cables; replaceable AC adapter |
| Warranty | 2 years |
| Package Contents | Adapter, installation guide, dual power supply, AC power cable, SATA data cable |
Frequently Asked Questions - V7U3IDESATABLK1E V7
User questions about V7U3IDESATABLK1E V7
0 question about this device. Answer the ones you know or ask your own.
Ask a new question about this device
Download the instructions for your Computer and peripheral cables in PDF format for free! Find your manual V7U3IDESATABLK1E - V7 and take your electronic device back in hand. On this page are published all the documents necessary for the use of your device. V7U3IDESATABLK1E by V7.
USER MANUAL V7U3IDESATABLK1E V7
USB 3.0 TO SATA IDE ADAPTER
V7U3-IDESATA-BLK
System Requirements
Hardware
- USB 3.0 or 2.0 enabled PC or Mac
- Serial-ATA Harddrive, 3.5" IDE or 2.5" IDE Drive
Software
- Windows 2000, XP, Vista, Windows 7 or Mac OS X
Package Contents
- Installation Guide (this manual)
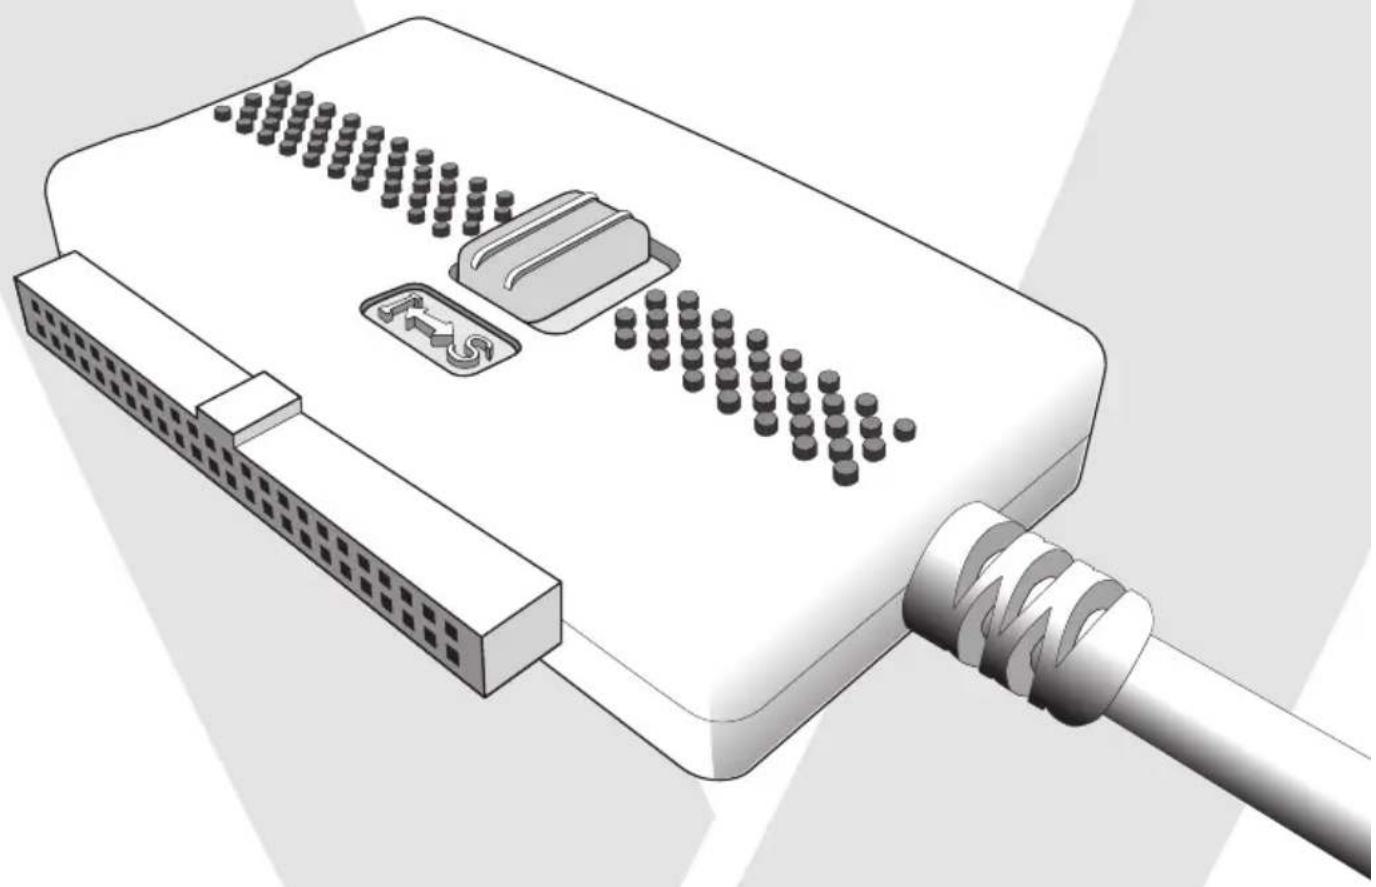
The USB 3.0 to IDE or SATA Adapter - Dual-mode Power Supply for Drives
- AC Power Cable
- SATA Data Cable
Hardware Installation
Step 1:
For 3.5" IDE drive
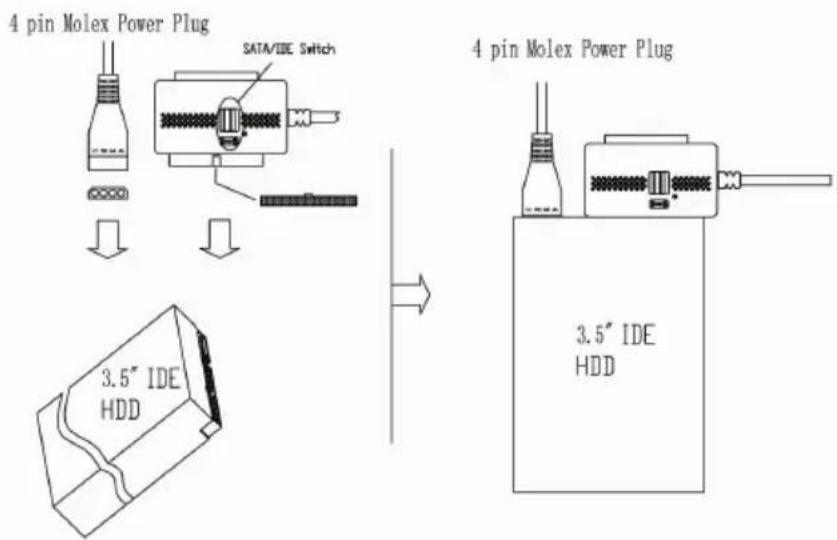
- Switch to "l" side.
- Connect the 4-pin molex power plug to the drive's power receptacle.
- Plug the drive directly to the 40-pin connector on the adapter (it is keyed, and will only fit one way).
For 2.5" IDE drive:
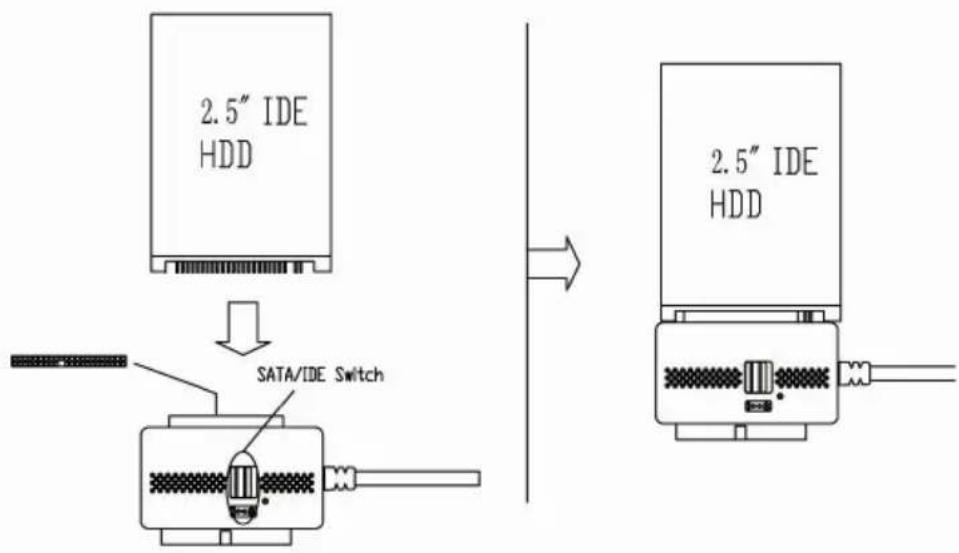
- Switch to "l" side.
- Plug the drive directly to the 44-pin connector on the adapter (it is keyed, and will only fit one way).
For 2.5" IDE drive:
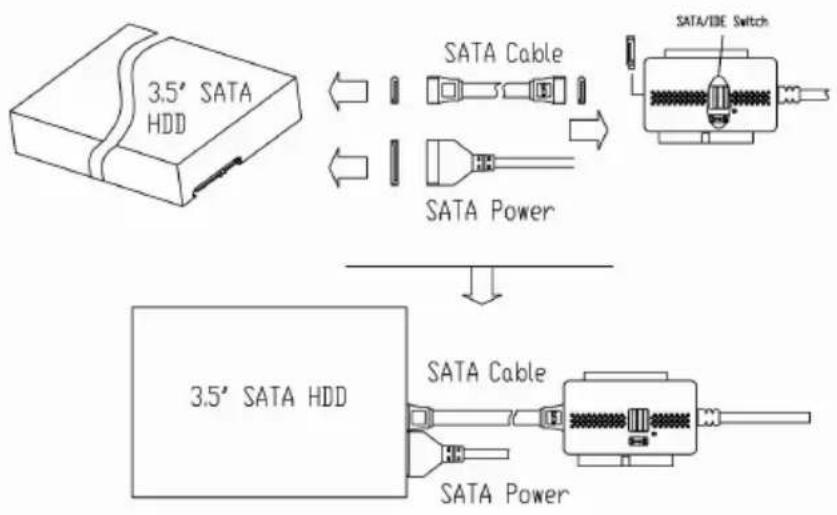
- Switch to "S" side.
- Connect the 15-pin SATA (flat) power plug to the SATA drive's power receptacle.
- Connect the Serial-ATA data cable from the SATA drive to the receptacle on the adapter.
Step 2:
- Connect the power cable to the power adapter.
Step 3:
- Plug the power supply into the wall. Push the power button. The green LED should light, and you should hear the drive spin up.
Step 4:
- After the computer boots, connect the USB plug on the adapter to an available USB port on the computer. Windows will find new hardware and install the appropriate drivers.
Step 5:
- Hardware installation is complete. Your drive is ready to use!
Software Installation
No software installation is required! Just plug it in and your drive will be detected automatically.
To Verify Successful Installation in Windows® 2000/XP
- Right-click My Computer, and select Properties. Click the Hardware tab, then Device Manager.
- You should see a category called Universal Serial Bus Controllers and a device called USB Mass Storage Device, and a category called Disk Drives with your drive listed as a USB Drive.
To Verify Successful Installation in Windows Vista/Windows 7 - Right-click Computer, and select Properties. Click Device Manager.
- You should see a category called Universal Serial Bus Controllers and a device called USB Mass Storage Device, and a category called Disk Drives with your drive listed as a USB Drive.
Troubleshooting
Problem
Drive and adapter show properly in Device Manager, but no drive letter is available in My Computer or Windows Explorer.
Solution
This is a normal occurrence with a new drive, or with a drive that contains an existing partition that Windows does not understand.
Using a new drive with Windows 2000/XP/Vista/Windows 7
You can partition and format the drive via USB using the Logical Disk Manager utility. Click Start, then Run. (Vista/Windows 7 users click Start and use the search box). Type diskmgmt.msc, and click Ok. This will start the utility. The USB drive should be visible in the bottom pane. Use Windows help for assistance with using Logical Disk Manager. Once you have partitioned and formatted the drive, Windows will assign it a drive letter and it is ready to use.
Using a drive with existing data that Windows does not recognize
If Windows does not assign a drive letter for a drive with data on it, it is because Windows does not recognize the partition on the drive. This is common if the drive came from another operation system, if the drive is encrypted NTFS, if it was partitioned with a third party utility, or if some or all of the data on the drive is corrupted. Unfortunately, there is not a practical workaround. The drive may work if it is erased and reformatted, but the data may not be recoverable.
Macintosh OS X
When you install a new drive using OSX, the Application "Disk Utility" is what you use to Partition, Format, RAID, Test, or Erase the drive. Disk Utility is located in the Applications/Utility folder.
Systemanforderungen
Hardware