
CareStyle 3 IS 3024 - Iron BRAUN - Free user manual and instructions
Find the device manual for free CareStyle 3 IS 3024 BRAUN in PDF.
| Product type | Steam generator with iron |
| Brand | Braun |
| Model | CareStyle 3 IS 3024 |
| Power supply | 220-240 V ~ 50/60 Hz, 16 A (check power on rating plate) |
| Water tank | Removable or fixed depending on model, max capacity indicated |
| Soleplate type | Eloxal 3D, rounded shape to go around buttons and pockets |
| Temperature setting | 3 levels (synthetic, wool/silk/polyester, cotton/linen) |
| Steam functions | Variable steam, precision jet, dual trigger, vertical steam |
| Anti-calc system | Manual descaling after 15 liters (approx. 8 refills) |
| Safety | Water heater standby mode after 10 min without steam, iron lock (depending on model), hot surfaces indicated |
| Maintenance and cleaning | Clean the soleplate with a damp cloth, do not use abrasive products |
| Included accessories | Iron, base unit, water tank, transparent cover, cleaning valve, locking system (depending on model) |
| Repairability | Spare parts and Braun authorized service (contact for replacement) |
| Weight and dimensions | Not specified in the manual (standard dimensions for a steam generator) |
Frequently Asked Questions - CareStyle 3 IS 3024 BRAUN
User questions about CareStyle 3 IS 3024 BRAUN
0 question about this device. Answer the ones you know or ask your own.
Ask a new question about this device
Download the instructions for your Iron in PDF format for free! Find your manual CareStyle 3 IS 3024 - BRAUN and take your electronic device back in hand. On this page are published all the documents necessary for the use of your device. CareStyle 3 IS 3024 by BRAUN.
USER MANUAL CareStyle 3 IS 3024 BRAUN
natural_image
Exterior view of a white CoRo Style air iron (no text or symbols visible on body)Register your product
www.braunhousehold.com/register
Ironing system
Deutsch 4
English 8
Français 12
Español 16
Português 20
Italiano 24
Nederlands 28
Dansk 32
Norsk 36
Svenska 40
Suomi 44
Polski 47
Český 51
Slovenský 55
Magyar 59
Hrvatski 63
Slovenski 67
Türkçe 71
Română (MD) 75
Ελληνικά 79
Қазақ 73
Русский 88
Українська 93

De'Longhi Braun Household GmbH
text_image
temp. ok Steam ButtonC
text_image
Precision Shot* *certain models only resetD
text_image
Boiler sleep mode Restart 10'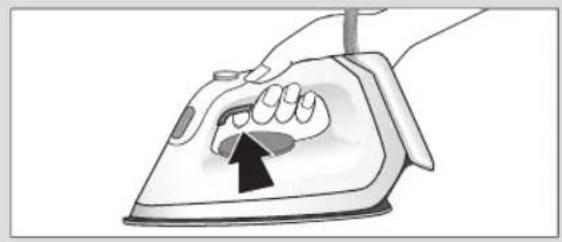
natural_image
Illustration of a hand using an iron on a surface, showing a hand pressing down with a black arrow indicating the motion (no text or symbols present)E
natural_image
Illustration of two hands pouring liquid from a container into a container (no text or symbols)F

natural_image
Three-panel illustration showing a hand pressing down on a small appliance, with a starburst and arrow labeled 'click!' (no text or symbols beyond the label)G

- Preparation
text_image
a allow to cool down min. 2.5 h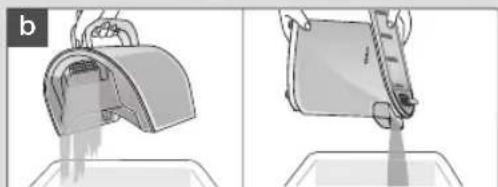
natural_image
Illustration of a hand pouring liquid into a container, showing two different stages (no text or symbols present)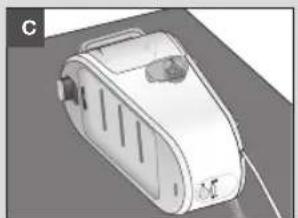
natural_image
3D rendered model of a white electronic device with ventilation slots and a small sensor on top (no text or symbols visible)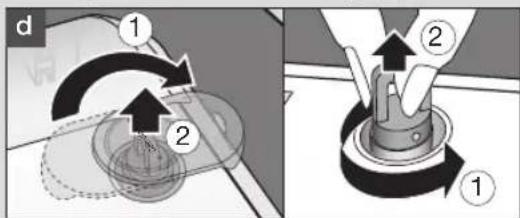
text_image
d ① ② ①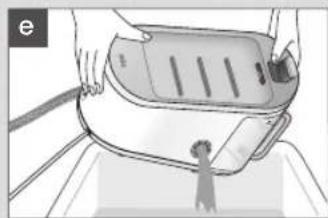
natural_image
Illustration of hands using a steam iron on a tray (no text or symbols visible)- Descaling
flowchart
graph TD
    A["2x"] --> B["a: 500 ml"]
    B --> C["b: 1"]
    C --> D["c: shake"]
    D --> E["d: 2"]
    E --> F["e: 1"]
    F --> G["f: 1"]
    G --> H["f: 2"]
    H --> I["3. Restart"]
    I --> J["a: reset"]
    J --> K["b: 5 sec."]
H

text_image
Illustration showing four steps of a handwashing appliance: electric plug, washing machine, cleaning device, and chemical waste.Deutsch
Vor dem Gebrauch
Please read instructions carefully and completely before using the appliance.
Caution

Caution: Hot surfaces! Electric ironing stations combine high temperatures and hot steam that could lead to burns.
This appliance can be used by children aged from 8 years and above and persons with reduced physical, sensory or mental capabilities or lack of experience and knowledge if they have been given supervision or instruction concerning use of the appliance in a safe way and understand the hazards involved.
●children shall not play with the appliance.
●Cleaning and user maintenance shall not be made by children without supervision.
During operation and cool-down the appliance and its mains cord shall be kept out of reach of children under 8 years.
the supply cord is damaged, it must be replaced by the manufacturer, its service agent or similarly qualified persons in order to avoid a hazard.
Always unplug the station/iron before filling with water.
The appliance must be used and rested on a stable surface.
During ironing pauses, place the iron upright on its heel rest or on the iron rest. Ensure that the heel rest is placed on a stable surface.
The iron must not be left unattended while it is connected to the supply mains.
Do not open the boiler during ironing.
During use, the pressurised apertures must not be opened for filling, descaling, rinsing or inspection.
The appliance must not to be used if it has dropped, if there are visible signs of damage or if it is leaking. Regularly check the cords for damages.
Never immerse the unit in water or other liquids.
This appliance is designed for household use only and for processing normal household quantities.
Please clean all parts before first use or as required, following the instructions in the Care and Cleaning section.
The cords should never come in contact with hot objects, the soleplate, water and sharp edges.
Before plugging into a socket, check whether your voltage corresponds with the voltage printed on the bottom of the appliance and that you are using an earthed socket.
When using an extension cord watch out that it is in good condition, has a plug with an earth connection and corresponds with the power rating of the appliance (16A).
The soleplate and the iron rest can reach very high temperatures that could lead to burns. Do not touch them.
Description
I Base unit
1 On/Off button
2 On/Off LED
3 Water tank empty LED
4 Reset button
5 Calc clean system LED
6 Steam regulator (certain models only)
7 Iron rest
8a Removable water tank
8b Fixed water tank
9 Transparent cover
10 Power cord
11 Cleaning valve
12 Lock system (certain models only)
II Iron
13 Double cord
14 Button
15 Temperature selector
16 Precision shot button (certain models only)
17 Temperature control light
18 Heel rest
(A) Filling the water tank
- Make sure that the appliance is switched off and the system is unplugged.
- Remove the water tank (8a) or open the water tank (8b).
- Fill the water tank with tap water, taking care not to exceed the "max" level.
- If you have extremely hard water, we recommend that you use a mixture of 50 % tap water and 50 % distilled water. Never use distilled water exclusively. Do not add any additives (e.g. starch). Do not use condensation water from a tumble dryer.
- Insert the water tank (8a) or close the water tank opening (8b).
- Place the appliance on a stable, level surface.
Note:
If you use filtering devices, make absolutely sure the water obtained is neutral ph.
Water tank empty LED
- When the water tank is empty the LED (3) is continuously on.
- If you want to continue steam ironing, refill the water tank (A).
- Press the reset button (4).
(B) Start ironing
- Place the iron on the iron rest (7) or on its heel rest (18), plug in the appliance and press the On/Off button(1).
- The iron will start to heat up: While this is happening, the temperature control light (17) is continuously on and the On/Off LED(2) is flashing.
- Once the desired temperature is reached the temperature control light turns off and the On/Off LED (2) is continuously on.
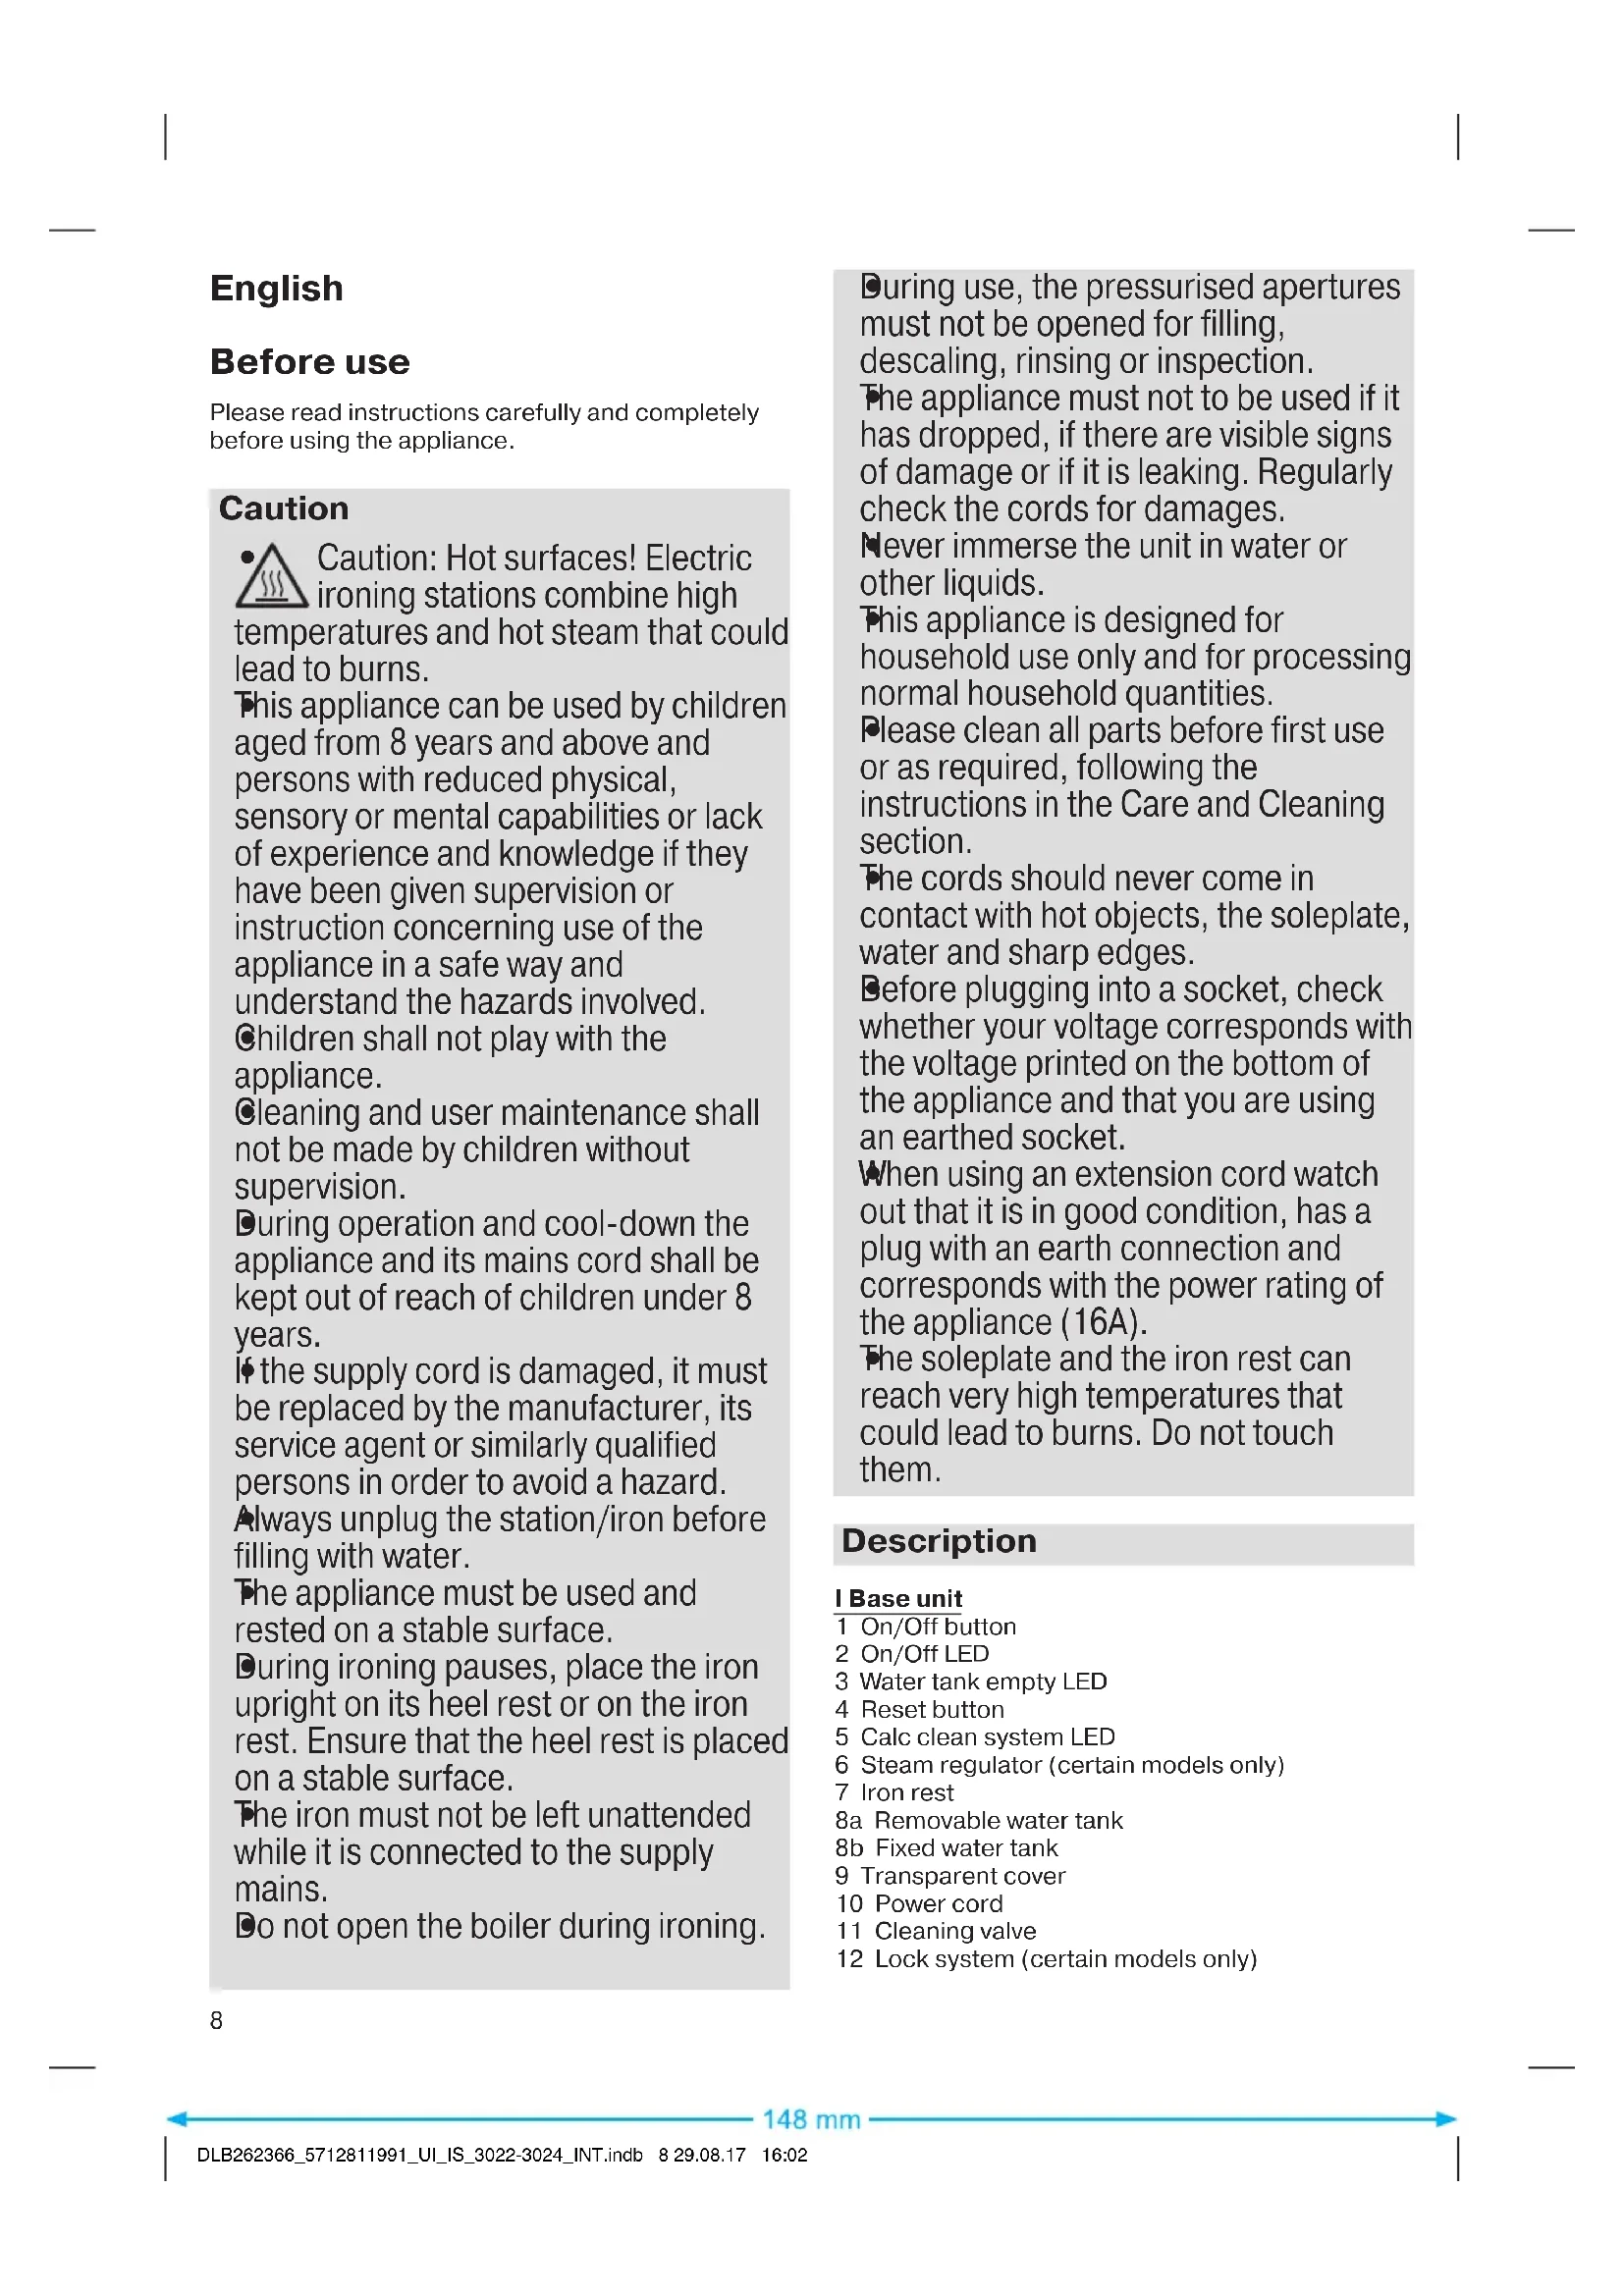
- Set the desired temperature with the temperature selector (15). Temperature level 1 (●) is suitable for synthetics, temperature level 2 (●●) for wool, silk, polyester and temperature level 3 (●●●) for cotton and linen. During use, the temperature control light turns on from time to time indicating that the iron is heating up.
- For steam ironing, set the temperature between temperature level 2 ( ) and “max” on the temperature selector and press the steam button (14) or the precision shot button (16). You can adjust the steam quantity by turning the steam
regulator (6). We recommend a medium steam setting for all delicate and synthetic garments. When ironing linen, cotton or similar fabrics we recommend the maximum steam setting.
- Dry ironing: Do not press the steam button (14) or the precision shot button (16).
- Double trigger: Press the steam button (14) or the precision shot button (16) twice in quick succession within 1 second. There will be a continuous steam emission for a few seconds. Press the steam button (14) or the precision shot button (16) once again to stop the function.
- Vertical steam: The iron can also be used for steaming hanging clothes (B).
- The unique round shape of the eloxal 3D soleplate ensures best gliding results on difficult parts (e.g. buttons, pockets, etc.).
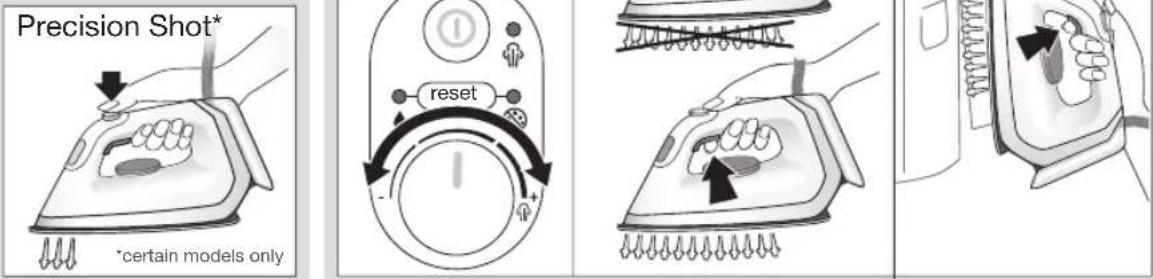
(C) Precision shot
- Press the precision shot button (16) completely down.
- Steam will come out of the tip area of the soleplate only.
- If you do not press it down completely, some steam may also come out from the rear steam holes in the soleplate.
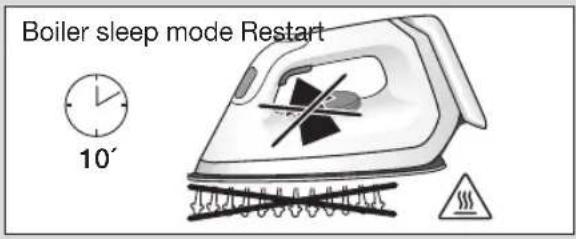
(D) Boiler Sleep Mode
In the sleep mode the temperature of the boiler goes down in order to reduce power consumption. Please note, that the temperature of the iron remains unchanged.
- It is activated if there has been no steam emission for 10 minutes.
- To restart steam ironing either the steam button (14), the reset button (4) or the precision shot button (16) has to be pressed.
(E) After ironing
- Press the On/Off button (1) to turn off the appliance.
- Unplug and let the appliance cool down before storing.
• Empty the water tank. - For models with lock system (12), lock the iron (F).
(F) Lock system
The lock system can be used for a safe and easy storage of the appliance.
Do not lift or carry the appliance on the handle of the locked iron.
- Place the soleplate into the recess on the iron rest.
- To lock the iron push the slider (12) toward the iron.
- To unlock the iron push down the button on the slider (12). The iron will be released.
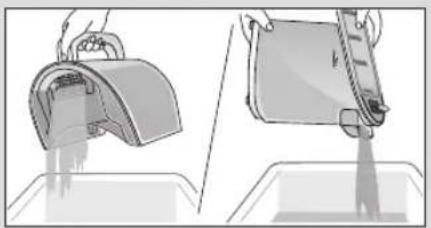
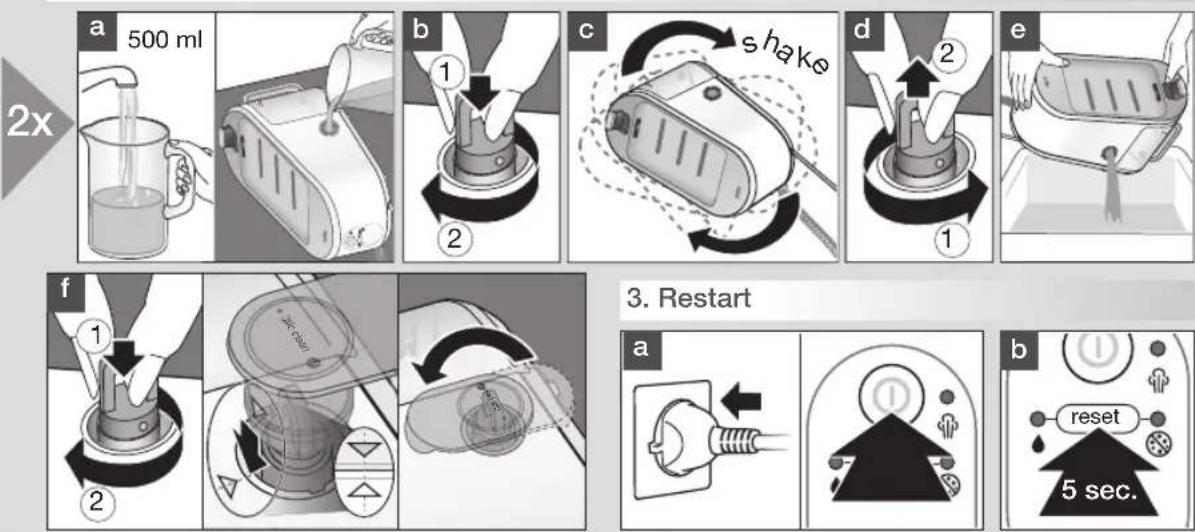
(G) Descaling
To maintain optimum performance, the system needs to be decalcified after every 15 litres of water consumption (about 8 complete refills). The LED (5) is flashing.
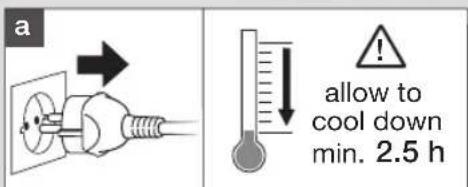
- First, switch off and unplug the appliance. Wait until the appliance has cooled down (minimum 2.5 hours).
• Empty the water tank (E). - Remove the iron from the iron rest (if applicable unlock the iron).
- Remove the transparent cover (9) and unscrew the cleaning valve (11).
- Empty the boiler.
- Pour in 500 ml tap water only. Do not use any chemicals, additives or calc remover.
- Screw the cleaning valve (11) to close the boiler.
- Shake the base unit to rinse, then empty the boiler.
- Repeat this procedure one more time.
- After having finished the descaling procedure, plug in, switch on (1) and press the reset button (4) for 5 seconds until the LED (5) turns off.
If the appliance is switched off without descaling, the LED (5) will start to flash again when it is next switched on.
(H) Cleaning and maintenance
- Before cleaning, always make sure that the appliance is switched off, unplugged and has cooled down completely.
- Wipe the soleplate clean with a damp or dry cloth. Never use scouring pads, vinegar or other chemicals.
- To clean the soft material on the handle use a damp cloth.
For UK Only
Guarantee Information
All Braun Household products carry a minimum guarantee period of two years. The rights and benefits under this guarantee are additional to your statutory rights which are not affected.
Please keep your receipt as this will form the basis of your guarantee.
In the unlikely event of a breakdown you have access to professional help from our team simply by calling:
02392 392333
For service in the Republic of Ireland please call:
012475471
Braun Household undertakes within the specified period to repair or replace any part of the appliance, free of charge (with the exception of any glass or porcelain-ware incorporated in the product) found to be defective provided that;
- We are promptly informed of the defect.
- The product is used and maintained in accordance with the User Instructions.
- The appliance has not been altered in any way or subjected to misuse or repair by a person other than an authorised service agent for Braun Household.
- No rights are given under this guarantee to a person acquiring the appliance second hand or for commercial or communal use.
- Any repaired or replaced appliance will be guaranteed on these terms for the unexpired portion of the guarantee.
- The need for repair has not been caused by insufficient aftercare or cleaning: or damage caused by the chemical or electrochemical effects of water.
Under no circumstances shall the application of this guarantee give rise to the complete replacement of the appliance or entitle the consumer to damages.
Braun Household, New Lane, Havant, Hampshire PO9 2NH
www.braunhousehold.co.uk
Thank You for choosing Braun. We are confident that you will get excellent service from this product.
TO IMPROVE YOUR EXPERIENCE
Register now at www.braunhousehold.co.uk By registering we may send you from time to time details on exclusive offers, promotions, recipes and inside tips.
Trouble shooting guide
| PROBLEM CAUSE REMEDY | ||
| The appliance does not switch on. | The appliance is not plugged into a mains socket. | Make sure the appliance is correctly connected and press the On/Off button. |
| Steam comes out under the base unit. | The “max” pressure safety system has opened. | Turn the appliance off immediately and contact an authorised Braun Customer Service. |
| There are some water drops from the holes in the bottom of the soleplate. | Water has condensed inside the tubes because steam is being used for the first time, or has not been used for some time. | Press the steam button several times away from the ironing board. This will eliminate cold water from the steam circuit. |
| The temperature selector is not in the correct position. | Set the temperature between temperature level 2 (●●) and “max” on the temperature selector. | |
| Brown coloured fluid leaks from the soleplate. | Chemical water softeners, distilled water or additives have been poured into the water tank or boiler. | Never pour products into the water tank. Clean the sole plate with a damp cloth and rinse the boiler. |
| The first time the appliance is turned on, you notice smoke / smell. | Some parts have been treated with sealer/lubricant which evaporates the first time the iron heats up. | This is normal and will stop when you have used the iron a few times. If the smoke/smell is still present after turning off the appliance, contact an authorised Braun Customer Service. |
| The appliance emits an intermittent noise associated with vibrations. | Water is being pumped into the boiler. | This is normal and no action is needed. |
| The water tank is empty. Refill the water tank and press the reset button. | ||
| The cleaning valve is difficult to unscrew. | Lime scale has made the cleaning valve difficult to open. | Turn the cap forcefully. To avoid the problem, rinse system frequently. |
| All LEDs are flashing. System error. | Unplug the system, plug in again and press the On/Off button. If this problem is still present, turn the appliance off immediately and contact an authorised Braun Customer Service. | |
| Steam comes out from the cleaning valve. | The cleaning valve is not tightened correctly. | Turn off the appliance and tighten the cleaning valve correctly, but not overtighten it.Note: the cleaning valve might be hot. |
| The cleaning valve gasket is damaged. | Turn off the appliance immediately and contact an authorised Braun Customer Service. | |
| Ironing system is ready, but no steam emission from the iron. | End of water alarm has been reset without water refill. | Refill the water tank and press the steam button several times for 1 minute until pump loads water inside the system. |
| Turn off the appliance and wait until it has cooled down. | ||
| The LED ♠ is still on although water has been refilled. | The reset button has not been pressed or has not been pressed correctly. | Make sure the reset button is pressed correctly. |
Subject to change without notice.
Please do not dispose the product in the household waste at the end of its useful life. Disposal can take place at a Braun Service Centre or at appropriate collection points provided in your country.

Français
Avant utilisation
1 På/Av(On/Off)-knapp
2 På/Av(On/Off)-lysdiod
3 Vattentank tom-lysdiod