DDR2611 - Humidifier DANBY - Free user manual and instructions
Find the device manual for free DDR2611 DANBY in PDF.
| Product type | Portable dehumidifier |
| Power supply | 120 V AC, 60 Hz, 15 A (dedicated circuit) |
| Dehumidification function | Auto-detection of ambient humidity, adjustment from 35% to 85% RH, continuous mode |
| Fan | 2 speeds (normal and high) |
| Automatic defrost | Yes, built-in |
| Water tank | Removable, located at the front, with "bucket full" indicator light and auto shut-off |
| Direct drain | Yes, via hose (not included) with threaded connection |
| Air filter | Removable, washable, located at the front behind the air intake |
| Control panel | Touch-sensitive, with digital display of humidity level and timer |
| Timer | Programmable automatic start and stop from 0 to 24 hours |
| Castors | 4 castors for easy movement |
| Operating temperature | Between 5°C and 35°C |
| Filter maintenance | Clean every 2 weeks with warm water and mild detergent |
| Appliance cleaning | Unplug before cleaning; use a soft cloth and warm water; never use gasoline or thinner |
| Safety | Grounding required; auto shut-off if tank full or not properly positioned; overload protection |
| Service and warranty | 12-month limited warranty; technical support at 1-800-263-2629 |
| Error codes | AS (humidity sensor), ES (temperature sensor), P1 (defrost), P2 (tank full or missing), E1 (general malfunction) |
Frequently Asked Questions - DDR2611 DANBY
User questions about DDR2611 DANBY
0 question about this device. Answer the ones you know or ask your own.
Ask a new question about this device
Download the instructions for your Humidifier in PDF format for free! Find your manual DDR2611 - DANBY and take your electronic device back in hand. On this page are published all the documents necessary for the use of your device. DDR2611 by DANBY.
USER MANUAL DDR2611 DANBY
Owner's Use and Care Guide 2-13
Welcome
- Important Safety Information
- Installation
- Features
Operation Instructions
Care and Maintenance
- Troubleshooting
Warranty
DÉSHUMIDIFCATEUR PORTATIF
Read and follow all safety rules and operating instructions before first use of this product.

PRECAUTION:
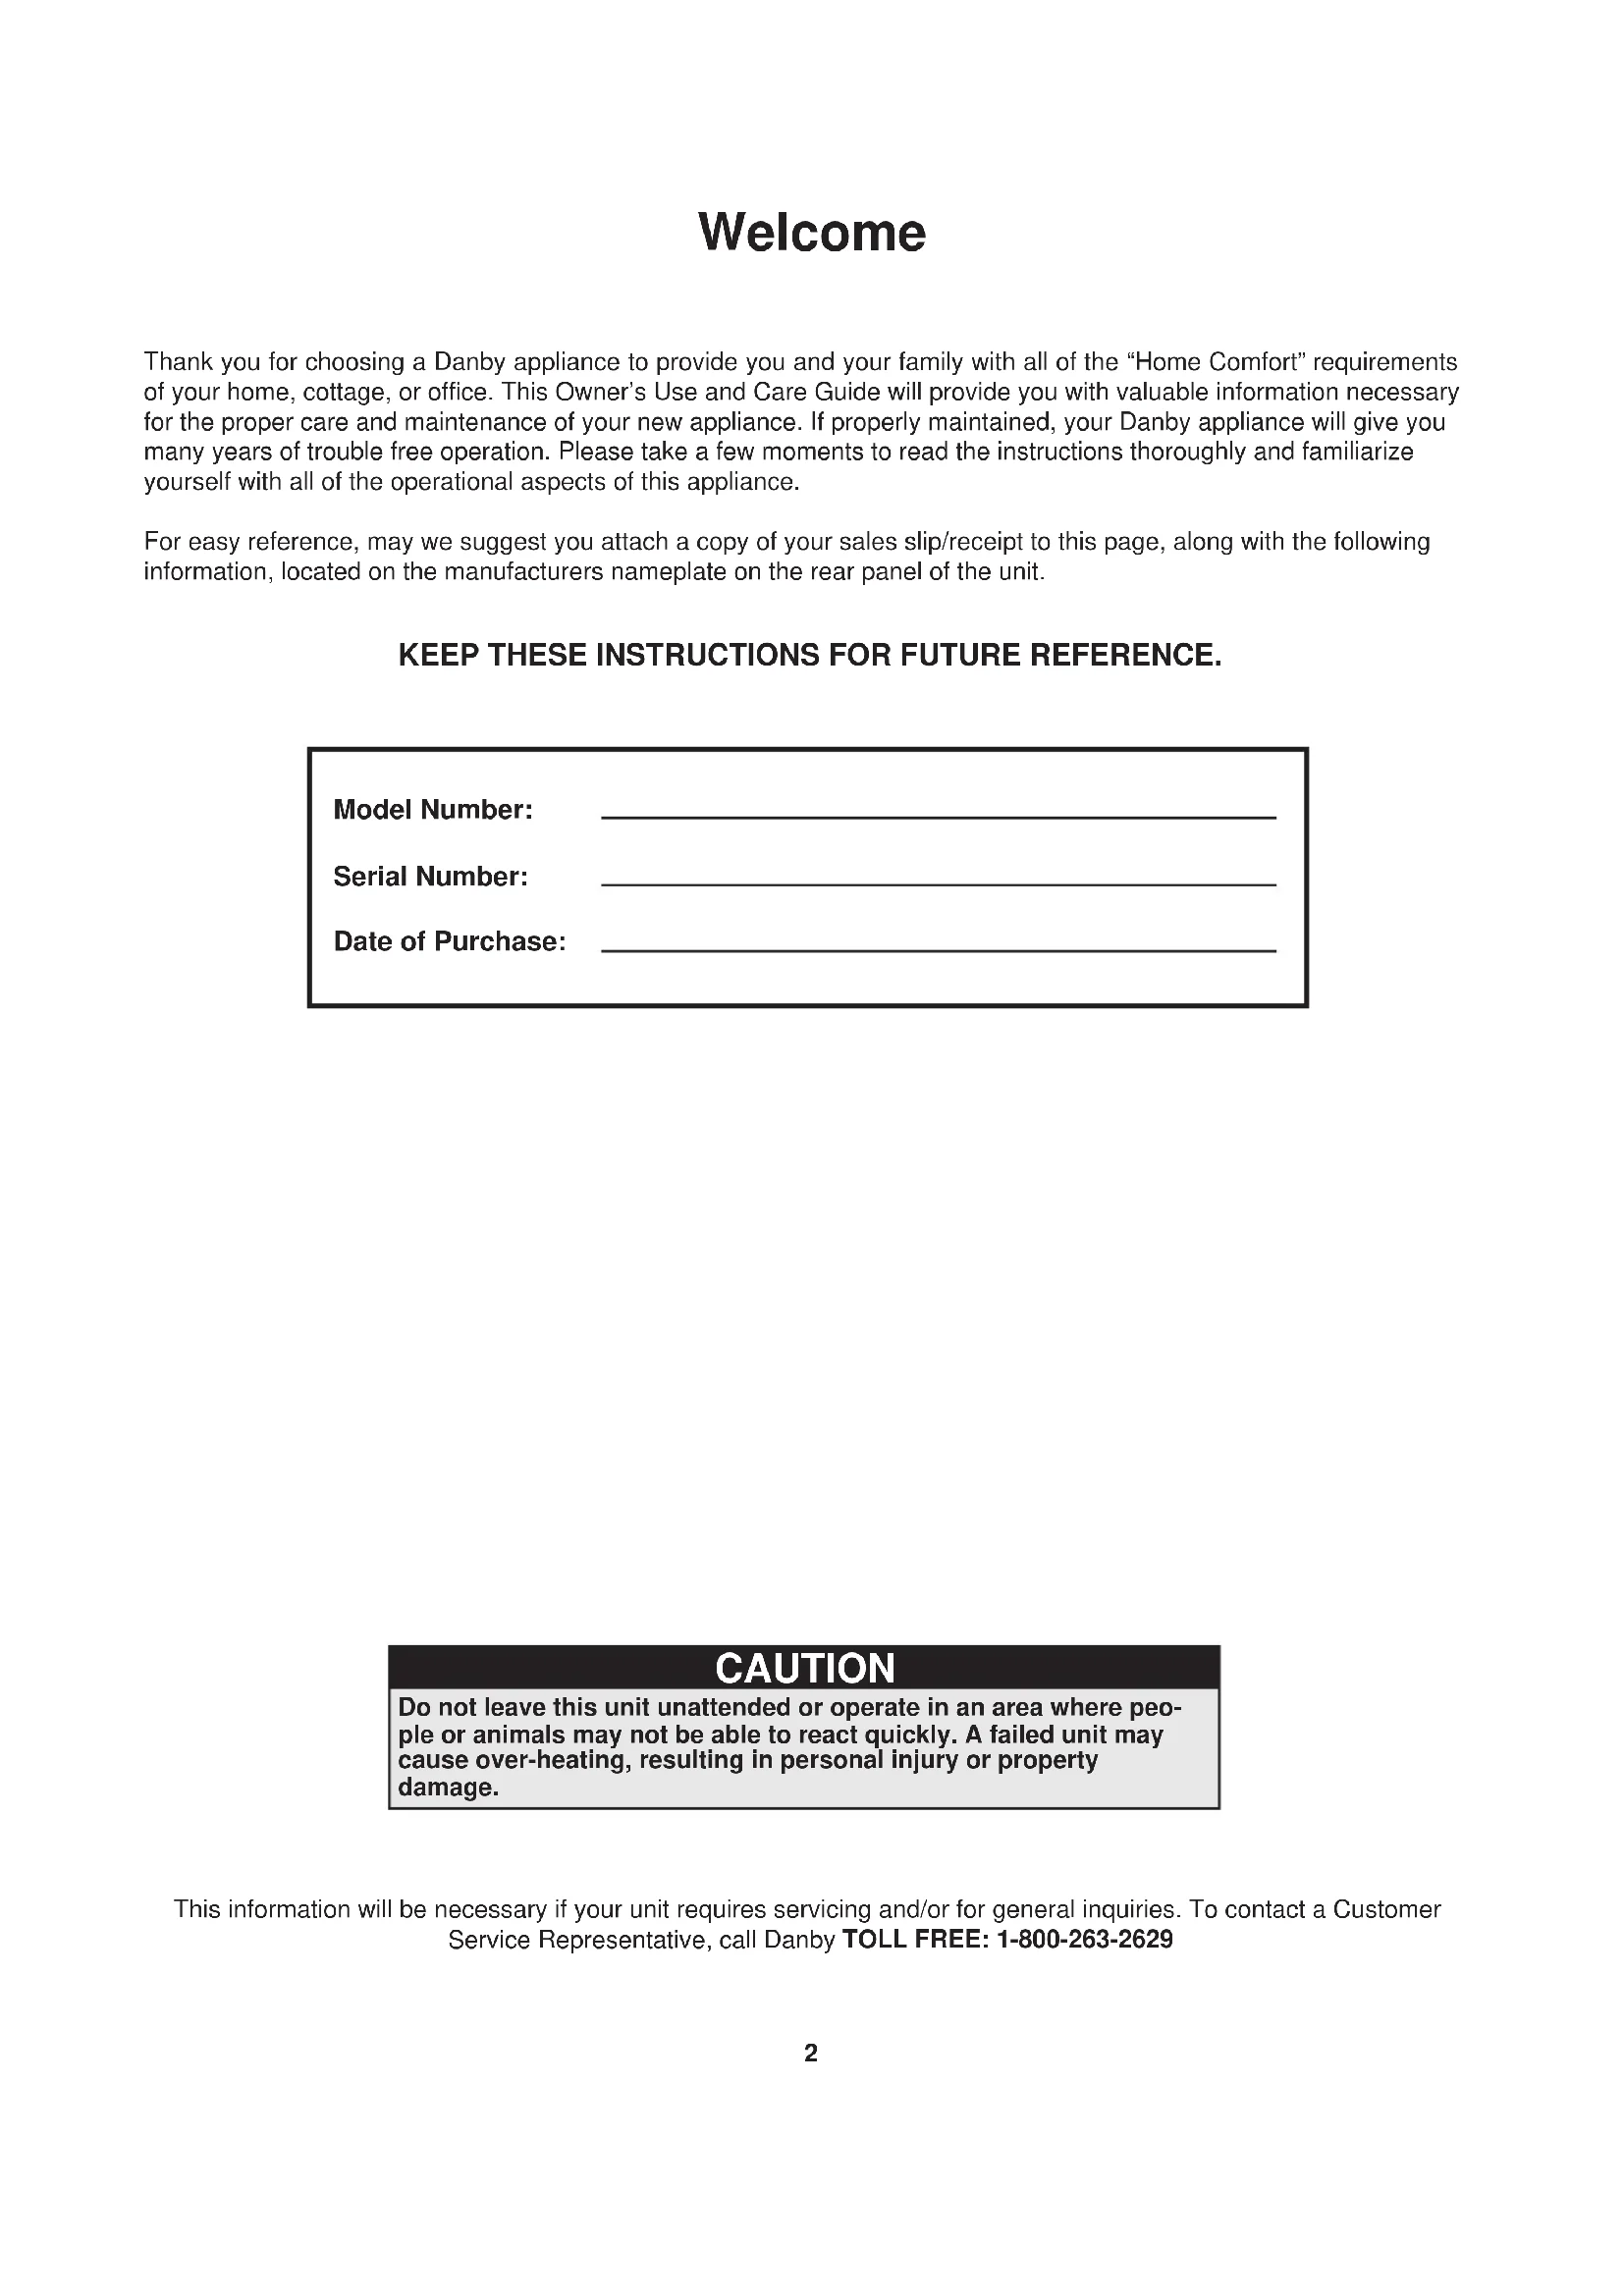
Thank you for choosing a Danby appliance to provide you and your family with all of the "Home Comfort" requirements of your home, cottage, or office. This Owner's Use and Care Guide will provide you with valuable information necessary for the proper care and maintenance of your new appliance. If properly maintained, your Danby appliance will give you many years of trouble free operation. Please take a few moments to read the instructions thoroughly and familiarize yourself with all of the operational aspects of this appliance.
For easy reference, may we suggest you attach a copy of your sales slip/receipt to this page, along with the following information, located on the manufacturers nameplate on the rear panel of the unit.
KEEP THESE INSTRUCTIONS FOR FUTURE REFERENCE.
Model Number:
Serial Number:
Date of Purchase:
CAUTION
Do not leave this unit unattended or operate in an area where people or animals may not be able to react quickly. A failed unit may cause over-heating, resulting in personal injury or property damage.
This information will be necessary if your unit requires servicing and/or for general inquiries. To contact a Customer
Service Representative, call Danby TOLL FREE: 1-800-263-2629
FOR YOUR SAFETY: Read these instructions carefully before operating the unit.
NOTE
The WARNING instructions issued in this manual are not meant to cover all possible conditions and situations that may occur. It must be understood that common sense, caution, and carefulness are factors that cannot be built into all appliances. These factors must be supplied by the person(s) installing, maintaining, or operating the appliance. Failure to install, maintain, and/or operate the equipment according to the manufacturer's instructions may result in conditions which can produce bodily injury and/or property damage. Contact your dealer, service agent, or the manufacturer about any problems or conditions you do not fully understand. For Danby Customer Service call (1-800-263-2629)
ELECTRICAL REQUIREMENTS
To reduce the risk of fire, electric shock, or personal injury, all wiring and grounding must conform with the latest edition of Local and National Electrical codes.
- It is the customer's responsibility to have the wiring and fuses checked by a qualified electrician to make sure adequate electrical power is available.
- This appliance is designed to operate on a separate branch, polarized, three-wire, effectively grounded 120 Volt 60 Hertz (alternating current) circuit protected by a 15 ampere fuse, equivalent fuse or circuit breaker. The three-prong grounding plug on the power cord should be plugged directly into a polarized, three slot, effectively grounded receptacle rated 110/120 V.A.C.
FOR YOUR SAFETY: To reduce the risk of fire or explosion, do not store or use gasoline or other flammable vapors or liquids in the vicinity of this or any other appliance.
GROUNDING INSTRUCTIONS
Improper connection of the equipment-grounding conductor can result in a risk of electrical shock. Check with a qualified electrician or serviceman if you are in doubt as to whether your appliance outlets are properly grounded.
- This appliance must be grounded. In the event of malfunction or breakdown, grounding will reduce the risk of electrical shock by providing a path of least resistance for electrical current. This appliance is equipped with a cord having an equipment-grounding conductor and 3 prong grounding plug. The plug must be connected into an outlet that is properly installed and grounded in accordance with all local codes and ordinances.
- Do not modify the plug provided with this appliance. If it will not fit the outlet, have a proper outlet installed by a qualified electrician.
- If the household electrical supply does not meet the above specifications, or it you are not sure your home has an effective ground, have a qualified electrician or your local electrical utility company check it and correct any problems.
SAVE THESE INSTRUCTIONS
LOCATION
-
Select a suitable location, making sure you have easy access to an electrical outlet (avoid the use of extension cords). If it is absolutely necessary to use an extension cord, use an approved "air conditioner" heavy duty extension cord ONLY (available at most local hardware stores).
-
Make sure there are no obstructions restricting airflow through the front air intake grill. Maintain a minimum clearance of at least 20~cm (8") between adjacent walls and the back of the unit, to allow for proper air circulation and maximum efficiency. To obtain maximum operating efficiency from your dehumidifier, the recommended (room ambient) operating temperatures should be between 5^ (41^) - 35^ (95^)
-
It is important to remember the efficiency of a dehumidifier will be effected/influenced by the rate at which new humid air (moisture) is allowed to infiltrate the same space/area. To maintain efficiency, the dehumidifier must be operated in an enclosed area. Keep all doors and windows closed.

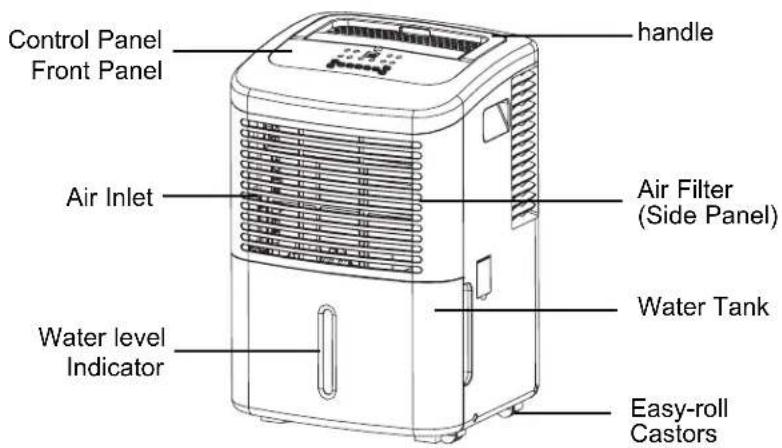
Features
- Soft touch (Electronic) Control Key Pads
- Auto-Sensing Humidity Control
- Adjustable Humidity Settings (35% - 85%)
2 Fan Speed Settings (High / Low)
Delay Start Protection (Compressor) - Auto-Defrost (De-Icer)
Full Bucket Indicator Light
Easy Roll Castors (4) - Front Mounted Water Tank(Removable)
- Direct Drain Option (Hose not Included)
- Quiet Operation
- Removable Air Filter
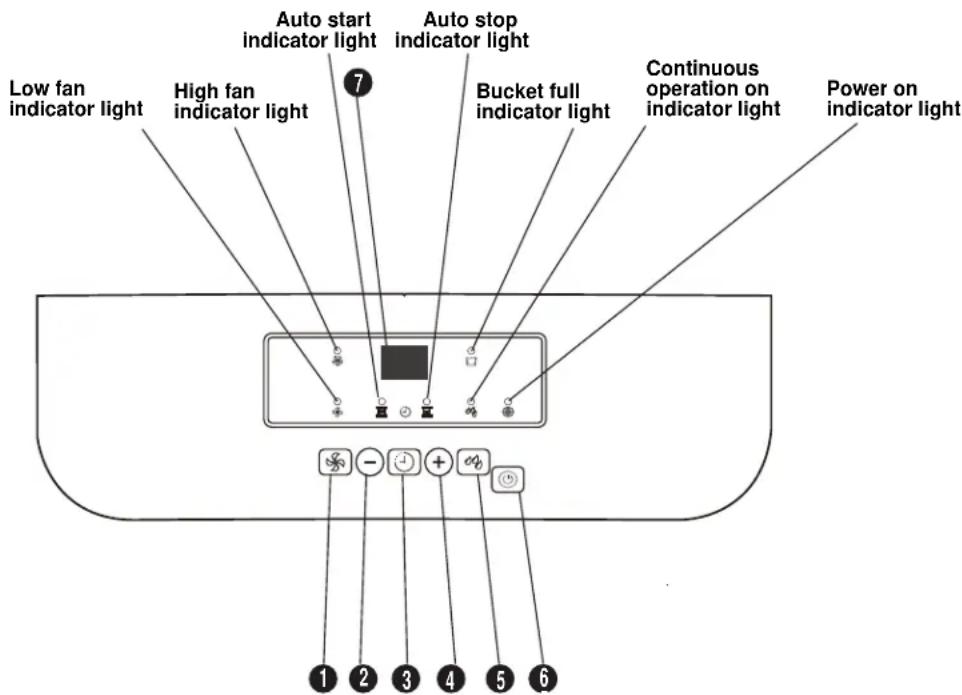
CONTROL PANEL INSTRUCTIONS
NOTE: The control panel of the unit you purchased may be slightly different according to the models.
CONTROLS
When you push the button to change operation modes, the unit will make a beeping sound to indicate that it is changing modes.
1) FAN BUTTON
Control the fan speed. Press to select either High or Normal fan speed. Set the fan control to High for maximum moisture removal. When the humidity has been reduced and quiet operation is preferred, set the fan control to Normal.
2,4) (+ / -) buttons
Humidity Set Control Pads
The humidity level can be set within a range of 35% RH (Relative Humidity) to 85% RH (Relative Humidity) in 5% increments.
- For drier air, press the (-) button and set to a lower percent value (%) .
- For damper air, press the (+) button and set a higher percent value(%)
Timer Set Control Buttons
Use the (+) buttons to set the Auto start and Auto stop time from 0.0 to 24.
3) Timer Button
Press to initiate the Auto start and Auto stop feature, in conjunction with the (+) and (-) keys.
5) Continue Button
Press to activate the continuous dehumidifying operation and dehumidifying operation.
CONTROLS
6) POWER BUTTON
Press to turn the dehumidifier on and off.
7) Display
Shows the set % humidity level from 35% to 85% or auto start/stop time (0~24) during setting, then shows the actual (± 5%) accuracy) room % humidity level in a range of 30% RH(Relative Humidity) to 90% RH (Relative Humidity).
Error Codes and Protection Codes:
AS - Humidity sensor error--Unplug the unit and plug it back in. If error repeats, call for service.
ES - Temperature sensor error-- Unplug the unit and plug it back in. If error repeats, call for service.
P1 - Unit is defrosting-- Allow the unit time to automatically defrost. The error will clear after the unit self defrosts.
P2 - Bucket is full or the bucket is not in right position--Empty the bucket and replace in the right position.
E1 - unit malfunction -- Unplug the unit and plug it back in. If error repeats, call for service.
INDICATOR LIGHT FUNCTION
Power Light (Green):
When the unit is first connected to an electrical outlet, the (green) power turns on. When the "on/off" button is activated, the power light turns to a state "on" condition. The dehumidifier will automatically default to the factory default setting:
Humidity Setting: 60%
Fan Speed: High
IMPORTANT NOTE: Depending on the humidity conditions of the surrounding environment, the dehumidifier may not start automatically when the "on/off" button is pressed (see dehumidifier operating instructions for details). In the event of a power failure, the unit will default to the last program setting that was used when power is restored.
Water Full Indicator Light (Red):
When the water tank is full and/or incorrectly positioned inside the cabinet, the (water full) red light turns on and remains on until such time the tank is emptied and/or correctly re-positioned. This condition will result in the shut down of the compressor immediately and fan motor operation shut down after 30 seconds. This is a safety feature. When the water tank is emptied and/or correctly re-positioned, the dehumidifier will resume operation automatically. NOTE: It may take several minutes before operating conditions resume.
Memory Setting:
Each time the unit is disconnected/re-connected and/or in the event of a power failure, the electronic circuit board automatically defaults to the last program setting that was used. It may take several minutes before operating conditions resume.
NOTE: In the event of a power failure, all previous settings are automatically erased/cancelled. If your program setting was different than above (default setting) it will be necessary to re-program your settings. When the unit is switched "off" manually (using the on/off keypad) the unit will always default to the last program setting that was used.
Never tamper with or attempt to defeat the water level (safety) float switch system. Proper installation of the water tank is crucial to maintaining reliable dehumidifier operation.
The water tank holds accumulated condensed water and by means of a safety switch, controls both the water level and operation of the dehumidification process- i.e. When the water tank is full and/or accidentally displaced inside the cabinet, the float switch actuator (inside the tank) breaks contact with the safety switch. This condition results in the immediate shut down of the compressor and fan motor system, preventing moisture from being condensed.
DEHUMIDIFYING
DEHUMIDIFYING is a means of removing moisture from the air. A dehumidifier will help to protect your home and valued possessions from damage (swelling) caused by moisture in the air. Essentially a dehumidifier removes moisture from air as moist air passes over a dehumidifying (evaporator) coil. Moisture is condensed on the evaporator coil, drained, and collected inside an internal (removable) water tank located at the front of the unit. The exhausted air being returned into the room environment is elevated several degrees causing the surrounding air temperature to increase (slightly). This process also contributes to lowering the relative humidity of the surrounding air.
DEHUMIDIFYING MODE INSTRUCTIONS
When the unit is first connected to the electrical outlet, the (green) power light will be flashing until the "on/off" button is pressed.
When the "on/off" button is activated (pressed), the power light turns to a state "on" condition and the dehumidifier automatically defaults to:
Display: Current Ambient Room Humidity (RH%)
Humidity Setting: 60% RH
Fan Speed: High
IMPORTANT NOTE: Depending on humidity conditions of the surrounding environment, the dehumidifier may not start automatically under the default setting (this is an indication that the humidity level of the surrounding environment is lower than the "default" setting of 60% RH). Therefore, it may be necessary to scroll through each of the different dehumidifier settings 35% - 85% until the "humidstat" (sensor) recognizes conditions that will allow the unit to operate.
DEHUMIDIFYING MODE SELECTION:
1) To turn the unit on press the ON/OFF button.
2a) Press the humidity ^ 十 + ^ 一 or - button to select a desired RH operating value (35% -85%)
OR
2b) Press the CONTINUOUS button. When CONTINUOUS mode is selected, the humidistat (sensor) will be by-passed and the compressor will operate non-stop regardless of humidity conditions.
FAN SPEED SELECTION:
3) Select a fan speed on the keypad. The speed you select is identified by the (illuminated) indicator light located directly above the selection made.

Operating Instructions
AIR FILTER

DIRECT DRAIN FEATURE
Your dehumidifer features a removable Air Filter, located at the front of the unit (behind the air intake grill) directly above the water tank compartment.
The air filter plays an important role in helping to reduce (minimize) dust/dirt particles from the surrounding environment. A blocked/clogged air filter reduces air intake, impacting negatively on operating efficiency.
To maintain maximum operating efficiency:
The filter must be checked and cleaned regularly (every 2 weeks)
- More frequent cleaning may be required depending upon indoor air quality.
IMPORTANT: Never operate the unit without the air filter in place.
AIR FILTER REMOVAL:
1) Grasp the filter handle, and pull the filter out. The filter will slide out easily (see Fig. 2)
2) Clean the filter thoroughly using a vacuum cleaner or wash using lukewarm water and mild detergent. Dry thoroughly before re-installing.
3) To re-install the air filter, slide the filter back inside the tracks and push inward.
This dehumidifier is inclusive of a direct drain feature, located at the right side of the cabinet. NOTE: The drain hose is not included with the unit. The direct drain feature is intended for use in basements inclusive of a floor drain only.
NOTE: Do not attempt to operate the direct drain feature using
Water can be automatically emptied into a floor drain by attaching the unit with a water hose (24mm diameter not included)
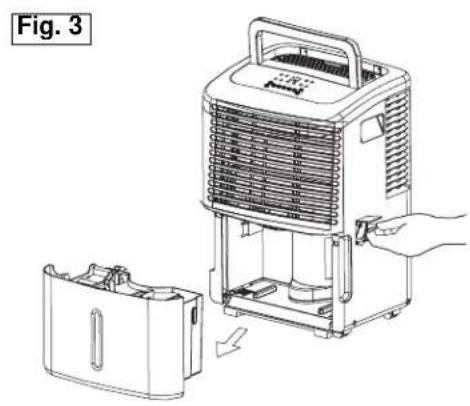
- Remove the water bucket from the unit and set aside.
- Lift up the side flap located on the right side of the unit (looking at the front). (Fig.3)
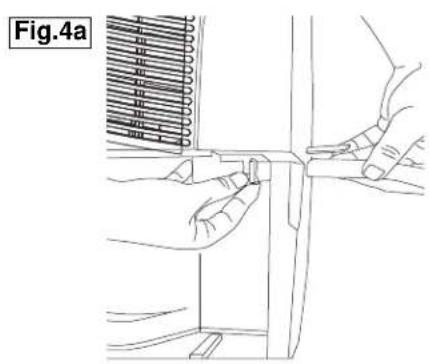
- Insert the female threaded end of the hose through the opening. (Fig.4a)
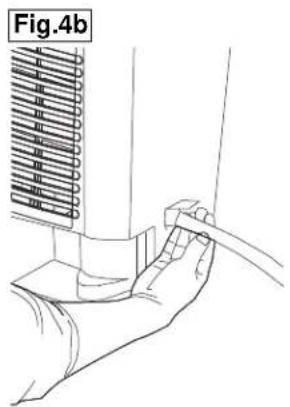
- Screw the garden hose onto the threaded portion of the tray underneath the bucket opening. (Fig.4b)
- Make sure the hose is secure so there are no leaks.
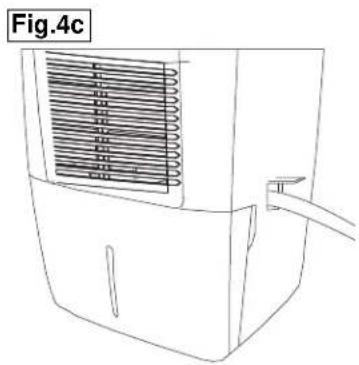
- Direct the hose toward the drain, making sure that there are no kinks that will stop the water flowing.
- Place the end of the hose ino the drain.
- Place the bucket back in the unit and make sure its positioned correctly. (Fig.4c)
- Select the desired humidity setting and fan speed on the unit for continuous draining to start.
CLEANING
CAUTION
Before attempting to clean and/or service this unit, always disconnect the power supply cord from the electrical supply outlet.
1) DO NOT use gasoline, benzene, paint thinner, or any other chemicals to clean this unit, as these substances will damage/deform both plastic components and luster finish.
2) Never attempt to clean the unit by pouring water directly over any of the surface areas, as this will cause deterioration of electrical components and wiring insulation.
3) Use only a mild dish washing detergent, lukewarm water, and a soft cloth to wipe the exterior surface of the unit and dry thoroughly.
STORAGE
When the dehumidifer is not being used for long time periods, please follow these instructions:
1) Disconnect the power cord from the power supply.
2) Empty the water tank and wipe (clean) thoroughly.
3) Clean air filter thoroughly.
4) Re-package the unit in the original carton.
5) Store the unit upright in a dry location.

Troubleshooting
Occasionally a problem may arise that is minor in nature, and a service call may not be necessary. Use this troubleshooting guide for a possible solution. If the unit continues to operate improperly, call an authorized service depot or Danby's Toll Free Number 1-800-263-2629 for assistance.
| PROBLEMS | POSSIBLE CAUSE |
| 1) Unit will not operate. · Check power cord connection. · Check electrical outlet for blown fuse. · Check if water tank is full (if yes, empty). · Check water tank is properly installed. | |
| 2) Dehumidifying capacity (moisture removal) low. | · Air filter is dirty and/or blocked. · Ambient (room) temperature too low (below 5°C/41°F). · Poor air flow circulation/obstruction of front grill. · Relative humidity in surrounding environment very low. |
| 3) Relative Humidity setting not reached after long period of operation. | · Check all doors and windows are closed. · Area/room is too large for the capacity of the dehumidifier. |
Danby
LIMITED APPLIANCE WARRANTY
This quality product is warranted to be free from manufacturer's defects in material and workmanship, provided that the unit is used under the normal operating conditions intended by the manufacturer.
This warranty is available only to the person to whom the unit was originally sold by Danby Products Limited (Canada) or Danby Products Inc. (U.S.A.) (hereafter "Danby") or by an authorized distributor of Danby, and is non-transferable.
TERMS OF WARRANTY
Plastic parts, are warranted for thirty (30) days only from purchase date, with no extensions provided.
First Year
During the first twelve (12) months, any functional parts of this product found to be defective, will be repaired or replaced, at warrantor's option, at no charge to the ORIGINAL purchaser.
To obtain Service
It will be the consumer's responsibility to transport the appliance (at their own expense) to the original retailer (point of purchase) or a service depot for repair. Contact your dealer from whom your unit was purchased, or contact your nearest authorized Danby service depot, where service must be performed by a qualified service technician.
If service is performed on the unit by anyone other than an authorized service depot, or the unit is used for commercial application, all obligations of Danby under this warranty shall be void.
Nothing within this warranty shall imply that Danby will be responsible or liable for any spoilage or damage to food or other contents of this appliance, whether due to any defect of the appliance, or its use, whether proper or improper.
EXCLUSIONS
Save as herein provided, Danby, there are no other warranties, conditions, representations or guarantees, express or implied, made or intended by Danby or its authorized distributors and all other warranties, conditions, representations or guarantees, including any warranties, conditions, representations or guarantees under any Sale of Goods Act or like legislation or statue is hereby expressly excluded. Save as herein provided, Danby shall not be responsible for any damages to persons or property, including the unit itself, howsoever caused or any consequential damages arising from the malfunction of the unit and by the purchase of the unit, the purchaser does hereby agree to indemnify and hold harmless Danby from any claim for damages to persons or property caused by the unit.
GENERAL PROVISIONS
No warranty or insurance herein contained or set out shall apply when damage or repair is caused by any of the following:
1) Power failure.
2) Damage in transit or when moving the appliance.
3) Improper power supply such as low voltage, defective house wiring or inadequate fuses.
4) Accident, alteration, abuse or misuse of the appliance such as inadequate air circulation in the room or abnormal operating conditions (extremely high or low room temperature).
5) Use for commercial or industrial purposes (ie. If the appliance is not installed in a domestic residence).
6) Fire, water damage, theft, war, riot, hostility, acts of God such as hurricanes, floods etc.
7) Service calls resulting in customer education.
8) Improper Installation (ie. Building-in of a free standing appliance or using an appliance outdoors that is not approved for outdoor application).
Proof of purchase date will be required for warranty claims; so, please retain bill of sale. In the event warranty service is required, present this document to our AUTHORIZED SERVICE DEPOT.
Warranty Service
Carry-In
Danby Products Limited
PO Box 1778, Guelph, Ontario, Canada N1H 6Z9
Telephone: (519) 837-0920 FAX: (519) 837-0449
1-800-263-2629
Danby Products Inc
PO Box 669, Findlay, Ohio, U.S.A. 45840
Telephone: (419) 425-8627 FAX: (419) 425-8629
04/09
BIENVENUE
Danby Products Limited
PO Box 1778, Guelph, Ontario, Canada N1H 6Z9
Telephone: (519) 837-0920 FAX: (519) 837-0449
1-800-263-2629
Danby Products Inc.
PO Box 669, Findlay, Ohio, U.S.A. 45840
Telephone: (419) 425-8627 FAX: (419) 425-8629
04/09
PORTABLE DEHUMIDIFIER
The model number can be found on the serial plate located on the back panel of the unit.
All repair parts are available for purchase or special order when you visit your nearest service depot. To request service and/or the location of the service depot nearest you, call the TOLL FREE NUMBER.
When requesting service or ordering parts, always provide the following information:
Product Type
- Model Number
Part Number
Part Description